manuals.online logo
Brands
  1. Home
  2. •
  3. Brands
  4. •
  5. Aiwa
  6. •
  7. Cassette Player
  8. •
  9. Aiwa HS-SP170 User manual

Aiwa HS-SP170 User manual

anua
HS-SP170W
PRECAUTIONS
PRECAUCIONES
OWNER’S RECORD
For your convenience, record the model number
and the serial number (you will find it in the
cassette holder of your set) in the space provided
below. Please refer them when you contact your
Aiwa dealer in case of difficulty.
Para mantener en buen estado de
funcionamiento
QNo utilice el aparato en lugares muy calientes,
fries, con polvo ohumedad.
Especialmente, no deje el aparato:
●en un Iugar muy htimedo, por ejemplo en un
bafro
●cerca de la calefaccion
●en un Iugar expuesto aIos rayos del sol (per
ejemplo, dentro de un coche estacionado donde
puede subir mucho la temperature)
●No abra el portapilas con Ias manes mojadas.
●Limpie bien el aparato antes de colocar Ias pilas.
●No permits que el aparato se moje con agua.
Pour une performance optimale
●Ne pas utiliser I’appareil clans des Iieux
extr%mement chauds, froids, poussiereux ou
humides. En particulier, ne pas Iaisser I’appareil
clans Ies endroits suivants:
●extrdmement humides, comme une sane de
bains
●aproximite d’un appareil de chauffage
●exposes ala Iumiere directe du soleil (par ex.
clans une voiture garee en plein soleil, car
I’habitacle peut devenir extr~mement chaud)
●N’ouvrez pas Ie Iogement des piles avec des
mains mouillees.
●Essuyez bien I’appareil avant d’inserer Ies piles.
●Ne mettez pas I’appareil clans I’eau.
STEREORADIOCASSETTEPLAYER
RADIORREPRODUCTORDECASSETTE
ESTEREOFONICO IModel No. HS-SP170W
ISerial No. I
OPERATING INSTRUCTIONS
INSTRUCCIONES DE MANEJO
MODE D’EMPLOI PRECAUTIONS
To maintain good performance
●Do not use the unit in places which are extremely
hot, cold, dusty or humid. In particular, do not
keep the unit:
●in ahigh humidity area such as abathroom
●near aheater
●in an area exposed to direct sunlight (e.g., inside
aparked car, where there could be a
considerable rise in temperature)
●Do not open the battery compartment with wet
hands,
●Wipe the unit thoroughly before inserting
batteries.
●Do not soak the unit in water.
Nota
Limpie bien el aparato despues de usarla. Remarque
Essuyez bien I’appareil apres I’avoir utilise,
Nota sobre el uso de auriculares
●Escuche a un volumen no muy alto para no datiar
SUS oidos.
●No utilice auriculares durante la conduccibn oal
andar en bicicleta. Puede provocar un accidente
de trafico.
●Debe tener mucho cuidado odejar de utilizar
provisoriamente cuando hay una situation
peligrosa, por ejemplo mientras camina oal trotar,
etc.
●Utilice correctamente: Les para la izquierda yR
para la derecha.
Remarque sur l’ecoute aux ecouteurs
●Ecoutez a un niveau modere pour eviter toute
lesion auditive.
●Ne portez pas Ies ecouteurs pendant la conduite
d’un vehicule ou d’une moto (velo). Vous pouvez
occasionner un accident.
●Vous devez 6tre extr~mement prudent ou
interrompre provisoirement I’ecoute clans Ies
situations potentiellement dangereuses, par
exemple en marchant ou faisant du jogging.
“Portez Ies ecouteurs correctement: L’oreillette
portant la marque “L” sur I’oreille gauche et
I’oreillette portant la marque “R” sur I’oreille
droite.
88-HSL-901-11
AIWA CO.,LTD. 980421 BYO-HX
Printed in Hong Kong
Note
Wipe the unit thoroughly after use.
Q
A
Note on listening with the headphones
●Listen at moderate volumes to avoid hearing
damage.
●Do not wear the headphones while driving or
cycling. It may create atraffic hazard.
cYou should use extreme caution or temporarily
discontinue use in potentially hazardous
situations, such as walking, jogging, etc.
●Wear them properly, Lis left, Ris right.
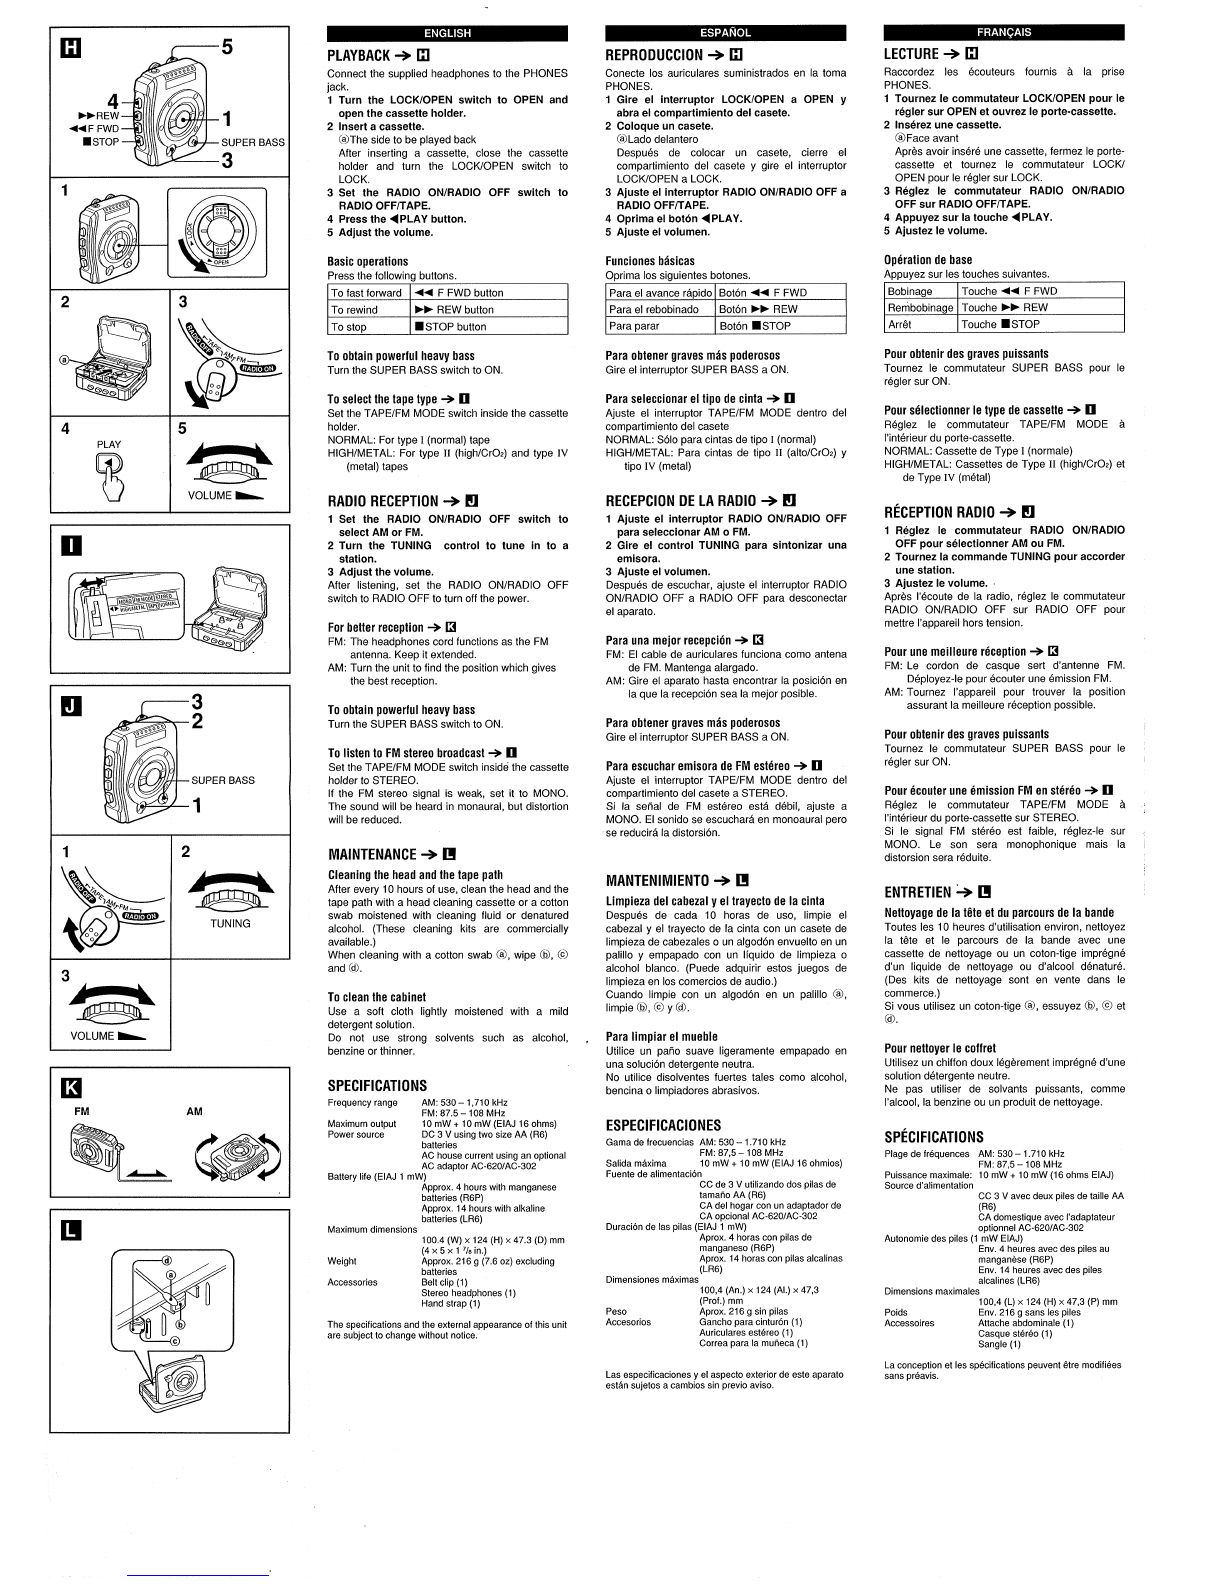
Casetes +❑
●Enrolle la cinta cuando este floja, antes de usarla,
con un Iapiz oherramienta similar, como en la
figura. Una cinta floja puede cortarse oatascarse
en el mecanismo.
●Las cintas de C-1 000 mas Iargas son muy finas y
pueden deformarse odafiarse facilmente. No se
recomienda su uso en este aparato.
Cassettes +El
●Avant d’ecouter une cassette, verifiez si la bande
est tendue et, au besoin, retendez-la avec un
crayon ou un objet similaire. Une bande mal
tendue peut se couper ou se coincer clans Ie
mecanisme.
●Les” cassettes C-100 ou plus Iongues ont des
bandes extr6mement fines qui se deferment ou
s’ablment facilement. Elles ne sent pas
recommandees pour cet appareil.
❑
w
D
Cassette tapes +L!
●Check and tighten slack tape before use with a
pencil or similar tool as illustrated. Slack tape may
break or get jammed in the mechanism.
●C-100 or longer tapes are extremely thin and
easily deformed or damaged. They are not
recommended for use in this unit.
PARA INSTALAR LAS PILAS +❑
Abra el portapilas en el aparato ycoloque dos pilas
tamaho AA (R6) con Ias marcas 0yO
correctamente alineadas.
POUR UTILISER L’ATTACHE DE
CEINTURE +❑
Cambio de Ias pilas +❑
Cambie Ias pilas cuando la cinta se mueve
Ientamente, baja el volumen ose distorsionan Ios
sonidos.
TO INSERT DRY CELL BATTERIES+ ❑Ouvrez Ie Iogement des piles aI’interieur de
I’appareil et inserez deux piles taille AA (R6) en
dirigeant Ies pbles 0et Oclans Ie sens correct.
Open the battery compartment inside the unit and
insert two size AA (R6) batteries with the 0 and O
marks properly aligned. Nota sobre Ias pilas
●Compruebe que Ias marcas 0yOestan
correctamente alineadas.
●No mezcle distintos tipos de pilas, o una vieja con
otra nueva.
●No cargue Ias pitas, caliente odesarme.
●Cuando no se utilicen Ias pilas, saquelas para
evitar que se desgasten imlilmente.
●Si se produce una fuga del Iiquido de Ias pilas,
Iimpie afondo para eliminar Ios restos.
Replacement des piles+ ❑
Remplacez Ies piles quand la bande defile plus
Ientement, Ie volume diminue ou Ie son presente
de la distortion.
Battery replacement +❑
Replace the batteries when the tape speed slows
down, volume decreases or sound distorts.
Note on dry cell batteries
●Make sure that the 0 and Omarks correctly
aligned.
●Do not mix different types of batteries, or an old
battery with anew one.
sNever recharge the batteries, apply heat to them,
or take them apart.
●When not using the batteries, remove them to
prevent needless wear.
●If liquid leaks from the batteries, wipe thoroughly
to remove.
Remarque sur Ies piles seches
●Veillez adiriger Ies pdles 0et Oclans Ie sens
correct.
●Ne pas inserer different types de piles en m6me
temps, ou une pile usee avec une pile neuve.
●Ne jamais recharger Ies piles, Ies chauffel rli Ies
ouvrir.
●Quand vous n’utilisez pas Ies piles, enlevez-les
pour eviter qu’elles ne s’usent inutilement.
QSi Ies piles fuient, essuyez bien Ie Iogement pour
enlever tout Ie Iiquide.
Para usar enchufado al tomacorriente de CA del
hogar +❑
Utilice solo el adaptador de CA optional (Aiwa AC-
620/AC-302).
PREPARATIVES
To use on AC house current +❑
Use only the optional AC adaptor (Aiwa AC-620/
AC-302).
Utilisation sur Ie courant secteur +III
Utilisez seulement I’adaptateur secteur propose en
option (Aiwa AC-620/AC-302).
Utilization del gancho para cinturon +H
Instate el gancho para cinturon suministrado en el
aparato para colgarlo de su cinturon.
!
IPREPARATIONS Utilization de la correa para la mufieca + HPREPARATIFS
1
2
3
Instale la correa para la muileca en egancho
para cinturdn.
Fije la protection (~ en el orificio.
Instale el gancho para cinturon en el aparto.
Coloque la correa para la mufieca. Enganche
Using the belt clip +E!
Attach the supplied belt clip to the main unit and
install it to your belt.
Utilisation de I’attache abdominal+ H
Fixez I’attache abdominal fournie aI’appareil puis
avotre ceinture.
Using the hand strap +H
1Attach the hand strap to the belt clip.
Fit the projection (a) into the hole.
2Attach the belt clip to the unit.
3Fasten the hand strap. Fit the projections
into the hole completely.
Ias salientes cornpletamente dentro del
orificio.
Conexion de auriculares +El
Conecte Ios auriculares suministrados en la toma
PHONES del aparato.
Utilisation de la sangle +H
1Fixez la sangle aI’attache abdominal.
Emboltez la saillie @clans I’orifice.
2Fixez I’attache abdominal aI’appareil.
3Attachez la sangle. Emboltez la saillie
completement clans I’orifice.
la
Connecting the headphones +R
Connect the supplied headphones to the PHONES
jack of the unit.
12 13 Raccordement d’un casque +El
Raccordez Ie casque fourni ala prise PHONES de
I’appareil.
PLAYBACK +❑
Connect the supplied headphones to the PHONES
jack.
Q5
4
➤>REW
++ FFWD 1
■STOP SUPER BASS
3
1
LECTURE +❑
Raccordez Ies ecouteurs fournis ala prise
PHONES.
REPRODUCTION +❑
Conecte Ios auriculares suministrados en la toma
PHONES.
1
2
3
4
5
Gire el interruptor LOCK/OPEN aOPEN y
abra el compartimiento del casete.
Coloque un casete.
(~Lado delantero
Despues de colocar un casete, cierre el
compartimiento del casete ygire el interruptor
LOCWOPEN aLOCK.
Ajuste el interruptor RADIO ON/RADIO OFF a
RADIO OFF/TAPE.
Oprima el bot6n <PLAY.
Ajuste el volumen.
1
2
3
4
5
Tournez Ie commutateur LOCK/OPEN pour Ie
regler sur OPEN et ouvrez Ie porte-cassette.
Insdrez une cassette.
@Face avant
Apres avoir insere une cassette, fermez Ie porte-
cassette et tournez Ie commutateur LOCK/
OPEN pour Ie regler sur LOCK.
R6glez Ie commutateur RADIO ON/RADIO
OFF sur RADIO OFF/TAPE.
Appuyez sur la touche <PLAY.
Ajustez Ie volume.
1
2
3
4
5
Turn the LOCK/OPEN switch to OPEN and
open the cassette holder.
Insert acassette.
(a)The side to be played back
After inserting acassette, close the cassette
holder and turn the LOCK/OPEN switch to
LOCK.
Set the RADIO ON/RADIO OFF switch to
RADIO OFF/TAPE.
Press the <PLAY button.
Adjust the volume.
Operation de base
Armuvez sur Ies touches suivantes.
Basic operations
Press the following buttons. Funciones basicas
Oprima Ios siguientes botones.
EiE5E&a
Para el avarice rapido Boton ++ FFWD Bobinage Touche ++ FFWD
Rernbobinage Touche FF REW
Arr6t Touche ■STOP
To fast forward ++ FFWD button
To rewind ➤>REW button
To stop ■STOP button
Pour obtenir des graves puissants
Tournez Ie commutateur SUPER BASS pour Ie
regler sur ON.
Para obtener graves mas poderosos
Gire el interruptor SUPER BASS aON.
To obtain powerful heavy bass
Turn the SUPER BASS switch to ON.
To select the tape type+ II
Set the TAPE/FM MODE switch inside the cassette
holder.
NORMAL: For type I(normal) tape
HIGH/METAL: For type 11(high/CrOz) and type IV
Para seleccionar el tipo de cinta +II
Ajuste el interruptor TAPE/FM MODE dentro del
compartimiento del casete
NORMAL: Solo para cintas de tipo I(normal)
HIGH/METAL: Para cintas de tipo 11(alto/CrOz) y
tipo IV (metal)
Pour selectionner Ie type de cassette+ ❑
Reglez Ie commutateur TAPE/FM MODE a
I’interieur du porte-cassette.
NORMAL: Cassette de Type I(normale)
HIGH/METAL: Cassettes de Type H(high/CrOz) et
de Type IV (metal)
(metal) tapes
RADIO RECEPTION +❑
1Set the RADIO ON/RADIO
select AM or FM.
2Turn the TUNING control
station.
3Adjust the volume.
After listening, set the RADIO
RECEPCION DE LA RADIO +Q
1Ajuste el interruptor RADIO ON/RADIO OFF
para seleccionar AM oFM.
2Gire el control TUNING para sintonizar una
emisora.
3Ajuste el volumen.
Despues de escuchar, ajuste el interruptor RADIO
ON/RADIO OFF aRADIO OFF para desconectar
el aparato.
RECEPTION RADIO +Q
1R6glez Ie commutateur RADIO ON/RADIO
OFF pour selectionner AM ou FM.
2Tournez la commande TUNING pour accorder
une station.
3Ajustez Ie volume. ~
Apres I’ecoute de la radio, reglez Ie commutateur
RADIO ON/RADIO OFF sur RADIO OFF pour
mettre I’appareil hors tension.
OFF switch to
to tune in to a
ON/RADIO OFF
❑
switch to RADIO OFF to turn off the power,
For better reception +❑
FM: The headphones cord functions as the FM
antenna. Keep it extended.
AM: Turn the unit to find the position which gives
the best reception,
Para una mejor recepcion + 13
FM: El cable de auriculares funciona como antena
de FM. Mantenga alargado.
AM: Gire el aparato hasta encontrar la position en
la que la recepcion sea la mejor posible.
Pour une meilleure r6ception +H
FM: Le cordon de casque sert d’antenne FM.
Deployez-le pour ecouter une emission FM.
AM: Tournez I’appareil pour trouver la position
assurant la meilleure reception possible.
El -3
2To obtain powerful heavy bass
Turn the SUPER BASS switch to ON. Para obtener graves mas poderosos
Gire el interruptor SUPER BASS aON. Pour obtenir des graves puissants
Tournez Ie commutateur SUPER BASS pour Ie
regler sur ON.
To listen to FM stereo broadcast +❑
Set the TAPE/FM MODE switch inside the cassette
holder to STEREO,
If the FM stereo signal is weak, set it to MONO.
The sound will be heard in monaural, but distortion
will be reduced.
Para escuchar emisora de FM estereo +❑
Ajuste el interruptor TAPE/FM MODE dentro del
compartimiento del casete aSTEREO.
Si la sefial de FM estereo esta debit, ajuste a
MONO. El sonido se escuchara en monoaural pero
se reducira la distortion.
SUPER BASS
1
Pour ecouter une emission FM en stereo +❑
Reglez Ie commutateur TAPE/FM MODE a
I’interieur du porte-cassette sur STEREO.
Si Ie signal FM stereo est faible, reglez-le sur
MONO. Le son sera monophonique mais la
distortion sera reduite.
2
1MAINTENANCE +❑
Cleaning the head and the tape path
After every 10 hours of use, clean the head and the
tape path with a head cleaning cassette or acotton
swab moistened with cleaning fluid or denatured
alcohol. (These cleaning kits are commercially
available.)
When cleaning with acotton swab @, wipe (b), (c)
and (d).
MANTENIMIENTO +❑ENTRETIEN +❑
Nettoyage de la t@teet du parcours de la bande
Toutes Ies 10 heures d’utilisation environ, nettoyez
la t6te et Ie parcours de la bande avec une
cassette de nettoyage ou un coton-tige impregne
d’un Iiquide de nettoyage ou d’alcool denature.
(Des kits de nettoyage sent en vente clans Ie
commerce.)
Si vous utilisez un coton-tige (9, essuyez (0, 0et
(0.
Limpieza del cabezal yel trayecto de la cinta
Despues de cada 10 horas de USO, Iimpie el
cabezal yel trayecto de la cinta con un casete de
Iimpieza de cabezales o un algodon envuelto en un
palillo yempapado con un Ifquido de Iimpieza o
alcohol blanco. (Puede adquirir estos juegos de
Iimpieza en Ios comercios de audio.)
Cuando Iimpie con un algodon en un palillo (a),
Iimpie (1, (c) y(d).
TUNING
3
To clean the cabinet
Use asoft cloth lightly moistened with amild
detergent solution.
Do not use strong solvents such as alcohol, ,
benzine or thinner. Para Iimpiar el mueble
Utilice un pafio suave Iigeramente empapado en
una solution detergence neutra.
No utilice disolventes fuertes tales como alcohol,
bencina oIimpiadores abrasives.
VOLUME -
Pour nettoyer Ie coffret
Utilisez un chiffon doux Iegerement impregne d’une
solution detergence neutre.
Ne pas utiliser de solvants puissants, comme
I’alcool, la benzine ou un produit de nettoyage.
In
FM
SPECIFICATIONS
Frequency range AM: 530– 1,710 kHz
FM: 87.5– 108 MHz
Maximum output 10 mW +10 mW (EIAJ 16 ohms)
Power source DC 3Vusing two size AA (R6)
batteries
AC house current using an optional
AC adaptor AC-620/AC-302
Battery life (EIAJ 1mW)
AM
ESPECIFICACIONES
Gama de frecuencias AM: 530 – 1,710 kHz
FM: 87,5– 108 MHz
Salida maxima 10 mW +10 mW (EIAJ 16 ohmios)
Fuente de alimentacion CC de 3 Vutilizando dos pilas de
tamar70 AA (R6)
CA del hogar con un adaptador de
CA optional AC-620/AC-302
Duraci6n de Ias pilas (EIAJ 1mW)
Aprox, 4horas con pilas de
manganeso (R6P)
Aprox. 14 horas con pilas alcalinas
(LR6)
Dimensioned m~ximas 100,4 (An.) x124 (Al.) x47,3
(Prof.) mm
Peso Aprox. 216 g sin pilas
Accesorios Gancho para cinturon (1)
Auriculares esk%eo (1)
Correa para la mufieca (1)
SPECIFICATIONS
Plage de frequencies AM: 530 – 1.710 kHz
FM: 87,5 – 108 MHz
Puissance maximale: 10 mW +10mW(16 ohms EIAJ)
Source d’alimentation CC 3Vavec deux piles de taille AA
(R6)
CA domestique avec I’adaptateur
optionnel AC-6201AC-302
Autonomic des piles (1 mW EIAJ)
Env. 4heures avec des piles au
manganese (R6P)
Env. 14 heures avec des piles
alcalines (LR6)
Dimensions maximales 100,4 (L) x124 (H) x47,3 (P) mm
Poids Env. 216 g saris Ies piles
Accessoires Attache abdominal (1)
Casque stereo(1)
Sangle (1)
La conception et Ies specifications peuvent 6tre modifiees
saris preavis.
Approx. 4hours with manganese
batteries (R6P)
Approx, 14 hours with alkaline
batteries (LR6)
100.4 (W) x124 (H) x47.3 (D) mm
(4x 5x17/8 h)
Approx. 216 g (7.6 OZ)excluding
batteries
Belt clip (1)
Maximum dimensions
Weight
Accessories Stereo headphones (1)
Hand strap (1)
The specifications and the external appearance of this unit
are subject to change without notice.
Las especificaciones yel aspecto exterior de este aparato
estan sujetos acambios sin previo aviso.

This manual suits for next models

1

Other Aiwa Cassette Player manuals

Aiwa HS-PS301 User manual

Aiwa

Aiwa HS-PS301 User manual

Aiwa CS-P55 User manual

Aiwa

Aiwa CS-P55 User manual

Aiwa HS-G35MKII User manual

Aiwa

Aiwa HS-G35MKII User manual

Aiwa HS-TX406 User manual

Aiwa

Aiwa HS-TX406 User manual

Aiwa HS-TA203YL User manual

Aiwa

Aiwa HS-TA203YL User manual

Aiwa AD-WX727 User manual

Aiwa

Aiwa AD-WX727 User manual

Aiwa CSD-ES216 User manual

Aiwa

Aiwa CSD-ES216 User manual

Aiwa HS-SP350 User manual

Aiwa

Aiwa HS-SP350 User manual

Aiwa CS-880 H User manual

Aiwa

Aiwa CS-880 H User manual

Aiwa HS-TA166 User manual

Aiwa

Aiwa HS-TA166 User manual

Aiwa HS-JX2000 User manual

Aiwa

Aiwa HS-JX2000 User manual

Aiwa CSD-SL20 Specification sheet

Aiwa

Aiwa CSD-SL20 Specification sheet

Aiwa HS-TX427 User manual

Aiwa

Aiwa HS-TX427 User manual

Aiwa CS-P5 User manual

Aiwa

Aiwa CS-P5 User manual

Aiwa HS-RX837 User manual

Aiwa

Aiwa HS-RX837 User manual

Aiwa CSD-ES577 Instructions for use

Aiwa

Aiwa CSD-ES577 Instructions for use

Aiwa HS-PX607 User manual

Aiwa

Aiwa HS-PX607 User manual

Aiwa HS-TX694 User manual

Aiwa

Aiwa HS-TX694 User manual

Aiwa HSP50 User manual

Aiwa

Aiwa HSP50 User manual

Aiwa CSD-ED99 User manual

Aiwa

Aiwa CSD-ED99 User manual

Aiwa HS-TA21 User manual

Aiwa

Aiwa HS-TA21 User manual

Aiwa TP-C455 User manual

Aiwa

Aiwa TP-C455 User manual

Aiwa CS-130 SHJ User manual

Aiwa

Aiwa CS-130 SHJ User manual

Aiwa HS-TA212YH User manual

Aiwa

Aiwa HS-TA212YH User manual

Popular Cassette Player manuals by other brands

Optimus SCR-63 owner's manual

Optimus

Optimus SCR-63 owner's manual

Teac W-700R owner's manual

Teac

Teac W-700R owner's manual

Philips AQ 6688/11 Instrucciones de manejo

Philips

Philips AQ 6688/11 Instrucciones de manejo

Panasonic RQ-SX56 operating instructions

Panasonic

Panasonic RQ-SX56 operating instructions

Akai GX-95 Operator's manual

Akai

Akai GX-95 Operator's manual

Pyle Pro PT-659DU user manual

Pyle Pro

Pyle Pro PT-659DU user manual

Yamaha TC-511S owner's manual

Yamaha

Yamaha TC-511S owner's manual

Panasonic RX-FT570 operating instructions

Panasonic

Panasonic RX-FT570 operating instructions

Sony TC-WE305 operating instructions

Sony

Sony TC-WE305 operating instructions

Pioneer CT-W205R Service manual

Pioneer

Pioneer CT-W205R Service manual

Pyle PCASRSD18BT user manual

Pyle

Pyle PCASRSD18BT user manual

Sony Walkman WM-FX493 operating instructions

Sony

Sony Walkman WM-FX493 operating instructions

Panasonic RQ-P35 operating instructions

Panasonic

Panasonic RQ-P35 operating instructions

Teac W-890RMKII owner's manual

Teac

Teac W-890RMKII owner's manual

Vitek VT-3458 Manual instruction

Vitek

Vitek VT-3458 Manual instruction

Yamaha K-98 owner's manual

Yamaha

Yamaha K-98 owner's manual

Panasonic RQ-218S-E Service manual

Panasonic

Panasonic RQ-218S-E Service manual

Pioneer CT-W103 operating instructions

Pioneer

Pioneer CT-W103 operating instructions

manuals.online logo
manuals.online logoBrands
  • About & Mission
  • Contact us
  • Privacy Policy
  • Terms and Conditions

Copyright 2025 Manuals.Online. All Rights Reserved.