manuals.online logo
Brands
  1. Home
  2. •
  3. Brands
  4. •
  5. Aiwa
  6. •
  7. Cassette Player
  8. •
  9. Aiwa HS-TX686 User manual

Aiwa HS-TX686 User manual

anua
PREPARATIVES +❑PREPARATION +❑
IMPORTANT
R6inititdlsation
Pour r6initialiser SI un afflchage OU”une
op6ration erron6 se produit.
Unaffichageou unfonctionnementerrondpeutse produire
clansIes cas suivants:
*Lors de la premibre utilisation de I’appareil
●Quand la charge des piles est failble
*Quand I’appareilest remis en service aprr$sune Iongue
p6riode d’inactivit6
Dans ces cas, effectuer une r6initialisation comme suit:
1Remplacer Ies piles pas d?s neuves.
2Appuyer Mgbnementsur Iebouton RESETAI’aided’une
tige line. + ~ ~
La r6initialisaticm de I’appareil apour consequence
d’effacer Ies donn6es pr6r4g16es.
PREPARATION +Q
IMPORTANT IMPORTANTE Q
MSP
HS”TX686 Conexi6n de Ios auriculares
Conecte10sauricularesque vienen con el aparato en la toma
0 desu unidad.Compruebequee! enchufe deIosauriculares
estd completamente insertado en la toma (?.
Interrupter HOLD
Este interruptor desactiva Ios botones del portacassettes,
excepto el bottm RESET,
Para evitar operaciones accldentales, oal transporter la
unidad, ajuste el interruptorHOLD errla posici6n de bloqueo
~. El indicador “HOLD parpadea.
Para activar Ios botones del portacassettes, ajuste e!
interruptorHOLDenlaposici6ndedesbloqueoo, Elindicador
“HOLD” desaparecer~.
Para reponer la unidad
Siocurre una visualkachht uoperac[dnerrdnea
puede presentarse,unaviqualizaci6nuoperaci6n err6nea
en [0s siguiente 0ss0s:
●Cuando la unidad se utilice por la primers vez,
●Cuando Ias pllas secas estdn consumidas.
●Cuando la unidad se utilice Iuego de haber dejado por
un lapso de tiempo prolongado sin ser utilizada,
Branchement du casque
BranchezIecasquefournisurla prise0 de I’appareil,Assurez-
vusquelafichedu casqued’6couteestcorrectementbranch6e
sur la prise C?.
To reset
If an erroneous display or operation occurs
An erroneous display or operation may occur in the fol-
Connecting the headphones
Connect the supplied headphones to the Cljack of the unit.
Makesurethe headphonesplug is insertedfullyto the Ojack.
STEREORADIOCASSETTEPLAYER ~
RADIO=CASSETTEESTEREOF6NIC0
lowingcases:
●When the unit is used for the first time
●When the dry cell batteries are low
●When the unit is used after having been left unused for
along period of time
In such cases, reset as follows.
1Replacethe dry cell batteries with new ones.
2Lightly press the RESET with athin rod. =+ ❑
When the unit is reset, preset data will be erased.
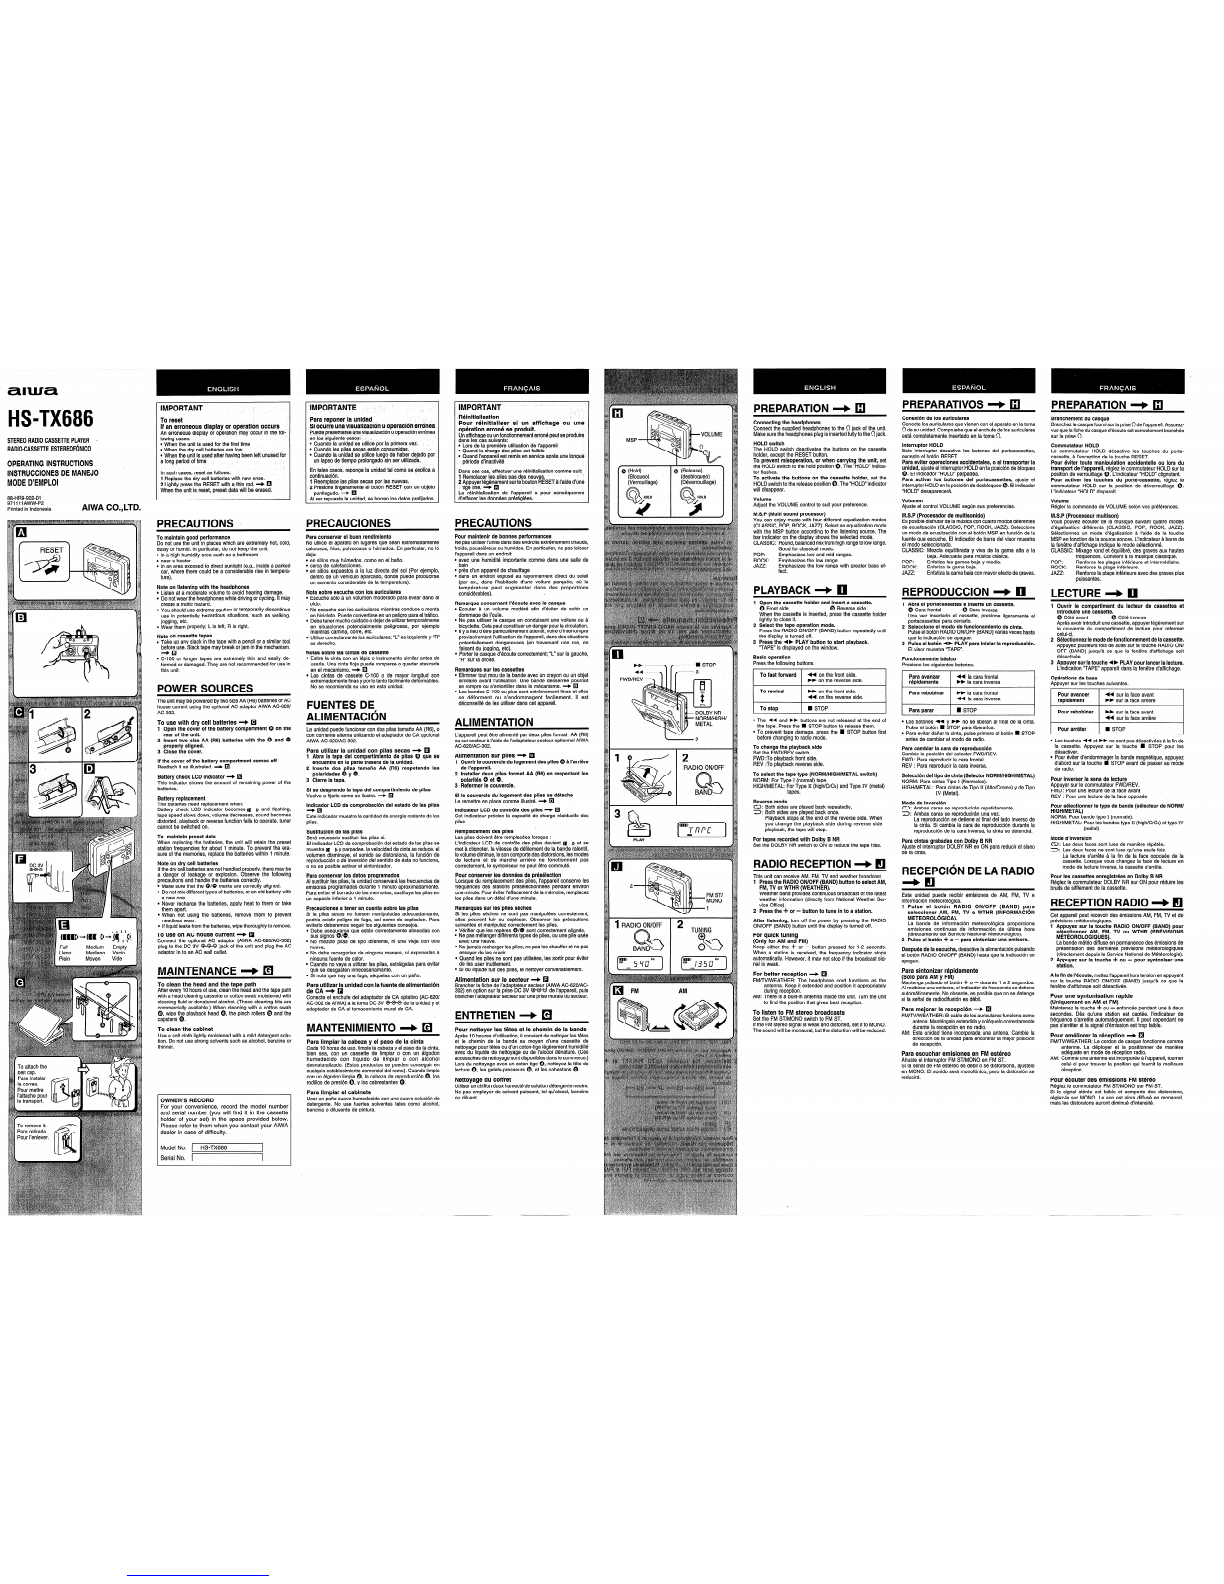
HOLD switch
The HOLD switch deactivates the buttons on the cassette
holder, except the RESET button.
To prevent misoperation, or when carrying the unit, set
the HOLDswitch to the hold position 0. The “HOLD indica-
tor flashes.
To activate the buttons on the cassette holder, set the
HOLDswitchto the releaseposition 0. The“HOLD indicator
will disappear.
Commutateur HOLD
Le commutateur HOLD desactive Ies touches du porte-
cassette, hI’exception de la touche RESET.
Pour 6viter toute manipulation accidentelle ou Iors du
transport de I’appareii, rdglez Iecommutateur HOLD sur la
position de verrouillage 0. L’indicateur ‘(HOLD clignotant,
Pour activer Ies touches du porte-cassette, r6glez Ie
commutateur HOLD sur la position de dt%errouillage ~.
L’indicateur “HOLD disparalt.
OPERATING INSTRUCTIONS
INSTRUCCIONES DE MANEJO
MODE D’EMPLOI
En tales cases, reponga la unidad tal como se explica a
continuaci6n.
1Reemplacelas pilas secas por Ias nuevas.
2Presiond Iingeramenteel bot6n RESET con un objeto
puntiagudo.=+ ❑
Al ser repuesta la unidad, se borran Iosdates prefijados. 11[
.. @(Hold) I@
(Release)
(Bloqueo) (desbloqueo)
(Verrouillage) (D6verrouillage) 1
88-HR9-902-01
97111lAWW-P2
Printed in Indonesia AIWA CO.,LTD. Volume
Adjust the VOLUME control to su,ityour preference. Volumen
Ajuste el control VOLUME segtin sus preferencias. Volume
R6gler la commande de VOLUME selon vos pr6f&ences.
MS.P (Multi sound processor)
You can enjoy music with four different equalization modes
(CLASSIC, POP, ROCK,JAZZ). Selectan equalizationmode
with the MSP button according to the listening source. The
bar indicator on the display shows the selected mode.
CLASSIC: Round,balancedmixfromhighrangeto lowrange.
Good for classical music.
POP: Emphasizes low and mid ranges,
ROCK: Emphasizes the low range.
JAZZ: Emphasizes the low range with greater bass ef-
fect,
M.S.P (Procesador de multisonido)
Esposibledisfrutar de la mtisica con cuatro modos diferentes
de ecualizaci6n (CLASSIC, POP, ROCK, JAZZ). Seleccione
un modo de ecualizaci6n con el bot6n MSP en funci6n de la
fuente que escuche. El indicador de barra del visor muestra
el modo seleccionado.
CLASSIC: Mezcla equilibrada yviva de la gama alta ala
baja. Adecuada para mtisica cl&ica,
POP: Enfatiza Ias gamas baja ymedia,
ROCK: Enfatiza la gama baja.
JAZZ: Enfatizalagamabajacon mayorefectode graves.
M.S.P (Processeur multison)
Vous pouvez 6couter de la musique suivant quatre modes
d’6galisation diff&ents (CLASSIC, POP, ROCK, JAZZ).
E%lectionnezun mode d’6galisation AI’aide de la touche
MSP enfonction de la source sonore. L’indicateurAbarre de
la fen6tre d’affichage indique Ie mode s61ectionn&
CLASSIC: Mixage rend et 6quilibr6, des graves aux hautes
fr6quences. Convient &la musique classique.
POP: Renforce Ies plages inf6rieure et interm6diaire.
ROCK: Renforce la plage inf6rieure,
JAZZ: Renforcela plageinf6rieure avec desgraves plus
puissances,
PRECAUTIONS
PRECAUTIONS PRECAUCIONES
Para conservar el buen rendimiento
No utilice el aparato en lugares que scan extremadamente
calurosos, fries, polvorosos ohdmedos. En particular, no 10
deje:
●en sitios muy htimedos, como en el bafio.
●cerca de calefacciones.
●en sitios expuestos ala Iuz directs del sol (Per ejemplo,
dentro de un vehiculo aparcado, donde puede producirse
un aumento considerable de la temperature).
Nota sobre escucha con Ios auriculares
●Escuche s610a un volumen moderado para evitar dafio al
oldo.
●Noescuche con Ios auriculares mientrasconduce omonta
en bicicleta, Puedeconvertirse en un peligro para eltr~fico.
●Debetener muchocuidadoodejardeutilizartemporalmente
en situaciones potencialmente peligrosas, por ejemplo
mientras camina, corre, etc.
●Utilice correctamente Iosauriculares; “L” es izquierdo y“R”
es derecho.
Pour maintenir de bonnes performances
Nepas utiliserI’uniteclansdes endroitsextr~mement chauds,
froids, poussir%euxou humides. En particulier, ne pas Iaisser
I’appareilclansun endroit:
●avec une humidit6 importancecomme clans une sane de
bain
●pr+s d’un appareil de chauffage
●clans un endroit expow%au rayonnement direct du soleil
(par ex., clans I’habitacle d’une voiture parqude, oil la
temperature peut augmenter clans des proportions
consid&ables).
To maintain good performance
Do not use the unit in places which are extremely hot, cold,
dusty or humid. In particular, do not keep the unit:
●in ahigh humidity area such as abathroom
●near aheater
●in an area exposed to direct sunlight (e.g., inside aparked
car, where there could be a considerable rise in tempera-
ture),
Note on listening with the headphones
●Listenat amoderatevolume to avoid hearing damage.
●Donot wearthe headphoneswhile driving or cycling. It may
create atraffic hazard.
●YOUshould use extreme caution or temporarily discontinue
use in potentially hazardous situations, such as walking,
PLAYBACK +❑REPRODUCTION +❑LECTURE +❑
Remarque concernant l’6coute avec Ie casque
●Ecouter~un volume mod6r6 afin d’6viter de subir un
dommage de I’ou’ie.
●Ne pas utiliser Ie casque en conduisant une voiture ou A
bicyclette.Celapeutconstituer un dangerpourla circulation.
cIIyalieu d’6tre particulibrementattentif, voire d’interrompre
provisoirementI’utilisationde I’appareil,clansdes situations
potentiellement dangereuses (en traversant une rue, en
faisant du jogging, etc).
●Porter Iecasque d%coute correctement; “L” sur la gauche,
“R” sur la droite.
1Open the cassette holder and insert acassette.
@Frontside ~Reverse side
When the cassette is inserted, press the cassette holder
lightly to close it.
2Select the tape operation mode.
Pressthe RADIO ON/OFF (BAND) button repeatedly until
the display is turned off.
3Press the 4➤PLAY button to start playback.
‘TAPE is displayed on the window.
1Abra el portacassettes einserte un cassette.
@Cara frontal 0Cara inversa
Una vez insertado el cassette, presione Iigeramente el
portacassettes para cerrarlo.
2Seleccione el modo de funcionamiento de cinta.
Pulseelbot6n RADIOON/OFF(BAND)variasveces hasta
que la indicaci6n se apague.
3Pulse el bot6n +E PLAY para iniciar la reproducci6n.
El visor muestra “TAPE’,
1Ouvrir Ie compartment du Iecteur de cassettes et
introduire une cassette.
0C6t6avant @C6t6 inverse
Apr&savoir introduit unecassette, appuyer i6g&ement sur
Ie couvercle du compartment de lecture pour refermer
celui-ci.
2S61ectionnezIe mode defonctionnement de la cassette.
Appuyez plusieurs fois de suite sur la touche RADIO ON/
OFF (BAND) jusqu% ce que la fen~tre d’affichage soit
d6sactiv6e.
3Appuyer surlatouche 4➤PLAY pour lancer la lecture.
L’indication“TAPE” apparalt clans la fen?dred’affichage,
jogging, etc.
●Wear them properiy; Lis left, Ris right.
/#!!% Note on cassette tapes
cTake up any slack in the tape with apencilor asimilar tool
b$r~se. Slacktape may break orjam inthe mechanism.
●C-100 or longer tapes are extremely thin and easily de-
formed or damaged.They are not recommended for use in
this unit.
Notas sotxe Ias cintas de cassette
●Estire la cinta con un Mpiz oinstrument similar antes de
usarla, Unacinta floja puede romperse oquedar atascada
en el mecanismo. +El
●Las cintas de cassete C-100 o de mayor Iongitud son
extremadamentefinasypor 10tantof~cilmentedeformable.
No se recomienda su uso en esta unidad.
Basic operation
Press the following buttons.
To fast forward 44 on the front side.
Mon the reverse side.
Funcionamente bdsico
Presione Ios siguientes botones.
zz=-M-=YTOp
Remarquessur Ies cassettes
●Eliminertout mou de la bande avec un crayon ou un objet
similaire avant I’utilisation. Une bande desserrde pourralt
se rompre ou s’entortiller clansIe m6canisme. +❑
●Les bandes C-100 ou plus sent extr~mement fines et elles
se dr5forment ou s’endommagent facilement. II est
d6conseil16de Ies utiliser clanscet appareil.
Para avanzar ++ la cara frontal
r6pidamente Mla cara inversa
FWD
NR
Op&ations de base
Appuyer sur Iestouches suivantes.
1I t
POWER SOURCES To rewind >on the front side.
+4 on the reverse side.
To stop ■STOP
Para rebobinar Mla cara frontal
4+ la cara inversa Pour avancer +4 sur la face avant
rapidement Msur la face arri?xe
2r
@
,-.0
.
(f+:..
.
The unitmay be powered by two size AA (R6)batteriesor AC
house current using the optional AC adaptor AIWA AC-620/
AC-302. FUENTES DE
ALIMENTACION IPara parar ]■STOP IPour rebobiner Msur la face avant
+sur la face arriixe
_——
–NORMjHiGH/
k\~ll ~METAL
ALIMENTATION ●The 44 and -buttons are not released at the end of
the tape. Press the ■STOP button to release them,
●To prevent tape damage, press the ■STOP button first
before changing to radio mode.
To use with dry cell batteries +❑
1Open the cover of the battery compartment @on the
rear of the unit.
2Insert two size AA (R6) batteries with the 0and O
properly aligned.
3Close the cover.
●Los botones +y-no se Iiberan al final de la cinta.
Pulse el bot6n ■STOP para Iiberarlos.
●Paraevitar dafiar la cinta, pulse primero el bot6n ■STOP
antes de cambiar al modo de radio.
Pour arrEiter ■STOP
La unidad puede funcionar con dos pilas tamafio AA (R6), o
con corriente alterna utilizando el adaptadorde CA optional
AIWA AC-620/AC-302.
Para utilizar la unidad con pilas secas +❑
1Abra la tapa del compartlmlento de pilas 0que se
encuentraen la parte trasera de la unidad.
2Inserte dos pilas tamaiio AA (R6) respetando Ias
polaridades C) yO.
3Cierre la tapa.
Si se desprende la tapa del compartimiento de pilas
Vuelva afijarlo como se ilustra. +❑
Indicador LCD de comprobaci6n del estado de Ias pilas
-+H
Este indicadormuestra lacantidad de energ(arestantede Ias
pilas.
Sustituci6n de Ias pilas
Ser~ necesario sustituir Ias pilas si:
El indicador LCDde comprobaci6n del estado de Iaspilas se
muestra@CIyparpadea,lavelocidad de cinta se reduce,el
volumen disminuye, et sonido se distorsiona, la funci6n de
reproducci6no de inversi6n del sentido de 6sta no funciona,
o no es posible activar el sintonizador.
Para conservar Ioa dates programados
Al sustituir Ias pilas, la unidadconsetvar~ Ias frecuencias de
emisoras programadas durante 1minuto aproximadamente.
Para evitar e! borradode Ias memorias,sustituya Iaspitasen
un espacio inferior a 1 minute.
Precauciones atener en cuenta sobre Ias pilas
Si la pilas secas no fuesen manipuladas adecuadamante,
podria existir peligro de fuga, asi como de explosfon. Para
evitarlo deberemos seguir Ios siguientes consejos.
●Debe asegurarse que est~n correctamente alineadas con
sus signos we.
●No mezcle pilas de tipo diferente, ni una vieja con otra
nueva.
●No debe recargarlas de ninguna manera, ni exponerlas a
ninguna fuente de calor,
●Cuando no vaya autilizar Ias pilas, extr~igalas para evitar
que se desgasten innecesariamante,
●Si nota que hay una fuga, si$quelascon un paiio.
Parautilizar la unidadcon la fuentede alimentaci6n
de CA+~
Conecte el enchufe del adaptador de CA optativo (AC-620/
AC-302 de AlWA) ala toma DC3V @-GX3 de la unidadyel
adaptador de CA al tomacorriente mural de CA.
L’appareil peut @trealiment6 par deux piles format AA (R6)
ousur secteur AI’aide de I’adaptateursecteur optionnel AIWA
AC-620/AC-302. ●Lestouches 44 et -nesent pasdt$sactivees~lafin de
la cassette. Appuyez sur la touche ■STOP pour Ies
dt%activer.
●Pour 6viter d’endommager la bande magn&ique, appuyez
d’abord sur la touche ■STOP avant de passer au mode
de radio,
To change the playback side
Set the FWD/REV switch.
FWD:To playback front side.
REV :To playback reverse side.
Para cambiar la cara de reproducci6n
Cambie la posici6n del selector FWD/REV.
FWD: Para reproducerla cara frontal.
REV :Para reproducerla cara inversa.
Alimentation sur piles +❑
1Ouvrir Ie couvercledu Iogement des piles 0hI’arritn’e
de I’appareil.
2Installer deux piles format AA (R6) en respectant Ies
polaritf% Qet O.
3Refermer Ie couvercle.
If the cover of the battery compartment comes off
Reattach it as illustrated. +❑
❑
oTo select the tape type (NORM/HIGH/METAL switch)
NORM: For Type I(normal) tape,
HIGH/METAL: For Type 11(high/CrOz)and Type IV (metal)
tapes.
Selecch5ndeltipo de cinta(Selector NORM/HIGH/METAL)
NORM: Para cintas Tipo I(Normales).
HIGH/METAL: Paracintas de Tipo 11(Alto/Cromo)yde Tipo
lV (Metal).
Batterycheck LCD indicator +❑
This indicator shows the amount of remaining power of the
batteries.
W
/’ :
1,
:“,
,; “.”.~
,’ :.
1’ .
,“ 1
‘‘“.@)
.-
Pour inverser Ie sens de lecture
Appuyer sur Ie commutateur FWD/REV.
FWD: Pour une lecture de la face avant
REV :Pour une lecture de la face opposde
Si Ie couvercle du Iogement des piles se d&ache
Le remettre en place comme illustr6. +❑
Battery replacement
The batteries need replacement when:
Battery check LCD indicator becomes w~and flashing,
tape speed slows down, volume decreases, sound becomes
distorted, playback or reverse function fails to operate, tuner
cannot be switched on.
Reverse mode
C22:Both sides are played back repeatedly.
=: Both sides are played back once,
Playback stops at the end of the reverse side, When
you change the playback side during reverse side
playback, the tape will stop.
Modo de inversi6n
CZJ:Ambas caras se reproducir~n repetidamente.
=: Ambas caras se reproducir~n una vez.
La reproducci6nse detiene al final del Iado inverso de
la cinta. Si cambia la cara de reproducci6n durante la
reproducci6nde la cara inversa, la cinta se detendr~.
Pour s61ectionnerIe type de bande (s4ecteur de NORM/
HIGH/METAL)
NORM: Pour bande type I(normale).
HIGH/METAL: PourIes bandestype 11(high/CrOz)et type lV
(m6tal).
Indicateur LCD de contr61edes piles +❑
Cet indicateur prdcise la capacit6 de charge rc%iduelledes
piles. 3rlPk3m
PLAY
Replacement des piles
Lespiles doivent t%reremplac6es Iorsque :
L’indicateur LCD de contrdle des piles devient (g oet se
met hclignoter, la vitesse de defilement de la bande ralentit,
levolumediminue,Iesoncomportedesdistortions, Iesmodes
de lecture et de marche arribre ne fonctionnent pas
correctement, Ie syntoniseur ne peut &re commut6.
To maintain preset data
When replacingthe batteries,the unitwill retain the preset
station frequencies for about 1minute. To prevent the era-
sure of the memories, replace the batteries within 1minute.
Mode d’inversion
C2J:Les deux faces sent Iues de manibre r6p6t6e.
=: Les deux faces ne sent Iues qu’une seule fois.
La lecture s’arri%e~la fin de la face oppos6e de la
cassette. Lorsque vous changez la face de lecture en
mode de lecture inverse, la cassette s’arr~te.
For tapes recorded with Dolby B NR
Set the DOLBYNR switch to ON to reduce the tape hiss, Para cintas grabadas con Dolby B NR
Ajuste el interruptor DOLBY NR en ON para reducir el siseo
de la cinta.
RADIO RECEPTION +❑
Note on dry cell batteries
If the drycell batteries are not handled properly,there maybe
adanger of leakage or explosion. Observe the following
precautions and handle the batteries correctly.
●Make sure that the 0/0 marks are correctly aligned.
●Do notmix differenttypes of batteries, or an old batterywith
anew one.
.Never recharge the batteries, apply heat to them or take
them apart.
●When not using the batteries, remove them to prevent
needless wear,
●If liquidleaks from the batteries,wipe thoroughlyto remove.
RECEPCION DE LA RADIO
-Pm
Pour conserver Ies donndes de pr6a61ection
Lorsque du replacement des piles, I’appareil conserve Ies
fr4quences des stations pr&srYectionn6espendant environ
uneminute.Pour6viterI’effacementde lam6moire,remplacez
Ies piles clansun d61aid’une minute.
This unit can receiveAM, FM, TV and weather broadcast,
1Pressthe RADIO ON/OFF (BAND) buttonto select AM,
FM, TV or WTHR (WEATHER).
Weather band providescontinuous broadcast of the latest
weather information (directly from National Weather Ser-
vice Office).
2Press the +or -button to tune in to astation.
Pour Ies cassettes enregistrt%esen Dolby B NR
R6glez Ie commutateur DOLBY NR sur ON pour r+rduireIes
bruits de sifflement de la cassette.
2
Esta unidad puede recibir emisiones de AM, FM, TV e
informaci6n meteoro16gica.
1Pulse el bot6n RADIO ON/OFF (BAND) para
seleccionar AM, FM, TV oWTHR (lNFORMACldN
METEOROLdGiCA),
La banda de informaci6n meteoro16gica proporciona
emisiones continuas de informaci6n de tiltima hors
(directamente del Sewicio National Meteoro16gico).
2Pulse el bot6n -1-0- para sintonizar una emisora.
FM ST/
MONO
1RECEPTION RADIO +Q
Remarques sur Ies piles sbches
Si Ies piles sbches ne sent pas manipu16escorrectement,
elles peuvent fuir ou exploser. Observer Ies precautions
suivantes et manipulez correctement Ies piles.
●V6rifier que Ies repbres 0/0 sent correctement aligm%.
●Ne pasm61angerdiffr%entstypes de piles, ou une pile us6e
avec une neuve.
●Nejamais rechargerIes piles, ne pas Ieschauffer et ne pas
essayer de Ies ouvrir.
●Quand les piles ne sent pas utilisdes, Ies sortir pour 6viter
de Ies user inutilement,
●Si du Iiquide fuit des piles, Ie nettoyer convenablement,
Cet appareil peut recevoir des 6missions AM, FM, TV et de
previsions m&60rologiques.
1Appuyez sur la touche RADIO ON/OFF (BA,ND)pour
s61ectionner AM, FM, TV ou WTHR (PREVISIONS
METEOROLOGIQUES),
La bande m&60 diffuse en permanencedes dmissions de
presentation des dernibres previsions m6t60rologiques
(directementdepuis Ie Service Nationalde M&40rologie).
2Appuyez sur la touche -1-ou -pour syntoniser une
station,
After listening, turnoff the power by pressing the RADIO
ON/OFF (BAND) button until the display is turned off,
1
1RADIO ONIOFF 2~uN,NG
,B% $k3
$@zE2 m
To use on AC house current *❑
Connect the optional AC adaptor (AIWA AC-620/AC-302)
plug to the DC 3V _jack of the unit and plug the AC
adaptor in to an AC wall outlet.
For quick tuning
(Only for AM and FM)
Keep either the -1-or -button pressed for 1-2 seconds.
When astation is received, the frequency indicator stops
automatically, However, it may not stop if the broadcast sig-
nal is weak.
I
[(aaac$+(m cl-+]$,-$
IFull Medium Empty
Lleno Mediano Vacio
Plein Moyen Vide
Despu6sde la escucha, desactive laalimentaci6n pulsando
el bot6n RADIO ON/OFF (BAND) hasta que la indicaci6n se
apague.
MAINTENANCE +❑Para sintonizar rdpidamente
(S610paraAM yFM)
Mantenga pulsado el bot6n +0- durante 1a2segundos.
Al recibirseunaemisora,el indicadordefrecuenciase detiene
autom&icamente. No obsante,es posible que nose detenga
si la sefial de radiodifusi6n es dtibil,
For better reception -+ H
FM/TV/WEATHER: The headphone cord functions as the
antenna. Keep it extended and position it appropriately
during reception.
AM: There is abuilt-in antenna inside the unit. Turn the unit
to find the position that gives best reception.
Ala finde I%coute,mettezI’appareilhorstensionenappuyant
sur la touche RADIO ON/OFF (BAND) jusqu’~ ce que la
fen6tre d’affichage soit d&activ6e,
Alimentation sur Ie secteur +❑
Brancherla fiche de I’adaptateursecteur (AIWA AC-620/AC-
302)en option sur la prise DC 3V @-@@ de I’appareil, puis
brancherI’adaptateursecteur sur une prise muraledusecteur.
To clean the head and the tape path
Afterevery 10 hoursof use, clean the head and the tape path
with a head cleaningcassette or cotton swab moistened with
cleaningfluid or denatured alcohol. (These cleaning kits are
commercially available.) When cleaning with acotton swab
0, wipe the playback head 0, the pinch rollers 0 and the
capstans 0.
AM Pour une syntonisation rapide
(Uniquementen AM et FM)
Maintenez la touche -i- ou -enfonc4e pendant une h deux
secondes, D% qu’une station est captde, I’indicateur de
fr6quence s’arrei$teautomatiquement. II peut cependant ne
pas s’arr6ter si la signal d’6mission est trop faible,
Para mejorar la recepci6n +13
FM/TV/WEATHER:Elcable de Iosauricularesfuncionacomo
antena.Mant6ngaIoextendidoyco16quelocorrectamente
durante la recepci6n en no radio.
AM: Esta unidad tiene incorporada una antena. Cambie la
direcci6n de la unidad para encontrar la mejor posici6n
de recepci6n.
To listen to FM stereo broadcasts
Set the FM ST/MONO switch to FM ST.
If the FMstereo signal is weak and distorted, set it to MONO.
Thesoundwill be monaural,but the distortionwill be reduced,
ENTRETIEN +❑
MANTENIMIENTO +❑
To clean the cabinet
Use asoft cloth lightly moistened with amild detergent solu-
tion. Do not use strong solvents such as alcohol, benzine or
thinner.
Pour nettoyer Ies t~tes et Ie chemin de la bande
Apr&s10 heures d’utilisation, ii convient de nettoyer Iest&es
et Ie chemin de la bande au moyen d’une cassette de
nettoyage pourti$tesou d’un coton-tige k$gbrementhumidifi6
avec du Iiquide de nettoyage ou de I’alcool d6natur& (Ces
accessoiresde nettoyagesent disponiblesclansIecommerce.)
Lorsdu nettoyage avec un coton-tige 0, nettoyez la t6te de
lecture 0, Ies galets-presseurs 0, et Ies cabestans ~.
Nettoyage du coffret
Utiliserunchiffondouxhumect6de solutiond&ergente neutre.
Ne pas employer de solvant puissant, tel qu’alcool, benzine
ou diluant.
Pour ameliorer la r6ception +H
FM/TV/WEATHER:Le cordon de casque fonctionne comme
antenne, La d6ployer et la positioner de manibre
adbquate en mode de rkception radio.
AM: Commeune antenne est incorpor6eAI’appareil,tourner
celui-ci pour trouver la position qui fournit la meilleure
r%ception.
Para Iimpiar la cabeza yel paso de la cinta
Cada 10horas de USO,Iimpiela cabeza ye!paso de la cinta,
bien sea, con un cassette de Iimpiar ocon un Algodon
humedecido con Ifquido de Iimpiar ocon alcohol
desnaturalizado. (Estos productos se pueden conseguir en
cualquie establecimientocomercial del ramo).Cuando Iimpie
con un dgodon limpie 0, la cabeza de reproducci6n ~, Ios
rodillos de presi6n 0, yIoscabrestantes 0.
Para Iimpiar el cabinete
Usar un pafio suave humedecidocon una suavesoluci6n de
detergence. No use fuertes solventes tales como alcohol,
bencina odiluyente de pintura.
Para escuchar emisiones en FM est&eo
Ahuste el interruptor FM ST/MONO en FM ST.
Si la sefial de FM est&eo es ddbil ose distorsiona, ajtistelo
en MONO. El sonido serd monof6nico, pero la distorsi6n se
reducir&
To attach the ,
belt-clip.
Para instalar
la correao
Pour mettre
I’attache pour
Ie transport.
Pour ecouter des 6missions FM st&60
R6glez Ie commutateur FM ST/MONO sur FM ST.
Si Ie signal st6r60 est faible et comporte des distortions,
rdglez-le sur MONO. Le son est alors diffus6 en monaural,
mais Ies distortions auront diminu6 d’intensit6.
OWNER’S RECORD
For your convenience, record the model number
and serial number (you will find it in the cassette
holder of your set) in the space provided below.
Please refer to them when you contact your AIWA
dealer in case of difficulty.
To remove it.
al
M
Para retirarla.
Pour I’enlever.
Model No. HS-TX686
Serial No.
—. ..
PROGRAMACION SLEEP TIMER SETTING
+t?l REGLAGE DU
PROGRAMMATEUR
D’EXTINCTION +~
PRESETTING PRESELECTION AJUSTE DEL
TEMPORIZADOR DE
DESACTIVACION +~
w
2
Cetappareilpeut pr6s61ectionner10 stations daqschacune
de,s bandes AM, FM, TV et WTHR (PREVISIONS
METEOROLOGIQUES).
This unit can preset 10stations for each AM, FM, TV and
WTHR (WEATHER) band.
Automatic presetting +❑
(Only for AM and FM)
Stations are automatically scanned once through the receiv-
able frequency range and stored to each preset number (1-
lo).
Esta unidad puede memorizar 10 emisoras para Ias
bandas de AM, FM, TV yWTHR (lNFORMACldN.
METEOROLdGICA).
Programacion automatic +❑
(SC510para AM yFM)
Lasemisoras se exploran automdticamente una vez atraw%
de la gama de frecuencias recibibles, yse almacenanen Ios
ntimeros de memorizaci6n (1 a10).
The unit can be turned off automatically at aspecified time:
1Press the SLEEP button until the “SLEEP” indicator
flashes on the display (sleep mode).
Preelection automatique +❑
(Uniquement en AM et FM)
Les stations sent balay6es automatiquement clans la plage
de frdquence captable et m6moris6es sous chacun des
num6ros de pr6s61ection(1 A10).
L’appareilpeut automatiquement6tre mis hors tension Aune
La unidad puede apagarse autom&icamente a una hors
especificada,
YK?-tt#-1’3 II Press each button below within 5seconds.
2Press the -1-button to designateand set the digit, heure pr6d6finie.
1Appuyez sur ia touche SLEEP jusqu’~ ce que
i’indicateur “SLEEP” se mette hclignoter clans ia
1
2
3
“Pulseel bot6n SLEEP hastaque el indicador “SLEEP”
parpadee en ei visor (modo de desactivacir5n).
Pulsecada bot6n que aparece m~s abajo dentro de un
espacio de 5 segundos.
Puise el botr5n-i- para determiner yajustar ei digito.
Puise el bot6n -para desplazarse al dfgito siguiente.
(Ei primerdfgito indica ia hors, mientras que ios otros dos
digitos de la derecha indican ios minutes.)
Press the -button to shift to the next digit.
(The first digit indicates hour while the other two digits on
the right indicate minute,) feni3tred’affichage (mode d’extinction).
Appuyezsur chacune destouchessuivantes clansun d61ai
de 5 secondes,
Appuyez sur la touche -1- pour d&signeret r6gler Ie
‘““~ m1
2
Appuyez sur ia touche RADiO ON/OFF (BAND) pour
s61ectionnerAM ou FM.
Maintenez ia touche AUTO PRESETenfoncdependant
1
2
Pulseel bot6n RADiO ON/OFF (BAND)paraseleccionar
AM OFM.
Mantenga puisado el bot6n AUTO PRESETdurante 1a‘m 2TUNING
%3m
1
2
Pressthe RADiO ON/OFF (BAND) button to select AM
or FM.
Keep the AUTO PRESET button pressed for 1-2 sec- You can aiso recalithe factory preset sleep time by press-
ing numeric (l-5) buttons.
Button 1I15 min
2chiffre.
Appuyez sur ia touche -pourpasserau chiffresuivant.
(Le premier chiffre indique i’heure tandis que Ies deux
autres chiffres Adroite indiquent Ies minutes.)
1&2secondes.
@Tout d’abord,I’expiorationdesstationscommenceavec
“PRESET’ etIeclignotementdu numtlrode pr&%lection.
@ Lorsqu’une station est syntonis6e, Ie balayage
s’interrompt. La station syntonis6e est diffusde pendant
2secondes et w5s61ectionn6e. Ensuite, Ie balayage
ends.
@lFirst, scanningstartswith the “PRESET” and preset
number display flashing.
@When astation is tuned in to, scanning stops. The
tuned station is heard for 2seconds and preset. Then,
scanning starts again.
@When presettingiscompieted,the last preset station
is heard, ISLEEP-
;m
3
#$ m+5
SLEEP
2segundos.
~EnprimerIugar, la exploraci6nse iniciaconia indicaci6n
denumerode memorizaci6ny“PRESET”parpadeando,
@Al sintonizarseuna emisora, la exploraci6nse detiene.
Laemisorasintonizada se oir~durante 2segundosyse
programard, Acontinuaci6n, volverA ainiciarse ia
exploraci6n.
@Aifinaiizarseiaprogramaci6n,seoirt$latiitimaemisora
programada,
Sideseaomitir aiguna emisora durante ia programaci6n
Al sintonizarse unaemisora, ia exploraci6nse detieneyse
oir~ ia emisora programada durante 2segundos.
Pulseel bot6nAUTO PRESETdurante dichos2seaundoq
para cancelar la selecci6n de esta emisora.
Nota
●Si Ias seiiales de radiodifusi6n son muy d6biles, no ser~
posibie programar ias emisoras autom~ticamente.
ProgrAmeiasmanualmente.
●Si pueden recibirse 10 emisoras om~s, la programaci6n
automatic finalizar~ una vez programadas 10 emisoras.
Programacion manual +III
BANDV Tambi6n es posible recuperar la hors de desactivaci6n
ajustada de f~brica pulsando ios botones num&icos (1 a
5).
2IButton 2I30 min I
Button 345 min
Button 41hour Vous pouvez4galement activer I’heure d’extinction r6g16e
par d6faut en appuyant sur Ies touches num6riques (1 A
5).
@%;~~~e ia proc6dure de pr4s6iectionest terminde,
la dernitrrestationpr&61ectionn6eestdiffus~e.
AUTO
PRESET
8
Bot6n 1I15 min. I
IButton 5I1hour 30 min I
mIBot6n 2I30 min. ITouche 115 min.
1
if there is astation you wish to skip during presetting
When astation is tuned in to, scanning stops and the
tuned station can be heard for 2seconds. Press the
AUTO PRESETbuttonwithin these 2secondsto deselect
this station.
Note
●Whenbroadcast signais are very weak, the stations cannot
be preset automatically, Preset manuaily.
●When 10 or more stationscan be received, auto presetting
ends after 10 stations are preset.
Si vous dt%irez omettre une station durant ia
pr6sr41ection
Lorsqu’unestationest syntonisde, Iebalayages’interrompt
et ia station syntonis6e est diffus6e pendant 2secondes.
Appuyez sur ia touche AUTO PRESET pendant ce d61ai
de2 secoridespour d&sactiver la sr51ectionde cettestation.
3Within5secondsaftertimer setting is completed,press
the SLEEP button to start the timer.
The “SLEEP indicator will light up and a beep sound will
be heard.
Q‘-- Touche 41heure
Touche 51heure 30 min.
if the “SLEEP” indicator disappears during the sleep
timer setting, repeat from step 1. Dentro de un es~acio no su~erior a5secwndostras
Remarque
●LorsqueIe signai d%mission est trbs faible, ia station ne
~eut6trem%4ectionn6e suivant la rx’oc6dureautomatique.
finalizar ei ajuste del temporizador, pul~e ei bot6n
SLEEP para poner dicho temporizador en
funcionamientoo
Ei indicador“SLEEP”se iiuminar~y se oirdun pitido.
Si el indicador “SLEEP’ desapareceduranteel ajuste dei
temporizador .de desactivacidn, repita ei procedimiento
desde ei paso 1.
Nota
●El ajuste mdximo del temporizador de desactivaci6n es de
5horas y59 minutes.
●Si ei temporizador de desactivaci6n apaga la unidad antes
de finalizar la reproducci6n de ia cinta, pulse el bot6n H
para Iiberarel bot6n 4> con el fin de evitar dafiar la cinta.
Para comprobar ei tiempo restante dei ajuste del
temporizador
Puiseel bot6nSLEEP hastaqueaparezca eltiempo restante.
Se mostrarefdurante 5segundos.
Para cancelar el temporizador de desactivaci6n
Pulseel bot6n SLEEP hasta queaparezcaettiempo restante.
Dentrode un espaciode 5 segundos, pulsesimuitdneamente
Ios botones -1-y-durante mds de 2 segundos,
Una vez aparezca 0:00, vueiva apulsar ei bot6n SLEEP
dentro de un espacio de 5 segundos. Ei indicador “SLEEP
desaparecer&
Dans ies 5secondes suivant ie r6glage du
programmateur, appuyez sur la touche SLEEP pour
d6marrer ie programmateur.
L’indicateur“SLEEP s’ailumeet un bipsonore retentit.
3
Note
●The maximum sleep timer setting is 5hours and 59 min-
utes.
●When the unit is turned off by the sleep timer before the
tape playbackis finished, press the ■buttonto releasethe
+~ button to prevent tape damage.
❑bans ce cas,vous pouvezia prf$sdectionnermanuellement.
.Si 10 stations ou plus sent captables, la pr6s61ection
automatique s’arr&e iorsque 10 stations ont &6
Manual presetting +❑
1Pressthe RADiO ON/OFF (BAND) button to select AM,
FM, TV or WTHR (WEATHER).
2Pressthe+ or -button to tune in to astation.
3Keep one of the numeric (l-5) buttons down for 1-2
secondsto seiect the preset number. For preset num-
ber 6and above, pressand release the +5 button first.
Example: To select preset number 6, press and release
the +5 button and then pressthe 1button for 1-2seconds.
The “PRESET” and the selected number indicatorwill turn
on.When the button is pressed, beep sound will be heard.
Si i’indicateur “SLEEP” disparalt pendant Ie r6giage du
programmateur, recommence Apartir de i’6tape 1.
pr&#ectionn4es.
Preelection manuelle +Gll To check the remaining timer setting
Pressthe SLEEP button untiithe remainingtime is displayed.
It will be displayed for 5seconds,
1
2
3
Remarque
●Le r6glage maximumdu programmateurd’extinctionest
fix6ii 5heureset 59 minutes.
●Lorsquei’appareilestmishorstensionparIeprogrammateur
d’extinctionavant iafin de ia lecture de lacassette, appuyez
sur latouche ■pour d&sactiverlatouche +Eafin d’6viter
d’endommager la bande magn&ique,
Appuyez sur ia touche RADiO ON/OFF (BAND) pour
sd!eqtionner AM, FM, TV ou WTHR (Previsions
METEOROLOGiQUES).
Maintenezla touche -i- ou -enfonc6epour syntoniser
1
2
3
Pulse ei bot6n RADiO ON/OFF (BAND) para
seoq cionar AM, FM, TV oWTHR (lNFORMAClbN
METEOROLdGICA).
Pulse Ios botones i- 0- para sintonizar una emisora.
Mantenga pulsado uno de Ios botones num6ricos (1 aTo cancel the sleep timer
Pressthe SLEEP button untiithe remainingtime is displayed.
Within 5seconds, pressthe -b and -buttons simultaneously
for more than 2seconds.
After the 0:00 is displayed, press the SLEEP button again
within 5seconds. The “SLEEP indicator wili disappear.
une station.
Maintenez i’une des touches num&iques (1 -5)
enfoncdependant 1~2secondes pour s61ectionnerie
num6ro de tm%$iection. Pour ies num6ros de
1RADIO ON/OFF 2TUNING
%1
@
BAND eQ
5) dura~te’1 a 2 segundos para seleccionar ei ntimero
de memorizaci6n. Para el numero de memorizaci6n 6
en adeiante, pulse ysueite primero e! bot6n +5.
Ejempio: Para seleccionar el ntimero de memorizaci6n 6,
pulseysuelte el bot6n +5 y, acontinuaci6n,pulse el bot6n
1durante 1 a 2 segundos.
El indicador “PRESET” yel ndmero seleccionado se
encenderdn. Al puisar ei bot6n, se oir~ un pitido.
●Para programar dos omds emisoras, repita Ios pasos 2
y3.
●Se oird un pitido al pulsar ei bot6n +5.
Para cambiar ia programaci6n
Repitaei procedimientoapartirdel paso 1.
Recepcion de emisoras programadas
prrk!lection 6et sup6rieurs, appuyez d’abord sur la Pour v6rifier la dur6e restant avant i’extinction
Appuyezsur latouche SLEEPjusqu’~ ce que la dur6erestant
avant I’extinction s’affiche. Elle reste affichde pendant 5
secondes.
touche +5.
Exemple :Pour s61ectionnerie num6ro de pr6s61ection6,
amxwez et rel~chezlatouche +5 et arx.x.!yezensuite sur la
●To preset two or more stations, repeatsteps 2-3.
●Abeep sound will be heardwhen the +5 button is pressed.
mmtouche 1pendant 1A2secondes. . .
L’indication“PRESET”et i’indicateurdunumc%os61ectionn6
sentactiw%. Lorsque la toucheest enfonc6e,unbipsonore
retentit.
SPECIFICATIONS
To change the presetting
Repeatthe procedure from step 1, Pour d6sactiver Ie programmateur d’extinction
Appuyezsurla touche SLEEPjusqu’~ ce que iadur6e restant
avant I’extinction s’affiche. Dans un ddai de 5 secondes,
appuyez simuitan6ment sur Iestouches i- et -pendant au
moins 2secondes.
Lorsque I’indication0:00 s’affiche, appuyez Anouveausur la
touche SLEEP clans Ies 5secondes. L’indicateur “SLEEP
disparalt.
3mm
m m f.-]
mnm -“=’
Frequency range
Listening to preset stations +❑
1Pressthe RADIOON/OFF (BAND) button to select AM,
FM, TV or WTHR (WEATHER).
2Press and release the numeric (l-5) buttons to select
the desired preset number. For preset number 6and
above, press and releasethe +5 button first.
Example: To select preset number 6, press and release
the +5 button and then the 1button.
●Pour pr6s61ectionnerdeux stations ou plus, r6p6tezIes
dapes 2et 3.
●Un bip sonore retentit si vous appuyez sur la touche +5.
i31/530 -1,602/1,710 kHz (9/10 kHz
;tep)
i31 -1,629 kHz (9 kHz step)
17.5/87.5–108/108,1 MHz (50/200 kHz
;tep)
‘6 -108 MHz (100 kHz step in 76-90
\M
#
Pour changer une pr6s6iection
R6p&ez la proc6dure Apartir de i’&ape 1. ‘M ESPECIFICACIONES
Ecouter des stations preselectionnees
+Kl
1Appuyez sur ia touche RADiO ON/OFF (BAND) pour
st$leqtionner AM, FM, TV ou WTHR (Previsions
MkTEOROLOGiQUES).
2Appuyez et reiiichez ies touches num6riques (1 h5)
pour s61ectionnerIe numth’o de pr6s61ectionvouiu.
Pour ies numrilrosde pr6s6iection 6et sup6rieurs,
appuyez et rel~chez d’abord la touche +5.
Exemple :Pour sdectionner Ie num6rode pr6s61ection6,
appuyezet rel~chez latouche +5 et appuyez ensuitesur la
touche 1.
—
-ml SPECIFICATIONS
1Puise ei bot6n RADiO ON/OFF (BAND) para
seieccionar AM, FM, TV oWTHR (lNFORMACldN
METEOROLbGiCA).
2Pulse ysuelte ios botones numr%’ices(1 a5) para
seieccionar ei ntimero de memorizaci6n que desee.
Para et ntlmero de memorizaci6n 6en adelante, puise
ysueite primero ei bot6n +5.
Ejemplo: Para seleccionar el ndmerode memorizaci6n 6,
pulse ysuelte et bot6n +5 y, acontinuaci6n, el bot6n 1.
Despur$sde ia escucha, desactive la alimentaci6npulsando
el bot6n RADiOON/OFF (BAND) hasta que la indicaci6n se
~Hz,50 kHz st{ 3in 90-108 MHz)
59.75 MHz
65.75 MHz
71.75 MHz
81.75 MHz
87.75 MHz
179.75 MHz
185.75 MHz
191.75 MHz
197.75 MHz
203.75 MHz
209.75 MHz
215.75 MHz
162,550 MHz
162,400 MHz
162.475 MHz
162.425 MHz
162.450 MHz
162.500 MHz
162.525 MHz
Gama de frecuencias
Ill 2
1
After iistening, turn off the power by pressing the RADIO
ON/OFF (BAND) button untilthe display is turned off.
Caution
Whenselectingapresetstation,DO NOT HOLD the
●numeric (1-5) buttons for more than asecond. Other-
wise, currently-tunedstation wili be preset to that button
instead.
●+5 button for more than 2seconds, Otherwise, the unit
will enter sieep mode,
-v 2ch
‘ch
4ch
5ch
6ch
7ch
8ch
9ch
10ch
llch
12ch
1‘ch
1ch
2ch
‘ch
4ch
5ch
6ch
4M
‘M
131/530-1.602/1.710 kHz (paso de 9/
OkHz) Piage de fr6quence
;31/530 –1.602/1.710 kHz (intewalie
~e9/1OkHz)
;31 -1.629 kHz (intervalie de 9 kHz)
17,5/87,5–108/108,1 MHz (intervalle
~e50/200 kHz)
76 –108 M1-fz (intervalle de 100 kHz
~ansla plage 76-90 MHz,intervallede
131-1.629 kHz (paso de 9 kHz)
7,5/87,5 -108/108,1 MHz(pasode 50/
’00 kHz)
6-108 MHz (pasode 100 kHzen 76-
IOMHz, paso de 50 kHz en 90 – 108
‘M
flHz)
2ch
‘ch “
4ch
5ch
6ch
7ch
8ch
9ch
10ch
llch
12ch
1‘ch
1ch
2ch
‘ch
4ch
5ch
6ch
7ch
Aiafin de i’dcoute,mettezI’appareilhorstensionenappuyant
sur la touche RADIO ON/OFF (BAND) jusqu’~ ce que la
1RADIO ON/OFF 2m m
%
mm
mm
BAND
(’$
59,75 MHz
65,75 MHz
71,75 MHz
81,75 MHz
87,75 MHz
179,75 MHz
185,75 MHz
191,75 MHz
197,75 MHz
203,75 MHz
209,75 MHz
215,75 MHz
162,550 MHz
162,400 MHz
162,475 MHz
162,425 MHz
162,450 MHz
162,500 MHz
162,525 MHz
apague.
Precauci6n
Alseleccionarunaemisoraprogramada,NO MANTENGA
PULSADO
●el bot6nnum6rico(1 a5) durantem~s de un segundo.
En caso contrario, ia emisora actualmente sintonizada
se programar%en ese bot6n.
●el bot6n +5 durante m~s de 2 segundos, En caso
contrario,ia unidadentrar~enei modode desactivaci6n.
Intervalo ymargen de frecuencia
v50kHz clansla
2ch
3ch
4ch
5ch
6ch
7ch
8ch
9ch
10ch
llch
12ch
1‘ch
1ch
2ch
3ch
4ch
5ch
6ch
7ch
Iage90-108 MHz)
59,75 MHz
65,75 MHz
71,75 MHz
81,75 MHz
87,75 MHz
179,75 MHz
185,75 MHz
191,75 MHz
197,75 MHz
203,75 MHz
209,75 MHz
215,75 MHz
162,550 MHz
162,400 MHz
162,475 MHz
162,425 MHz
162,450 MHz
162,500 MHz
162,525 MHz
fendtre d’affichage soit d6sactiv6e.
h
Frequency range and step
Radiobroadcastshavedifferentfrequencyrangesandchange
in different steps in different countries.
This unit is factory preset to use in North and South America
(with TV and WTHR bands). To use the unit in another
country, change the receivable frequency ranges and steps
as below,
v
IAttention
Lors de ia s61ectiond’une station crr&r51ectionn6e,ne VEATHEE
MAiNTENEZ PAS ENFONCEESIes
●touchesnum&iques (1~5) pendantplusd’uneseconde.
Sinon, ia station actueliement syntonis6e sera
pr6s61ectionn6esous cette touche.
●touche +5pendant plusde 2 secondes. Sinon,i’appareil
passe en mode d’extinction.
Plaae et intervalle de freauence
mlti For North and South America use
(with TV and WTHR bands)
AM: 530-1,710 kHz (10 kHz step)
FM: 87.5 -108.1 MHz (200 kHz step)
TV: 2-13th
Weather: 1-7 ch
For North and South America use
(without TV and WTHR bands)
AM: 530-1,710 kHz (10 kHz step)
FM1, Ffvf2:87,5 -108.1 MHz (200 kHz step)
For Japan use
AM: 531-1,629 kHz (9 kHz step)
FMI, FM2: 76-108 MHz (100 kHz step in 76 – 90 MHz,
50 kHz step in 90-108 MHz)
For Europe and other areas use
AM: 531-1,602 kHz (9 kHz step)
FM1, FM2: 87,5-108 MHz (50 kHz step)
7ch
Las emisiones de radio tienen m~rgenes de frecuencia
diferentes ycambian en intervals diferentes en funci6n del
pais.
Esta unidadest~ ajustada de fdbrica para su uso en Norte y
Sudam6rica (conbandas deTV yWTHR). Para utilizar dicha
unidad en otro pafs, cambie Ios intervals ym~rgenes de
frecuencia recibibles como se muestra acontinuaci6n.
Para su uso en Norte ySudam6rica
(con bandas de TV yWTHR)
AM: 530-1.710 kHz (paso de 10 kHz)
FM: 87,5 -108,1 MHz (paso de 200 kHz)
TV: 2– I’ch
lnformaci6n meteoro16gica:1 – 7 ch
Para su uso en NorteySudam&ica
(sin bandas de TV yWTHR)
AM: 530-1.710 kHz (paso de 10 kHz)
FM1, FM2: 87,5 -108,1 MHz (paso de 200 kHz)
Para su uso en Jap6n
AM: 531-1.629 kHz (paso de 9 kHz)
FM1, FM2: 76-108 MHz (paso de 100 kHz en 76-90
MHz, paso de 50 kHz en 90-108 MHz)
Para su uso en Europa yotras zonas
AM: 531-1,602 kHz (paso de 9 kHz)
FMI, FM2: 87,5-108 MHz (paso de 50 kHz)
1Puise et bot6n RADiO ON/OFF (BAND) para activar ia
radio.
2Mantenga pulsados ios botones AUTO PRESET y+
simuitdneamentedurante 3segundos.
Cadavez queiosmantengapulsados,el ajustede banda
aparecec(clicamentecomo se muestra acontinuaci6n.
USI— US— JP— EU
US1: NorteySudam&ica
(con bandas de TV yWTHR)
US :NorteySudam&ica
(sin bandas de TV yWTHR)
JP :Jap6n
EU :Europayotras zonas
●Para recuperar directamente ei ajuste de fhbrica del
intervalo ymargen de frecuencia, mantenga puisados
simult~neamente Ios botones -1-y-durante 3segundos.
●Al cambiar el intervalo ymargen de frecuencia, Ias
emisoras programadasse borrar~n.
●En e! ajuste de US, JP yEU, la banda dei sintonizador
cambiartf aAM, FM1 yFM2. FMI yFM2 tieneei mismo
margende frecuenciasypuedenutilizarseparasintonizar
emisorasde FM.
Less~ationsde radio6mettentclansdes”plagesdefr6quences
diff6rentes et suivant des intervalles diff6rents clanschaque Maximum output
20mW+20mW(EiAJ/16Q)
15mW+15mW (EIAJ/32Q)
Power source
NFOHMAC16N
dETEOROL6
GICA
pays.
Cet appareilest r6g16par d6faut pour ies paysd’Amerique du
Nerd et iatine (avec bandes TV et WTHR). Pour pouvoir
utiliser cet appareil clansun autre pays, change? ies plages
de frt%uencescar)tableset Iesintervalles scion ia proc6dure
‘REVISIONS
AETEOROLO.
ilQUES
Battery DC 3V, size AA (R6) X2
Domestic AC power (using optional AC adaptor: AIWA
AC-620/AC-302)
Battery life
(EIAJ, lmW output, playback)
Approx.9hoursusing size AA (R6P) manganese batter-
ies
Approx. 22 hours using size AA (LR6) alkaline batteries
Maximum dimensions (W XHXD)
112.6 )( 86.8 X34.9 mm (4’/2X31/, X17/,.5 inches)
Weight (exciuding batteries)
Approx. 172g (6.02 OZ)
Accessories
Stereo headphones (1)
Belt clip (1)
suivante.
Pour l’Am&ique du Nerd et iatine
(avec bandesTV et WTHR)
AM: 530-1.710 kHz (intervalie de 10 kHz)
FM: 87,5 –108,1 MHz (intervalle de 200 kHz)
TV: 2– I’ch
Previsions mr$tdorologiques:1 – 7 ch
Pour l’Amr%iquedu Nerd et Iatine
(saris bandes TV et WTHR)
AM: 530-1.710 kHz (intervalle de 10 kHz)
FM1, FM2: 87,5 –108,1 MHz (intervalle de 200 kHz)
Pour ie Japon
AM: 531-1,629 kHz (intervalle de 9 kHz)
FM1, FM2: 76-108 MHz (intervalle de 100 kHz clansla
plage 76 – 90 MHz, intervalle de 50 kHz clans
la plage 90-108 MHz)
Pour i’Europe et Ies autres zones g60graphiques
AM: 531-1.602 kHz (intervalle de 9 kHz)
FM1, FM2: 87,5 – 108 MHz (intewalie de 50 kHz)
1Appuyez sur ia touche RADiO ON/OFF (BAND) pour
Salida mdxima
20mW +20mW (EiAJ/16Q)
15mW +15mW (EIAJ/32f2)
Fuente de aiimentaci6n
Puissance maximale
20mW +20mW (EIAJ/16Q)
15mW+15mW (EIAJ/32Q)
Aiimentation
Courant continu 3V, 2piies format AA (R6)
Secteur (avec emploi d’adaptateur secteur en option:
AIWA AC-620/AC-302)
Autonomic de piles
(EiAJ, sortie lmW, en lecture)
Env.9heuresavecpilesau manganbseformatAA (R6P)
Env. 22 heures avec piles alcalines format AA (LR6)
Dimensions maximales (L XHXP)
112,6 X86,8 X34,9 mm
Poids (piles exclure)
Env. 172g
Accessoires
Casque st&40 (1)
Attache pour ceinture (1)
1Pressthe RADiO ON/OFF (BAND)buttonto turn on the
radio,
2Hoiddown both AUTO PRESET and -1-buttons simul-
taneously for 3seconds.
Each time they are held, the band setting is displayed
cyclically as below.
rus’—us—Jp—ET
2~ilas secas de 3VCC. tamafio AA (R6)
F~entede alimentaci6n”deCA (per medio del adaptador
de CA optativo: AC-620/AC-302 de AiWA)
Violade piias
(EIAJ, salida de 1mW, reproducci6n)
9horas aproximadamente con Ias pitas mangan6sicas
tamailo AA (R6P)
22 horasaproximadamenteconias piiasalcalinastamafio
AA (LR6)
Dimensioned mdximas (W XHXD)
112,6 X86,8 X34,9 mm
Peso (con excepto ei pilas)
172gaproximadamente
Accesorios
Estereoaud[fonos(1)
Presillaparacintur6n(1)
●The specifications and external appearanceof this unit are
subject to change without prior notice,
US1: North and South America
(with TV and WTHR bands)
US :North and South America
(withoutTV and WTHR bands)
JP :Japan
EU :Europe and other areas
Dolbynoisereductionmanufacturedunderlicensefrom Dolby
LaboratoriesLicensing Corporation,
“DOLBY” and the doubie-D symbol are trademarks of Dolby
LaboratoriesLicensing Corporation.
activer ia radio.
2Maintenez ies touches AUTO PRESET et +
simuitantfment enfonc~es pendant 3secondes.
Chaquefois que vous appuyez sur ces touches, Ier6glage
de bande est affich6 cycliquement comme indiqu6 ci-
dessous.
~uSI— US—JP— EU 1
●To return to the factory preset frequency range and
step directiy, hold down both i- and -buttons simulta-
neouslyfor 3seconds.
●When the frequency range and step are changed, the
preset stations are erased.
●inthe US,JP and EU setting,the tuner band wili change
to AM, FM1 and FM2, Both FM1 and FM2 have the same
frequency range and can be used to tune in to an FM
station.
●Les specifications et i’aspect ext6rieur de cet appareil
peuvent 6tre modifi6s saris prdavis.
●Las especificacionesas( como la configurac[on externa de
esta unidad est/m sujetas acambios sin previos aviso.
R4duction de bruit Dolby fabriqu6e sous Iicence de Doiby
LaboratoriesLicensing Corporation.
DOLBY et Ie symbole double-D sent des marques de Dolby
Laboratories Licensing Corporation,
Reducci6n de ruido Dolby fabricado bajo iicencia de Dolby
Laboratories Licensing Corporation.
DOLBY yei sfmbolo de ia Ddobie son marcas de Dolby
LaboratoriesLicensing Corporation.
US1: Am6rique du Nerd et Iatine
(avec bandes TV et WTHR)
US :Am6rique du Nerd et Iatine
(saris bandes TV et WTHR)
JP :Japon
EU :Europe et ies autres zones g60graphiques
●Pour revenir directement hia plage et bi’intem]lle de
fr6quence par d6faut, maintenez Ies touches +et -
simultan6ment enfoncdes pendant 3secondes.
●Lorsque la plage et I’intervaiie de frt$quenceont &6
modifi6s, ies stations pr6s61ectionn6essent effac6es.
●Dansies r6glages US, JP et EU, la bandedu syntoniseur
change pour AM, FM1 et FM2. Les bandes FM1 et FM2
couvrent la m~me plage de fr6quences et puevent ~tre
utilis6es pour syntoniser une station FM.
——...
——
——.

Other Aiwa Cassette Player manuals

Aiwa HS-P10 HS-G101 User manual

Aiwa

Aiwa HS-P10 HS-G101 User manual

Aiwa HS-TA183 User manual

Aiwa

Aiwa HS-TA183 User manual

Aiwa TP-VS480 User manual

Aiwa

Aiwa TP-VS480 User manual

Aiwa HS-GMX70Y User manual

Aiwa

Aiwa HS-GMX70Y User manual

Aiwa AD-WX909E User manual

Aiwa

Aiwa AD-WX909E User manual

Aiwa HS-TX426 User manual

Aiwa

Aiwa HS-TX426 User manual

Aiwa HS-TX516 User manual

Aiwa

Aiwa HS-TX516 User manual

Aiwa HS-TX386 User manual

Aiwa

Aiwa HS-TX386 User manual

Aiwa HS-RX490 User manual

Aiwa

Aiwa HS-RX490 User manual

Aiwa AD-WX808 User manual

Aiwa

Aiwa AD-WX808 User manual

Aiwa HS-AP61 User manual

Aiwa

Aiwa HS-AP61 User manual

Aiwa HS-GS392 User manual

Aiwa

Aiwa HS-GS392 User manual

Aiwa RM-67HEJ User manual

Aiwa

Aiwa RM-67HEJ User manual

Aiwa CSD-ES977 User manual

Aiwa

Aiwa CSD-ES977 User manual

Aiwa HS-TX525 User manual

Aiwa

Aiwa HS-TX525 User manual

Aiwa HS-TA481 User manual

Aiwa

Aiwa HS-TA481 User manual

Aiwa HS-PX607 User manual

Aiwa

Aiwa HS-PX607 User manual

Aiwa HS-TX694 User manual

Aiwa

Aiwa HS-TX694 User manual

Aiwa HS-TA493 User manual

Aiwa

Aiwa HS-TA493 User manual

Aiwa AD-6800 User manual

Aiwa

Aiwa AD-6800 User manual

Aiwa HS-TX694 User manual

Aiwa

Aiwa HS-TX694 User manual

Aiwa HS-JS380 User manual

Aiwa

Aiwa HS-JS380 User manual

Aiwa CSD-TD20 User manual

Aiwa

Aiwa CSD-TD20 User manual

Aiwa csd-md11 User manual

Aiwa

Aiwa csd-md11 User manual

Popular Cassette Player manuals by other brands

Sony Walkman WM-FX481 operating instructions

Sony

Sony Walkman WM-FX481 operating instructions

Nakamichi ZX-7 Service manual

Nakamichi

Nakamichi ZX-7 Service manual

Onkyo TA-623 Instruction book

Onkyo

Onkyo TA-623 Instruction book

Sanyo MCD-Z90F Service manual

Sanyo

Sanyo MCD-Z90F Service manual

Sony WM-EX668 Service manual

Sony

Sony WM-EX668 Service manual

Sony XR-C290RDS Installation

Sony

Sony XR-C290RDS Installation

Philips AQ6426/20 user manual

Philips

Philips AQ6426/20 user manual

JVC KD-2A Service manual

JVC

JVC KD-2A Service manual

Panasonic RQ-CR18V operating instructions

Panasonic

Panasonic RQ-CR18V operating instructions

JVC HR-C3 manual

JVC

JVC HR-C3 manual

Pioneer CT-4141 Service manual

Pioneer

Pioneer CT-4141 Service manual

Orion DVD/VR-2961 Service manual

Orion

Orion DVD/VR-2961 Service manual

Sony TC-D3 Service manual

Sony

Sony TC-D3 Service manual

Pioneer RX-1180 Service manual

Pioneer

Pioneer RX-1180 Service manual

Radio Shack SCR-64 owner's manual

Radio Shack

Radio Shack SCR-64 owner's manual

Philips AQ6588/01P Specification sheet

Philips

Philips AQ6588/01P Specification sheet

Sanyo MCD-Z12F Service manual supplement

Sanyo

Sanyo MCD-Z12F Service manual supplement

Sony CF-SW1000T operating instructions

Sony

Sony CF-SW1000T operating instructions

manuals.online logo
manuals.online logoBrands
  • About & Mission
  • Contact us
  • Privacy Policy
  • Terms and Conditions

Copyright 2025 Manuals.Online. All Rights Reserved.