Aiwa CX-ZL10 User manual

8Z-MA6-903-01
981 115AKM-Y-9
For assistance and information
call toll free 1-800-BUY-AIWA
(United States and Puerto Rico)
diii3if!
DIGITAL AUDIO

A,●
RISKOFELECTRICSHOCK
DO NOT OPEN
~A●
“CAUTION:TO REDUCE THE RISK OF
ELECTRIC SHOCK,
DO NOT REMOVE COVER (OR BACK).
NO USER-SERVICEABLE PARTS INSIDE.
REFER SERVICING TO QUALIFIED
SERVICE PERSONNEL.”
Explanation of Graphical Symbols:
The lightning flash with arrowhead symbol,
A
withinanequilateraltriangle,isintendedto alert
the user to the presence of uninsulated
“dangerous voltage” within the product’s
enclosurethat may be of sufficient magnitude
to constituteariskof electricshockto persons.
The exclamation point within an equilateral
A
triangle is intended to alert the user to the
presence of important operating and
●maintenance (servicing) instructions in the
literatureaccompanyingthe appliance.
Read the Operating Instructions carefully and completely before
operating the unit. Be sure to keep the Operating Instructions
for future reference. All warnings and cautions in the Operating
Instructions and on the unit should be strictly followed, as well
as the safety suggestions below.
Installation
1
2
3
4
5
6
2
Water and moisture —Do not use this unit near water, such
as near abathtub, washbowl, swimming pool, or the like.
Heat —Do not use this unit near sources of heat, including
heating vents, stoves, or other appliances that generate heat.
It also should not be placed in temperatures less than 5°C
(41“F) or greater than 35°C (95°F).
Mounting surface —Place the unit on a flat, even surface.
Ventilation —The unit should be situated with adequate
space around it so that proper heat ventilation is assured.
Allow 10 cm (4 in,) clearance from trre rear anctme top of me
unit, and 5 cm (2 in.) from each side.
-Do not place the unit on a bed, rug, or similar surface that
may block the ventilation openings.
-Do not install the unit in abookcase, cabinet, or airtight rack
where ventilation may be impeded.
Objects and liquid entry —Take care that objects or liquid
do not get inside the unit through the ventilation oPenincJs.
Carts and stands —Whe; placed or -
mounted on a stand or cart, the unit should
be moved with care.
Quick stops, excessive force, and uneven
surfaces may cause the unit or cart to 6!!I 3
A&-
overturn or fall.
7Condensation —Moisture may form on the CD pickup lens
when:
-The unit is moved from acold spot to awarm spot
-The heating system has just been turned on
-The unit is used in avery humid room
-The unit is cooled by an air conditioner
When this unit has condensation inside, it may not function
normally. Should this occur, leave the unit for afew hours,
then try to operate again.
8Wall or ceiling mounting —The unit should not be mounted
on a wall or ceiling, unless specified in the Operating
Instructions.
Electric Power
1
2
3
4
5
Power sources —Connect this unit only to power sources
specified in the Operating Instructions, and as marked on the
unit.
Polarization —As asafety feature, some units are equipped
with polarized AC power plugs which can only be inserted one
way into apower outlet. If it is difficult or impossible to insert
the AC power plug into an outlet, turn the plug over and try
again. If it is not still inserted easily into the outlet, please call
aqualified service technician to service or replace the outlet,
To avoid defeating the safety feature of the polarized plug, do
not force it into apower outlet,
AC power cord
-When disconnecting the AC power cord, pull it out by the AC
power plug. Do not pull the cord itself.
-Never handle the AC power plug with wet hands, as this
could result in fire or shock.
-Power cords should be firmly secured to avoid being severely
bent, pinched, or walked upon. Pay particular attention to
the cord from the unit to the power outlet.
-Avoid overloading AC power plugs and extension cords
beyond their capacity, as this could result in fire or shock.
Extension cord —To help prevent electric shock, do not use
apolarized AC power plug with an extension cord, receptacle,
or other outlet unless the polarized plug can be completely
inserted to prevent exposure of the blades of the plug.
When not in use —Unplug the AC power cord from the power
outlet if the unit will not be used for several months or more,
When the cord is plugged in, asmall amount of current
continues to flow to the unit, even when the power is turned
off.
Outdoor Antenna
1
2
Power lines —When connecting an outdoor antenna, make
sure it is located away from power lines.
Outdoor antenna grounding —Be sure the antenna system
is properly grounded to provide protection against unexpected
voltage surges or static electricity build-up. Article 810 of the
National Electrical Code, ANS1/NFPA 70, provides information
on proper grounding of the mast, supporting structure, and
the lead-in wire to the antenna discharge unit, as well as the
size of the grounding unit, connection to grounding terminals,
and requirements for grounding terminals themselves.
AntennaGroundingAccordingtotheNationalElectricalCord
ANTENNA LEAD IN WIRE
ANTENNA DISCHARGE
(NEC SECTION 810-20)
ELECTRIC GROUNDING
SERVICE CONDUCTORS
EQUIPMENT -(NEC SECTION 810-21)
GROUND CLAMPS
POWER SERVICE GROUNDING
./ ELECTRODE SYSTEM
(NEC ART 250 PART H)
NEC-NATIONALELECTRICALCODE
ENGLISH

Maintenance
Clean the unit only as recommended in the Operating
Instructions.
Damaae Reauirina Service
Have the units serviced by aqualified service technician if:
-The AC power cord or plug has been damaged
-Foreign objects or liquid have got inside the unit
-The unit has been exposed to rain or water
-The unit does not seem to operate normally
-The unit exhibits amarked change in performance
-The unit has been dropped, or the cabinet has been damaged
DO NOT ATTEMPT TO SERVICE THE UNIT YOURSELF
Check your system and accessories
lzu!l
CX-ZLI OCompact disc stereo cassette receiver
SX-ZL1 OFront speakers
m
CX-ZL1 OCompact disc stereo cassette receiver
SX-ZL1 OFront speakers
PX-E860 Stereo turntable
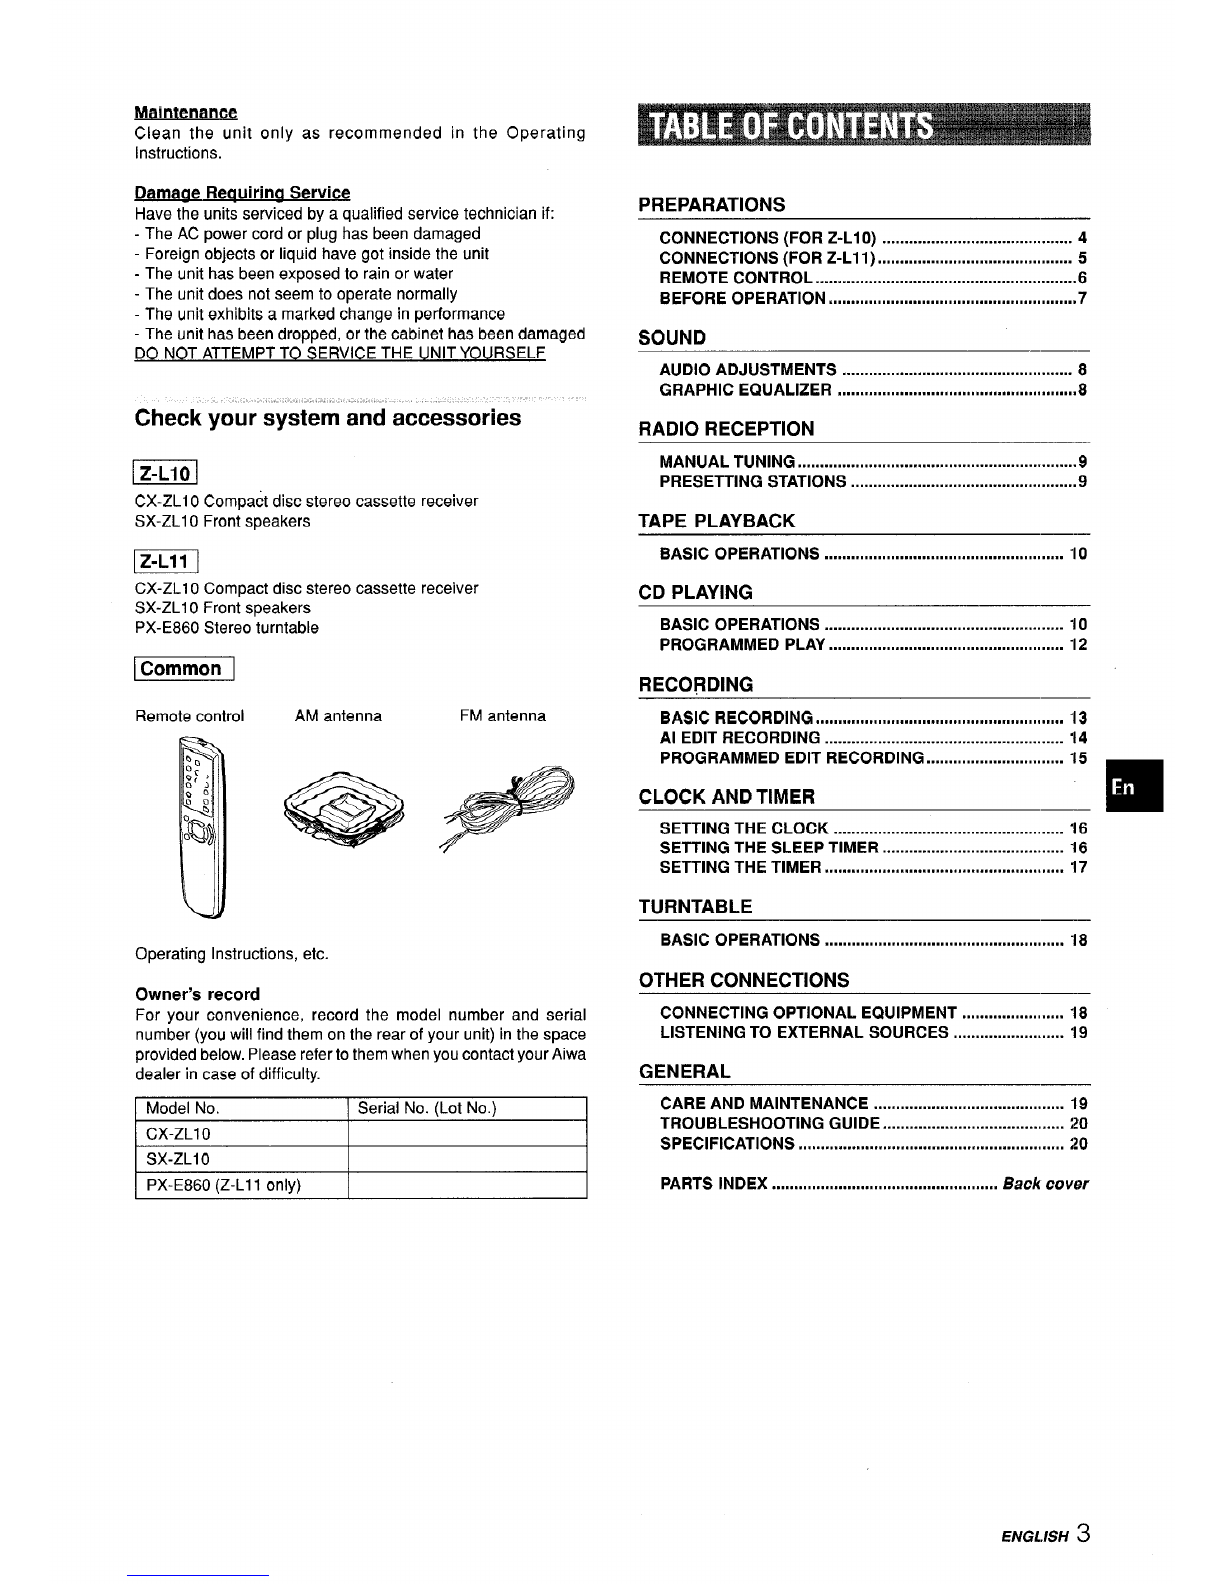
l@m!Y--
Remote control AM antenna
Operating Instructions, etc.
Owner’s record
FM antenna
For your convenience, record the model number and serial
number (you will find them on the rear of your unit) in the space
provided below. Please refer to them when you contact your Aiwa
dealer in case of difficulty.
Model No. Serial No. (Lot No.)
CX-ZL1 O
SX-ZLI13
PREPARATIONS
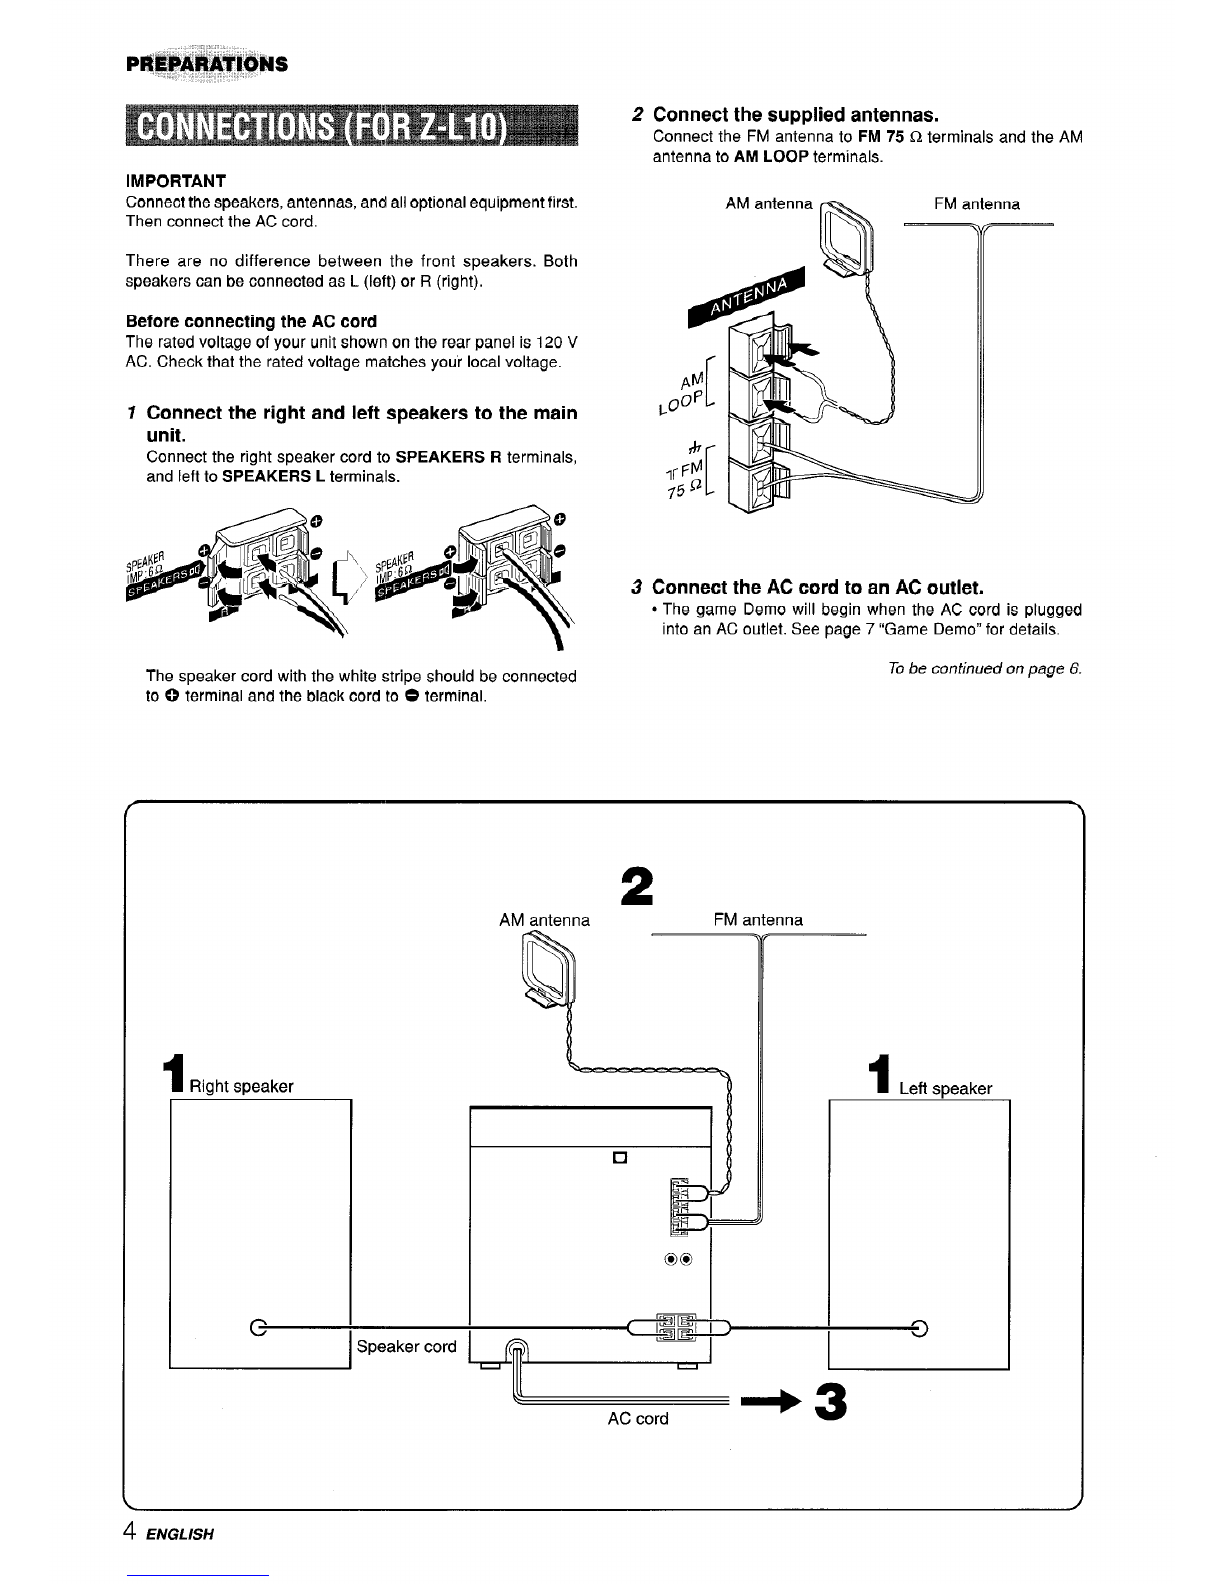
CONNECTIONS (FOR Z-L1O) ........................................... 4
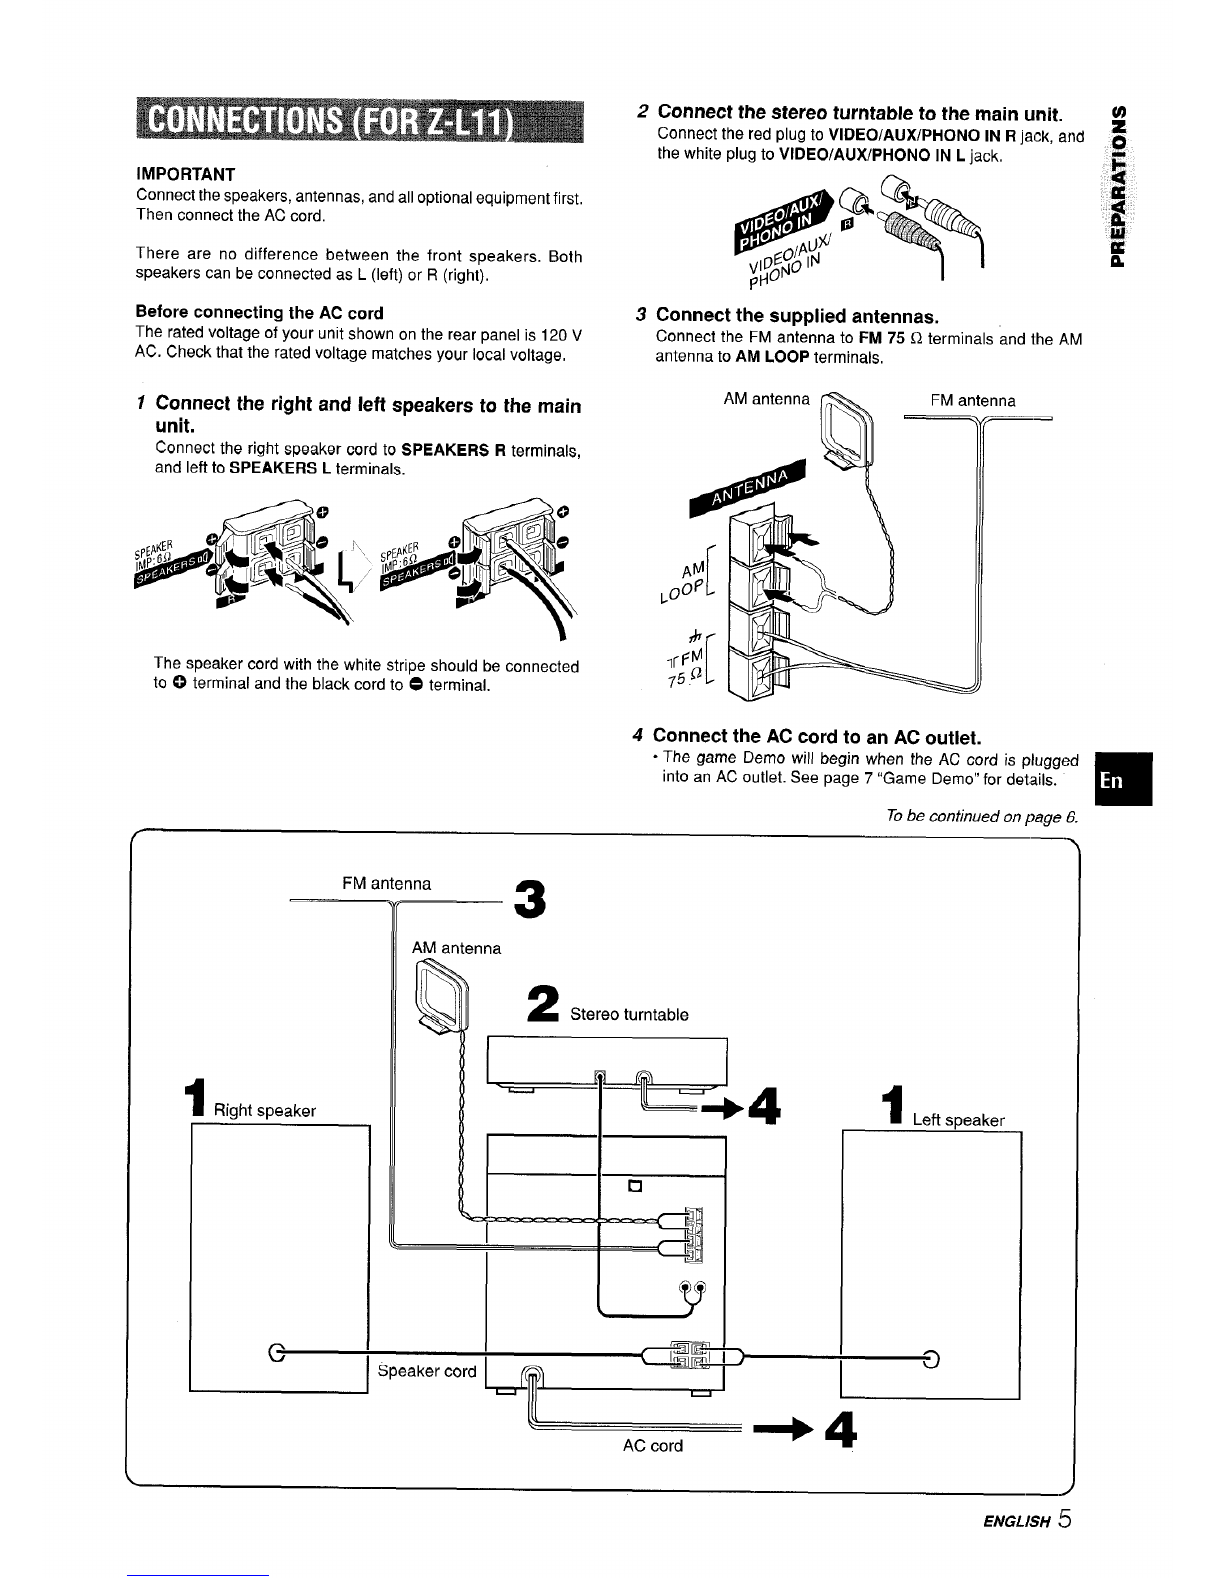
CONNECTIONS (FOR Z-L11) ............................................ 5
REMOTE CONTROL ...........................................................6
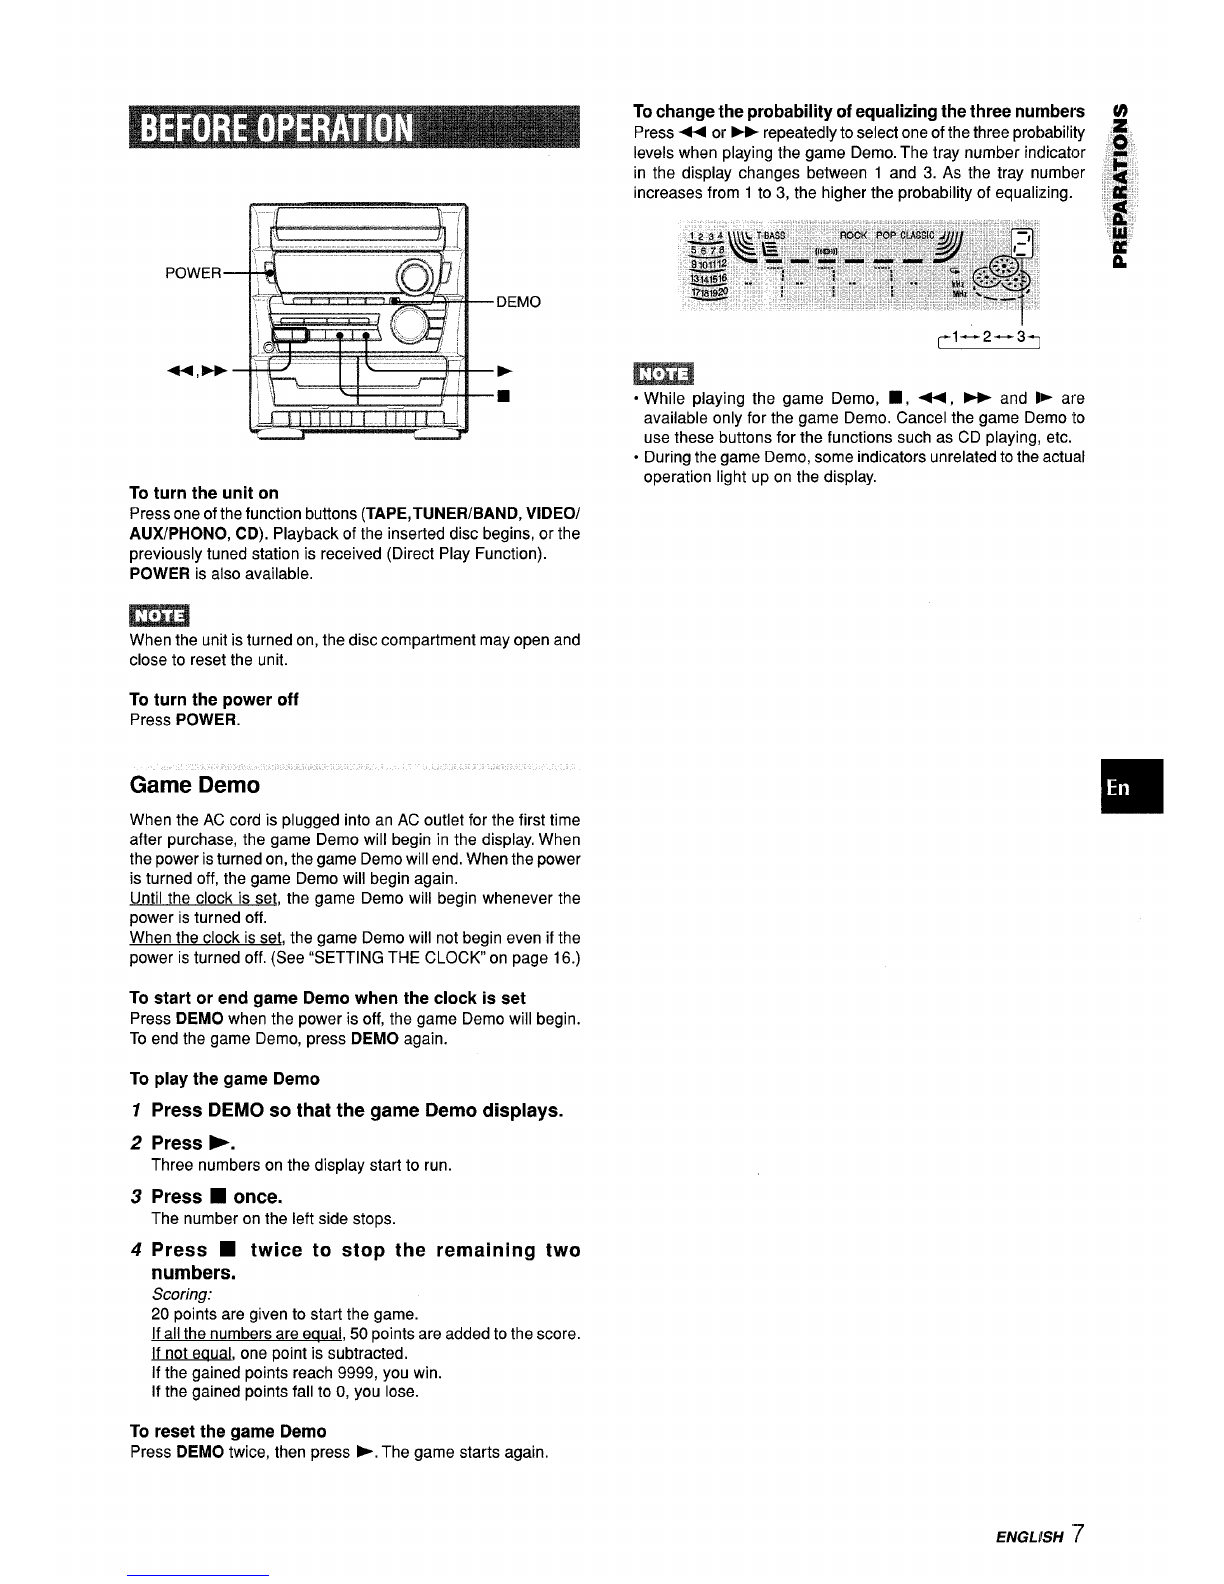
BEFORE OPERATION ,,,,,,,,,,,, ,,,,,,,,,,,,,,, ,,,,,,,,,,,,, ,,,,,,,,,,,,,,,, 7
SOUND
AUDIO ADJUSTMENTS .................................................... 8
GRAPHIC EQUALIZER .................................1....0. ..............8
RADIO RECEPTION
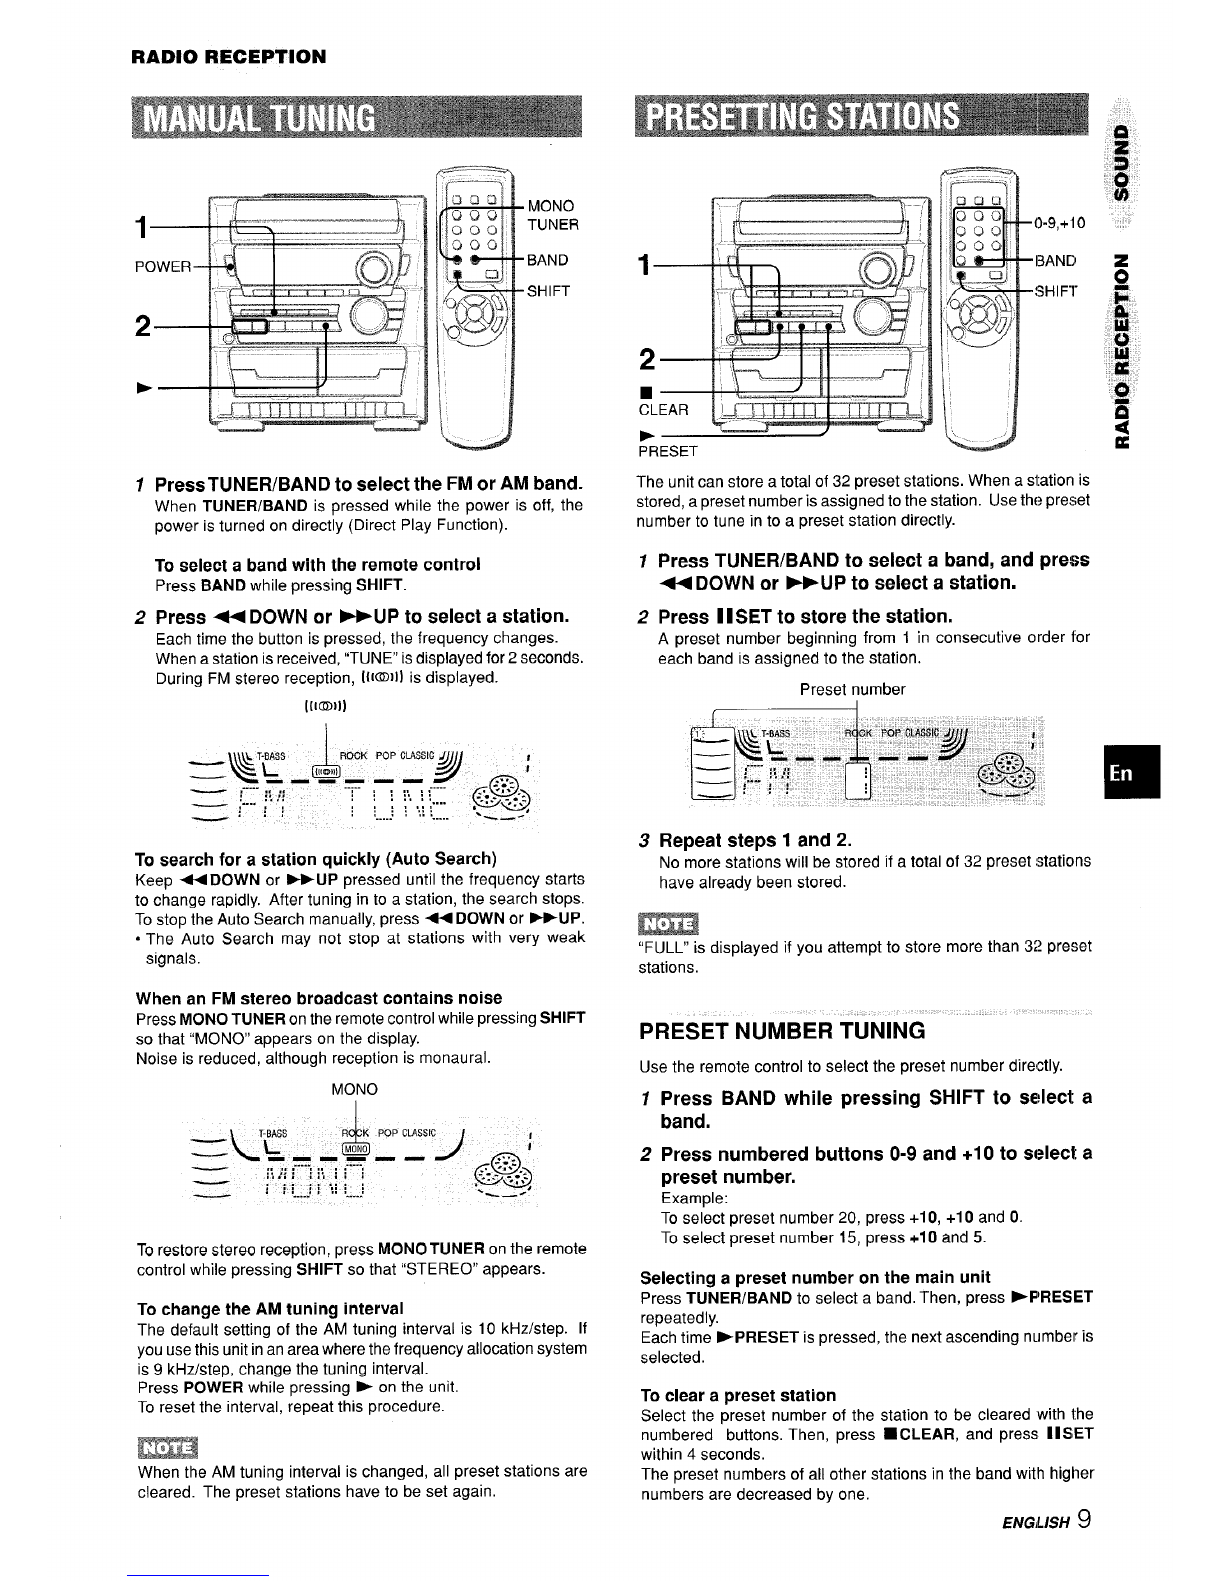
MANUAL TUNING ...............................................................9
PRESETTING STATIONS ...................................................9
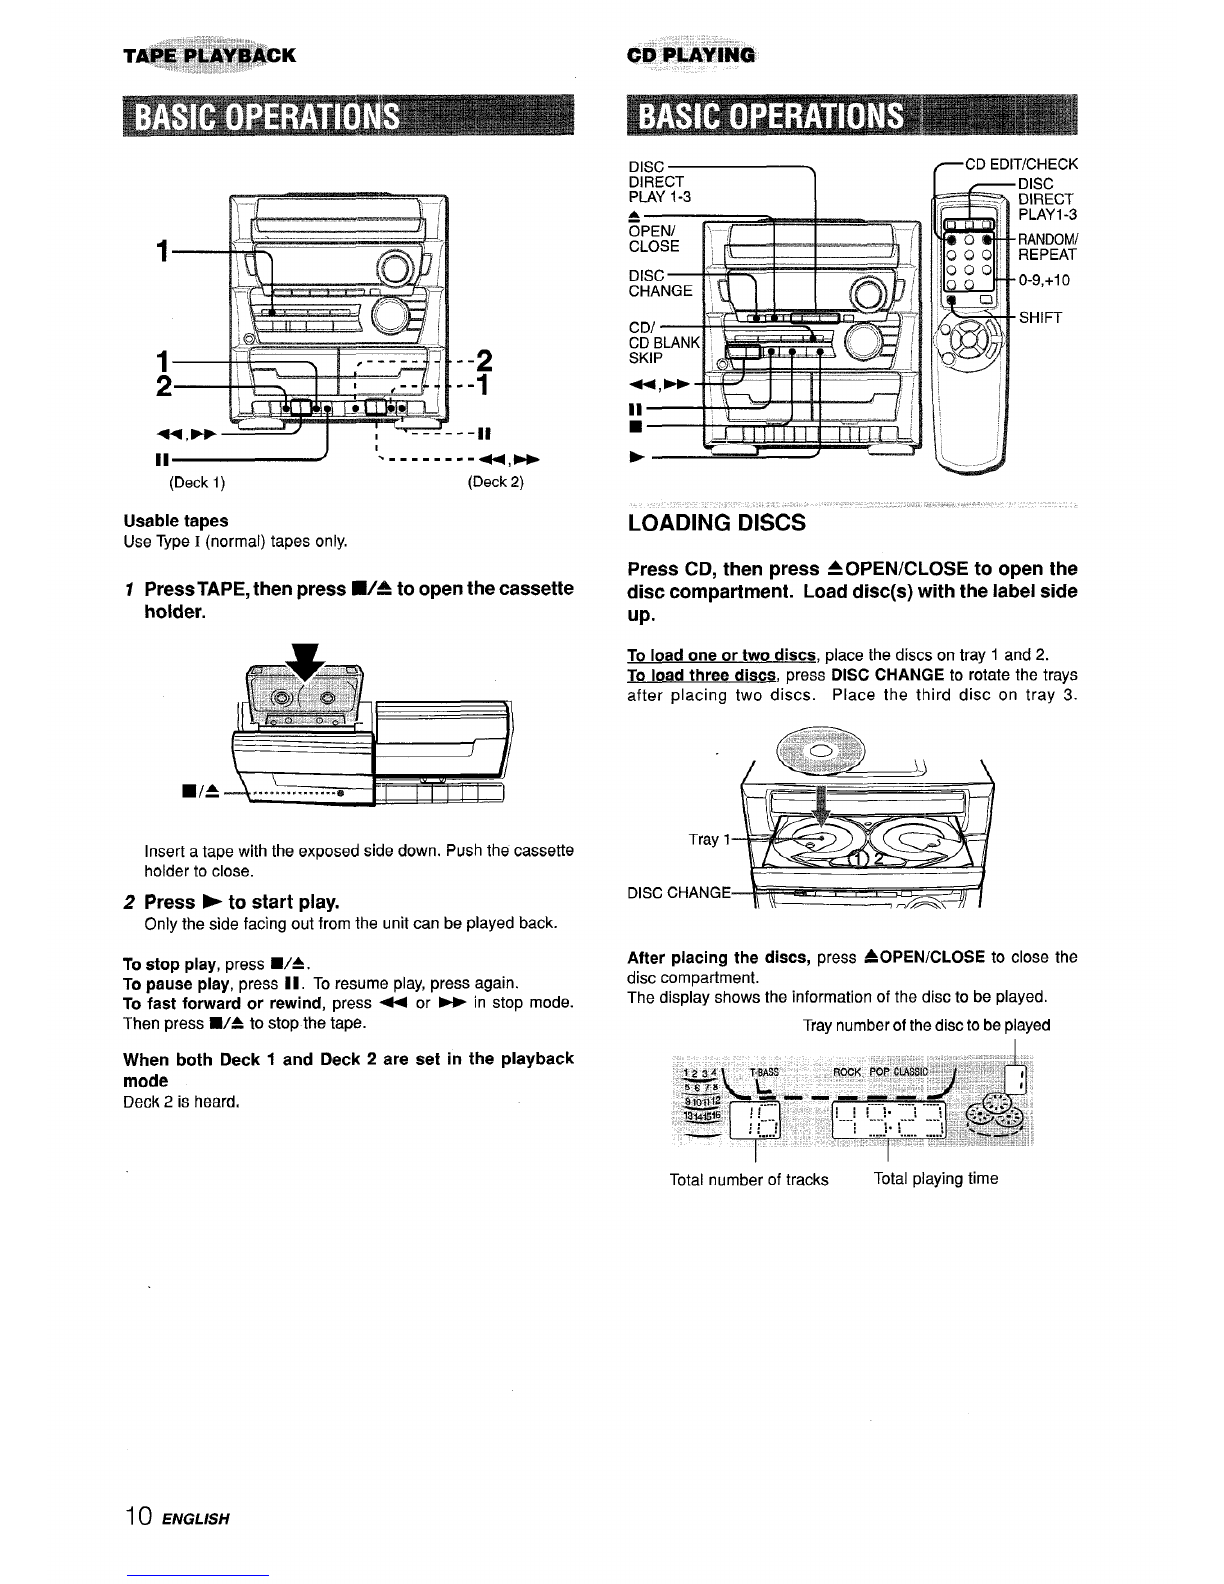
TAPE PLAYBACK
BASIC OPERATIONS ...................................................... 10
CD PLAYING
BASIC OPERATIONS ...................................................... 10
PROGRAMMED PLAY ..................................................... 112
RECORDING
BASIC RECORDING ,,,,,,,,,,,,,, ,,,,,,,,, ,,,,,,,,,, ,,,,,,, ,,,,,,,, ,,, ,,,,, 13
Al EDIT RECORDING ...................................................... 14
PROGRAMMED EDIT RECORDING ............................... 15
CLOCK AND TIMER ❑
SETTING THE CLOCK .............................................. ..... 16
SETTING THE SLEEP TIMER ......................................... 16
SETTING THE TIMER !,,,,,,,,,,,,,!,,,,s,,., ,,,., !,.,,,,,,,, ,,,,,,,,, ,,,,, 17
TURNTABLE
BASIC OPERATIONS ...................................................... 18
OTHER CONNECTIONS
CONNECTING OPTIONAL EQUIPMENT ....................... ’18
LISTENING TO EXTERNAL SOURCES ......................... 19
GENERAL .
CARE AND MAINTENANCE .......................................... 19
TROUBLESHOOTING GUIDE .......................................... 20
SPECIFICATIONS ,,,,,0,,,,..,,,,,,,,,,,,,,.,O,...........,..,,,.,,,...,,,..,, 20
\PX-E860(Z-L11 only) IIPARTS INDEX ................................................... Back cover
ENGL.ISH 3

,-,,
,,. ,,,,., .,,1
PFfiipAi!AWONS
.,
2Connect thesupplied antennas.
Connect the FM antenna to FM 75 Qterminals and the AM
antenna to AM LOOP terminals.
IMPORTANT
Connect the speakers, antennas, and all optional equipment first.
Then connect the AC cord.
There are no difference between the front speakers. Both
speakers can be connected as L(left) or R(right).
Before connecting the AC cord
The rated voltage of your unit shown on the rear panel is 120 V
AC. Check that the rated voltage matches your local voltage.
7Connect the right and left speakers to the main
unit.
Connect the right speaker cord to SPEAKERS Rterminals,
and left to SPEAKERS Lterminals.
‘>
/
The speaker cord with the white stripe should be connected
to 0terminal and the black cord to Oterminal.
tenna
3Connect the AC cord to an AC outlet.
●The game Demo will begin when the AC cord is plugged
into an AC outlet. See page 7 “Game Demo’r for details.
Tobe continued on page 6.
1Right speaker
2
AM antenna FM antenna
TV?
Q
1Left s~eaker
❑
[
=4
:; I
~@@ [
I I
“~. &
AC cord
4ENGLISH

IMPORTANT
Connect the speakers, antennas, and all optional equipment first.
Then connect the AC cord.
There are no difference between the front speakers. Both
speakers can be connected as L(left) or R(right).
Before connecting the AC cord
The rated voltage of your unit shown on the rear panel is 120 V
AC. Check that the rated voltage matches your local voltage,
7Connect the right and left speakers to the main
unit.
2Connect the stereo turntable to the main unit.
Connect the red plug to VIDEO/AUX/PHONO IN Rjack, and
the white plug to VIDEO/AUX/PHONO IN Ljack.
3Connect the supplied antennas.
Connect the FM antenna to FM 75 Qterminals and the A,M
antenna to AM LOOP terminals,
AM antenna
h
FM antenna
Yr-
Connect the right speaker cord to SPEAKERS Rterminals, w
Ill
and left to SPEAKERS Lterminals. A
The speaker cord with the white stripe should be connected lW
f~lv, —
to 0terminal and the black cord to Oterminal. 75.@ ~
4Connect the AC cord to an AC outlet.
“The game Demo will begin when the AC cord ;s plugged
into an AC outlet. See page 7 “Game Demo” for details.
To be continued on page 6.
ENGLISH ~

To position the antennas
FM feeder antenna:
Extend the antenna horizontally in aT-shape and fix its ends to
the wall,
AM antenna:
Position to find the best reception,
To stand the AM antenna on asurface
Fix the claw to the slot,
m
●Be sure to connect the speaker cords correctly. Improper
connections can cause short circuits in SPEAKERS terminals.
●Do not leave objects generating magnetism, such as credit
cards, near the speakers, as the objects may be damaged.
●Do not bring the FM antenna near metal objects or curtain rails.
●Do not bring the AM antenna near other optional equipment,
the stereo system itself, the AC cord or speaker cords, since
noise will be picked up.
*Do not unwind the AM antenna wire.
:.Ir ,X .** ‘:,,,W) ,# ,,1. !,,,,,:,,,,,,),,,,,,,.,,.,.,.,,,,,.,,”, ,’ .,?,, ~’ ‘:-‘t ,, . ,. . . .-
CONNECTING AN OUTDOOR ANTENNA
For better FM reception, use of an outdoor antenna is
recommended.
Connect the outdoor antenna to FM 75 Qterminals.
m]~~m~~~1~
m1 8 :11
Inserting batteries
Detach the battery cover on the rear of the remote control and
insert two R6 (size AA) batteries.
R6(AA)
When to retdace the batteries
The maximu”m operational distance between the remote control
and the sensor on the main unit should be approximately 5meters
(16 feet). When this distance decreases, replace the batteries
with new ones.
To use SHIFT on the remote control
Buttons @have two different functions. One of these functions
is indicated on the button, and the other on the plate above the
button.
To use the function on the button, simply press the button.
To use the function on the plate above the button, press the
button while pressing SHIFT,
To use FUNCTION on the remote control
FUNCTION substitutes for the function buttons (TAPE, TUNER/
BAND, VIDEO/AUX/PHONO, CD) on the main unit.
Each time FUNCTION is pressed, the next function is selected
cyclically.
0
SHIFT FUNCTION
“If the remote control is not going to be used for an extended
period of time, remove the batteries to prevent possible
electrolyte IeaKage.
●The remote control may not operate correctly when:
-The line of sight between the remote control and the remote
sensor inside the display window is exposed to intense light,
such as direct sunlight.
-Other remote controls are used nearby (those of atelevision,
etc.).
ITo connect other optional equipment+ page 18. /
6ENGLISH

To turn the unit on
Press one of the function buttons (TAPE, TUNER/BAND, VIDEO/
AUX/PHONO, CD). Playback of the inserted disc begins, or the
previously tuned station is received (Direct Play Function).
POWER is also available.
When the unit is turned on, the disc compartment may open and
close to reset the unit.
To turn the power off
Press POWER.
Game Demo
When the AC cord is plugged into an AC outlet for the first time
after purchase, the game Demo will begin in the display. When
the power is turned on, the game Demo will end. When the power
is turned off, the game Demo will begin again.
Until the clock is set, the game Demo will begin whenever the
power is turned off.
When the clock is set, the game Demo will not begin even if the
power is turned off. (See “SETTING THE CLOCK” on page 16.)
To start or end game Demo when the clock is set
Press DEMO when the power is off, the game Demo will begin.
To end the game Demo, press DEMO again.
To play the game Demo
1
2
3
4
Press DEMO so that the game Demo displays.
Press E.
Three numbers on the display start to run.
Press ■once.
The number on the left side stops.
Press ■twice to stop the remaining two
numbers.
Scoring:
20 points are given to start the game.
If ail the numbers are eaual, 50 points are added to the score.
If not eaual, one point is subtracted.
If the gained points reach 9999, you win.
If the gained points fall to O,you lose.
To reset the game Demo
Press DEMO twice, then press P. The game starts again.
To change the probability of equalizing the three numbers
Press +or >repeatedly to select one of the three probability
levels when playing the game Demo. The tray number indicator
in the display changes between 1 and 3. As the tray number
increases from 1to 3, the higher the probability of equalizing.
r-l-2 -3--
●While playing the game Demo, ■,++, -and IF are
available only for the game Demo. Cancel the game Demo ito
use these buttons for the functions such as CD playing, etc.
●During the game Demo, some indicators unrelated to the actual
operation light up on the display.
ENGLfSH “7

lb-- -! J-’--h
,,
Turn VOLUME on the main unit, or press VOL on
the remote control.
The volume level is displayed as anumber from 00 to MAX (31).
The volume level is automatically set to 16 when the power is
turned off with the volume level set to 17 or more.
,,$, ,,, ,---
SUPER T-BASS SYSTEM
The T-BASS system enhances the realism of low-frequency
sound.
Press T-BASS.
Each time it is pressed, the level changes. Select one of the
three levels or the off position to suit your preference.
To select with the remote control
Press T-BASS while pressing SHIFT.
Low frequency sound may be distorted when the T-BASS system
is used for adisc or tape in which low frequency sound is already
emphasized. In this case, cancel the T-BASS system.
Using the headphones
Connect headphones to PHONES jack with astandard stereo
plug (06.3 mm, 1/4 inch).
No sound is output from the speakers while the headphones are
plugged in.
ROCK,
POP, —
CLASSIC
This unit provides the following three different equalization curves.
ROCK: Powerful sound emphasizing treble and bass
POP: More presence in the vocals and midrange
CLASSIC: Enriched sound with heavy bass and fine treble.
Press one of the graphic equalizer buttons (ROCK,
POP, CLASSIC).
The selected equalization mode is displayed.
To cancel the selected mode
Press the selected button again. “GEQ OFF” is displayed.
To select with the remote control
Press GEQ repeatedly while pressing SHIFT. The GEQ mode is
displayed cyclically as follows.
~ROCK —POP— CLASSIC— GEQ OFF
(cancel) 1
Sound adjustment during recording
The output volume and tone of the speakers or headphones may
be freely varied without affecting the recording.
8ENGLISH

RADIO RECEPTION
K==3
1
2
PressTUNER/BAND to select the FM or AM band.
When TUNER/BAND is pressed while the power is off, the
power is turned on directly (Direct Play Function).
To select a band with the remote control
Press BAND while pressing SHIFT.
Press 4DOWN or -UP to select astation.
Each time the button is pressed, the frequency changes.
When astation is received, “TUNE” is displayed for 2seconds.
During FM stereo reception, [{[~)1) is displayed.
[[mm])
To search for astation quickly (Auto Search)
Keep 44 DOWN or -UP pressed until the frequency starts
to change rapidly. After tuning in to astation, the search stops.
To stop the Auto Search manually, press *DOWN or *UP.
●The Auto Search may not stop at stations with very weak
signals.
When an FM stereo broadcast contains noise
Press MONO TUNER on the remote control while pressing SHIFT
so that “MONO” appears on the display.
Noise is reduced, although reception is monaural.
MONO
To restore stereo reception, press MONO TUNER on the remote
control while pressing SHIFT so that “STEREO” appears.
To change the AM tuning interval
The default setting of the AM tuning interval is 10 kHz/step. If
you use this unit in an area where the frequency allocation system
is 9kHz/step, change the tuning interval.
Press POWER while pressing -on the unit.
To reset the interval, repeat this procedure.
m
When the AM tuning interval is changed, all preset stations are
cleared. The preset stations have to be set again.
■“
CLEAR ~“.
F-d .
PRESET
The unit can store atotal of 32 preset stations. When astation is
stored, apreset number is assigned to the station. Use the preset
number to tune in to apreset station directly.
1
2
3
Press TUNER/BAND to select aband, and press
aDOWN or -UP to select astation.
Press 1ISET to store the station.
Apreset number beginning from 1in consecutive order lor
each band is assigned to the station.
Preset number
I
Repeat steps 1and 2.
No more stations will be stored if atotal of 32 preset :staticms
have already been stored.
m
“FULL” is displayed if you attempt to store more than 32 pKXW
stations.
PRESET NUMBER TUNING
Use the remote control to select the preset number directly,
7Press BAND while pressing SHIFT to sedeclt a
band.
2Press numbered buttons O-9 and +1Oto select a
preset number.
Example:
To select preset number 20, press +10, +10 and O.
To select preset number 15, press +10 and 5.
Selecting apreset number on the main unit
Press TUNER/BAND to select aband. Then, press -P’RESET
repeatedly.
Each time -PRESET is pressed, the next ascending number is
selected.
To clear apreset station
Select the preset number of the station to be cleared with the
numbered buttons. Then, press ■CLEAR, and press II SET
within 4seconds.
The preset numbers of all other stations in the band with higher
numbers are decreased by one. iWGILISH9

DISCz-CD EDIT/CHECK
. . 2
..1
--II
,,~ ‘.......-.+.*
(Deck 1) (Deck 2)
Usable tapes
Use Type I(normal) tapes only.
1
2
Press TAPE, then press ■/A to open the cassette
holder.
Insert atape with the exposed side down. Push the cassette
holder to close.
Press >to start tday.
Only the side facing o~t f;om the unit can be played back.
To stop play, press WA.
To pause play, press 11. To resume play, press again.
To fast forward or rewind, press 44 or -in stop mode.
Then press ■/: to stop the tape.
When both Deck 1 and Deck 2are set in the playback
mode
Deck 2is heard,
DIRECT
PLAY 1-!3 IDISC
DIRECT
PLAY1-3
RANDOMI
REPEAT
0-9,+1o
SHIFT
Press CD, then press AOPEN/CLOSE to open the
disc compartment. Load disc(s) with the label side
up.
To load one or two discs, place the discs on tray 1 and 2.
To load three discs, press DISC CHANGE to rotate the trays
after placing two discs. Place the third disc on tray 3.
DISC CHANGE
After placing the discs, press 40 PEN/CLOSE to close the
disc compartment.
The display shows the information of the disc to be played.
Tray number of the disc to be played
I
Total number of tracks Total playing time
1() ENGLISH

PLAYING DISCS
Load discs.
To dav all discs in the disc compartment, press E.
Play begins with the disc on tray 1.
Number of track being played Elapsed playing time
To dav one disc only, press one of DISC DIRECT PLAY
1-3.
The selected disc is played once.
Selected disc tray nu~ber
Number of track being played Elapsed playing time
To stop play, press W.
To pause play, press II. To resume play, press again.
To search for aparticular point during playback, keep -
or *pressed and release the button at the desired point.
To skip to the beginning of atrack during playback, press
uor -repeatedly.
To remove discs, press AOPEN/CLOSE.
To start play when the power is off (Direct Play Function)
Press CD. The power is turned on and play of the loaded disc(s)
begins.
When AOPEN/CLOSE is pressed, the power is also turned on
and the disc compartment is opened.
To check the remaining time
During play, press CD EDIT/CHECK on the remote control while
pressing SHIFT. The amount of time remaining until all tracks
finish playing is displayed. To restore the playing time display,
repeat the above.
Selecting atrack with the remote control
1Press one of DISC DIRECT PLAY 1-3 to select adisc.
2Press numbered buttons O-9 and +1Oto select atrack.
Example:
To select the 25th track, press +1O, +1Oand 5.
To select the 10th track, press +1Oand O.
The selected track starts to play and continues to the end of
that disc.
Replacing discs during play
While one disc is playing, the other discs can be replaced without
interru~ting Dlay.
1
2
3
Press Disc CHANGE.
Remove the discs and replace with other discs.
Press AOPEN/CLOSE to close the disc compartment.
●When Ioadina an 8-cm (3-inch) disc, make sure to place it ontQ, ‘3
the inner circle of the trav rxecisely. Otherwise, the dlisc may m,,,
be damaged or the disc compartment will not open. If it dae.s ~
not open, please consult your Aiwa dealer for repair.
“Do not place more than one compact disc on one disc tray. a’
●Do not tilt the unit with discs loaded. Doing so may cause g
malfunctions. ~
●When transporting the unit, remove the discs from the trays.
.Do not use irregular shape CDs (example: heart-shaped,
octagonal ones). It may result in malfunctions. :Z:
RANDOM/REPEAT PLAY “r”
*’
Use the remote control. ‘“d
,+
a
RANDOM play e
All the tracks on the selected disc or all the discs can be playecl
randomly.
REPEAT play
Asingle disc or all the discs can be played repeatedly.
Press RANDOM/REPEAT while pressing SHIFT.
Each time it is pressed, the function can be selected cyclically.
RANDOM play —RANDOM lights up on the display.
REPEAT play —Glights upon the display.
RANDOM/REPEAT play —RANDOM and ~light up on the
display.
Cancel —RANDOM and ~disappear from the display.
To dav all discs, press >to start play.
To Dlav asinale disc, press one of DISC DIRECT PLAY 1-:3tc}
start play.
m
During random play it is not possible to skip to the previously
played track with +.
The silent portions between tracks recorded on a CDI can be
skipped during playback.
7Press CD/CD BLANK SKIP on the main unit.
“CD BLANK SKIP ON” is displayed and a small dot will appear
in the display.
Small dot
2Press Eto start playback.
The silent portions between tracks will be skipped, and the
sound will be played back without interruption. If atrack fades
out (ends with the sound gradually decreasing), the fadeout
portion will also be skipped.
To return to normal playback
Press CD/CD BLANK SKIP again, “CD BLANK SKIP OFF’” is
displayed and the dot in the display will disappear.
●There may be a case where BLANK SKIP PLAY cloes not
function correctly.
cBLANK SKIP PLAY is automatically canceled when performing
Al EDIT RECORDING (page 14), PROGRAMMED EDIT
RECORDING (page 15), or recording during PROGRAMMED
PLAY (page 12) or RANDOM PLAY (page 11).
ENGLISH I1

To add tracks to the program
Repeat steps 2 and 3 in stop mode. The track will be programmed
after the last track.
To change the programmed tracks
Up to 30 tracks can be programmed from any of the inserted Clear the program and repeat all the steps again.
discs.
2To play the programmed tracks repeatedly
After programming the tracks, press RANDOM/REPEAT
3repeatedly while pressing SHIFT until ~appears on the display.
15m
“During programmed play, you can not use random play, check
44, Ethe remaining time or select atrack.
““FULL’> is displayed if you attempt to program more than 30
■tracks.
U.;
.....,.
Use the remote control,
1
2
3
Press PRGM while pressing SHIFT in stop mode.
“PRGM” is displayed
Press one of DISC DIRECT PLAY 1-3 to select a
disc.
Go to the next step when the tray stops rotating.
Press numbered buttons O-9 and +1Oto program
atrack.
Example:
To select the 25th track, press +1O, +1Oand 5
To select the 10th track, press +1Oand O.
Program number
Selected track number
Total playing time of
the selected tracks
Total number of selected tracks
4Repeat steps 2and 3to program other tracks.
5Press >to start play.
To check the program
Each time <or >is pressed in stop mode, adisc number,
track number, and program number will be displayed.
To clear the program
Press ■CLEAR in stop mode.
12 ENGLISH

RECOR091UG
Preparation
“Use Type I(normal) tapes only.
“Set the tape to the point where recording will start.
●Note that recording is done on only one side of the tape
1
2
3
Insert the tape to be recorded on into Deck 1.
Insert the tape with the side to be recorded on first facing out
from the unit.
Press one of the function buttons and prepare
the source to be recorded.
To record from aCD, press CD and load the disc(s).
To record from ata~e, press TAPE. Then, insert the original
tape into Deck 2 and play it.
To record from aradio broadcast, press TUNER/BAND and
tune in to astation.
To record from aconnected source, press VIDEO/AUX/
PHONO and play.
Press ●on Deck 1to start recording.
~is depressed simultaneously.
When the selected function is CD, playback and recording
start simultaneously.
To stop recording, press WA on Deck 1.
To pause recording, press II on Deck 1.
To resume recording, press it again.
To record selected tracks of the CD
Before pressing ●,program the tracks (see page 12).
To record part of the CD 4f
When ●is pressed, recording always starts from the first track. ~
Tostart in the middle of atrack, play the CD first and press I I SET
for CD at the point you wish to start recording from. Then, pr[?ss ~
●.The pause mode for CD button is released automatically &
and recording starts. n
Q
Sound adjustment during recording
The output volume and tone of the speakers or headphones tare ~
freely varied without affecting the recording. 2
E
.Do not press the buttons on Deck 2during recording. $
●●cannot be depressed if the erasure prevention tab on the ~
side of the tape to be recorded is broken off.
To erase arecording
Aprevious recording is erased when anew recording is made
on that part of that tape.
1Insert the tape you want to erase into Deck 1.
2Press TAPE and stop all the tape operation in Deck 2.
3Wind UPthe tape to the point where the erasure is to be started.
4Press Oon Deck 1to”start the erasure.
About cassette tapes
.To prevent accidental erasure, break off the plastic tabs
on the cassette tape after recording with ascrewdriver or
other ~ointed tool.
Side ATab for side A
To record on the tape again, cover the tab openinge witlh
adhesive tape, etc.
●120-minute or longer tapes are extremely thin and easily
deformed or damaged. They are not recommended,
wTake up any sfack in the tape with apencil or similar toed
before use. Slack tape may break or jam in the mechamisml.
ENGLISH ‘t 3

The Al edit recording function enables CD recording without
worrying about tape length and track length. When aCD is
inserted, the unit automatically calculates the total track length.
If necessary, the order of tracks is rearranged so that no track is
cut short.
(Al: Artificial Intelligence)
1
2
3
4
5
Insert the tape into Deck 1.
Insert the tape with the side to be recorded on first facing out
from the unit, and wind up the tape with +.
Press CD and load the disc(s).
Press CD EDIT/CHECK once while pressing
SHIFT on the remote control.
“EDIT” and “AI” are displayed.
Al EDIT
●When “PRGM” is displayed, press CD EDIT/CHECK while
pressing SHIFT again.
Press one of DISC DIRECT PLAY 1-3 to select a
disc.
Press numbered buttons O-9 on the remote
control to designate the tape length.
10 to 99 minutes can be specified.
Example: When using a60-minute tape, press 6 and O.
In afew seconds, the tracks to be recorded on each side of
the tape are determined.
●<and >are also available to designate the tape length.
Programmed Remaining time
Tape length
Itracks for side Aof recording
Tape sid~ “inus mark
A: First recording side
B: Second recording side
6
7
8
Press ●on Deck 1to start recording on the first
side.
~flashes for 10 seconds, and then CD play and recording
of edited tracks for the first side start simultaneously. When
the end of the tape is reached, Deck 1enters the recording
stop mode. After entering the recording stop mode go to step
7.
Press CD EDIT/CHECK while pressing SHIFT on
the remote control to display the program for the
second recording.
“B is displayed.
Turn over the tape in Deck 1and press ●to start
recording on the second side. “
To stop recording
Press ■/A on Deck 1.
Recording and CD play stop simultaneously.
To clear the edit program
Press ■CLEAR twice in the stop mode so that “EDIT” disappears
on the display, or press AOPEN/CLOSE.
To check the order of the programmed track numbers
Before recording, press CD EDIT/CHECK while pressing SHIFT
on the remote control to select side Aor B, and press <or
-repeatedly.
Programmed
track numbers Track number
Tape side Program number
To add tracks from other discs to the edit program
If there is any time remaining on the tape after step 5, you can
add tracks from other discs in the CD compartment.
1Press CD EDIT/CHECK while pressing SHIFT on the remote
control to select side Aor B.
2Press one of DISC DIRECT PLAY 1-3 to select adisc.
3Press numbered buttons on the remote control to select tracks.
Atrack whose playing time is longer than the remaining time
cannot be programmed.
4Repeat steps 2 and 3 to add more tracks.
Time on cassette tapes and editing time
The actual cassette recording time is usually alittle longer than
the specified recording time printed on the label. This unit can
program tracks to use the extra time. When the total recording
time is alittle longer than the tape’s specified recording time
after editing, the display shows the extra time (without aminus
mark), instead of the time remaining on the tape (with the minus
mark),
●Recording is inhibited if the erasure presentation tab for the
side of the tape facing out from the unit is broken off.
.The Al edit recording function cannot be used with discs
containing 31 tracks or more. “TR OVER” is displayed if this is
attempted.
14 ENGLISH

In the programmed edit recording function the tracks can be
programmed while checking the remaining time on each side of
the tape as the tracks are programmed.
1
2
3
4
Insert the tape into Deck 1.
Insert the tape with the side to be recorded on first facing out
from the unit, and wind up the tape with +.
Press CD and load the disc(s).
Press CD EDIT/CHECK twice while pressing
SHIFT on the remote control.
“EDIT” and “PRGM” are displayed.
PRGM EDIT
●When “Al” is displayed, press CD EDIT/CHECK while
pressing SHIFT again.
Press numbered buttons on the remote control
to designate the tape length.
10 to 99 minutes can be specified.
●+and -are also available to designate the tape length.
Maximum recording
Tape length time for side A
Tape side A
5Press one of DISC DIRECT PLAY 1-3 to select a
disc,
Then, press numbered buttons O-9 and +10 on
the remote control to program atrack.
Example: To select the 10th track of disc 2, press DISC
DIRECT PLAY 2, then press +10 and O.
Selected track Selected disc
number number Programmed track number
Program number Remaining time on side A
6
7
8
9
Repeat step 5for the rest of the tracks for side @
A. a
‘,m
Atrack whose playing time is longer than the remaining time .&
cannot be programmed. l!
Press CD EDIT/CHECK while pressing SHIFT on w
the remote control to select side Band prc~gram =
the tracks for side B.
Tape side B(reverse side)
Press CD EDIT/CHECK while pressing SHIFT to
select side Aand press Oon Deck 1.
~flashes for 10 seconds, and then CD play and recording
of edited tracks for the first side start simultaneously, When
the end of the tape is reached, Deck 1enters the recording
stop mode. After entering the recording stop modf?, go to
step 9.
Press CD EDIT/CHECK while pressing SHIFT cm
the remote control for recording of [he second
side.
“B” is displayed.
10 Turn over the tape in Deck 1and press ●to start
recording.
Recording starts.
To stop recording
Press WA on Deck 1. Recording and CD play stop ❑
simultaneously.
To check the order of the programmed track numbers
Before recording, press CD EDIT/CHECK while pressing SHIFT
on the remote control to select side Aor B, and press +or
*repeatedly.
Programmed
track numbers Track number Disc nunnber
Tape side Program number
To change the program of each side
Press CD EDIT/CHECK while pressing SHIFT on the remote
control to select side Aor B, and press ■CLEAR to clear “the
program on the selected side. Then program tracks agalin.
To clear the edit program
Press ■CLEAR twice in stop mode so that “EDIT” disappears
on the display.
.Recording is inhibited if the erasure preventafion tab for the
side of the tape facing out from the unit is broken off.
●Up to 30 tracks can be programmed from any of the inserted
discs.
●“FULL” is displayed if you attempt to program more than 30
tracks.
ENGLISH ‘15

[+Tj-i~J /,
-. (J.
.. .—. ... w
When the clock is set, the “:” between the hours and minutes
flashes. When the power cord is plugged into an AC outlet for
the first time after purchase or when the clock setting is canceled
due to apower failure, the entire clock display flashes.
Use the remote control.
1
2
3
Press CLOCK once while pressing SHIFT on the
remote control.
Within 4seconds, press 4or -to designate
the hour and the minute.
Holding these buttons down will vary the time rapidly.
Press II.
The clock starts from 00 seconds.
To view the clock when another display is in the display
Press CLOCK while pressing SHIFT. The time is displayed for 4
seconds and then the original display reappears. However, the
clock cannot be displayed during recording.
To switch to the 24-hour standard
Press CLOCK once while pressing SHIFT and then press ■
within 4seconds.
Repeat the same procedure to restore the 12-hour standard.
~
If the display flashes when the clock is displayed, it indicates
that the clock has stopped due to apower failure or the removal
of the power cord. The current time needs to be reset.
2
The unit can be turned off automatically at aspecified time.
Use the remote control.
1Press SLEEP while pressing SHIFT on the remote
control.
2Within 4seconds, press +or -10 specify
the time until the power is turned off.
The time “changes between 5 and 240 minutes in 5-minutf?
steps.
Specified time
While the sleep timer is in operation, the display is dimmer
than usual.
To check the time remaining until the power is turned off
Press SLEEP once while pressing SHIFT. The remaining time
is displayed for 4seconds.
To cancel the sleep timer
Press SLEEP twice while pressing SHIFT so that “SLEEF’OFF”
appears on the display.
~6ENGLISH

The unit can be turned on at aspecified time every day with the
built-in timer.
Preparation
Make sure the clock is set correctly.
1
2
3
4
5
Press one of the function buttons to select a
source.
●If TUNER/BAND is pressed, the band can be selected in
this step.
Press TIMER while pressing SHIFT on the remote
control until @and “D PLAY” appear on the
display.
Time and audio source name flash alternately.
Within 6seconds, press -or -to designate
the timer-on time, then press Il.
Holding these buttons down will vary the time rapidly.
Within 4seconds, press< or -to select the
duration for the timer-activated period.
The duration can be set between 5 and 240 minutes in 5-
minute steps.
The duration will be automatically set after 4seconds. It will
also be set if II is pressed within 4seconds after step 4.
Adjust the volume.
The source sound will play at the volume level set in this step
when the power is turned on by the timer.
If the volume level is set to 17 or higher, however, it will
automatically be set to 16 when the power is turned on.
6
7
8
Prepare the source. a
To listen to aCD, load the disc to be played first on tray 1. w
~
To listen to atape, insert the tape into Deck 1or 2.
To listen to the radio, tune in to astation. ;,;;r ,,
Press POWER to turn off the power. :5’
@remains on the display after the power is turned olf (timer ~
standby mode). g“
Get ready for the TAPE function or the timer
recording.
To listen to the tape, press Pon Deck 1or 2.
To record the source, insert the tape into Deck 1 and press
●on Deck 1.
When the timer-on time is reached, the unit turns on and
begins play with the selected source,
You can change the source that was selected in step 1by
pressing one of the function buttons before pressing 11 in slep
3.
The timer recording period and tape length
When the length of the tape to be recorded is shorter than the
timer recording period, ●on Deck 1is released before the timer
is off.
When the tape length is longer than the timer recording period,
●is not released. If ●is not released for along time, the tape
in the deck may be damaged. Press W4 to release ●.❑
To check the timer setting
Press TIMER while pressing SHIFT.
The selected source, the timer-on time, and the duration for the
timer-activated period will be displayed for 4seconds.
To change any of the previous setting
Carry out from step 1.
However, if you do not change the timer-on time, in step 3just
press II twice and continue from step 4.
To cancel the timer standby mode temporarily
Press TIMER while pressing SHIFT so that @disappears.
To restore the timer standby mode, press these buttons again to
display 0.
Using the unit while the timer is set
You can use the unit normally after setting the timer.
Before turning off the power, carry out step 5 and 6.
0Timer playback and timer recording will not begin unless the
power is turned off.
“Connected equipment cannot be turned on and off by the built-
in timer of this unit. Use an external timer.
●While the timer is in operation, the display indication is dimmer
than usual.
ENGLISH 17

\_ —.. —
n1
–1
I
J-
Preparation
●Connect the supplied stereo turntable to the main unit. (See
page 5)
“Set EQUALIZER AMP on the turntable to ON position. (Refer
to the operating instructions of the turntable for details.)
1
2
3
4
Press VIDEO/AUX/PHONO on the main unit.
“VIDEO” appears on the display.
The source name on the display can be changed to “PHONO”.
(See “LISTENING TO EXTERNAL SOURCES” on page 19.)
Adjust the volume to minimum.
Turn VOLUME counterclockwise until “VOL O“is displayed.
Play the turntable.
Refer to the operating instructions of the turntable for details.
Adjust the volume according to your preference.
Ifia El
Dam
caEfl
—CD DIGITALOUT
(OPTICAL)
—VIDEO/AUX/
PHONO IN
Refer to the operating instructions of the connected equipment
for details.
●The connecting cords are not supplied. Obtain the necessary
connecting cords.
●Consult your local Aiwa dealer for optional equipment.
,..
VIDEO/AUX/PHONO IN JACKS
This unit can input analog sound signals through these jacks.
Use acable with RCA phono plugs to connect audio equipment
(LD players, MD players, VCRs, TV, etc.).
Connect the red plug to VIDEO/ALfX/PHONO IN Rjack, and the
white plug to VIDEO/AUX/PHONO IN Ljack.
When connecting aturntable
Use an Aiwa turntable equipped with abuilt-in equalizer amplifier.
,. ,,,.-
CD DIGITAL OUT (OPTICAL) JACK “‘
This unit can output CD digital sound signals through this jack.
Use an optical cable to connect digital audio equipment (DAT
deck, MD recorder, etc.).
Remove the dust cap @from the CD DIGITAL OUT (OPTICAL)
jack. Then, connect an optical cable plug to the CD DIGITAL
OUT (OPTICAL) jack,
4F
When the CD DIGITAL OUT (OPTICAL) jack is not being
used
Attach the supplied dust cap.
18 ENGLISH

To play equipment connected to VIDEO/AUX/PHONO IN jacks
proceed as follows.
1Press VIDEO/AUX/PHONO.
“VIDEO” appears on the display.
2Play the connected equipment.
To change asource name rm the display
When VIDEO/AUX/PHONO is pressed, “VIDEO” is displayed
initially. It can be changed to “AuX,” “TV” or “PHONO?
With the power on, press POWER while pressing VIDEO/AUX/
PHQNQ,
Repeat the procedure to select one of the names.
Occasional care and maintenance of the unit and the :software
are needed to optimize the performance of your unit.
To clean the cabinet
Use asoft and dry cloth.
If the surfaces are extremely dirty, use asoft cloth lightly
moistened with mild detergent solution. DO not US13strong
solvents, such as alcohol, benzine or thinner as these could
damage the finish of the unit.
To clean the tape heads
When the tape heads are dirty;
-high frequency sound is not emitted
-the sound is not adequately high
-the sound is off-balance
-the tape cannot be erased
-the tape cannot be recorded on
After every 10 hours of use, clean the tape heads with a head
cleaning cassette.
Refer to the instructions of the cleaning cassette for details.
To demagnetize the tape heads
The tape heads may become magnetized after long-term IJW.
This may narrow the output range of recorded tapes and increase
noise.
After every 20 to 30 hours of use, demagnetize the tape hsads
with aseparately sold demagnetizing cassette.
Ffefer to the instructions of the demagnetizing cassette f(lr details.
Care of discs
●When adisc becomes dirty, wipe the disc from the center out
with acleaning cloth.
@
,,,,,
,,
,’
-,, ‘, .,,
cAfter playing adisc, store the disc in its case. Do not Ieav(?the
disc in places that are hot or humid.
Care of tapes
●Store tapes in their cases after use.
.Do not leave tapes near magnets, motors, television sets, or
any source of magnetism. This will downgrade the sound quality
and cause noise.
●Do not expose tapes to direct sunlight, or leave therm in acar
parked in direct sunlight,

If the unit fails to perform as described in these Operating
Instructions, check the following guide,
GENERAL
There is no sound.
●Isthe AC cord connected properly?
.Is there abad connection? (~ pages 4, 5)
●There may be ashort circuit in the speaker terminals.
+Disconnect the AC cord, then correct the speaker
connections.
●Was an incorrect function button pressed?
Sound is emitted from one speaker only.
●Isthe other speaker disconnected?
An erroneous display or amalfunction occurs.
+Reset the unit as stated below.
TUNER SECTION
There is constant, wave-like static,
“Is the antenna connected properly? (+ pages 4, 5)
.Is the signai weak?
~connect an outdoor antenna.
The reception contains noise interferences or the sound
is distorted.
●Isthe system pickingup externai noise or multipath distortion?
+Change the orientation of the antenna.
+Move the unit away from other electrical appliances.
CASSETTE DECK SECTION
The tape does not run,
.Is the deck in pause mode? (- page 10)
The sound is off-balance or not adequately high.
*Is the playback head dirty? (+ page 19)
Recording is not possibie.
●Is the erasure prevention tab on the tape broken off? (~ page
13)
*Is the recording head dirty? (* page 19)
Erasure is not possible.
*is the erasure head dirty? (+ page 19)
●Is ametal tape being used?
High frequency sound is not emitted.
“Is the recording/playback head dirty? (-+ page 19)
CD PLAYER SECTiON
The CD player does not play,
●Is the disc correctiy placed? (+ page 10)
●Is the disc dirty? (+ page 19)
●Is the lens affected by condensation?
+Wait approximately one hour and try again.
To reset
If an unusual condition occurs in the display window or the
cassette decks, reset the unit as follows.
1Press POWER to turn off the power.
2Press POWER to turn the power back on while pressing
■CLEAR. Everything stored in memory after purchase is
canceled.
if the power cannot be turned off in step 1because of a
malfunction, reset by disconnecting the AC cord, and connect it
again. Then carry out step 2.
Main unit CX-ZLIO
FM tuner section
Tuning range
Usable sensitivity (IHF)
Antenna terminals
AM tuner section
Tuning range
Usable sensitivity
Antenna
Amplifier section
Power output
Total harmonic distortion
Inputs
Outpute
Cassette deck section
Track format
Frequency response
Recording system
Heads
87.5 MHz to 108 MHz
13.2dBf
75 ohms (unbalanced)
530 kHz to 1710 kHz (1OkHz step)
531 kHz to 1602 kHz (9 kHz step)
350 lNlm
Loop antenna
10W+10W(50Hz–20 kHz,THD
less than 1%, 6ohms)
15W+15W(1 kHz,THD lessthan
10%, 6ohms)
0.1 %(6 W, 1kHz, 6ohms, DIN
AUDIO)
VIDEO/AUX/PHONO IN: 500 mV
CD DIGITAL OUT (OPTICAL)
SPEAKERS: accept speakers of 6
ohms or more
PHONES (stereo jack): accepts
headphones of 32 ohms or more
4tracks, 2channels stereo
50 Hz -10000 Hz
AC bias
Deck 1:Recording/playback head
x1, erase head x1
Deck 2:Playback head x1
Compact disc player section
Laser
D-A converter
Signal-tomoise ratio
Harmonic distortion
Wow and flutter
General
Power requirements
Power consumption
Dimensions of main unit
(W XHXD)
Waight of main unit
Speaker system SX-ZL1O
Semiconductor laser (h= 780 nm)
1bit dual
65 dB (1 kHz, OdB)
0.05 7.(1 kHz, OdB)
Unmeasurable
120VAC, 60 Hz
40 w
360 x394.5x 350 mm
(141/4 X155/8X 137/8 in.)
5.9 kg (13 Ibs)
Cabinet type 2way,bass reflex
Speakers Woofer:
130 mm (51/8 h) cone type
Super tweeter:
20 mm (’3/16 h.) ceramic type
Impedance 6ohms
Output sound prassure level 87 cfBIWlm
Dimensions (W xHxD) 260 x444 x215 mm (10’/4 x171/2
x81/2
in.)
Weight 3.5 kg(7 Ibs 12 OZ.)
Specificationsand externalappearancearesubjectto changewithout
notice.
20 ENGLISH
This manual suits for next models
2
Table of contents
Languages:
Other Aiwa Stereo System manuals

Aiwa
Aiwa XR-M500 User manual

Aiwa
Aiwa NSX-A888 User manual

Aiwa
Aiwa NSX-AJ17 User manual

Aiwa
Aiwa LCX-K117 User manual

Aiwa
Aiwa XR-M700 Building instructions

Aiwa
Aiwa NSX-AVH90 User manual

Aiwa
Aiwa NSX-SZ103 User manual

Aiwa
Aiwa NSX-MA545 User manual

Aiwa
Aiwa XS-G3 SERIES User manual

Aiwa
Aiwa CX-NV8000 User manual