Akai VS-K203M-E7 User manual


Features
•
•
•
•
•
•
•
•
•
•
•
High Quality (HQ) Images
On-Screen Displays (OSD)
CATV Tuner with Hyperband
80 Memories for Presets
Automatic TV station presetting
30 Minutes Back-Up in case of
Power Failure
Timer Recording of up to 8
Programs per Month
One-Touch Timer Recording
(OTR)
Video Index Search System
NTSC Video Cassette Tape
Playback on PAL TV
Auto Power ON and Auto
Playback when inserting a
Cassette Tape
•
•
•
•
•
•
•
•
•
Auto Rewind, Auto Eject, and
Auto Power OFF
Real-Time Tape Counter with
ZERO RETURN-Function
Auto Video Head Cleaning
System
2 Tape Speeds
Digital Auto Tracking (ATR
Function)
Repeat
On-Screen Language Display
in English, German, French,
Italian, or Spanish
Scart socket
CE Symbol Guaranteeing
Compliance to Currently
Effective European Standards.
4F37001A (E)COVER 5/6/2002, 16:402

1
Precautions ..........................................................2
Locations of Indicators and Controls.................... 4
Remote Control .................................................... 5
Connections and Installation ................................ 7
Setting the TV to the AV-Channel ........................ 9
On-screen Language Selection..........................10
Setting the Time and Date ................................. 10
Automatic TV station presetting .........................11
Mapping TV stations .......................................... 11
Manual TV station presetting ............................. 13
Preparation
Recording a TV Program ...................................18
One-Touch Timer Recording (OTR)................... 19
Timer Recording.................................................20
Recording
Duplicating a Video Tape ................................... 22
Error Search.........................................................
23
Video Head Cleaning .........................................24
Specifications .....................................................25
Contents
Other Functions
Loading and Unloading a Cassette Tape........... 14
Playback.............................................................14
Special Playback................................................ 15
Repeat Playback ................................................ 16
Counter Display..................................................17
Video Index Search System.................................
17
Playback
4F37001A (E)P01-09 5/6/2002, 16:401

2
Precautions
2
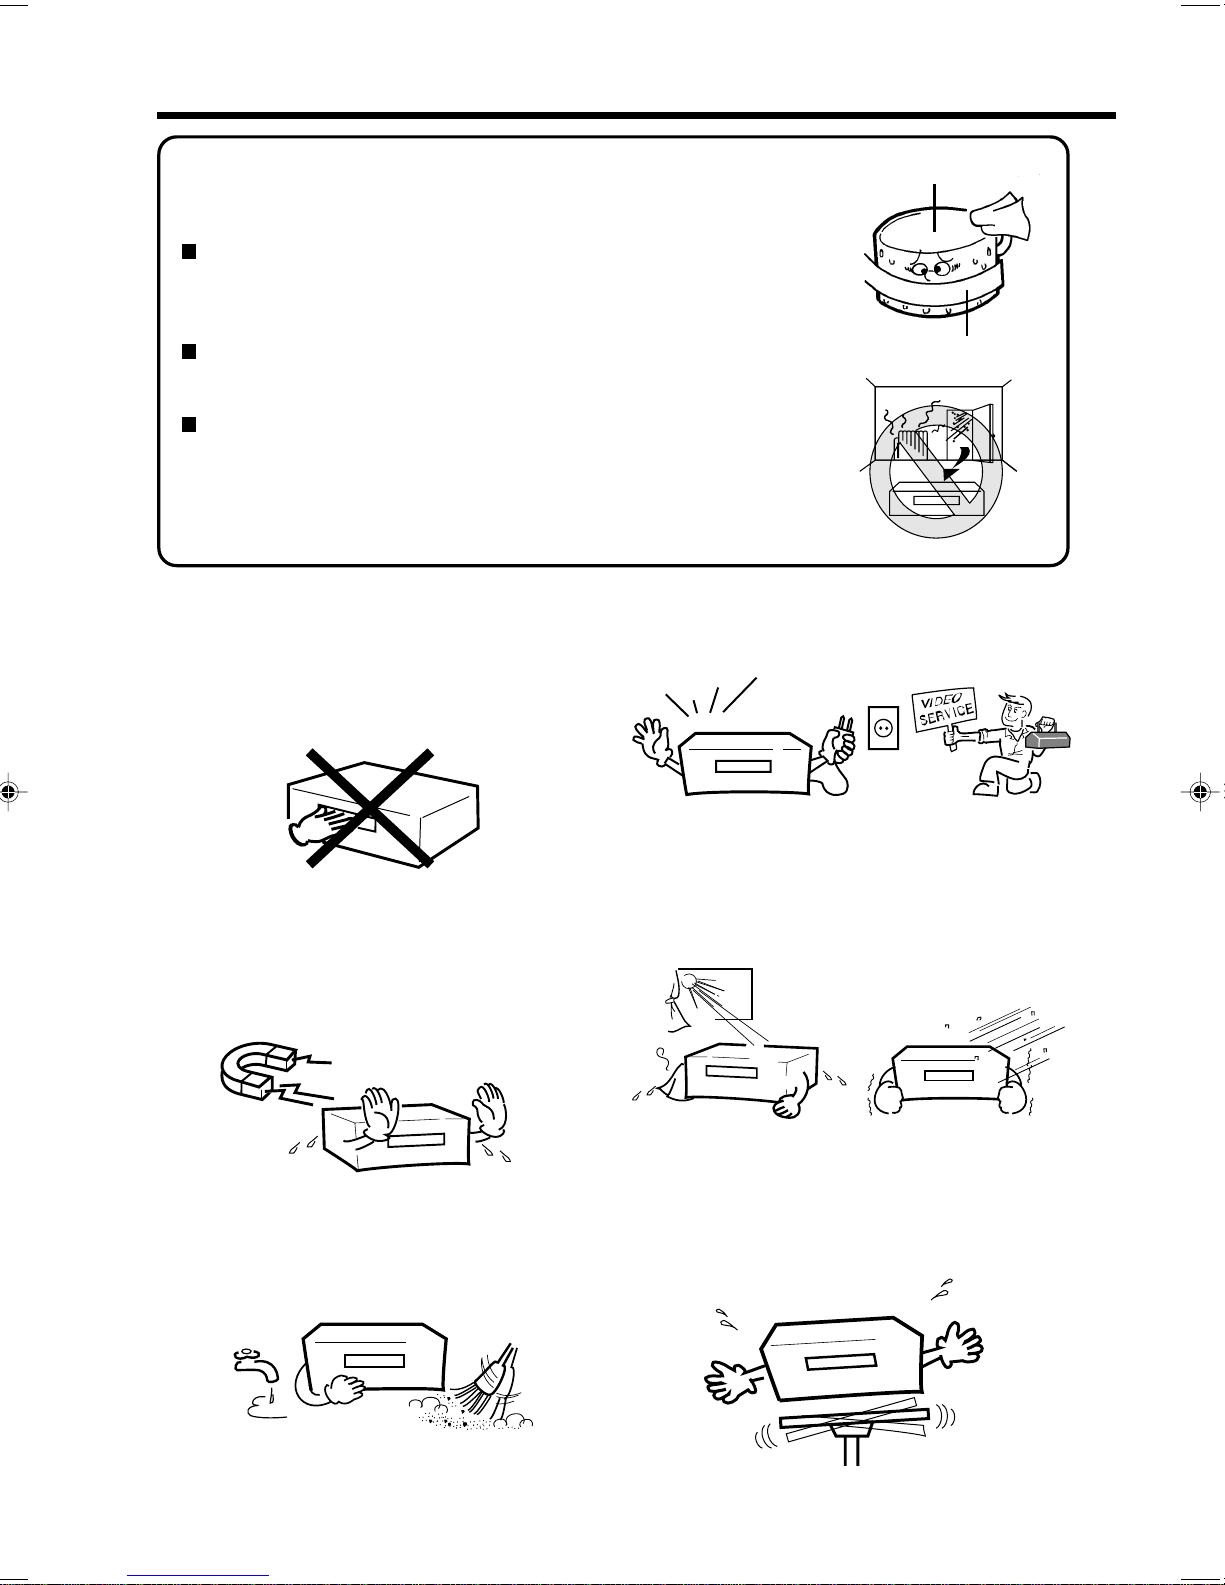
To prevent injuries do not insert your hand into the
cassette loading slot.
Watch out for toddlers who often love to imitate the
behavior of adults. In some cases, toys inserted into
the cassette loading slot have resulted in expensive
repairs.
Leave repairs to a qualified service technician.
Video Tape
Video Head Drum
Moisture condensation
Do not place the unit near appliances which may
cause electromagnetic interference such as loud-
speakers, amplifiers, electric motors, etc. Magnetic
fields may affect picture or sound quality of video
recordings.
Avoidlocationssubjectedtoextremeheatandcold.
Avoid extreme moisture and dust. Avoid to place the unit on any surfaces that may by
subjected to vibrations or shocks.
Moisture will condense on the unit in the following cases;
If the unit is suddenly moved from a cold place to a warm place,
do not operate it for two or three hours.
When cold water is poured into a glass, for example, water vapour in
the air will condense on the surface of the glass. This is called moisture
condensation.
What is moisture condensation?
When you move this VCR from a cold to a warm place.
After heating a cold room or under extremely humid conditions.
If you experience the above conditions:
Plug the mains lead into an AC outlet, set the POWER button to ON
and leave at the room temperature until moisture condensation
disappears.
Depending on the surrounding conditions, this may take for two or
three hours.
NO !
****
4F37001A (E)P01-09 5/6/2002, 16:402

3
Do not place flower vases on top or next to the unit.
Water spilled into the unit could cause serious unit
damages. In case of water damage, do not unplug
the power cord from its wall outlet and call for
qualified service immediately.
Whenyouleaveyourhomeforalongperiodoftime,
unplug the power cord for safety reasons.
Do not insert fingers or any other objects into the
cassette loading slot. Also, when cleaning the unit,
never spray cleaner or furniture wax directly on the
unit housing.
Toprotecttheunitduringathunderstorm,unplugthe
power cord and disconnect the antenna.
OK !
OK !
OK !
Cleaning Precautions
For cleaning the VCR we recommend a mild soap
solution and a slightly moistened soft cloth as it is
used for furniture. To avoid electrical shocks unplug
the AC power cord from its wall outlet before
cleaning.Beespeciallycarefulwhencleaningplastic
components.
Precautions
NO !
4F37001A (E)P01-09 5/6/2002, 16:403

4
PLAY
REW
REC/OTR
STOP/
EJECT
CHANNEL
F.FWD
Front view
VCR Indicator
Clock/Counter/Deck Status/Channel
Display (see below)
VCR Indicators and Displays
One-touch Timer Recording
Timer Recording
ON Symbol
(Clock symbol) ATR Indicator (AUTO
TRACKING)
The following indications will light up or blink for several seconds on the display.
Tape In
Locations of Indicators and Controls
Program selection / Manual
Tracking adjustment
Stop / cassette eject
Recording / Instant recording
Infrared sensor
Display
Playback
Tape rewind
Tape fast forward
Power On/Off
Cassette loading slot
0:30
11:30
01:54
AU
CH 29
CUE
FF
OFF
Page
Remaining Time of OTR
Current Time
Elapsed Time
Scart Input
Channel selected
Forward picture search
Fast forward
AV-Channel is not output
19
10
17
22
18,19
15
14
9
RF:36
PAUS
PLAY
REC
REV
REW
Still
STOP
AV-Channel 36
Pause for recording
Playback
Recording
Reverse picture search
Tape rewind
Still picture
Tape stop
9
18,22
14
18
15
14
15
14,18~19
*
*
*
*
*will appear and change to counter display after approx. 4 seconds.
Display
Explanation
*
*
Display
Explanation Page
OTR VCR
ATR
4F37001A (E)P01-09 5/6/2002, 16:404

5
EJECT
ENTER
REC/OTR
PAUSE/STILL
CH/TRAV
MENU
123
456
7
0
89
INDEX CANCEL
–
CALL
SPEED
SP/LP
CLOCK/
COUNTER
TV/VCR
PROGRAM
TIMER REC
ZERO
RETURN
COUNTER
RESET
+
Page
10
Remote Control
On/Off
Select channel 11,13
Use as the Number buttons in
various setting modes 10~13
1
1
~
Scart Input 22
AV
CH/TR
–
+
Manual Tracking 15
Select channel step by step 11,18
Recording/OTR 18,19
REC/OTR
09
PAUSE/STILL
18
Still picture 15
Pause for recording On/Off
Playback
Menu setting 14
Menu setting 14,15
Reverse picture search/Tape rewind
Menu setting
Forward picture search/Fast forward 14,15
14,15
Tape Stop
Menu setting
Memorize
ENTER
INDEX
Index 17
21
11
CANCEL
Fade-out channel
Cancel Timer recording
MENU
Call Menu 10~13, 16,20
TIMER REC
Timer recording On/Off 20
Confirmation of Timer-Recording 21
PROGRAM
CALL
Display status 18
Clock / Counter 17
CLOCK/
COUNTER
17
COUNTER
RESET
Set Counter to zero
17Return to counter position 00:00
ZERO
RETURN
SPEED
SP/LP
Select Tape speed 18,19
TV/VCR
18
Switch to TV only at Scart connection
EJECT Tape eject 14
4F37001A (E)P01-09 5/6/2002, 16:405

6
How to install the batteries
Use micro batteries type UM-4 (AAA-Size).
Z
Z
Z
Z
Z
Z
If the batteries have not been installed according
to their polarities. If the batteries are weak.
Ifbright sunlight directly beams onto theunit front. If an obstacle is placed between the unit and the
handset.
The remote control handset will not work properly in the following cases:
3
2
1Move cover in direction of
arrow and take it off. Install the batteries as shown
below, pay attention to
polarities.
Replace cover.
approx. 5m
Distance of Remote Control Operation
•Point the remote control
directly at the remote sensor.
Remote sensor
Effective angle: approx. 60°
Transmitter window
Remote Control
4F37001A (E)P01-09 5/6/2002, 16:406

7
IN
(ENTR)
RF
(ANT)
OUT
(SORTIE)
TV
(PRISE PERITEL)
Connect your VCR to your home's aerial and to your TV-set as shown in the illustration.
When you have finished these connections you connect your VCR to the 230 V / 50 Hz mains.
Connections and Installation
TV
Supplied Coaxial cable
AC power cord 230V/50 Hz
Video-Cassette-
Recorder (VCR)
Antenna-Input
RF-Input (from
house antenna)
TV Scart Socket
RF-Output (to TV)
(not supplied)
Antenna
If you don’t have a SCART-cable at hand just now, perform now the output channel adjustment (AV-channel)
(see pg. 9). This VCR will work without connecting a SCART-cable. Please note that not using a SCART-
cable makes installing procedure more complicated. Therefore we recommend to
Connect a TV through the SCART-Socket
Youcanconnect theVCRto yourTV withRFcable. Ifhowever,yourTVhas SCART-Socketyoucan connect
it to the VCR with a SCART cable as shown above for better quality pictures and sound.
If your TV-set does not switch to video-playback automatically, please turn your
TV's video switch to VIDEO position manually.
4F37001A (E)P01-09 5/6/2002, 16:407

8
The SCART-Socket is suitable to connect the video recorder to other units.
SCART-cable
(not supplied)
SCART-Socket
Video Cassette
Recorder (VCR)
From house aerial
SCART-Socket
TV
Connection to a Stereo Amplifier
If the VCR is connected to a stereo amplifier, the video soundtrack can be output through the loudspeakers
of the stereo system. (The playback sound is in Mono.)
Connections and Installation
Video Cassette Recorder (VCR)
From house antenna
To AUDIO-
Input (left) To AUDIO-
Input (right)
SCART-cable (not supplied)
Connection to a Satellite Receiver
If you install a Satellite Receiver, we recommend the following connection:
Satellite
antenna
TV
To Scart-
Input
Satellite
Receiver
or
Satellite
Receiver
From house antenna
TV
To RF-Input
SCART-Socket
Video Cassette Recorder (VCR)
Satellite
Antenna
To Scart-Output
SCART-cable (not supplied)
RF-Output
RF-Output
RF-Output
RF-Output
4F37001A (E)P01-09 5/6/2002, 16:408

9
TEST
Setting the TV to the AV-Channel
Don’texecute,ifyoualreadyinstalleda
scart connection.
ThisVCRincorporatesaTV-transmitter,
whichbroadcastsatchannel36inUHF-
band. Your TV-set can receive this TV-
transmitter via the supplied DIN-DIN-
coaxial cable. If there is already a TV-
transmitter in your neighborhood
broadcasting at channel 36, or if you
connected another set (e.g. Sat-
Receiver) to your VCR via the coaxial
cable, you must change the output
channel in your VCR (see below).
Preparation
•
•Turn on the TV.
Make sure the power of Video recorder has been turned off.
1Press the VCR’s button (not the one on your remote
control) and keep pressing it until the display shows RF.
The number next to RF is the channel in UHF-band to
VCR
2Select an unused channel on the TV and tune the TV in
the same way as tuning in a TV broadcast station until the
TEST appears clearly on the TV screen. Refer to the TV
operating instructions for tuning.
Now the output from the VCR is tuned
to this channel. Whenever you want to
playback a tape, select this channel.
3If there is interference in the picture (wavy lines, picture
roll, etc.), use CHANNEL button to select any RF channel
between23and69,retuningyourTVuntilthetestappears
clearly.
If you connected a satellite receiver as explained on the
lowerofpage8,youmustswitchofftheVCR’stransmitter.
Press the VCR’s CHANNEL button repeatedly until OFF
appears in the display window
(OFF
will appear after 69 or before 23).
which you must tune your TV-set.
4Press the button to turn OFF the VCR.
VCR
1,4
CHANNEL /
4F37001A (E)P01-09 5/6/2002, 16:409

10
The Clock has a 24-Hour-Display. After you plug
theACpowercordinawalloutlet,"0:00"willblink
in the Display.
Preparation
TurnontheTV,andselecttheAV-programpositiononTV.
2Press or
repeatedly
until the dot before
SYSTEM SETUP
blinks. Then press
ENTER
.
3
4Press /
repeatedly or 10
numberbuttonsuntil
“26”
appears. Then press
.
5Set the month, year,
hour and minute in
the same way as the
step 4. Then press
ENTER.
6Press MENU repeatedly until the TV picture
appears on the screen.
7The clock will begin operation and the colon will
blink on the VCR display.
Example: Setting the clock to 11:30, 26th October 2002.
Press or
repeatedly
until the dot before
CLOCK SET blink.
Then press ENTER.
1Press MENU.
If the clock is not set, SYSTEM SETUP menu of
step 3will appear automatically.
Preparation
Turn on your TV and select the AV-Program
position, on which you have already set your
VCR. (it will happen automatically by Scart-cable
connection). So you can follow up the all setting
onTVscreen.ThisVCRcandisplaytheallsetting
on the TV screen in English, German, French,
Italian or Spanish.
2Press or repeatedly
until the dot
before
SYSTEM SETUP blinks. Then press
ENTER.
3Press or
repeatedly
until the dot before
LANGUAGE blinks.
Then press ENTER.
4Press or
repeatedly
until the dot points to
thedesiredlanguage.
Then press ENTER.
5Press MENU repeatedly until the TV picture
appears on the screen.
On-screen Language Selection / Setting the Time and Date
Press the button to turn on the VCR.
1Press MENU,
If you use the unit for the first time and press
MENU,insteadofthe MENUscreen insteps2, 3
the one in step 4may appear. Please select the
language at first.
Note: If there is no
pressing of any
buttonsfor
more than
60 seconds, then the
VCR switch back to
TV-operation
automatically.
TIMER REC SET
VCR EXTENSION
CHANNEL SETUP
SYSTEM SETUP
SELECT :
ENTER
: ENTER
MENU
EXIT
:
SHARPNESS
CLOCK SET
SYSTEM SETUP
LANGUAGE/SPRACHE/LANGUE
LINGUA/LENGUA
SELECT :
ENTER
: ENTER
MENU
EXIT
:
LANGUAGE/SPRACHE/LANGUE
LINGUA/LENGUA
ESPANOL
ENGLISH
DEUTSCH
ITALIANO
SELECT : OK: ENTER
FRANCAIS
VCR
CLOCK SET
SYSTEM SETUP
LANGUAGE/SPRACHE/LANGUE
LINGUA/LENGUA
SELECT :
ENTER
: ENTER
MENU
EXIT
:
CLOCK SET
DAY WED
26
MONTH
YEAR
TIME
1
2000
0:00
SELECT
:
SET
:
OK
: ENTER EXIT : MENU
/ 0–9
CLOCK SET
DAY SAT
26
MONTH
YEAR
TIME
10
2002
11:30
SELECT
:
SET
:
OK
: ENTER EXIT : MENU
/ 0–9
TIMER REC SET
VCR EXTENSION
CHANNEL SETUP
SYSTEM SETUP
SELECT :
ENTER
: ENTER
MENU
EXIT
:
SHARPNESS
•
In case of an erro-
neous input press
to goback to
before step and
enter again.
Note:
In case of a power failure the clock will continue to
operateforanother30minuteswithquartz-controlled
precision. To indicate that the power failure has
lasted for an excessive period of time "
-
:
--
" will blink
on the display. In this case readjust time and date.
On-screen Language Selection Setting the Time and Date
4F37001A (E)P10-15 5/6/2002, 16:4010

11
Automatic TV station presetting / Mapping TV stations
Automatic station presetting
Allstationswillbepresetinsequenceavailableinyourarea.
1Press MENU.
Press or
repeatedly
until the dot before
CHANNEL SETUP
blinks. Then press
ENTER.
TIMER REC SET
VCR EXTENSION
CHANNEL SETUP
SYSTEM SETUP
SELECT :
ENTER
: ENTER
MENU
EXIT
:
SHARPNESS
2
CH TUNING
AUTO TUNING
CHANNEL SETUP
SELECT
:
ENTER
: ENTER
MENU
EXIT
:
CHANNEL MAPPING
3Press ENTER.
The VCR will begin searching and setting with
early stored channel the number is increased by
one into memory all the broadcasting channels
available in your area (VHF-L, VHF-H, UHF).
Whilesettingchannels,AUTOTUNINGappears.
When the setting finished, the CHANNEL
MAPPING menu will appear.
Press or
repeatedly
until the dot before
AUTO TUNING blink.
To skip a channel position
Unwanted channels can be skipped so that they
cannot be called up by pressing CH. Select the
channel to be skipped, ...e.g. channel 29. Select
channel 29, then press CANCEL.
Thischannel’snumberwillbeflashing.Thatway you
can cancel further channels one after the other.
To cancel skipping select the skipped channel using
10numberbuttons,thenpressCANCEL.Thechan-
nel No. does not blink any longer, and the channel
No. now may be selected again using CH.
AUTO TUNING
CHANNEL MAPPING
1
2 6 9
12
3
4
5
7
8
10
11
SELECT
:
SKIP
: CANCEL
CHANGE NAME
:1
MOVE : 2
EXIT
: MENU
4Press MENU repeatedly until the TV picture
appears on the screen.
Preparation
TurnontheTV,andselecttheAV-programpositiononTV.
Automatic TV station presetting
This VCR has one built-in tuner to receive the
broadcast. Before you record one TV-broadcast,
youmustsetandpresetthewholeofthebroadcasts.
This VCR can preset up to 80 broadcast.
Note:
•TVreceptioninterferenceorpowerfailuremayresult in
Automatic station presetting malfunctions. In such a
case repeat the setting procedure from the beginning.
However,youcannotreceivethenecessarybroadcast
yet,trytopresetthebroadcastmanually.(Seepage13)
•Whentheunitisintheauxiliaryinputmode,youcannot
preset channels.
For a number of TV stations (such as MTV) no name
codewillbedisplayedbecausetheseTVstationsdo
not provide the necessary information. You can
enter the respective names yourself. Moreover,
unwantedstationcodescanbechangedbytheuser.
TurnontheTV,andselecttheAV-programpositiononTV.
Preparation
Exempel:
MTV
is assigned to station No. 10, but the
code “
MTV
”will not be displayed and will also not
appear in the table.
1Select the "CHANNEL MAPPING" in Menu-
screen in the same way as the step 1 ~ 2 on left
side. Then press ENTER.
2Press /
or /
repeatedly until the
station number
position now to be
named will blink.
1
2 6 9
12
3
4
5
7
8
10
11
CHANNEL MAPPING
SELECT
:
SKIP
: CANCEL
CHANGE NAME
:1
MOVE : 2
EXIT
: MENU
•If you want to turn over the page when the
blinking spot is in the left or right edge of on-
screen, press or repeatedly until
the next page's 12 stations appears.
3
Press "1" of 10
numberbuttons.The
first display line will
change to "CHANGE
BROADCAST
NAME".
4Press or repeatedlyuntilthedesired
characterappears.Thenpress .Use
or toselectthenextcharacter.Thenpress
1
2 6 9
12
3
4
5
7
8
10
11 M
CHANGE BROADCAST NAME
SELECT
:
NAME
:
OK
: ENTER
CLEAR
: CANCEL
EXIT
: MENU
. Up to four
characters can be
used to create a
station name. The
character “”stands
for a space.
Then press ENTER.
Each press of will change the screen
display as follows.
A, B, C, ... X, Y, Z 0, 1, 2, ... 7, 8, 9
Press MENU repeatedly until the TV picture
appears on the screen.
5
1
2 6 9
12
3
4
5
7
8
10
11
CHANGE BROADCAST NAME
SELECT
:
NAME
:
OK
: ENTER
CLEAR
: CANCEL
EXIT
: MENU
Note:
Whena wrong character is entered, pressCANCEL
and enter the correct character.
–
+
/
•
Changing TV station names
Mapping TV stations
4F37001A (E)P10-15 5/6/2002, 16:4011

12
Skipping unwanted TV stations
(Skip those TV stations that are not wanted to be
selected by pressing the CHANNEL button.)
1
2Press or
repeatedly until the dot
before CHANNEL
MAPPING blinks. Then
press ENTER.
3Press / or
/
repeatedly
The every channel will
appear in the back-
ground of this setting
screen.
CHANNEL MAPPING
1
2 6 9
12
3
4
5
7
8
10
11
SELECT
:
SKIP
: CANCEL
CHANGE NAME
:1
MOVE : 2
EXIT
: MENU
KA1 TV5
MTV
NELO
VIIH
NRK
TV1
DR-1
TV2
TV3
TV4
TVN
Then press CANCEL.
The number before the
canceled channel (e.g.
12) will be bracketed.
CHANNEL MAPPING
1
2 6 9
[12]
3
4
5
7
8
10
11
SELECT
:
SKIP
: CANCEL
CHANGE NAME
:1
MOVE : 2
EXIT
: MENU
KA1 TV5
MTV
NELO
VIIH
NRK
TV1
DR-1
TV2
TV3
TV4
TVN
4
Canceling the skip function:
Press / or
/
repeatedly
until the skipped TV station blinks, then press
CANCEL.
The brackets will disappear.
5Press MENU repeatedly until the TV picture
appears on the screen.
TurnontheTV,andselecttheAV-programpositiononTV.
Preparation
Press MENU.
Press or
repeatedly until the dot
before CHANNEL
SETUP
blinks. Then
press ENTER.
TIMER REC SET
VCR EXTENSION
CHANNEL SETUP
SYSTEM SETUP
SELECT :
ENTER
: ENTER
MENU
EXIT
:
SHARPNESS
CH TUNING
AUTO TUNING
CHANNEL SETUP
SELECT
:
ENTER
: ENTER
MENU
EXIT
:
CHANNEL MAPPING
Mapping TV stations
Reassigning TV station positions
Example: Reassign the TV station under No.
6(TV3) to position No. 2(NRK).
1
TurnontheTV,andselecttheAV-programpositiononTV.
Preparation
Select the "CHANNEL MAPPING" in Menu-
screen in the same way as the step 1 ~ 2 at the
left side of page 11. Then press ENTER.
2Press / or
/repeatedly
until the TV station to
be reassigned blinks.
Press "2" of 10 number
buttons. Then, the TV
station will be moved to
the first display line.
And position 6
becomes blank.
CHANNEL MAPPING
1
2 6 9
12
3
4
KA1 TV5
MTV
NELO
VIIH
NRK
TV1
DR-1
TV2
TV3
TV4
TVN
5
7
8
10
11
SELECT
:
SKIP
: CANCEL
CHANGE NAME
:1
MOVE : 2
EXIT
:MENU
MOVE CHANNEL
1
2 6 9
12
3
4
5
7
8
10
11
6 TV3
POSITION :
MOVE
: ENTER
EXIT
: MENU
KA1 TV5
MTV
NELO
VIIH
NRK
TV1
DR-1
TV2
TV4
TVN
1
2 6 9
12
3
4
5
7
8
10
11
6 TV3
MOVE CHANNEL
POSITION :
MOVE
: ENTER
EXIT
: MENU
KA1 TV5
MTV
NELO
VIIH
NRK
TV1
DR-1
TV2
TV4
TVN
3
1
2 6 9
12
3
4
5
7
8
10
11
WAIT
MOVE CHANNEL
POSITION :
MOVE
: ENTER
EXIT
: MENU
KA1 TV5
MTV
NELO
VIIH
NRK
TV1
DR-1
TV2
TV4
TVN
Press /or
/repeatedly
until the position number
blinkstowhichtheselected
TV station is to be moved,
then press ENTER.
WAIT blinks.
The data will be ordered
in the table newly.
1
2 6 9
12
3
4
5
7
8
10
11
6 NRK
MOVE CHANNEL
POSITION :
MOVE
: ENTER
EXIT
: MENU
KA1 TV5
MTV
NELO
VIIH
TV3
TV1
DR-1
TV2
TV4
TVN
4
1
2 6 9
12
3
4
5
7
8
10
11
MOVE CHANNEL
POSITION :
MOVE
: ENTER
EXIT
: MENU
KA1 TV5
MTV
NELO
VIIH
TV3
TV1
DR-1
TV2
NRK
TV4
TVN
Afterapprox.12seconds
the station TV3 is set in
new position 2.
The NRK will be ex-
tracted to the first line.
Now to finish this proce-
dureandatthesametime
set the protruded
station(NRK) totheblank
position 6, press MENU
repeatedly until TV-sta-
tion appears.
Or you can of course
selectanotherstationto
set in the protruded station(NRK) in step 4.
•
5
until the TV station to be
skipped blinks.
6Aposition number(6)will indicatednear thepro-
truded station(NRK) at the first line.
If any button is not pressed for more than 60
seconds, this station(NRK) will be set to this
position number(6) automatically.
•
Press MENU repeatedly until the TV picture
appears on the screen.
4F37001A (E)P10-15 5/6/2002, 16:4112

13
CH 1
SEARCH : / F. TUNE :
MENU
EXIT
:
Manual TV station presetting
Manual station presetting
You activate the auto search function until your preferred station is tuned in. Then You memorize this station
into the chosen channel memory. For each station you repeat this procedure.
Example: Preset the SAT1 on program position 5.
1
2
CH TUNING
AUTO TUNING
CHANNEL SETUP
SELECT
:
ENTER
: ENTER
MENU
EXIT
:
CHANNEL MAPPING
Press (rising frequency) or (falling
frequency) once. The search starts. It stops at
each broadcast automatically (" " change to
" "). Press or repeatedly until
the SAT1 appears. Only in case of receiving of
the weak broadcast
(drifting picture),
search does not stop.
If you want to stop,
press /or
/ .
3
Turn on the TV, and select the AV-program position on TV.
Preparation
Press or
repeatedly
untilthe dot before
CH
TUNING
blinks. Then
press ENTER.
Press MENU.
Press or
repeatedly
until the dot before
CHANNEL SETUP
blinks. Then press
ENTER.
TIMER REC SET
VCR EXTENSION
CHANNEL SETUP
SYSTEM SETUP
SELECT :
ENTER
: ENTER
MENU
EXIT
:
SHARPNESS
The Auto CH Memory function(See page 11) memorizes all broadcasts to the suitable CH positions
by where you done this function.
However one broadcast may not be memorized depend on the bad receiving condition. In case of
these broadcast, use this Manual tuning function.
CH 1
SEARCH : / F. TUNE :
ENTER
OK
:MENU
EXIT :
DEC OFF
CH 5
CH
:ENTER
OK
:MENU
EXIT :
/ 0–9
DEC OFF
4If the picture is not satisfactory press or
5
Repeat the steps 3and 5to preset other TV
stations.
6
Press or
repeatedly
until "5" displayed. Or
enter 5with 10
number button.
Then press ENTER.
7Press MENU repeatedly until the TV picture
appears on the screen
Note:
Occasionally, the auto search might catch a weak
signal and stop. If the TV station signal is weak, you
shouldn't store this station.
In that case restart the auto search using or
.
until the best
picture is achieved.
Then press ENTER.
4F37001A (E)P10-15 5/6/2002, 16:4113

14
VCR
1Loadapre-recordedcassettetape.Whenloading
2
To rewind the tape or forward it rapidly
a cassette tape without an erase
prevention tab, playback will start
automatically.
Press . Playback will start.
To stop playback
Press .
To rewind the tape:
Press .
To forward the tape:
Press .
Forward/reverse picture search mode
Whenthetapeisbeingtransportedyoucanswitchto
picture search mode (see next page). To do this,
press or andhold it down. The unit will
resume the tape transport as soon as the button is
released.
NTSC Video cassette-Playback
When using a pre-recorded NTSC video cassette
tape, the connected TV set must operate with a 60
Hz vertical frequency. Otherwise the on-screen
picturewillbeaffectedbyverticalrolling.Evenifyour
TVsetiscapableofprocessingNTSCvideosignals,
thepicturemaybeshortenedvertically(appearance
of black bars at the top and at the bottom of the TV
screen).ThedubbingofaNTSCvideocassettetape
to a standard PAL VCR is not possible.
Turn on the TV, and select the AV-program position
on TV.
Preparation
If the cassette has not
loaded yet, will blink
for 4 seconds.
VCR
VCR
VCR
VCR
ATR
Use only video cassette tapes marked
.
Loading
Push the center of the tape until it is automatically
inserted.
Insert the cassette tape with its labeled side facing
up and the erase prevention tab positioned at your
left. An inverted cassette tape cannot be inserted.
Screwdriver
To prevent accidental erasure
Removetheerasepreventiontabwithascrewdriver.
Automatic tape eject
When the VCR is automatically rewinding the tape
and reaches its beginning, the cassette tape will be
ejected automatically.
OR:
Unloading
2
1Press STOP/EJECT on the VCR. When a tape
is being played press this button twice.
Remove the cassette tape.
Automatic playback
When loading a cassette tape without an erase
prevention tab, playback will start automatically.
Automatic power ON
When you insert a cassette tape the VCR power will
turn ON automatically.
PressEJECTontheremote
control. Even if a tape is
being played, press this
button only once.
Loading and Unloading a Cassette Tape / Playback
inspelningsskydd
Erase prevention tab
VCR
VCR
VCR
Adhesive
tape
To record again
Cover the hole with a piece of adhesive tape.
Loading and Unloading a Cassette Tape Playback
4F37001A (E)P10-15 5/6/2002, 16:4114

15
Special Playback
Note:
These Special Playback will automatically change
to playback after approx. 5 minutes to protect the
video tape against excessive wear.
WhenduringaReversepicturesearchthebeginning
of tape is reached, the unit will return to playback
automatically.
•
•
Press x 1 or x 2 during
the playback.
Still Picture
Forward picture search function
Pressx 1 orx 2 during
the playback.
Reverse picture search function
Picture Search
•To return to playback: Press .
Press PAUSE/STILL during playback. To resume
normal playback, press
.
VCR
VCR
VCR
CH :
MANUAL TR.
Digital Auto Tracking Adjustments
When a cassette tape is played, the Digital Auto
TrackingSystemwillbe activated automaticallyand
provide the optimum picture quality. The ATR
indicator blinks while the system is searching for
optimum tracking. At the same time, the sound
output may be slightly distorted until the automatic
adjustment is completed. Then the ATR indicator
stopsblinkingandremainslitaslongastheautomatic
tracking continues. In case of noise-distorted
recordingsfromothersourcesthesystemwillperform
several attempts to improve the playback picture
quality. Use TR to reduce
the picture noise on these
cassette tapes. You can
adjust the Tracking also
withCHANNELontheunit.
After doing that, the
ATR
functionwill be deactivated,
and the ATR indicator is
unlit.Toreturntoautomatic
tracking,ejectthetapeand
play again (see page 14).
1
Adjusting the sharpness of the picture
You can make the playback picture clearer or
softer.
Press .
Playback will starts.
2Press MENU.
Press or
repeatedly until the dot
before SHARPNESS
blinks. Then press
ENTER.
3
4Press MENU repeatedly until the TV picture
appears on the screen.
Press or within60secondstoadjust
VCR
ATR
SHARPNESS
+ ––+ ––+ ––+ ––
SET
:CANCEL
CENTRE : MENU
EXIT :
2
softer sharper
Note:
•
•
You can select SHARPNESS in step 2only during
playback.
To return to the initial sharpness setting, press
CANCEL while the sharpness setting screen is
appearing.
TIMER REC SET
VCR EXTENSION
CHANNEL SETUP
SYSTEM SETUP
SELECT :
ENTER
: ENTER
MENU
EXIT
:
SHARPNESS
the picture sharper or
softer.
Increasing the number
makes the picture
sharper, and decreas-
ing the number makes
the picture softer.
4F37001A (E)P10-15 5/6/2002, 16:4115

16
VCR
ATR
VCR
VCR
ATR
Repeat Playback
Scene repeat playback Normal repeat playback
Note:
To cancel auto repeat mode follow above steps 1to
3,then select “OFF”and confirm by pressingMENU.
Note:
SR-PLAY in step 5will not be indicated from the
second repeat playback.
Preparation
Turn on the TV, and select the AV-program position on TV.
Loadavideocassettewiththeerasepreventiontab
intact. (Otherwise you can not select the position
SCENE REPEAT in menu)
•
•
TIMER REC SET
VCR EXTENSION
CHANNEL SETUP
SYSTEM SETUP
SELECT :
ENTER
: ENTER
MENU
EXIT
:
SHARPNESS
1Press MENU.
Press or
repeatedly
until the dot
before VCR
EXTENSION blinks.
Then press ENTER.
Turn on the TV, and select theAV-program position on TV.
Loadavideocassettewiththeerasepreventiontab
intact.
•
•
S
–
REPEAT
3Press ENTER at the
point you want to start
scene repeat playback.
4Press ENTER once again at the point you want
to end scene repeat playback.
S–REPEAT will blink on
the screen.
SR –R
SR –PLAY
5When the starting point
was found, the Scene
repeat-playbackwill start
automatically.
SR–R will appear on the
screenand thetape willbe
rewinded automatically to
go back to the starting
point.
Now, the Scene you extracted at step 3and 4will be
played back repeatedly.
To stop Scene repeat playback:
Press .
2Press or repeatedly until the dot
before SCENE REPEAT blinks. Then press
ENTER.
The playback starts
automatically.
Press MENU.
Press or
repeatedly until the dot
before
VCR
EXTENSION
blinks.
Then press ENTER.
1
TIMER REC SET
VCR EXTENSION
CHANNEL SETUP
SYSTEM SETUP
SELECT :
ENTER
: ENTER
MENU
EXIT
:
SHARPNESS
2
AUTO REPEAT [OFF]
SCENE REPEAT
VCR EXTENSION
SELECT :
ENTER
: ENTER
MENU
EXIT :
AUTO REPEAT [ON]
SCENE REPEAT
VCR EXTENSION
SELECT :
ENTER
: ENTER
MENU
EXIT :
4
3
Preparation
Press or
repeatedly until the dot
before AUTO REPEAT
blinks.
Press /or
ENTER to select [ON]
or [OFF].
Press MENU repeatedly until the TV picture
appears on the screen.
If you press , the unit will repeat playing
the video tape until the repeat mode is
cancelled.
AUTO REPEAT [OFF]
SCENE REPEAT
VCR EXTENSION
SELECT :
ENTER
: ENTER
MENU
EXIT :
4F37001A (E)P16-19 5/6/2002, 16:4116

17
ZERO RETURN function
This function makes tape-rewinding stop at the
counter 00:00:00 position automatically.
Note:
When rewinding the tape from the "00:00:00"
position, a minus sign (–) appears at the left end of
the tape counter.
When you load a video cassette, the display
indication changes to "00:00:00".
The counter display does not function on non-
recorded (blank) sections of the tape. When you
rewind, fast forward or play tapes through blank
sections, the counter display stops.
Counter Display / Video Index Search System
Press CALL.
The counter display
shows the tape running
time during playback or
recording.
1
Press COUNTER RE-
SET at the desired tape
position (e.g. the
begining of recording).
The counter display will
be reset to the
"00:00:00" position.
2
3Press when playback or recording is
finished.
Press ZERO RETURN. The tape will rewind and
automatically stop at the ”00:00:00”position.
The CLOCK/COUNTER-button
Each time you press CLOCK/COUNTER,
the clock
andtapecounteralternatewitheachotherintheVCR
display.
•
•
•
Turn on the TV, and select theAV-program position on TV.
Load a video cassette with the erase prevention
tab intact.
•
•
Preparation
CH 6
12:00 SUN
00:00:00 SP
M6
CH 6
12:00 SUN
01:23:45 SP
M6
VCR
VCR
1Press INDEX during
the playback or tape
stop mode.
The Video Index Search System enables you to
locate the beginning of any recording made on
this unit. Whenever a recording has begun or
whenthe channelis changed during the RECORD
PAUSE mode, an invisible INDEX mark is
recorded on the tape. This mark can easily be
located by using and .
Note:
When you record an index mark at the very
beginning of the tape, the mark may not be found.
Duringanindex searchthe tapemay stopandbegin
to play at a slightly different location.
Video Index Search System may not function
properly with old or worn video tapes.
Maximal 9 INDEX-Marks can be searched.
•
•
•
•
INDEX 1
NO. 1
:9
:
:INDEX
SEARCH
EXIT
2Press number buttons
of 0-9 toenter thenumber
of INDEX markings you
wish to skip.
Example: If you wish to
go to the third recording
from the current position,
press 3of number
buttons 0-9.
INDEX 3
NO. 1
:9
:
:INDEX
SEARCH
EXIT
3
INDEX 3
NO. 1
:9
:
:INDEX
SEARCH
EXIT
Each time of skipping over
the INDEX marking, INDEX
No. will decrease one by
one.
Press or . The unit will skip over the
selected INDEX markings, when the INDEX
markingyou chose is found theVCRwill resume
playing.
Counter Display Video Index Search System
4F37001A (E)P16-19 5/6/2002, 16:4117

18
VCR
Recording with a SCART Cable
You can record a program using the TV receiver
of the VCR and at the same time watch another
program on the TV set using its receiver. As the
VCR automatically switches the TV set the
following points should be observed:
To Display VCR operation Status
PressCALL.The clock, dayof theweekand more
informations will be indicated.
To cancel the indicating: Press CALL until all
indicator disappear.
Auto Rewind Feature
TheVCR will automaticallyrewind when the tape
hasended(except duringOTR andTIMERREC).
It will also eject the cassette tape and turn the
unit's power off.
3Using TV/VCR you can switch the TV screen
between the VCR picture and the TV picture. If
2While the VCR is recording press TV/VCR until
the "VCR" indicator on the display goes off. The
TV set now displays the program of its built-in
receiving module. Select the TV channel you
wantto watch on theTV set.AlthoughtheTV set
now shows another program the VCR will
1Press TV/VCR until "VCR" appears on the
display.Selectthe program on theVCR you want
VCR
VCR
VCR
VCR
VCR
Recording a TV Program
Note:
Preparation
Turn on the TV, and select the AV-program position on TV.
1
Loadablankcassettetapewiththeeraseprevention
2Select the program you want to record with CH
or 10 number buttons.
3If a recording in Long Play mode is intended,
press SPEED SP/LP to display "LP". To check
thetapespeed,pressCALL(seebottomrighton
this page).
4Press REC/OTR to start
recording.
If the erase prevention tab is removed, the tape
willejectwhenREC/OTRispressedforrecording.
To Stop Recording
Press .
To Stop Recording Temporarily
To stop a recording for a
shortperiodoftimepress
PAUSE/STILL. Press
this button again if you
want to resume the
recording.
A safety circuit turns the pause mode off
automatically after 5 minutes, and the VCR will
stop the recording mode.
Attention:
1~9:
10~80: e.g. 5 = press “5”
e.g. 29 = press “2”and “9”.
Since the VCR has a built-in TV tuner the TV set
may be turned off when recording.The TV set may
only be used to check for accurate program
adjustments or to monitor recordings.
CH 29
INDEX
RTL
NICAM ST
VCR
tab intact. (The VCR will
automatically turn on.)
to record. This program can
be watched on the screen
and recorded by the VCR.
continue recording the
previously selected
program.
the "VCR" indicator is lit on
the display, you will watch
theVCRpicture.Thishas no
trouble on the recording.
CH 80
23:59 SUN
01:36:58 SP
****
Deck-status
here: Playback
Program
number or
Scart input
(AU)
Time
Day of the week
Stand of Tape
counter
Cassette
in Unit
Tape speed
*Station's
name (e.g.
NRK)
4F37001A (E)P16-19 5/6/2002, 16:4118
Table of contents
Other Akai VCR System manuals

Akai
Akai VS-G415EA User manual

Akai
Akai VS-K606N-E3(S) User manual

Akai
Akai VS-G242EA User manual

Akai
Akai VS-2EGN User manual

Akai
Akai VS-J4600 User manual

Akai
Akai VS-X9EGN User manual

Akai
Akai AVR250 User manual

Akai
Akai SHOWVIEW VS-G245EDG User manual

Akai
Akai VS-G205 User manual

Akai
Akai VS-606EA User manual