Akasa Integral LAN User manual


2
Getting Started
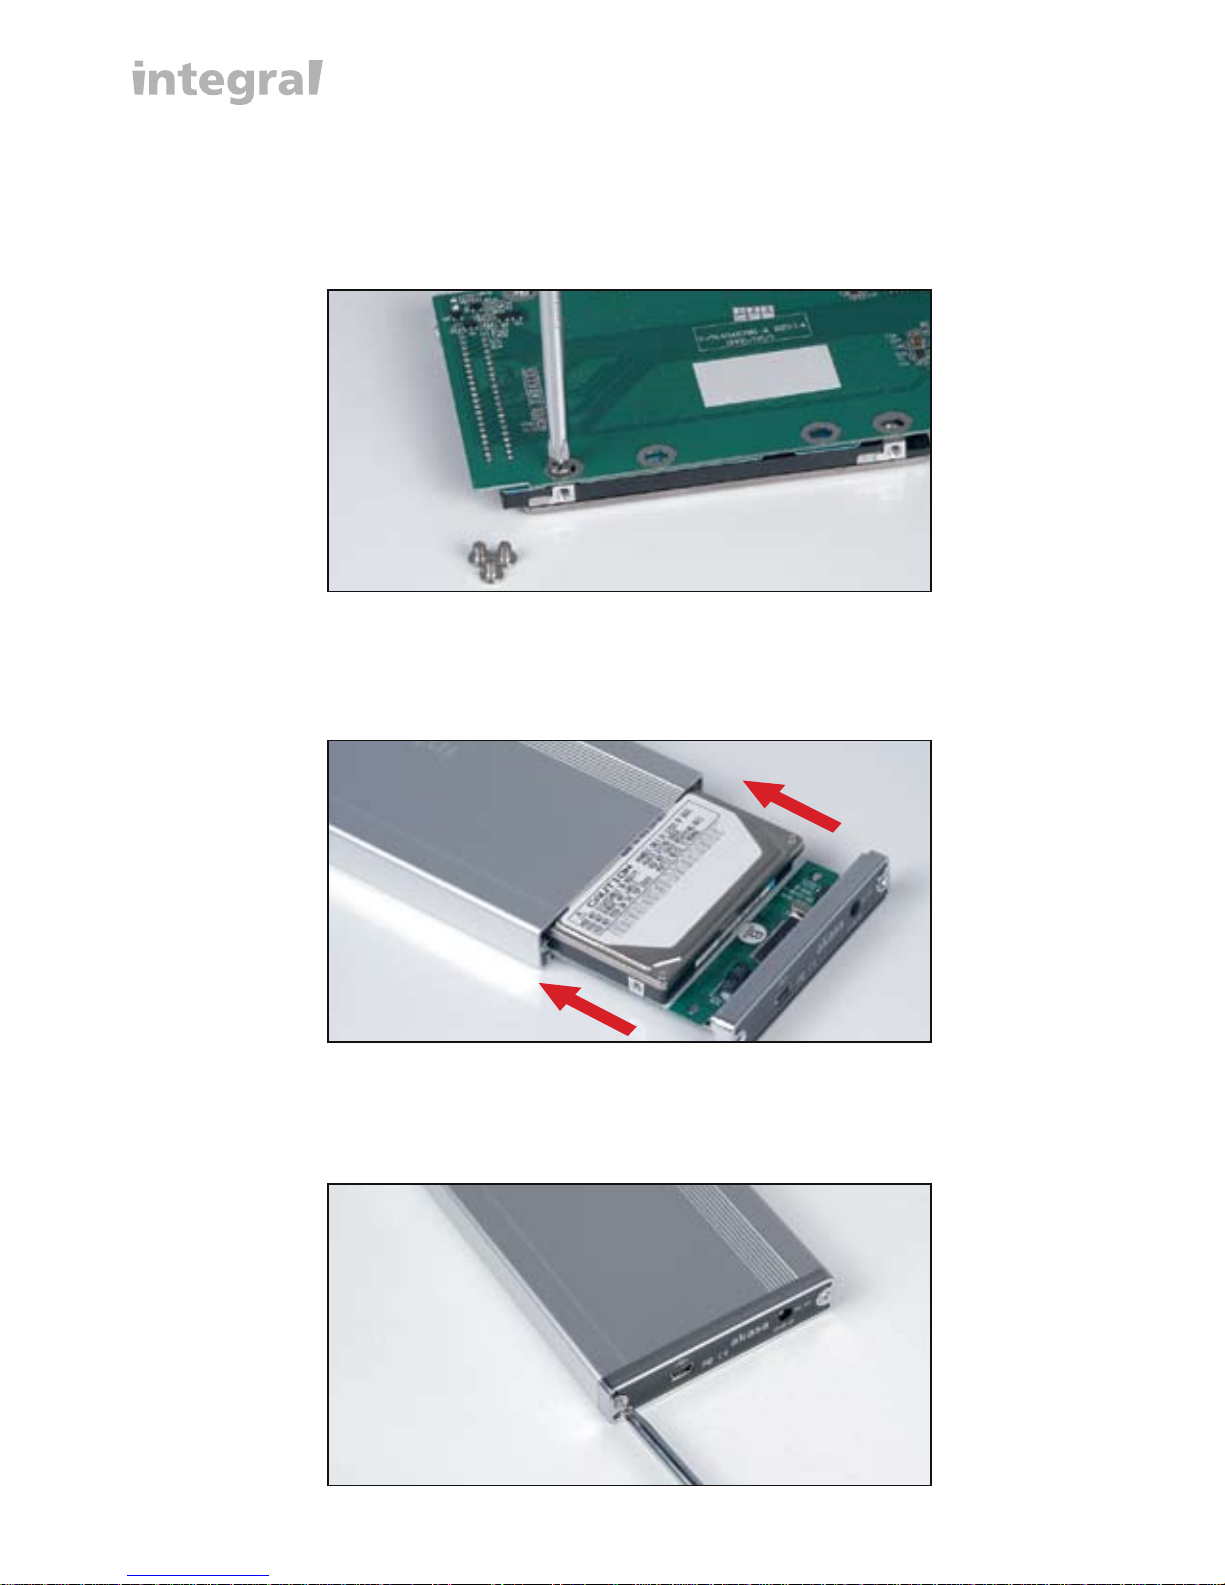
To install your new Enclosure you will need:
• Hard Disk Drive (HDD) (not included)
• Micro Philips-head screwdriver (not included)
• Mounting screws (included)
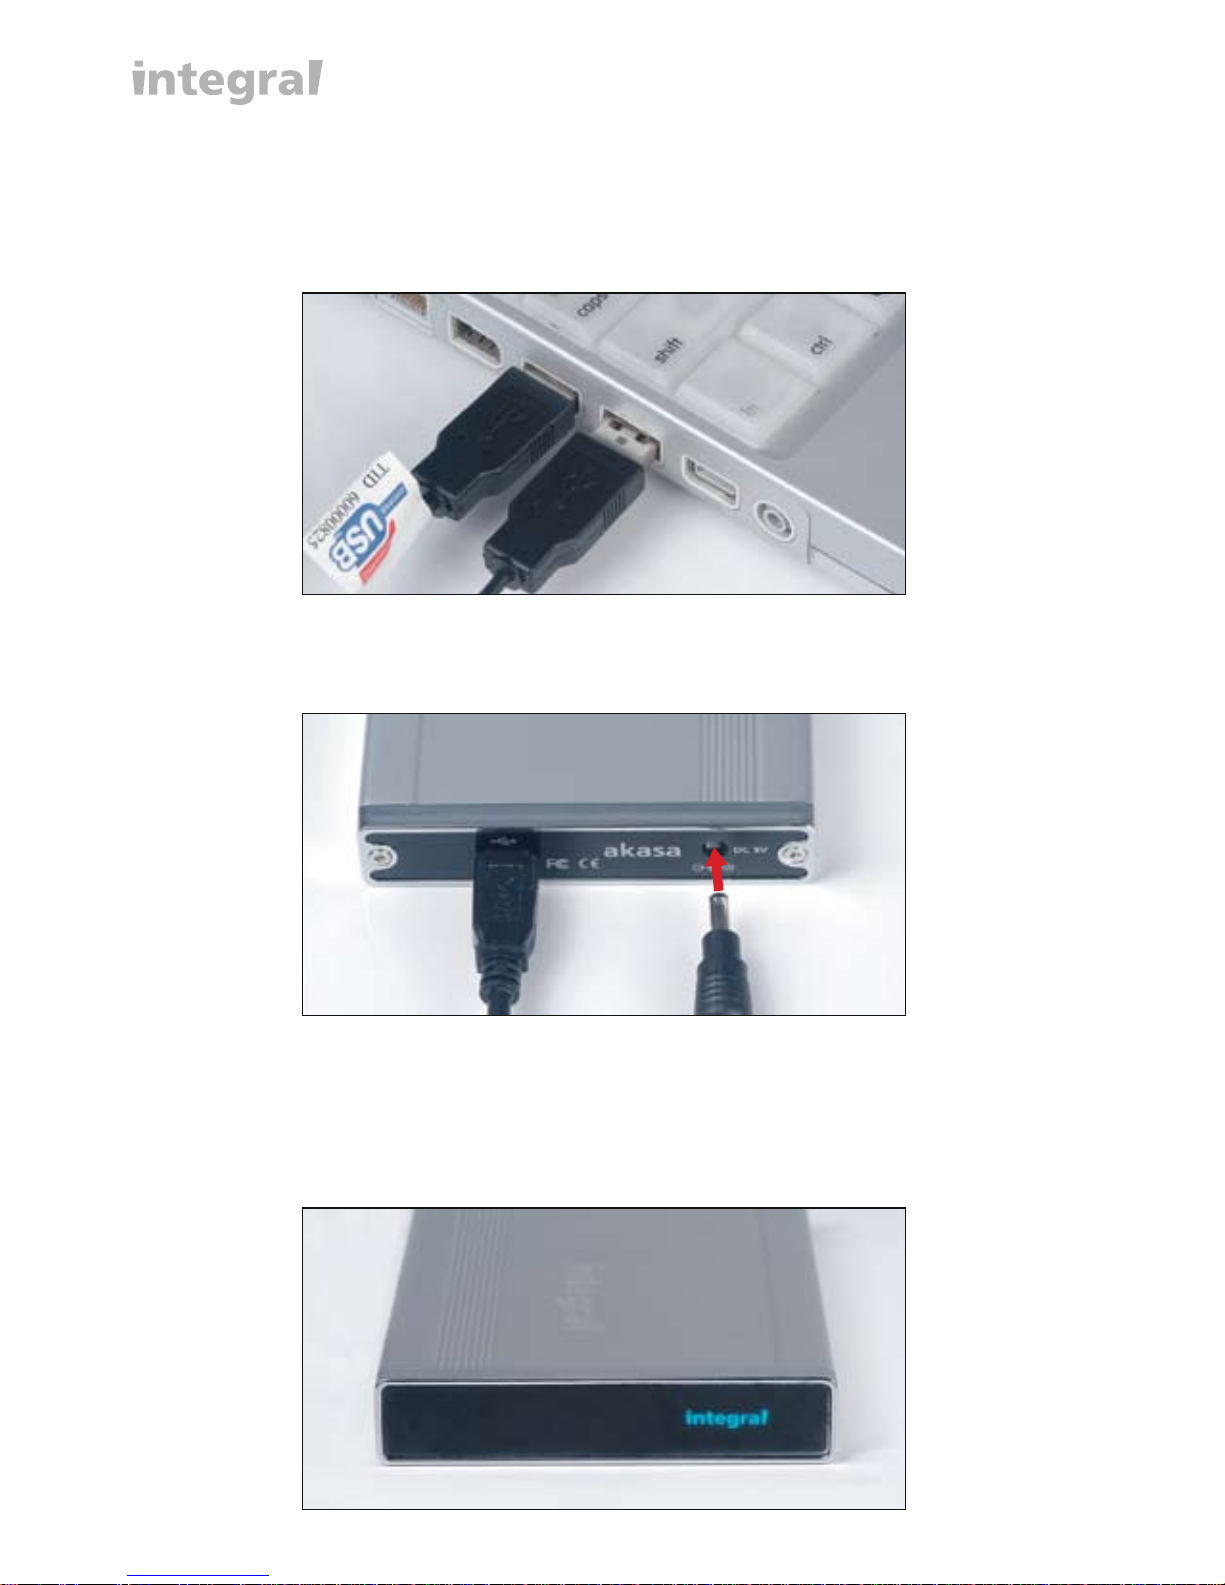
• USB 2.0 Data Cable (included)
• USB to DC Power Cable (included)
AKASA Company notices
The information contained in this document is subject to change without
notice.
All rights reserved. Reproduction, adaptation, or translation of this material
is prohibited without prior written permission of AKASA, except as allowed
under copyright laws.
The only warranties for AKASA products and services are set forth in the
express warranty statements accompanying such products and services.
Nothing herein should be construed as constituting an additional warranty.
AKASA shall not be liable for technical or editorial errors or omissions
contained herein.
Acknowledgements
Microsoft, Windows, Windows NT and Windows XP are registered
trademarks of MicrosoftCorporation.
Adobe and Acrobat are trademarks of Adobe Systems Incorporated.
Copyright 2006 AKASA ASIA Corporation.
General Notice: Other product names used herein are for identification
purposes only and may be trademarks of their respective owners. AKASA
disclaims any and all rights in those marks.
english

3
2. Place the HDD on top of the tray and line-up the IDE connectors with
the drive
Installation
1. Undo the securing screws from the housing unit and open the back of
the enclosure by sliding the tray out of the aluminum housing.
Note the IDE connector for the 2.5" HDD.
3. Gently insert the HDD into the tray’s IDE connector until the
connection is secure
IDE Connector
HDD IDE
Connector
Tray IDE
Connector

4
4. While supporting the HDD with your hand, gently turn the tray over
and locate the HDD mounting holes. Use the four (4) mounting screws
(provided) to secure the HDD to the tray.
5. Gently insert the tray back into the housing until the back panel
fits against the housing.
6. Secure the back panel to the housing using the screws provided.

5
7. Plug the small, flat end of the USB cable(Mini B connector) into the back
of the enclosure.
8. Insert the other end of the USB cable (Type A Connector) into any available
active USB port on the computer.
Note:
The 2.5" enclosure can draw power from the USB bus, the cable carries
both: data and power. In some cases the enclosure may require additional
DC current for operation. The additional USB-to-DC power converter cable
is provided.

6
9. If the HDD requires more power, connect the USB portion (Type A
Connector) of the USB-to-DC power cable to any available active USB
port on the computer.
10. Insert the other end of the USB-to-DC cable into the DC power port
on the enclosure.
Note:
The integral logo on the front bezel serves two operational purposes.
It illuminates when power is being supplied to the enclosure and when
there is drive activity, i.e., when data is being read or written to the
drive, the LED will flash.

7
System Setup
Setup instructions are outlined for each type of enclosure based on the computer’s
operating system, i.e. Windows® XP, Windows® 98 or Mac® OS.
Windows® XP
1. Windows® XP will auto-detect the new device and automatically load an
embedded USB driver. The following notification will appear in the bottom,
right-hand corner of the screen.
Found New Hardware
USB 2.0 Storage Device USB Device
Found New Hardware
Your new hardware is installed and ready to use
2. If the installed hard drive has not already been formatted, in order for the
computer to recognize the drive, it must be initialized, partitioned and formatted.
Click on Start and open the Control Panel.
Select Administrative Tools and open Computer Management.
Select Disk Management to launch the “New Disk Wizard.”

8
3. Follow the Wizard screens to initialize the drive.

9
4. The new device can now be viewed in Disk Management. To launch
the New Partition Wizard, right-button click in the Disk 1 area and select
“New Partition.”

10
5. Follow the wizard screens to complete the partitioning and formatting.
Select “Primary Partition.”
Set for maximum size.
Assign letter or path for drive.

11
Assign the file format from the list displayed (“FAT32” or “NTFS”) and select
“Perform a quick format.”
Click on “Finish” to complete and close the wizard.

12
6. Open My Computer. The drive is now displayed and ready for use.

13
Windows® 98
When installing large capacity hard disk drives into the enclosure and in use
with Win98, the Win98 OS may not properly recognize the full capacity of
the HDD. In order to remedy this situation, Win98 may automatically ask to
format the drive to its default capacity and / or you may need to use a 3rd
party application.
Mac® OS 9.0 or later
The Mac® OS will auto-detect the new device. Once the Integral is installed
on the computer via the USB, an icon for the device will be displayed on the
desktop.
If using the CD recording software Toast, the extension driver for USB 2.0
must be installed.
Mac® OS 8.6
For USB port installations on Mac® OS 8.6, the USB Mass Storage Support
1.3.5 application must be installed. Downloads of this software are available
from the Apple Software Updates section at www.apple.com
FCC Compliance Statement
This Device complies with part 15 of the FCC Rules. Operation is subiect
to the following two conditions:
● This device may not cause harmful interference.
● This device must accept any interference received,including
interference that may cause undesired operation.

14
Mise en route
Eléments nécessaires pour installer votre nouveau boîtier :
• Disque dur (HDD) (non inclus)
• Micro tournevis cruciforme (non inclus)
• Vis de montage (incluses)
• Câble de données USB 2.0 (inclus)
• Câble d'alimentation USB vers CC (inclus)
Chartes de la compagnie AKASA
Les informations contenues dans ce document peuvent être modifiées sans
avertissement. Tous droits réservés. Toute reproduction, adaptation, ou
traduction de ce matériel est interdite sans la permission préalable écrite
d'AKASA, excepté pour ce qui est autorisé par les lois du copyright.
Les seules garanties pour les produits et les services d'AKASA sont stipulés
dans la garantie expresse accompagnant de tels produits et services. Rien
dans le présent document ne pourra être interprété comme constituant une
garantie supplémentaire. AKASA ne peut être tenue responsable des erreurs
techniques ou éditoriales ou omissions.
Remerciements
Microsoft et Windows, Windows NT et Windows XP sont des marques
déposées de Microsoft Corporation.
Adobe et Acrobat sont des marques d'Adobe Systems Incorporated.
Copyright 2006 AKASA ASIA Corporation.
Notice générale : Les autres noms de produits mentionnés ici sont utilisés
dans un but d’identification seulement et peuvent être des marques de leurs
propriétaires respectifs. AKASA rejette tout et tous droits concernant ces
marques.
français

15
2. Placez le disque dur sur le plateau et alignez les connecteurs IDE avec le
lecteur.
Installation
1. Dévissez les vis de fixation du carter et ouvrez le dos du boîtier en faisant
coulisser le plateau pour l'extraire du carter en aluminium. Remarquez le
connecteur IDE pour le disque dur de 2,5".
3. Insérez doucement le disque dur dans le connecteur IDE du plateau jusqu'à
ce que la connexion soit bien établie.
Connecteur IDE
Connecteur IDE
du disque dur
Connecteur IDE
du plateau

16
4. Tout en maintenant le disque dur avec votre main, retournez doucement
le plateau et repérez les trous de montage du disque dur. Utilisez les
quatre (4) vis de montage (fournies) pour fixer le disque dur sur le plateau.
5. Réinsérez doucement le plateau dans le carter jusqu'à ce que le panneau
arrière s'ajuste contre le carter.
6. Fixez le panneau arrière du carter à l'aide des vis fournies.

17
7. Branchez la petite extrémité plate du câble USB (connecteur Mini B) au
dos du boîtier.
8. Insérez l'autre extrémité du câble USB (connecteur de Type A) à un port
USB actif disponible sur l’ordinateur.
Remarque:
Le boîtier de 2,5" peut être alimenté par le bus USB, le câble transporte à
la fois : des données et l'alimentation. Dans certains cas le boîtier peut
nécessiter du courant CC supplémentaire pour le fonctionnement. Le câble
de convertisseur d'alimentation USB vers CC supplémentaire est fourni.

18
9. Si le disque dur nécessite plus de courant, connectez la portion USB
(connecteur de type A) du câble d'alimentation USB vers CC à tout
port USB actif disponible sur l'ordinateur.
10. Insérez l'autre extrémité du câble USB vers CC dans la port d'alimentation
CC sur le boîtier.
Remarque :
Le logo intégral du cadre avant sert deux objectifs de fonctionnement.
Il s'illumine quand l'alimentation est fournie au boîtier et quand il y a une
activité du lecteur, c.-à-d., quand des données sont lues ou écrites sur le
lecteur, la LED clignote.

19
Configuration du système
Les instructions d'installation sont spécifiées pour chaque type de boîtier selon le
système d'exploitation de l'ordinateur, c.-à-d. Windows® XP, Windows® 98 ou
Mac® OS.
Windows® XP
1. Windows® XP détectera automatiquement le nouveau périphérique et chargera
automatiquement un pilote USB intégré. La notification suivante apparaîtra en bas à
droite de l'écran.
Nouveau matériel trouvé
Périphérique de stockage USB 2.0 Périphérique USB
Nouveau matériel trouvé
Votre nouveau matériel est installé et prêt à être utilisé
2. Si le disque dur installé n'a pas déjà été formaté, pour que l'ordinateur
reconnaisse le lecteur, il doit être initialisé, partitionné et formaté.
Cliquez sur Start et ouvrez le Control Panel.
Sélectionnez Administrative Tools et ouvrez Computer Management.
Sélectionnez Disk Management pour lancer le “New Disk Wizard.”

20
3. Suivez les écrans de l'assistant pour initialiser le lecteur.
Other manuals for Integral LAN
6
Table of contents
Languages:
Other Akasa Computer Accessories manuals

Akasa
Akasa A-ITX21-A1B User manual

Akasa
Akasa A-NUC22-A3B User manual

Akasa
Akasa ZEN User manual

Akasa
Akasa A-NUC56-A1B User manual

Akasa
Akasa A-NUC20-A1B User manual

Akasa
Akasa A-NUC18-A1B User manual

Akasa
Akasa VENOMTOXIC BLACK User manual

Akasa
Akasa A-ITX25-A1B User manual

Akasa
Akasa A-NUC08-A1B User manual

Akasa
Akasa Maze Pro User manual
Popular Computer Accessories manuals by other brands

Panasonic
Panasonic CF-VEB521 Series operating instructions

Luxafor
Luxafor Bluetooth user manual

IRIS
IRIS IRISNotes Air 3 Quick user guide

Sun Microsystems
Sun Microsystems Computer Accessories user manual

Accessory Power
Accessory Power ENHANCE ENPCPSF100BKEW user guide

Arctic
Arctic VR004 installation manual