Akaso DL2 User manual

Please read this manual before operating your car dash camera,
and keep it for further reference. 33
DL2 Car Dash Camera
User Manual

41 - 50 51 - 60
01 - 10 11 - 20
31 - 4021 - 30
日本語

English
AKASO Dash Cam is not intended to be modified, or calibrated while operating a
vehicle. AKASO is not responsible for any damages resulting from the user's misuse
of the camera.
Use only manufacturer-approved chargers, accessories, and supplies.
AKASO cannot be responsible for the user’s safety when using accessories or supplies
that are not approved by AKASO.
Do not store your device in excessively hot, cold, damp or dry locations.
Doing so may cause the screen to malfunction, result in damage to the device, or cause
the battery to explode. Your device is recommended for use within a temperature range
of -4º to 131º F (-10º to 55º C), and a humidity range of 10% to 80%.
If your device becomes overheated, allow it to cool down before use.
Prolonged exposure of skin to an overheated device may cause low-temperature burn
symptoms, such as red spots or areas of darker pigmentation.
Do not touch the car charger with wet hands or disconnect the charger by pulling the
cord. Doing so may result in electrocution.
Do not use damaged power cords or plugs, or loose electrical sockets.
Faulty connections can cause electric shock or fire.
Do not touch your device with wet hands.
Doing so may cause electric shock.
Do not remove the SD card from the product during data recording, which may
cause an Error.
Always keep the camera lens clean, and ensure that the lens is not blocked by any
object or placed near any reflective material.
If the car’s windshield is tinted with a dark coating, recording quality may be affected.
PREAUTION Please use10 high-speed MicroSD memory card.
Please buy genuine MicroSD memory card to use to avoid compatible issue.
For the first time, please format your MicroSD memory card.
Note:
a. MicroSD card maximum support 32G, FAT32 format, allocation unit size ≥ 32kb;
b. Make sure insert MicroSD card in the local MicroSD card slot. When you hear "click",
the memory card is inserted correctly.
USE SUGGESTIONS
PRODUCT OVERVIEW
LCD Panel
OK
GPS Port
(Optional) MicroSD
Card Slot Rear
Camera Port USB Port
Mode Power Up Down
Spaker Back Clasp Lens
① ② ③ ④ ⑤ ⑥ ⑦ ⑧ ⑨
12

1. Installation
Insert MicroSD card into the recorder to store video, images and other files. Fix the
recorder in the position of rear view mirror and connect it to cigarette lighter via car
charger.
Note: You can lay out the extended charging/power supply wiring along the edge
of windshield. Optional rear camera is installed in the rear of the vehicle, and
you need to pay attention to the direction of the installation. Wiring can be
laid along the roof of a vehicle. After installation is complete, put camera plug
into the recorder’s rear camera port. Adjust the lens position to ensure that
the lens level with the ground. Start the engine to check if the device has been
installed correctly.
INSTALLATION AND USAGE
①OK Button: On / Off recording function In standby mode, press【OK】to start
recording, press【OK】again to stop recording.
②Menu Button
Function 1: In the standby mode, short press【M】key to enter the setup menu
interface.
Function 2: camera key in the camera mode, short press【OK】key to take a photo.
③Power Button
Function 1: Screen ON/OFF function, short press the【Power】button to turn on or
off the screen. (When the screen is off, click on the display area can also
light up the screen)
Function 2: ON/OFF function, long press【Power】key to turn on/off the machine.
The unit automatically saves the video file and user settings and shuts
down.
④UP
⑤DOWN
⑥ USB interface: the machine power supply and internal battery charge.
⑦AV IN camera interface
⑧MicroSD card slot
⑨GPS module (optional)
Optimal Installation Location
Power Supply Wining
How to install rearview camera, You have two ways to install it.
1. Installed on the rear windshield.
2. Installed near the license plate.
3. Black and red lines connected to the reversing lights in order to view the reversing situation.
2. Start to work
Press [POWER] button to turn on the recorder; or connect car charger and start car
engine, the recorder will be started automatically.
3. Charging Battery and USB Connection
Press [POWER] button to turn on the recorder; or connect car charger and start car
engine, the recorder will be started automatically.
(1) You can use our free car charger. Upon access to power, battery symbol on top of
the screen will be changed into the charging symbol.
(2) The device could be connected to a computer via USB cable and a successful
connection would automatically pop up the options menu. You can press [UP /
DOWN] button to select and press [OK] button to confirm.
This device could be functioned as a portable hard drive to copy and transfer files to/
from computer.
34

INTRODUCTION TO MAIN INTERFACE FUNCTIONS
Rec Off Playback Video Lock
Audio Off
2017-09-13 Tuesday Camera Setup
12:45
REC
1. Automatic recording function
Start the car engine, the recorder automatically starts and turns on the recording
function. Turn off the car engine, the recorder automatically save the contents of the
record and shut down, record the video segment stored in the MicroSD card. When the
MicroSD card is full, the recorder will overwrite the earlier recorded images, and the
locked file will not automatically be covered.
2. Use the manual recording function
In the main interface, click the recorder icon , enter the traffic recording screen point
to the right of the icon, you can manually turn on/off video function. You can also press
the OK button to turn on/off the recording function. If you want to turn off the power,
press the [POWER] key again for 3 seconds, and the recorder will save the record
automatically and turn it off.
3. Set Up
In the main interface, click the [System Settings] icon , enter the system settings, the
system settings, including recorder settings / general settings, as shown below:
【Note】When entering the system settings, stop recording first.
FEATURES
VIDEO MODE (ICON INTRODUCTION)
Back
Video LockAudio Off
Tale CaptuRec Off
Night Mode
Video Switch
REC 00:58
2016-09-20 12:23:12
1080FHD
Date/time Video on/off
Front/rear image switching Take pictures
Front/rear
image switching
Return to
the main
interface
Video lock/Unlock
instructions
Audio status Video time
Video resolution
Audio on / off
Video lock/Unlock
Power state
Video status 1/2 RecordSetting
Common Setting
Resolution
Back
Looprecording
NightMode
Boot into recorder interface
MotionDetection
2/2 RecordSetting
Common Setting
RecordAudio
Back
DateStamp
G-Sensor
56

2/2 RecordSetting
Common Setting
ScreenSaver
Back
Format
DefaultSetting
Version
4. Use the camera function
Back to main interface, please click the icon to enter the camera mode.
5. One key lock function
The unit has one key lock function. When the driving function is turned on, click on the
main interface [video lock] icon , the entire video image will be locked; or enter the
driving function interface, click the upper right corner of the icon . Then entire video
will be locked, and cannot be overwritten.
6. Date and time settings
In the main interface, click the [System Settings] icon, click [Common Settings] to enter
the date / time settings. As shown below:
RecordSetting
Common Setting
Date/Time
Year Month Date Hour Minute Second
Back
2017 09 22 12 00 00
Note: In order to effectively record the date and time of forensic of traffic safety
accident, please set the correct time immediately before using the machine.
7. Mute Function
In the main interface, click the [Voice Record] icon to a key to open or close the
recording.
8. File playback
In the main interface, click the [Playback Mode] icon to enter the video / photo
playback, click on the screen [Previous]or [Next]to select the video / photo, or press
[UP]or [DOWN] to select.
9. Rear View
First of all, you must connect a rear camera to the recorder with the extension of long
lines. When the car engine starts, the recorder will work automatically.
10. Parking mode
In the main interface, click [System Settings]icon menu settings, click [General
Settings]; Open the parking mode: the recorder will start to work based on G-SENSOR
induction to automatically save 30 seconds video when the vehicle is shut down. When
the park mode is not turned on, the recorder will not be turned on by vibration.
78

PRODUCT SPECIFICATION
Display screen 5inch high-definition IPS touch screen
170° Wide-angle lens
Stand by
Stand by
Stand by
Stand by
Stand by
Stand by
Stand by
Stand by
Maximum support 32GB
1 M
MOV
JPEG
Support multi-language
Lens angle
Pull back the camera
G-SENSOR
Automatic reversing visual
Speaker
Microphone
Language
Loop video
Recording function
Picture-in-picture
Memory card
Front camera video resolution
Take pictures of quality
Video Format
Image Format
1080P FHD(1920*1080) 720P(1080*720)
TROUBLE SHOOTING
In the normal operation, if the product problems, please refer to the following methods
to solve:
●Cannot record
Check whether there is enough space MicroSD card, whether too many files due to
lock the MicroSD card storage space is not enough, please format the TF memory card
after use.
Check if the cycle recording in the main menu is set to OFF, set it to 3 minutes.
●When recording, it will stop automatically
Due to the large amount of high-definition video data processed at the time of
recording, please use a high-speed TF memory card of Class10 or Class10 or higher.
●A "File Error" prompt appears when you replay your pictures and videos
Please buy genuine TF memory card use.
If the TF card is storing the data, the file is incomplete. Please use the "Format" function
of the recorder to reformat the TF card.
●The image is misty
Please check the lens for fingerprints, dirty, and use the lens paper / cloth to clean the
lens parts, while cleaning the front windshield.
●Crash
After the crash, use a sharp object to press the reset button to restart the machine.
Note: This product retains the design and specifications without notice.
CONTACT US
For any inquiries, issues or comments concerning our products, please send E-mail to
the address below, and we will respond as soon as possible.
E-mail: [email protected]
US customer service line: (301)670-7335
910
English

11 12
Deutsch
Die AKASO Armaturen-Kamera ist nicht dazu bestimmt, gerändert oder während
der Autofahrt abgestimmt zu werden. AKASO haftet für keinerlei Schäden, die durch
Missbrauch oder Fehlgebrauch der Kamera entstehen.
Verwenden Sie ausschließlich Ladegeräte, Zubehör und sonstige Zusätze, die vom
Hersteller zugelassen sind.
AKASO kann nicht für die Sicherheit des Benutzers garantieren, wenn Zubehör
verwendet wird, welches nicht von AKASO zugelassen wurde.
Lagern Sie Ihr Gerät nicht an übermäßig heißen, kalten, feuchten oder trockenen
Orten.
Andernfalls könnten Schäden am Bildschirm oder am Gerät auftreten oder der Akku
explodieren. Es wird empfohlen, dass Sie Ihr Gerät innerhalb von Temperaturen
zwischen -10° bis 55° C und einer Luftfeuchtigkeit von 10% bis 80% verwenden.
Wenn sich Ihr Gerät überhitzt, warten Sie, bis es abkühlt, bevor Sie es verwenden.
Bei längerem Hautkontakt mit einem überhitzten Gerät können Niedrig-Temperatur
Verbrennungssymptome wie rote Stellen oder dunklere Pigmentierung auftreten.
Berühren Sie das Autoladegerät nicht mit feuchten Händen und entfernen Sie das
Ladegerät nicht, indem Sie am Kabel ziehen. Andernfalls kann dies zu Stromschlägen
führen.
Verwenden Sie keine beschädigten Stromkabel, Stecker oder lose Steckdosen.
Fehlerhafte Anschlüsse können elektrische Schläge oder Feuer verursachen.
Berühren Sie das Gerät nicht mit feuchten oder gar nassen Händen.
Dies kann zu elektrischen Schlägen führen.
Entfernen Sie die SD-Karte nicht während der Aufnahme. Dies könnte Fehler
verursachen.
Halten Sie die Linse stets sauber und stellen Sie sicher, dass die Linse nicht von
Objekten verdeckt oder in der Nähe von reflektierenden Materialien platziert ist.
Wenn die Windschutzscheibe des Fahrzeugs getönt ist, könnte dies die
Aufnahmequalität beeinträchtigen.
ACHTUNG Bitte verwenden Sie eine 10 schnelle Mikro-SD-Speicherkarte.
Bitte verwenden Sie ausschließlich originale Mikro-SD-Speicherkarten um
Kompatibilitätsprobleme zu vermeiden.
Formatieren Sie bitte Ihre Mikro-SD-Speicherkarte vor der erstmaligen Verwendung.
Hinweis:
a. Mikro-SD Speicherkarte unterstützt maximal 32 GB, FAT32 Format,
Standardclustergröße ≥ 32kb;
b. Vergewissern Sie sich, dass Sie die Mikro-SD-Speicherkarte korrekt in den lokalen
Mikro-SD-Kartensteckplatz eingelegen. Wenn Sie ein Klicken hören, wurde die
Speicherkarte korrekt eingelegt.
NUTZUNGSEMPFEHLUNG
PRODUKT ÜBERSICHT
LCD Bildschirm
OK
GPS Port
(Optional) Mikro-SD
Steckplatz Rück Kamera
Anschluss USB Port
Modus Power Auf Ab
Lautsprecher Verschluss Linse
①② ③ ④ ⑤ ⑥ ⑦ ⑧ ⑨

1. Installation
Setzen Sie die Mikro-SD-Karte in das Gerät um Videos, Fotos und andere Dateien zu
speichern. Platzieren Sie das Aufnahmegerät in der Nähe des Rückspiegels und
verbinden Sie es über das Stromkabel mit dem Zigarettenanzünder.
Hinweis: Sie können das verlängerte Strom/Ladekabel entlang des Randes der
Windschutzscheibe verlegen. Die optionale Rückkamera wird am Heck des Fahrzeugs
angebracht und sie müssen bei der Platzierung der Kameras auf die Richtung achten.
Die Verkabelung kann entlang des Dachhimmels erfolgen. Nachdem die Installation
abgeschlossen wurde, stecken Sie den Kamerastecker in den hinteren Anschluss des
Aufnahmegerätes. Passen Sie die Linsenposition so an, dass Sie am Boden ausgerichtet
ist. Starten Sie den Motor des Fahrzeugs um zu überprüfen, ob das Gerät
ordnungsgemäß angeschlossen wurde.
INSTALLATION UND NUTZUNG
①OK Taste: An / Aus Aufnahmefunktion im Standby-Modus, [OK]drücken um
Aufnahme zu starten, [OK]erneut drücken um Aufnahme zu stoppen.
② Menü Taste
Funktion 1: Im Standby-Modus kurz die [M]Taste drücken um die
Einstellungsoberfläche zu öffnen.
Funktion 2: Kamera Taste im Kamera-Modus, [OK]Taste kurz drücken um ein Foto
zu machen.
③ Power Taste
Funktion 1: Bildschirm AN/AUS Funktion, [Power]Taste kurz drücken um den
Bildschirm ein- oder auszuschalten. (Wenn der Bildschirm ausgeschaltet
ist, kann auch durch berühren des Bildschirmbereichs der Bildschirm
aktiviert werden.)
Funktion 2: AN / AUS Funktion, [Power]Taste lange gedrückt halten um das Gerät
an / auszuschalten.
Das Gerät speichert das Video und Einstellungen automatisch und schaltet sich ab.
④AUF ⑤AB
⑥ USB-Anschluss: Stromversorgung und interner Akkulader des Geräts.
⑦AV IN Kamera Anschluss ⑧Mikro-SD-Kartensteckplatz ⑨GPS Modul (Optional)
Optimale Installationsposition
Stromverkabelung
13 14
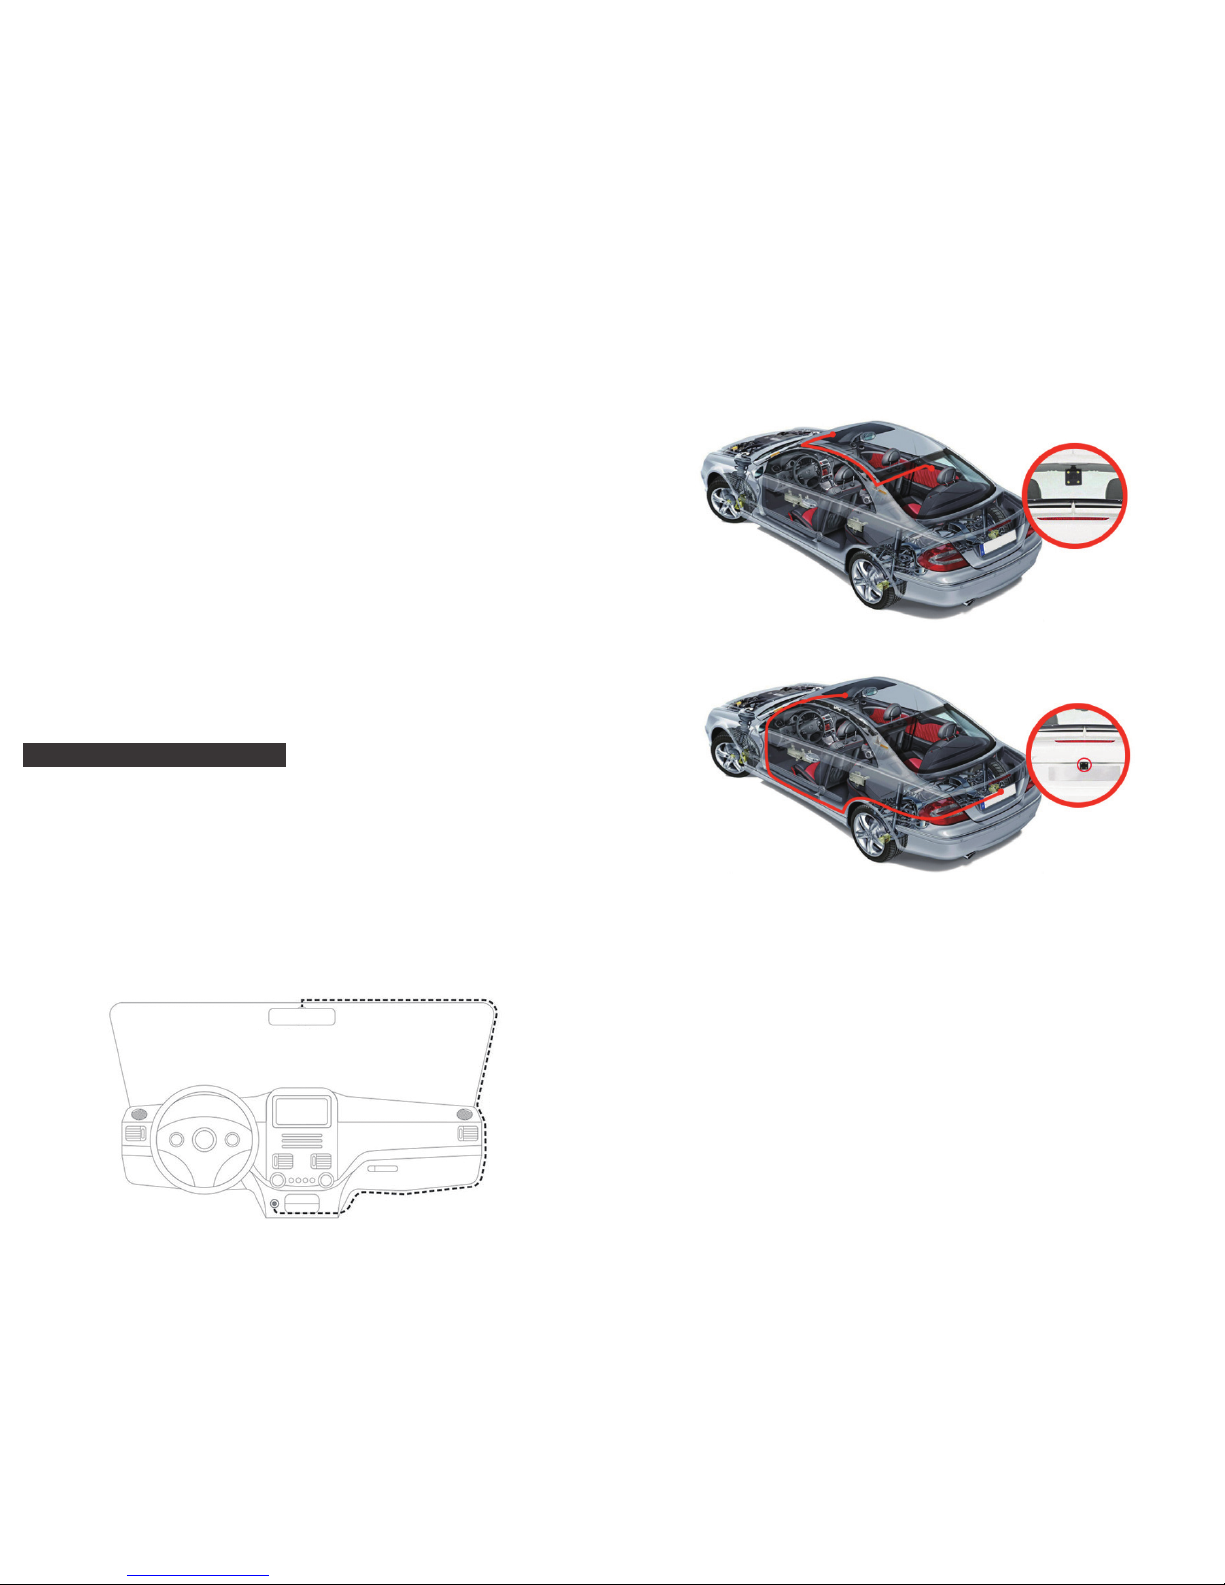
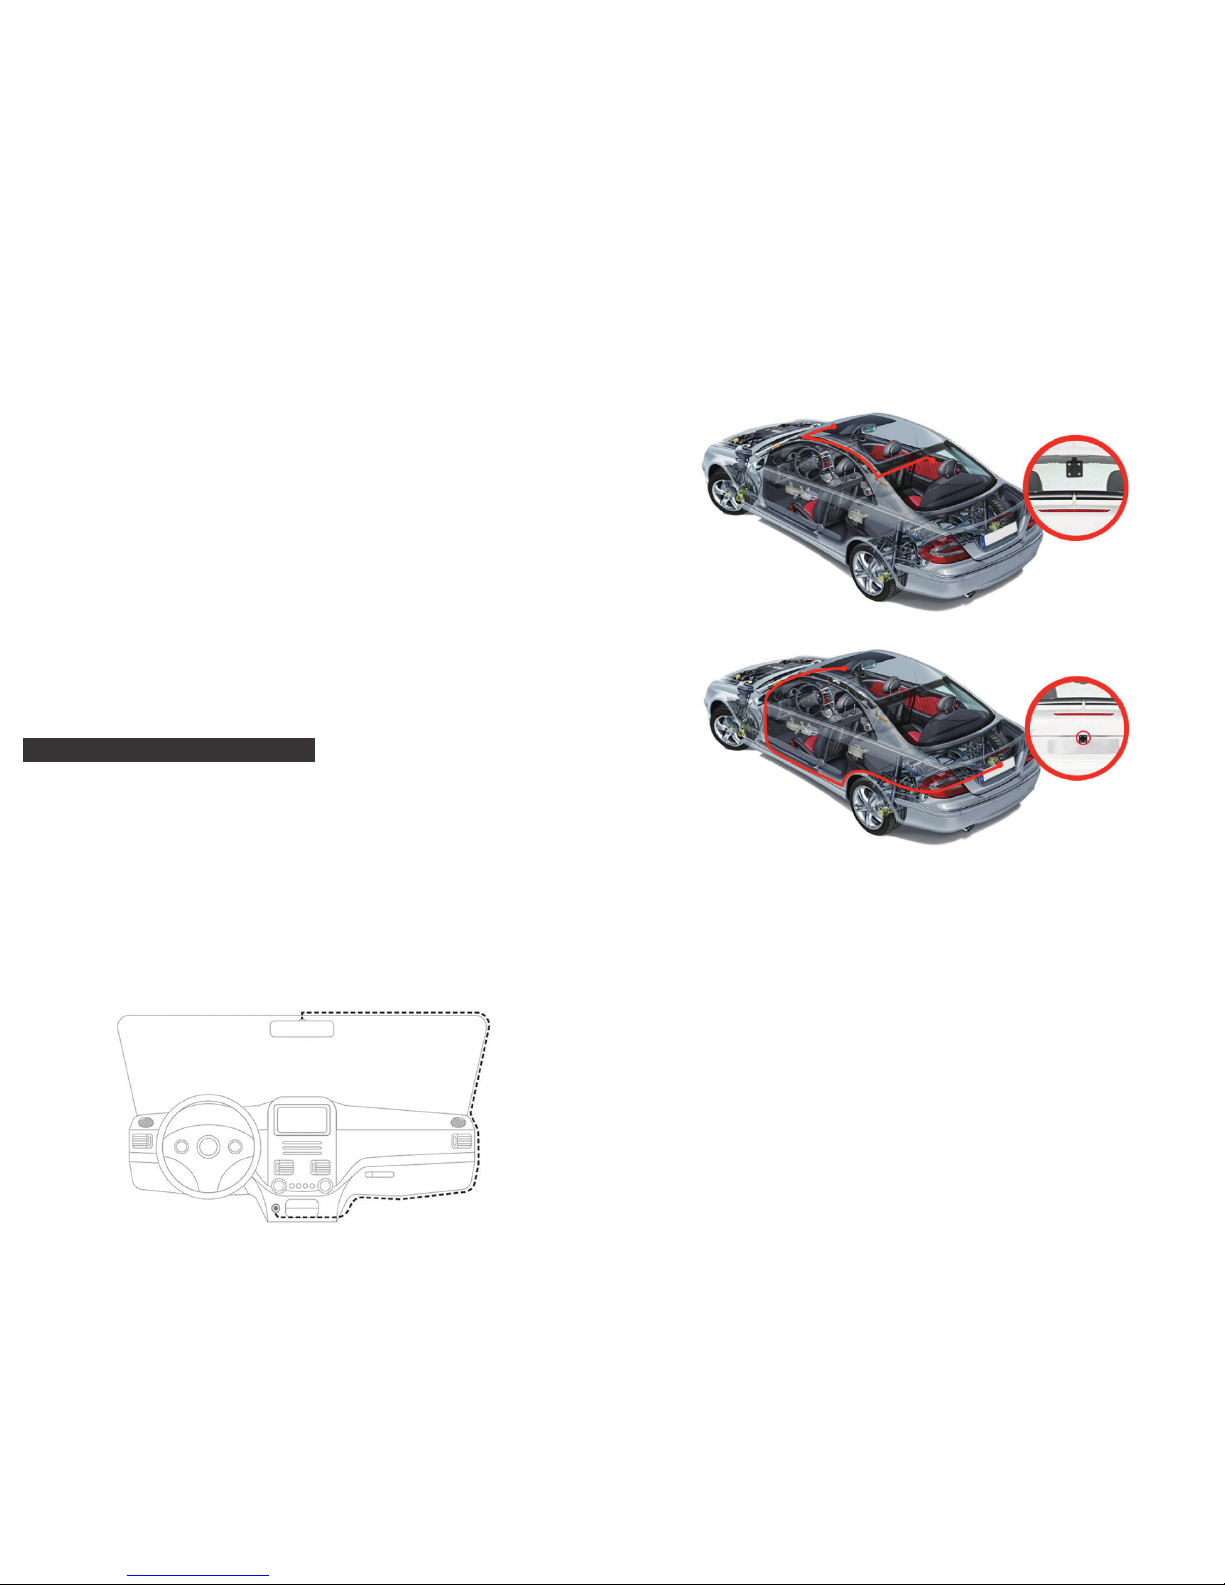
Wie Sie die Rückfahrkamera installieren, haben Sie zwei Arten von Installationsmethoden.
1. Installiert auf der Heckscheibe.
2. In der Nähe des Nummernschilds installiert.
3. Verbinden Sie die schwarzen und roten Kabel mit den Rückfahrscheinwerfern, um die
Rückwärtsfahrt zu sehen.
2. Betriebsaufnahme
Drücken Sie die [POWER] Taste um das Gerät zu einzuschalten, oder verbinden Sie es
mit dem Stromkabel um das Gerät automatisch zu starten, wenn der Motor des
Fahrzeugs gestartet wird.
3. Aufladen der Batterie und USB Verbindung
Drücken Sie die [POWER] Taste um das Gerät einzuschalten; oder verbinden Sie es mit
dem Ladekabel und starten Sie den Fahrzeugmotor um das Gerät automatisch zu
starten.
(1) Sie können unser kostenlos mitgeliefertes Autoladekabel verwenden. Sobald das
Gerät mit Strom versorgt wird, verändert sich das Batteriesymbol im oberen Bereich
des Bildschirms in das Auflade Symbol.
(2) Wenn das Gerät per USB-Kabel erfolgreich an einen Computer angeschlossen wird,
erscheint automatisch das Optionsmenü. Sie können die [AUF / AB] Tasten
verwenden um auszuwählen und die [OK] Taste drücken um zu bestätigen.
Dieses Gerät kann auch als mobile Festplatte verwendet werden, um Dateien von / zu
Ihrem Computer zu kopieren oder zu verschieben.

EINFÜHRUNG ZU DEN FUNKTIONEN DES HAUPTMENÜS
15 16
Aufn Aus Wiedergabe Video sperren
Audio Aus
2017-09-13 Dienstag Kamera Einstellungen
12:45
VIDEOMODUS (SYMBOL ERKLÄRUNG)
Zurück
Video
Sperre
Audio Aus
Tale Captu
Aufnahme
Aus
Nachtmodus
Video
Wechsel
REC 00:58
2016-09-20 12:23:12
1080FHD
Datum/Uhrzeit Video on/off
Front/Heck Bild Wechsel Foto machen
Front / Heck
Bild Wechsel
Rückkehr zu
Hauptmenü
Video sperren
/entsperren
Anweisungen
Audio Status Video Zeit
Video Auflösung
Audio An / Aus
Video sperren
/ Entsperren
Strom Status
Video Status
1. Automatische Aufnahmefunktion
Wenn der Fahrzeugmotor gestartet wird schaltet sich das Gerät selbst ein und aktiviert
die Aufnahmefunktion. Wenn der Fahrzeugmotor abgestellt wird, speichert das Gerät
automatisch sämtliche Inhalte sowie alle aufgenommen Videos auf der SD-Karte und
schaltet sich ab. Wenn der Speicher der SD-Karte voll ist, wird das Gerät alle früheren
aufgenommenen Bilder überschreiben und die gesperrte Datei wird nicht automatisch
geschützt.
2. Verwendung der manuellen Aufnahmefunktion
Drücken Sie im Hauptmenü auf das Aufnahme Symbol , um den Verkehrsaufnahme
Bildschirm auf der rechten Seite des Symbols zu öffnen um manuell die Videofunktion
ein-/auszuschalten. Sie können auch die OK Taste drücken um die Aufnahmefunktion
ein-/auszuschalten. Wenn Sie das Gerät ausschalten möchten, drücken Sie die [POWER]
Taste erneut für 3 Sekunden und das Gerät wird die Aufnahme automatisch speichern
und sich danach abschalten.
3. Einstellung
Drücken Sie im Hauptmenü auf das [Systemeinstellungen] Symbol , um die
Systemeinstellungen sowie Aufnahmeeinstellungen / Allgemeine Einstellungen zu
öffnen, wie unten gezeigt:
Note: Wenn Sie die Systemeinstellungen öffnen, stoppen Sie zuerst die
Aufnahme.
FUNKTIONEN
1/2 Aufnahme
Einstellungen
Allgemeine
Einstellungen
Auflösungt
Zurückt
Schleifenaufnahme
Nachtmodus
In das Aufnahmemenü starten
Bewegungserkennung

4. Verwendung der Kamerafunktion
Zurück im Hauptmenü, drücken Sie bitte auf das Symbol um in den Kameramodus
zu wechseln.
5. Eine-Taste Sperrfunktion
Dieses Gerät verfügt über eine Eine-Taste Sperrfunktion. Wenn die Fahrt-Funktion
eingeschaltet ist, drücken Sie auf das Hauptmenü [Video Sperre] Symbol , um das
gesamte Video zu sperren, oder öffnen Sie das Menü der Fahrt Funktion und drücken
Sie auf das Symbol in der oberen rechten Ecke. Das gesamte Video wird gesperrt
und kann nicht überschrieben werden.
6. Datums - und Uhrzeiteinstellungen
Drücken Sie im Hauptmenü auf das [Systemeinstellungen] Symbol, drücken Sie auf
[Allgemeine Einstellungen] um die Datums- / Uhrzeiteinstellungen wie unten gezeigt
zu öffnen:
Datum/Uhrzeit
Jahr Monat Tag Stunde Minute Sekunde
Zurück
2017 09 22 12 00 00
Hinweis: Um das Datum und die Uhrzeit bei Verkehrsunfällen richtig zu erfassen,
stellen Sie bitte sofort das richtige Datum und Uhrzeit ein bevor Sie das
Gerät verwenden.
7. Stummschalten Funktion
Drücken Sie im Hauptmenü auf das [Stimmaufzeichnung] Symbol ,um die Aufnahme
zu aktiveren oder zu deaktivieren.
8. Datei Wiedergabe
Drücken Sie im Hauptmenü auf das [Wiedergabemodus] Symbol um die Video/Foto
Wiedergabe zu öffnen, drücken Sie im Bildschirm auf [Vorheriges] oder [Nächstes] um
das Video / Foto auszuwählen oder drücken Sie [AUF] oder [AB] um auszuwählen.
9. Rückansicht
Zuerst muss eine Rückkamera mit dem Gerät über das Verlängerungskabel verbunden
werden. Wenn der Fahrzeugmotor gestartet wird, schaltet sich das Aufnahmegerät
automatisch ein.
17 18
2/2
Tonaufnahme
Zurück
Datumsstempel
G-Sensor
2/2
Bildschirmschoner
Zurück
Format
Standardeinstellungen
Version
Zurück
Aufnahme
Einstellungen
Allgemeine
Einstellungen
Aufnahme
Einstellungen
Allgemeine
Einstellungen
Aufnahme
Einstellungen
Allgemeine
Einstellungen
Aufnahme
Einstellungen
Allgemeine
Einstellungen
Datum / Uhrzeit
Parküberwachung
Piepton
Sprachen
Frequenz

10. Parkmodus
Drücken Sie im Hauptmenü auf das [Systemeinstellungen] Symbol, drücken Sie
[Allgemeine Einstellungen]; Öffnen Sie den Parkmodus: Das Gerät wird sich über den
G-SENSOR einschalten und automatisch 30 Sekunden lange Videos aufnehmen, wenn
das Fahrzeug abgestellt wird. Wenn der Parkmodus ausgeschaltet ist, wird das Gerät
bei Erschütterungen keine Videos aufzeichnen.
FEHLERBEHEBUNG
Sollten unter normalem Betrieb Probleme auftreten, beachten Sie bitte die folgenden
Methoden zu Fehlerbehebung:
●Das Gerät nimmt nichts auf
Überprüfen Sie ob genug Speicherplatz auf der Mikro-SD-Karte vorhanden ist, ob
durch zu viele gesperrte Dateien zu wenig Speicherplatz auf der SD-Karte vorhanden
ist, bitte formatieren Sie die TF-Speicherkarte nach Benutzung.
Überprüfen Sie ob die Schleifenaufnahme im Hauptmenü ausgeschaltet ist, stellen Sie
sie auf 3 Minuten ein.
●Die Aufnahme wird automatisch gestoppt
Verwenden Sie bitte eine ausreichend schnelle TF-Speicherkarte der Klasse10 oder
Höher, da während der Aufnahme große Mengen an Hochauflösender Videodaten
verarbeitet werden.
●Eine "Datei Fehler" Meldung erscheint bei der Wiedergabe von Videos und
Fotos
Bitte verwenden Sie eine originale TF-Speicherkarte.
Wenn die TF-Karte die Daten speichert, ist die Datei unvollständig. Bitte verwenden Sie
die “Format” Funktion des Geräts um die TF-Karte neu zu formatieren.
●Die Aufnahmen sind verschwommen/undeutlich
Bitte überprüfen Sie die Linse auf Fingerabdrücke, Schmutz und verwenden Sie Linsen
papier / ein Tuch zur Reinigung der Linse, wenn Sie die Windschutzscheibe säubern.
● Absturz
Verwenden Sie ein spitzes Objekt um die Reset-Taste nach einem Absturz zu drücken
und das Gerät neu zu starten.
PRODUKT SPEZIFIKATIONEN
Bildschirm 5 Zoll Hochauflösender IPS Touchscreen
170° Weitwinkel Linse
Standby
Standby
Standby
Standby
Standby
Standby
Standby
Standby
Maximum support 32GB
1 M
MOV
JPEG
Mehrsprachenunterstützung
Linsenwinkel
Kamera zurückziehen
G-SENSOR
Automatische Bildumkehr
Lautsprecher
Mikrofon
Sprache
Schleifen-Video
Aufnahmefunktion
Bild-In-Bild
Speicherkarte
Frontkamera Bildauflösung
Fotoaufnahme Qualität
Videoformat
Bildformat
1080P FHD(1920*1080) 720P(1080*720)
Hinweis: Dieses Produkt behält Design und Spezifikationen ohne Ankündigung.
19 20
KONTAKTIEREN SIE UNS
Bei Fragen, Problemen oder Kommentaren zu unseren Produkten senden Sie bitte ein
E-Mail an die untenstehende Adresse oder rufen Sie uns an. Wir werden so schnell wie
möglich antworten.
E-Mail: [email protected]
Deutsch

21 22
Español
La cámara de salpicadero AKASO no está diseñada para ser modificada, o calibrada
mientras esté conduciendo un vehículo. AKASO no se hace responsable de los daños
que pueda causar un mal uso de la cámara por parte del usuario.
Utilice solamente cargadores, accesorios, y suministros aprobados por el fabricante.
AKASO no se hace responsable de la seguridad del usuario al usar accesorios o
suministros que no han sido aprobados por AKASO.
No guarde su dispositivo en lugares excesivamente cálidos, fríos, húmedos o secos.
Hacerlo puede provocar que la pantalla no funcione correctamente, causar daños al
dispositivo, o hacer que explote la batería. Se recomienda utilizar su dispositivo dentro
de un rango de temperaturas de entre -10º a 55º C, y un rango de humedad relativa
de entre el 10% y el 80%.
Si su dispositivo se recalienta, deje que se enfríe antes de usarlo.
Una exposición prolongada de la piel a un dispositivo sobrecalentado puede causar
síntomas de quemaduras de baja temperatura, tales como manchas rojas, o zonas de
pigmentación más oscura.
No toque el cargador para el coche con las manos húmedas ni lo desconecte tirando
del cable. Hacerlo puede tener como resultado una electrocución.
No utilice cables de alimentación ni enchufes o tomas de corriente flojas.
Las conexiones defectuosas pueden provocar descargas eléctricas o fuego.
No toque su dispositivo con las manos húmedas.
Hacerlo puede provocar una descarga eléctrica.
No retire la tarjeta SD del aparato mientras esté grabando datos, ya que se puede
producir un error.
Mantenga siempre limpia la lente de la cámara, y asegúrese de que no está
bloqueada por ningún objeto o situada cerca de cualquier material reflectante.
Si el parabrisas del coche está tintado con un recubrimiento oscuro, la calidad de la
grabación puede verse afectada.
PRECAUCIÓN Por favor, utilice 10 tarjetas de memoria MicroSD de alta velocidad.
Por favor, compre tarjetas de memoria MicroSD auténticas para evitar problemas de
compatibilidad. La primera vez, por favor, formatee su tarjeta de memoria MicroSD.
Nota:
a. La capacidad máxima de la tarjeta MicroSD es de 32G, formato FAT32, tamaño de la
unidad asignado ≥ 32kb.
b. Asegúrese de introducir una tarjeta MicroSD en la ranura MicroSD local. Cuando se
escuche un "click", la tarjeta de memoria se habrá insertado correctamente.
SUGERENCIAS DE USO
RESUMEN DEL PRODUCTO
Pantalla LCD
OK
Puerto GPS
(Opcional)
Ranura de
tarjetas
MicroSD
Puerto de
cámara
trasera Puerto USB
Modo Encendido Arriba Abajo
Altavoz Hebilla trasera Lente
① ② ③ ④ ⑤ ⑥ ⑦ ⑧ ⑨

1
24
INSTALACIÓN Y USO
①Botón de OK: Encender / Apagar la función de grabación en modo reposo, presione
[OK] para empezar a grabar, presione [OK] de nuevo para dejar de
grabar.
②Botón menú
Función 1: En el modo de reposo presione brevemente la tecla [M] para entrar en el
menú de configuración de la interfaz;.
Función 2: toque la tecla cámara en el modo cámara, presione brevemente la tecla
[OK] para sacar una foto.
③ Botón de encendido
Función 1: función de ENCENDIDO/APAGADO de la pantalla, presione brevemente
el botón [Encendido] para encender o apagar la pantalla (cuando la
pantalla esté apagada, haga click en la zona de visualización, también
puede iluminar la pantalla)
Función 2: Función de ENCENDIDO/APAGADO, mantenga presionada la tecla
[Encendido] para encender/apagar la máquina.
El aparato automáticamente guarda el archivo de video y los ajustes del usuario y se
apaga.
④ARRIBA ⑤ ABAJO
⑥ Interfaz de USB: la fuente de alimentación y la carga de la batería interna.
⑦AV IN interfaz de cámara ⑧Puerto MicroSD ⑨Módulo GPS (opcional)
Ubicación para instalación óptima
Cable de alimentación
1. Instalación
Introduzca la tarjeta MicroSD en el grabador para poder almacenar video, imágenes y
otros archivos. Fije el grabador en la posición de retrovisor y conéctelo al mechero a
través del cargador para el coche.
Nota: Puede colocar el cable de carga/alimentación a lo largo del borde del parabrisas.
Hay una cámara trasera opcional instalada en la parte trasera del vehículo, y debe
prestar atención a la dirección en la que ha sido instalada. El cableado se puede
colocar a lo largo del techo del vehículo. Cuando haya completado la instalación,
conecte el conector de la cámara en el puerto de cámara trasera del grabador. Ajuste
la posición de la lente y asegúrese de que está a nivel con el suelo. Arranque el motor
para comprobar si el dispositivo se ha instalado correctamente.
ordnungsgemäß angeschlossen wurde.
23
Cómo instalar la cámara de visión trasera, tiene dos tipos de métodos de instalación.
1. Instalado en el parabrisas trasero.
2. Instalado cerca de la matrícula.
3. Conecte los cables negro y rojo a las luces de marcha atrás para ver la situación de inversión.
2. Inicie el funcionamiento
Presione el botón [ENCENDIDO] para encender el grabador; o para conectar el
cargador del coche y encender el motor, el grabador se encenderá automáticamente.
3. Cargar la batería y la conexión USB
Presione el botón [ENCENDIDO] para encender el grabador; o conecte el cargador del
coche y arranque el motor, el grabador se iniciará automáticamente.
(1) Puede usar nuestro cargador para coches gratis. Al acceder a la energía, el símbolo
de batería que está en lo alto de la pantalla se cambiará por un símbolo de carga.
(2) El dispositivo se podría conectar a un ordenador por medio de un cable USB y una
conexión exitosa haría saltar un menú de opciones. Puede presionar el botón
[ARRIBA /ABAJO] para seleccionar y presione el botón [OK] para confirmar.
Este dispositivo podría funcionar como un disco duro portátil para copiar y transferir
archivos hacia / y desde un ordenador.

25 26
INTRODUCCIÓN A LAS PRINCIPALES FUNCIONES
Apagar
Grabación Reproducción Bloqueo
e video
Apagar audio
2017-09-13 Martes Cámara Setup
12:45
MODO VIDEO (INTRODUCCIÓN A LOS ICONOS)
Atrás
Video
bloqueado
Audio
apagado
Captura
de cuento
Grabación
apagada
Modo
nocturno
Cambio
de video
REC 00:58
2016-09-20 12:23:12
1080FHD
Fecha / hora Video encendido / apagadof
Cambio de imagen frontal / trasera Sacar fotos
Frontal / trasera
Cambio de imgen
Volver a
la interfaz
principal
Bloqueo/desbloqueo
de Video instrucciones
Estatus de Audio Hora del Video
Resolución de video
Audio encendido /
apagadof
Bloqueo/desbloqueo
de vídeo
Estado de
energía
Estado de víde
1. Función de grabación automática
Arranque el motor del coche, el grabador se enciende automáticamente y se activa la
función de grabación. Apague el coche, el grabador comenzará automáticamente a
guardar contenidos del registro y se apagará, grabando el segmento de vídeo
almacenado en la tarjeta MicroSD. Cuando la tarjeta MicroSD esté llena, el grabador
sobreescribirá las primeras imágenes grabadas, y el fichero bloqueado no se
sobreeescribirá automáticamente.
2. Utilice la función de grabación manual
En la interfaz principal, haga click en el icono del grabador , introdúzcase en la
pantalla de grabación del tráfico, apunte a la derecha del icono, podrá activar /
desactivar manualmente. También puede presionar el botón OK para encender /
apagar la función de grabación. Si desea apagar el aparato, presione la Tecla
[ENCENDIDO] otra vez durante 3 segundos, y el grabador guardará el registro
automáticamente y se apagará.
3. Configuración
En la interfaz principal, haga click en [Ajustes del sistema] el icono , introdúzcase en
los ajustes del Sistema, incluyendo los ajustes del grabador / generales, como se
muestra abajo:
Note: Para entrar en los ajustes del Sistema, primero deje de grabar.
CARACTERÍSTICAS
1/2 Ajustes de
grabación
Ajustes
generales
Resolución
Atrás
Grabación en bucle
Modo nocturno
Iniciar en la interfaz del grabador
Detección del movimiento

27 28
2/2
Grabar Audio
Atrás
Código de tiempo
G-Sensor
2/2
Salvapantallas
Atrás
Formato
Ajuste por derecho
Version
Atrás
Fecha / Hora
Seguimiento del parking
Sonido Busca
Idiomas
Frecuencia
Ajustes de
grabación
Ajustes
generales
Ajustes de
grabación
Ajustes
generales
Ajustes de
grabación
Ajustes
generales
4. Uso de la función de cámara
Vuelva a la interfaz principal, haga click en el icono .
5. Función de bloqueo con una tecla
El aparato tiene una función de bloqueo con una tecla. Cuando la función de
conducción está encendida, haga click en la interfaz principal en el icono [bloqueo
de video], la imagen de video al completo se bloqueará; o entre en la interfaz de la
función de conducción, haga click en la esquina superior derecha del icono . Todo el
video se bloqueará, y no se podrá sobreescribir.
6. Ajuste de la fecha y la hora
En la interfaz principal, haga click en el icono [Ajustes del Sistema], luego click en
[Ajustes Comunes] para introducir los ajustes de fecha / hora. Como se muestra a
continuación:
Fecha / Hora
Año Mes Fecha Hora Minuto Segundo
Atrás
2017 09 22 12 00 00
Nota: Con el objeto de guardar efectivamente la fecha y la hora de un accidente de
tráfico, por favor, establezca la hora correcta inmediatamente antes de utilizar
la máquina.
7. Función de silencio
En la interfaz principal, haga click en [Grabación de Voz] en el icono y a una tecla
para abrir o cerrar la grabación.
8. Reproducción de los archivos
En la interfaz principal, haga click en el [Modo Reproducción] en el icono para entrar
en la reproducción de video/foto, haga click en la pantalla [Anterior] o [Siguiente] para
seleccionar el vídeo / foto, o presionar [ARRIBA] o [ABAJO] para seleccionar.
9. Vista trasera
Antes que nada, debe conectar una cámara trasera al grabador con los cables de
extensión. Cuando el motor del coche arranque, el grabador comenzará a funcionar
automáticamente.
Ajustes de
grabación
Ajustes
generales

29 30
10. Modo de estacionamiento
En la interfaz principal, haga click en el icono [Ajustes del sistema] del menú de ajustes,
luego haga click en [Ajustes Generales]; abra el modo de aparcamiento: el grabador
comenzará a funcionar utilizando un G-SENSOR de inducción para guardar
automáticamente 30 segundos de video cuando el vehículo se haya apagado. Cuando
el modo de estacionamiento no esté encendido, el grabador no se encenderá en caso
de vibración.
RESOLUCIÓN DE PROBLEMAS
Si el producto experimenta problemas durante su uso normal, por favor recurra a los
siguientes métodos para solucionar esos problemas:
●No graba
Compruebe si hay suficiente espacio en la tarjeta MicroSD, si hay demasiados ficheros
debido al bloqueo de la tarjeta MicroSD, el espacio de almacenamiento no es
suficiente, por favor formatee la tarjeta de memoria TF después de su uso.
Compruebe si el ciclo de grabación en el menu principal está seleccionado en OFF,
seleccione 3 minutos.
ESPECIFICACIONES DEL PRODUCTO
Pantalla de visualización 5 pulgadas, alta definición, pantalla táctil IPS
170° ancho de ángulo de la lente
Reposo
Reposo
Reposo
Reposo
Reposo
Reposo
Reposo
Reposo
Capacidad máxima de 32GB
1 M
MOV
JPEG
Funcionamiento multilenguaje
Ángulo de la lente
Retirar la cámara
G-SENSOR
Marcha atrás automática de las imágenes
Altavoz
Micrófono
Idioma
Vídeo en bucle
Función de grabar
Foto a foto
Tarjeta de memoria
Resolución de la cámara frontal
Toma de fotos de calidad
Formato de vídeo
Formato de imagen
1080P FHD(1920*1080) 720P(1080*720)
Note: Este producto retiene el diseño y especificaciones sin previo aviso.
●Cuando graba, se para automáticamente
Debido a la gran cantidad de datos de video de alta definición procesados en el
momento de la grabación, por favor, utilice tarjetas de memoria TF de alta velocidad
de clase 10 o superior.
●Aparece un mensaje de “error de archive” cuando intenta ver sus fotos y vídeos
Por favor, compre una tarjeta de memoria TF auténtica; si la tarjeta TF está guardando
los datos, el fichero está incompleto. Por favor, utilice la función “Formato” del
grabador para reformatear la tarjeta TF.
●La imagen está borrosa
Por favor, compruebe que no hay huellas o suciedad en la lente y utilice el papel /
gamuza de a lente para limpiar sus partes, mientras limpia el parabrisas frontal.
● Cuelgue
Después de un cuelgue, utilice un objeto puntiagudo para presionar el botón que
reinicia la máquina.
CONTACTE CON NOSOTROS
Para cualquier pregunta, incidencia o comentario sobre nuestros productos, por favor,
envíe un correoelectrónico a la siguiente dirección o llámenos. Responderemos lo
antes posible.
Español

31 32
Français
La caméra embarquée AKASO n’est pas destinée à être modifiée ou réglée pendant
l’utilisation du véhicule. AKASO ne peut être tenu responsable des dommages
résultant d’une mauvaise utilisation par l’utilisateur de la caméra
Utilisez uniquement les chargeurs, accessoires et du matériel approuvés par le
fabricant.
AKASO ne peut être tenu responsable de la sécurité de l’utilisateur lorsque des
accessoires ou du matériel ne sont pas approuvés par AKASO.
Ne laissez pas votre appareil à des endroits excessivement chauds, froids, humides
ou secs.
Cela pourrait entraîner un dysfonctionnement de l’écran, endommager l’appareil ou
provoquer l’explosion de la batterie. Il est recommandé d’utiliser l’appareil dans des
environnements à une température comprise entre -10°C et 55°C et une humidité
allant de 10 à 80%.
Si votre appareil chauffe excessivement, laissez-le refroidir avant de l’utiliser à
nouveau.
Le contact prolongé d’un appareil en surchauffe contre la peau peut entraîner une
apparence de brûlures (basse température) telle que des tâches rouges ou des zones
de pigmentation plus foncées.
Ne manipulez pas le chargeur pour voiture avec des mains mouillées et ne
déconnectez pas le chargeur en tirant sur le câble. Cela peut entraîner une
électrocution.
N’utilisez pas de câble d’alimentation ou de connecteur endommagés, ni de prise
électrique desserrées.
Un branchement défectueux risque de causer un choc électrique voire un incendie.
Ne manipulez pas votre appareil avec les mains mouillées.
Cela peut entraîner un choc électrique.
Pendant un enregistrement, veillez à ne pas retirer la carte SD de la caméra car cela
risque de générer une erreur.
Veuillez toujours garder propre l’objectif de la caméra et assurez-vous que la caméra
n’est pas gênée de face par un objet ou par un élément réflecteur.
Si les vitres du véhicule sont sur-teintées, la qualité de l’enregistrement vidéo s’en
trouvera diminuée.
PRÉCAUTIONS Veuillez utiliser une carte Micro SD 10 à haute vitesse (TF).
Veuillez acheter une carte micro SD authentique afin d’éviter tout problème de
compatibilité.
Lors de la première utilisation, veuillez formater la carte micro SD
Remarques:
a. Carte micro SD supportée jusqu’à 32G, format FAT32, taille unitaire d’allocation ≥
32kb.
b. Assurez-vous d’insérer correctement la carte micro SD dans la fente intégrée.
Lorsque vous entendez un « clic », la carte mémoire est alors correctement insérée.
CONSEILS D’UTILISATION
PRÉSENTATION DU PRODUIT
Écran LCD
OK
Port GPS
(optionnel) Fente
micro SD Port caméra
arrière Port USB
Mode Alimentation Haut Bas
Haut-parleur Clip arrière Objectif
① ② ③ ④ ⑤ ⑥ ⑦ ⑧ ⑨

33 34
1
INSTALLATION ET UTILISATION
① Bouton OK: Fonction d’enregistrement On/off. En mode veille, appuyez sur [OK]
pour commencer l’enregistrement, et appuyez de nouveau sur [OK]
pour l’arrêter.
② Bouton Menu
Fonction 1: En mode veille, appuyez brièvement sur la touche [M] pour accéder à
l’interface du menu de configuration.
Fonction 2: en mode photo, touche pour prendre une photo, appuyez brièvement
sur [OK] pour prendre une photo.
③ Bouton d’alimentation
Fonction 1: Fonction ON / OFF de l’écran, appuyez brièvement sur le bouton
[ALIMENTATION] pour allumer ou éteindre l’écran (lorsque l’écran est
éteint, il suffit de toucher l’écran pour qu’il s’allume)
Fonction 2: Fonction ON / OFF, appuyez longuement sur la touche [ALIMENTATION]
pour allumer / éteindre l’appareil.
L’appareil enregistre automatiquement les fichiers vidéo et les paramètres utilisateur,
puis s’éteint.
④ HAUT ⑤ BAS
⑥ Port USB : l’alimentation de la machine et le rechargement de la.
⑦Batterie interne ⑧Fente carte micro SD ⑨Port GPS (optionnel)
Emplacement d’installation idéal
Câble d’alimentation
1. Installation
Insérez la carte micro SD dans l’enregistreur pour garder les vidéos, les images et
d’autres fichiers. Placez l’enregistreur dans le sens d’un rétroviseur et branchez-le à la
prise allume-cigare à l’aide du chargeur voiture.
Remarque: Vous pouvez étendre le câblage de chargement / d’alimentation tout le
long du bord du pare-brise. La caméra arrière optionnelle est installée à l'arrière du
véhicule, et vous devez faire attention à l’orientation du placement. Le câblage peut
être effectué le long du toit du véhicule. Une fois l'installation terminée, insérez la prise
de la caméra dans le port arrière caméra de l’enregistreur. Ajustez la position de
l'objectif pour vous assurer qu‘il est au même niveau que le sol. Démarrez le moteur
pour vérifier que le périphérique a été correctement installé.
Comment installer la caméra de vue arrière, vous avez deux types de méthodes d'installation.
1. Installé sur le pare-brise arrière.
2. Installé près de la plaque d'immatriculation.
3. Connectez les fils noir et rouge aux feux de recul pour voir la situation d'inversion.
2. Lancer le fonctionnement
Appuyez sur la touche [ALIMENTATION] pour allumer l’enregistreur ; ou connectez le
chargeur voiture puis démarrez la voiture et l’enregistreur se mettra en tension
automatiquement.
3. Rechargement de la batterie et connexion USB
Appuyez sur la touche [ALIMENTATION] pour allumer l’enregistreur ; ou connectez le
chargeur voiture puis démarrez la voiture et l’enregistreur se mettra en tension
automatiquement.
(1) Vous pouvez utiliser le chargeur voiture fourni gratuitement. Sur alimentation, le
symbole batterie en haut de l’écran sera remplacé par le symbole chargement.
(2) L’appareil peut être connecté à un ordinateur par câble USB et une connexion
réussie devrait automatiquement laisser apparaître le menu des options. Vous
pouvez appuyer sur les touches [HAUT / BAS] pour sélectionner puis sur la touche
[OK] pour confirmer.
Cet appareil peut fonctionner comme un disque dur portable afin de copier et
transférer des fichiers depuis un ordinateur.

35 36
PRÉSENTATION DES PRINCIPALES FONCTIONS DE L’INTERFACE
Enr off lecture Vidéos verrou
Son off
2017-09-13 Mardi Caméra Réglages
12:45
MODE VIDÉO (INTRODUCTION DE L’ICÔNE)
Retour
Verou vidéoAudio Off
Capturer
photo
Enr Off
Mode nuit
Changement
vidéo
REC 00:58
2016-09-20 12:23:12
1080FHD
Date / heure Vidéo on / off
Changement caméra
avant / arrière
Prendre photo
Mode nocturne
Retourà
a page
principale
Vidéo verrouillé /
déverrouillé
Instructions
État son Temps d’enregistrement
Résolution vidéo
Audio on / off
Verrouiller /
déverrouiller vidéo
État de
consommation
État vidéo
1. Fonction d’enregistrement automatique
Démarrez le moteur de la voiture, l'enregistreur s’allume automatiquement et active la
fonction d'enregistrement. Éteignez le moteur de la voiture, l'enregistreur sauvegarde
automatiquement le contenu de l'enregistrement et s’éteint, enregistre la séquence
vidéo stockée sur la carte micro SD. Lorsque la carte micro SD est pleine, l'enregistreur
écrasera les images précédemment enregistrées, sauf les fichiers verrouillés qui ne
seront pas automatiquement couverts.
2. Utiliser la fonction d’enregistrement manuel
Sur la page principale, cliquez sur l'icône de l'enregistreur , cliquez sur le point de
l'écran d'enregistrement du trafic, à droite de l'icône ; vous pouvez manuellement
activer / désactiver la fonction vidéo. Vous pouvez également appuyer sur le bouton
OK pour activer / désactiver la fonction d'enregistrement. Si vous souhaitez mettre
l'appareil hors tension, appuyez à nouveau pendant 3 secondes sur la touche
[ALIMENTATION] et l'enregistreur sauvegarde automatiquement l'enregistrement et
tout s'éteint.
3. Configuration
Sur la page principale, cliquez sur l'icône [Paramètres système] , entrez les
paramètres du système, y compris les paramètres de l'enregistreur / paramètres
généraux, comme indiqué ci-dessous :
Remarque: Avant d’entrer dans les paramètres du système, veuillez d’abord
arrêter tout enregistrement.
FEATURES
1/2 Rég enregistr
Param
généraux
Résolution
Retour
Enregistrement en boucle
Mode nuit
Démarrer sur la page de l’enregistreur
Détection de mouvements
Table of contents
Languages:
Other Akaso Dashcam manuals
Popular Dashcam manuals by other brands

Kompernass
Kompernass CR 5 A2 Operating instructions and safety instructions

BlackVue
BlackVue DR900X-1CH quick start guide

RoadScan Canada
RoadScan Canada PBC1 User instruction manual

Car and Driver
Car and Driver CDC-900 user manual

morning station
morning station MS-T7 Quick user manual

Smart Witness
Smart Witness KP1 user guide