Akaso C320 User manual

USER
MANUAL
C320 Dash Camera

What’s in the box
Camera overview
How to power on
Format Memory Card
Playback Mode
Settings Operation
Video Settings
System Settings
Specifications
Precautions
Troubleshooting
Contact US
1
1
3
4
5
8
9
10
12
12
12
13
CONTENTS
English
01

C320 Dash Camera Car Charger Adapter
Hardwire Kit +
Five Cable Clips Quick User Manual
USB Cable
Bracket
WHAT’S IN THE BOX
QUICK
REFERENCE
GUIDE
C320Dash Camera
CAMERA OVERVIEW
USB
RE MIC
2
3
4
5
8
9
10
11
13
14
12
17
15
16
1. Speaker
2. OK Button
3. Mode Button
4. Lock Button
5. Power Button
6. Bracket Slot
7. Lens
8. SD Card Slot
9. Up Button
10. Menu Button
11. Down Button
12. USB Power Slot
13. Charging Indicator Light
14. Working Indicator Light
15. Screen
16. MIC
17. Reset Button
7
6
1
02 03

HOW TO POWER ON
1
2
① Insert the car charger into your car’s cigarette lighter socket.
② Insert the USB port of the car charger into the dash cam’s USB port (Charger is DC
12-24V, Out DC 5V 2A).
Note:
①After powering on dash cam through the car charger, the dash cam will automatically
turn on and start recording (if the card has been inserted). If want to do some settings,
please firstly stop recording by pressing “OK” button.
②Please charge for at least 30 minutes before using the built-in battery as power supply.
③The indicator light on the left top of the screen will be stayed red when the battery is
charging; And the light stayed blue when it is fully charged .
④The built-in battery is only ready for "parking monitor" function.
In normal use, please plug the car charger into the cigarette lighter of the car to power
the dash cam. The built-in battery is not recommended as a normal use of power
supply to the dash cam, in order to avoid the battery no power when parking, and
cause the parking monitoring function to fail.
⑤The camera can be powered by connecting the phone adapter 5VDC with the USB
Cable to plug into a power outlet.
When charging, please shut down the camera by long press the power button.
Tips:
① Flashing blue indicator light means the camera is recording
② Red indicator light means the camera is charging.
FORMAT MEMORY CARD
Press to enter into the setting, press again to switch to setup setting, then press
to “Format”, press button and then press or to choose “Cancel or OK”, press to
confirm and exit.
Format
Default Setting
Version
3/3
Setup
Format
Default Setting
Version
3/3
Setup
All data will be
deleted
Cancel
OK
Note:
① All data will be deleted. Before formatting your memory card, please remember to
backup your important data on your other devices.
② Every time you insert a SD card, please format it in the camera to ensure that the SD
card is compatible with the camera well.
04 05

PLAYBACK MODE
1. Playback Videos on Dash Camera
Press “OK” button to stop recording firstly, press “M” button to enter to playback mode.
There are 2 folder in playback mode. 1st one is the folder of Normal video, 2nd is the
folder of Emergency video.
Playback the Normal Videos
① After entering the playback interface, press / to choose the folder of Normal video,
then press OK ; Press / to choose the video you want to playback, press OK to
confirm.
Normal Video
Emergency Video
Folder
Playback the Emergency video
① After entering the playback interface, press / to choose the folder of Emergency
video, then press OK; Press / to choose the video you want to playback, press OK
to confirm.
②Press “M” to exit when you finish to playback the video.
001_2019_0606_102846.mov
06/06/2019 10:34:46 AM
1080P
001_2019_0606_102846.mov 2/2
1 2
001_2019_0606_095837.mov 1/1
06 07

2. Playback recorded videos on Computer
Download Videos from SD Card
Way1. Connect the dash cam to the USB port of computer via USB cable;
Choose ”Storage Mode” option on the screen of dash cam, press OK;
”Mass Storage” will pop out on the screen of dash cam, then you can copy the videos
from sd card.
②Press “M” to exit when you finish to playback the video.
Note:
Press OK one time to stop playing, press OK again to continue playing.
Press to exit the current playing.
Press / to to backward/forward the current playing, 2X/4X/8X for options.
06/06/2019 10:51:26 AM
1080P
00:0012
Mass Storage
Note: The computer can be directly used as the power supply for the dash cam if you
choose the “Record Mode”, and the camera will automatically start recording.
You can real-time preview, record, change the setting, etc.
Way2. Take out the card from the dash cam, then insert the sd card to the card reader and
insert the card reader into the USB port of the computer to obtain the videos in the card.
SETTINGS OPERATION
After turning on the camera, press OK button to stop recording firstly.
Press to enter into the settings interface.
Resolution
Loop Recording
WDR
Record Audio
1/2
Video
08 09
Storage Mode
Mass Storage

Video Settings
Press to choose , then press OK to enter into video settings.
Resolution - 1080FHD 1920 x 1080, 720P 1280 x 720 for optional,
default is 1080FHD 1920 x 1080
Press to choose “Resolution”, press OK and press or to choose “1080FHD
1920 x 1080 or 720P 1280 x 720”, press OK to confirm and exit.
Loop Recording - Off, 1 Minute, 3 Minutes, 5 Minutes for options, default is 3 Minutes.
Press to choose “Loop recording”, press OK to enter loop recording settings, and then
press or to choose ”Off or 1 Minute or 3 Minutes or 5 Minutes”, press OK to
confirm and exit.
The dash cam will keep recording to fill the memory card, when the card is full, the oldest
file will be overwritten to make room for the new recording.
WDR (Wide Dynamic Range) - Off, On for options, default is on.
Press to choose “WDR”, press OK and press or to choose ”Off or On”, press OK to
confirm and exit.
WDR improves the overall exposure to create a well-balanced image, with greater details
in dark and the highlights that do not get blown-out.
Record Audio - Off, On for options, default is on.
Press to choose “Record Audio”, press OK and press or to choose ”Off or On”,
press OK to confirm and exit.
Date Tag - On / off for optional, default is on.
Show the date and time on videos.
Press to choose “Date Tag”, press OK and press or to choose ”Off or On”, press
OK to confirm and exit.
G Sensor - Off, Low, Medium, High for options, default is Low.
Press to choose “G Sensor”, press OK to enter G-sensor settings and then press or
to choose ”Off or Low or Medium or High”, press OK to confirm and exit.
The dash cam will automatically lock the current recording as a proof of an incident, once
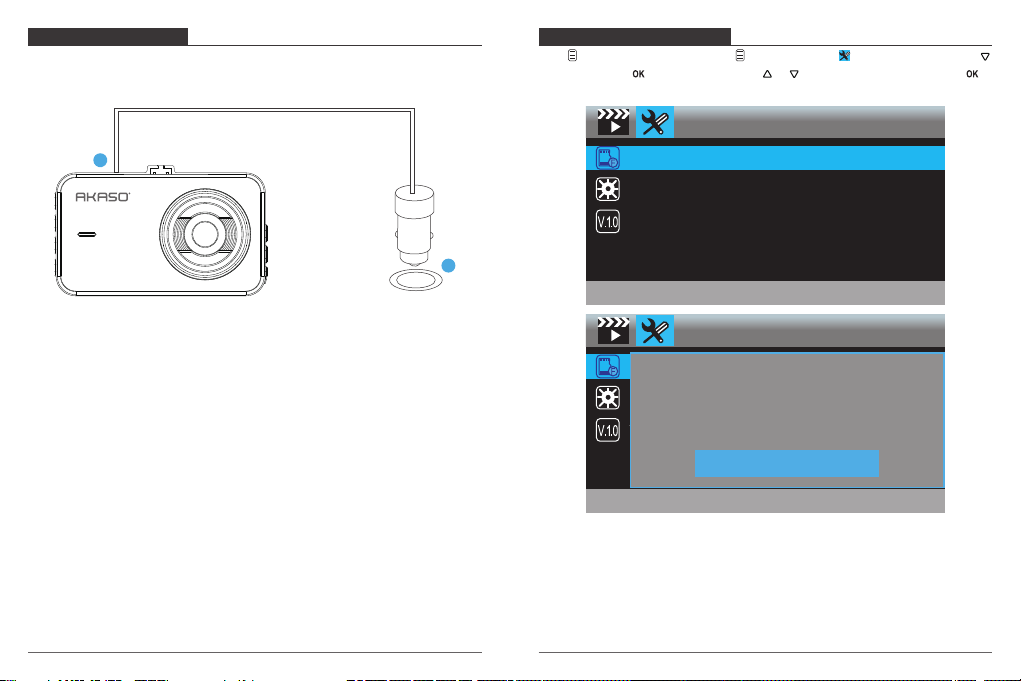
System Settings
Press to choose , then press OK to enter into system settings.
Screen Saver
Date/Time
Time Mode
Beep Sound
1/3
Setups
Screen Saver - Off, 30 Sec., 1 Minute, 2 Minutes for options, default is 1 Minute.
Press to choose “Screen save”, press OK , and then press or to choose off /
30seconds / 1minute / 2minutes option, press OK to confirm and exit.
Date/Time - YY/MM/DD; MM/DD/YY; DD/MM/YY 3 mode for optional, default is
MM/DD/YY mode.
Press to choose “Date/Time”, press OK to enter this settings. Press OK button until it
turn to the mode setting on button, choose the Date/Time mode you want. Then press
or adjust the number of moth/day/year and hour/minute/second one by one, press OK
to confirm and switch to next.
Time Mode - 12-hour system, 24-hour system for options, default is 12h.
Press to choose “Time System” in settings, press OK to enter this settings. Press or
to choose “12-hour system” or “24-hour system” according to your preference and press
OK to confirm and exist
Beep Sound - Off, On for options, default is on.
Press to choose “Beep Sound” in settings, press OK and press or to choose off/on,
press OK to confirm and exit.
10 11
the built-in G-sensor detects a collision. The locked files will NOT be overwritten by Loop
Recording.

Language - Set the language of dash cam, default is English.
Press to choose “Language” in settings, press or to choose the language you need,
press OK to confirm and exit.
Fatigue Driving Reminder - Off, 1hour, 2hours, 4hours for options, default is off.
Press to choose “Fatigue Driving Reminder”, press OK to enter this settings. Press or
to choose the “off”, ”1hour”, ”2hours” or ”4hours” according to you need and press OK
to confirm and exist.
Parking Monitor - Off, On for options, default is off.
Enter into the setup setting, press to choose “Parking Monitor”, press OK to confirm,
and then press or to choose off/on, press OK to confirm and exit.
Frequency - 50Hz, 60Hz for options, default is 60Hz.
Press to choose “Frequency” in settings, press OK and press or to choose “50Hz
or 60Hz”, press OK to confirm and exit.
Format - Format the card on dash cam.
Press to choose ”Format” in settings, press OK twice to enter to SD card format settings,
press or to choose ”cancel” or ”ok” and then press OK to confirm your choice.
Default Settings - Restore the original settings.
Press to choose “Default Setting” in settings, press OK and press or to choose
“Cancel or OK”, press OK to confirm and exit.
Version info - Check the version info of current camera.
Press to choose “Version” in settings, press OK to check the camera’s version
information.
SPECIFICATIONS
Name
Resolution
Speaker
Screen
Micro
SD Card
AKASO C320 Dash Cam
1080P/720P
8Ω 0.5W
3 inch IPS screen
8GB-32GB
Model
Lens Angle
Working Temperature
Battery
Car Charger Output
C320
170°
-4°F ~ +140°F
180mAh
5V/2A
PRECAUTIONS
①Please safekeeping, prevent the lens from scratching and dirty.
②Please pay attention to anti-fouling and moisture-proof.
③Do not exposure the machine to the sun directly, prevent the built-in battery from
damage.
TROUBLESHOOTING
Q: The bracket is easy to fall off.
A: Please tear off the film on the bracket, and clean the windshield with a dry cloth.
Q: The camera lose power often.
A: Due to different vehicle designs, please rotate the car charger to adjust it keep stable.
Q: The camera unable to be turned on.
A: Please make sure that whether the charge indicator light is on or off, if off, please
re-insert the car charger and reset the camera.
Q: All buttons are not responding.
A: Please reset the camera to restart.
12 13

Q: The camera doesn’t record automatically after turning on.
A: 1, Check whether the memory card is full or no.
2, Reformat the card, if this problem exists, please change a new card with class 10 &
above.
Q: The video has no voice.
A: 1. Please check the voice icon is not .
2. In recording mode, press button to turn on/off the voice.
Q: When connect to computer, there is no external storage device.
A: Please replace another USB data cable to try.
Q: Menu button “ ” was no responding.
A: Because when the camera is recording, you can not operate the menu button, please
press OK button to stop recording.
Q: The camera keeps turning on and off automatically.
A: Please charge the camera via USB car charger, do not charge the battery via the USB
data cable with other adapters.
CONTACT US
For any inquires, issue or comments concerning our products, please send E-mail to the
address below, and we will respond as soon as possible.
E-mail: [email protected]
Tel: (888) 466-9222 (US) Mon-Fri 9am-5pm (EST)
Official website: www.akasotech.com
14
English

15
Deutsch
Was ist in der Box?
Kameraübersicht
Wie man Einschaltet
Speicherkarte formatieren
Wiedergabemodus
Einstellungen
Spezifikationen
Vorsichtsmaßnahmen
Problemlösung
Kontaktieren Sie Uns
16
16
17
19
20
23
27
27
27
28
INHALTSVERZEICHNIS

C320 Dashcam Autoladegerät
Kabelgebundenes Set +
fünf Kabelclips Kurzanleitung
USB-Kabel
Halterung
WAS IST IN DER BOX?
QUICK
REFERENCE
GUIDE
C320Dash Camera
KAMERAÜBERSICHT
USB
RE MIC
2
3
4
5
8
9
10
11
13
14
12
17
15
16
1. Lautsprecher
2. OK-Taste
3. Modus-Taste
4. Sperren-Taste
5. Ein- / Ausschalter
6. Halterungsschlitz
7. Linse
8. SD-Kartenschlitz
9. Aufwärtstaste
10. Menütaste
11. Abwärtstaste
12. USB-Ladeanschluss
13. Ladeanzeige
14. Arbeitsanzeige
15. Bildschirm
16. Mikrofon
17. Reset-Taste
7
6
1
WIE MAN EINSCHALTET
① Setzen Sie das Ladegerät in den Zigarettenanzünder Ihres Autos ein.
②Stecken Sie den USB-Anschluss der Autoladung in den USB-Anschluss der Dash-Cam
(Ladegerät ist DC 12-24 V, Ausgang DC 5 V 2A).
16 17

1
2
Hinweis:
①Mit der Stromversorgung über das Autoladegerät schaltet sich die Dashcam
automatisch ein und startet die Aufnahme (wenn die Karte eingelegt wurde). Wenn Sie
einige Einstellungen vornehmen möchten, beenden Sie zunächst die Aufnahme, indem
Sie auf die “OK-Taste“ drücken.
② Bitte laden Sie das Gerät 30 Minuten lang auf, bevor Sie diese Autokamera mit dem
eingebauten Akku verwenden.
③ Die Anzeigelampe oben links auf dem Bildschirm bleibt rot, wenn der Akku aufgeladen
wird. Und das Licht wird blau, wenn es voll aufgeladen ist.
④ Der eingebaute Akku dient nur zur Stromversorgung der Funktion "Parküberwachung".
Schließen Sie bei normalem Gebrauch das Autoladegerät an den Zigarettenanzünder
des Autos an, um die Autokamera mit Strom zu versorgen. Die eingebaute Batterie
wird nicht als normale Stromversorgung für die Autokamera empfohlen, um zu
vermeiden, dass die Batterie beim Parken keinen Strom erhält und die
Parküberwachungsfunktion ausfällt.
⑤ Die Kamera kann mit Strom versorgt werden, indem der Telefonadapter 5VDC mit dem
USB-Kabel an eine Steckdose angeschlossen wird.
Schalten Sie die Kamera während des Ladevorgangs durch langes Drücken des
Netzschalters aus.
Tipps: ① Blau Blinklicht bedeutet, dass die Kamera aufzeichnet
② Rotes Licht bedeutet, dass die Kamera aufgeladen wird.
③ Blaues Licht bedeutet, dass die Kamera arbeitet.
SPEICHERKARTE FORMATIEREN
Drücken Sie Gehen Sie in die Setup-Einstellung ein und drücken Sie Um
“Formatieren“ auszuwählen, drücken Sie OK und dann drücken OK erneut, um die
SD-Kartenoption zu bestätigen oder Um "Abbrechen oder OK" zu wählen, drücken
Sie OK um zu bestätigen und zu beenden.
Formatieren
Standardeinstellung
Ausführung
3/3
Konfiguration
Formatieren
Default Setting
Version
3/3
Konfiguration
Alle Daten werden sein
gelöscht
Stornieren
OK
Hinweis:
① Alle Daten werden gelöscht. Denken Sie vor dem Formatieren Ihrer Speicherkarte
daran, Ihre wichtigen Daten auf Ihren anderen Geräten zu sichern.
② Formatieren Sie die Karte bei jedem Einlegen in die Kamera, um eine bessere
Kompatibilität mit der Kamera zu gewährleisten.
18 19

WIEDERGABEMODUS
1. Videos auf Dashcam wiedergeben.
Drücken zuerst OK um die Aufnahme zu beenden, und dann “M”-Taste zum
Wiedergabemodus.
Es gibt zwei Ordner im Wiedergabemodus. Der erste ist Ordner des Normalvideos und
der zweite für Notfallvideo.
Wiedergabe der Normalvideos
① Nach dem Aufrufen der Wiedergabeschnittstelle, drücken / um den Ordner der
Normalvideos zu wählen, drücken dann; Drücken / und wählen das Video aus Sie
wiederspielen möchten und drücken zu bestätigen.
Normalvideos
Notfallvideo
Ordner
Wiedergabe der Notfallvideos
① Nach dem Aufrufen der Wiedergabeschnittstelle, drücken / um den Ordner der
Notfallvideos zu wählen, drücken dann OK; Drücken / und wählen das Video aus
Sie wiederspielen möchten und drücken zu bestätigen.
②Drücken Sie “M”-Taste um das Menü zu verlassen, wenn Sie mit der Wiedergabe des
Videos fertig sind.
001_2019_0606_102846.mov
06/06/2019 10:34:46 AM
1080P
001_2019_0606_102846.mov 2/2
1 2
001_2019_0606_095837.mov 1/1
20 21

2. Wiedergabe von Videos auf dem Computer
Weg1. Verwenden Sie das USB-Kabel, um die Dash-Cam an den USB-Anschluss des
Computers anzuschließen.
Wählen Sie "Speichermodus" auf dem Bildschirm der Dashcam und drücken Sie OK ;
Auf dem Bildschirm der Dash-Cam wird "Speicher" angezeigt. Anschließend können Sie
die Videos von der Karte kopieren.
②Drücken Sie “M”-Taste um das Menü zu verlassen, wenn Sie mit der Wiedergabe des
Videos fertig sind.
Hinweis:
Drücken einmal um die Wiedergabe anzuhalten, drücken nochmal um weiterzuspielen.
Drücken um die aktuelle Wiedergabe zu beenden.
Drücken / um die aktuelle Wiedergabe vor-oder zurückzuspulen, 2X / 4X / 8X für
Optionen.
06/06/2019 10:51:26 AM
1080P
00:0012
Speicher
Hinweis: Wenn der “Videomodus” ausgewählt ist, kann der Computer direkt als
Stromversorgung für die Schaltnocke verwendet werden.
In diesem Modus startet die Kamera automatisch die Aufnahme.
Sie können in Echtzeit eine Vorschau anzeigen, aufzeichnen, die Einstellungen ändern usw.
Weg2. TNehmen Sie die Karte aus der Dash-Cam heraus, setzen Sie die Karte in den
Kartenleser ein und stecken Sie den Kartenleser zuletzt in den USB-Anschluss des
Computers, um die Videos auf der Karte zu erhalten.
EINSTELLUNGEN
Der Kamera Drücken Sie nach dem Einschalten der Kamera OK Drücken Sie die Taste, um
die Aufnahme zu beenden. Anschließend können Sie Einstellungen vornehmen.
Auflösung
Loop-Aufnahme
WDR
Audioaufnehmen
1/2
Video
22 23
Speichermodus
Videomodus

Video
Drücken Sie die Taste, um die Systemeinstellungen aufzurufen. Wählen Sie , Drücken
Sie OK um die Einstellung einzugeben.
Auflötsung - 1080FHD 1920X1080, 720P 1280X720 für optional,
Standard ist 1080FHD 1920X1080.
Drücken um “Auflösung” zu wählen, drücken OK und drücken oder um “1080FHD
1920X1080 oder 720P 1280X720” zuwählen, drücken OK zu bestätigen und das Menü
verlassen.
Loop-Aufnahme - Aus, 1Min, 3Min, 5Min für Optionen, Standard ist 3 Minuten.
Drücken Sie , um “Loop-Aufnahme“ auszuwählen OK Um die Einstellung einzugeben
und "Aus oder 1 Minute oder 3 Minuten oder 5 Minuten" zu wählen, drücken Sie OK zu
retten und zu existieren.
Die Dashcam nimmt auf und es füllt die Speicherkarte. Wenn die Karte voll ist, wird die
älteste Datei überschrieben, um Platz für neue Aufnahme zu bereiten.
WDR - An / Aus für Optionen, Standardeinstellung ist An.
Drücken Sie um “WDR“ zu wählen, drücken Sie OK Um die Einstellung einzugeben und
"Aus oder An" zu wählen, drücken Sie OK um zu bestätigen und zu beenden.
WDR verbessert die Belichtung, um ein wohlausgewogenes Bild mit größeren Details bei
Dunkelheit und Glanzlichtern, die nicht ausgeblasen werden, zu erzielen.
Audioaufnehmen - An / Aus für Optionen, Standardeinstellung ist An.
Drücken Sie um “Audio aufnehmen“ zu wählen, drücken Sie OK Um die Einstellung
einzugeben und "Aus oder An" zu wählen, drücken Sie OK um zu bestätigen und zu
beenden.
Datums-Etikett - Ein / Aus für optional, Standard ist Ein.
Es zeigt Datum und Uhrzeit in Videos an.
Drücken und wählen “Datums-Etikett”, drücken OK und dann oder um ”Aus oder
Ein” zu wählen, drücken OK um zu bestätigen und das Menü zu verlassen.
G-Sensor - AUS, Niedrig, Mittel, Hoch für Optionen, Standard ist niedrig.
Drücken Sie um “G-Sensor“ zu wählen, drücken Sie OK Um die Einstellung einzugeben
Konfiguration
Drücken um zu wählen, drücken dann OK um System Einstellungen aufzurufen.
Bildschirmschutz
Datum/Uhrzeit
Zeitmodus
Tastenton
1/3
Konfiguration
Bildschirmschutz - Aus, 30Sek., 1Min, 2Min für Optionen, Standard ist 1 Minute.
Drücken Sie , um “Bildschirmschutz“ auszuwählen, drücken Sie OK Um die Einstellung
einzugeben und “Aus oder 30 Sek. oder 1 Min oder 2 Min“ zu wählen, drücken Sie OK
um zu bestätigen und zu beenden.
Datum/Uhrzeit - JJ/MM/TT; MM/TT/JJ; TT/MM/JJ
Drei-Modus für optional, Standard ist MM / TT / JJ-Modus.
Drücken um “Datum/Uhrzeit” zu wählen, drücken OK zur Einstellung. Drücken Taste OK
bis die Moduseinstellung auf der Schaltfläche angezeigt wird, wählen Sie den gewünschten
“Datum/Uhrzeit”-Modus aus. Drücken dann oder um die Nummer der Modi
“Monate/Tage/Jahre” und “Stunden/Minuten/Sekunden” nacheinander einzustellen,
drücken um zu bestätigen und zum nächsten zu wechseln.
Zeitmodus - 12-Stunden-System, 24-Stunden-System für Optionen, Standard ist
12-Stunden-System.
Drücken um “Zeitmodus” in Einstellungen zu wählen, drücken OK zu der Einstellung.
Drücken oder um “12-Stunden-System” oder “24-Stunden-System” nach Ihrem
Wunsch auszuwählen und drücken OK zu bestätigen und das Menü zu verlassen.
24 25
und "Aus oder Niedrig oder Mittel oder Hoch" zu wählen, drücken Sie OK um zu
bestätigen und zu beenden.
Sobald der eingebaute G-Sensor eine Kollision erkennt, sperrt die Dashcam automatisch
die aktuelle Aufzeichnung als Beweis für einen Vorfall. Die gesperrten Dateien werden von
der Loop-Aufnahme NICHT überschrieben.

Tastenton - An / Aus für Optionen, Standardeinstellung ist An.
Drücken Sie um “Tastenton“ zu wählen, drücken Sie OK Um die Einstellung einzugeben
und "Aus oder An" zu wählen, drücken Sie OK zu speichern und zu beenden.
Sprache - Stellen Sie die Sprache der Dash-Cam ein. Die Standardeinstellung ist Englisch.
Drücken Sie , um “Sprache“ zu wählen, und drücken Sie OK , um die Einstellung
einzugeben und die gewünschte Sprache auszuwählen. Drücken Sie OK um die
Einstellung zu speichern und den Vorgang zu beenden.
Müdigkeitsfahren Erinnerung - Aus, 1Stunde, 2Stunden, 4Stunden für Optionen,
Standardeinstellung ist Aus.
Drücken Sie , um “Müdigkeitsfahren Erinnerung“ auszuwählen. Drücken Sie OK um die
Einstellung einzugeben und “Aus oder 1 Stunde oder 2 Stunden oder 4 Stunden“ zu
wählen, drücken Sie OK um zu bestätigen und zu beenden.
Parkplatz-Monitor - An / Aus für Optionen, Standardeinstellung ist Aus.
Drücken Sie um “Parkplatz-Monitor“ zu wählen, drücken Sie OK Um die Einstellung
einzugeben und "Aus oder An" zu wählen, drücken Sie OK zu speichern und zu beenden.
Frequenz - 50Hz, 60Hz für Optionen, Standard ist 60Hz.
Drücken Sie um "Frequenz" auszuwählen, drücken Sie, OK um die Einstellung
einzugeben, und wählen Sie "50Hz oder 60Hz". Drücken Sie, OK , um die Einstellung zu
speichern und zu beenden.
Formatieren - Formatieren Sie die Karte mit der Dash-Cam.
Drücken Sie um “Formatieren“ auszuwählen, drücken Sie OK um die Einstellung
einzugeben und "SD-Karte" zu wählen, drücken Sie OK und um "Abbrechen oder OK"
zu wählen, drücken Sie OK um zu bestätigen und zu beenden.
Standardeinstellung - Stellt die werkseitigen Standardeinstellungen wieder her.
Drücken Sie um “Standardeinstellung”, auszuwählen, drücken Sie OK um die Einstellung
einzugeben und ”Abbrechen or OK”, drücken Sie OK um zu bestätigen und zu beenden.
Fireware-Info - Überprüfen Sie die Version der Kamera.
Drücken Sie um “Fireware-Info", Drücken Sie OK um die Versionsinformationen der
Kamera anzuzeigen, drücken Sie OK um zu bestätigen und zu beenden.
SPEZIFIKATIONEN
Name
Auflösung
Speaker
Bildschirm
Micro
SD Karte
AKASO C320 DashCam
1080P/720P
8Ω 0.5W
3-Zoll-IPS-LCD-Bildschirm
8GB-32GB
Modell
Linsenwinkel
Arbeitstemperatur
Batterie
Auto
Autoladegerät-Adapter
C320
170°
-4°F ~ +140°F
180mAh
5V/2A
VORSICHTSMASSNAHMEN
①Bitte bewahren Sie das Objektiv gut auf, damit es nicht zerkratzt und verschmutzt wird.
② Bitte achten Sie auf Antifouling und Feuchtigkeitsbeständigkeit.
③ Setzen Sie das Gerät nicht direkt der Sonne aus, um eine Beschädigung des
eingebauten Akkus zu vermeiden.
PROBLEMLÖSUNG
F: Die Halterung lässt sich leicht abfallen.
A: Bitte reißen Sie vor der Anbringung die Folie von der Halterung ab und reinigen Sie die
Windschutzscheibe mit einem trockenen Tuch.
F: Die Kamera verliert häufig an Strom.
A: Aufgrund unterschiedlicher Fahrzeugkonstruktionen drehen Sie das Autoladegerät bitte,
um es so einzustellen, dass es stabil bleibt.
F: Die Kamera kann nicht eingeschaltet werden.
A: Vergewissern Sie sich, dass die Ladekontrollleuchte ein- oder ausgeschaltet ist. Wenn
sie ausgeschaltet ist, setzen Sie das Autoladegerät wieder ein und setzen Sie die
Kamera zurück.
26 27

F: Alle Tasten reagieren nicht.
A: Bitte setzen Sie die Kamera zurück, um neu zu starten.
F: Die Kamera nimmt nach dem Einschalten nicht automatisch auf.
A: 1, Überprüfen Sie, ob die Speicherkarte voll ist oder nicht.
2, Formatieren Sie die Karte neu. Wenn dieses Problem auftritt, tauschen Sie bitte eine
neue Karte der Klasse 10 und höher aus.
F: Das Video hat keine Stimme.
A: Bitte überprüfen Sie, ob das Sprachsymbol angezeigt wird oder wenn es bei der
aufnahme ist , bitte schalten Sie es ein, um .
F: Beim Anschließen an einen Computer ist kein externes Speichergerät vorhanden.
A: Bitte ersetzen Sie ein anderes USB-Datenkabel, um es zu versuchen.
F: Menütaste reagiert nicht.
A: Da Sie während der Aufnahme der Kamera die Menütaste nicht bedienen können,
drücken Sie bitte OK Taste, um die Aufnahme zu beenden.
Q: Die Kamera schaltet sich automatisch ein und aus.
A: Bitte laden Sie die Kamera über das USB-Autoladegerät auf. Laden Sie den Akku nicht
über das USB-Datenkabel mit anderen Adaptern auf.
28
Deutsch
KONTAKTIEREN UNS
Bei Fragen, Problemen oder Kommentaren zu unseren Produkten zögern Sie bitte nicht,
uns zu kontaktieren. Wir werden Ihnen schnellstmöglich antworten.
E-mail: [email protected]
Offizielle website: www.akasotech.com

¿Qué hay en el Paquete?
Información General de Cámara
¿Cómo Encender?
Dar Formato a la Tarjeta de Memoria
Modo de reproducción
Ajustes de Dash Cam
Especificaciones
Precauciones
Resolución de Problemas
Contáctenos
30
30
31
33
34
37
41
41
41
42
29
CONTENIDO
Español

C320 Dash Cam Adaptador de
cargador de coche
Kit de cableado +
Cinco clips de cable Manual de usuario rápido
Cable USB
Soporte
¿QUÉ HAY EN EL PAQUETE?
QUICK
REFERENCE
GUIDE
C320Dash Camera
INFORMACIÓN GENERAL DE CÁMARA
USB
RE MIC
2
3
4
5
8
9
10
11
13
14
12
17
15
16
1. Altavoz
2. Botón OK
3. Botón de modo
4. Botón de bloqueo
5. Botón de encendido
6. Ranura de soporte
7. Lentes
8. Ranura de tarjeta SD
9. Botón Arriba
10. Botón de menú
11. Botón de abajo
12. Ranura de alimentación USB
13. Luz indicadora de trabajo
14. Working Indicator Light
15. Pantalla
16. Micrófono
17. Botón de reinicio
7
6
1
¿CÓMO ENCENDER?
① Inserte el cargador del coche en la ranura del encendedor de cigarrillos.
② Inserte el puerto USB del cargador del coche en el puerto USB de dash cam (El
cargador es DC 12-24V, DC de Salida 5C 2A).
30 31
Table of contents
Languages:
Other Akaso Dashcam manuals