manuals.online logo
Brands
  1. Home
  2. •
  3. Brands
  4. •
  5. Alexander
  6. •
  7. Music Pedal
  8. •
  9. Alexander SPACE FORCE REVEBERATION LEAP Series User manual

Alexander SPACE FORCE REVEBERATION LEAP Series User manual

USER MANUAL
v1.02
SPACESPACE
FORCEFORCE
reverberation
SERIES
1
Mankind has long known of the amazing properties of reverberant spaces. From the brilliant
reections of the largest concert halls to the splashy depths of your own shower, every
space has its own characteristic sound. The Space Force is our love letter to the sounds of
“elsewhere,” and features eight ingenious ways to add some space to your place, whether
you’re reaching for the stars or just trying to make your world a little bigger.
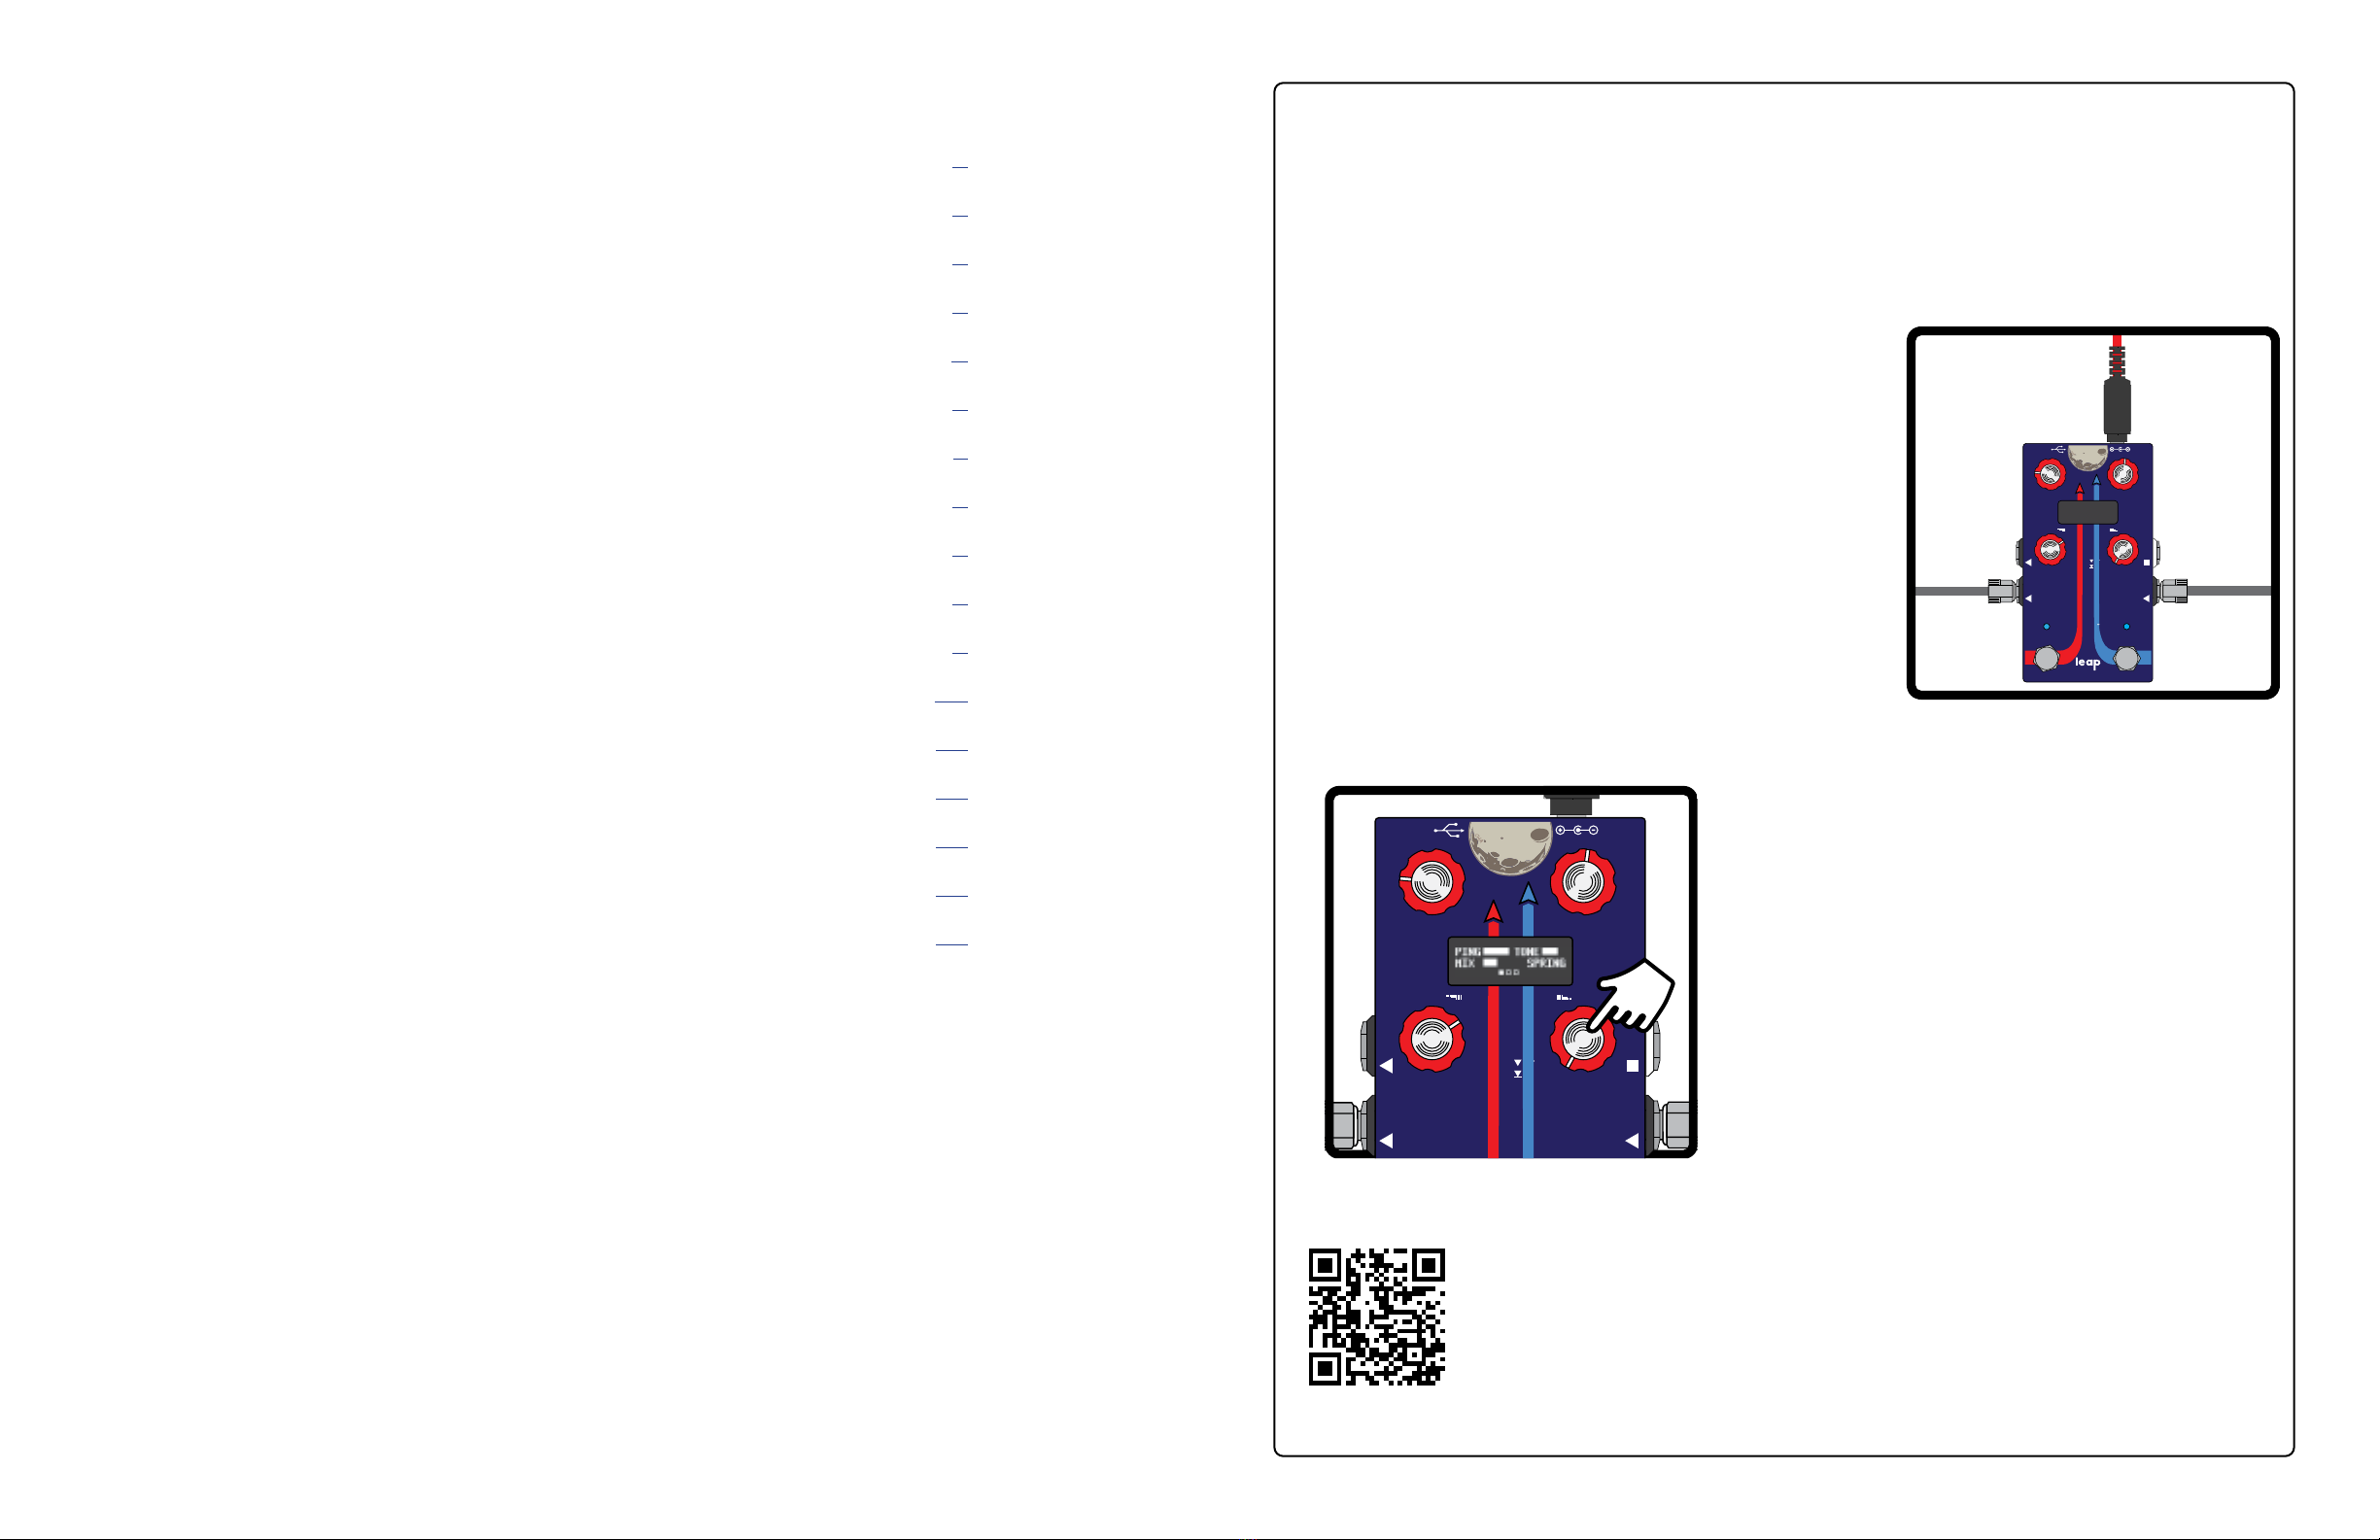
Using the pedal is pretty simple:
Plug your instrument into the INPUT jack and your
amplier or other effect into the L jack.
Power up the pedal with 9V 250mA or more.
Turn some knobs. As soon as you touch a knob, the
display will change to show what is happening.
Hold the right foot switch (BYPASS / PRESET) to
advance to the next preset, we’ve loaded some cool
sounds on here for you to try out.
BASIC OPERATION
scan me for
more info!
CONTENTS
BASIC OPERATION ...............................................................................1
CONTROLS & DISPLAY..........................................................................2
INS & OUTS............................................................................................3
BYPASS & TRAILS.................................................................................3
SOUND MODES......................................................................................4
PRESETS ..............................................................................................6
SETUP MENU ........................................................................................7
EXPRESSION PEDAL............................................................................8
RAMPING ...............................................................................................9
REMOTE FOOT SWITCH.........................................................................9
EXPANDER SWITCH ..............................................................................9
TAP TEMPO AND MIDI CLOCK ........................................................... 10
STEREO ROUTING ............................................................................. 11
MIDI SETUP ........................................................................................ 12
MIDI COMMANDS ................................................................................ 13
SPECIFICATIONS ............................................................................... 14
CHANGE LOG ..................................................................................... 14
Alexander Pedals builds hand-crafted eects pedals in Garner, North Carolina. Each Alexander Pedal is
meticulously voiced and tweaked by our sonic scientists to achieve sounds that are both instantly familiar yet
completely unique.
Alexander Pedals are designed by Matthew Farrow and a group of trusted players, builders, and friends.
Matthew has been building guitar pedals since the late 1990s, rst with Pharaoh Ampliers, and now with
Disaster Area Designs. Matthew has designed some of the most innovative eects units on the market,
including some big names he’s not allowed to tell you about.
Alexander Pedals was started for two reasons - to make great tones, and to do good. The great tones part you
probably have some idea about. As for doing good, Alexander Pedals donates a portion of the prots from
every pedal sold to charity, whether you buy from us or our dealers. Matthew’s younger brother Alex passed
away in 1987 of a form of cancer called neuroblastoma. Alexander Pedals honors his memory by helping in the
ght to end childhood cancer.
ABOUT ALEXANDER PEDALS
alexanderpedals.com
MANUAL VERSION 1.01b
FEBRUARY 2023
The lower-right knob has a pushbutton switch, tap that
to access extra parameters on the back pages of the
user interface.
We’ve put the most common controls up front,
tweaking stuff on page 2, and utility items on page 3.
Three small boxes at the bottom of the display
indicate the currently selected page.
That’s pretty much it. The rest of this manual covers
advanced topics and ne details. If you run into any
issues, we’ve got support info at the link below.
Have fun!
This manual contains full technical details on the operation of this pedal.
For more information regarding rmware updates, update tools, and
software integration, please scan the code in this section to visit our
website.
VO
VO
FORCEFORCE
SPACESPACE
R
L IN
CTRL
DOT MATRIX DISPLAYDOT MATRIX DISPLAY
PAGEPAGE
MENUMENU
PAGE
MENU
EVO
EVO
reverberationreverberationreverberation
FORCEFORCE
SPACESPACE
BYPASS | PRESETTAP | CTRL
SERIES
R
L IN
CTRL
DOT MATRIX DISPLAYDOT MATRIX DISPLAY
PAGEPAGE
MENUMENU
PAGE
MENU
2 3
INPUT: Instrument input. Defaults to mono, may be set to TRS Stereo or TRS Sum using
the Setup menu.
RIGHT: Right stereo output. This output may be phase-inverted in the Setup menu to
match the output phase of your ampliers.
LEFT / TRS: Main output. Use this as the main output for mono setups, or the left output for
stereo. May also be used as a TRS stereo output (disables the RIGHT jack) if the
next effect or input is TRS stereo.
MULTI: User congurable jack, used for Expression pedal (TRS only,) remote foot switch,
or MIDI input / output (requires converter unit or adapter cable.)
DC 9V: Center-negative, 2.1mm ID barrel jack for DC input. The pedal requires a
minimum of 250mA to operate, higher current supplies are acceptable. Do not
power the pedal from a source greater than 9.6V DC.
USB: USB mini-B connector for USB MIDI or rmware updates
INS & OUTS
INPUT
MONO OR TRS
STEREO INPUT
RIGHT
R STEREO OUTPUT
LEFT
MONO OUTPUT
OR TRS STEREO
MULTI
EXPRESSION
PEDAL OR MIDI
BYPASS | PRESETTAP | CTRL
SERIESSERIESSERIES
R
L IN
CTRL
DOT MATRIX DISPLAY
DOT MATRIX DISPLAY
DOT MATRIX DISPLAY
PAGEPAGE
MENUMENU
PAGE
MENU
9V DC INPUT
250 MA, CENTER NEGATIVE
USB PORT
USB MIDI AND
FIRMWARE UPDATE
We’ve equipped every Leap Series pedal with a plethora of pluggable ports, to allow you lots of
exibility in your pedalboard routing.
We’ll cover the stereo routing stuff in full detail on page 10, but if you’re running in mono just
use the input and L output jacks.
BYPASS & TRAILS
Leap Series pedals feature a buffered bypass system designed to keep your signal as clean
as possible at all times. The dry signal passes through the digital signal processor in order to
maintain phase coherence between wet and dry.
We offer three bypass modes, selectable with the TRAILS item in the Setup menu.
OFF: The wet signal is cut off immediately upon entering bypass
ON: The wet signal delay / reverb trails are allowed to ring out in bypass
AUTO: The wet signal delay / reverb trails are allowed to ring out but automatically
fade out after 10 seconds to eliminate noise in bypass
CONTROLS & DISPLAY
Your Leap Series pedal is pretty complex under the hood, but we worked hard to make sure that
it’s easy to drive. We combined a simple user interface with a high-contrast OLED display to
get you the maximum tweakability with the minimum frustration. Just turn the knobs, it acts like
pretty much every other pedal.
If KNOBS is set to JUMP, turning any physical knob will make the virtual knob on the display
jump immediately to the physical knob’s position. If set to PICKUP, the virtual knob won’t
update until the physical knob is turned to the same position as the virtual knob. This prevents
unexpected knob value changes.
The lower right knob is equipped with push switch. Tap this knob to switch the display page, as
indicated by the three small boxes at the bottom of the display. We’ll refer to this knob + button
as the Page knob throughout this manual. Hold the Page knob to access the Setup (page 7)
and Preset Save (page 6) menus.
KNOB DISPLAY
Turn the pedal knobs to show the Knob Display.
Each knob is labeled with its function and current
value.
Set DISPLAY = KNOBS in the Setup menu to make
the pedal show this screen by default.
PRESET DISPLAY
Hold the Bypass / Preset foot switch to load a the
next preset and show this display. The current preset
name, number, and sound mode are shown.
Set DISPLAY = PRESET in the Setup menu to make
the pedal show this screen by default.
BYPASS | PRESETTAP | CTRL
SERIESSERIESSERIES
R
L IN
CTRL
DOT MATRIX DISPLAY
DOT MATRIX DISPLAY
DOT MATRIX DISPLAY
PAGEPAGE
MENUMENU
PAGE
MENU
DISPLAY BLANK
Set DISPLAY = BLANK in the Setup menu to blank
the display. The display automatically returns to
Knobs or Preset mode when a knob is turned or a
preset is loaded.
. . .
HOLD BOTH FOOTSWITCHES
FOR PREVIOUS PRESET
HOLD RIGHT FOOTSWITCH
FOR NEXT PRESET
4 5
SOUND MODES
Space Force has eight selectable sound modes, each based on a dierent reverb eect type. You can tweak these modes to your taste, and you can save any sound to any preset. To change sound modes, turn the lower right
knob on page 1. Tap the lower right knob to advance to the next page.
The following controls are common to all modes on page 3:
DIV - tap division for modulation or delay, not available in DYNAMIC or PITCH modes RAMP - Ramp rate, lower settings ramp faster
LEVL - overall volume for the eect TRIG - Ramp trigger mode, please see Expression and Ramping for details
Reverb modes marked with *support reverb HOLD. Turn this knob to maximum to increase reverb time and freeze the reverb. While the HOLD is active, the reverb eect will be “frozen” and new notes will not add the
reverb. Reduce this knob slightly to exit HOLD and return to normal reverb mode. Fun tip: try ramping or using the expression pedal to engage the HOLD function to create reverb “pad” eects.
PLATE
Based on a vintage studio reverb, this simulates the reective properties of a giant
metal plate. We’ve also included a virtual tape pre-delay and adjustable tape
anging modulation.
SIZE* - reverb decay time
DAMP - reverb high EQ
MIX - mix of wet and dry signals
PRE - tape echo pre-delay
RATE - tape anger rate
WAVE - tape anger waveform
DEPTH - tape anger intensity
MOD HALL
Classic 1980s electronic hall reverb with adjustable pitch modulation. We’ve
added high and low EQ controls to allow for ne-tuning the reverb tone.
SIZE* - reverb decay time
TONE - reverb high EQ
MIX - mix of wet and dry signals
LOW - reverb low EQ
RATE - reverb modulation rate
WAVE - modulation waveform
DEPTH - modulation intensity
PITCH
Chamber reverb eect with twin adjustable pitch shifters. Each shifter has
selectable intervals ranging from a detune eect to an octave. Try with detune or
down an octave for a cool textural wash.
SIZE* - reverb decay time
TONE - reverb high EQ
MIX - mix of wet and dry signals
UP - pitch up amount
DOWN - pitch down amount
P.UP - pitch up interval
P.DN - pitch down interval
SPRING
Surf’s up! Spring reverb eect with multi-wave tube bias type tremolo. We’ve
placed the tremolo after the reverb to ensure that it stays juicy no matter how wet
you run the springs.
PING - spring reverb“drip”
TONE - reverb tank tone control
MIX - mix of wet and dry signals
TANK - size of reverb springs
RATE - tube bias tremolo rate
WAVE - tremolo waveform
DEPTH - tremolo intensity
LO-FI
1990s style electronic reverb with distortion on the reverb trails. Classic
“shoegaze”eect, try this with the SAW modulation to simulate whammy bar
guitar.
SIZE* - reverb decay time
DIRT - post-reverb dirt
MIX - mix of wet and dry signals
PRE - reverb pre-delay
RATE - vibrato modulation rate
WAVE - vibrato waveform
DEPTH - vibrato intensity
ANALOG
“Electronic” reverb based on an obsolete analog delay chip, these units were often
used in karaoke units and have a distinctive tone. Keep the time knob low for
reverb or increase for cascading delay eects.
TIME - delay time
REPT - delay feedback / repeats
MIX - mix of wet and dry signals
TONE - delay tone control
RATE - chorus modulation rate
WAVE - chorus waveform
DEPTH - chorus intensity
DYNAMIC
Large cathedral-style reverb with a volume-sensing fade eect. GATE mode will
cut o the reverb like‘80s drums, BLOOM will fade in just the reverb signal, and
SWELL fades in both wet and dry for a more intense eect.
SIZE - reverb decay time
DAMP - reverb high EQ
MIX - mix of wet and dry signals
PRE - reverb pre-delay time
TIME - slow-attack gate time
ATTK - gate sensitivity
RELS - gate release
TYPE (pg3) - GATE, BLOOM, SWELL
ECHOVERB
Room reverb and delay in parallel. Each eect has its own set of controls and is
independent. The delay eect works even when the reverb eect is in the HOLD /
FREEZE state.
REVB* - reverb decay time
TONE - reverb high EQ
MIX - mix of wet and dry signals
DTIM - delay time control
REPT - delay feedback / repeats
DMIX - delay mix
D.EQ - delay high EQ
6 7
SETUP MENU
To enter the Setup menu, rst hold down the PAGE / MENU knob (lower right,) then hold the
left foot switch.
Turn the lower left knob to scroll through the available parameters, then turn the lower right
knob to set its value.
Hold the PAGE / MENU knob (lower right) to save your settings and exit the menu.
M.JACK EXPRESSN MultiJack is expression pedal input, set here if not using jack
FOOT. SW MultiJack is foot switch input
MIDI MultiJack is MIDI input (requires MIDI to TRS adapter)
PRST.EX MultiJack connects to Expander Switch for preset selection
SCRL.EX MultiJack connects to Expander Switch for preset scrolling
CHANNL Sets MIDI input channel
STEREO MONO IN INPUT jack is mono, outputs are stereo
INP. SUM INPUT jack sums to mono, outputs are stereo
STEREO INPUT jack is stereo, outputs are stereo
RPHASE NORMAL R / DRY output phase normal
INVERT R / DRY output phase inverted
PRESET Sets number of presets available on device. Does not aect MIDI.
DISPLY PRESET Display shows preset except when turning knobs
KNOBS Display shows knobs except when loading preset
BLANK Display is o when not adjusting knobs
KNOBS JUMP Knobs will jump to new value immediately
PICKUP Knobs don’t move until turned to previous value rst
RETURN Pedal will retun to the main control page after 5, 10, 30 seconds
MIDOUT OFF Pedal does not send MIDI CC values when knobs are turned
JACK Pedal sends MIDI CC from MultiJack
USB Pedal sends MIDI CC from USB MIDI
BOTH Pedal sends MIDI CC from both
TRAILS NORMAL Hard bypass
TRAILS Trails bypass, allows reverbs or delays to ring
AUTO Auto-Trails bypass, trails ring but are faded after 10s.
EXP LO Sets the heel down calibration for the MultiJack expression pedal
EXP HI Sets the toe down calibration for the MultiJack expression pedal
TAPCNT Enable or disable tap tempo timer display
PWR ON Choose BYPASS or ENGAGE to set the power-on state of the pedal
RESET Turn to reset CONFIG, PRESETS, or ALL. Hold MODE to reset.
Set to MIDI DUMP to export the pedal presets over USB MIDI.
TURN TO
SCROLL
ITEMS
TURN TO
CHANGE
ITEM
PRESETS
TURN TO
CHOOSE
LETTER
TURN TO
CHANGE
LETTER
HOLD LEFT FOOT
SWITCH TO CANCEL
HOLD RIGHT FOOT
SWITCH TO SAVE
BYPASS | PRESET
TAP | CTRL
How do you make quick changes on a pedal that has 12+ knobs? PRESETS. Every
Leap Series pedal allows you to save up to 32 presets that contain the entire state of
the pedal.
Loading a preset recalls all knob positions, sound modes, and expression pedal
mappings.
To load a preset, hold the BYPASS / PRESET foot switch. You can set the number of
available presets in the Setup Menu, from 1 to 8. You can also set the pedal to access
the upper banks of presets (9-16, 17-24, 25-32) in the same menu. This allows you to
use multiple banks of presets for different gigs, bands, instruments, whatever you like.
Hold both footswitches to scroll back to the previous preset.
If eight presets per bank isn’t enough, you can enable a double-bank of 16 presets by
setting PRESET = 1-16 or 17-32.
You can also use an external MIDI controller to load any preset from 1-32, regardless of
how the Setup Menu is congured.
To save a preset, rst use the pedal knobs to tweak the sound, then hold the Page
knob. Press and hold the BYPASS / PRESET foot switch to enter the save menu.
If you want to save to the current preset, you can just hold down the BYPASS /
PRESET foot switch again. If you prefer to rename the preset, turn the lower left knob
to select a character in the name and turn the Page knob to edit that character. You
can also change the save location by highlighting the preset number then turning the
Page knob.
Press and hold the BYPASS / PRESET foot switch to save, or hold the TAP / CTRL foot
switch to cancel the save.
8 9
EXPRESSION PEDAL
Your Leap Series pedal will smoothly blend between the two knob settings as you move
the expression pedal. You can map any of the effect knobs to the expression pedal,
other than a few controls that don’t have linear functions like tap division and ramp
settings.
If you prefer to have controls that aren’t affected by the expression pedal, simply set
them with the pedal heel down, then gently “wiggle” the knob with the pedal at toe
down. This will set the same values for heel and toe and those knobs won’t change
as you sweep the pedal. You can also use the Ramp Clear function to clear the
expression pedal settings, as described on the next page.
The MultiJack input is factory-calibrated for most common expression pedal types,
but you can also adjust the range using the Setup menu. Sweep the pedal to the heel
position and then set the EXP LO value to match the number shown in the box on the
display next to it. Repeat for the EXP HI value and then save.
Connect a TRS expression pedal to the MultiJack to control any or all of the pedal
parameters remotely. Enter the Setup menu and congure M.JACK = EXPRESSN,
then save and exit.
Leap Series pedals requires a TRS expression pedal, sleeve = 0V (common,) ring =
3.3V, tip = 0-3.3V. You can also use an external control voltage (CV) connected to tip
and sleeve, as long as it doesn’t exceed 3.3V.
If you’re using a MIDI controller, you can send MIDI CC 100, value 0-127. 0 is the
same as full heel setting, 127 is toe setting.
To map expression pedal values to pedal settings, rst set the expression pedal to the
heel setting then turn the pedal knobs. Then sweep the expression pedal to the toe
setting and turn the knobs again.
HEEL SETTING TOE SETTING
CALIBRATE
HEEL VALUE
CALIBRATE
TOE VALUE
RAMPING
You can also connect a standard momentary normally-open foot switch to the MultiJack
to remotely control the Tap / Ramp functions.
Enter the Setup menu and congure M.JACK = FT.SW, then save and exit.
Tap the remote foot switch to set the tap tempo rate, hold to trigger the ramp. The
remote foot switch will duplicate the functions of the built-in left foot switch.
If you’re not into using an expression pedal, that’s okay - the Leap Series pedals
feature a built-in expression control function called RAMP.
Imagine the Ramp as an automatic expression pedal that you trigger from a foot switch.
Hold the Tap / Ramp foot switch to re the ramp, and the pedal will smoothly move
between expression pedal settings by itself.
Use the RAMP knob to set the speed of the ramp, and the TRIG knob to set the trigger
mode.
TOGG ramp will alternate between positions when you hold the foot switch
MOM ramp will move from heel to toe when you hold the foot switch, and return
when you release it.
CLR* resets the ramp and expression parameters. Select this option, then re
the ramp using the Tap / Ramp foot switch copy the “heel” values to the “toe” values
and clear the expression settings. The ramp trigger will then return to TOGG mode.
REMOTE FOOT SWITCH
Starting with rmware version 1.01, Space Force supports the ALEXPANDER triple foot
switch for preset selection or scrolling.
Connect your ALEXPANDER to the MultiJack using a standard TRS / stereo cable,
then enter the Setup menu and congure M.JACK = PRST.EX or SCRL.EX. Save and
exit.
In PRST.EX mode, the three buttons of the ALEXPANDER directly select presets 1, 2,
and 3 with a single tap. You can still use the footswitches on the pedal itself to access
any other presets in your currently selected bank.
In SCRL.EX mode, the A and C (left and right) buttons of the ALEXPANDER will scroll
through all 32 presets in order. Tap the B (center) button to enter SEARCH MODE,
which will scroll through the presets without activating them. When you arrive at your
desired preset, tap the B (center) button again to load that preset and exit SEARCH.
EXPANDER SWITCH
10 11
TAP TEMPO AND MIDI CLOCK
Leap Series pedals support Tap Tempo for the modulation LFO or the delay time. The pedal
will always prioritize the delay time for sound modes that have both LFO and delay.
Tap the TAP / CTRL (left) footswitch once to begin the Tap Tempo function. The display will
show TAP in the lower left corner to indicate that the pedal is waiting for a second tap.
Tap the TAP / CTRL (left) footswitch a second time to set the tempo and end the Tap Tempo
function.
If you don’t tap a second time, the tempo will remain at the previously set value.
If TAPCNT is enabled in the Setup menu, the display will also show a bar to indicate the
remaining time before the Tap Tempo function times out and resets.
The DIV parameter on PG3 of the display sets the tap tempo subdivision.
TRP: time subdivides to eighth-note triplet (3x tap speed)
8TH: time subdivides to eighth-note (2x tap speed)
DOT: time subdivides to dotted eighth-note (1.5x tap speed)
QTR: time is not subdivided, quarter-note (1x tap speed)
NCLK: time is not subdivied, quarter note, MIDI CLOCK is ignored
The pedal will use the most recent tempo adjustment, so if you tap tempo and then turn the
Time or Rate knob the tapped tempo will be cancelled and set to the knob value.
If you tap in a tempo and then save the preset, the saved time will use the tempo and the
subdivision as set by the DIV knob. If you use the time or rate knob to set the tempo, it may
load with a dierent tempo unless DIV is set to QTR or NCLK. If you mostly plan to use the
pedal knobs to set the tempo, we recommend using the QTR or NCLK setting for DIV.
Leap Series pedals also sync to incoming MIDI clock over the MultiJack or USB. MIDI clock
will override all other tempo sources including Tap Tempo and the pedal knobs, unless DIV is
set to NCLK in which case the pedal will ignore MIDI clock entirely.
The DIV setting is saved for each preset, so you can use any division on any preset based on
your musical needs.
Your Leap Series pedal supports two dierent tempo modes, set by the TEMPO item in the
Setup menu.
PRESET: Each preset loads with its saved tempo and division
PRST+MS: Each preset loads with its saved tempo and division, display shows
delay time in milliseconds after tap tempo.
GLOBAL: All presets load with the same master tempo but will subdivide based
on DIV settings in preset.
GLOB+MS: All presets load with the same master tempo but will subdivide based
on DIV settings in preset. Display shows delay time in milliseconds after tap tempo.
Presets saved with DIV = NCLK will always load with their saved tempo, even if the
pedal is set to GLOBAL tap tempo. This is useful for dialing in slap echo when in GLOBAL
tempo mode.
STEREO ROUTING
Every Leap Series pedal is designed to work in a stereo context, but also shines in mono.
We’ll cover how all the various stereo modes work so you can pick the one that works best
with your rig.
To set the stereo mode, enter the Setup menu and navigate to STEREO. The pedal will
recongure its inputs and outputs as you step through the menu, and once you’ve set it as
you like just hold the PAGE knob to save.
We also allow you to change the phase of the R output to correct issues with the phase of
your ampliers or other eects. Try setting R.PHASE to both options, the one with more low
end is usually correct.
Standard mono input.
Use this for mono input with full stereo output
Use the L output for mono.
Input is summed L+R from TRS, output is full stereo.
Use this if you play in mono but have stereo eects before
the Leap Series pedal.
Input is stereo from TRS, output is full stereo.
Use this if the previous device in chain has stereo output.
MONO INPUTINPUT SUMSTEREO
12 13
MIDI SETUP
The MultiJack can also act as a MIDI interface, to allow full remote control of your Leap Series
pedal.
Enter the Setup menu and congure M.JACK = MIDI, then set CHANNL = your desired MIDI
channel. Save and exit.
You can then connect your Leap Series pedal to your MIDI controller or other device using
the MultiJack.
We recommend the use of an active MIDI converter such as the Disaster Area MIDI Box 4.
MIDI THR UM IDI I N9V DC
MIDI BOX 4
PWR / MIDI
TIP ACTIVE
ALEXANDER, MERIS, EMPRESS
TIP AND RING ACTIVE
USE TRS Y-CABLE
TRS MIDI
BOSS, JACKSON, COOPER
RING ACTIVE
CHASE BLISS AUDIO
RH R T RH R T RH R T RH R T
DOT MATRIX DISPLAY
BYPASS
PRESET
TAP
CTRL
PAGE
MENU
SERIES
R
L
MULTI
IN
FROM MIDI
CONTROLLER
TRS OR MONO
CABLE
SET TIP ACTIVE
(ALEXANDER)
CONFIGURE
JACK=MIDI
The MultiJack is also compatible with many devices using a passive MIDI to TRS cable, we
recommend the Disaster Area 5P-TRS PRO but most TRS type-A cables should work so long as
pin 2 is earthed at the MIDI controller output. Please note that some MIDI controllers do not
support the use of a passive MIDI to TRS cable, consult your controller manufacturer.
The MultiJack is wired using Tip = Current Sink, Sleeve = Ground / Common.
NOTE: In some cases, MIDI interference can occur if the TRS ring is left oating. We
recommend you set MIDOUT to OFF or USB, this disables the ring connection and will
prevent MIDI echoes.
MIDI COMMANDS
Your Leap Series pedal features full and comprehensive MIDI implementation. Every single
function and knob may be controlled by MIDI.
Each MIDI command controls the knob or function as described below. Please consult the
Sound Modes section on page 6-7 to match each knob position to the relevant control.
Leap Series pedals will sync to incoming MIDI clock messages for any modes that have the
DIV knob on the last page of the display. The pedal will subdivide incoming clock as set by
DIV, or set DIV to NCLK to force the pedal to ignore incoming clock. This setting is saved per-
preset. Please consult the Tap Tempo and MIDI Clock section on page10 for details.
Command MIDI CC Range
Knob 0 (PG1 upper L) 50 0-127
Knob 1 (PG1 upper R) 51 0-127
Knob 2 (PG1 lower L) 52 0-127
Knob 4 (PG2 upper L) 54 0-127
Knob 5 (PG2 upper R) 55 0-127
Knob 6 (PG2 lower L) 56 0-127
Knob 7 (PG2 lower R) 57 0-127
Knob 8 (PG3 upper L) 58 0-127
Ramp Rate 59 0-127
Level 60 0-127
Ramp Trigger Mode 61 0-50 TOGG
51-110 MOM
111-127 CLR*
Command MIDI CC Range
SOUND MODE 53 0-15 PLATE
16-30 MOD HALL
31-45 PITCH
46-60 SPRING
61-75 LO-FI
76-90 ANALOG
91-105 DYNAMIC
106-127 ECHOVERB
TAP TEMPO 93 ANY
RAMP TRIGGER 97 ANY
EXPRESSION PDL 100 0 HEEL, 127 TOE
BYPASS 102 0 BYP, 127 ON
MIDI BEAT CLOCK CONTROLS LFO
RATE (MODES 1,2
4,5,6) OR DELAY
TIME (MODE 8)
NOT USED IN
MODES 3, 7.
14
SPECIFICATIONS
• Input: Mono or stereo (TRS)
• Output: Mono or stereo (use either TRS or dual TS)
• Input Impedance: 1M ohms
• Output Impedance: 560 ohms
• Power Requirements: DC 9V only, 250mA or greater
• Requires isolated DC power supply
• Dimensions: 2.4”x 4.7” x 1.6”W x H x D not including knobs (67 x 120 x 42mm)
• 32 user presets, selectable on-device without additional controllers
• MultiJack enables expression pedal, foot switch, expander switch, or MIDI input
• Full MIDI control over every knob and setting
• EXP Morph allows controlling all knobs from expression or MIDI
• Automated ramping function for expression without external pedal
• CTL foot switch for tap tempo or ramp trigger
• USB port for rmware updates and USB MIDI
• Buered bypass (hybrid analog+digital)
CHANGE LOG
v1.02
Removed display brightness conguration option
Added knobs reading mode conguration option
Added Knob Mode = Pickup, user must turn pot to match display before the pedal will change values
Added eeprom ready state check
Fix issue with EEPROM reading on 24CW128-equipped pedals
v1.01b 2/22/23
Fix issue with MIDI clock not setting ECHOVERB delay time properly
v1.01a
Ramp always resets after program load, ramp also clears if trigger mode is changed
removed incorrect knob settings in cong mode (knobs 12+13)
v1.01
DSP - now use global MREG / CREG / SFR to save space in ash
DSP - improve input muting for Echoverb mode
Enable support for ALExpander multi switch
added dual bank (1-16 or 17-32)
GREAT TONES. DOING GOOD.

Other Alexander Music Pedal manuals

Alexander NEO Series User manual

Alexander

Alexander NEO Series User manual

Alexander History Lesson VOL.3 User manual

Alexander

Alexander History Lesson VOL.3 User manual

Alexander SPACE FORCE User manual

Alexander

Alexander SPACE FORCE User manual

Alexander SUPER Neo-Matic User manual

Alexander

Alexander SUPER Neo-Matic User manual

Alexander Quadrant User manual

Alexander

Alexander Quadrant User manual

Alexander F-13 Neo Flanger User manual

Alexander

Alexander F-13 Neo Flanger User manual

Alexander Space Race User manual

Alexander

Alexander Space Race User manual

Alexander NEO Series User manual

Alexander

Alexander NEO Series User manual

Alexander NEO Series Manual

Alexander

Alexander NEO Series Manual

Alexander Marshmallow User manual

Alexander

Alexander Marshmallow User manual

Alexander Venture Series User manual

Alexander

Alexander Venture Series User manual

Alexander SYNTAX ERROR User manual

Alexander

Alexander SYNTAX ERROR User manual

Alexander Sugarcube User manual

Alexander

Alexander Sugarcube User manual

Alexander NEO Series User manual

Alexander

Alexander NEO Series User manual

Alexander SKY FI User manual

Alexander

Alexander SKY FI User manual

Alexander Leap Luminous Beta User manual

Alexander

Alexander Leap Luminous Beta User manual

Alexander leap Series User manual

Alexander

Alexander leap Series User manual

Alexander leap SPACE FORCE User manual

Alexander

Alexander leap SPACE FORCE User manual

Popular Music Pedal manuals by other brands

Source Audio Aftershock Bass Distortion user guide

Source Audio

Source Audio Aftershock Bass Distortion user guide

SOLIDGOLD FX Ether manual

SOLIDGOLD FX

SOLIDGOLD FX Ether manual

Mesa/Boogie Three Channel Dual & Triple Rectifier Solo... owner's manual

Mesa/Boogie

Mesa/Boogie Three Channel Dual & Triple Rectifier Solo... owner's manual

Korg Nu:Tekt TR-S owner's manual

Korg

Korg Nu:Tekt TR-S owner's manual

PedalPCB Golden Falk Overdrive instructions

PedalPCB

PedalPCB Golden Falk Overdrive instructions

BAE Audio Hot Fuzz instruction manual

BAE Audio

BAE Audio Hot Fuzz instruction manual

FAME Dumbler LEF-315 user manual

FAME

FAME Dumbler LEF-315 user manual

EBS FUZZMO user manual

EBS

EBS FUZZMO user manual

Fender HAMMERTONE CHORUS quick start guide

Fender

Fender HAMMERTONE CHORUS quick start guide

ChaseBliss GRAVITAS instruction manual

ChaseBliss

ChaseBliss GRAVITAS instruction manual

Lithium Grim Divine Fuzz Building instructions

Lithium Grim

Lithium Grim Divine Fuzz Building instructions

Visual Sound V3 Series Route 66 manual

Visual Sound

Visual Sound V3 Series Route 66 manual

Midi Solutions Pedal Controller operating instructions

Midi Solutions

Midi Solutions Pedal Controller operating instructions

Viscount Midi user manual

Viscount

Viscount Midi user manual

Donner DARK MOUSE owner's manual

Donner

Donner DARK MOUSE owner's manual

Ibanez Tube Screamer TS808HW owner's manual

Ibanez

Ibanez Tube Screamer TS808HW owner's manual

Yamaha DFP8210 owner's manual

Yamaha

Yamaha DFP8210 owner's manual

Electro-Harmonix STEREO POLYCHORUS XO quick start guide

Electro-Harmonix

Electro-Harmonix STEREO POLYCHORUS XO quick start guide

manuals.online logo
manuals.online logoBrands
  • About & Mission
  • Contact us
  • Privacy Policy
  • Terms and Conditions

Copyright 2025 Manuals.Online. All Rights Reserved.