Alfa Network Napoli M90 User manual

USER MANUAL
FORNO NAPOLI


1
02 WARNINGS
05 WARRANTY
06 INSTALLATION E
PLACEMENT
08 FLUE CONNECTION
09 GAS CONNECTION
10 IGNITION
14 15 kW BURNER
16 24 kW BURNER
22 34 kW BURNER
27 PRODUCT MAINTENANCE
AND CARE

2
-Cracks inside and outside the oven refractory materials may occur as a result of
thermal shock and don’t compromise the functionality of the appliance.
-In case of long periods of inactivity, follow the instructions as if it were the rst
use.
-The oven door is an effective temperature regulator: by closing it and opening
it you can manage the heat.
-During use, refractory ovens can get very hot
-Use high-temperature cutlery and tools.
-For safety reasons, keep the oven out of reach of children and pets.
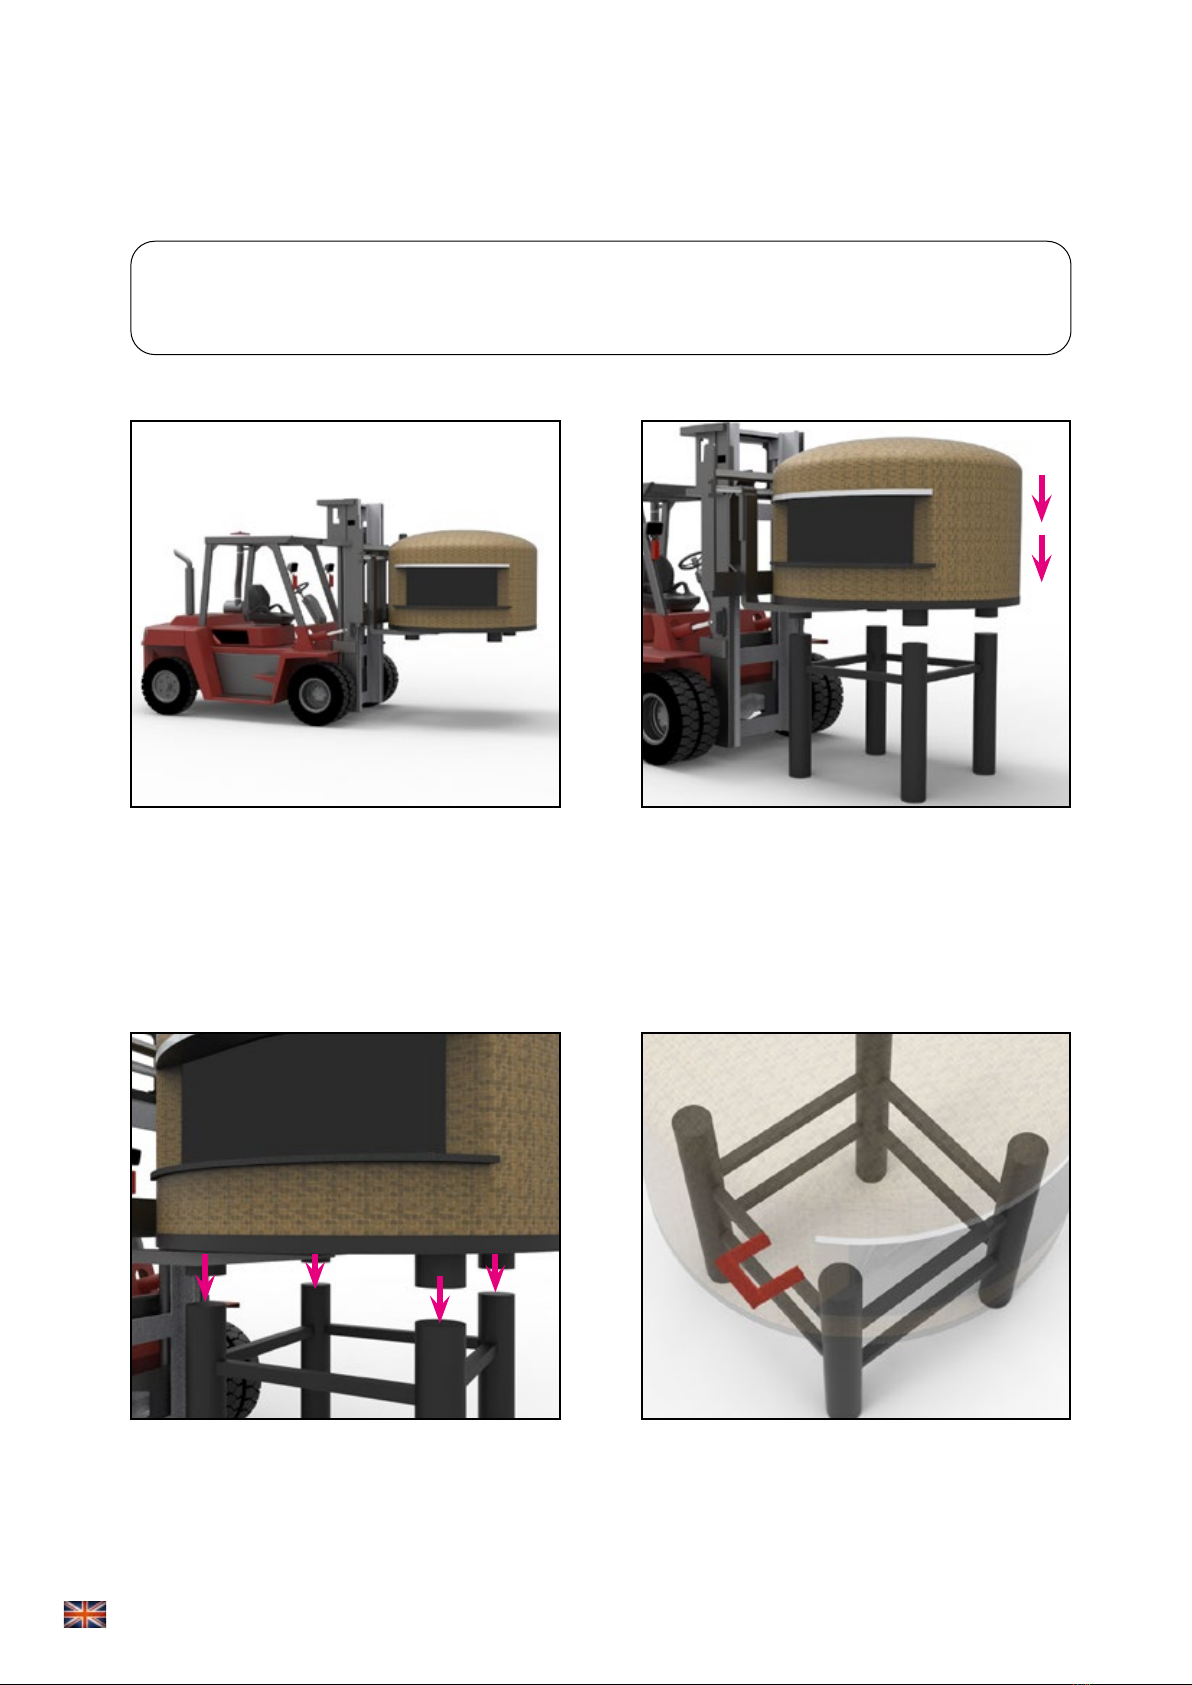
-Put the oven on a at surface and away from wind or strong draughts.
-Sparks may come out of the oven mouth: make sure not to put ammable
liquids near it.
-Do not touch the ue and the door when the oven is operating to avoid burns.
-Do not use the oven in case of breakage or malfunctioning.
-Hold the door handle when opening and closing.
-The oven colour may change owing to the temperature.
-Do not use water to put out the re.
-Do not use ammable liquids close to the oven.
-Do not colour the oven or stick objects on it.
-Do not use any fuel other than that recommended.
-Do not ignite the oven abruptly to avoid damage to refractory materials.
-At 100°C (212°F) water/humidity of the oven turns into steam. In this process,
water increases its volume 30 times and can seriously damage the refractories
if the ignition is not gradual.
-Do not bend over the oven during ignition: keep face and body away from the
oven door.
-Do not leave the appliance unattended during cooking releasing fats and oils:
they can catch re.
-Do not obstruct ventilation openings.
-Wear heat resistant gloves when operating the oven.
WARNINGS
PLEASE KEEP THIS MANUAL FOR FUTURE REFERENCE
Online copies of this manual are available at www.alfaforni.com
PLEASE READ THE FOLLOWING INFORMATION CAREFULLY FOR CORRECT
INSTALLATION AND USE OF THE OVEN. THIS APPLIANCE, IF NOT PROPERLY
INSTALLED AND USED, CAN CAUSE FIRE. TO REDUCE FIRE HAZARDS, FOLLOW
THE INSTRUCTIONS AND USE MATERIALS SPECIFICALLY DESIGNED TO
WITHSTAND HIGH TEMPERATURES.

3
WARNINGS
ONLY FOR WOOD-FIRED OR HYBRID OVENS
Do not throw logs on the re but lay them on it
Do not make a big re that comes out of the oven mouth
Do not use any fuel other than rewood

4
WARNINGS
ONLY FOR GAS-FIRED OVENS
GAS LEAKS CAN LEAD TO FIRES AND EXPLOSIONS AND CAN CAUSE SERIOUS
PROPERTY DAMAGES, PERSONAL INJURIES AND DEATH.
WHAT TO DO IF YOU SMELL GAS:
1. Turn off the gas supply
2. Extinguish any naked ame
3. Open the oven door
4. Call a gas service technician
WARNING: this oven may be converted from natural gas to LPG and vice
versa by means of the kit supplied by Alfa Forni; conversion must be carried
out by specialised technicians using Alfa material, otherwise, the warranty will
no longer be valid.
The product must be installed by qualied personnel.
-If the gas-red oven is not being used, switch off the gas supply.
-Follow the instructions to connect the gas regulator.
-If the oven is left inactive for a certain period, make sure there are no gas
leaks and that the burners are not clogged.
-Keep power cables and supply pipes away from hot surfaces.
-No ammable materials may be kept within a 1-metre radius of the oven.
-In case of uncontrolled re, move the food away from the ames until they
are smothered.
-If the fat catches re, shut off the gas valve and close the door until the re
goes out.
-LPG is not the same as natural gas. It’s dangerous to convert or use natural
gas with an oven powered by LPG. In this case, the warranty will be invalid.
-A rusty or damaged gas bottle may be dangerous and should be checked
by the supplier. Do not use gas bottles with faulty valves.
-Do not place used gas bottles near the oven. Non-empty containers may
still contain traces of combustible material.
-This appliance is intended for professional use by qualied persons. Do not
allow children to come near the oven when in operation or to play with it.

5
WARRANTY
In compliance with Italian and European regulations, ALFA ovens are covered
by the legal guarantee, paid by the retailer, of 24 months from the date of
purchase.
After the warranty period of 24 months, any repairs will be borne by the
consumer.
YOU ARE REQUIRED TO KEEP THE RECEIPT OR PURCHASE INVOICE TO
SHOW THE DEALER. WRITE BELOW THE SERIAL NUMBER INDICATED
ON THE DATA PLATE.
ALFA also provides remote technical service by call from Monday to Friday from
8:00 to 17:00 (Italian Time).
Good maintenance and correct use can help extend the shelf life of the product.
We suggest that you store the oven indoors during winter to protect it from
adverse conditions or that you put a breathable cover on it.
The warranty DOESN’T apply in the following cases:
• If the oven is not properly used or installed as described in the instruction manual.
• If the oven has been intentionally or unintentionally damaged.
• If the oven is not or is inadequately maintained. Burner problems due to food residues or
to the use of different fuels are not covered by this warranty.
• If the oven has been altered in any manner and is no longer in the condition it was upon
delivery.
• If the recommended fuel has NOT been used. Never use liquid charcoal for barbecue,
chemicals or any other fuel.
• If the damage is due to the use of chemicals inside or outside the oven.
• This warranty does not cover the oven door.
• Damages due to exceeding the temperature limits of 450 °C/850 °F.
• If you use parts not manufactured or recommended by Alfa.
• If the damage is done to parts that are decorative or not functional that do not affect the
normal use of the oven, including scratches or colour changes.
• If the data plate has been removed, altered or erased.
• Our rebricks are not covered by the warranty; however, our ovens include a spare one
and further components can be purchased on demand.

6
ASSEMBLY AND INSTALLATION OF THE BASE
IF YOU ALSO BUY THE OVEN BASE, JUST PLACE
THE OVEN ON IT AS SHOWN IN THE PICTURE.
STEP 1
Lift the oven with the help of a forklift
paying attention to its load capacity
that usually ranges from 1 200 to 2
200 kg (2 600 to 5 000 lbs).
STEP 2
Lift the oven over the base and place it
carefully on it.
STEP 3
Fit the oven legs with the base
structure.
STEP 4
In the case of an oven with burner,
there’s a protrusion in the base (in red
in the picture) suitable for holding it.

7
PLACEMENT
WARNING: THE EXTERNAL SIDES OF THE OVEN
CAN REACH TEMPERATURES ABOVE 50°C (120°F).
ANY FLAMMABLE MATERIALS MUST NOT
BE WITHIN 1-METRE RADIUS OF THE OVEN.
The Napoli built-in oven is
available. In gas-red models,
allow for a ventilation and
inspection grid for the burner.
FOR YOUR SAFETY: Place
the oven on a at and stable
surface. Involuntary movements
during operation may result in
personal injury and property
damage.
CAUTION: Put the oven
away from wind or strong
draughts.
CAUTION: Place the oven at a minimum distance of 20 cm
(8 in) from the wall or any other equipment.
Never place rewood or ammable
materials on the oven landing.
20 cm 20 cm
Consider a minimum distance
of 50 cm (20 in) to place the
ue according to the model and
insulation.
50 cm 50 cm

8
INSTALLATION
IN THE EYES OF THE LAW, THE FLUE MUST SERVE ONLY ONE APPLIANCE.
CONNECTING MANY OVENS TO THE SAME FLUE COULD COMPROMISE A
REGULAR EVACUATION OF SMOKE.
Contact local re services to nd out about any restrictions
regarding ue installation or inspection of oven installation.
INDOOR FLUE CONNECTION
For the Napoli oven to function correctly, it needs a ue with a diameter
of 250 mm (10 in) and at least 4 metres (13 ft) high.
1. For existing and insufcient ues, it is advisable to use stainless steel
connecting pipes with right diameter and proper insulation.
2. Seal with materials resistant to high temperatures (450°C-840°F).
3. This connection must avoid as far as possible any bends or diversions
that can prevent the smoke evacuation.
4. Any bend must be no greater than 45 degrees.
5. To prevent smoke from travelling back into your home, place the
chimney pot in the highest part of the roof fully exposed to the wind
(anti-downdraught chimney cowls).
6. Do not connect the ue with other ducts.
7. The ue must be thermally insulated to prevent heat loss and to allow
the smoke to rise.
8. All installation work must be carried out by an authorized expert.
9. The following table shows the correct diameter (D) of the ue as its
height varies.
H < 3 m 3 m < H < 5 m H > 5 m
D 300 mm D 250 mm D 200 mm
N.B. A buttery valve, not included, can
improve the draught and smoke regulation.

9
PYROMETER
- The pyrometer detects the temperature at a
given point inside the oven. The value gauged
by the pyrometer is only indicative. With expe-
rience, you will better assess when the oven is
ready for various types of cooking. Gradually,
you will have command of your oven and beco-
me very adept at choosing the cooking tempe-
rature. The Alfa Pro laser thermometer comes as
an optional extra in the tool section of the web-
site.
OVEN DOOR
- If the re is too high and spills out of the oven
mouth, use the door to adjust the ame.
WARNING: this product has not been tested for
use with the door. To reduce the risk of re and
injuries, do not use the oven door.
Keep the oven door open when the re is on.
PUTTING OUT THE FIRE
To extinguish the re, close the oven door and wait for the ash to form. Make
sure the oven is cold and remove the ash with the help of metal tools.

10
WARNING: Before ring the oven, follow the instructions.
-Do not use ammable liquids or other fuels to light the re.
-Make sure that there are no ammable materials near the oven and that the minimum safety
distance is respected.
IGNITION
1. Make a small pile of dry kindling in the centre of
the oven.
2. When the re gets going, add two large logs and
move the re to one side of the oven.
3. After a few minutes of continuous burning, the
oven will reach the temperature of 400°C (750°F)
burning soot. Now the oven is ready to cook.
PUTTING OUT THE FIRE
-To extinguish the re, close the oven door and wait for ash to form
-After about 30 minutes, remove the ash.
DIFFERENT TYPES OF FIREWOOD
-Use small-sized dry wood for lighting the re.
-Never use treated, resinous or scrap wood to make the re.
-Wet or damp wood can pop due to the water trapped inside.
It will produce a lot of smoke and less heat.
IGNITION
WOOD-FIRED OVENS

11
FOR YOUR SAFETY:
-Do not leave the oven unattended while the re gets going
-To keep constant temperature, throw in small amounts of rewood at
regular intervals. Do not keep adding more logs to avoid a dangerous
rise in temperature or ames spilling out of the oven that could damage
people or things.
PLEASE READ CAREFULLY THE MANUFACTURER’S INSTRUCTIONS
FOR CORRECT INSTALLATION AND OPTIMUM PERFORMANCE OF THE
OVEN.
-FIRST IGNITION
After installing the oven or after a period of long inactivity, wait three days
before ignition if the oven is damp.
-DAY ONE
Proceed with caution on the rst day. Keep the temperature at 60°C (140°F)
for as long as possible (at least 50-60 minutes) by burning paper, cardboard
and leaves.
-DAY TWO
Keep the temperature at 85°C (185°F) for as long as possible (at least 50-60
minutes) by burning straw and branches.
-DAY THREE
Exceed the 100°C (210°F) threshold bringing the temperature up to 130°-
150°C (250°- 300°F) for as long as possible (at least 50-60 minutes) by
burning small-sized logs.
-DAY FOUR
Fire your oven easily as it will be completely dry.

12
FOR YOUR SAFETY:
-Do not close the door when the oven is on with the ame at the
maximum setting.
-Never exceed the temperature limit of 500°C (900°F).
-Never disconnect the gas pipe or other ttings when using the oven.
PLEASE READ CAREFULLY THE MANUFACTURER’S INSTRUCTIONS
FOR CORRECT INSTALLATION AND OPTIMUM PERFORMANCE OF THE
OVEN.
-FIRST IGNITION
After installing the oven or after a period of long inactivity, wait three days
before ignition if the oven is damp.
-DAY ONE
Proceed with caution on the rst day. Keep the temperature at 60°C (140°F)
for as long as possible (at least 50-60 minutes).
-DAY TWO
Keep the temperature at 85°C (185°F) for as long as possible (at least 50-60
minutes).
-DAY THREE
Exceed the 100°C (210°F) threshold bringing the temperature up to 130°-
150°C (250°- 300°F) for as long as possible (at least 50-60 minutes).
-DAY FOUR
Fire your oven easily as it will be completely dry.
IGNITION
GAS-FIRED OVENS

13

14
WARNING: Before ring the oven, follow the instructions.
-Check all gas connections before using the oven
-Do not lean over the oven when lighting. Keep your face and body at least 50 cm (20 in)
away from the oven door.
-When lighting the oven, the door must be open.
-The gas knob must be in the “0” position.
-Do not move the oven when it is in use.
1. To ignite the pilot light, press and turn the knob to the
spark symbol.
2. Press the gas knob and the ignition button at the same
time to spark the pilot light.
N.B. The ignition of the pilot light might need several
attempts due to the air in the supply line, so be patient.
3. Once the pilot light is on, release the ignition button
but KEEP PRESSING the burner knob for at least 15
seconds to allow the thermocouple to heat up enough.
4.Release the gas knob and turn it anticlockwise to high
ame setting to heat up the oven.
15 kW BURNER
NAPOLI OVEN MODEL M90

15
STEP 1 - Use a Ø4 mm spanner to loosen
and remove screw “D” to fully open the
partition.
LPG-NATURAL GAS CONVERSION
NAPOLI GAS BURNER 15KW
STEP 2 – Use a 13 mm spanner to dismantle
the stud bolt “B” and remove it from the
burner.
STEP 3 - Use an 11 mm spanner to unscrew
nozzle “A” from stud bolt “B”, and replace the
nozzle required for the type of gas.
STEP 4 – Fasten stud bolt “B” and nozzle “A”
to tting “C”.
STEP 5 - Tighten screw “D” again to fasten
the partition.
NAPOLI gas burner 15KW

16
7 8
12 11
910
13
6 4 3 5 2
1
15
14
24 kW BURNER
NAPOLI OVEN MODEL M110
LIST COMPONENTS DRAGO D1M BURNER
1. Control Equipment.
2. Gas solenoid valve.
3. Air Regulator.
4. Safety thermostat with automatic reset.
5. Switching on and ame detection cable.
6. Burner xing ange.
7. Flame fuel head.
8. Switching on and ame detection electrode.
9. Gas inlet connection 1/2” to the burner.
10. Gas pressure inlet.
11. Electrical wiring multiple sockets.
12. Burner voltage indicator.
CONTROL UNIT FUNCTIONS
1. Burner on Switch.
2. Button to increase high ame power.
3. Button to decrease high ame power.
4. Button to increase the set temperature.
5. Press to manually turn off and on the ame.
6. Button to deacrease the set temperature
7. Low ame mode signal Led
8. High ame mode signal Led.
9. Faulty temperature problem signal Led.
10. Burner lockout signal Led.
11. Button to “reset”. Push to unlock the burner.
12. Red display of the internal T° measured and error messages.
13. Green Display of the set temperature and unit information.
14. Led of reserved phase and neutral on.
15. Main switch.
16. High ame power indicator.
8
7
6
5
4
3
2
1
12
11
10
9

17
LPG-NATURAL GAS CONVERSION
NAPOLI GAS BURNER 24KW
STEP 1 - Disconnect the plug “A” of the
ignition/detection cable.
Remove the “B” thermostat.
STEP 2 – Unscrew completely the tapered
joint “C”, then move the valve assembly away
from the burner.
STEP 3 - Unscrew nozzle “D”, then remove it
from the burner.
NAPOLI gas burner 24KW

18
• Switch on the Easy Control unit by inserting the blue plug into an IEC 220 V, 16 A, 50
HZ socket. The displays light up; the red one indicates the oven internal temp while
the green one indicates the set temperature. If it’s the rst ignition 0°C appears on
the display.
In case of rst ignition, the burner might lock out On green appears “ERR 1” the
burner tries to ignite once again then it get blocked and show the written “BLOCK”
and the red led (N°10) of burner locked lights up. To unlock the burner push “rest”
(N°11), green display show again the written “ERR 1” and the red lock led turn off.
The burner tries to ignite once again and the green display show the set
temperature. The low ame LED will light up (N°7).
• Press the temperature up button until the temperature to be set shows on the green
display ⬆ (N. 4). When the desired temperature is reached, release the arrow key.
Drago Baby Six stores the set temperature, which ashes on the green display. The
green display stops ashing and the LED related to the operation of the high ame
switches on (N°8).
During this oven heating phase, press key N.2 to increase the ame power up to
• “6”. Once the previously set temperature has been reached, the high ame goes
out and only the low ame will remain lit. The ame will start again only to bring the
oven back to temperature
• To turn off the burner with the control panel Drago Baby six push the red button
“ON/OFF”. The ame goes out automatically and the message OFF appears on the
display
BRUCIATORE 24kW
ISTRUZIONI PER L’USO DELLA CENTRALINA
This manual suits for next models
9
Table of contents
Languages:
Other Alfa Network Kitchen Appliance manuals

Alfa Network
Alfa Network roll User manual

Alfa Network
Alfa Network ONE User manual

Alfa Network
Alfa Network QUATTRO PRO User manual

Alfa Network
Alfa Network FXSTONE-L/GPL/RAM User manual

Alfa Network
Alfa Network 5 MINUTI User manual

Alfa Network
Alfa Network CUPOLINO 60 User manual

Alfa Network
Alfa Network DOLCE VITA TOP User manual

Alfa Network
Alfa Network CUPOLA FXCUP-L User manual

Alfa Network
Alfa Network NANO User manual