ALGE-Timing TDC8001 User manual

Manual
Version-E220323

Manual
TdC 8001
-2-

Manual
TdC 8001
-3-
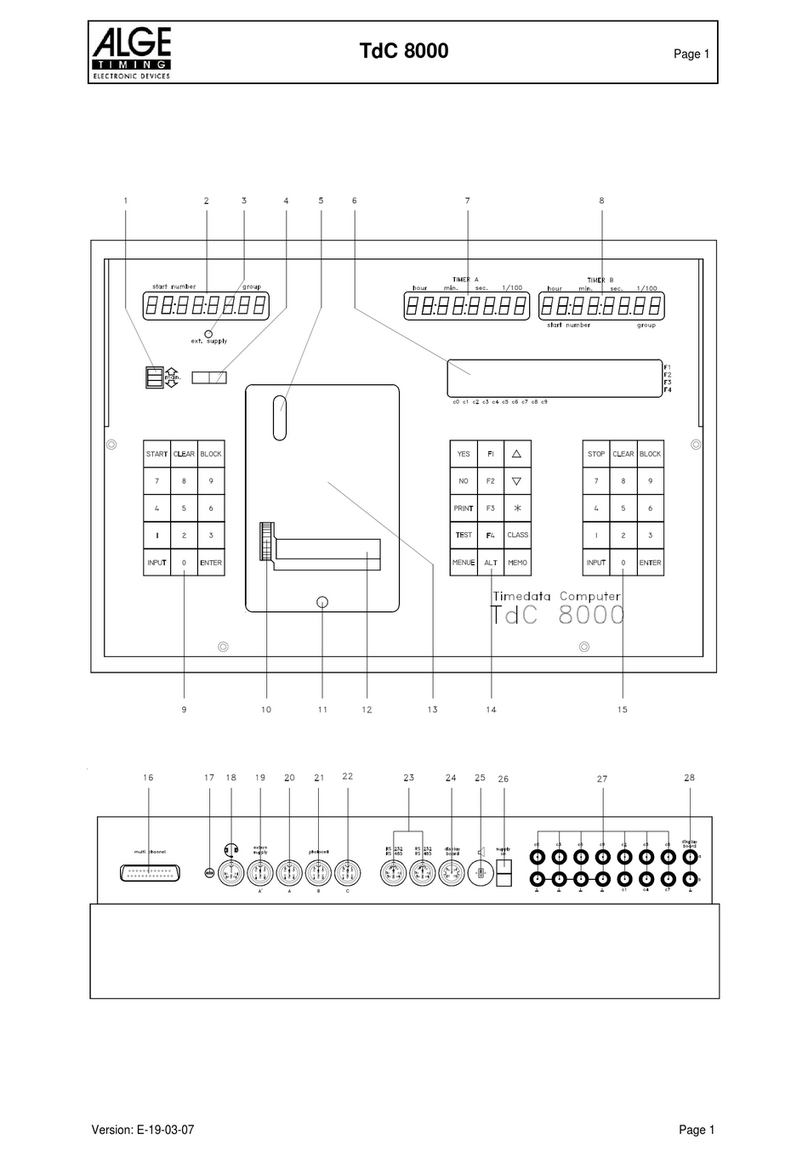
Operating Elements and Connections
1 Start display
2 Charging control (LED)
3 Meter for monitoring power supply and
alignment of photocell
4 Paper roller
5 Running time display
6 Finish display (for some programs here
also the time is indicated)
7 Info display
8 Finish keypad:
STOP...... manual stop impulse
CLEAR ... clear stop impulse
BLOCK ... stop impulse invalid (as long as
the key is pressed)
INPUT .... edit stop times
ENTER ... confirm input (counting up start
numbers)
0-9 .......... numeric keys for input of start
number of runner in finish
9 Function keypad:
YES ........ for confirmation
NO.......... for denial (continuation)
PRINT .... switch printer off or on
PRINT .... buffer mode on or off
+ PRINT ....printer on/off
TEST ...... info display (7) shows device
test
......... next in menu
......... previous in menu
......... special functions
CLASS ... ranking
MEMO .... finish memory
MENU..... always in combination with fur-
ther key, menus of the key func-
tions are selected
......... always in combination with a fur-
ther key
function key 1
function key 2
function key 3
function key 4
10 Paper feed
11 Paper compartment and thermal printer
12 Start keypad:
START ....manual start impulse
CLEAR....clear start impulse
BLOCK ...start impulse invalid (as long as
the key is pressed)
INPUT.....edit start times
ENTER ...confirm input (counting up start
numbers)
0-9...........numeric keys for input of start
number of runner at start
a Connection for Extender and Multichannel
(channel 0-9)
b Volume control for headset
c Connection for headset
A’ Jack for connecting the charging device
PS12, otherwise identical to jack A
A Jack for connecting the finish photocell
(also PS12, identical to jack A’)
B Jack for connecting the finish photocell at
parallel slalom
C Jack for connecting an intermediate time
photocell or the charging device PS12
d Two identical jacks with RS232 and RS485
interface
e Jack for connecting an ALGE scoreboard
f Jack for connecting a loud speaker (e. g. for
show jumping)
g ON / OFF switch
h Banana jacks for all 10 channels:
c0..... start channel
c1..... stop channel
c2..... intermediate time 1
c3..... intermediate time 2 (start channel
2 Dual-Timer)
c4..... intermediate time 3 (finish channel
2 – Timer)
c5..... intermediate time 4
c6..... intermediate time 5
c7..... intermediate time 6
c8..... intermediate time 7
c9..... intermediate time 8
i „display board“ output (channel 2) on ba-
nana jacks

Manual
TdC 8001
-4-

Manual
TdC 8001
-5-
Important Information
General
Before using your ALGE-TIMING device read the complete manual carefully. It is part of the device and
contains important information about installation, safety and its intended use. This manual cannot cover
all conceivable applications. For further information or in case of problems that are mentioned not at all
or not sufficiently detailed, please contact your ALGE-TIMING representative. You can find contact details
on our homepage https://www.alge-timing.com/
Safety
Apart from the information of this manual all general safety and accident prevention regulations of the
legislator must be taken into account.
The device must only be used by trained persons. The setting-up and installation must only be executed
according to the manufacturer’s data.
Intended Use
The device must only be used for its intended applications. Technical modifications and any misuse are
prohibited because of the risks involved! ALGE-TIMING is not liable for damages that are caused by im-
proper use or incorrect operation.
Power supply
The stated voltage on the type plate must correspond to voltage of the power source. Check all connec-
tions and plugs before usage. Damaged connection wires must be replaced immediately by an author-
ized electrician. The device must only be connected to an electric supply that has been installed by an
electrician according to IEC 60364-1. Never touch the mains plug with wet hands! Never touch live parts!
Cleaning
Please clean the outside of the device only with a smooth cloth. Detergents can cause damage. Never
submerge in water, never open or clean with wet cloth. The cleaning must not be carried out by hose or
high-pressure (risk of short circuits or other damage).
Liability Limitations
All technical information, data and information for installation and operation correspond to the latest
status at time of printing and are made in all conscience considering our past experience and knowledge.
Information, pictures and description do not entitle to base any claims. The manufacturer is not liable
for damage due to failure to observe the manual, improper use, incorrect repairs, technical modifications,
use of unauthorized spare parts. Translations are made in all conscience. We assume no liability for
translation mistakes, even if the translation is carried out by us or on our behalf.
Disposal
If a label is placed on the device showing a crossed-out dustbin on wheels (see drawing),
the European directive 2002/96/EG applies for this device.
Please get informed about the applicable regulations for separate collection of electrical and
electronical waste in your country and do not dispose of the old devices as household waste.
Correct disposal of old equipment protects the environment and humans against negative
consequences!
Copyright by ALGE-TIMING GmbH
All rights reserved. Any duplication, either in full or in part, requires the prior written consent of the
copyright holder.

Manual
TdC 8001
-6-
Table of Contents
1Device Description ......................................................................................................8
1.1 Standard Programs.....................................................................................................8
2Getting Started ..........................................................................................................10
2.1 Power Supply............................................................................................................10
2.1.1 Charging Device PS12 ..........................................................................................................................10
2.1.2 External Battery (12 V Car Battery) .......................................................................................................10
2.1.3 Operating Time ......................................................................................................................................10
2.1.4 Charge Condition of the Battery ............................................................................................................10
2.2 Printer .......................................................................................................................11
2.3 Connection of Auxiliary Devices ................................................................................12
2.4 Select Language .......................................................................................................15
2.5 Memory.....................................................................................................................15
2.5.1 Memory Organization ............................................................................................................................15
2.5.2 Clear Memory ........................................................................................................................................15
2.6 Select a Race ...........................................................................................................16
2.7 Precision ...................................................................................................................16
2.8 Set Timing Modes .....................................................................................................16
2.9 Enter Groups ............................................................................................................17
2.10 Test Function – Checking the TdC 8001....................................................................17
2.11 Synchronized Start....................................................................................................18
3Timing ........................................................................................................................19
3.1 Turn on TdC 8001 .....................................................................................................19
3.1.1 First Heat ...............................................................................................................................................19
3.1.2 Turning on and continuation in the same heat.......................................................................................21
3.1.3 Second (next) heat ................................................................................................................................21
3.2 Keypad Functions .....................................................................................................23
3.2.1 Start Keypad (12) ..................................................................................................................................23
3.2.2 Finish Keypad (8) ..................................................................................................................................23
3.2.3 Function Keypad (9) ..............................................................................................................................24
3.3 Start Mode ................................................................................................................25
3.3.1 Single Start ............................................................................................................................................25
3.3.2 Start Procedure for 2nd Heat ..................................................................................................................26
3.3.3 Group Start............................................................................................................................................26
3.3.4 Mass Start .............................................................................................................................................26
4Special Functions......................................................................................................27
4.1 Test – Check TdC 8001.............................................................................................27
4.2 Block – Deactivate Impulse Channels .......................................................................27
4.2.1 Block Start .............................................................................................................................................27
4.2.2 Block Finish ...........................................................................................................................................27
4.2.3 Individual Setting of Channels ...............................................................................................................27
4.3 Edit Times .................................................................................................................28
4.3.1 Edit Start Times .....................................................................................................................................28
4.3.2 Edit Finish Times ...................................................................................................................................30
4.4 Memo – Buffer for Mass Finish .................................................................................33
4.5 Class – Print Ranking................................................................................................35
4.5.1 Ranking in 1st Heat ................................................................................................................................35
4.5.2 Ranking in 2nd heat ................................................................................................................................38
4.5.3 Race Points ...........................................................................................................................................39
4.6 Print – Turn Printer On or Off ....................................................................................39
Manual
TdC 8001
-7-
5Main Menu – General Settings..................................................................................40
5.1 Restoring the Default Settings...................................................................................40
5.2 Open Main Menu ......................................................................................................40
5.3 Main Menu – Brief Description ..................................................................................40
6Programs ...................................................................................................................52
6.1 Split, Program 1 ........................................................................................................53
6.2 Split-Sequential, Program 3 ......................................................................................56
6.3 Parallel Slalom ..........................................................................................................59
6.3.1 Parallel Diff. (parallel slalom with finish difference time), program 4......................................................59
6.3.2 Parallel Slalom Net, Program 5 .............................................................................................................63
6.4 Dual Timer, Program 6 ..............................................................................................70
6.5 Speed, Program 7.....................................................................................................74
6.6 Speed Skiing, Program 8 ..........................................................................................77
6.7 Carving, Program 9...................................................................................................80
6.8 10-Channel Timer, Program 10 .................................................................................83
6.8.1 10-Channel Timer 1, Program 101 ........................................................................................................83
6.8.2 10-Channel Timer 2, Program 102 ........................................................................................................86
6.9 Equestrian Sport, Program 11 ...................................................................................89
6.10 Speed Skating, Program 12 ......................................................................................90
6.11 Cycling, Program 13..................................................................................................94
6.11.1 Road Races, Program 131 ....................................................................................................................94
6.12 Dog Sports, Program 14 ...........................................................................................97
6.12.1 Challenge, Program 141........................................................................................................................97
6.13 TdC Test, Program 15 ...............................................................................................97
7Description of Accessory Devices ...........................................................................99
7.1 Multichannel MC18 ...................................................................................................99
8Technical Data .........................................................................................................100
8.1 Connection System.................................................................................................101
8.1.1 Photocell Jacks and External Supply...................................................................................................101
8.1.2 Connection for Headset (c)..................................................................................................................101
8.1.3 Speaker Jack (f) ..................................................................................................................................101
8.1.4 Display Board Jack (e).........................................................................................................................101
8.1.5 RS232 / RS485 (d) ..............................................................................................................................102
8.1.6 Display Board (i) ..................................................................................................................................102
8.1.7 Banana Jacks Channel 0 to 9 (h) ........................................................................................................102
8.1.8 Multichannel (a) ...................................................................................................................................102
8.2 RS232 Interface (a, d).............................................................................................102
8.2.1 Inquiry of Device Settings via RS232 Interface....................................................................................104
8.2.2 Settings of Main Menu via RS232 Interface.........................................................................................104
8.2.3 Retrieve Data via RS232 Interface ......................................................................................................106
8.2.4 Read Start Times of a PC into the TdC8001........................................................................................109
8.3 RS485 Interface (a,d)..............................................................................................109
8.4 Display Board (e) – Interface for Display Board.......................................................110

Manual
TdC 8001
-8-
1 Device Description
With the ALGE Timedata Computer TdC 8001 you have acquired an ideal and absolutely future-proof
timing computer. In case you have any questions regarding operating, please contact your local ALGE
agent. Good luck with your ALGE Timedata Computer TdC 8001.
1.1 Standard Programs
SPLIT:
Program 1
Program for timing with intermediate time. Pre-
cision is adjustable. 256 heats are possible.
There is one start channel (c0), one stop chan-
nel (c1) and up to 8 intermediate time channels
(c2 – c9).
SPLIT SEQUENTIAL (SPLIT SEQU.):
Program 3
Program for timing lap times and run times, pre-
cision adjustable. Before the race the number of
laps must be entered. 256 heats are possible.
There is a start channel (c0), a stop channel (c1)
and up to 8 intermediate time channels (c2 –
c9).
PARALLEL SLALOM:
Program 4 Parallel Diff. (Parallel slalom
with difference time):
The difference time between two racers is
shown together with the winning course (blue or
red).
Program 5 Parallel Net (Parallel slalom
with net time and difference time):
The net time of each racer and the difference
time are measured. From both heats the total
time and total difference time is calculated.
DUAL TIMER:
Program 6
Net timing with intermediate times on both
courses with one racer each on the course. The
start can be executed individually or together for
both courses. The evaluation can be carried out
individually or together for both courses.
SPEED (Speed measurement):
Program 7
Program for measuring speed, selectable in
km/h, m/s or mph. The measuring distance has
to be in between 1 and 9999 meters.
SPEED SKIING (Speed measurement for ski-
ing):
Program 8
Program for measuring of time and speed for
Speed Skiing.
Program
Prg. No.
Page
Split
1
53
Split Sequential
3
56
Parallel Diff.
4
59
Parallel Net
5
63
Dual Timer
6
69
Speed
7
73
Speed Skiing
8
76
Carving
9
79
10-channel-Timer
10
82
10-channel-Timer 1
101
82
10-channel-Timer 2
102
85
Equestrian Sports
11
88
Standard Jumping A1
111
Standard Jumping A2
112
Standard Jumping AM3
113
Standard Jumping AM4
114
Standard Jumping AM5
115
Standard Jumping AM6
116
Standard Jumping AM7
117
Standard Jumping AM8
118
Time Jumping C
120
Two Stage Jumping
121
American Stage F
122
American Stage / Time
123
Standard / Time
124
Speed Skating
12
89
Cycling
13
92
Cycling Road
131
92
Dog Sports
14
95
Challenge
141
95
TdC Test
15
95

Manual
TdC 8001
-9-
CARVING:
Program 9
Countdown of preset time until 0 and than upward running clock.
10-CHANNEL TIMER:
Program 10
Program 101 10-channel Timer 1:
Program with split timing for 10 channels. Each start number can have any number of stop impulses on
the same channel. Output of times on same scoreboard.
Program 102 10-channel Timer 2:
Program with split timing for 10 channels. Each start number can have any number of stop impulses on
same channel. Output of times on separate channels on separate scoreboards.
EQUESTRIAN SPORTS:
Program 11
Programs for show jumping events. Please ask your ALGE agent for a separate manual.
SPEED SKATING:
Program 12
Program for timing speed skating
CYCLING:
Program 13
Program 131 Cycling-Road
For road races to control the scoreboard (run time, time difference, average speed).
DOG SPORTS:
Program 14
Program 141 Challenge:
Program for Agility „Challenge“. Please ask your ALGE agent for a separate manual.
TDC-TEST:
Program 15
Program for testing the TdC 8001

Manual
TdC 8001
-10-
2 Getting Started
2.1 Power Supply
The TdC8001 has an integrated battery pack. The battery pack consists of six welded NiMH cells. It can
be charged with an ALGE charging device PS12 or a 12 volt car battery. The charging voltage must be
in between 11 and 16 Volt with the device switched on.
2.1.1 Charging Device PS12
The TdC 8001 can be charged directly from the mains (100-240VAC/50-60Hz) with the charging device.
-Connect PS12 to mains
-Connect PS12 at the jack „extern supply“ (A’) or „photocell“ (A, B or C)
-Turn on TdC 8001 (ON / OFF switch g)
-Red LED (2) must glow
-The TdC 8001 must be turned on during charging so that the internal charging electronic works.
-The TdC 8001 can be charged during normal timing operation.
-Charging time with PS12 is approx. 12 hours
-Open circuit voltage of PS12 is 15 volt
-Charging voltage of PS12 is 11.7 volt
Important: The batteries are not charged when TdC 8001 is turned off!
2.1.2 External Battery (12 V Car Battery)
Every battery with a voltage of 12 volt and a power of at least 5 Ah can be used for charging and sup-
plying the TdC 8001.
-Connect cable 005-02 to jack „extern supply“ (A’)
-Connect automotive clip (+) at positive pole of the battery
-Connect automotive clip (-) at negative pole of the battery
-red LED (2) at TdC 8001 must glow
2.1.3 Operating Time
The battery status is continuously indicated with the meter (3). As long as the indicator of the meter is
in the green area, the TdC 8001 can be operated.
2.1.4 Charge Condition of the Battery
The TdC 8001 has six NiMh batteries with 1.2 volts and 4.5 Ah each. The voltage of the batteries can
be shown in the info display (7) at any time by pressing the key <TEST>.
The voltage of the batteries is automatically checked and so a warning is shown in the info display (7)
in case the batteries become empty.
Pre Warning: The display shows “nearly empty batteries”. The voltage is 6.8 volts.
You can continue to work until a voltage of 5.8 volts. If possible, the charging device
PS12 or an external 12 volts battery should be connected.
Shutdown: The display shows “empty batteries”. The voltage is 5.8 volts.
If a voltage of 5.8 volts is reached, the TdC 8001 automatically shuts down into stand-
by. This is necessary for keeping the memory. Work can only be continued if the battery
is charged with a charging device or an external battery. The TdC 8001 does not have
to be re-synchronized.

Manual
TdC 8001
-11-
2.2 Printer
The TdC 8001 has an integrated thermal printer. The original ALGE paper is best suited for this printer.
You can recognize the paper by the ALGE logo on its back. It is available with your ALGE agent
The printer is very user friendly. The print head does not move and the roll is integrated in the paper
cover. Replacing the paper is therefore very easy.
The printer works very fast and silent. With external power supply up to 6 lines are printed per second,
with battery operation 4 lines per second. It is automatically activated when turning the TdC 8001 on.
As soon as a program of the TdC 8001 is activated, your can set the following with the key <PRINT>:
Print Mode:All printer data is printed. After turning the TdC8001 on, the print mode is activated
automatically.
Buffer Mode:All printer data is stored but not printed. This mode should be activated during paper
replacement
-Printer in print mode, press <PRINT>
-Printer in buffer mode; <PRINT>
-Printer switches to print mode and prints all stored data
Turn Printer Off:Printer is turned off and sent data is lost.
-Printer in print mode; press <ALT> and <PRINT> at the same time
-Printer is off; press <PRINT> or <ALT> and <PRINT> at the same time
-Printer in print mode
Replace Paper:- Open paper compartment
-Replace empty roll by new one
-Thread through yellow cover at tearing edge
-Close printer cover
-Note: Make sure that the paper protrudes through the edge when placing the
cover on the device.
-A red stripe on the thermal paper indicates a soon end of the paper.
During the print out you must not tear at the paper strip as otherwise the paper will jam. If the paper is
jammed, press black lever forward (direction of the arrow) and at the same time carefully tear the paper
out. Keep the paper dry.

Manual
TdC 8001
-12-
2.3 Connection of Auxiliary Devices
-Charging unit PS12
-External 12 V battery
-Start gate STSn with headset
-Photocell PR1a
oFinish photocell:
When operating with one finish, the photocell should be connected to jack (A’). For a
race with several courses, the photocell of course 1 is connected to jack (A’), of course
2 to jack (A) and of course 3 to jack (B) (cable 001-xx).
oIntermediate time (supply from timing device):
The cable depends on used program. For Split the connections can be as described
above but cable 003 has to be used (up to 100 m this cabling is possible).
oIntermediate time (two-core cable):
Any channel can be connected via the banana jack. For this cabling the photocell has
to be supplied internally (battery in photocell).
The two-core cable is connected to the TdC 8001 and
to the photocell, e.g. cable reel KT500 or KT300.

Manual
TdC 8001
-13-
-Display Board GAZ:
For distances of more than 10 meters, any two-core cable with banana plugs can be used.
-Start microphone SM8 with speech amplifier SV4/SM:
-Photocell adapter LA5:
-Push-button:

Manual
TdC 8001
-14-
-Speaker:
-PC:

Manual
TdC 8001
-15-
2.4 Select Language
The following languages are available:
German: <1>
English: <2>
French: <3>
Italian: <4>
Spanish: <5>
Finnish: <6>
-Keep the corresponding figure (see above) on the finish keypad pressed when turning on
-Turn on TdC 8001
-Let go of the key when program can be selected
-Language will be stored even after turning off.
2.5 Memory
The TdC8001 can store about 18,000 times in a maximum of four separate races. In one race a maxi-
mum of 9,999 times can be stored. Races 1 and 2 have a total of 9,999 disk space. If race 1 has already
saved 1,000 times, race 2 can dispose of another 8,999 times. The same applies for races 3 and 4 with
a total of 8,067 disk space.
In each race a maximum of 256 heats can be executed. The memory can be deleted after the program
selection when turning on the TdC 8001.
Start time (time of day), finish time (time of day) and run time (for difference time mode) are always
saved for the current heat. For previous heats, a memory time (total time for all stored heats) is saved.
Times saved in 1. heat:
-Start time (only difference timing)
-Finish time (only difference timing)
-Intermediate time (every one)
-Run time
Times saved in 2. heat:
-Memory time
-Start time (only difference timing)
-Finish time (only difference timing)
-Intermediate time (every one)
-Total time
2.5.1 Memory Organization
For every race a limited memory capacity is available:
Race 1: 9,999 times, if race 2 has not saved any data
Race 2: 9,999 times, if race 1 has not saved any data
Race 3: 8,067 times, if race 4 has not saved any data
Race 4: 8,067 times, if race 3 has not saved any data
2.5.2 Clear Memory
After turning on the TdC 8001 the program is selected. You can now choose if you want to clear the
memory. The info display (7) shows the following:
Clear race: 9746/ 253 R1 F1 Pressing the <F> key clears
0/ 253 R2 F2 race separately
51/ 6473 R3 F3
Continue: ENTER 943/ 6473 R4 F4
If you press an <F> key, the corresponding race is marked with an arrow. You can clear several races
at the same time. Clear: Press <ENTER> on finish keypad (8). If for example races 1 and 3 are cleared,
the info display shows the following:
Clear race: 9746/ 253 R1 < F1
0/ 253 R2 F2
51/ 6473 R3 < F3
Continue: ENTER 943/ 6473 R4 F4
If you only press <ENTER> without previously having selected a race with the <F> keys, no memory is
cleared.

Manual
TdC 8001
-16-
2.6 Select a Race
After clearing the memory, the current race has to be selected. A maximum of four races can be stored
at the same time. Every race is completely independent, i.e. every race can use start number from 1 to
9999 and execute up to 256 heats.
Select race: 7012/ 2987 R1 < F1
0/ 2987 R2 F2
651/ 6473 R3 F3
Continue: ENTER 943/ 6473 R4 F4
For every race two figures are entered. The first figure indicates how many disk spaces are occupied,
the second one how many disk spaces are free. A deleted race has to show 0 as first figure. The last
race is suggested automatically. If you want to use this again, just press <ENTER>. If you want to select
another race, use either of the <F> keys. The selected race is indicated by an arrow.
Memory was not cleared:
If a race is selected of which the memory is not cleared, the following is shown at the info display (7):
Select heat: SAME (1) < F1 (1) means 1. Heat
NEXT (2) F2 (2) means 2. Heat
Continue: ENTER
-If the same heat is selected, you can continue in the same heat as before.
-If the next heat is selected, a new heat is started.
New heat: - All valid run times (and total times) are saved for further heats.
-All other times are cleared.
2.7 Precision
The precision with which run, intermediate and total time are shown, can be selected with the <F> keys.
The time of day is always measured with a precision of 1/10,000 seconds.
Select precision: 1 s F1 Precision: Seconds
1/10 s F2 Precision: Tenths of a second
1/100 s < F3 Precision: Hundredth of a second
Continue: ENTER 1/1000 s F4 Precision: Milliseconds
2.8 Set Timing Modes
There are two possibilities of timing: difference and absolute. The timing mode for most of the programs
must be set in the prefix.
Select timing: ABSOLUTE F1
DIFFERENCE < F2
Continue: ENTER
Absolute:
Time starts from 0:00.00. For every competitor only the run time (total and intermediate) is saved. This
mode should mainly be used for mass starts.
Advantage: for every competitor only one disk space is used (1 heat, no intermediate time)
Disadvantage: time corrections are impossible
Difference:
Input the time of day when switching the device on. For every competitor start- finish- and run time is
printed. This mode should always be used for single and group starts.
Advantage: time corrections are possible
Disadvantage: for every competitor at least 3 disk spaces are occupied (start, finish and run time)

Manual
TdC 8001
-17-
2.9 Enter Groups
The competitors can be divided into a maximum of 99 groups. One group has to consist of consecutive
start numbers. If groups are entered, the rank is output within the group. A group evaluation can be
created for the ranking; a group start is possible (all group members start at the same time).
Input groups? YES F1 If you do not want to enter groups
NO < F2 press <NO> or <F2>; if you want to
Enter groups press <YES> or <F1>
Continue: ENTER and <ENTER>
GROUPS: Gr 1: 1 > 0 Enter the last start number of each group
as first start number of the following group
the next start number is automatically shown.
Save with: ENTER
GROUPS: Gr 1: 1 > 60 1. Group from StNo. 1 to 60
Gr 2: 61 > 90 2. Group from StNo. 61 to 90
Gr 3: 91 > 120 3. Group from StNo. 91 to 120
Save with: ENTER Gr 1: 121 > 0No input yet
Attention: You should always leave some vacant start numbers in a group so that you can use them in
case of late entries.
2.10 Test Function – Checking the TdC 8001
The info display (7) shows the following picture as long as <TEST> is pressed:
C0 = 4,9V battery = 7,3V
C3 = 4,9V photocell = 4,9V
C6 = 4,9V extender = 0,00A
# # # # # # # # # #
c0 c1 c2 c3 c4 c5 c6 c7 c8 c9
The test function shows the state of the device. All 10 channels are always monitored regarding their
state (4. line). If a channel blinks, it short-circuited. For the channels 0, 3 and 6 the voltage is always
shown directly. Moreover, the voltages of the battery and the photocells as well as the power consump-
tion of the extender are displayed.
The channels 0, 3 and 6 should have in normal state (open) 5 V. At an impulse the voltage has to break
down to 0 V.
The battery has a voltage of about 7.4 V when fully charged. When empty the battery voltage is about
5.8 V. With this voltage, the device cannot operate anymore. A warning about the state of the battery is
issued at 6.8 V.
The stabilized voltage “photocell” that supplies the photocell(s) has to be about 5 V.
The power consumption through the RS485 interface (d) must not exceed 1 A. In case of a consumption
of more than 1 A the supply for the extender is turned off.
Performance test – Check of the two-core start-finish connection:
Check of a two-core cable at banana jack c0, c3 or c6
−Turn on TdC 8001 (g)
−Select any program
−Go through start menu until the TdC 8001 is ready
−Keep <TEST> pressed
−Info display (7) shows measuring’s
−Measuring’s of c0, c3 and c6 are important for the performance test
Shor circuit test:
−Cable is open at the other end
−Press <TEST>
−Voltage at the measured channel must be about 4.9 V

Manual
TdC 8001
-18-
Shunt test:
−Short-circuit cable at the other end (connect the banana plugs)
−Press <TEST>
−Voltage at short-circuited channel must be between 0 and 0.9 V. In case the voltage is higher
than 0.9 V, the resistance of the cable is too large (maximum 2,000 Ohm loop resistance).
The voltage measurement is just a quick test of the connections before a race. You should use a multi-
meter to check the resistance of the connection if it has not been used for a long time.
Most of the problems with timing are caused by bad connections. The cables should be inspected in
good time before the season’s opening. Bad cables or plugs cannot be replaced shortly before a race.
Your ALGE representation can assist here.
Needle of meter (3) swings:
The needle starts to swing if the photocell is misaligned. The photocell must be checked. The swinging
of the needle can also be caused by a long impulse or short-circuit.
2.11 Synchronized Start
Synchronization with other timing devices is possible. The synchronization is carried out during setting
of the time of day in the main menu after turning on the TdC 8001.
Connect the timing devices via start banana jacks (or cable 004) with each other.
Time: 10:15:23 OK < F1 time and date are correct
Date: 11-02-28 WRONG 2F2 time or date is wrong
Continue: ENTER
There are two ways to synchronize:
−Synchronization by internal clock
−Manual synchronization
Synchronization by internal clock:
−Press <F1> and then <ENTER>
−Info display (7) shows:
Time: 10:15:23
Date: 11-02-28
Synchronize: on minute change
Manual synchronization:
−Press <F2>, then
−Press <ENTER>
−Info display (7) shows:
Time: 10:15:23
Date: 11-02-28
Save with: ENTER
−Enter time of day with finish keypad (8) and confirm with <ENTER>
−Enter date with finish keypad (8) and confirm with <ENTER>
Time: 11:25:23
Date: 11-03-17
Synchronize: START key / channel C0
−Press <START> for synchronization or synchronize by external start impulse c0
−TdC 8001 is ready for timing

Manual
TdC 8001
-19-
3 Timing
3.1 Turn on TdC 8001
3.1.1 First Heat
−Turn on TdC 8001 with switch (g) (language settings see chapter 0)
−Info display shows the following:
ALGE-TIMING Company
TdC 8001 Device
DEU V02.B1 Language and current version
−After a few seconds the program used last is shown.
Program 1: SPLIT Program
Select: YES/NO or Program number: 0# possible selections
−Select shown program with <YES> or <ENTER>. For selection of another program enter pro-
gram number or select with <NO> and cursor keys any program.
−Info display (7) shows the currently occupied disk space (see chapter 2.5)
Clear race: 1345/ 8654 R1 < F1
0/ 8654 R2 F2
1250/ 6283 R3 F3
Continue: ENTER 534/ 6283 R4 F4
−Four separate races can be stored (R1, R2, R3 and R4). It is shown how many disk spaces are
occupied (first number) and how many are vacant (second number).
−By pressing one of the F-keys 1-4 the races that are to be cleared can be indicated (arrow at
the end of the line).
−Clear selected races with <ENTER>.
−Select race:
Select race: 0/ 9999 R1 < F1
0/ 9999 R2 F2
1250/ 6283 R3 F3
Continue: ENTER 534/ 6283 R4 F4
−Select race with one of the F-keys 1-4 and confirm with <ENTER>.
−When the selected race is clear, you must select the precision:
Select precision: 1 s F1 precision: seconds
1/10 s F2 precision: 1
10
�seconds
1/100 s < F3 precision: 1
100
�seconds
Continue: ENTER 1/1000 s F4 precision: 1
1000
�seconds
−The precision sets what precision is displayed. It only applies to calculate times (run time, inter-
mediate time, etx.) not for time of days.
−The precision is selected with one of the F-keys 1-4. The last used precision is suggested.
−Confirm precision with <ENTER>.
−After the precision the timing mode has to be selected:

Manual
TdC 8001
-20-
Select timing: ABSOLUTE F1 Timing without time of days
DIFFERENCE < F2 Timing with time of days
Continue: ENTER
-Select timing mode with <F1> or <F2> (see chapter 2.8)
-After the timing mode, the start mode must be selected:
Select start mode: SINGLE START < F1 every competitor start individually
GROUP START F2 mass start within a group
MASS START F3 all competitors start at the same time
Continue: ENTER
-Select start mode with F-keys 1-3 (see chapter 0)
-Confirm start mode with <ENTER>.
-After the start mode the groups have to be defined:
Enter groups? YES F1
NO < F2
Continue: ENTER
-For entering groups press <YES> or <F1>, for no groups press <NO> or <F2>.
-When groups are entered, the info display (7) shows the following:
GROUPS: Gr 1: 1 > 50 The last start number of each group has to
Gr 2: 51 > 100 be entered. In case three groups are entered
Gr 1: 101 > 230 as shown here, for the fourth group press two
Save with: ENTER Gr 4: 231 > 0times <ENTER>
-After the groups, the time of day has to be entered:
Time: 10:25:36 OK < F1 internal clock
Date: 11-02-2 WRONG F2 enter time of day
Continue: ENTER confirm with <ENTER>
-You can enter the time of day in two ways (see chapter 2.11)
-Internal clock and manual synchronization
oInternal clock:
press <F1>
press <ENTER>
owaiting for synchronous pulse (daytime in the info display)
manual synchronization: −<F2> Press −<ENTER> Press
enter time with finish keyboard (8)
press <ENTER>
enter date with finish keyboard (8)
press <ENTER>
start signal with the <Start> key or by external start impulse (channel 0)
-After setting the time of day the TdC 8001 is ready for the start of the first competitor.
-For every competitor the following times are printed:
0001 SZ 10:07:04.640 start time
ZZ 10:08:35.150 finish time
LZ 1:30.500 run time
Table of contents
Other ALGE-Timing Timer manuals

ALGE-Timing
ALGE-Timing TIMY2 User manual

ALGE-Timing
ALGE-Timing Timy3 User manual

ALGE-Timing
ALGE-Timing Timy User manual

ALGE-Timing
ALGE-Timing Timy 3 User manual

ALGE-Timing
ALGE-Timing TIMY2 User manual

ALGE-Timing
ALGE-Timing Timy User manual

ALGE-Timing
ALGE-Timing Timy LapTimer User manual

ALGE-Timing
ALGE-Timing SF3 User manual

ALGE-Timing
ALGE-Timing Timy User manual

ALGE-Timing
ALGE-Timing Mobile Timing MT1 User manual