All Pro Solutions HERA-3 User manual

Standalone, fully automated
CD/DVD/BD Duplication System with
LightScribe printing capabilities
User Manual
1351 East Black Street • Rock Hill, SC 29730
Tel: 803-980-4141 • Fa : 803-980-4145 • www.allprosolutions.com

3
COPYRIGHT_____________________________________________________________________
Copyright © 2000–2010 All Pro Solutions, Inc
All Rights Reserved. This manual and the so tware described in it are copyrighted with all rights
reserved. No part o this publication may be reproduced, transmitted, transcribed, stored in a
retrieval system or translated into any language in any orm by any means without the written
permission o All Pro Solutions, Inc.
PRIVACY / ILLEGAL COPYING ____________________________________________________
The HERA Series copiers are designed to help you easily reproduce material or which you own the
copyright or have obtained permission rom the copyright owner to make copies. Unless you own
the copyright or have permission rom the copyright owner to make copies, you may be violating
copyright law and be subject to payment o ines, damages and/or other remedies. All Pro Solutions
Inc. accepts no responsibility or the use or misuse o this equipment or illegal purposes. I you are
uncertain about your rights, contact your legal advisor.
WARRANTY____________________________________________________________________
All Pro Solutions, Inc (hereina ter “All Pro Solutions”) warrants its products to be ree rom de ects in
materials and workmanship under normal and proper usage or the period stated in your Warranty
Card.
All Pro Sol tions shall not be liable or direct, indirect, special, incidental or consequential
damages arising rom the use or inability to use this product or documentation. In particular, All Pro
Solutions shall not have liability or any hardware used with this product, including the costs o
repairing, replacing or recovering such hardware.
DAMAGE_______________________________________________________________________
This shipment was packaged and delivered to the carrier with the utmost care to ensure sa e
delivery o goods. I your HERA system is damaged during shipment, please contact the reight
carrier irst, then contact your distributor or All Pro Solutions
INCOMPLETE ORDERS___________________________________________________________
Check the shipment against the shipping papers thoroughly and immediately to ensure receivership
o a ull shipment. Do not discard packing materials or cases. Check out all possibilities be ore
reporting a shortage or incomplete order.
SAVE PACKAGING_______________________________________________________________
You have to save your packaging materials so that i the need arises you can return your system or
service. Sending a system to All Pro Solutions without the original packaging will void the warranty.
This packaging was designed speci ically or shipping your system. Other packaging may not be as
suitable.
IF YOUR SYSTEM REQUIRES SUPPORT____________________________________________
I your system requires servicing, you should irst contact the place o purchase and request support
or contact All Pro Solutions as ollows:
Phone: (803) 980-4141
Be ore shipping any item to All Pro Solutions, irst obtain a RMA (Return Material Authorization)
Number rom All Pro Solutions support. This number must be placed on the outside o the product
packaging where it can be easily ound; otherwise the item will be re used and returned at the
sender’s expense.

HERA LS Series CD/DVD Duplication System / User Manual
Table Of Contents
Introduction .................................................................................................................................... 1
Quick Start ...................................................................................................................................... 2
etting Started ………………………………………………………………………………………....2
Manufacturer Recommendations ……………………………..……………………………………….3
Mounting the Tower …………...………………...………………………………………………….....3
Operating Environment........................................................................................................................... 5
Connecting Power ……………………………………...…………………………………………….....5
Overview …………………………………………………………………………………………..7
1. Welcome .………………………………………………………………………………………..……7
2. The Robotic Platform .….………………………………...………………………...………….……9
3. The LCD Control Panel .……………………………………………………………………..…….10
4. Menu Overview .……………………………………………………………………………..……..11
5. Introduction to Manage Accounts .……………………………………...…………………..….…16
6. Single Master and Multi Master Mode .……………………………………...………….……….17
7. Setting Counters and Assigning Names ………………………………..……………..…..………18
Operation ………………………………………………………………………………………..20
1. Copy ………………………………………………………………………………………………....20
1.1. Making Copies in Single Master Mode …………………………………………………………………20
1.2. Making Copies in Multi Master Mode ……………………………………………………………….…22
2. Print ………………………………………………………………………………………………....24
3. Test .……………………………………………………………………………………………..…..26
4. Compare ……………………………………………………………………………………..….…..27
5. Test + Copy …………………………………………………………………………………..….….28
6. Copy + Compare ………………………………………...…………………………………..……..28
7. Select Burn Speed …………………………………………………………………………..………28
8. Select Source ………………………………………………………………………………..………29
9. Master Mode ………………………………………………………………………………..………30
10. Erase RW ……………………………………………………………………………………..…...30
11. Hard Drive Setup …………………………………………………………………………..……..31
11.1. Select Partition ……………………………………………………………………………………….…32
11.2. Load Partition …………………………………………………………………………………………..32
11.3. Rename Partition ……………………………………………………………………………………….33
11.4. Delete Partition …………………………………………………………………………………………33
11.5. Partition Info ……………………………………………………………………………………………34
11.6. Partition Size ……………………………………………………………………………………………34
11.7. Format Hard Drive ………………………………………………………………………………….….35

Automated CD-R Duplicator System / CD-2 CD-4 &CD-7 Series / User Manual
5
12. Print Setup …………………………………………………………………………………..…….35
12.1. Load Label ………………………………………………………………………………………………35
12.2. Rename Label ………………………………………………………………………………………..…36
12.3. Delete Label …………………………………………………………………………………………….36
12.4. Print Surface Info ………………………………………………………………………………………37
12.5. Label Info …………………………………………………………………….……………….37
13. Setup ………………………………………………………………………………………..……...37
13.1. Language ………………………………………………………………………………………………..37
13.2. Read Error Skip …………………………………………………………………………………….…..38
13.3. CD Writing Mode ………………………………………………………………………………………38
13.4. Max Audio VCD & CD Speed ……………………………………………………………………….38
13.5. Buzzer ……………………………………………………………………………………………………39
13.6. Startup Menu ………………………………………………………………………………………...…39
13.7. Screen Saver …………………………………………………………………………………………….39
13.8. Counter ………………………………………………………………………………………………….40
13.9. Autocopy Enabled ………………………………………………………………………………………40
13.10. ISRC …………………………………………………………………………………………………….42
13.11. DVD+R High Compatibility Mode ……………………………………………………………………42
13.12. Disable Drives ………………………………………………………………………………………….42
13.13. CD Overburn …………………………………………………………………………………………..43
13.14. Max Failure per Job …………………………………………………………………………………...43
13.15. Ma Failure per Drive ………………………………………………………………… ..…44
14. System Utilities ………………………………………………………………………………..…..44
14.1. Disc Info …………………………………………………………………………………………………45
14.2. System Info ……………………………………………………………………………………………...45
14.3. Device Info ………………………………………………………………………………………………45
14.4. Load Default …………………………………………………………………………………………….45
14.5. Update Firmware ……………………………………………………………………………………….46
15. Loader Utilities ………………………………………………………………………………..…..46
15.1. Drive Alignment …………………………………………………………………………………….…..46
15.2. Alignment Protection …………………………………………………………………………………..47
16. Manage Accounts ………………………………………...……………………………….….…...47
16.1. View User ……………………………………………………………………………………………….48
16.2. Create User ……………………………………………………………………………………………..48
16.3. Edit User Info …………………………………………………………………………………………..49
16.4. Delete User ……………………………………………………………………………………………...49
16.5. Password on Bootup ……………………………………………………………………………………50
17. Autocopy …………………………………………………………………………………….……..50
18. Shutdown ………………………………………...………………………………………….…..…50
LightScribe Software Setup Instructions …………………………………………………...…. 1
Design and Create a Label ……………………………………………………...……... 4
Trouble Shooting ……………………………………………………………………………..… 8

HERA LS Series CD/DVD Duplication System / User Manual
1
Introduction
Thank you or choosing the HERA Series duplication systems. Hope ully this equipment will bring you satis action
and great pleasure in CD/DVD duplication.
Feat res:
• Stand-alone design, no PC nor so tware required.
• Easy operation, no training required.
• Support various CD and DVD ormats
• Load, Copy, Compare, Veri y, Emulate, Editing, etc.
• Track selection available or copying music tracks
• On-the- ly direct copy or through hard drive loading
• User riendly LCD display
Important Note:
• Make sure voltage setting (AC115/230V) is correct.
• Stable input o power required or normal operation.
• Duplicator should be placed on a lat and stable sur ace inside clean & cool working area.
• Check, clean the master and CD/DVD discs be ore duplication starts.
• Do not touch recording sur ace o the discs.
•
Do not move the duplicator during operation.

HERA LS Series CD/DVD Duplication System / User Manual
2
Quick Start
Getting started
The removal of this prod ct sho ld be ndertaken by at least 2 people beca se of its size and
weight. Please ens re safe man al handling proced res are followed
Care ully remove your system rom it’s shipping box and veri y that all parts are present. I there are
missing or damaged parts contact All Pro Solutions (APS) or an authorized distributor immediately to
correct any miss-packed or missing parts.
You should ind the ollowing packaged with your system:
Autoloader AU4 (330 disc capacity), AU7 (630 disc capacity) or AU9 (900 disc capacity), depends
on your model con iguration
Tower populated with drives
Two Power cords (1 or autoloader and 1 or tower)
Serial Cable
User Manual
5/64 hex head key (Allen wrench) and a bottle with oil to maintain sha ts unctionality
Warranty card
NOTE:
I your system is damaged during shipment, please contact the reight carrier irst, and then contact
your distributor or All Pro Solutions.
You have to save your shipping materials so that i the need arises you can return your system or
service. Sending a system to All Pro Solutions without the original packaging will void the warranty.
This packaging was designed speci ically or shipping your system. Other packaging may not be as
suitable. I you have already disposed o your packaging materials, you can receive a new set rom All
Pro Solutions or a ee.

HERA LS Series CD/DVD Duplication System / User Manual
3
Man fact rer Recommendations
Be ore starting to operate your system, please read the User’s Manual entirely!
Place your system on a lat, steady sur ace in a climate controlled environment with regular o ice light
(no bright light to re lect into the system’s sensor), ree o dirt, dust, excess humidity, excessive heat
or electro-magnetic inter erence.
Please an the media be ore placing it into the Input Hopper and align it. Media has to slide easy on
top o each other
Do not use un-expensive media because it can generate problems: media sticks together and 2 or
more discs can be loaded even i the picker it’s designed to grab just one.
For audio duplication, please use good quality media and max 16x speed on CD
Because your system is equipped with up 22x DVD drives, use only 52x certi ied CD and 22x certi ied
DVD media.
From time to time, the drives have to be cleaned using a CD Lens cleaning Kit or blowing air using a
compressed gas duster.
The 2 sha ts used by the Picker to travel up and down should be oiled rom time to time; use the
multipurpose oil provided
Mo nting the tower
For all systems, the tower is provided with a tower plate mounted on the bottom. This plate will help in stabilizing
the tower on the adapter (see Fig. 1 page 4)
Make sure all thumbscrews are loose, place the tower on top o the adapter matching the colored marks (see
Fig.2). Tight gently thumbscrews # 1 on both sides until they touch the adapter and then tight thumbscrews # 2
(they consolidate the tower on the adapter) as shown in Fig. 3.
A ter the tower has been mounted success ully, proceed with “Connecting Power” (page 5) and “Drive Alignment”
(page 41)
In case you don’t have good alignment, loose all thumbscrews, adjust the tower (le t and right, back and orth) and
tight back the thumbscrews as described above. Repeat the steps above until you obtain the right alignment.

HERA LS Series CD/DVD Duplication System / User Manual
4
Fig. 1
System nassembled
Fig.2 Fig. 3
Tower alignment Side view

HERA LS Series CD/DVD Duplication System / User Manual
5
Operating Environment
Your APS System should be used in a climate-controlled environment ree o dirt, dust, excess humidity,
excessive heat or electro-magnetic inter erence. Your APS System should be placed on a sturdy level
sur ace – away rom sources o vibration and excessive lighting.
Allow at least our (4) inches o clearance around the sides and back o the system or ventilation.
Connecting power
Plug one power cable into the tower system, and the other one into the autoloader. Plug each power cable into the
proper power source and connect Serial Cable as shown in:
Fig. 4b (page 6)
The power On/O switch or the tower is located in the ront and the one or the autoloader is located in the back.
Power the tower on irst, then turn on the autoloader

HERA LS Series CD/DVD Duplication System / User Manual
6
Fig. 4a
System assembled
HERA-3: 330 disc capacity HERA-6: 630 disc capacity HERA-9: 900 disc capacity
Fig. 4b
Back View – Cables config ration
(same on all models)

HERA LS Series CD/DVD Duplication System / User Manual
7
OVERVIEW
1. Welcome
The Autoloader is a reliable, high per ormance, high speed, standalone, robotic DVD, CD and/or BD (optional)
autoloader with LightScribe printing capabilities. With its pro essional industrial design and simple user inter ace,
it makes your duplicating experience easier than ever.
With the Autoloader, you can have a capacity up to 900 discs, duplicate continuously or 24 hours (even with
multiple masters), and get the highest quality duplication, all at an extremely a ordable price. The Autoloader is
the most reliable and a ordable autoloader on the market, even compared to units with hal the drives and
capacity.
* The multiple-master eature applies to Duplication ONLY. LightScribe Printing ONLY supports the single master
unction.
Be ore you start using this autoloader, please read the ollowing to ensure proper operation:
DVD/BD D plication Limitations
The autoloader will not copy any BD/DVDs that have Copy Protection encoded in the content. Typically, most Blu-
Ray (BD) or DVD movies you purchase or rent rom a store contain Copy Protection.
In addition to the copy protection limitation, the autoloader will only copy a single layer (4.7 GB) disc to another
single layer recordable media. I your autoloader has double layer/dual layer capability, you can copy a double
layer (8.5 GB) disc to another double layer recordable media, but you cannot duplicate a single layer disc on to a
double layer recordable media or vice versa.
Temperat re Warning
I the Autoloader was stored in a location where the temperature dropped below 32° F (0° C) within the past 24
hours, leave the autoloader in a warm room with temperatures at least 65° F (19° C) or our hours prior to
powering it on or the irst time. Failure to do so may cause irreparable harm and prevent the autoloader rom
unctioning.
Maintenance
It is very important to operate and keep the autoloader in a dust ree, clean environment since dust is the number
one killer o CD/DVD/BD recording devices. Failure to do so can severely damage your autoloader. We strongly
suggest that you constantly use an Air Duster (Canned Air) to clear o any dust on the sur ace o the autoloader.
Note: Do not try to use an Air Duster to clean the autoloader while the writer trays are open. In doing so you may
inadvertently blow dust into the recording device and damage it.

HERA LS Series CD/DVD Duplication System / User Manual
8
Proper Sh tdown
To avoid possible system ailures, you need to shut down the autoloader properly. To shut down the autoloader,
scroll to menu 15. Shutdown and ollow the instructions on the screen. Not per orming this unction increases the
risk o damaging the autoloader
.
Do ble Layer/D al Layer Partition Iss e
I you have a 16x speed or higher autoloader with double layer/dual layer DVD9 capability, the hard drive partitions
are set to a de ault size o 9 GB each to accommodate or the expanded size o the DVD9 ormat. I you require
more partitions and do not plan on using double layer/dual layer DVD9 media, you can reduce the size o the
partitions using the instructions given in “Partition Size” on page 33. Keep in mind that i you alter the partition size,
all previous data/video stored on the hard drive will be lost and you will only be able to load media with less than 5
GB capacity such as DVD5 (4.7 GB), CD (700 MB), etc.
Disc Static and Sticky Media Iss es
The most common problems when using an autoloader are the disc static and sticky media issues. These static
charge problems cause multiple discs to stick together, resulting in improper operation and more severely, can
shock the robotic arm while loading a disc that causes the system reeze. Even though the autoloader has a sticky
media separator unction to prevent the sticky media, but you should still ollow these steps to prevent sticky media
rom disrupting your operation and protect your system rom disc static charge.
This issue is most commonly seen when you buy a 100 pack o blank discs and insert them into the autoloader
without any treatment. I you have experienced this kind o problem, please do the ollowing to remove the
adhesive static between the discs:
Separate the blank discs be ore you place them into the autoloader's bins and align them using. Separating them
will greatly reduce the static between discs. See pictures below:
I this doesn't achieve the desired outcome, use an air duster (canned air) to blow air around the circular edge o
the blank discs. This process reduces the static between the discs up to 90%. The amount o air to use depends
on actors speci ic to your environment.

HERA LS Series CD/DVD Duplication System / User Manual
9
Disc Placement Iss e
Another common problem when using an autoloader is the placement o media into the bins. Placing the media into
the bins properly can avoid possible picking errors when operating the autoloader. Even though the autoloader is
designed with certain tolerance adjustments to prevent mishandling by the picking arm, ailures may still arise i the
bins are not loaded correctly. All media loaded into the bins should be lat and not slanted at an angle to ensure the
picking arm can securely grab the disc. Be sure not to load too many discs into the bins as well as this may cause
errors in placement and loading. The igure below shows the proper and incorrect disc placements when loading
media into the bins
2. The Robotic Platform
The autoloader (with up to 900 Disc Capacity) has 3 input bins that hold:
- 110 discs each or HERA-3
- 210 discs each or HERA-6
- 300 discs each or HERA-9
The robotic arm picks blank discs rom Input Bin # 1 irst, and places the success ul copies into the Output Bin.
Once Input Bin # 1 is empty, it picks blank discs rom Input Bin # 2, and places the success ul copies into Input Bin
# 1 which becomes Output Bin # 2. It then picks rom Input Bin # 3 and places into Input Bin # 2 which becomes
Output Bin # 3 and so on. Reject discs are placed on to the deck below the drive trays. (Throughout this manual,
this area is also re erred as “Reject Area”).
HERA LS Series CD/DVD Duplication System / User Manual
10
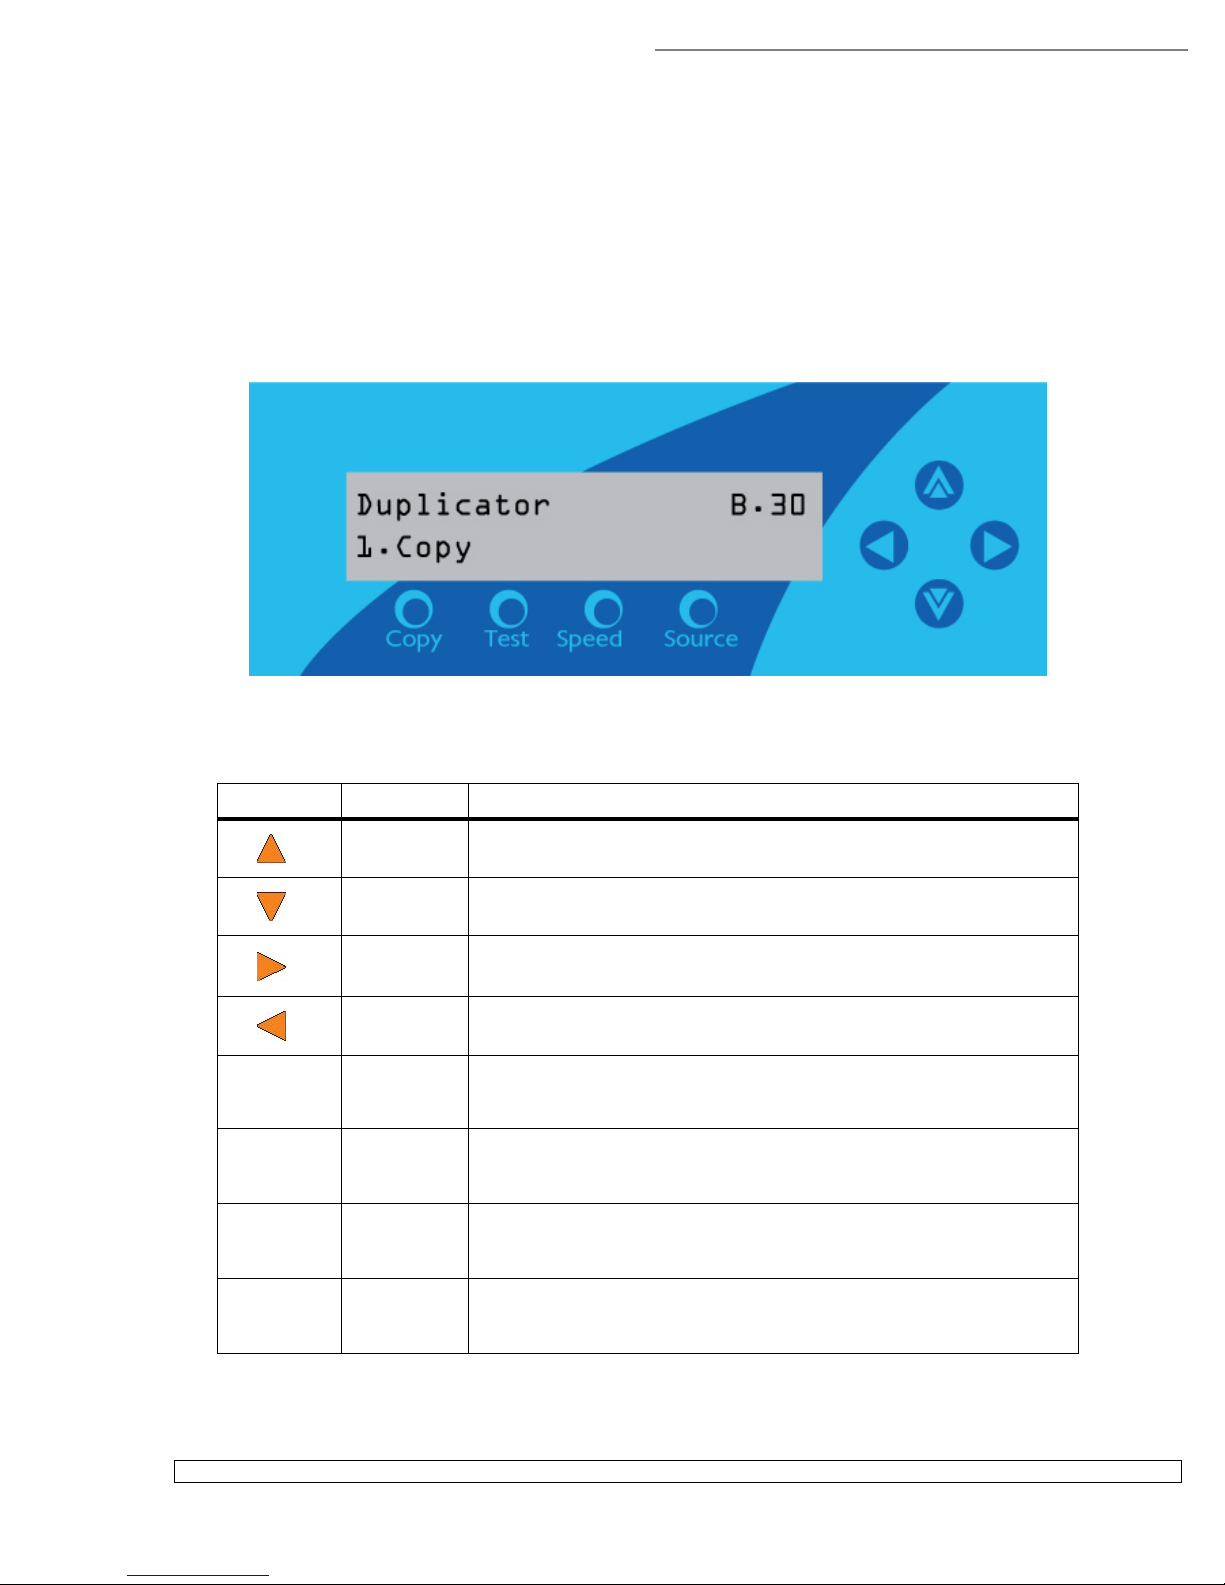
3. The LCD Control Panel
Figure 4 below shows the LCD Control Panel. This panel has a two-line 20 character LCD display to provide user
eedback and eight push buttons to control the operation o the Autoloader. The unctions or these buttons are
shown in Table 1.
Fig. 4
LCD Control Panel Layout
Table 1: Front Panel Controls
Control Name Function
Up Scroll up through the menu or list.
Down Scroll down through the menu or list.
Enter Execute the unction. Also called OK in the Menus.
ESC Go back to the previous unction.
Copy Copy Quick key to make a copy. Pressing this key takes you directly
to the Copy menu.
Test Test Quick key to make a simulation o the copy process. Pressing
this key takes you directly to the Test menu.
Speed Speed Quick key to change the duplication speed. Pressing this key
takes you directly to the Select Burn Speed menu.
Source Source Quick key to change the master reading source. Pressing this
key takes you directly to the Select Source menu.

HERA LS Series CD/DVD Duplication System / User Manual
11
. Menu Overview
This section provides an overview o the menu options. These menu options are explained in detail on the
re erenced pages.
1. Copy (page 20)
Use the Copy menu or Copy quick key to make CD/DVD or BD (optional) copies. Be ore you start a
copy, make sure you have selected the correct Master Mode.
I you plan to use Single Master Mode, please make sure you have success ully loaded your master disc
to a partition on the Hard Drive.
I you plan to use Multi Master Mode, please make sure you have placed every master disc on top o the
corresponding number o blank discs.
For additional in ormation, see “Making Copies in Single Master Mode” on page 19 or “Making Copies in
Multi Master Mode” on page 21.
2. Print (page 2 )
Use the Print menu to print label(s) directly onto the label side o your LightScribe printable media. Be ore
you start a printing process, please make sure you have success ully loaded your LightScirbe label ile(s)
into the Hard Drive via the “Load Label” unction under “Print Setup”. See page 35 or details.
For additional in ormation on creating/designing your labels, please re er to “Design and Create a Label
File” on page 54.
3. Test (page 26)
Use the Test menu or Test quick key to simulate the copy process. With simulation, write once
recordable discs such as DVD-R, or CDR will be reusable. The purpose o simulation is to ensure error
ree duplication.
Note: Due to physical limitations of the BD/DVD+R recordable format if you try to simulate BD/DVD+R
copying you will encounter failure messages.
Warning: If you are using CD/DVD/BD Rewritable discs as your blank media during the simulation the
content on those discs will be permanently erased.
. Compare (page 27)
Use the Compare unction to per orm a bit-by-bit comparison between the content o your master disc(s)
in the Hard Drive and the contents o all discs it copied. This ensures that all o your copies are identical
to original master disc(s).

HERA LS Series CD/DVD Duplication System / User Manual
12
Note: The bit-by-bit comparison will only apply on all BDs DVDs and Data CDs. The readability check
will be applied for other formats like Audio CDs CD+G and Video CDs discs due to their lack of
error correction mechanisms.
5. Test + Copy (page 28)
Use the Test + Copy menu option to simulate the copying process initially. Then, the autoloader per orms
the actual copy process on the blank disc(s) that passed the simulation. For the blank disc(s) that didn’t
pass the simulation, the autoloader will place it/them to the Reject Area.
6. Copy + Compare (page 28)
Use the Copy + Compare menu option to make 100% reliable copies. A ter the copy process is done, the
autoloader automatically compares the copies rom the content o your original master disc.
7. Select Burn Speed (page 28)
Use the Select Burn Speed menu option or the Speed quick key to adjust the duplication speed or the
various blank disc ormats. For additional in ormation, see “Select Burn Speed” on page 28.
8. Select Source (page 29)
Use the Select Source menu or the Source quick key to tell the system where the content o the master
disc resides during duplication. At this point, Hard Drive is the only place where the content o the master
disc resides during duplication. For additional in ormation, see “Select Source” on page 29.
9. Master Mode (page 30)
Use the Master Mode menu to select either Single Master Mode(SM) or Multi Master Mode (MM). For
more in ormation on those modes, see “Single Master and Multi Master Modes” on page 17. For more
in ormation on using the Master Mode menu, see “Master Mode” on page 30
10. Erase RW (page 30)
Use the Erase RW menu to erase your Rewritable discs. There are two options:
F ll Erase: This option erases the entire disc, destroying all previously written data in the
process.
Q ick Erase: This option erases the index (TOC) o the Rewritable disc, not the data section. It
is much aster than Full Erase. However, the data section is still recoverable. I you pre er the old
content not to be recovered or security purpose, please per orm Full Erase.

HERA LS Series CD/DVD Duplication System / User Manual
13
11. Hard Drive Setup (page 31)
Use the Hard Drive Setup menu to per orm various hard drive-related operations. These options include
loading, renaming, or deleting your images. For additional in ormation, see “Hard Drive Setup” on page
28.
12. Print Setup (page 35)
Use the Print Setup menu to per orm various printing-related operations. These operations include
loading, renaming, or deleting your print labels.
13. Setup (page 37)
Use the Setup menu options to control how the autoloader operates. You can scroll between the various
options using the Up or Down button.
1. Lang age
Use this setting to choose the language used to navigate the autoloader. The autoloader
supports English and Spanish menus.
2. Read Error Skip
Normally, when the autoloader encounters a read error while reading the master disc, all the
duplication will be aborted and all the recordable media in the writers will be ruined. However, i
you believe that your master disc has a small, insigni icant error due to physical damage, you can
enable this setting to allow the autoloader to skip any read errors that it encounters. It is ON by
de ault.
Important: This function does not fix the error; it only skips it to continue copying the rest of the
readable data. This function is recommended for Video and Audio duplication purpose.
3. CD Writing Mode
Use this setting to select the mode you would like use to duplicate a CD. There are two di erent
modes: “Disc at Once” and “Track at Once.” Unless you understand completely what they mean,
we strongly suggest you to set it as “Disc at Once”.
4. Max A dio, VCD & CDG Speed
Due to the lack o error checking mechanism or Audio CD, Video CD and CD+G ormat,
duplicating them at too high a speed can cause requent errors like glitches and skips. Use this
setting to adjust the maximum duplication speed or Audio, Video CD and CD+G ormat to
ensure the reliable duplication or such ormats.
5. B zzer
Use this setting to choose whether you want to hear a beep when you press a button and when a
task has been completed.
6. Start p Men
Use this setting to choose which menu you would like to see irst when you turn on the
autoloader.
7. Screen Saver
Use this setting to enable or disable the Screen Saver eature. When this is enabled, a screen
saver is displayed whenever your autoloader has been idle or a long period o time.

HERA LS Series CD/DVD Duplication System / User Manual
14
8. Co nter
Use the Counter menu to enable or disable the Counter eature. The counter tells you how many
discs have been copied and how many discs are le t to go during the progress and it will stop the
job once the desired number o copies has been made.
9. AUTOCOPY Enabled
This menu option turns on the hidden AUTOCOPY main menu option. The AUTOCOPY unction
simpli ies the copy process by allowing you to stack blank media on a spindle(s), place the
master on top o the stack on the irst spindle, and press the Enter button on AUTOCOPY key
in the main menu. It will load the content o the top disc o the 1
st
input spindle (master disc) into
the Reserved Partition o the Hard Drive and copy it to blank disc(s) below it and other input
spindle(s) i exists.
10. DVD+R Compatibility Mode
This eature allows you to turn the DVD+R High Compatibility Mode eature ON or OFF. The
purpose o this eature is to increase the compatibility o DVD+R media with a broader range o
DVD Video players.
11. ISRC
This option will allow you to enable/disable copying the ISRC code o an Audio CD. ISRC is the
serial number o the audio track that uniquely identi ies the song in that audio track. This ISRC
code is commonly ound in commercial Audio CDs and rarely seen on home made Audio CDs.
By enabling this eature, the duplication per ormance will be lowered.
12. Disable Drives
Use this utility to allow the system to disable certain drives/trays when certain drives/trays are
producing high ailure rates. See “Disable Drives” on page 42.
13. CD Overb rn
Most CD-R media is either 650MB or 700MB. The burning starts rom the center o the CD and
works its way out but stops be ore the physical edge o the CD. Overburning is a burning method
to bypass the limitations o burning urther out onto the edge o the CD. This can result in slightly
higher storage capacity, however, it has also been known to have compatibility playback issues.
Please use it with caution.
14. Max Fail re per Job
Use this setting to set the maximum number o ailures the autoloader is allowed per job. Once
the maximum is reached, the job will be stopped.
15. Max Fail re per Drive
Use this setting to set the maximum number o ailures each drive is allowed during the job.
Once the maximum is reached or any particular drive, said drive will be disabled or the
remainder o the job. The autoloader will continue to unction using the remaining drives.
1 . System Utilities (page )
1. Disc Info
Use the Disc In o utility to identi y the type o blank recordable media. This utility identi ies your
blank recordable Media's ormat, capacity, manu acture ID, and the Media's certi ied writing
speed.
2. System Info

HERA LS Series CD/DVD Duplication System / User Manual
15
Use this menu option to see data about the autoloader and its resources ( irmware version, RAM
and CPU).
3. Device Info
Use this menu option to see data about the drives that are installed in the autoloader.
4. Load Defa lt
Use this menu option to reset all o the options back to the manu acturer's de ault values. You
can use this unction i your autoloader is acting abnormally.
5. Update Firmware
Use this utility to update the so tware in your autoloader. To update, insert the manu acturer’s
Certi ied Update CD into the 1
st
tray and make sure no other discs are in rest o the trays. Then
you can press the Enter button to update.
Important: You should not upgrade your autoloader's irmware unless your system is becoming
unstable or you are advised to do so by Tech Support.
15. Loader Utilities (page 6)
Use the Loader Utilities menu options to access the various utilities built into the autoloader. You can
scroll between the various options using the Up or Down button.
1. Drive Alignment
The Drive Alignment menu is used to check the mechanical alignment between the drives and
the robotic arm. See “Drive Alignment” on page 46 or more in ormation.
2. Alignment Protection
Enabling Alignment Protection makes each drive tray quickly slide in and out a ter a disc has
been loaded into it. This ensures that the disc sits properly in the disc indentation o the tray by
“shaking” the disc into place. See “Alignment Protection” on page 47.
16. Manage Accounts (page 7)
Use this menu option to:
Create user accounts and passwords to prevent unauthorized use o the autoloader.
Edit existing user account in ormation, including name and password.
Delete existing user account(s).
Enable/Disable this eature.
For additional in ormation, re er to “Introduction to Manage Accounts” on page 16.
17. AUTOCOPY (Hidden – page 0 and 50)
The AUTOCOPY unction simpli ies the copy process by allowing you to stack blank media on a
spindle(s), place the master on top o the stack on the irst spindle, and press the Enter button on
AUTOCOPY key in the main menu. It will load the content o the top disc o the 1
st
input spindle (master
disc) into the Reserved Partition o the Hard Drive and copy it to blank disc(s) below it and other input
spindle(s) i exists.
To activate this unction, you need to activate it by going to “13. Setup” -> “9.AUTOCOPY” and turn it on.

HERA LS Series CD/DVD Duplication System / User Manual
16
18. Shutdown (page 50)
Use this menu option to turn o your system. Once you see the “Ready to Power O ” message, you can
sa ely turn o the machine using the power switch. Turning o your autoloader without per orming this
unction increases the risk o damaging it.
5. Introduction to Manage Accounts
This eature allows the administrator to:
Create user accounts and passwords to prevent unauthorized use o the autoloader.
Edit existing user account in ormation, including name and password.
Delete existing user account(s).
Enable or disable “Manage Accounts”.
Manage Accounts is disabled by de ault. Prior to activating the “Manage Accounts” eature, the autoloader
recognizes all users as the Administrator.
The pre-de ined password or this unction is “0000.”
By adding additional users, each individual user has his/her own settings and only has access to the hard drive
partitions that the individual user loaded to the hard drive. No one else can access their hard drive partitions other
than the Administrator.
For example, i USER 1 logs-in and loads a master disc to hard drive Partition A, when USER 2 logs-in, USER 2
will not have access to any partitions loaded by USER 1; which includes partition A.
To take advantage o this eature, ollow these instructions:
Change the Administrator password. Re er to “Edit User In o” on page 49 or additional in ormation.
Create a User Name and Password or each authorized person on this autoloader. Re er to “Create
User” on page 48 or additional in ormation.
Enable the “Manage Accounts” eature by turning on the “Password on Bootup” setting. Re er to
“Password on Bootup” on page 50 or additional in ormation.
Note: This autoloader comes with a standard license that allows you to create up to 32 users. However if
you desire to create more than 32 users please contact Tech Support Service regarding our special 64 user
license pack.
For instructions on how to use “Manage accounts”, see “Manage Accounts” on page 47
.
6. Single Master and Multi Master Mode
There are two ways to make copies using the autoloader:
Single Master Mode:
This mode requires that a single master disc is loaded onto the hard drive prior to initiating the duplication
process. This mode is ideal i your job involves one or very ew master disc(s).
M lti Master Mode (Batch Mode):
This mode does not require you to manually load your master. Simply place the master disc(s) on top o
the stack o blank discs needed or that particular job o the master disc. This mode is ideal i you have
numerous master discs and ewer copies or each master disc.
This manual suits for next models
2
Table of contents
Other All Pro Solutions Disc Duplicator manuals


Popular Disc Duplicator manuals by other brands


Duplo
Duplo DUPRINTER DP-440 instruction manual

Gestetner
Gestetner CP6244 operating instructions

MicroBoards Technology
MicroBoards Technology CopyWriter Series Specifications

Aleratec
Aleratec 1:5 HDD Cruiser 350104 user guide

Aleratec
Aleratec PortaCruiser 350108 user guide

Aleratec
Aleratec 260167 user guide