Alleswolke UCM3300 series User manual

"
LTE Smart Dashboard Camera"
UCM3300 series"
UCM3310S (Sprint Version)"
UCM3300U (Universal Version)"
User Manual"
"
●$ Version 1.05"
Alleswolke Inc. All rights reserved"
1

Menu
Disclaimer……………………………………………………………………………………………..…3 "
Acknowledgement………………………………………………………………………………..…….4 "
What’s included……………………………………………………………………………….…………5"
Device Instruction ……………………………………………………………………………….……..6"
Hardware Specs……………………………………………………………………………….………..7"
LED Indicators……………………………………………………………………………….…………..8"
Installation Instructions…………………………………………………………………………………9"
●$ Installation position………………………………………………………………………………9"
●$ Installation procedure…………………………………………………………………………..9"
Operating instructions……………………………………………………………………………….…13"
●$ Download and Install Smartphone Application ……………………………….………….…13"
●$ Account Registration…………………………………..……………………………….…….…14"
●$ Add a camera by scanning the QR-code……………………..…………………….….….…15"
●$ Navigation/overview/camera page Introduction……………….…………………….…….…17"
●$ Live video page Introduction……………….……………………………………….….…….…20"
●$ Video streaming and remote access via LTE……………………………………………….…21"
●$ Take live video stream earrings and panoramic photos……..…..………………….…….…21$ "
●$ Two-way Audio Feature……………………..…………………………………………..…….…22"
●$ Wi-Fi Connection and SD Card Video Access…..……………..…………………..…….…..23"
●$ GPS Location and Route Tracking page…………………….………………….……………..24"
●$ Event History Page……………………………………………………………………………….25"
●$ Push Notifications……………………………………………………………………………..….28"
●$ Settings Menu Introduction…………………………………………………………………..…30"
●$ Shock/impact Detection Sensitivity Adjustment ………………………………………….…32"
●$ Reset……………………………………………….………………………………………………32"
●$ Patrol mode ………………………………………….…………………………………………..33"
●$ Emergency button …………………………………………………………………………….…33"
Firmware update…………………………………………………………………………………………34"
Fleet features…………………………………………………………………………………………..…35"
Q&A………………………………………………………………………………………………..………36"
RoHS disclaimer …………………………………………………………………..…………………….37"
2

FCC ID and Document ……………………………………………….…………..…………………….38"
Disclaimer
Without the written authorization by Alleswolke Inc., any content that is provided in this
user manual is not permitted to be published, spread, transcribed or stored in any
searchable system with indices or journals, or translated into any other languages, to or
via any form of media. "
Alleswolke Inc. reserves the rights of modification, altercation, removal and any other acts
to the contents in this user manual, including but not limited to the hardware and software
specifications, user instructions and other general contents without any previous
notification to customers or users."
Under any circumstances, Alleswolke Inc. does not assume any liabilities caused by the
improper use of this product, including but not limited to the operations contradictory to
the user instructions, use of excessive or abusive force against the products and
accessories, or any activities in commission of criminal activities and/or civil rights."
Alleswolke Inc. exerts our utmost to ensure the accuracy and integrity of contents within
this user manual. We are sincerely thankful should you discover and notify any errors or
misses to us."
3

Acknowledgement
Dear Respected User: We sincerely thank you for choosing our product. Before using the product,
please carefully read the Precaution for the correct installation and use of the product."
•The product is designed with a high standard and contains sophisticated electronic circuits.
The LTE hub in this product is suitable for 12V automotive battery voltage. The camera is
suitable for 5V voltage and works only with accessories designed and manufactured
specifically for this product and security needs. Any improper use of non-compliant third-party
accessories may cause incidental and consequential damages of product and users, which are
not subject to the coverage of warranty service or other liabilities by the manufacturers or
service providers."
•Should there be any need to install or remove the SIM card or Micro SD card within the device,
please ensure that the power status of device is OFF when doing so."
•When it is necessary to remove the stain or dirt on the surface of product, it is recommended
to wipe it using soft cloth or wet tissue paper. Do not use any chemical solvents that have an
irritating or corrosive nature. Please try to keep the lens clean as lens with stains or dirts on the
surface may affect the picture quality. If it is necessary to clean the lens, pleas wipe lightly with
soft cloth, suede, or any tissue paper that is designed to wipe lens glasses."
•This product is not water-proof and will cause damages if submerged into water or places
within an environment with high humidity. Permanent damage will be caused by the rust
generated with the contact or exposure to water or such an environment."
•Do not expose the product into an environment with strong electromagnetic radiation or a
strong magnetic field, or place any device/object with such a nature nearby. Objects and
equipments that generate strong static electricity or magnetic fields may interfere with the
product performance, damage data storage of memory card, or affect the internal circuitry."
•Do not try to open the product or repair it by self. Please contact customer service or the
official designated maintenance point for testing, repair or replacement should there be any
problems or failures of the product."
•It is recommended to disconnect the power cable from the vehicle in case of long-term storage
or parking of vehicle, in order to prevent the drainage of battery power."
•If there is any other problems during the use of device, please read the Frequently Asked
Questions at the later sections of this user manual, or contact Alleswolke Inc. for additional
consultation.(
4

What’s included
1×Alleswolke Smart LTE Hub"
1×Alleswolke Smart Dashboard Camera "
1×Alleswolke Smart OBD-II Power/Data Cable"
1×Camera USB-C Power Cable"
1×Emergency Button with Strap"
1×Camera Dashboard/Windshield Mount"
1×Windshield Clean Wiper"
1×Hook-and-Loop Fastener"
1×Spare Mounting Sticker"
10×Cable/Wire Clips"
1×Quick Start Guide"
Warning: it is strongly prohibited to plug the attached power and data cables into any other
electronic devices not designated to use with, such as cell phones. Alleswolke does not assume
any liability of damages cased by the contradictory use against this instruction."
Warning: it is strongly prohibited to use non-compliant third-party power cables and adapters
(such as cables and adapters for smartphones) to power the product, it may cause incidental and
consequential damages of the product and users, which are not subject to the coverage of
warranty service or other liabilities by the manufacturers or service providers."
5
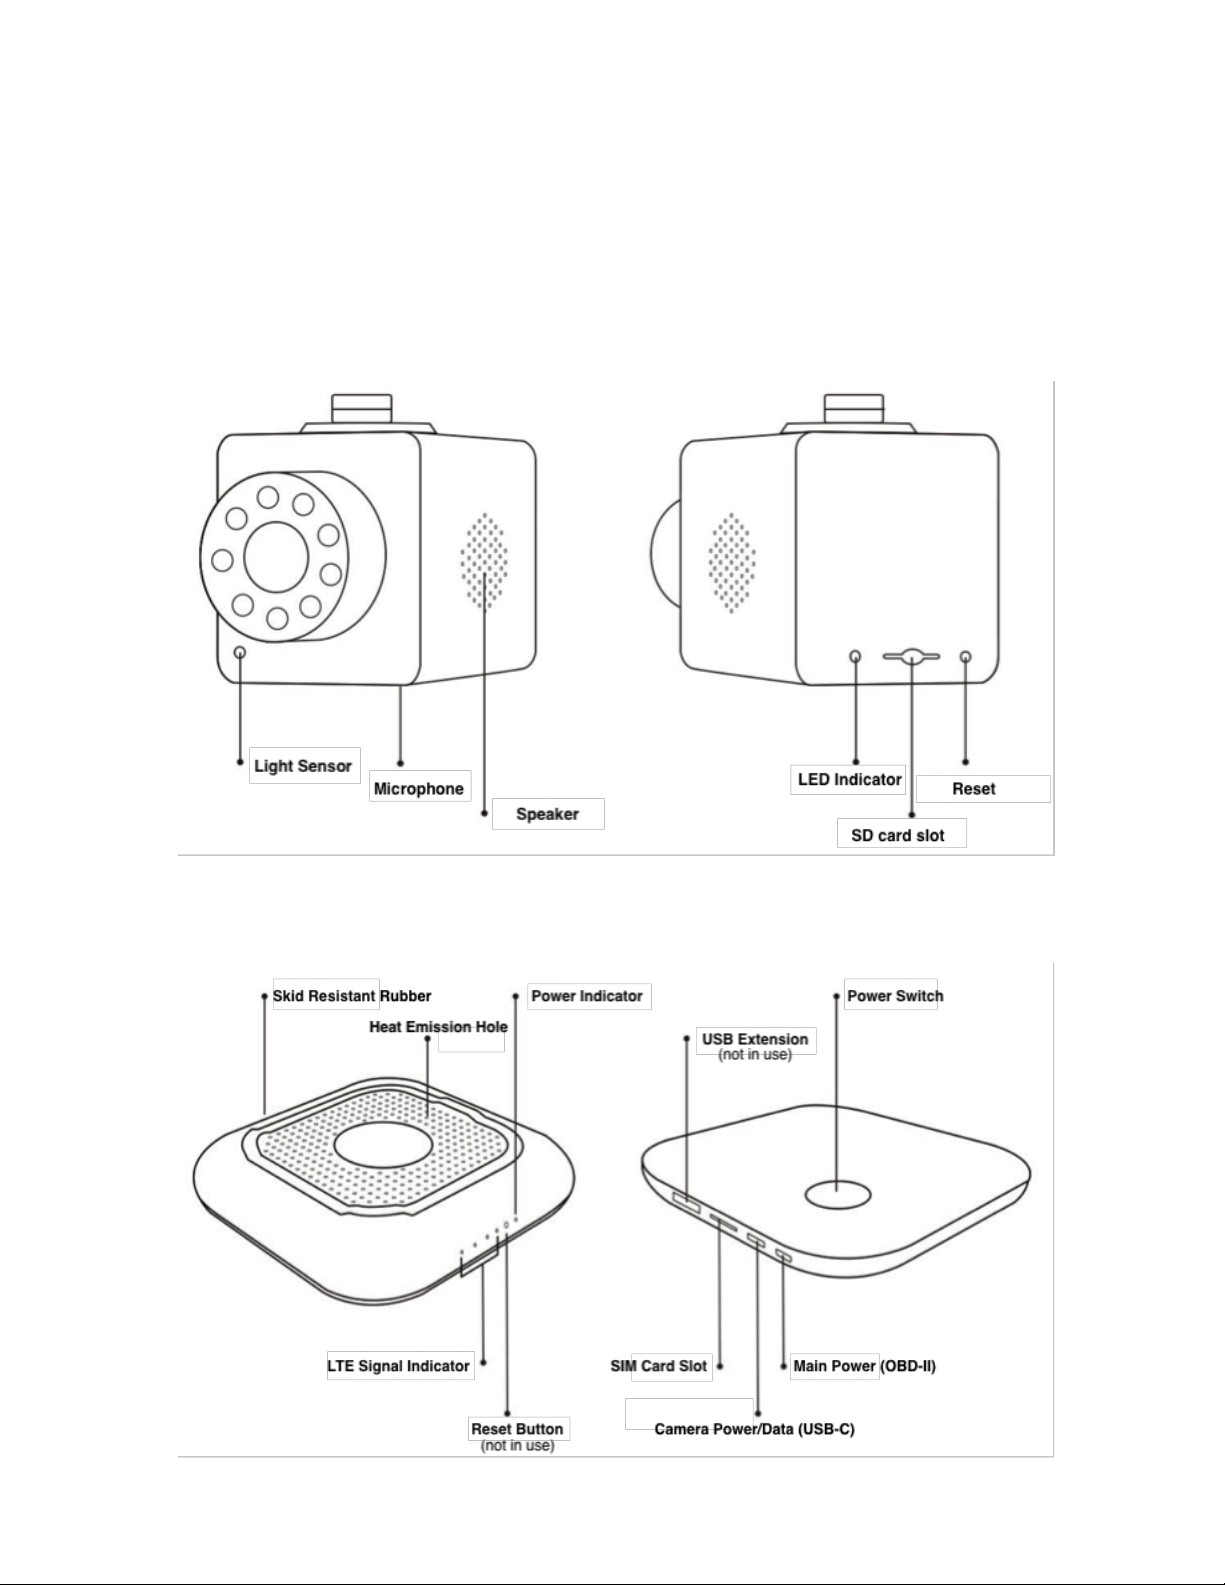
Device Instruction
●$ Smart Dashboard Camera"
"
●$ Smart LTE Hub"
"
6

Hardware Specification
ications "
Product Model
UCM3310
Dimensions
CAM:74×43×45mm$HUB:92×92×15mm
LTE Module
Sierra Wireless WP7504 (UCM3310) or other
Main Chip
Qualcomm Atheros AR9x31
Lens
6-layers glass and IR-Cut with IR LED night visions
Aperture
F1.9
Viewing Angle
Diagonal 162°/ Horizontal129° / 360° Motorized Pan
CMOS
APTINA AR0230 CMOS 1/2.7
Focal Length
2.9mm
Sensors
G-Sensor, Gyroscope, GPS, Temperature sensor
Resolution
Up to 1920x1080(1080P)
Audio Format
ADPCM
Video Format
H.264
Picture Format
JPG
Memory Card
Micro SD (CLASS10 and above), to 64GB (or 128GB in FAT32)
LTE/3G Network
GSM/WCDMA/TDSCDMA/TDD-LTE/FDD-LTE
WiFi
IEEE 802.11b/g/n, 2.4GHz
SIM Type
Micro SIM Card (3FF) x 1
LTE Speed
LTE download 100Mbps (UCM3310)
Emergency Button/Sensors
2.4GHz preparatory, IEEE802.15based
Max Wi-Fi connect#
Recommend < 8 devices
Port
Micro Usb/ Usb/Type-C
Current
500mA
Voltage
12V (Hub) 5V (Camera); OBDII cable support 9V-36V input
Working Temp
-20 to 60℃
Storage Temp
-20 to 80℃
Humidity
15-85%RH
Power Consumption
6W (Hub) 5W (Camera) 0.5W Overall in Sleepmode
7

LED Indicators
The LED indicators include the Power Indicator on the top of device and the series of Status
Indicators on the bottom of device, with their status and colors representing the Status of
Device."
* 1-4 LEDs indicates LTE signal strength. 1 LED means relatively weak signal and 4 LEDs
means relatively strong signal.(
Device
Type
Color
Status
Device Status
Camera
Indicator
Green
On
Device Starting
Blue
On
Normal
Green
Blink
Firmware update
Red
Blink
SD Card Failure
Hub
Power
Indicator
Blue
On
Normal
Blue
Blink
F/W update
LTE signal
Indicator
Green
Rotate LED
Dialing
Green
on (1-4)*
Normal (running/standby)
Green
Blink
No SIM or Network
8
Installation Instructions
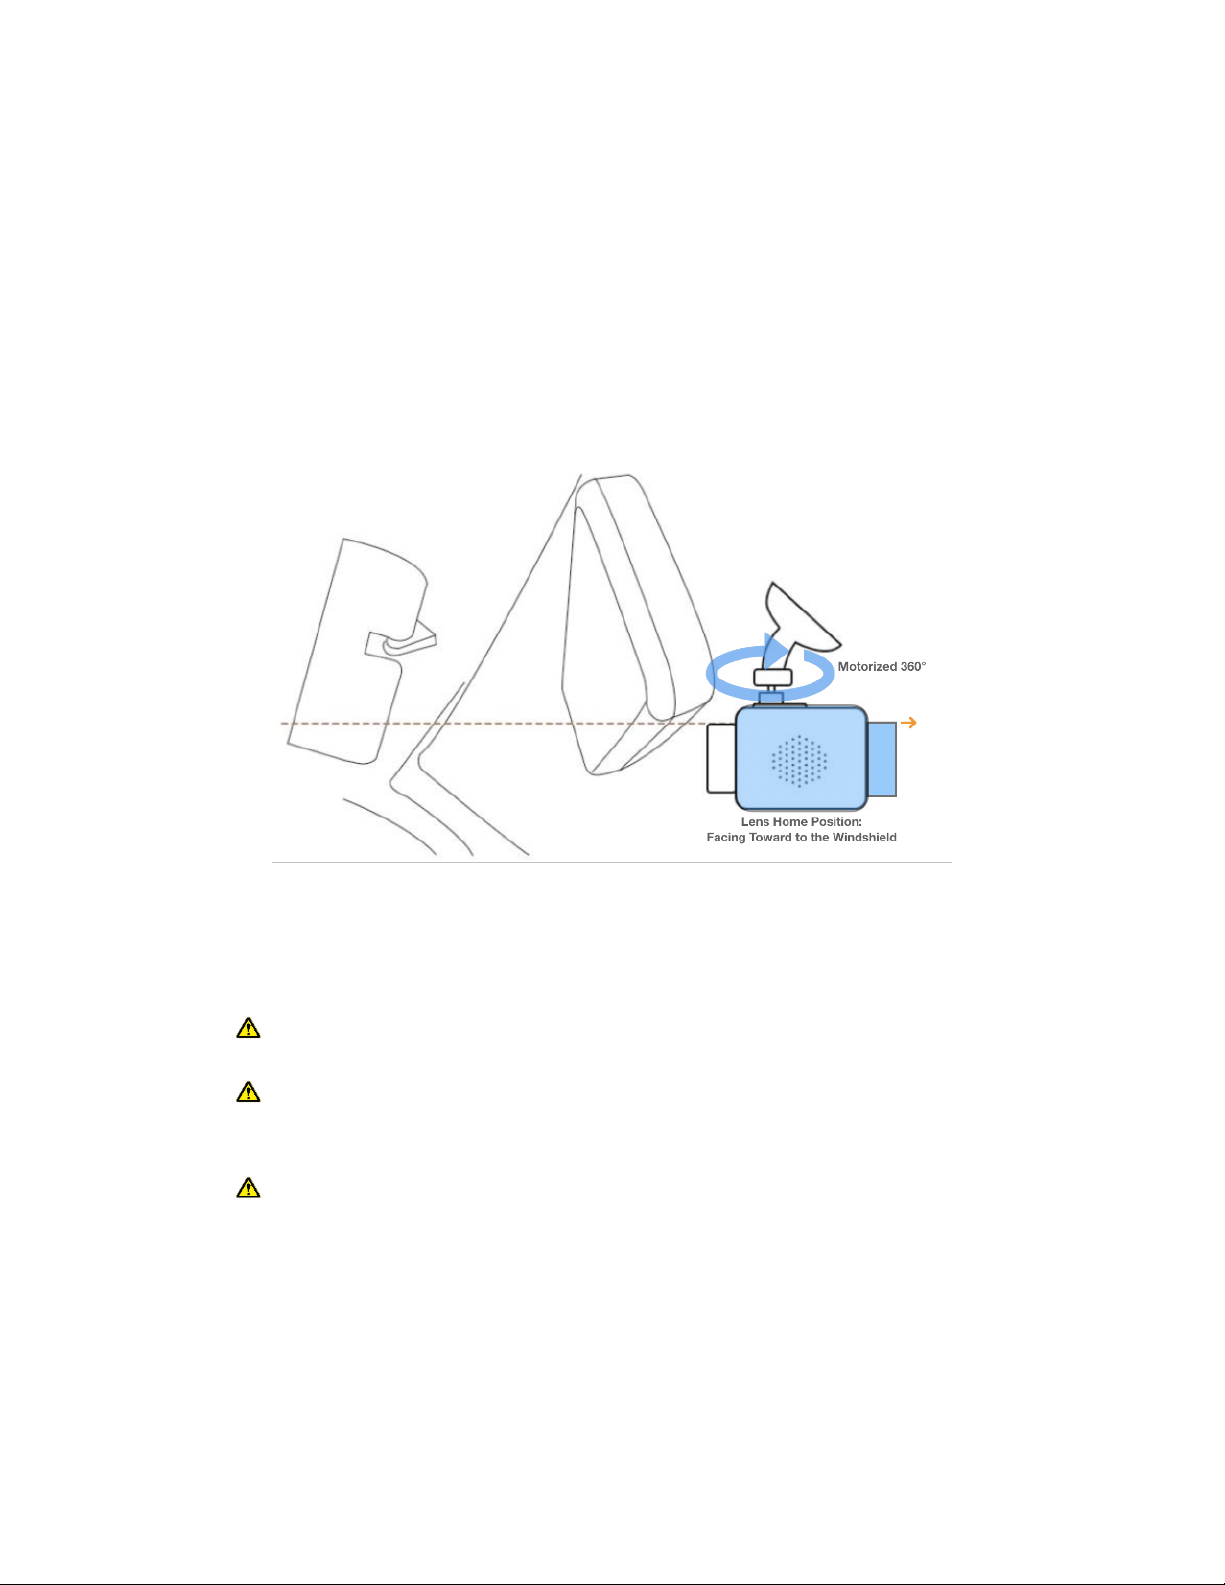
●$ Position of Installation"
For the best performance and the prevention of interfering visual coverage, it is recommended to
install the camera unit at a proper position behind the driver’s sight of rear view mirror or on the
top center of dashboard. At the meantime, to avoid the obstruction of camera’s lens visual
coverage when it rotates toward the inside of vehicle, it is recommended to keep the camera lens
exposed within the sight of passengers and drivers below the rear view mirror. The default lens
position is facing toward to the windshield to capture road scene when driving the vehicle. "
Position of Installation Diagram"
●$ Installation Procedure"
1) Insert Micro SD card into Camera’s Micro SD card Slot;"
Pay attention to Micro SD card’s direction of insertion. The maximum capacity of the
SD card supported is 64G with Class 10 and above or 128G in FAT32-Format."
Push the SD card toward into the slot, you will hear or feel a “tick” sound, the SD card
will be locked and won’t eject out, which indicates the SIM card has been installed
correctly."
To eject the SD card out for check or format purposes, simply push the SIM card
toward into the slot, you will hear or feel a “tick” sound, the SD card will be unlocked
and eject out."
2) Install the Camera to the Camera Mount;"
3) Clean the windshield or dashboard using the Windshield Clean Wipe;"
4) Peel the protection cover from the sticker on the Mount and press the Mount firmly onto
the desired place of windshield or the top center of dashboard;"
5) Insert Micro SIM card into Camera’s Micro SIM card slot. You may skip this step if the SIM
9
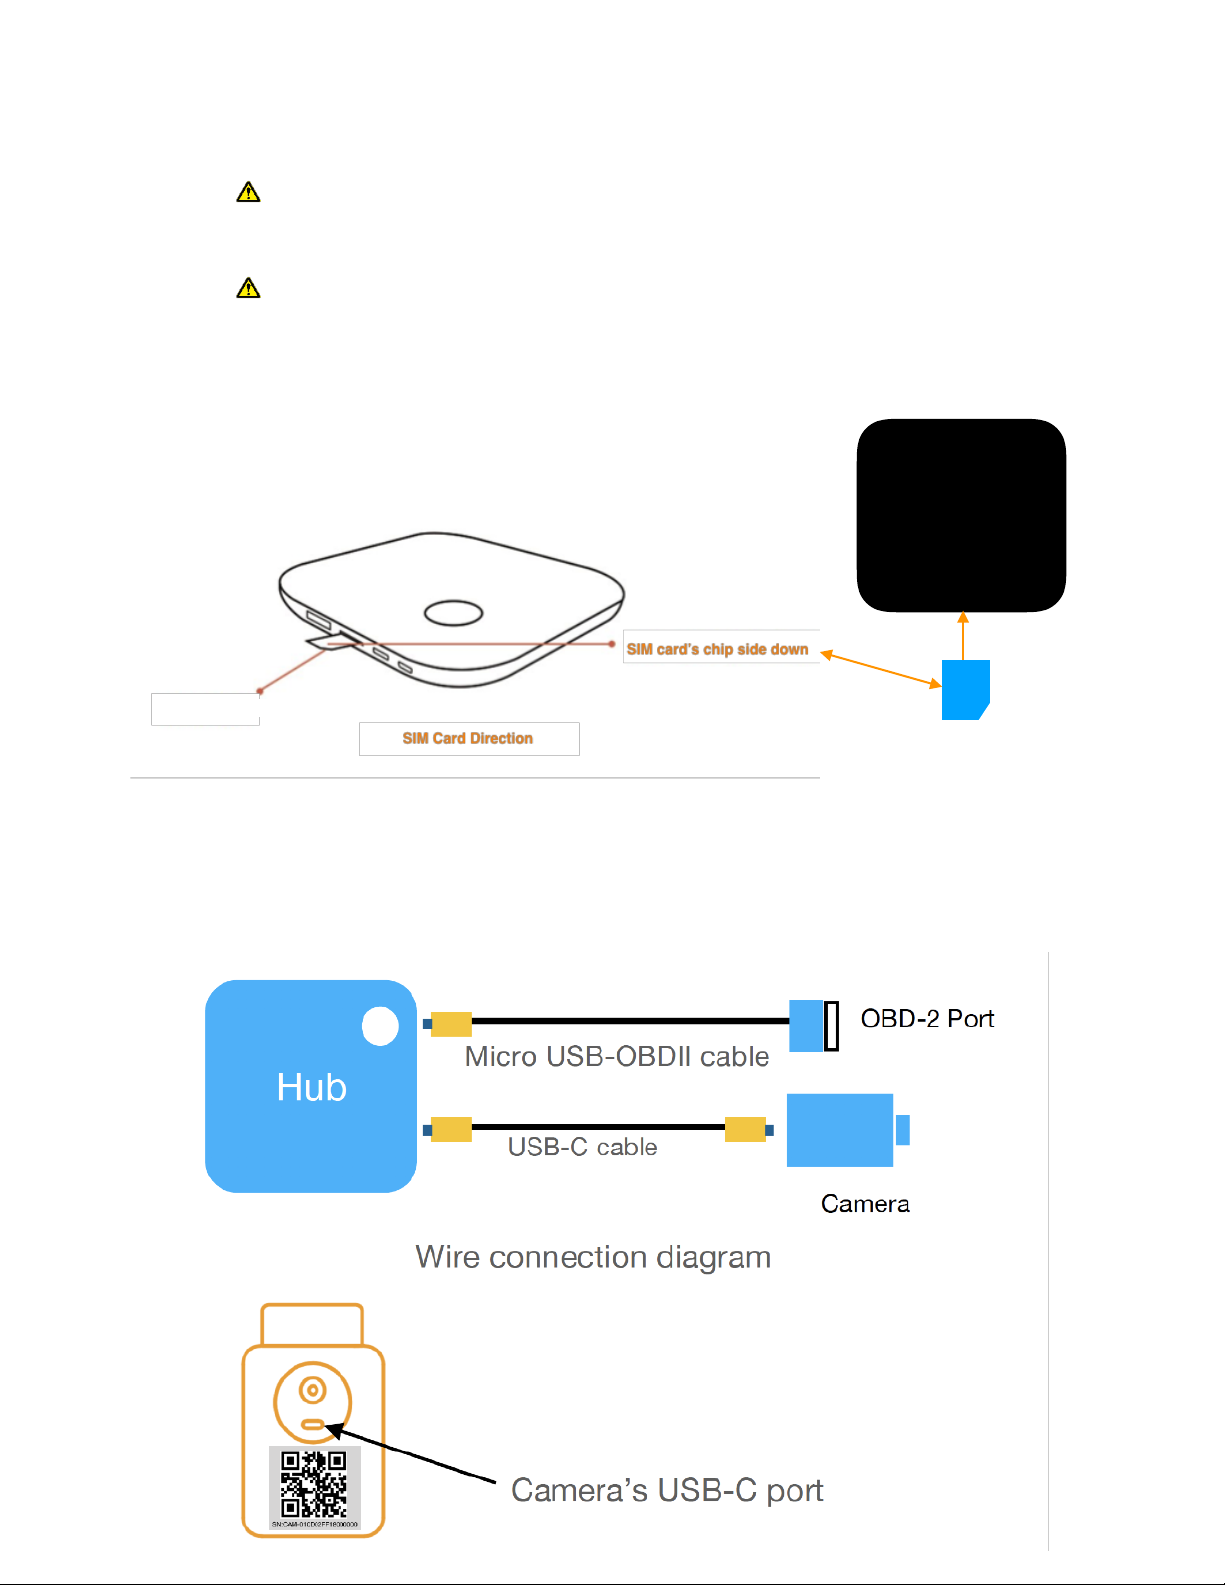
card has been pre-installed; "
Pay attention to micro SIM card’s direction, make sure the chip side faces down, and
the odd corner to the outside. You will hear or feel a “click” sound, the SIM card will
be locked and won’t eject, which indicates the SIM card has been installed correctly. "
To eject the SIM card out for check purpose, simply push the SIM card toward into
the slot, you will hear or feel a “tick” sound, the SIM card will be unlocked and eject
out."
7) Attach the LTE Hub on the top on the dashboard using the included Hook-and-Loop
Fastener. "
8) Connect the Type-C Cable between the Hub and Camera."
10
Odd Corner
Hub"
(Top)

9) Use the Power Cable to connect OBD-II port with the Hub. The OBD-II port of vehicles is
usually located underneath the dashboard, please check the manual of your vehicle or
consult professionals to locate it in your vehicle."
"
The OBD-II port generally provides constant power that supports video streaming
access by smartphone application and web regardless if the car engine is on or off.
Exceptions may exist, please consult automobile professionals for further questions. "
The device switches to sleep mode 3-5 minutes after the ignition turns off, which
consumes very little power and generally does not drain the vehicle battery in a short
while. If the battery voltage drops below the sufficient power range during the sleep
mode, the device will send a low battery alert to user."
$ Loose and dangling cables may create safety hazard. We recommend the user to fix
the cables firmly in places where they cannot easily fall out."
11
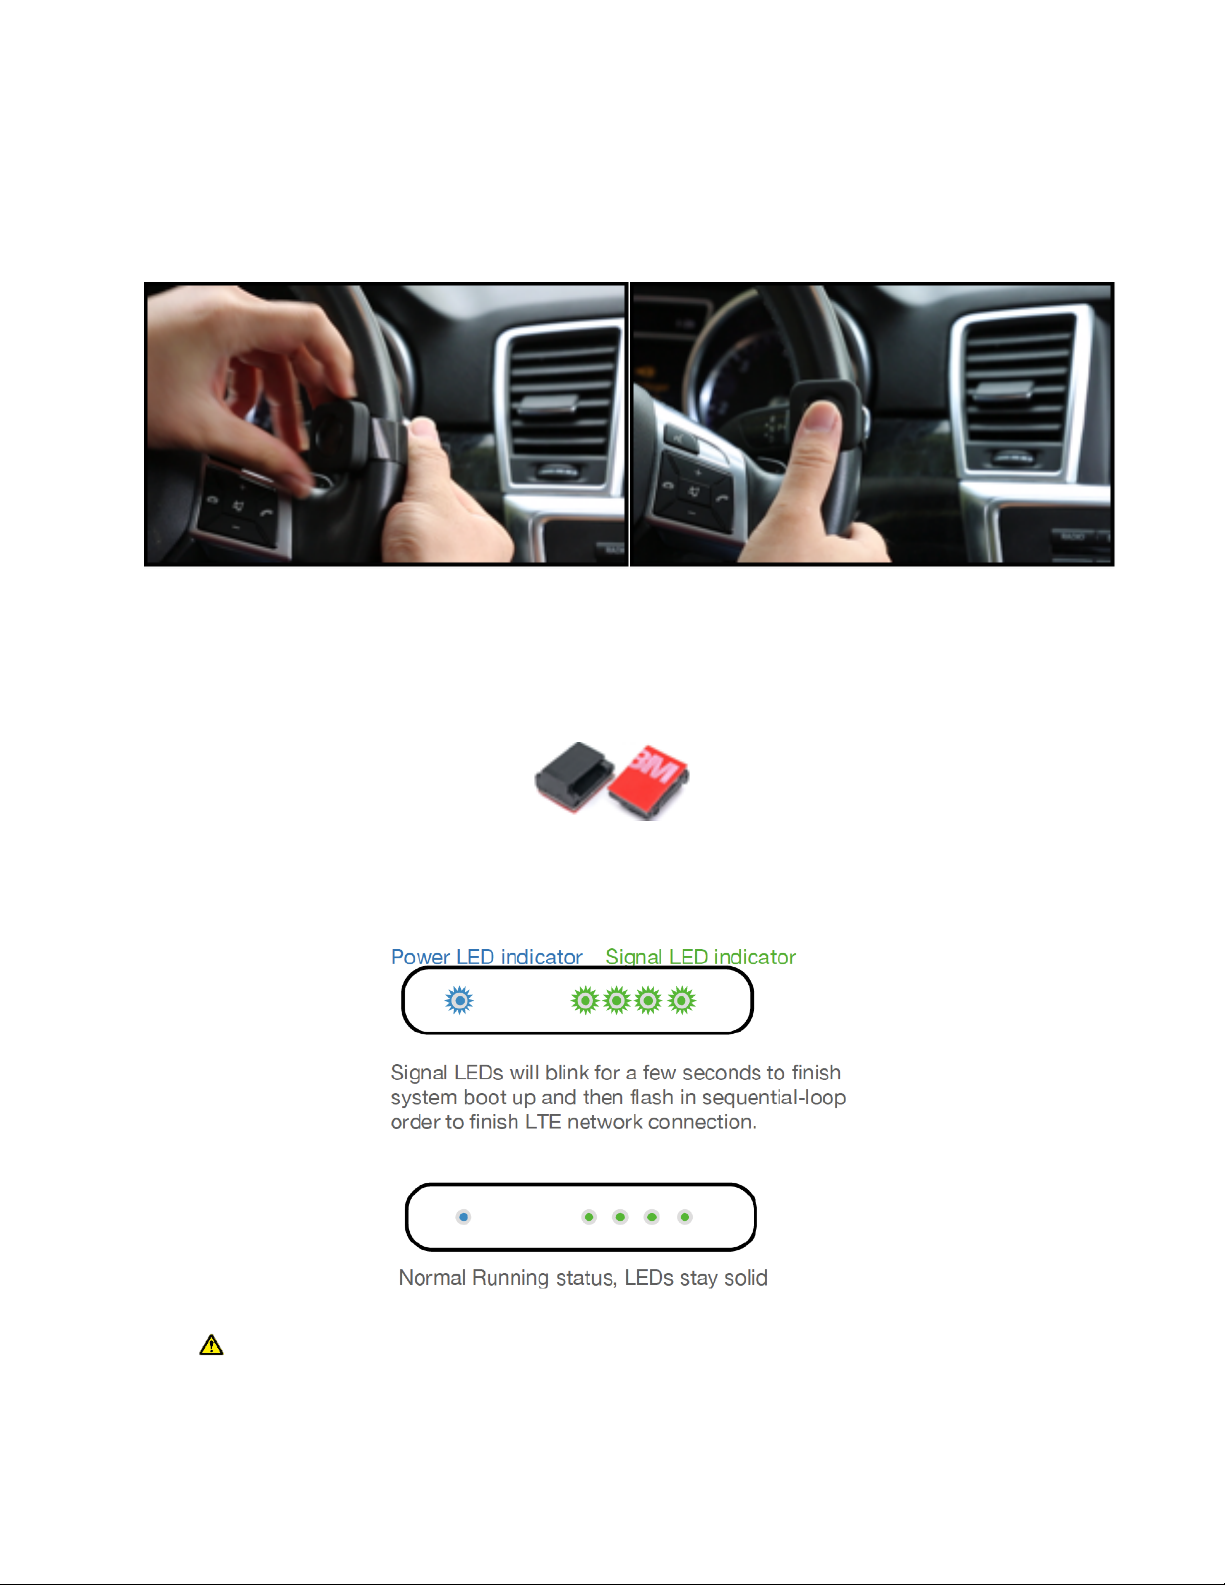
10) Install the Emergency Button with the Self-Grip Strap by tying the panic button around
the steering wheel firmly, or anywhere else that is firm and convenient to reach. You can also
use the spare double-side sticker to mount the button on the dashboard."
11) Use adhesive wire clips to keep your windshield and dashboard clean and organized.
Peel the protection cover from the sticker and press the clip firmly onto the desired place of
windshield or dashboard. "
12) Press the device power button, a prompt tone will sound and the device should power
up. Please check the LED status chart on Page 8 for more information. "
Warning: When the system boots up for the first time, it may take a longer time (several
minutes) for the backend of cellular network to finish the registration process. Please re-
power cycle the Hub to minimize the waiting time"
12
Wire Clips X 10

If you have connection issues, need to watch installation tutorial videos, find troubleshooting tips,
or contact customer support, please visit https://www.alleswolke.com/dashcam_support.html or
scan the QR-code below. "
Operating Instructions
●Download and Install the Smartphone application."
You can download the Application in the following ways:"
1. Scan the following QR code and download via our download guide webpage."
Or visit https://www.alleswolke.com/dashcamdownload.html"
2. By searching “LTEdashcam” (without the quotation marks) in Google Play Store or
“LTEdashcam Pro” (without the quotation marks) in Apple App store. "
13
3. Or scan the following QR-code to Google Play Store or Apple App Store"
"
"
"
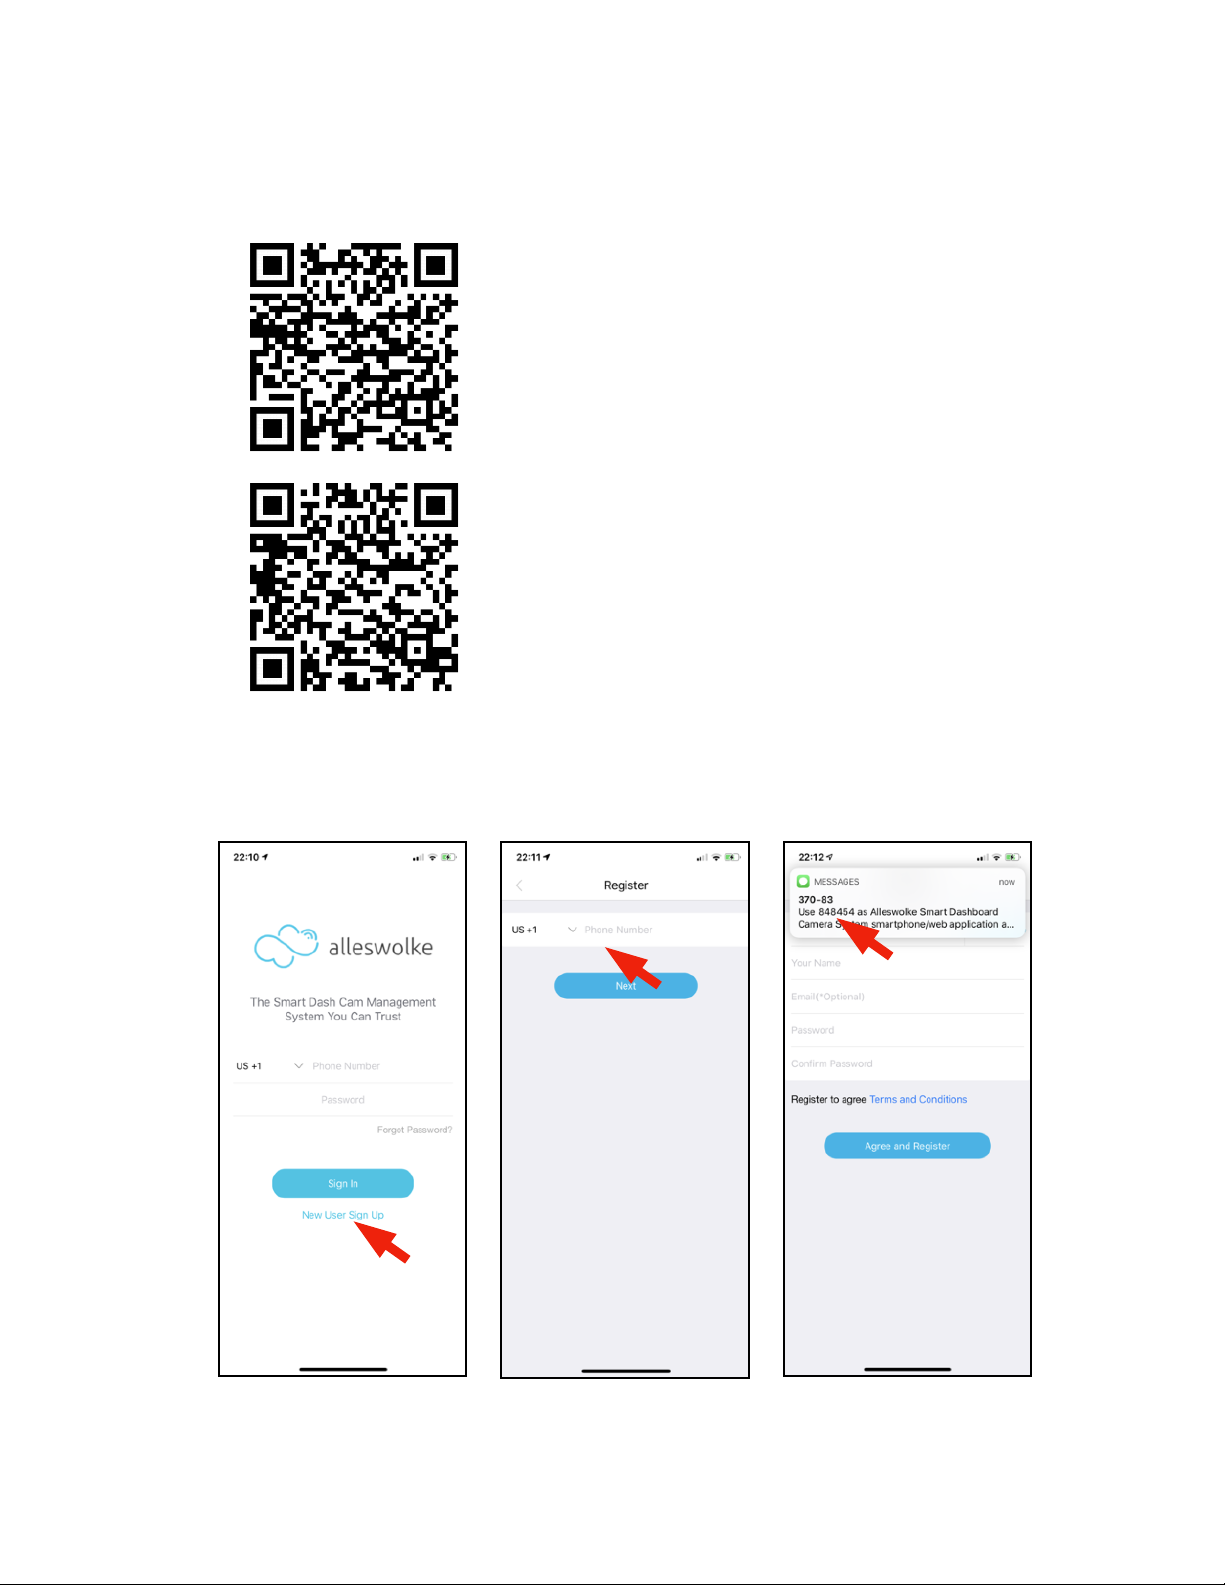
●Account Registration"
1.
14
“LTEdashcam” in Google Play
“LTEdashcam Pro” in Apple App Store

Tap to open the App “LTEdashcam” in your Android phone or “LTEdashcam Pro” in your
iPhone. "
2. Tap “New User Sign Up”"
3. Enter a valid cell phone number. This number will become your account number"
4. You will receive an SMS text message with a security code, enter the code and your
information to finish sign-up. "
5. Tap Agree and Register. "
6. Sign into your account."
"
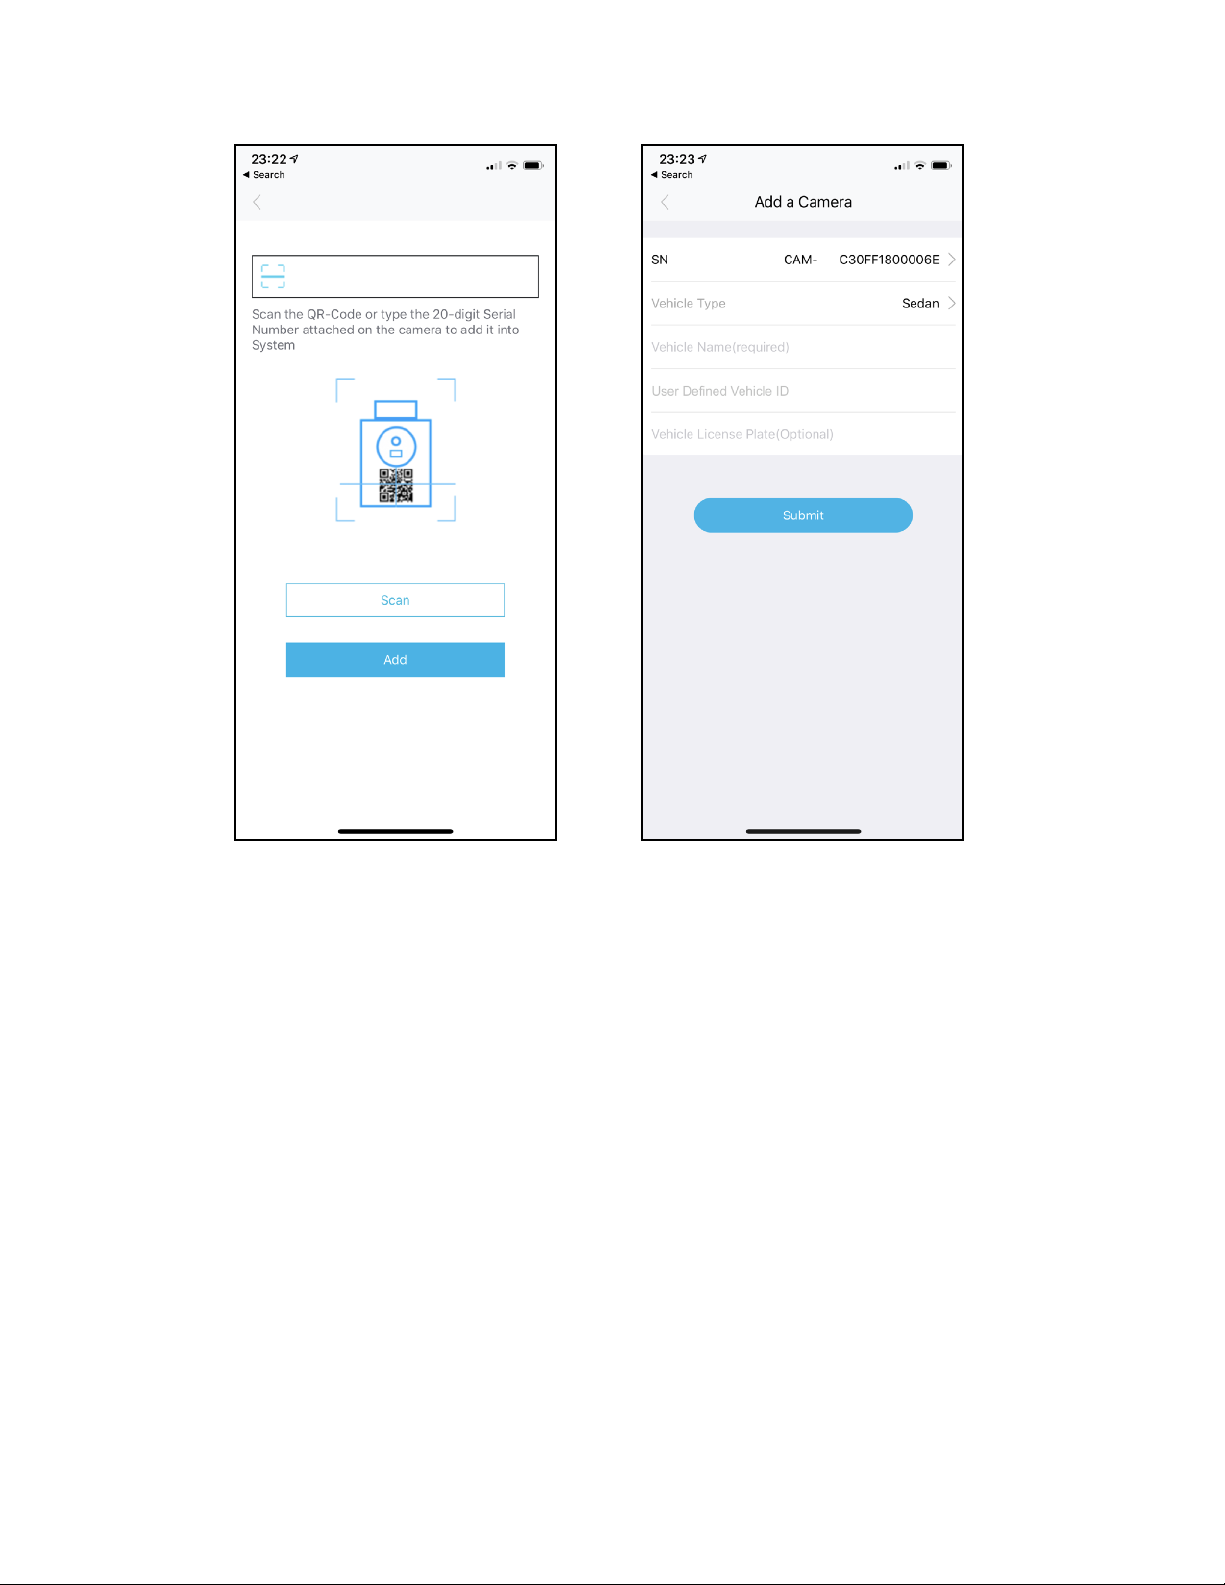
●Add a camera by scanning the QR code. "
After signing into your account, Tap the button “Add camera”, tap the scan button to scan the QR-
code on the top of the Camera. The code is device Serial Number (SN) with a 20-digit code in
alphanumerical combination."
Do not scan the IMEI/MEID bar-code on the back of Hub. "
If the QR-code on the camera damaged or detached, There is another SN or serial $
number QR-code on the package box that can be scanned."
After 30 seconds without a successful scan of QR code, an assist page will pop and show where
the QR-code can be found. Alternatively, you may enter the 20-digit Serial Number by the
keyboard when you find it, or tap Scan to re-scan the QR-code by camera."
For iOS users, the system will ask you for permission to access the camera, please tap
“OK” to allow the App to scan the QR-code."
15
"
+
The last step will be entering your vehicle’s information. You may set up a name for your vehicle,
enter license plate number, or if you are a business user and your company has a unique vehicle
ID for each vehicle in the fleet, you can enter it as User Defined Vehicle ID (UDID)."
The UDID and license plate number is optional and used for searching the vehicle in Alleswolke
fleet management tool."
After entering the information, press “Submit” to add the vehicle into the system."
16

●Navigation/overview/camera page Introduction "
"
17
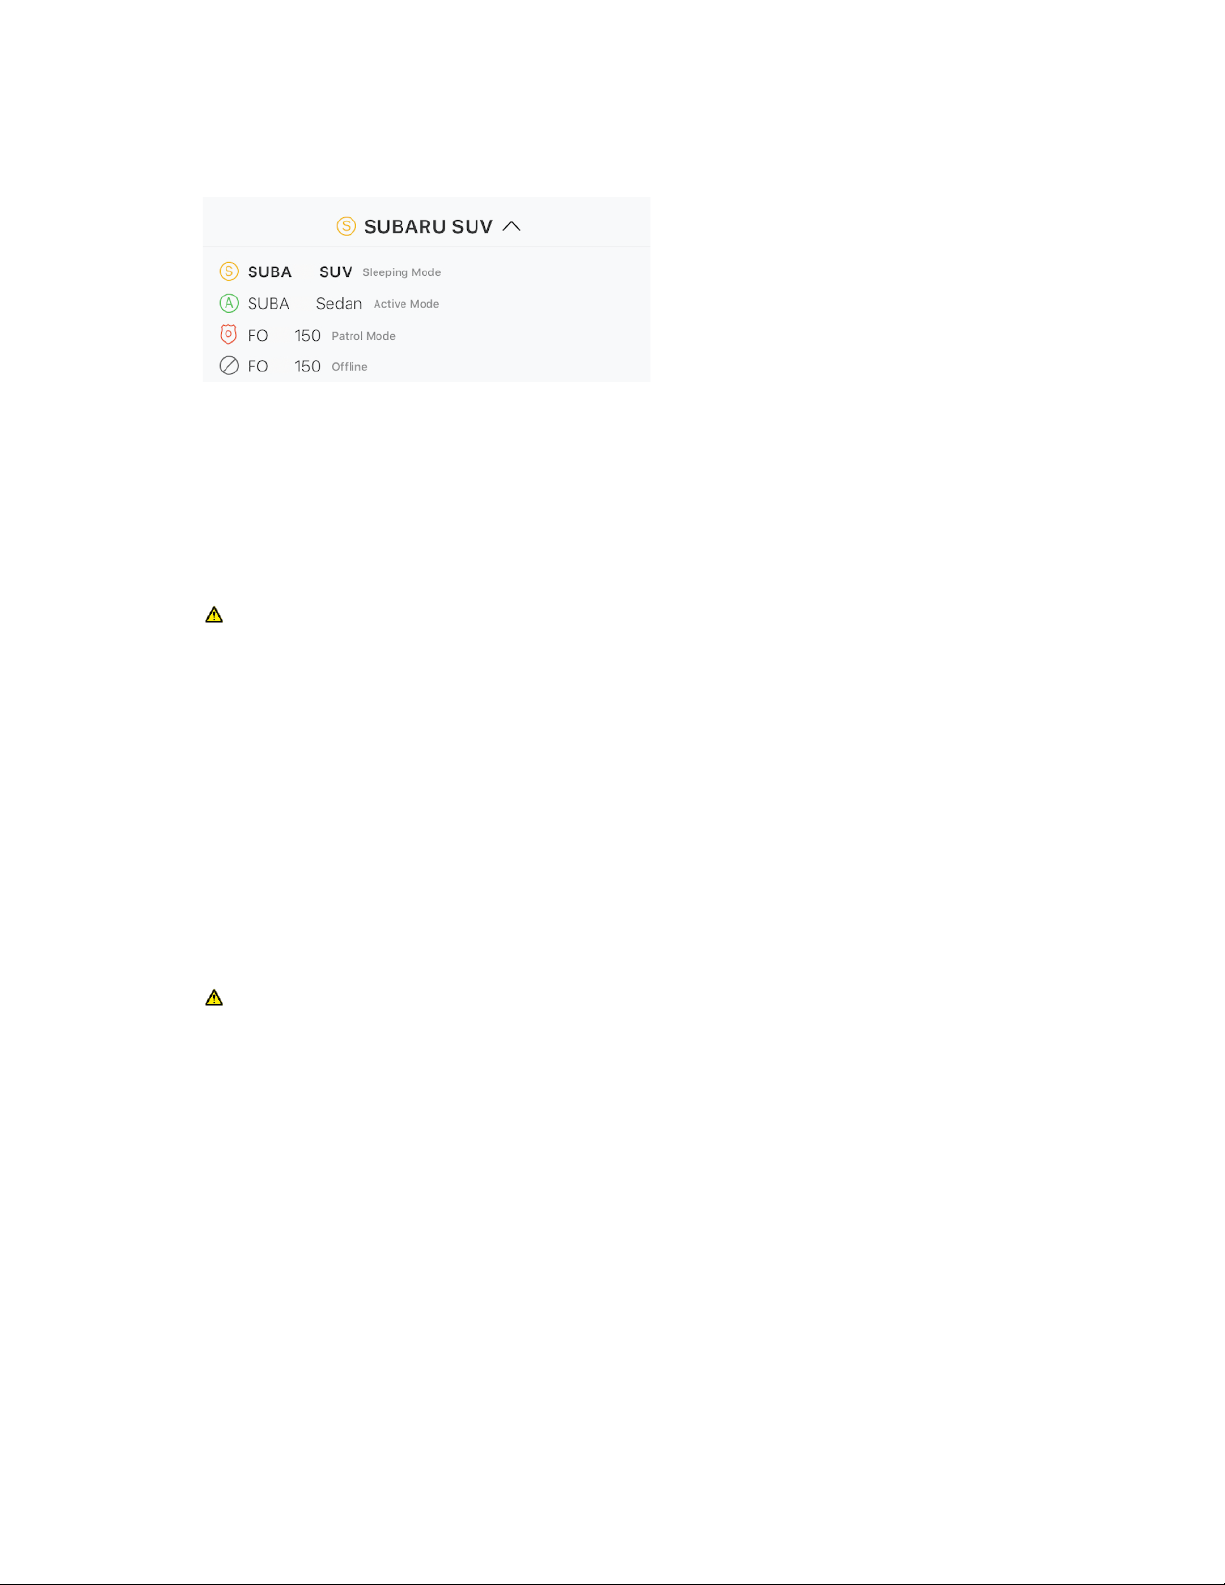
1. Vehicle Select List and Status Display "
If you have multiple devices (hubs and cameras) installed in different vehicles, you can
switch the hub here. Each hub represent a vehicle. It also shows each vehicle’s status."
"
Sleeping Mode: The vehicle’s engine is off, the camera will be facing to the inner of the
vehicle. the system is in power saving mode and can be waken up at any time by taping
“Live Video” or “Live Photo”. The wake-up process may take up to 1 minutes. "
For model UCM3310 with WP7504 module, the offline mode may also display as Sleep
Mode. "
Active Mode: The vehicle’s engine is on, system is full power operational, you can connect
the system for video streaming or live photo by taping “Live Video” or “Live Photo” "
Patrol Mode: The vehicle’s engine is off, but user can manually lock the system in patrol
mode, in this mode, the system is always on and camera is rotating 360 to patrol and
surveillance the surroundingsYou can connect the system for video streaming or live photo
by taping “Live Video” or “Live Photo” "
Offline Mode: cannot wake up for remote access"
Offline mode is not applicable for model UCM3310 with WP7504 module."
2. Setting Menu"
Basic Settings for Hub and Cameras, see page 30 for more information, "
3. Camera name"
Shows camera’s name, you may make a change in Settings -> Camera Settings. "
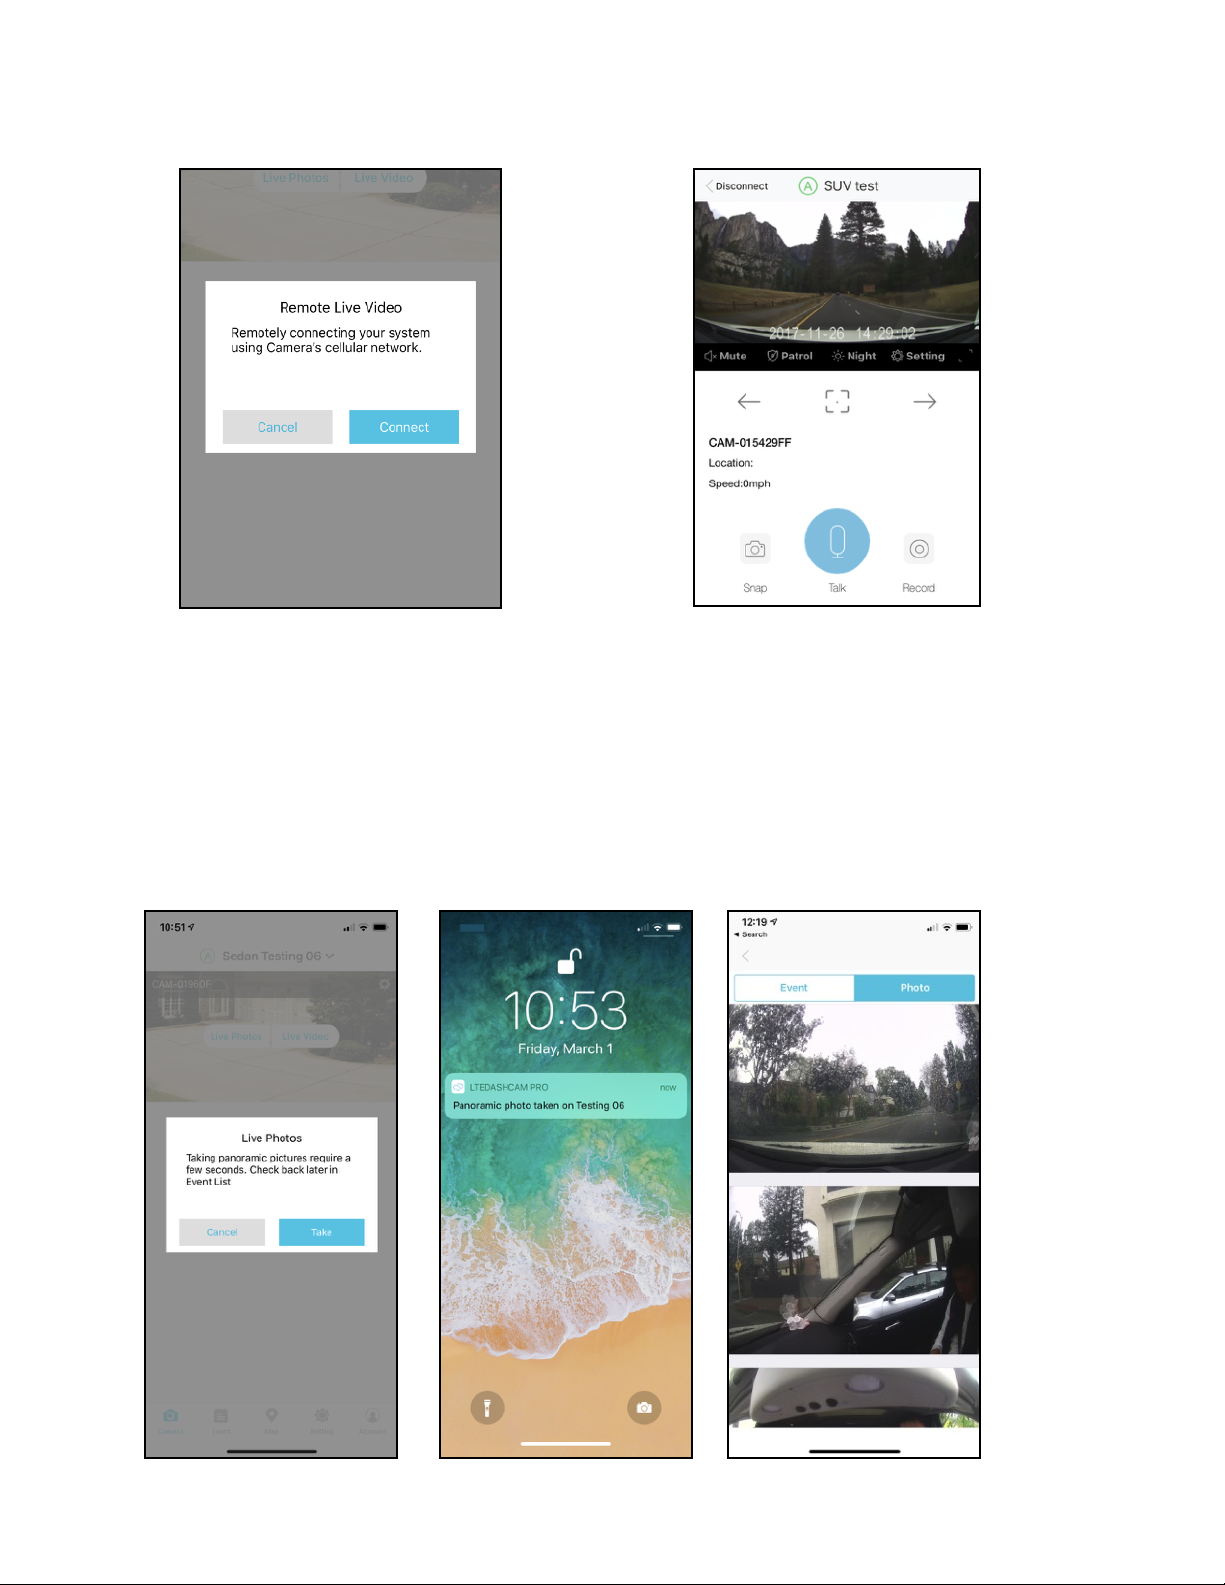
4. Live Video Streaming "
Tap for video live streaming if the camera is in activate mode. "
Tap for camera waking-up and video live streaming if the camera is in sleep mode, this may take"
up to 1 minute to finish the wake-up process and start live video streaming. "
All Remote Video Clips will be stored into Cloud server and can be retrieved in Event History. "
Please see page 20&21 for detailed live video page introduction. "
18
"
5. Taking panoramic photos"
Tap for taking panoramic photos. Camera will rotate 360 degree to take panoramic photos."
It may take up to 20 seconds to finish photo shooting and syncing back to the phone. "
If your car is in parking mode, it may take longer to go through prior wake-up process. "
You will receive a push notification when the photo is ready. "
You can browse the pictures in Event list -> Live recording."
Please see page 25 for detailed Event History page introduction."
19

6. Add another system/camera"
Tap the scan button to scan the QR-code on the top of the Camera. The code is device Serial
Number (SN) with an 20-digits code with alphanumerical combination. Please see page 15 for
detailed adding camera introduction."
7. Event History"
All the event and recording are listed here. "
Please see page 25 for detailed Event History introduction."
8. The Current GPS location and historical GPS route are listed here. "
Please see page 24 for detailed GPS Location and Route introduction."
9. Account information"
Edit your user information, email, change password, give fleet manager authorization (see page 35
for more information ), find documents, FAQs and Support here. "
●Live Video Page "
20
1. Tap to Mute/Unmute"
2. Turn on/offPatrol mode"
(refer to page 33 for more information)"
3. Turn on/offnight vision"
4. Tap to open settings page"
(refer to page 30 for more information)"
5. Tap to play in full screen"
6. Camera pan to left"
7. Camera turn back to home position "
8. Camera pan to right"
9. Vehicle Local Time"
10. Vehicle Location Address"
11. Vehicle Driving Speed"
12. Take a screen shoot and save to photo albums "
13. Start talk to the camera"
14. Take a 15 seconds video clip and save to photo
albums
Other manuals for UCM3300 series
2
This manual suits for next models
2
Table of contents
Other Alleswolke Dashcam manuals


