manuals.online logo
Brands
  1. Home
  2. •
  3. Brands
  4. •
  5. allgood
  6. •
  7. Door Lock
  8. •
  9. allgood 76508L30 Series User manual

allgood 76508L30 Series User manual

QUALITYSINCE 1948
T: 020 7387 9951 www.allgood.co.uk
76508L30/50R | 76509L30/50R | 76510U30/50R | 76511U30/50R
Issue 22/01/21
ELECTRONIC DIGITAL L SHAPED HANDLESET
2
!
!
!
14
8 6
10
2
15
4
5
3
21 7
1
12
3
6
9
13
13
13 13 17
18
11
7
13
20
19 14
15
"##$%%&!'()*+(!!
,,-./012304/05!
,,-./667304/05
QUALITYSINCE 1948
T: 020 7387 9951 www.allgood.co.uk
76508L30/50R | 76509L30/50R | 76510U30/50R | 76511U30/50R
Issue 22/01/21
ELECTRONIC DIGITAL L SHAPED HANDLESET
3
8
6
14
10
2
15 4
7
5
6
9
13
3
21
13
13 13
18
17
7
20
19
15
14
3
"##$%%&!'()*+(!
,,-./082304/05!
,,-./607304/05
QUALITYSINCE 1948
T: 020 7387 9951 www.allgood.co.uk
76508L30/50R | 76509L30/50R | 76510U30/50R | 76511U30/50R
Issue 22/01/21
ELECTRONIC DIGITAL L SHAPED HANDLESET
4
Features and Technical Details
Description
Easykey is a digital escutcheon with Numeric & Braille
keyboard, conceived for interior use
Locking & Opening Time The latch is locked automatically after 3 seconds
Master Codes The default master code is 856069
It is recommended to change the master code
when the digital handle isinstalled
User Code Administrator can create a user code with 4 - 6 digits
Max. number of user codes Up to 150 user codes
Security System After 5 wrong codes, the lock is blocked for 1 minute
Memory Information EEPROM: user codes remain in memory when
the battery is replaced
Cycles 40.000
Signals Red and green light signals, acoustic signals
Low battery signal Before last 500 openings
Battery Lithium battery, CR-P2 (6V)
Included accessories Battery, fixation kit, user guide
QUALITYSINCE 1948
T: 020 7387 9951 www.allgood.co.uk
76508L30/50R | 76509L30/50R | 76510U30/50R | 76511U30/50R
Issue 22/01/21
ELECTRONIC DIGITAL L SHAPED HANDLESET
5
Functions: Easykey in use
CHANGE MASTER CODE
BydefaultEasykeyhasaMasterCode856069,whichmustbemodifiedwhenitisinstalled.
Each installation administrator-user can change it, following the sequencebelow:
A+A+C+C+A+A+CURRENT MASTER CODE+A+NEW MASTER CODE+A
ACTIVATE USER CODES
To enter a new code follow the sequence below:
A+C+A+MASTER CODE+A+CODE 1+A+CODE 2+A+…+CODE N+A+C
DEVICE OPENING WITH USER CODE
To open the device enter the user code followed by the letter A:
CODE+A
DEACTIVATE USER CODES
To cancel a code, follow the sequence below:
C+A+C+MASTER CODE+C+CODE 1+C+CODE 2+C…+CODE N+C+A
COMPLETE DEACTIVATION OF ALL USER CODES
To cancel / deactivate all the stored codes follow the sequence below:
C+C+A+A+C+C+MASTER CODE+C
CREATE/CHANGE FREE-ENTRANCE CODE
A+A+A+C+C+MASTER CODE+A+FREE-ENTRANCE CODE+A
ACTIVATE/DEACTIVATE FREE-ENTRANCE MODE
FREE ENTRANCE CODE+A
QUALITYSINCE 1948
T: 020 7387 9951 www.allgood.co.uk
76508L30/50R | 76509L30/50R | 76510U30/50R | 76511U30/50R
Issue 22/01/21
ELECTRONIC DIGITAL L SHAPED HANDLESET
6
Installation Guide
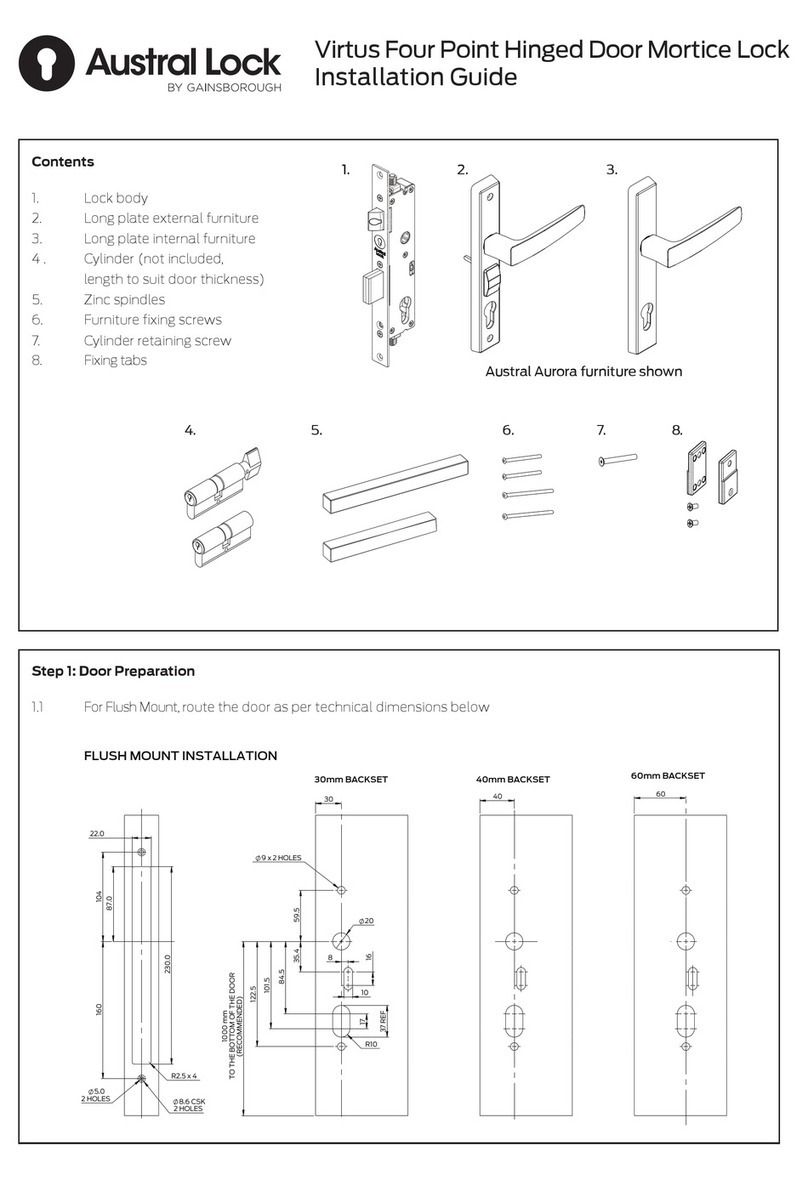
1.!Install the lockcase (1) with its insulator (if it is provided) in the door (2)
and fix in place with the provided screws (3).
2.!Ensure that the handle opening screw (4) is in the correct position
for the required handle turn.
3.!Put the spindle (5) of the outside escutcheon with the groove
in the vertical position (21).
4.!Put the insulator (6) and the plastic cover (7) with the outside escutcheon (8)
(the highlights of the cover should face the outside escutcheon) and present it
towards the door. Make sure that the spindle (5) goes through the lock (1).
5.!Put the insulator (6) and the plastic cover (7) with the inside escutcheon (9)
(the highlights of the cover should face the inside escutcheon) and insert it
in the spindle (5) leaving enough place to be able to connect the wires.
6.!Connect the wires (10) matching frompair.
7.!Push the inside escutcheon (9) towards the door. Be careful not to trap the wires.
8.!Slim: If you have to install the cylinder (11), insert it and fix in place with a screw (12).
9.!Slim: Secure the entire lock in place using the 5 screws (13) provided.
Adapt: Secure the entire lock in place using the 4 screws (13) provided.
10.!Fit the handles (14) and plastic washers (15) onto the spindles and push into place.
11.!Place the battery CR-P2 Lithium model with 6V (17) into the battery holder (18),
with the poles in the upper position and the sticker looking outside.
12.!Secure the battery cover (19) into place with the supplied screw (20).
Please note:
Any other installation techniques used to fit this product that are not outlined above will result in a void of
the product warranty.
Lock model = 1901ERL.
Fire resistance certification = EN 1634-1:2010 with a single wooden door. Report number 205324.
This manual suits for next models

7

Other allgood Door Lock manuals

allgood 9943N5 User manual

allgood

allgood 9943N5 User manual

allgood 9151A User manual

allgood

allgood 9151A User manual

Popular Door Lock manuals by other brands

ShineACS SL-F8903 user manual

ShineACS

ShineACS SL-F8903 user manual

Turbolock YL-99 user manual

Turbolock

Turbolock YL-99 user manual

TownSteel TSF-300A installation instructions

TownSteel

TownSteel TSF-300A installation instructions

Lock Control SL-133 installation manual

Lock Control

Lock Control SL-133 installation manual

Yale Assure Lock 2 Touch manual

Yale

Yale Assure Lock 2 Touch manual

BURG-WACHTER TSE 5011 Assembly and user's manual

BURG-WACHTER

BURG-WACHTER TSE 5011 Assembly and user's manual

Esco systeQ-M-SL-ESC Installation, operation and maintenance instructions

Esco

Esco systeQ-M-SL-ESC Installation, operation and maintenance instructions

Omnia LEVEL quick start guide

Omnia

Omnia LEVEL quick start guide

Signature Hardware VALMA manual

Signature Hardware

Signature Hardware VALMA manual

Alarm Lock SCHLAGE CYLINDER ASSEMBLY Addendum manual

Alarm Lock

Alarm Lock SCHLAGE CYLINDER ASSEMBLY Addendum manual

Ezviz L2 quick start guide

Ezviz

Ezviz L2 quick start guide

Transmitter Solutions ICE-LOCK installation manual

Transmitter Solutions

Transmitter Solutions ICE-LOCK installation manual

CAMDEN CX-93M-26LS installation instructions

CAMDEN

CAMDEN CX-93M-26LS installation instructions

EVVA Xesar 2.0 System manual

EVVA

EVVA Xesar 2.0 System manual

Assa Abloy ABLOY EL654 manual

Assa Abloy

Assa Abloy ABLOY EL654 manual

Omnia LEVEL Smart Deadbolt with Plate instructions

Omnia

Omnia LEVEL Smart Deadbolt with Plate instructions

latch LEVER SET installation guide

latch

latch LEVER SET installation guide

Functional Fenestration AGB Unitop 1455-3 installation guide

Functional Fenestration

Functional Fenestration AGB Unitop 1455-3 installation guide

manuals.online logo
manuals.online logoBrands
  • About & Mission
  • Contact us
  • Privacy Policy
  • Terms and Conditions

Copyright 2025 Manuals.Online. All Rights Reserved.