Allsheng Auto-Pure Mini User manual
Operation Manual
V1.0
Auto-Pure Mini
Nucleic Acid Purification
System
Hangzhou Allsheng Instruments Co., Ltd.

Foreword
Thank you for purchasing our Nucleic Acid Purification System Auto-Pure
Mini. This Manual describes the function and operation of the instrument.
In order to use the instrument properly, please read this manual carefully
before using. Keep it for later use when you meet with difficulties.
Opening Check
Please check the Instrument and Accessories according to the packing list
when you first open the packing case. If anything wrong or missing, please
contact the distributor or the manufacturer.
HANGZHOU ALLSHENG INSTRUMENTS CO., LTD.
Add: Building 1 & 2, Zheheng Science Park, Zhuantang Town, Xihu District, Hangzhou,
Zhejiang 310024, China
Tel.: 0086-0571-89948289
Fax: 0086-0571-87205673
Website: www.allsheng.com
E-mail: [email protected]
File No.: AS213SM
Version No.: V1.0, Jun. 2021
1
Safety Warnings and Guidelines
1. Important information for safe use
Users should have a clear understanding of how to use this instrument
before operation, please read this manual carefully prior to operation.
Any improper operation may cause injured or electric shock.
Please read the manual carefully and operate safely according to
the guidelines.
2. Security
The operation and maintenance and repair of the instrument should comply
with the basic guidelines and warnings below. Incorrect operation or
maintenance will have effect on using life, performance, and safety features
of the instrument.
The instrument is normal indoor instrument which conforms to
classⅠof GB 4793.1 standard.
Please read this manual carefully before operation. The device
must be used by experienced personnel with appropriate
training.
The operator should not repair the instrument in case any injury
or out-of warranty. If service required, please contact Allsheng or
your local distributor for repair.
Before powering on, please make sure the voltage of the power
supply is consistent with the required voltage. And make sure the
rated load of the power outlet is not less than required by the
instrument.
If the power cord is damaged, replace it with the same type and
specification power cord. Do not cover anything on the
instruments when using. Insert and pull the power line with hand
gently and make sure the plug completely insert to the jack.
2
The temperature of the heating block is high, please do not touch
it during the operation in case any injury.
The instrument should be kept in an area with minimal dust,
away from wet areas and direct sunlight. In additional the
installation location should have sufficient ventilation, but away
from electromagnetic interference and heat sources. The vent on
this instrument are designed for ventilation. Do not cover them
in case overheat. When many instruments are used at the same
time, the distance between each instrument should be more
than 100cm.
Power off when not in use. If the instrument will not be used for
a long period of time, cover it with a cloth or plastic to protect it
from dust.
Disconnect the power cord from the jack at once in the following
cases, and contact your local distributor or Allsheng:
Liquid enters into the Instrument;
Instrument was rained or watered.
Abnormal operation: such as abnormal sound or smell.
Instrument dropping or outer shell damaged.
The function has obviously changed.
Indicates disposal instruction.
DO NOT throw this unit into a municipal trash bin when this unit
has reached the end of its lifetime.To ensure utmost protection of
the global environment and minimize pollution,please recycle
this unit.
3. Maintenance
The instrument should be cleaned regularly using a soft cloth damp with
small amount of alcohol. If any stain on the surface of the instrument, wipe it
with soft cloth damp with cleansing cream.

3
4. Transportation and storage requirements
Ambient temperature: 10℃~ 40℃
Relative humidity: ≤80%
Atmosphere pressure range: 500 ~ 1060hpa
Locate it in a well-ventilated room, away from corrosive gas.
5. After-sales service
a) Warranty content
One month from the date of delivery, in case of faults due to material and
manufacturing defects, our company will be responsible for replacement.
Twelve months from the date of delivery, provide warranty for faults due to
material and manufacturing defects. During the warranty period, our
company will selectively repair or replace instrument that are proved to be
defective.
The products under warranty must be delivered by customer to the repair
department designated by our company. The freight of the instrument from
the user to the maintenance department shall be paid by the user. Our
company shall bear the freight of returning the instrument to the user.
For repairs beyond the warranty, our company will charge appropriate
maintenance costs.
b) Warranty scope
The above warranty is not applicable to the damage caused by users'
improper maintenance, use under non-conforming conditions, repair or
modify without authorization.
After-sales service: HANGZHOU ALLSHENG INSTRUMENTS CO., LTD.
Add: Building 1 & 2, Zheheng Science Park, Zhuantang Town, Xihu District, Hangzhou,
Zhejiang 310024, China
Tel.: 0086-0571-89948289
Fax: 0086-0571-87205673
Post code: 310024
E-mail: [email protected]

4
Contents
Chapter 1 Introduction.................................................................................... 1
1. Application...................................................................................................... 1
2. Contraindication............................................................................................. 1
3. Service Life...................................................................................................... 1
Chapter 2 Specifications.................................................................................. 2
1. Working Conditions........................................................................................ 2
2. Basic Parameters.............................................................................................2
3. Outline Dimension.......................................................................................... 3
Chapter 3 Basic Operating Instructions...........................................................4
1. Structure......................................................................................................... 4
2. Operation Panel.............................................................................................. 6
Chapter 4 Operations...................................................................................... 7
1. Preparation before use................................................................................... 7
2. Power Connection...........................................................................................8
3. Kits Installation................................................................................................8
4. Magnetic rod's tip installation........................................................................ 9
5. Remove magnetic rod's tip........................................................................... 10
6. Detailed Operations......................................................................................10
Chapter 5 Trouble Shooting...........................................................................40
Chapter 6 Acronyms and Marks.................................................................... 42
1. Acronyms...................................................................................................... 42
2. Marks.............................................................................................................43
Appendix: Wiring Diagram................................................................................44

Auto-Pure Mini Operation Manual Chapter 1 Introduction
1
Chapter 1 Introduction
Auto-Pure Mini nucleic acid purification instrument is a newly launched
automatic extraction and purification system for DNA/RNA, proteins and cells.
It can absorb, transfer and release magnetic beads by magnetic rod and
magnetic rod's tip to separate magnetic beads and samples. The operation is
automatic, fast and simple. Users can extract 1~16 samples simultaneously
with 96-Deepwell plate. It can extract samples of animal/plant tissue, blood
and body fluids, etc with different kinds of magnetic bead nucleic acid
extraction reagents. It is mainly used for the extraction and purification of
nucleic acid from human body samples.
1. Application
This instrument is suitable for the extraction and purification of nucleic acids in
clinical samples.
2. Contraindication
No contraindication.
3. Service Life
Service life of the instrument is five years.
For production date, please see the label on back of the instrument.
Features
Humanized operation---English and Chinese interface operation, touch
screen and 3 shortcut keys for operation, and can be connected to an
external mouse, easy to use.
Open software system---protocols are with editable function.
Heating function---Realize pyrolysis heating and elution heating.
Self sterilization - with UV sterilizing function which can reduce the
possibility of contamination in experimental area.
Stability - very low noise during working and with no vibration.
Safe and reliable - full automatic reagent with disposable consumables
which protect users from hazardous reagents.
Fast extraction - generally 10 ~ 60min/time for different reagents.
High quality consumables-qualified materials and processes which
guarantee high yield and low loss of magnetic beads.
APP software - for pad or mobile phone with Android system.
Extended features ---- Internet of Things.

Auto-Pure Mini Operation Manual Chapter 2 Specifications
2
Chapter 2 Specifications
1. Working Conditions
Environmental Temperature: 10C~40C
Relative Humidity: ≤80%
Input Voltage: AC 100~240V, 50Hz/60Hz
2. Basic Parameters
Table 1 Parameters
Model
Parameters
Auto-Pure Mini
Principle
Magnetic Particle Method, Magnet type
Sample Volume
50μL—1000μL
Throughput
1—16
Stability
CV≤3%
Extraction time
With different nucleic acid extraction reagents, 10 ~ 60min/time
Temperature control
module
Ambient temperature ~ 120℃for lysis and elution
Heating time
Ambient temperature ~120℃≤5 minutes
Temp. Accuracy
±1℃
Operation
4.3 inch touch screen
APP Software
Equipped with Android APP software to realize protocol editing
and data transmission with the instrument
Internal protocols
Store up to 100 groups of protocols
Extension interface
With USB port, ethernet port and RS232 port
Data transfer
Support Bluetooth, USB, RS232 data transmission, can expand the
transmission of PC port
Bar code scan
External code scanning gun, software can expand the sample
information input

Auto-Pure Mini Operation Manual Chapter 2 Specifications
3
consumables
Special magnetic rod tip, 96-Deepwell plate, special single sample
kit
Purification
disinfection
Fan exhaust, UV disinfection
Power Supply
100-240V±10%、50-60Hz±5%; support battery power
Power
Standby 10W, MAX 150W
Operating
temperature
10℃~ 40℃
Operating humidity
Less than 80%
3. Outline Dimension
Fig 1 Outline Dimension
Dimensions (W×D×H): 208mm×258mm×315mm

Auto-Pure Mini Operation Manual Chapter 3 Basic Operating Instructions
4
Chapter 3 Basic Operating Instructions
This chapter mainly introduces structures, basic operation keys, displays, as
well as preparations before starting up. Please read this chapter carefully
before using
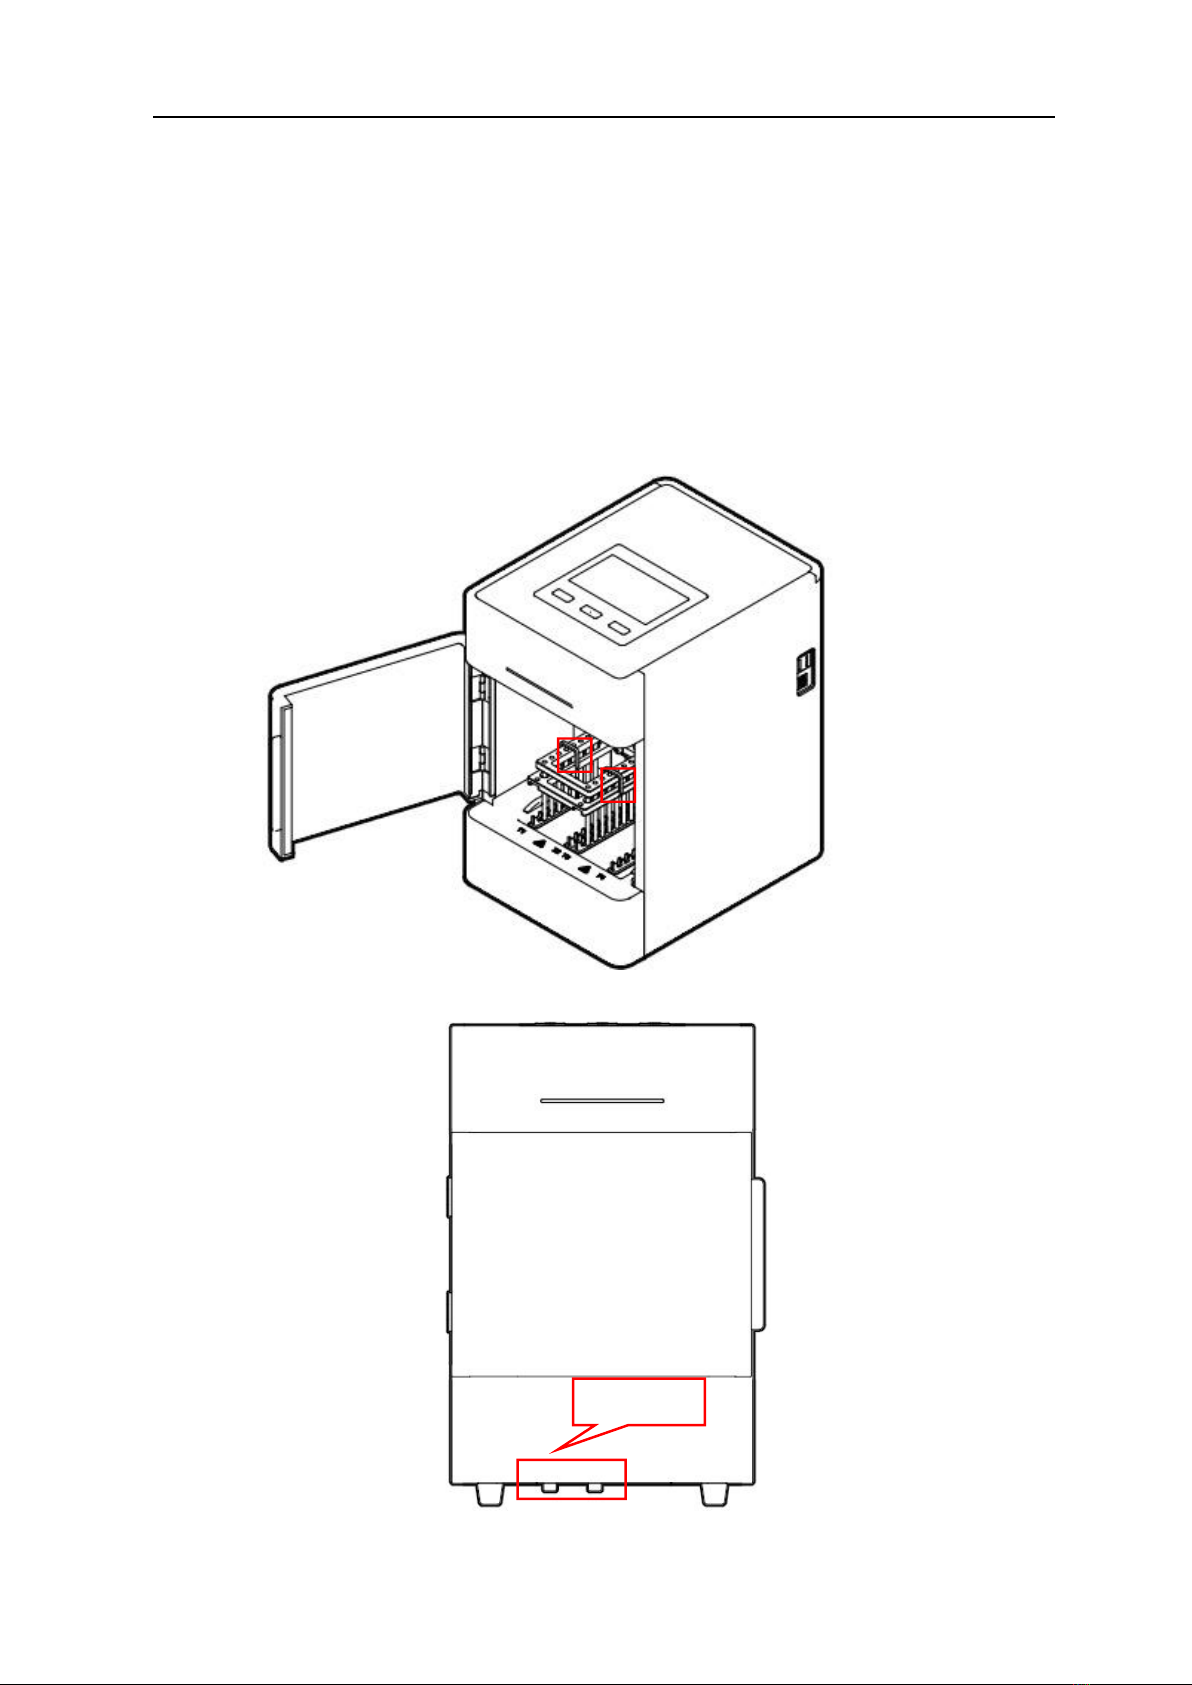
1. Structure
1.1. Front
Fig 2 Front
1.2. Back
State lamp
Transparent lid

Auto-Pure Mini Operation Manual Chapter 3 Basic Operating Instructions
5
Fig 3 Back
1.3. Side
Fig 4 Side
Fan
Power Switch
RS232 Port
Power Socket
Fuse
USD Port
Fuse
PC Port
Auto-Pure Mini Operation Manual Chapter 3 Basic Operating Instructions
6
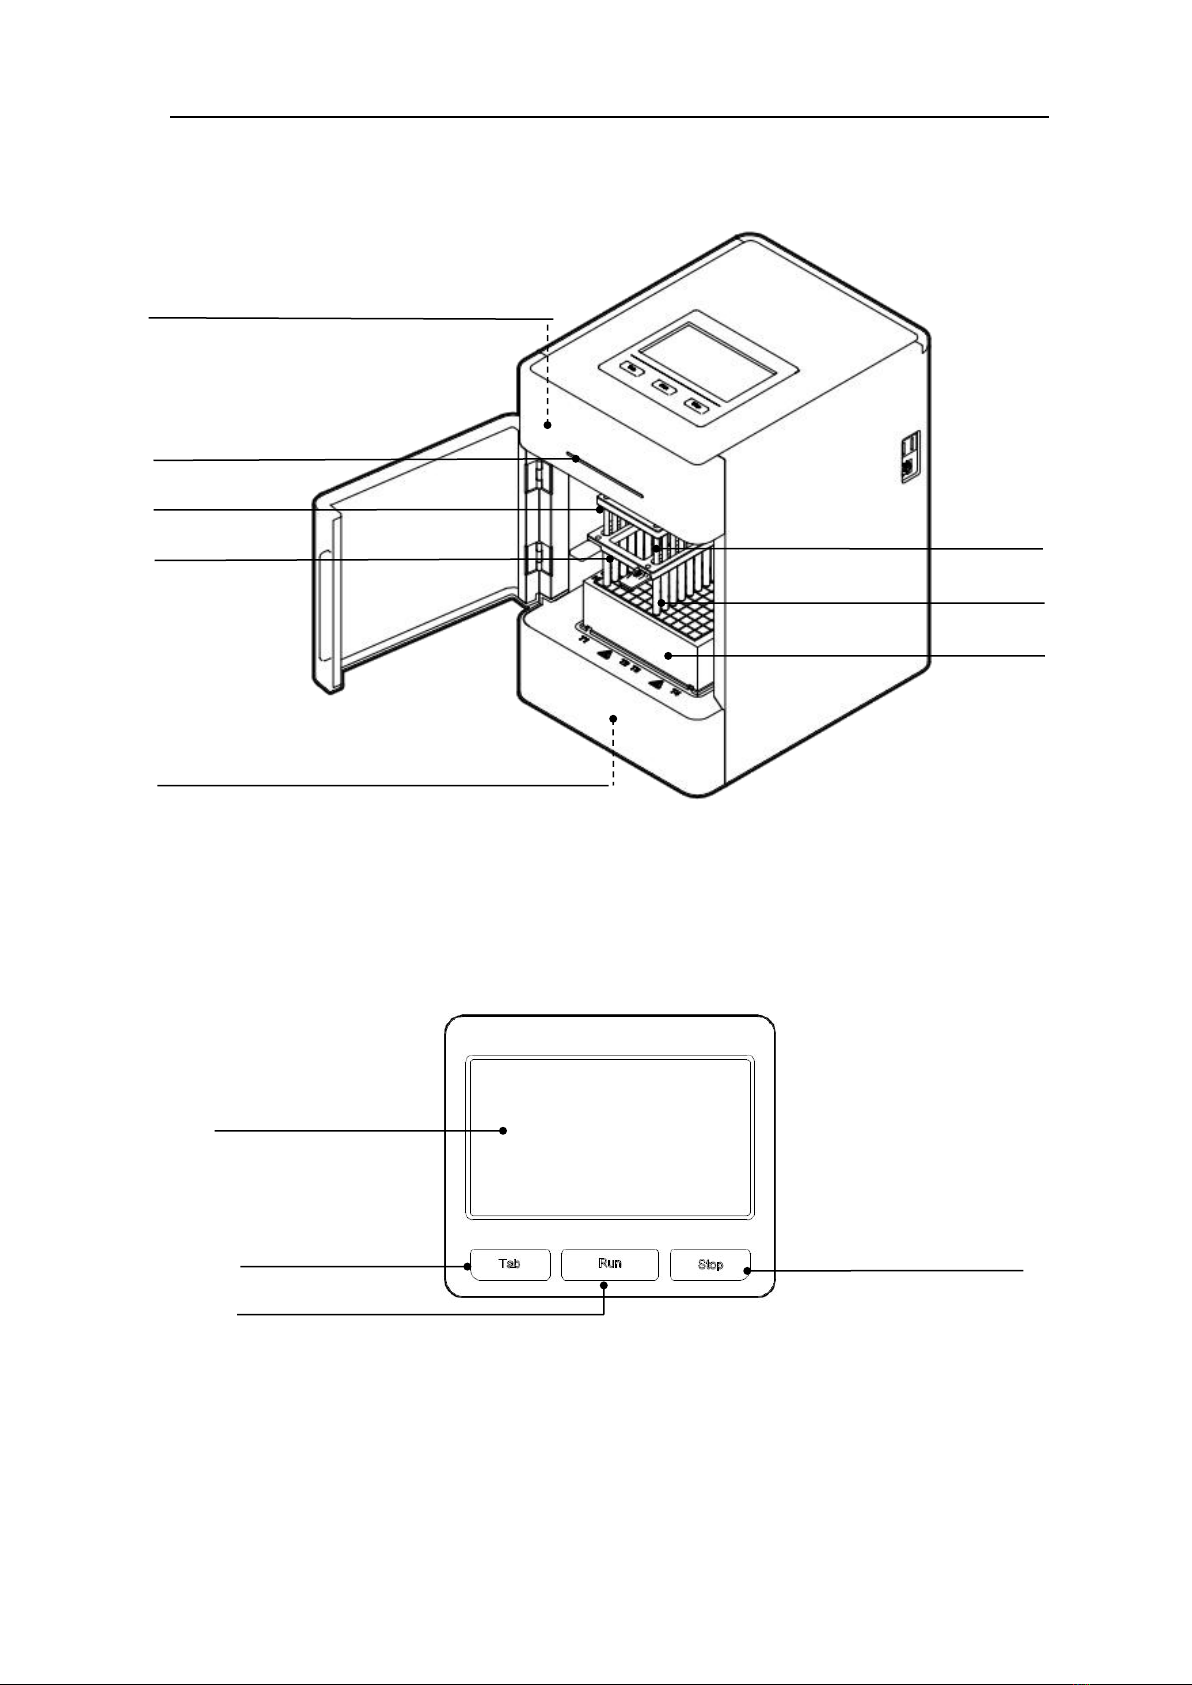
1.4. Test area
Fig 5 Test area
2. Operation Panel
Fig 6 Touch screen
Display screen: Touch screen, mouse also can be connected for operation.
TAB: Switching between protocols.
RUN: Start the protocol and run the instrument.
STOP: Stop the operation.
STOP
Lighting, UV lamp (top of test area)
State lamp
Magnetic rod holder
Magnetic rod's
tip holder
Magnetic rods
Magnetic rod's tip
96-Deepwell plate
Cooling fan (bottom of test area)
4.3 inch display screen
TAB
RUN
Auto-Pure Mini Operation Manual Chapter 4 Operations
7
Chapter 4 Operations
1. Preparation before use
Remove the instrument from the packing case, Remove the tape holding the
cabin door, open the door, remove the fastening belt between the magnetic
rod holder and the Magnetic rod's tip holder. Then unscrew the hexagonal
screw fixing the lifting part at the bottom of the instrument to release the
lifting part.
Fig 7 Remove the belt
Fig 8 Remove fixing screw
M5 screw

Auto-Pure Mini Operation Manual Chapter 4 Operations
8
Note: Please pay more attention to magnetic rods during the operation in
case any damage!
2. Power Connection
AC 100 ~ 240V
3. Kits Installation
3.1. 96-Deepwell plate installation
Open the cabin door. First, place the plate with the sample in the position slot
according to the arrow ①. Then press the plate into the heating strip
according to the arrow ②, and place it smoothly. Note the orientation of the
plate (kit corner A1 corresponds to the marker A1 on the instrument) to avoid
the wrong sequence of reagents. After the plate is in place, close the door.
Fig 9 96-Deepwell plate installation
3.2. Single sample kit installation
Single sample kit trays are placed in the same way as 96-Deepwell plates. The
difference is that the single-sample kit tray can hold 1~8 single-sample kits, and
the number of single-sample kits can be determined according to the number
of samples.
96-Deep well plate
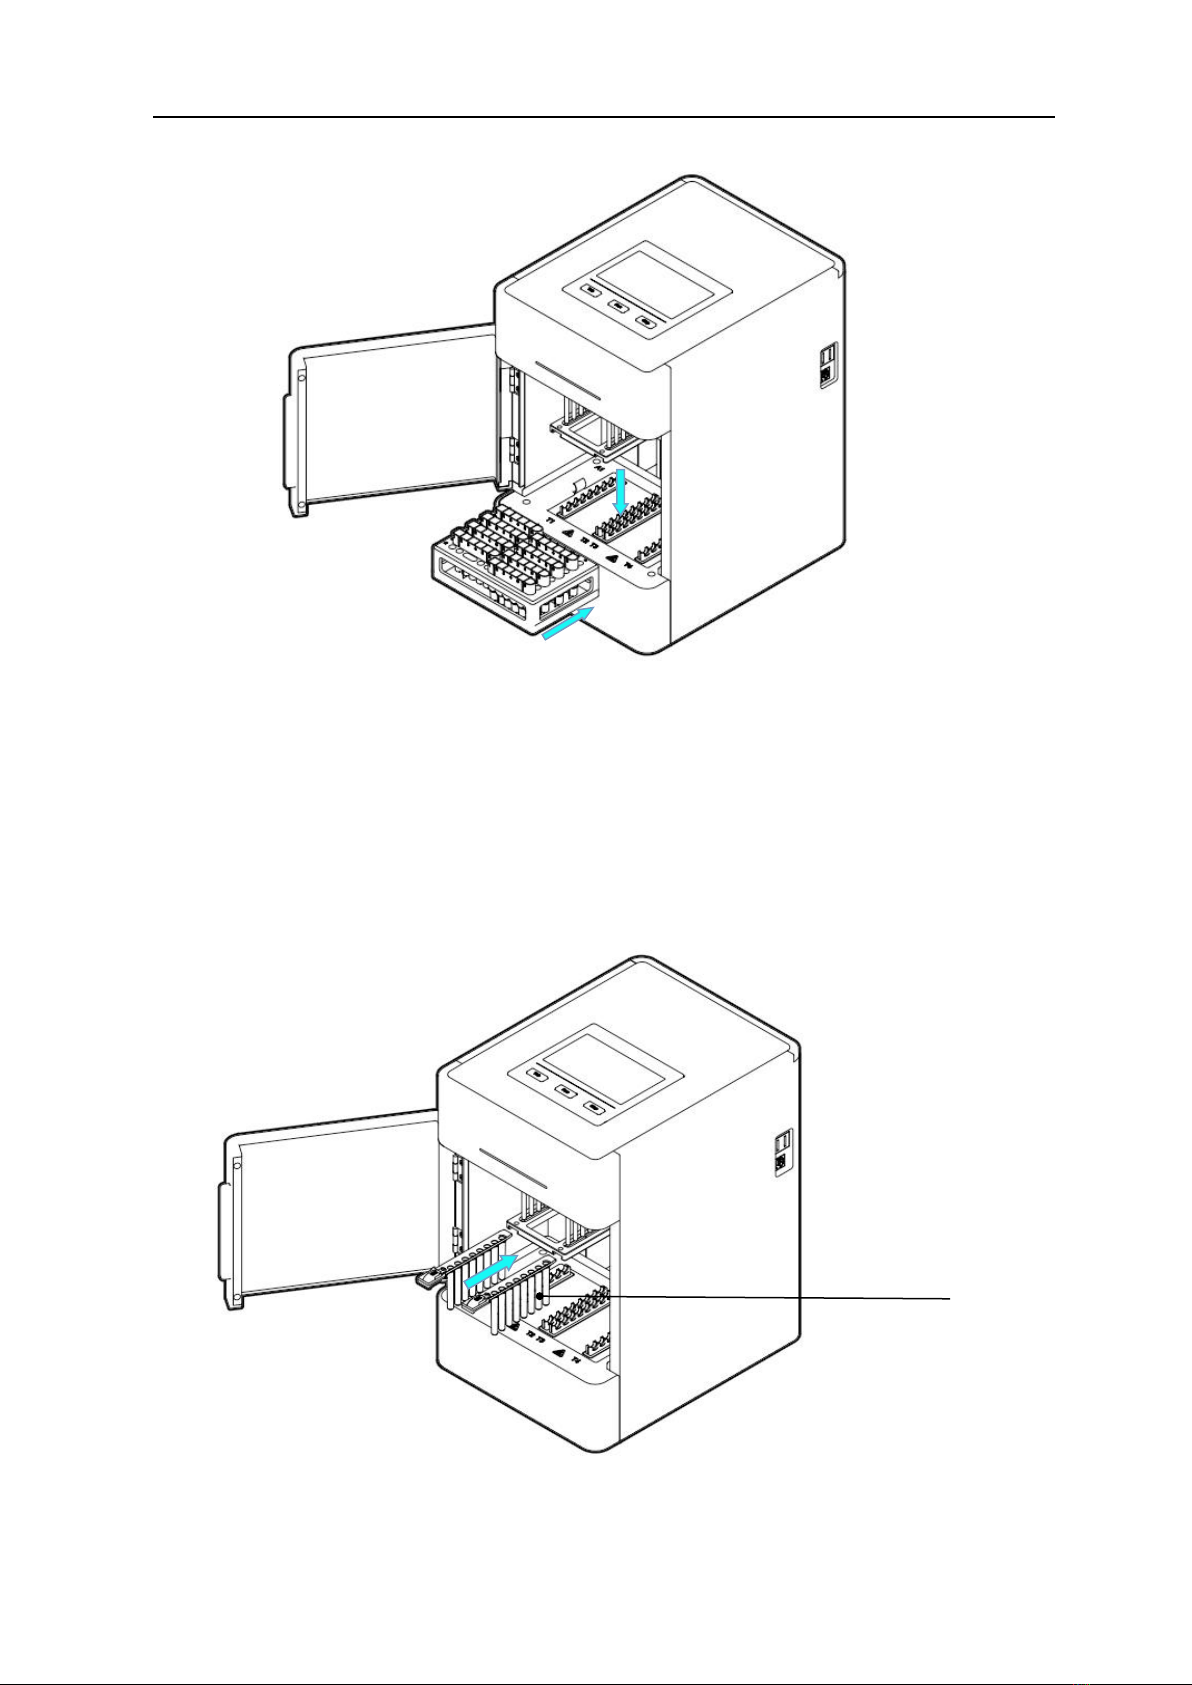
Auto-Pure Mini Operation Manual Chapter 4 Operations
9
Fig 10 Single sample kit installation
4. Magnetic rod's tip installation
4.1. Magnetic rod's tip installation
Insert the magnetic rod's tip into the fixed groove of the magnetic rod's tip
holder in the direction of the arrow to the end. The number of magnetic rod's
tip can be determined according to the number of samples.
Fig 11 Magnetic rod's tip installation
Note: Up to 2 pcs magnetic rod's tip for Auto-Pure Mini.
Magnetic rod's tip

Auto-Pure Mini Operation Manual Chapter 4 Operations
10
5. Remove magnetic rod's tip
Press the button on the magnetic rod's tip by the arrow ①, and pull out the it
along the direction of the arrow ②.
Fig 12 Remove magnetic rod's tip
6. Detailed Operations
The instrument software is divided into APP software and embedded software
in the instrument:
APP software is only supported by Android devices, used to complete the edit
of experimental protocols, generation of QR code and other operations;
The instrument software is oriented to the experimenter and is used for the
operation of the protocol and the setting of relevant parameters.
6.1 App software
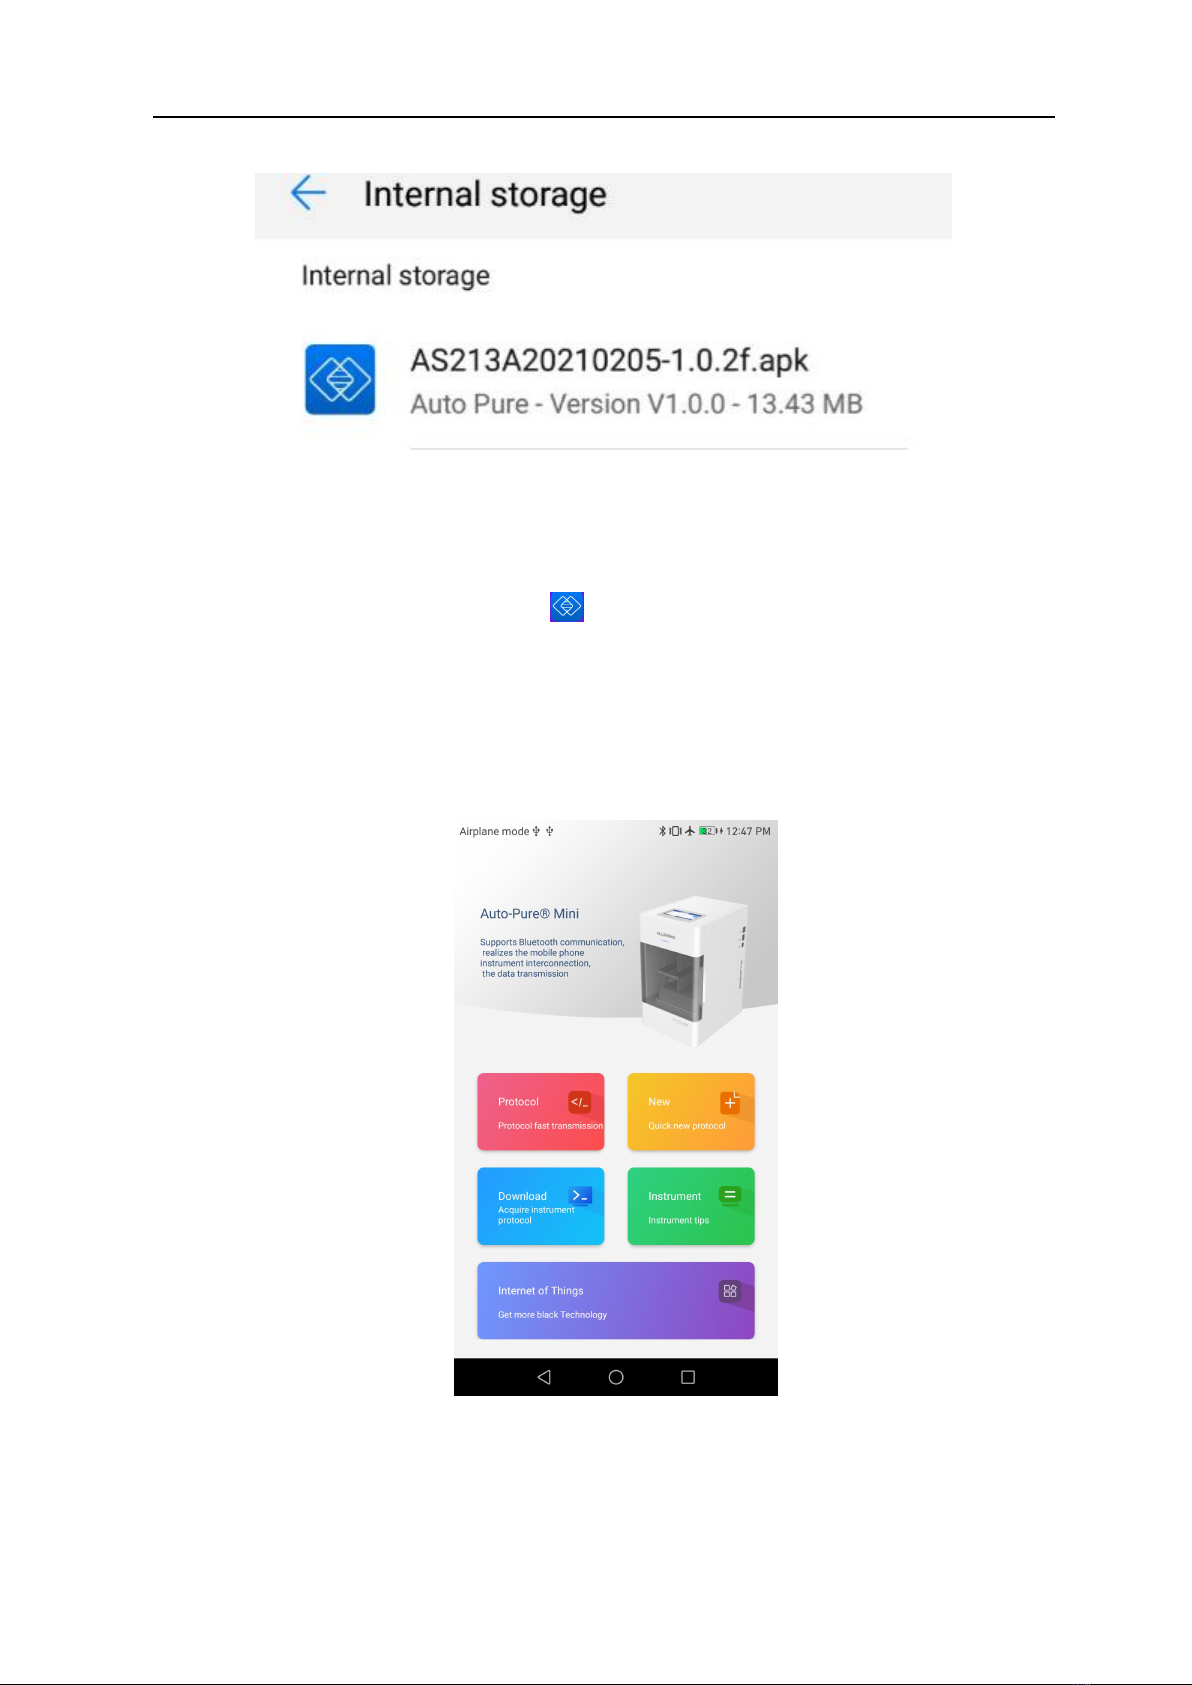
6.1.1 APP installation
Copy the APK file on the USB flash drive to the root directory of the memory of
the mobile phone, then find the APK file in the file management - internal
storage of the mobile phone, and click the APK file to install, as shown in the
following figure.
Auto-Pure Mini Operation Manual Chapter 4 Operations
11
Fig 13 Installation path
6.1.2 Main interface
After the software installed, click “ ”software icon on the interface, After the
startup is completed, you will enter the startup interface, where the software
version information will be displayed. Then into the main interface, whose
upper part display the name and information of the instrument, and the lower
part displays five main function blocks: protocol, New, Download, Instrument
and Internet of Things.
Fig 14 APP main interface

Auto-Pure Mini Operation Manual Chapter 4 Operations
12
Table 2 Title bar menu
Icon
Name
Function
Protocol
Click into protocol interface
New
Click to quickly create new protocol
Download
Click into download protocol interface
Instrument
Click into instrument management and setting interface
Internet of
Things
Click into Internet function interface
6.1.3 Protocol interface
Click protocol on main interface to enter the protocol interface. protocol
interface is mainly divided into two parts: local creation and instrument
acquisition.
Local creation: Create the protocol in the APP, and modify the parameters;
Instrument acquisition: The protocol in the instrument can be obtained after
Bluetooth connection, and the downloaded protocol can be edited and
transmitted.
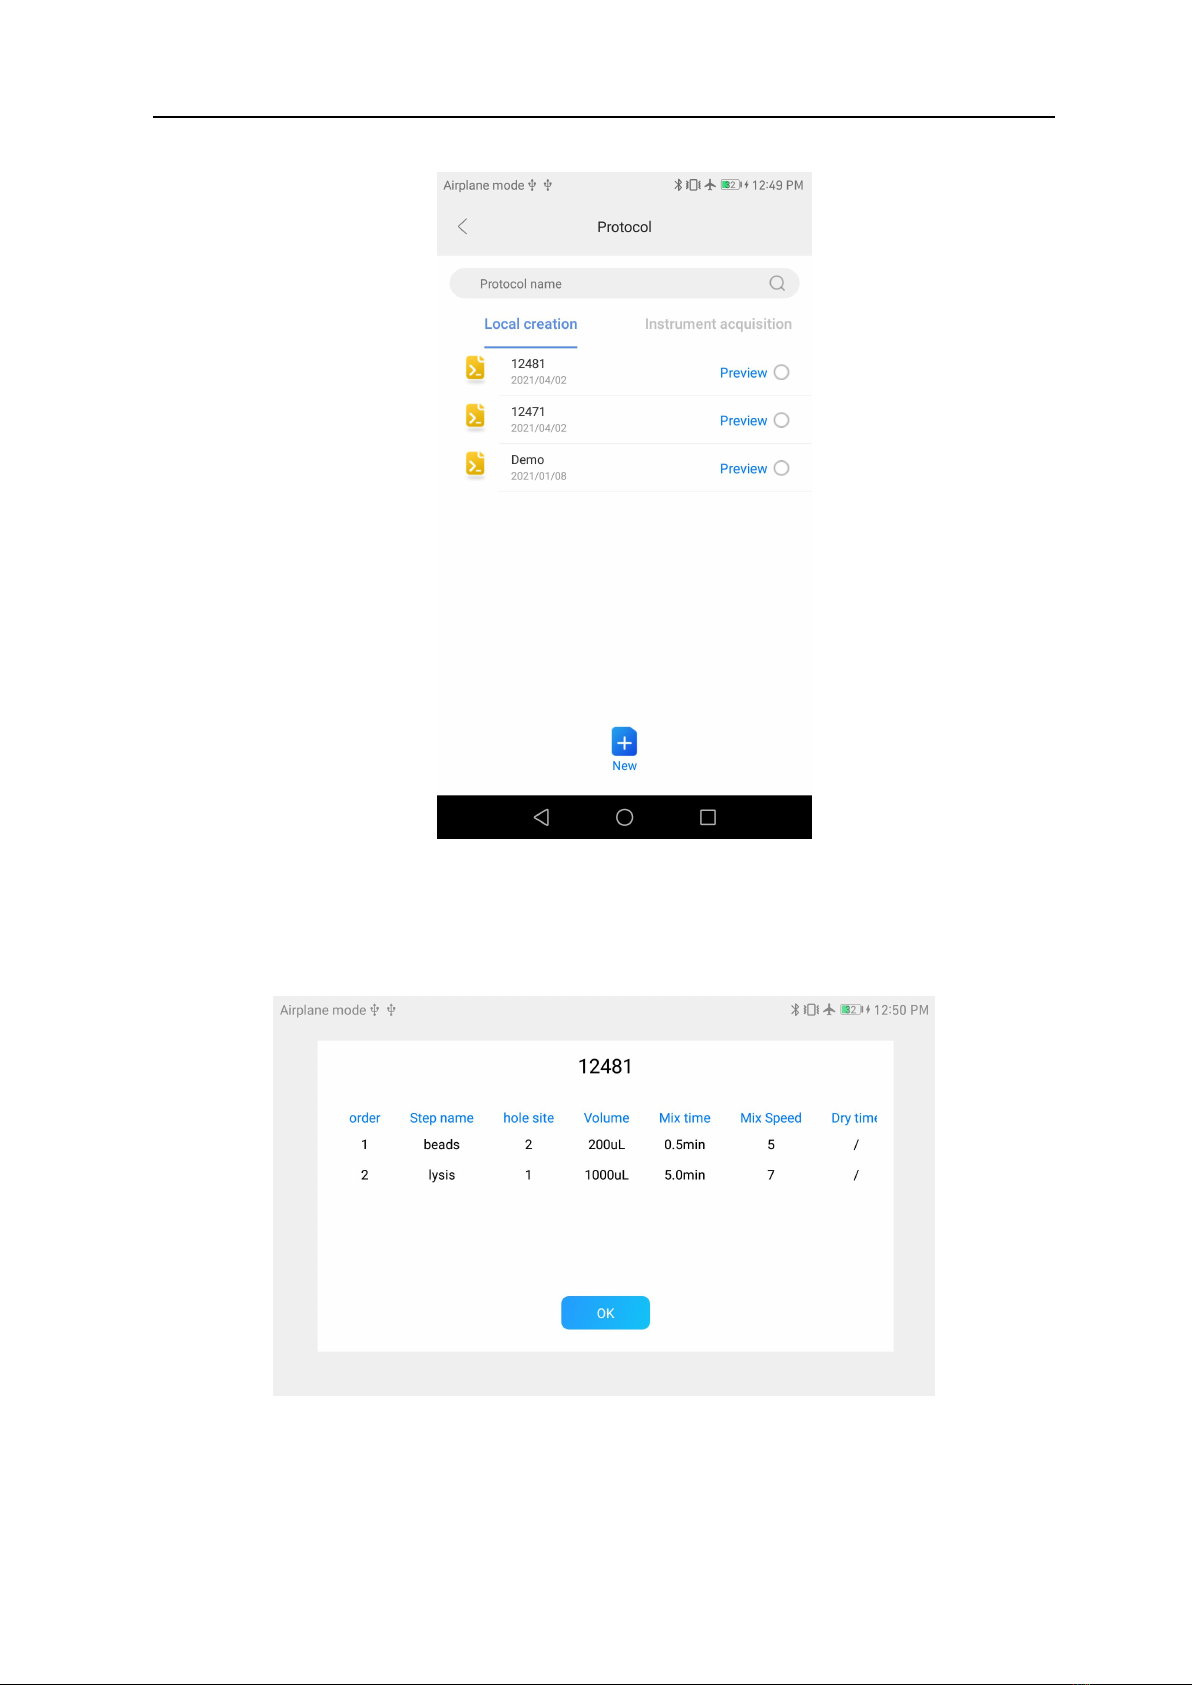
Auto-Pure Mini Operation Manual Chapter 4 Operations
13
Fig 15 Protocol list interface
The protocol interface mainly displays the protocol list, with new, preview,
selection, protocol search and other function.
Fig 16 Preview protocol
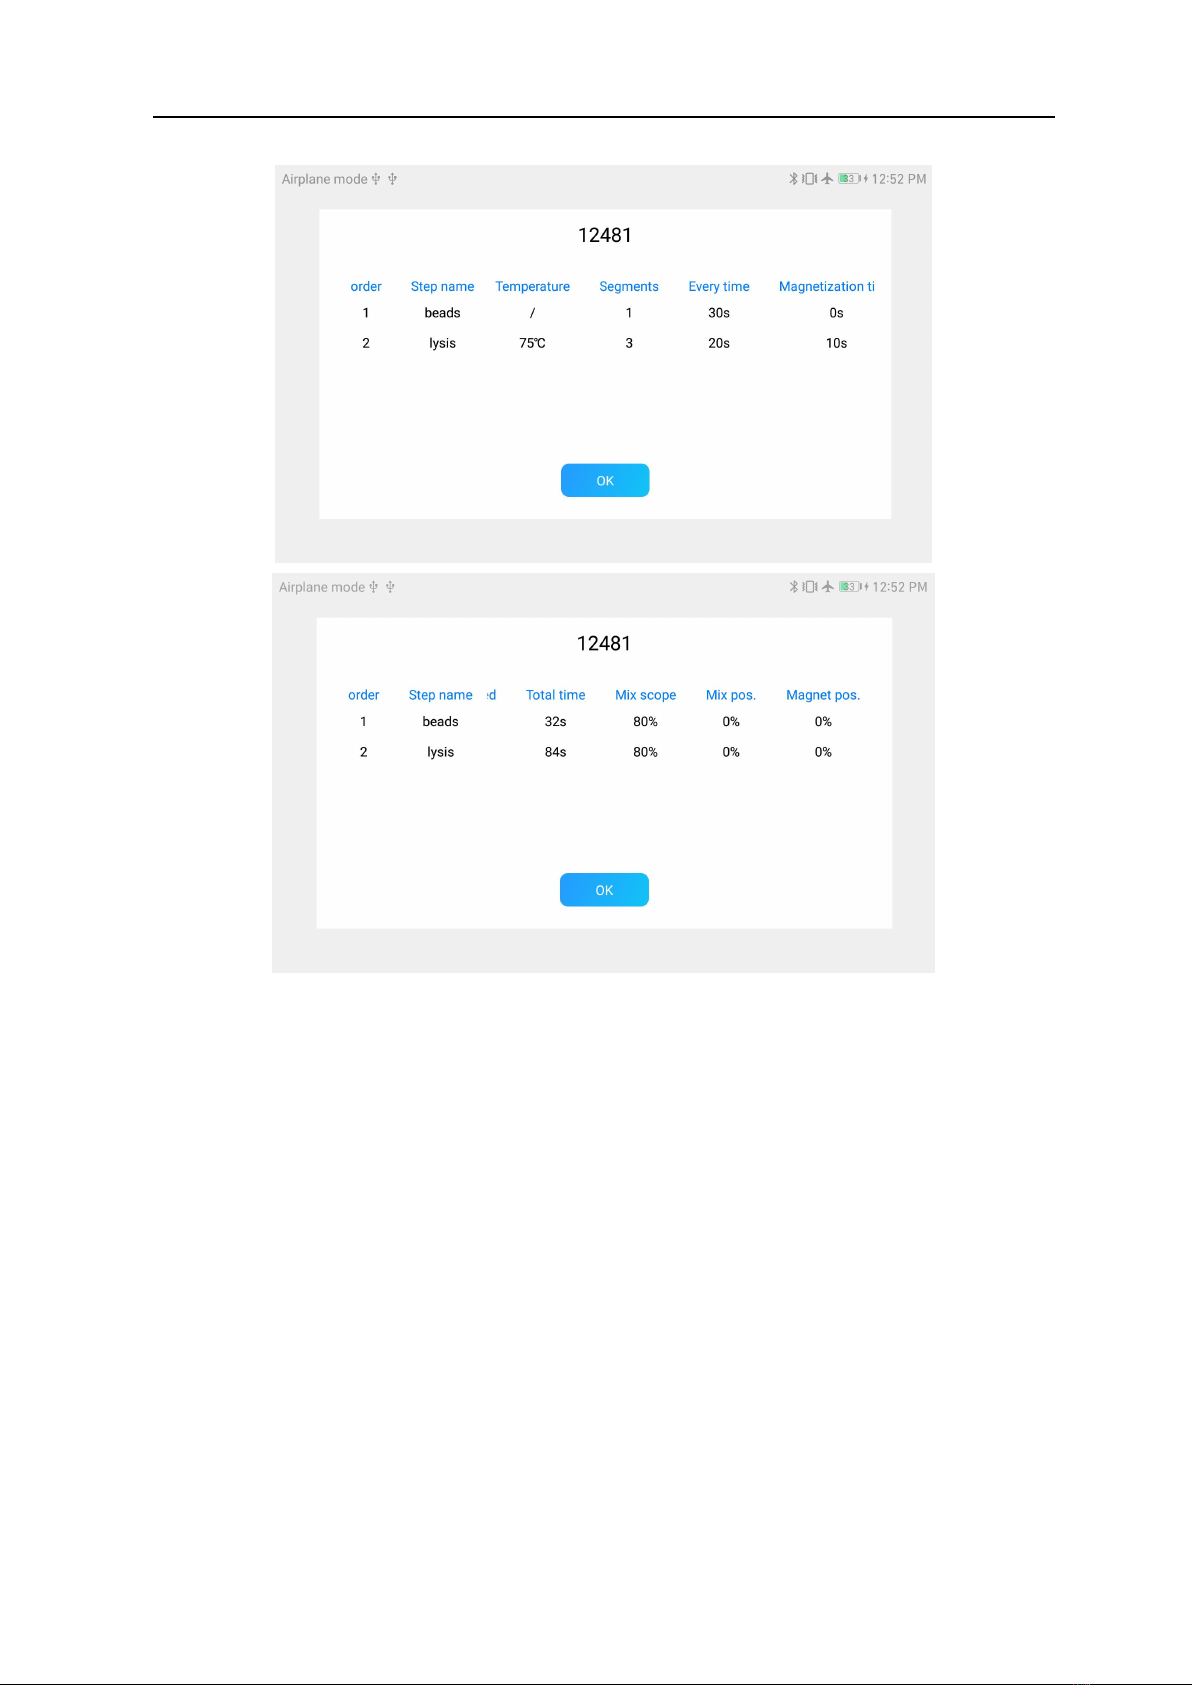
Auto-Pure Mini Operation Manual Chapter 4 Operations
14
Fig 17 Preview protocol
When selecting a single protocol, four buttons appear at the bottom of the
interface, Transmission, Delete, Protocol code and Save as, which can carry out
Bluetooth transmission, protocol Delete, generate the QR code of the protocol
and save the protocol;
Note: generate code and save protocol can only select 1 protocol, can not
select multiple protocol.
Table of contents
Other Allsheng Laboratory Equipment manuals


Popular Laboratory Equipment manuals by other brands


Millipore
Millipore Helicon S10 installation guide

Endress+Hauser
Endress+Hauser Analytik Jena Automatic Boat Drive operating manual

Hanil
Hanil Ultra 5.0 operating manual

Ilmvac
Ilmvac LVS 101 Z Operation manual

Bibby Sterilin
Bibby Sterilin Techne No ICE Operator's manual

Fisher Scientific
Fisher Scientific accumet AB40 user manual


