Allsheng AMR-100 User manual

Operations Manual
Version 2.0
AMR-100
Microplate Reader
Hangzhou Allsheng Instruments Co.,Ltd.

I
Foreword
Thank you for purchasing our Microplate Reader. This user manual describes how
the instrument works and the operation guide, please read carefully before
operation and keep for future reference.

II
Opening check
Please check the instruments as well as all accessories with packing list when
you first open it. If you find any wrong or missing, please contact distributor or
manufacturer.
HANGZHOU ALLSHENG INSTRUMENTS CO., LTD.
Address: #2, Xiyuan 6th Road, Xihu Economic & Technology Zone,
Hangzhou, Zhejiang 310030 China
Tel: +86-571-88802738
Fax: +86-571-87205673
Post code: 310030
Website: www.allsheng.com
Email: [email protected]
File No.: AS112SM
Version No.: 2nd, October 2016
III
Safety warming and guidelines
1. Important information for safe use
2. Safety Tips
The operation, maintenance and repair of the Instrument should comply with the basic
guidelines and the remarked warning below. If you don’t comply with them, it will have effect
on the scheduled using life of the Instrument and the protection provided.
Warning: Biological contamination!! All samples for test, quality control,
calibration are regarded as infectious, and any part contact with samples
will also need to be treated as infectious. Please wear gloves when operate
this device.
This instrument intended to use in Scientific Research only!
Warning: Avoid injury. Keep your body or any part of body away 15cm (or
more) from the instrument when running.
Users should have a clear main idea on how to use this instrument before operate,
do read this user manual carefully.
Any improper operation without reading manual is forbidden, otherwise there
will be risks in cause accidental injury or electrical shock.
Do read manual carefully and operate safely according to this guidelines.
Before using the device, read the Manual carefully. These units are designed
for use in laboratory environments. The device must be used by skilled
personnel with the appropriate training.
Indoor use only.

IV
The operator should not open or repair the Instrument by himself, which will
result in losing the qualification of repair guarantee or occur accident. If there
is some wrong with the Instrument, please contact manufacturer for repair.
Before power on, guarantee the voltage used should be accordant to the
voltage needed, and the rated load of electrical outlet should not lower than
the demand.
If the electric line is damaged, you should replace it with the same type. You
should assure there’s nothing on the electric line and you should not put the
electric line in the ambulatory place.
Hold the socket when you pull out the plug, and don’t pull the electric line
only.
The Instrument should be put in the place of low temperature, less dust, no
water and no sun or strong lamp. What’s more, the place should be good
ventilation, no corrosively gas or strong disturbing magnetic field, far away
from central heating, camp stove and other hot resource.
Power off when you finish your work. Pull off the connector plug when there’s
long time no use of the Instrument and cover it with a cloth or plastic paper to
prevent from dust.
Pull the connector plug from the socket at once in the following cases, and
contact the vendor:
There is some liquid flowing into the Instrument;
Drenched or fire burned.
Abnormal operation: such as abnormal sound or smell.
Instrument dropping or outer shell damaged.
Malfunction

V
Contents
Foreword.................................................................................................................................................... I
Opening check......................................................................................................................................... II
Safety warming and guidelines............................................................................................................ III
1. Important information for safe use.......................................................................................III
2. Safety Tips................................................................................................................................III
Chapter 1 Brief introduction.............................................................................................................. 1
Chapter 2 Features............................................................................................................................ 2
Chapter 3 Instrument structure.........................................................................................................3
Chapter 4 Installation......................................................................................................................... 4
1. Opening check......................................................................................................................... 4
2. Installation.................................................................................................................................4
3. Installation steps...................................................................................................................... 4
Chapter 5 Operation guide................................................................................................................5
Section 1 Instrument self checking..............................................................................................5
Section 2 Program interface......................................................................................................... 6
Section 3 Report........................................................................................................................... 26
1. Ordinary Report interface........................................................................................................ 26
2. Kinetics Report interface......................................................................................................... 30
Section 4 Settings........................................................................................................................ 33
1. Language setting...................................................................................................................33
2. Filter setting............................................................................................................................34
3. Maintenance...........................................................................................................................35
4. Print setting............................................................................................................................ 36
5. Time and Date setting.......................................................................................................... 36
6. Help..........................................................................................................................................37
Chapter 6 Maintenance, storage, transportation............................................................................. 38
1. Maintenance...........................................................................................................................38
2. Storage and transportation.................................................................................................. 41
Chapter 7 Trouble shooting................................................................................................................. 42
Chapter 8 Accessories..........................................................................................................................43

AMR-100 Microplate reader user manual Chapter 1 Brief introduction
─1─
Chapter 1 Brief introduction
This automatic microplate reader AMR-100 is professional instrument for EIA test , measuring
concentration, absorbance, positive or negative of the antibody and antigen in the sample by
testing the color of the Enzyme - Linked Immunosorbent Assay ( ELISA ). This reader is widely
used in clinical test, biology agriculture, food and environment research, especially benefit
from ELISA kits increasingly wide utilization.
Highlights:
Easy of use with 7 inch touch screen together with 3 external keys.
English or Chinese operation system available for complete edit, measurement, save data.
Able to use individually or connect with PC or PAD to control and export data.
8 positions optical filter wheel, equipped with 4 standard optical filters and optional filters
available.
8 channel vertical optical path, zero dispersion single mode fiber measurement system,
automatic plate well center position function.
96-well visual layout helps to mark blank, sample, positive/negative control, quality control
and multi-value control.
Multi-choice tests on single plate.
Single or double wavelength measurement.
Self-checking optical path, mechanical motion.
Plate shaking function, time and speed are adjustable.
Designed with light source energy saving.
Different kind of data export ports available.
Measurement results can be exported to “MS Excel” file.

AMR-100 Microplate Reader User manual Chapter 2 Features
─2─
Chapter 2 Features
Working conditions:
Ambient temperature: 4C~45C
The relative humidity: ≤70%
Power: AC100-240V 50-60Hz 2A
The basic parameters and characteristics
Model
Parameter AMR-100
Light source 6V 10W Quartz-Halogen lamp
Wavelength 400~750nm
Optical filter Four standard filter 405/450/492/630 nm, max load eight filters.
Read-out range 0.000-4.000 Abs
Resolution 0.001Abs
Linearity (0,3.0)≤±1%;【3.0,4.0)≤±2%
Precision (0,3.0)≤0.3%, 【3,4.0)≤2%
stability (0,3.0)≤0.3%,【3.0,4.0)≤2%
Accuracy
(0,2.0)≤
0.005A,【2.0,3.0)≤
1%,【3.0,4.0)≤
3%
sensitivity ≥0.010
Channel deviation <0.01A 1.0Abs
Speed Single wavelength <15s/96well, double wavelength<28s/96well
(Routine mode)
Dimension (WXDXH) 295 x 440 x 225 mm
Weight (kg) 10

AMR-100 Microplate reader user manual Chapter 3 Instrument structure
─3─
Chapter 3 Instrument structure
Before first use of this instrument, please read this chapter carefully to make a better preparation.
External button: “Start”, “Stop” and “Plate in/out”.
Plate holder: Hold microplate.
USB Port: can connect keyboard or mouse.
Data port: connect PC.
Aerial: connect andriod system which can control this instrument.
Back door: can open to change light source and optical filter.
Knob: To open back door.
Structure
Back door
Aerial
USB Port X2
Data port
Internet
port
Knob
Power Socket
Touch screen
Roof cover
Decoration bar
Rear cover
Button
Rear cover
Plate holder
Front door
Lower cover

AMR-100 Microplate reader user manual Chapter 4 Installation
─4─
Chapter 4 Installation
1. Opening check
Each AMR-100 is completely checked before package, please check again when you receive
instrument after transportation, contact your local distributor or manufacturer in case of:
The outer package inverted or deformation.
The outer package has an obvious stains of water.
The outer package has marks of impact.
The outer package has sign of open.
In case of outer good package, please check instrument and appendix.
According to your packing list to check all accessories.
Check instrument appearance if there is cracks or damage or deformation.
2. Installation
Working condition: locate instrument on a flat dry and clean work table, keeping the front side
with enough space for plate holder in and out, also keeping 15cm space for back, left and right
side to enable put or connect wires.
Working environment:
a.Clean air free from corrosion steam or smoke.
b.Temperature within +10°C to +40°C.
c.Relative humidity within 10% to 80% to avoid condensation.
Note: KEEP INSTRUMENT AWAY FROM DESTRUCTIVE GAS OR LIQUID!
3. Installation steps
locate instrument on work table.
Note: Don’t drive off any screws or parts unless for any specified steps, or it will affect
the warranty and leads to damage of the device.
Connect instrument to power supply.
Instrument will start to self-checking after turning on.
Warming: The Instrument must be properly grounded before operating!!

AMR-100 Microplate reader user manual Chapter 5 Operation guide
─5─
Chapter 5 Operation guide
Section 1 Instrument self checking
This chapter introduces default programs operation, it begins to self checking after turned on.
Refer to the picture below
fig 1
There are 4 parts in the software: Programs, Report, Settings, Help.
You can swift these 4 parts by clicking icon area upside.

AMR-100 Microplate reader user manual Chapter 5 Operation guide
─6─
Section 2 Program interface
After self-check complete, enter the software main “Program” interface.
fig 2
File management, Function Key and Qperation
1.1. File management
The name of current program file: (Fig 2),
Note: There are two kinds of program files: one includes the detection data and analysis
results with the icon “ ”, the parameter can’t be changed and can be used in measuring
after rename the program file; the other only has the parameter of the program without any
icon, the parameter setting can be changed and used in measurement.
: New program
Click “New” to set the name of new program and then click “OK” to save. After that, the parameter
setting can be changed(Fig 3).
File management
Function Key
Parameter setting

AMR-100 Microplate reader user manual Chapter 5 Operation guide
─7─
fig 3
:Save the current program
Click “Save” button to save the setting program and view it in “File List”.
Note: The new program will not be set after detecting sample and display in gray font;
on the contrary, it still can be set.
:Save as new program
Click “Save As” to rename the program and save as new one.
Note: The save as program can be set based on the previous parameters. The
detection data and parameter will be save at the same time.
:Open the program file list
Click “File List” button to enter the interface(Fig 4) of all the program file. Choose the program
file and click “Open” button, you can view the specific information of the program.
Click the “ ”or“ ”button to rank the program files.
Click the“ ”,“ ”,“ ”,“ ” to page quickly.

AMR-100 Microplate reader user manual Chapter 5 Operation guide
─8─
fig 4
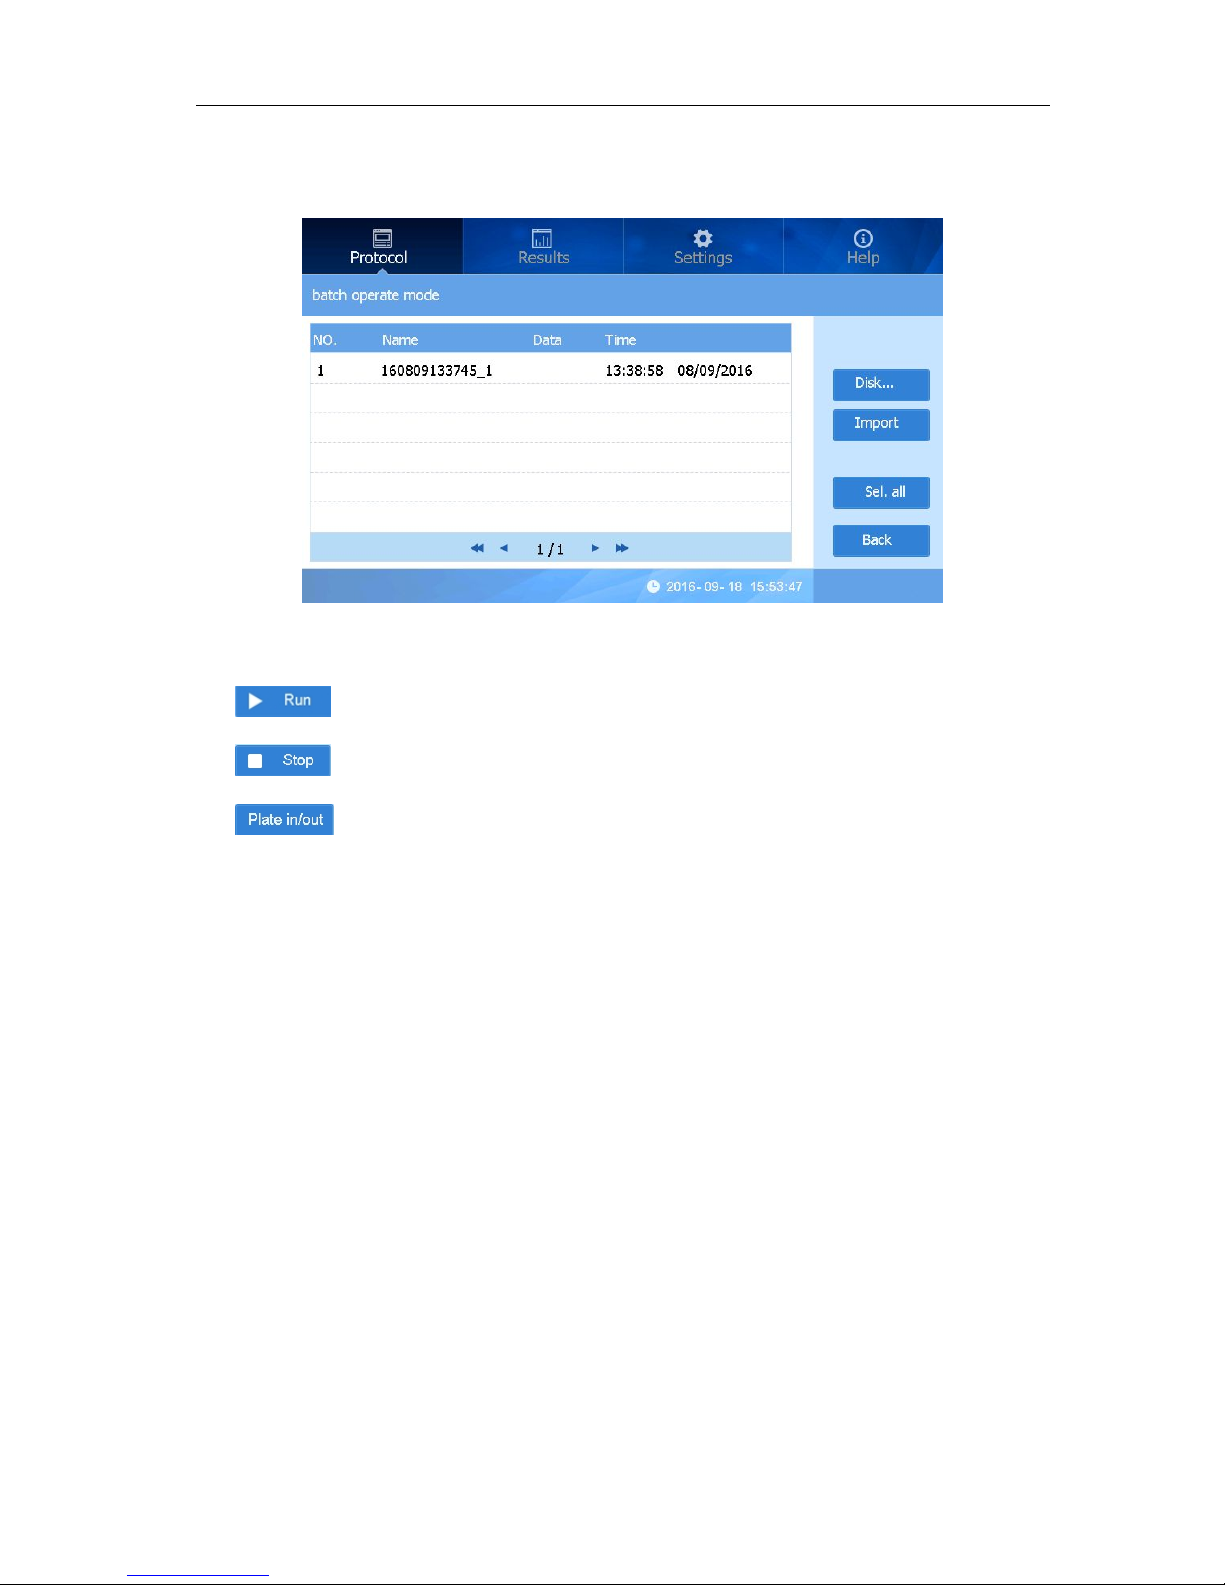
Click “Batch OP” to enter the interface(Fig 5):
fig 5
You can batch deletion, import and export the program files.
:Delete the program file(Fig 7).
,:Click “USB Drive” button to exchange the program files between hard disk
drive and external USB drive(Fig 6,8).
:Export the hard disk drive data to external USB drive.

AMR-100 Microplate reader user manual Chapter 5 Operation guide
─9─
:Import the external USB drive data to hard disk drive.
:Select the whole program files in the hard disk drive (external USB drive) and then
the button will be change to “ ”.
fig 6
:Back to the program interface.
Note: The program files in external USB drive couldn’t be deleted.
fig 7
AMR-100 Microplate reader user manual Chapter 5 Operation guide
─10 ─
fig 8
1.2. Function button
:Click to detect the sample.
:Click to stop the detection.
: Click to control the Elisa plate in and out.
Note: It will create a new file when click “Run” button and then input the name of program
file. Click “OK” to start the running.
1.3. Procedure
Sample detecting procedure:
Open the procedure file (or New) and set the parameter.
Click the“Plate in/out” button on the screen or the front panel to put the Elisa plate into the
instrument as Fig 9.

AMR-100 Microplate reader user manual Chapter 5 Operation guide
─11 ─
fig 9
Click “ ” on the screen or “Start” button on the front panel to start the running(Fig 10).
fig 10
Note: You can only click “Stop” button to stop the running.
After 15 sec running, it will enter the “Report” interface automatically and display the detection
report(Fig 11).

AMR-100 Microplate reader user manual Chapter 5 Operation guide
─12 ─
fig 11
2. Programs setting
This part introduces how to create program, set parameters(wavelength, shaking mode), layout,
shaking setting, data calculate, qualitative setting, quality control setting and program save.
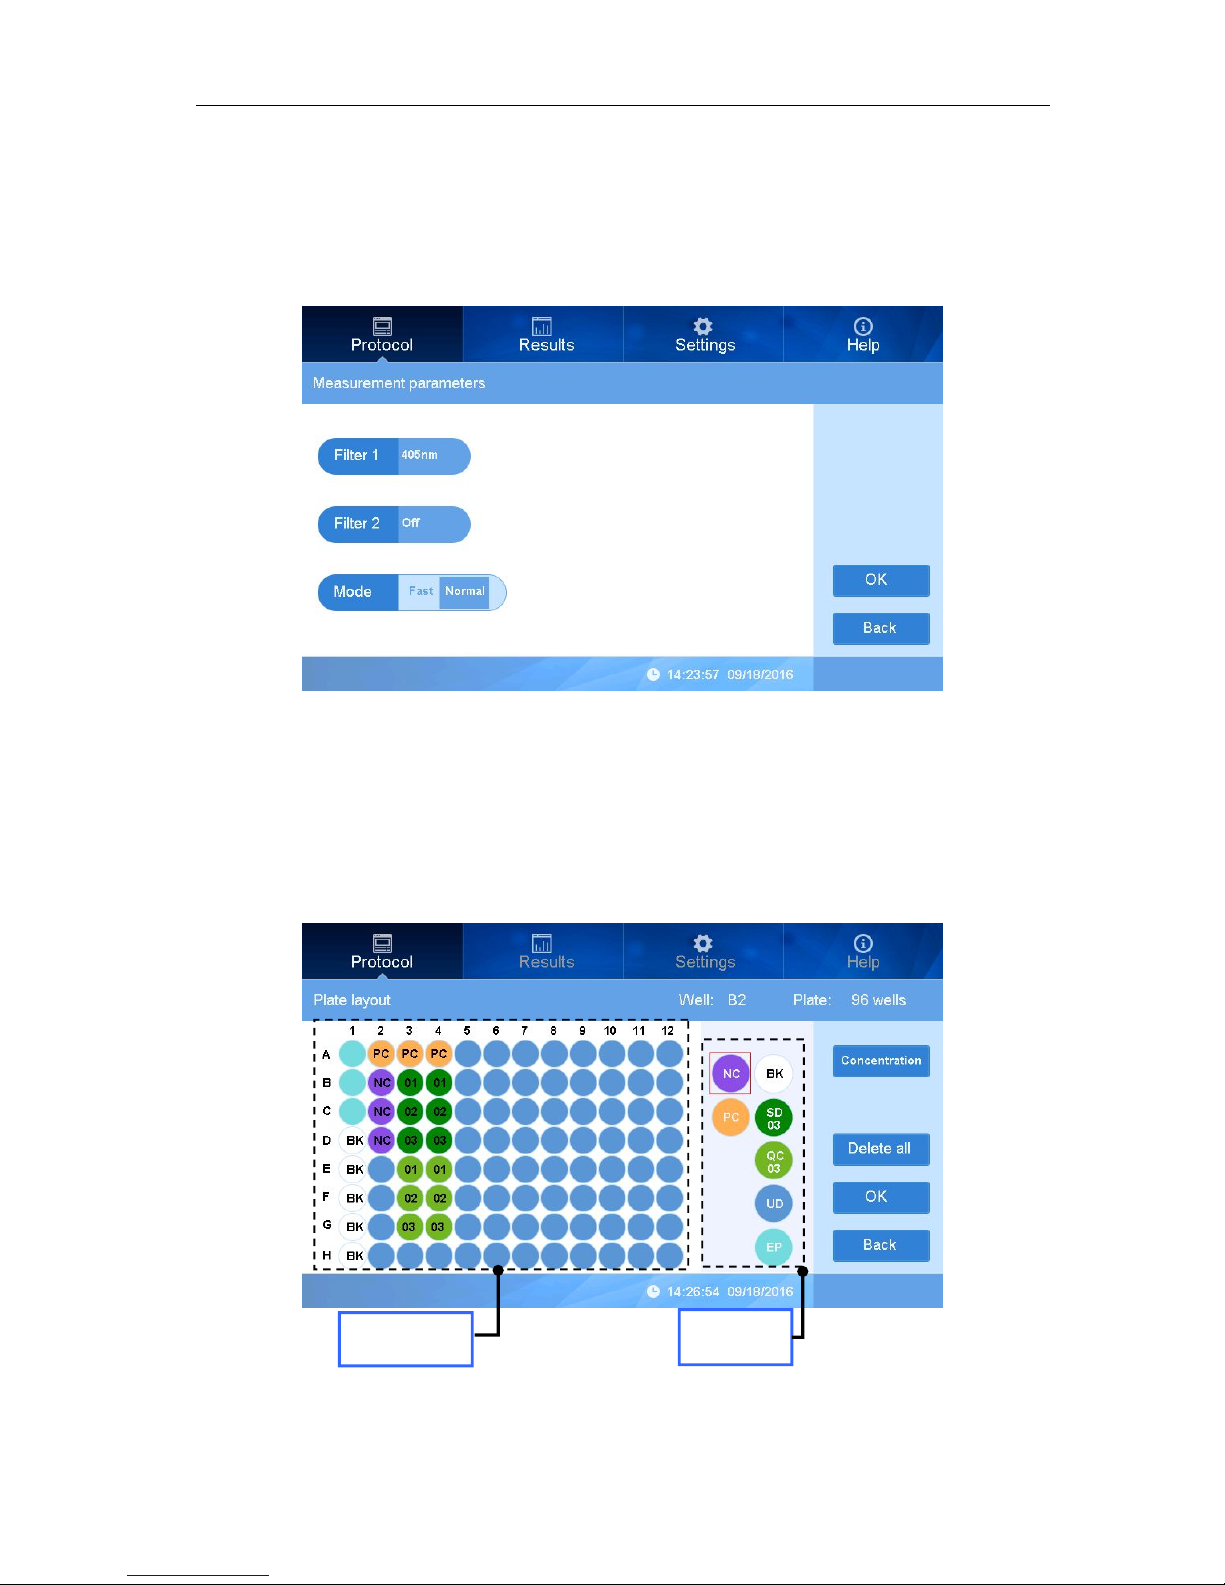
2.1. Mode setting(Measure)
Wavelength and mode can be set in measurement mode.
On interface “Programs”, click blank area near “Measure” to set parameters(Fig 12).
fig 12

AMR-100 Microplate reader user manual Chapter 5 Operation guide
─13 ─
Filter1 setting
Click right part near “Filter1” to choose wavelength(Fig 9).
fig 13
There are 4 standard filter equipped: 405nm, 450nm, 492nm, 630nm, choose one as Filter1’s
wavelength.
Filter2 Setting
This instruments can measure with single wavelength as well as double wavelength. Click right
part near “Filter2” to choose wavelength (choose a different wavelength to Filter1), see picture
below:
fig 14
Note: For single wavelength measurement, please choose “Off Filter” on Filter 2.
AMR-100 Microplate reader user manual Chapter 5 Operation guide
─14 ─
Measurement speed choice:
Two mode available : Fast, Normal. Click right part near ”Mode” to choose , see picture below:
fig 15
Note: “Normal” mode is recommended .
Press “OK” to finish setting and return back to main interface.
2.2. Layout
2.2.1. Layout
In interface “Programs”, “Plate layout” interface appears by pressing button right beside it, at
the right side there are some buttons “ Concentration”, “Delete all”, “OK”, “Back”, as Fig 16.
fig 16
Plate
layout
Type
Table of contents
Other Allsheng Laboratory Equipment manuals


Popular Laboratory Equipment manuals by other brands

Markes International
Markes International HiSorb Agitator U-HSAG-20 Instructions for use

Sartorius Stedim Biotech
Sartorius Stedim Biotech Palletank user manual

dentronix
dentronix DDS 7000 operating instructions

Selecta
Selecta PRESOCLAVE III 50L manual

Metrohm
Metrohm 940 Professional IC Vario ONE/ChS/LPG manual

Glass Expansion
Glass Expansion D-Torch manual


