Allsheng Auto-Pure Series User manual

Operation Manual
Auto-Pure 20A
Auto-Pure 20B
Auto-Pure 32A
Auto-Pure Series
Nucleic Acid Purification System
Hangzhou Allsheng Instruments Co., Ltd.

Thank you for purchasing Auto-Pure series Nucleic Acid Purification System.
In order to use the instrument properly, please read carefully this manual
before operating and keep it for future reference.
Opening Check
Please check the instrument and Appendix with the packing list when you
first open the package. If you find anything missing or incorrect, please
contact the distributor.
HANGZHOU ALLSHENG INSTRUMENTS CO., LTD.
Address: Building 1&2, Zheheng Science Park, Zhuantang Town, Xihu
District,Hangzhou, Zhejiang 310024, China
Telephone: +86-571-88802738,88948289
Fax: +86-571-87205673
Post code: 310024
Website: www.allsheng.com
Email: [email protected]
File No.: AS41160101010
Version No.:V1.0, Nov. 2016

Safety Warnings and Guidelines
1Warning
Please read this Manual carefully before operation.
2Safety Tips
The operation, maintenance and repair of the Instrument should comply with the
basic guidelines and cautions as below. Improper use of the instrument may cause
damage to the system, inaccurate results, or potentially nullify warranties.
Operation without reading the manual may cause damage or even
electrical shock.
Indoor use only
Read the Manual carefully before operation, only qualified and trained
staff can operate this Instrument.
The operator should not open or repair the Instrument without Vendor’s
authorization, if not, there might be cause potential damages or injuries
and affect the warranty.
Before connecting to power, make sure the voltage used is same as the
instrument required, and the maximum rated load should be sufficient for
the instrument.
Please replace the power cord with same specs if the power cord is
damaged. Please make sure there’s nothing covered the power cord and
keep it away from crowds when in use.
When plug in and plug out, make sure to hold the plug firmly and not to
pull with power cord only.
During operation, the surface temperature of heating block inside
operation window could be very high. To avoid possible scald or boiling of
the liquid, do not touch the metal part when operating.
3The maintenance of Instrument
The inner side of drawer should be cleaned periodically by the cloth with alcohol.
If there are any stains on the Instrument, clean them with cleansing cream.
4The limiting condition of transportation and storage
environment
Ambient temperature range: 10℃~35℃
Relative humidity : ≤70%
Atmosphere range: 500~1060hpa
No corrosive gas and a well-ventilated room.
The Instrument should be placed in a position with low humidity, less dust,
and keep it away from water, sunshine and strong light source. Make sure
of adequate ventilation, no corrosive gases, no strong magnetic
interference and to avoid any heat sources.
When operating more than one Instrument simultaneously, the spacing
distance should be no less than 100 cm.
Power off the instrument after operation and please disconnect the plug if
long time no use of the instrument and cover it with something to prevent
from dust.
Under the following circumstances, please disconnect the power
immediately and contact with your distributor.
Liquids into the Instrument;
Drenched by rain or water
Abnormal operation especially like abnormal sound or smell
Instrument fell or outer shell damaged.
Malfunction

Contents
Chapter 1 Brief Introduction----------------------------------------------------------------------------- 1
Chapter 2 Specifications----------------------------------------------------------------------------------- 2
1. The normal operating condition---------------------------------------------------------------------------2
2. The basic parameters and performance--------------------------------------------------------------- 2
3. Overall dimension---------------------------------------------------------------------------------------------- 3
Chapter 3 Product Introduction------------------------------------------------------------------------ 4
1. Structure-----------------------------------------------------------------------------------------------------------4
2. Operation panel------------------------------------------------------------------------------------------------- 5
Chapter 4 Operation------------------------------------------------------------------------------------------ 6
1. Before Operation----------------------------------------------------------------------------------------------- 6
2. Power connection---------------------------------------------------------------------------------------------- 7
3. Reagent Kit installation-------------------------------------------------------------------------------------- 7
4. Install Magnetic rod cover-----------------------------------------------------------------------------------8
5. Remove Magnetic rod cover--------------------------------------------------------------------------------9
6. Operating-------------------------------------------------------------------------------------------------------- 10
Chapter 5 Trouble Shooting---------------------------------------------------------------------------- 24
Appendix------------------------------------------------------------------------------------------------------------ 26

─1─
Chapter 1 Brief Introduction
Auto-Pure series Nucleic Acid Purification System use the magnetic rod to adsorb, transfer
and release magnetic particles to transfer the operating sample and in this way to purify
DNA/RNA, protein and cell etc. The Purification system able to handle 1-20 or 1-32 samples
simultaneously with special reagent kit or 96 well reaction plate, and when using the different
reagent, would be able to extract DNA/RNA from animal or plant tissue, blood and body fluid
etc.
Features
Friendly interface with easy operation
Touch screen with 3 shortcut key or mouse operation
Heating function in Lyse and elution
UV sterilization
Quiet operation without vibration
One stop operation to avoid contamination
Rapid extraction:15~40 minutes / time
Premium magnetic particles leads to high yield
Extendable Ethernet remote control and WiFi
APP software for mobile phone and PAD w/android system

─2─
Chapter 2 Specification
1. Normal operating conditions
Environmental Temperature: 10C~35C
Relative Humidity ≤70%
Input: AC 100~240V,50Hz/60Hz
2. Basic parameter & Performance
Model
Parameter
Auto-Pure
20A
Auto-Pure
20B
Auto-Pure 32A
Principle
Magnetic Particle Method
Magnetic Particle Method
Throughput
1~20
1~32
Sample Volume
20μL~2000μL
20μL~5000μL
20μL~1000μL
Magnetic rod
number
20
32
CV
CV<5%
CV<5%
Heating Temp.
Room Temperature -- 120℃
Room Temperature --120℃
Temp. accuracy
±1℃
±1℃
Operating Surface
7” Touch screeen w/3 shorcut
key and mouse
7” Touch screeen w/3
shorcut key and mouse
Program Capacity
Pre-installed 8 program and
able to store max. 100 program
Pre-installed 8 program and
able to store max. 100
program
Program
Management
New, edit, save as, delete,
model program
Create, edit, save as,
delete, model program
Extendable terminal
USB and ethernet port
USB and ethernet port
Network
Extendable ethernet remote
control and Wireless Wifi
Extendable ethernet remote
control and Wireless Wifi
Sterilization
UV sterilization
UV sterilization
Venting
Fan
Fan
Data Storage
Store with SD card
Store with SD card
Max. Input wattage
450W
450W
Dimension
(W×D×H)
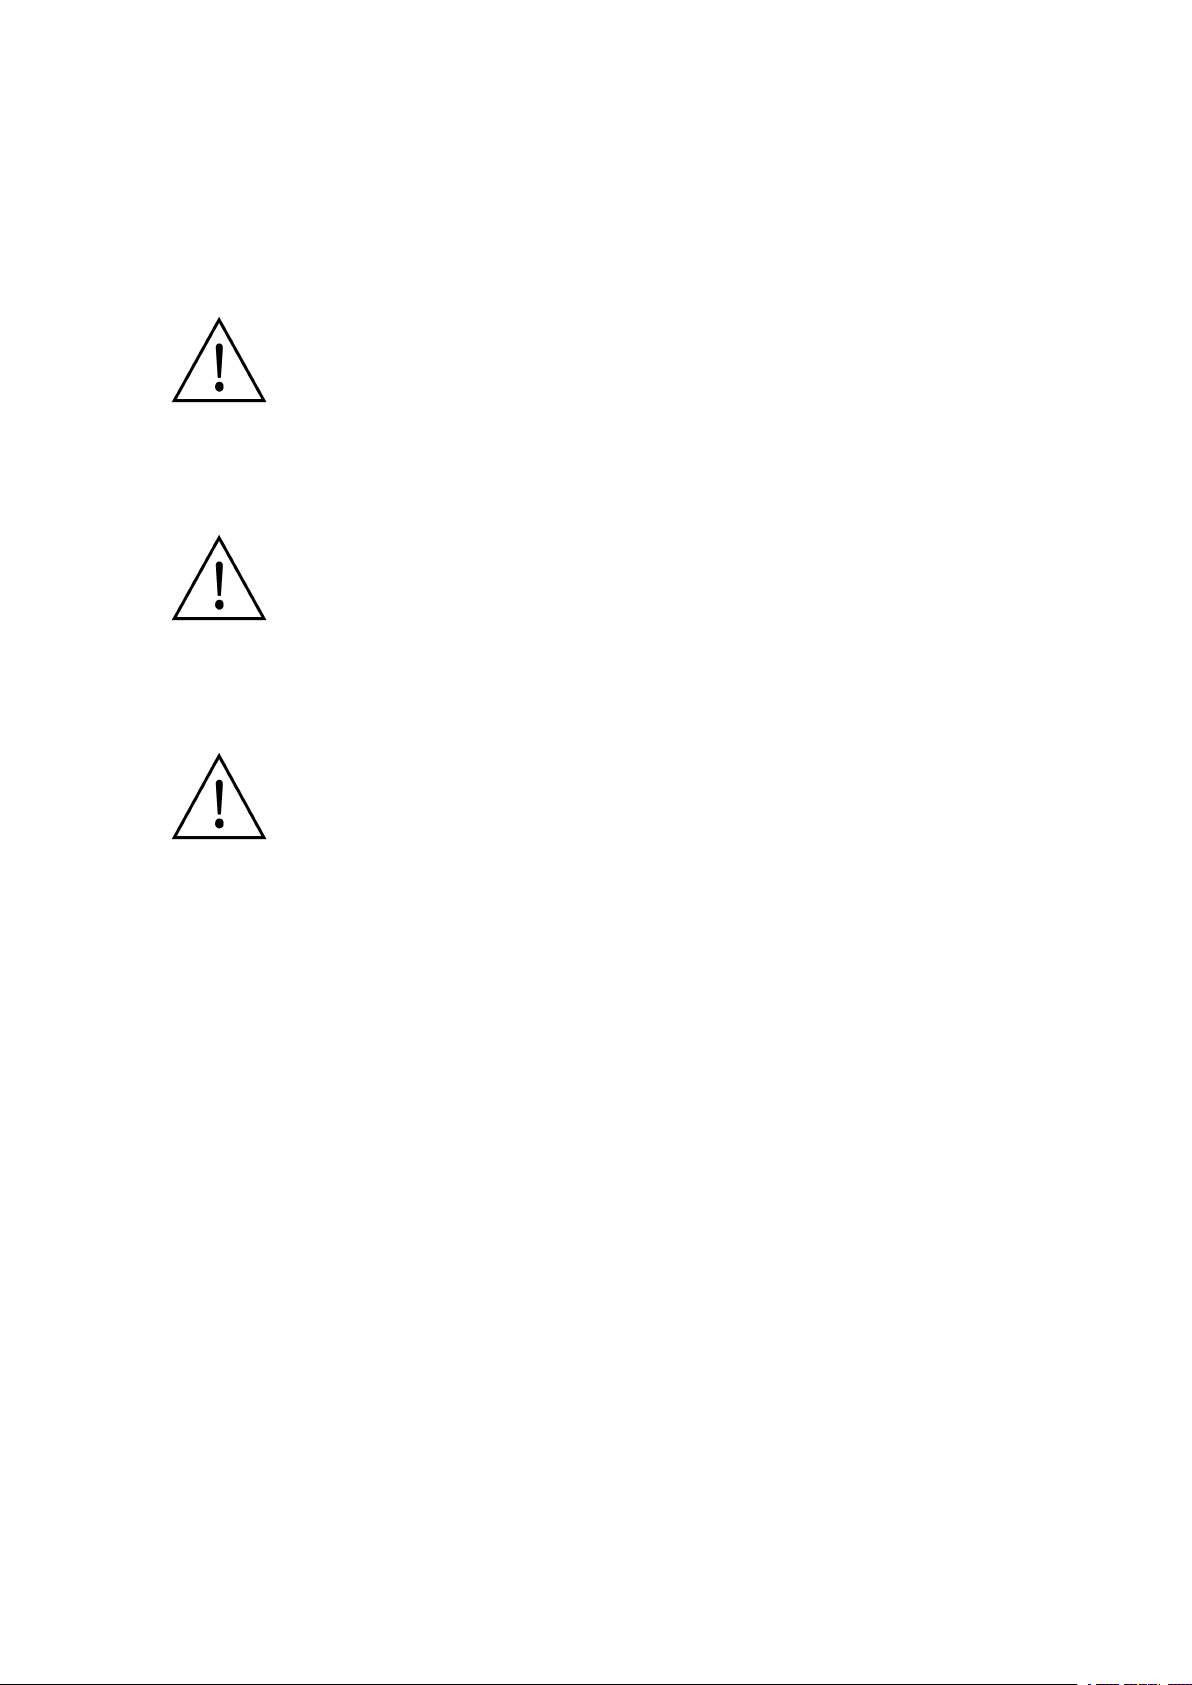
400mm×520mm×450mm
400mm×470mm×450mm
Weight(kg)
30
28
─3─
3. Overall Dimension

─4─
Chapter 3 Product Introduction
This chapter basically introduce the instrument structure, operation buttons, display panel
as well as the preparations before operate. For the first time user, please make sure to read this
chapter before start.
1. Structure
1.1. Front
1.2. Back
Display
screeen
Shortcut
key
Operation Window
Socket
Fuse
Power Switch
USB port
Ethernet port
Debuggling port
Fan

─5─
1.3. Auto-Pure 20A & Auto-Pure 20B Inside view
Note: The only difference between the experiment module of Auto-Pure 20A and
Auto-Pure 20B is the shape of the heating strip.
1.4. Auto-Pure 32A Inside view
2. Operation panel
Display screen: Operate by touch screen or mouse which connect with USB port
TAB: Select for the shortcut program
RUN: Run for the shortcut program
STOP: Stop operating
Magnetic rod
(Over the magnetic rod cover)
Magnetic rod cover stand
Drawer
Heating strip
UV light
(top inside)
Magnetic rod
(Over the magnetic rod cover)
Fan
(bottom inside)
Magnetic rod cover stand
Drawer
Heating strip
UV light
(top inside)
Fan
(bottom inside)
Display screen
TAB
RUN
STOP

─6─
Chapter 4 Operation
1. Preparation
Take out the instrument from packing carton and tear off the tape on the edge of operation
window, then open it and take out the foam. Screw out the screw of position ①as below and
take out the baffle and release the drawer.
Note: Be careful in operating or the magnetic rod will be broken.
2. Connect the power
Connect one end of power cord to the instrument socket and the other to power
(AC200~240V), then turn on the power switch.
3. Install the reagent kit
3.1 Install the customized reagent kit for Auto-Pure 20A & Auto-Pure 20B.
Open the drawer and mount the customized reagent kit on the heating strip, make sure the
sample well marked with 1 should be on the left side, then push back the drawer slowly.

─7─
Note: The shape of customized reagent kit of Auto-Pure 20B is different from
Auto-Pure 20A, while the installation is the same.
3.2 Install the 96 well reaction plate on Auto-Pure 32A.
Take out the drawer and put the 96 well reaction plate which already filled with samples
mounted on the locating slot, make sure the plate with chamfering should be on the left side,
then push back the drawer slowly.
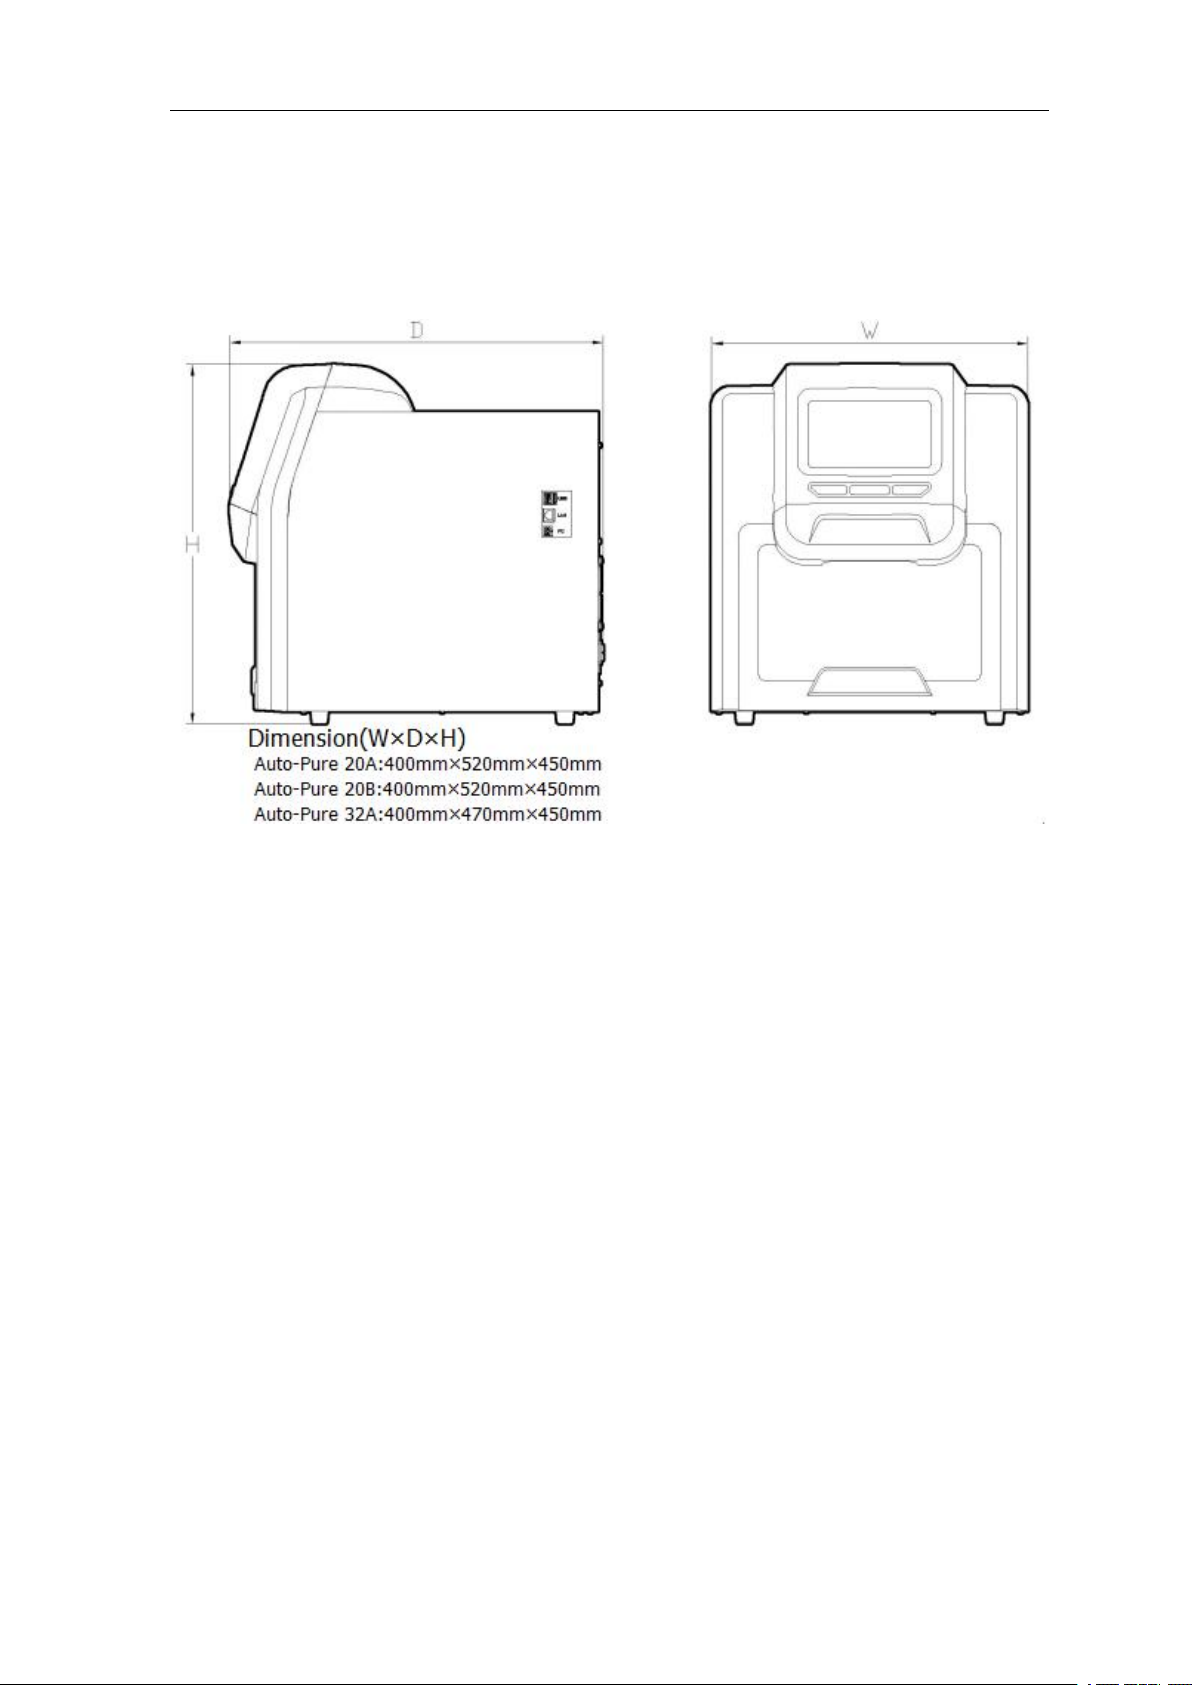
4. Install the magnetic rod cover
4.1 Install the magnetic rod cover for Auto-Pure 20A & Auto-Pure 20B
Insert the magnetic rod cover completely on the mounting groove, and the installation
Customized reagent kit
96 well reaction plate
─8─
quantity depends on the reagent kit number.
Note: The installation of magnetic rod cover between Auto-Pure 20A and Auto-Pure
20B is the same.
4.2 Install the magnetic rod cover for Auto-Pure 32A
Insert the magnetic rod cover completely on the mounting groove, and the installation
quantity depends on the reagent kit number.
Auto-Pure 20A
Auto-Pure 20B
Magnetic rod cover
Auto-Pure 32A
Magnetic rod cover

─9─
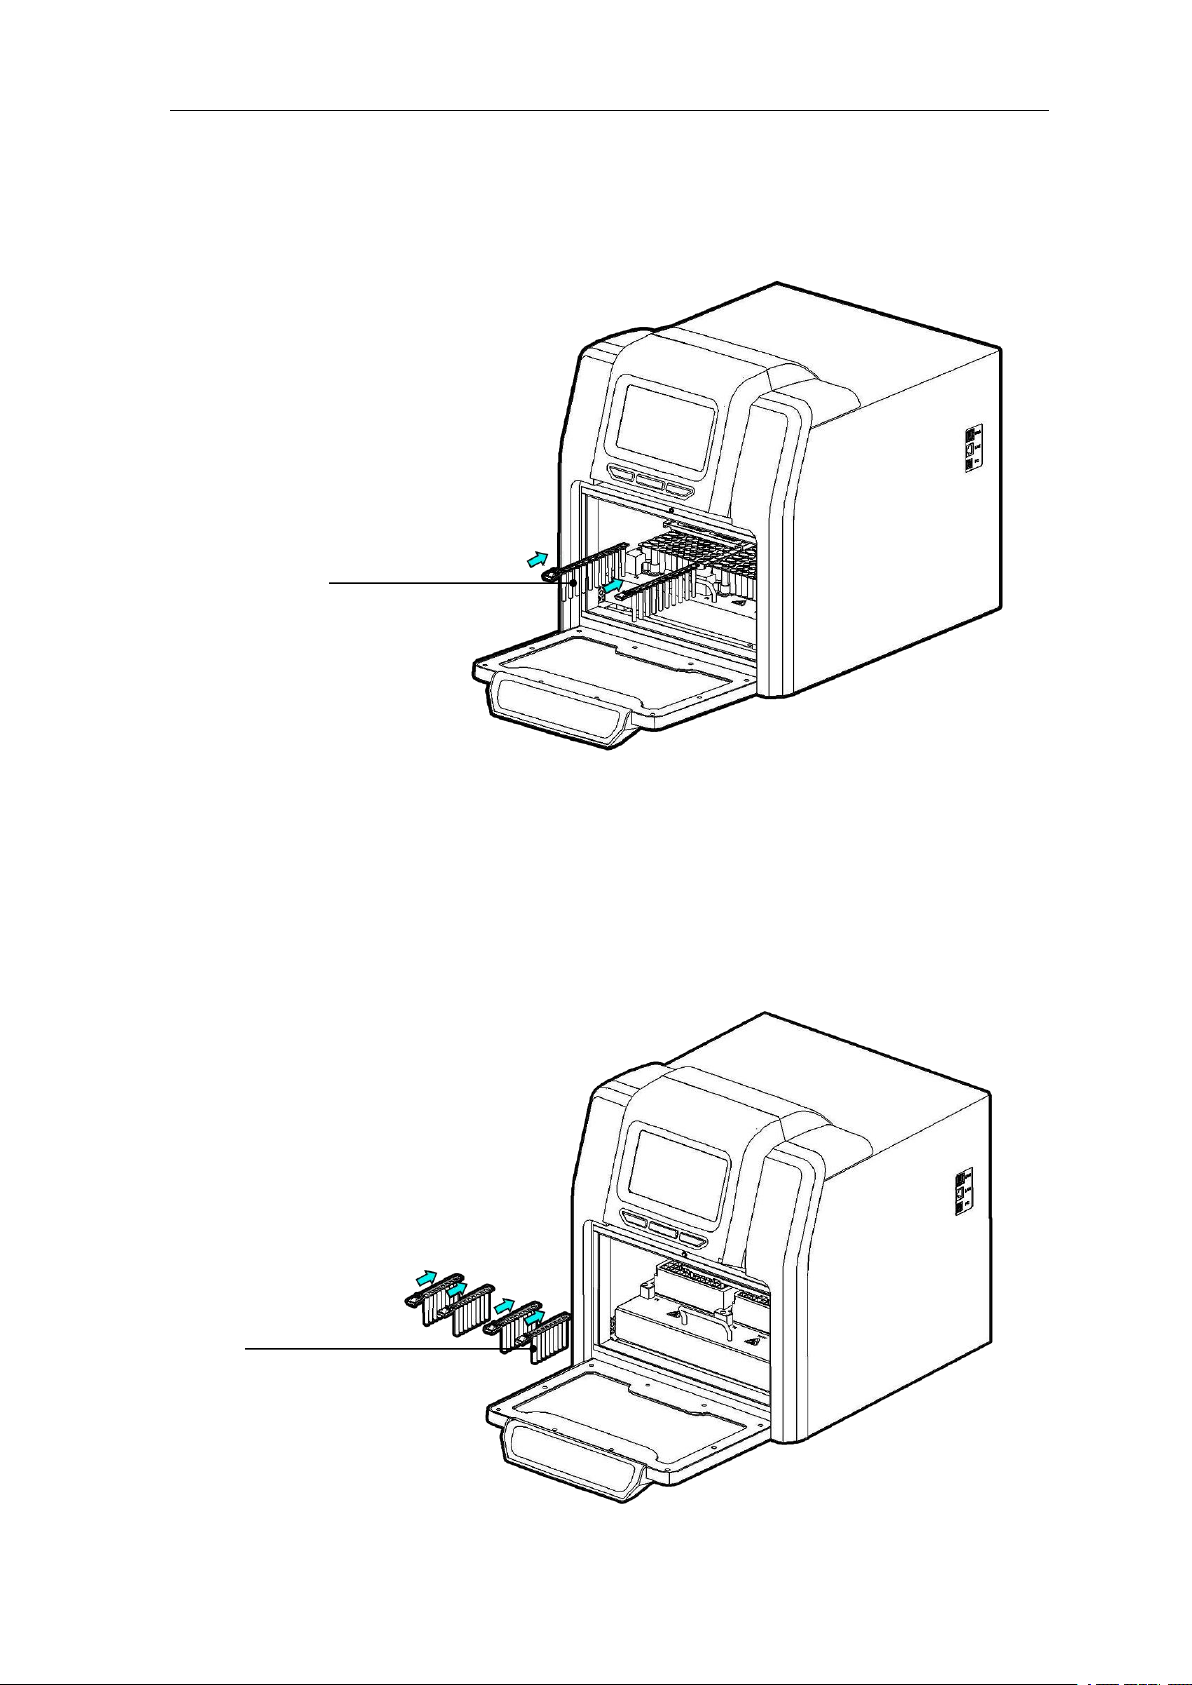
5. Remove magnetic rod cover
Press the button and take out the magnetic rod cover as per below photo.

─10─
6. Operation
6.1 Start-up Interface
Turn on the instrument and make sure the drawer is closed before start, the screen will
display the start-up interface.
After start, it will enter into the shortcut mode as below:
6.2 Program Run
6.2.1 Shortcut mode

─11─
Under the shortcut mode, select the program needed and click “Run”, it will enter into the
program run interface.
The program can also be selected by press “Tab” button on the panel and then press “Run”
for start or “Stop” for terminate.
Auto-Pure 20A Run interface
Auto-Pure 20B Run interface

─12─
Auto-Pure 32A Running interface
On the left side, it shows the current step info., when the exact reagent position start to run,
then this position will be highlighted, and there will be temperature display on the position of
heating function. The progress bar will display the progress and there’s also left time display on
the top right corner.
Click “Pause” to pause or continue the program.
Click “Stop”, the program will stop and there will be check box. Click “Cancel”, program will
be continue and click “OK” the program run will be back to original place and the “Stop” button
will change to “Run Again”. Click “Run Again” to continue the program.
Click “Back” to return the previous menu.
Remark: If the drawer is open during operation, there will be below message box
and the device will stop to run, and the instrument will continue to run only after the
drawer is closed.

─13─
6.2.2 List mode
Select the program and click "Run" to enter into the run interface.
Click “View” to enter into the check interface.

─14─
Click “Run” to enter the running interface.
Click “Option” to view the parameter setting of the program.
Click “Back” to previous interface.
6.2.3 Lamp
At the bottom of interface, the icon “ ” shows that the lamp is on,and the icon “ ”
shows that the lamp is off. Click this icon to change the state of the lamp.
6.3 Program Management
Click “Manage prog” into the surface of program management
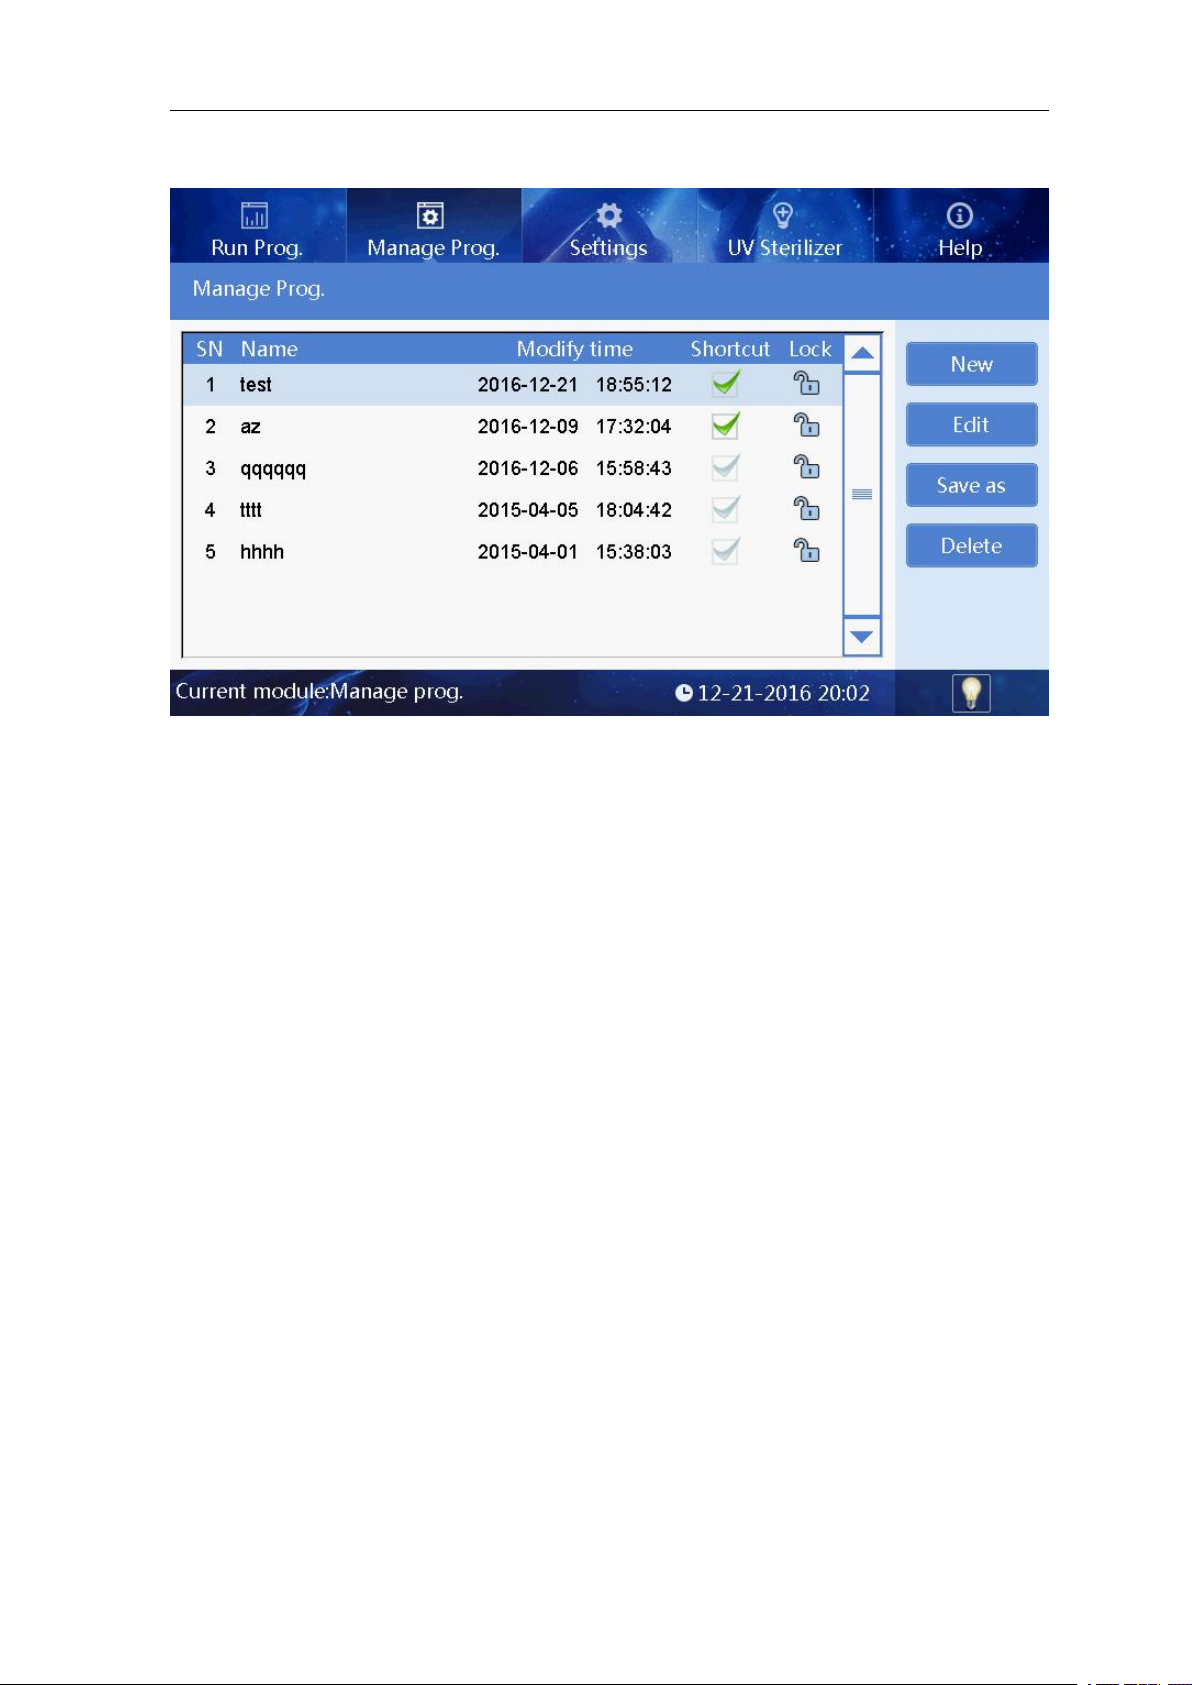
─15─
Other manuals for Auto-Pure Series
3
This manual suits for next models
3
Table of contents
Other Allsheng Laboratory Equipment manuals


