Altapure AP-4 Series User manual

READ AND SAVE THESE INSTRUCTIONS
AP-4 Series
Disinfection System
User Guide

100-6262_R5 AP-4 User Guide Release Date: 4/28/20 2
CAUTION
RISK OF ELECTRIC SHOCK
DO NOT OPEN COVERS
ATTENTION
RISQUE DE CHOC ÉLECTRIQUE
NE COUVRE PAS OUVRIR
Contact an authorized service technician for repair or maintenance of this unit. NEVER
attempt to open the covers or perform repairs on any internal components. CALL
YOUR SERVICE REPRESENTATIVE FOR HELP! 303-838-7320
FOR YOUR RECORDS
Fill in the important items below for future reference:
Important Information
Model #
Serial #
Service Representative
Name
Service Representative
Phone Number
Emergency Response
Number
Date of Release
PLEASE READ AND UNDERSTAND THIS MANUAL COMPLETELY BEFORE
OPERATING THE EQUIPMENT
This guide will provide you proper procedures to use and maintain your AP-4 system. The Altapure
AP-4 is safe when used as directed. Care should be taken to follow all operating instructions.
If you have any questions after reading this manual, please contact your Unity-Healthcare Solutions
sales representative 303-838-7320.

100-6262_R5 AP-4 User Guide Release Date: 4/28/20 3
Table of Contents
Warnings ....................................................................................4
Specifications..............................................................................5
Operating Instructions.................................................................6
Cleaning .....................................................................................15
Maintenance...............................................................................15
Troubleshooting..........................................................................16
Accessories ................................................................................16
Warranty.....................................................................................16

100-6262_R5 AP-4 User Guide Release Date: 4/28/20 4
WARNINGS
Read all instructions before using equipment.
•To prevent injury to the user or other people and property damage, the following instructions must be followed.
•Incorrect operation due to ignoring instructions may cause harm or damage.
CAUTION
RISK OF ELECTRIC SHOCK
DO NOT REMOVE COVERS
CAUTION: RISK OF ELECTRIC SHOCK. DO NOT REMOVE COVERS.
ATTENTION: RISQUE DE CHOC ÉLECTRIQUE. NE COUVRE PAS OUVRIR.
WARNING: This system must be properly grounded.
The power cord of this system is equipped with a three-prong grounding plug. To minimize the risk of electric shock, use the plug only
with a standard 20A three-slot grounding wall power outlet. If the power outlet does not match the plug completely, have a qualified
electrician replace the outlet before you use the equipment. DO NOT USE AN ADAPTER.
WARNING: Do not cut or remove the grounding prong from the power plug.
WARNING: If you have any doubt whether the system is properly grounded, have the wall receptacle and circuit checked
by a qualified electrician.
WARNING: Do not disassemble or modify any part of this machine.
WARNING: This system must be operated on a level surface. Avoid bumping or moving the machine while in operation.
WARNING: Do not block the air inlet or outlet.
WARNING: Close and seal all doors, windows and other outside openings to the room including ventilation ducts.
WARNING: Do not operate if room temperature is below 60°F (15.5°C) or above 100°F (37.8 °C).
WARNING: Do not operate with wet hands or in a damp environment.
WARNING: Make sure the system is set correctly for the area you want to disinfect.
WARNING: Use a soft cloth to clean. Do not use wax, thinner, or a strong detergent.

100-6262_R5 AP-4 User Guide Release Date: 4/28/20 5
SPECIFICATIONS
AC Supply: 120V 16A 60Hz
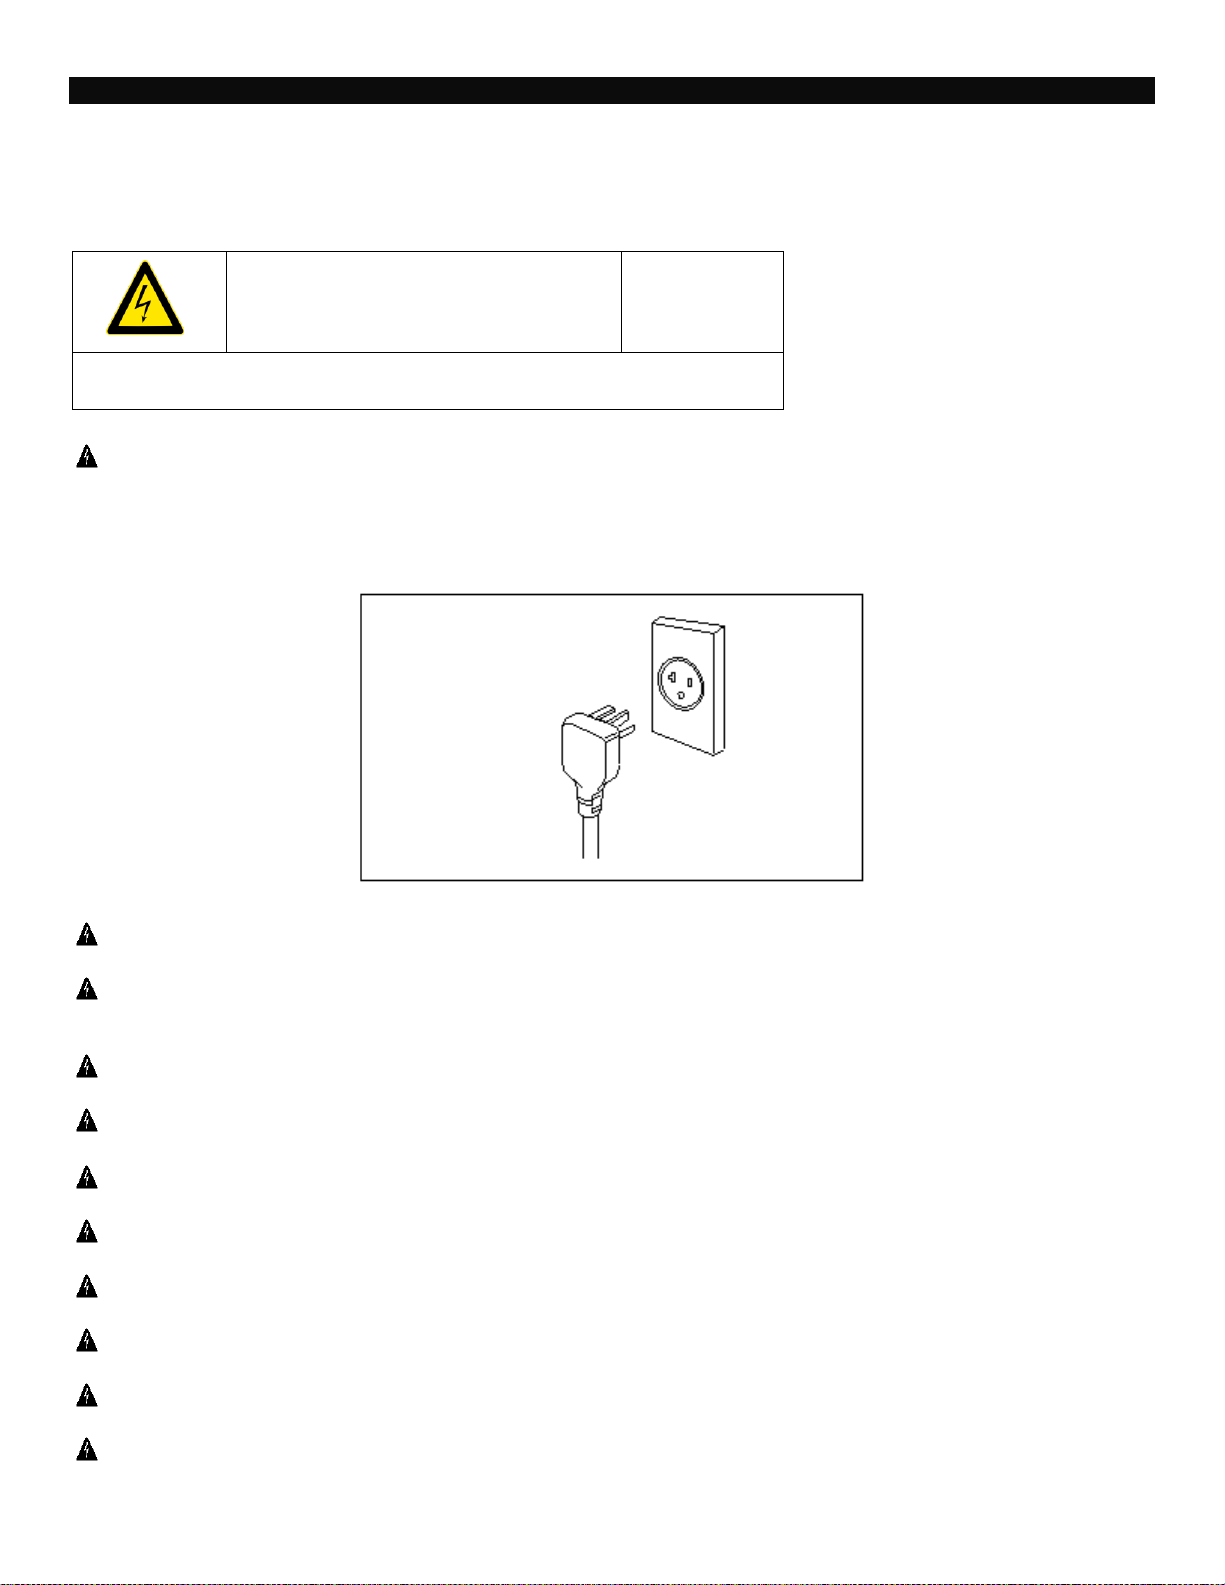
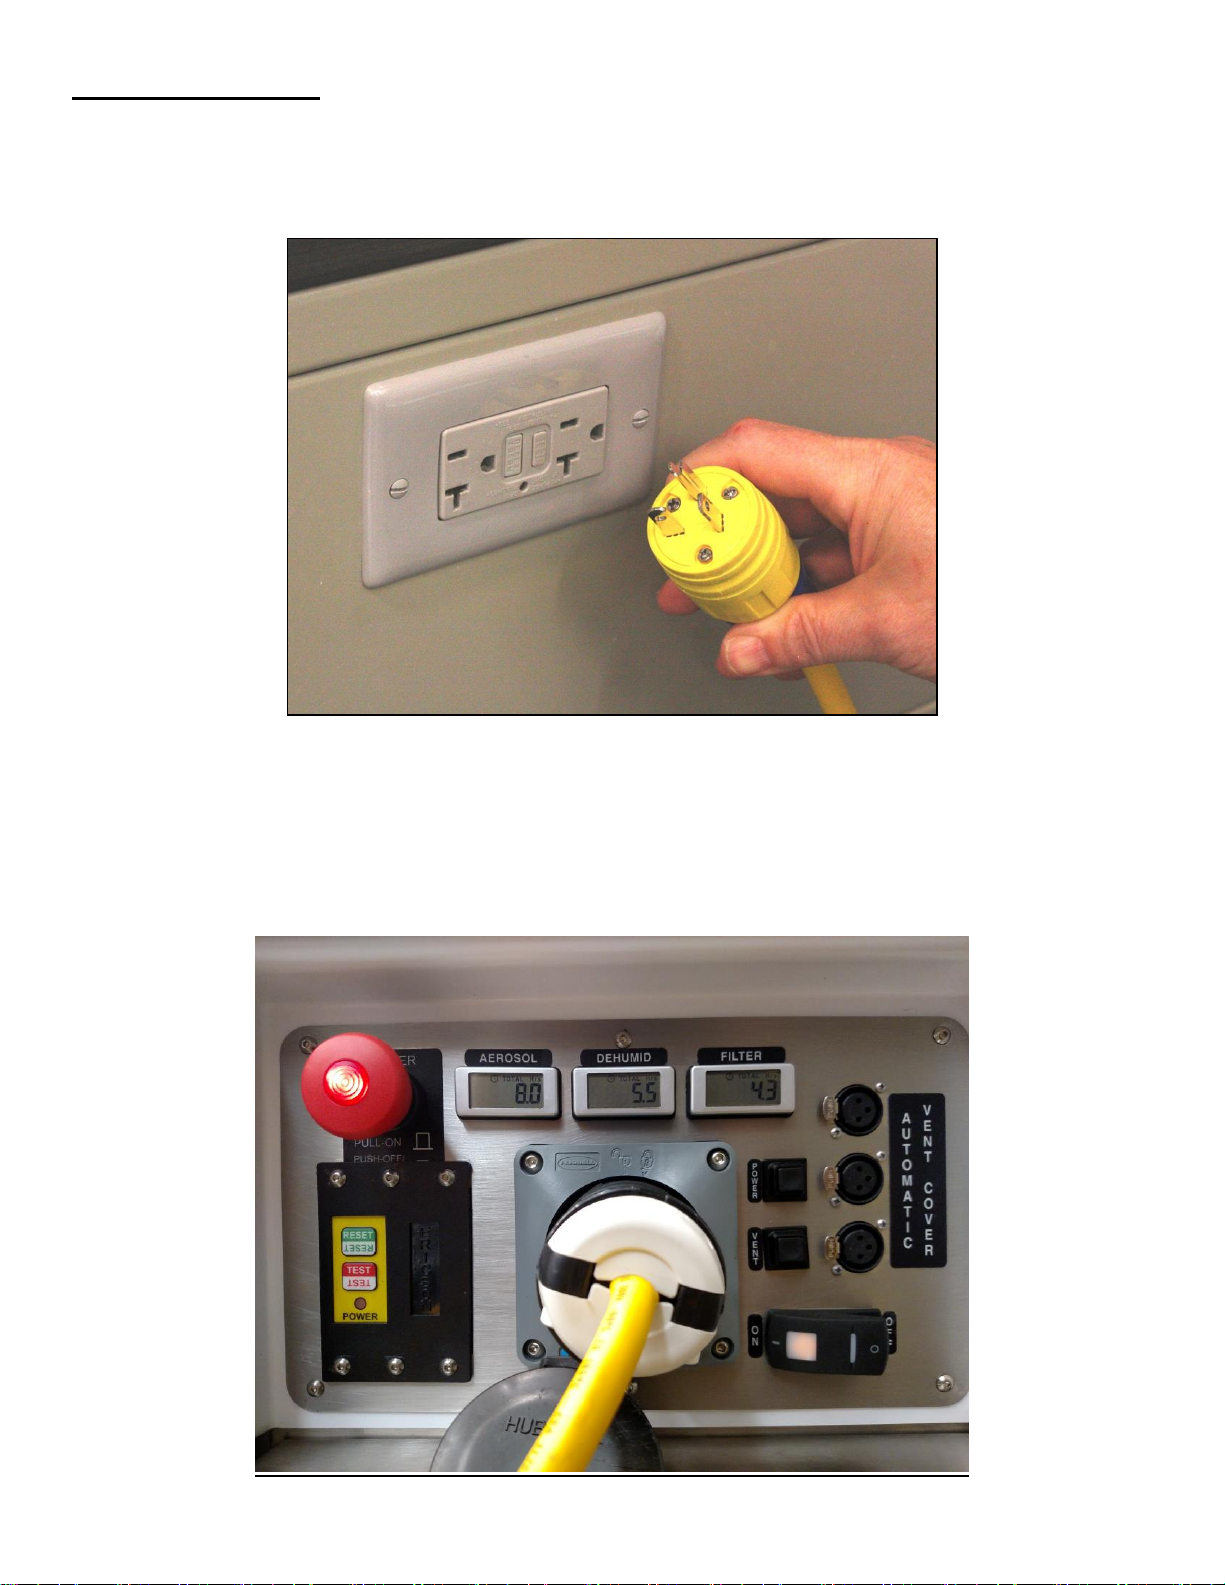
Use only the power cord supplied with the equipment. Connect only to a dedicated 20A branch circuit outlet.
Failure to do this will result in nuisance tripping of the circuit breaker and may result in a risk of fire or other
damage to the electrical system.
PRIOR TO OPERATION
PRIOR TO OPERATION
1. Plug in the power cord properly.
2. Use a dedicated circuit.
3. Do not use an extension cord.
4. Do not start/stop operation by plugging/unplugging the power cord.
USAGE
1. Do not expose occupants, pets, or plants to direct contact with the disinfecting solution in either liquid or aerosol form.
2. Do not ventilate room when the system is being used.
3. Do not use this system for any purposes other than those specified by Altapure or the sales representative. Such
usage could damage the system or other items.
CLEANING AND MAINTENANCE
1. When cleaning the unit, make sure that the power switch is turned off and UNPLUG THE POWER CORD FROM THE
WALL OUTLET.
2. Wipe down the outside of the machine with a soft damp cloth.
3. Any further maintenance or service must be performed by an authorized service technician only.
SERVICE
Note: The AP-4 contains expensive, proprietary, and delicate electronics.
Do not attempt any repairs under any circumstances. Call 574-485-2145 option 1
In case of any problem, contact your authorized service agent. Failure to do so may result in bodily injury and economic
loss beyond the value of the machine.
OPERATING INSTRUCTIONS
ROOM PREPARATION
Prior to disinfection
1. Perform normal janitorial room cleaning.
2. Remove bedding from room.
3. Ensure all sterile packaged items are in air tight containers or have been removed from room.
4. Seal all vents using correct room sealing apparatus.
5. Place system in center of room. Allow at least 18 inches of space on all sides of the unit for good air circulation.
Locate your system as close to the center of the room as possible. Ensure the air-intake of the machine is clear of
obstructions and the machine exhaust port is not blocked.
6. Place air reprocessor in room. Allow 18 inches of space in front of air reprocessor vents.
7. Place warning sign outside room.
Room is now ready to be disinfected.

100-6262_R5 AP-4 User Guide Release Date: 4/28/20 6
SYSTEM OPERATION
1. Plug the AP-4 into a 20A 120VAC/60Hz outlet. NOTE: The 20A plug on the AP-4 has one
horizontal “blade” and one vertical “blade” to match up with only a 20A service outlet.
2. Power up the AP-4 by switching the breaker switch to “ON” (the orange indicator should glow),
and pulling out on the Emergency Stop/Power Switch (the red center of the button should
glow). Note that only the Red Power Switch need be pressed in to power down the machine,
the other switch can be left in the “ON” state.

100-6262_R5 AP-4 User Guide Release Date: 4/28/20 7
3. Turn the Control Tablet on by holding down the power switch on back side of the top left corner
of the screen.
4. Once the Control Tablet is booted up it will show the screen below. It may take a few seconds
to connect with the AP-4 unit so please wait until the “Ready” appears in the upper left corner.
This indicates that it is communicating properly with the main unit. Verify the battery charge is
above 20%. If needed, connect to the charger outside the room.

100-6262_R5 AP-4 User Guide Release Date: 4/28/20 8
5. If the Water or Concentrate show low (yellow bar) you will need to fill it prior to starting a cycle.
To add water, remove the black cap labeled “WATER ONLY”. Fill with reverse osmosis (RO)
and/or deionized (DI) water until the display shows close to 100%. Add 1 mL of Altacare
concentrate per gallon of water to assure freshness. Make sure to add some water after
the concentrate is added to rinse it down the filler tube. Do not use tap water or filtered
drinking water. Replace the cap.
6. To add Altacare Concentrate, remove the black cap labeled “ALTACARE ONLY”.
IMPORTANT: Wear appropriate latex gloves and eye protection any time you are
handling the concentrated Altacare solution.
Carefully remove the cap from the Altacare bottle and pour into the fill spout. It is preferred to
wait until the Concentrate level is below 10% so that the entire contents of the bottle (1L) can
be added to avoid partial bottles needing to be stored. When the bottle is empty, rinse and
discard or recycle
7. If the Mixture shows EXPIRED, it will need to be drained before you can start a cycle. Press
the “Drain Mix Tank” button and allow it to drain into the drain bottle. Once it is fully drained, it
will reset the Mixture time to 72 hours.

100-6262_R5 AP-4 User Guide Release Date: 4/28/20 9
8. Remove the drain bottle by pressing the gray button on the valve and lifting up on the hose to
disengage the connector. Lift the hose to clear the cap and slide the drain bottle out of the
pocket. Dispose of the fluid by pouring into any sink or commode and flushing with water.
Place the drain bottle back into the pocket and connect the tube by pressing the fitting back
into the valve until you hear the retainer snap into place.
9. Once the fluids and mixture are OK, press the “Start Cycle” button.

100-6262_R5 AP-4 User Guide Release Date: 4/28/20 10
10.Log in with your username. (Must match as set up by the administrator.)
11.Enter the room number to be treated. (Must match as set up by administrator.)

100-6262_R5 AP-4 User Guide Release Date: 4/28/20 11
12.Select the appropriate reason for treating the room and then press "Enter."
13.Verify that the cycle times and room size are appropriate for the room you are disinfecting or
set custom times if needed to properly treat the space. (See room size entry section below.)
Then press the “Confirm and Continue” button.

100-6262_R5 AP-4 User Guide Release Date: 4/28/20 12
14.The filling and preheating process will take a few minutes to complete at this point. During
this time you can set up the automatic vent covers and make sure all vents and smoke alarms
are covered and sealed. Also, close the door and seal it with tape as the next step will begin
filling the room with the aerosol treatment.
15.Once preheating is complete, the bar will turn green and the “Start Process” button will
become active. Double check to make sure everything is sealed and ready, then press the
“Start Process” button.

100-6262_R5 AP-4 User Guide Release Date: 4/28/20 13
16.This will start the countdown on the next screen showing the time in each phase of the cycle
and the total time remaining. It is recommended that the operator stay close by through the
deploy portion of the cycle to make sure there are no issues with the aerosol leaking into the
hallway or anywhere else. Then the operator can leave and come back at the end of the cycle
as indicated by the Total Remaining Time countdown.
17.Once the cycle is complete, each phase will show “DONE” and the status at the bottom will
display “Cycle Complete”. At this point, press the “exit button to return to the main screen and
proceed to open the door, tear down the system setup, and ready the room for the next
patient.

100-6262_R5 AP-4 User Guide Release Date: 4/28/20 14
18.When the cycle is complete, check the fluid level in the drain bottle. If it is over ½ full, remove
and empty the bottle as detailed in step 8 above.
Room size entry:
If the room size has not already been set up in the control tablet, you will be presented with the
screen below. You can enter in the information for the room by selecting each field and then
typing in the value for that field. If you know the cubic feet of the room you can just enter that
directly. Otherwise fill in the Width, Length and Height and then press "Continue". The size
will be calculated and stored for that room. Press "Continue" again to proceed to the Fill and
Preheat step.

100-6262_R5 AP-4 User Guide Release Date: 4/28/20 15
If you wish to use presets or enter custom cycle times, press the "Choose Preset" button. On
this screen you can select one of the preset cycles or set custom times for each portion of the
cycle. Once selected, press the "Enter" button to proceed to the Fill and Preheat process.
.
CLEANING
▪Remove the POWER CORD FROM THE WALL OUTLET before cleaning the system.
▪You may use a damp cloth to wipe outside of the machine.
MAINTENANCE
The AP-4 requires no customer maintenance other than just periodic cleaning of the outside and
making sure to add 1mL of Altacare per gallon of water when filling the water tank.

100-6262_R5 AP-4 User Guide Release Date: 4/28/20 16
TROUBLESHOOTING
THE USER SHALL NOT ATTEMPT TO MAKE ANY REPAIRS TO THE MACHINE UNDER ANY
CIRCUMSTANCES. ALL REPAIRS MUST BE MADE BY TRAINED SERVICE TECHNICIANS.
If the unit does not turn on:
a. Check the GFCI power indicator on the control panel to determine if power is getting to the
machine.
b. If not on, make sure unit is properly plugged into wall outlet.
c. Contact facilities personnel to ensure that outlet is functioning properly.
d. Push reset button on the GFCI.
e. Check the power switch indicator. (It will illuminate dimly so surround it with your hand to
see properly.)
f. Make sure the battery in the Control Tablet is fully charged.
g. Call your service representative with any further questions. (303-838-7320)
ACCESSORIES
Part Number
Description
100-1644
Standard Vent Cover (24" x 24")
100-1645
Small Vent Cover (12" x 12")
100-1652
Custom Vent Covers (up to 4 sq ft.)
100-1658
Vent Bypass Kit
110-0100
Auto Vent Cover Tripod
110-1489
Manual Vent Cover Pole
110-1490
Vent Cover Tripod Extension
100-6220
Smoke Detector Cover
100-1629
Control Tablet
100-1641
Battery Charger for Control Tablet
Consumables
900-0390
Chemical, Altacare (Case of 4 Liters)
Order Placement
Email (preferred):
Phone: 303-838-7320
LIMITED WARRANTY
All equipment is covered by a Twelve (12 ) month parts and labor warranty, excluding damage or
failure caused by misuse of the product. Altapure warrants to the customer that the equipment will
perform in accordance with Altapure’s specifications when used for the purpose for which it was
intended: high level disinfection only. Altapure’s sole and exclusive obligation under this
warranty and the customer’s sole and exclusive remedy, shall be, in Altapure's sole discretion, repair
or replacement of the defective or damaged component provided that it is notified within 24 hours
of such failure.

100-6262_R5 AP-4 User Guide Release Date: 4/28/20 17
CUSTOMER AGREES THAT THE EXPRESS WARRANTY ABOVE IS EXCLUSIVE AND IN LIEU
OF ALL OTHER WARRANTIES, INCLUDING WITHOUT LIMITATION ANY IMPLIED
WARRANTIES OF MERCHANTABILITY OR FITNESS FOR A PARTICULAR PURPOSE.
ALTAPURE HEREBY DISCLAIMS AND EXCLUDES ALL OTHER EXPRESS OR IMPLIED
WARRANTIES. Any oral or written description of the Equipment is for the sole purpose of
identifying the Equipment and shall not be construed as an express warranty. Prior to using or
permitting use of the Equipment, the customer shall assume all risk and liability whatsoever in
connection therewith. IN NO EVENT SHALL ALTAPURE BE LIABLE FOR INCIDENTAL,
COMPENSATORY, PUNITIVE, SPECIAL, OR CONSEQUENTIAL OR OTHER DAMAGES.
ALTAPURE'S AGGREGATE LIABILITY WITH RESPECT TO DEFECTIVE EQUIPMENT AND THIS
AGREEMENT SHALL BE LIMITED TO THE AMOUNT OF MONEY PAID TO ALTAPURE.
End of Manual
UNITY-HEALTHCARE SOLUTIONS
25967 CONIFER RD., CONIFER, CO 80421
PH: 303-838-7320 ~ Fax: 303-838-4550
http://www.unity-healthcare.com/
Table of contents
Popular Cleaning Equipment manuals by other brands

IBS Scherer
IBS Scherer BK-50 Translation of the original instructions

Wohler
Wohler Snap & Sweep manual

Sprintus
Sprintus CRAFTIX M Original user manual

High Street TV
High Street TV Turbo Scrub Deluxe Kit instruction manual

Caviblaster
Caviblaster 0520-E Operation & maintenance manual

Alfalaval
Alfalaval Gunclean Toftejorg TZ-75 instruction manual