Alto Carpetmaster 579 User manual

Model 579
Carpetmaster
Operator's
Manual
Form No. 78045B 8/98 CLARKE TECHNOLOGY Printed in the U.S.A.
READ THIS BOOK
This book has important information for the use and safe operation of this machine. Failure to read this
book prior to operating or attempting any service or maintenance procedure to your ALTO machine could
result in injury to you or to other personnel; damage to the machine or to other property could occur as
well. You must have training in the operation of this machine before using it. If you or your operator(s)
cannot read English, have this manual explained fully before attempting to operate this machine.
Si Ud. o sus operadores no pueden leer el Inglés, se hagan explicar este manual completamente antes
de tratar el manejo o servicio de esta máquina.
All directions given in this book are as seen from the operator’s position at the rear of the machine.
For new books write to: ALTO U.S. Inc., 2100 Highway 265, Springdale, Arkansas 72764.
E

CLARKE TECHNOLOGY Operator's Manual 579 Carpetmaster Page 2
TABLE OF CONTENTS
OperatorSafetyInstructions................................................................................................... 3
HowtoPrepareTheMachineFor Operation:
HowToAdjustTheBrush .......................................................................................... 4
How To Use Your MachineAsATank Type Vacuum Cleaner .................................... 4
Instructions For Connection To The Power Supply & Electrical Ground .................... 5
ExtensionCords ....................................................................................................... 5
HowToOperateYour Machine:
HowToStartThe Machine ........................................................................................ 6
HowTo StopThe Machine......................................................................................... 6
Circuit Breaker ......................................................................................................... 6
Maintenance:
HowToCleanTheFilter Bags.................................................................................... 6
HowTo CleanThe Foam Filter ................................................................................... 7
HowToInstallThe Micro-Staphicidal®Filter ............................................................... 7
How To Clean The Micro-Staphicidal®Filter .............................................................. 8
How To Check For Worn Brushes ............................................................................. 8
HowToReplaceTheBrush........................................................................................ 8
HowToOpenTheBottomCover ................................................................................ 8
HowToCleanTheAir Tunnel ..................................................................................... 9
HowToAdjustTheBrush DriveBelt ........................................................................... 9
HowToRemoveTheDriveMotor ............................................................................... 10
MaintenanceOfTheVacuum Motor........................................................................... 10
HowToCheckThe CommutatorAndThe Carbon Brushes ........................................ 10
How To Correct Problems In The Machine................................................................. 11
Drawings and Parts List:
Model 579 Wiring Diagram and Electrical Schematic................................................ 12
Model579 Upper-Half Drawing .................................................................................. 14
Model579 Upper-Half Parts List ................................................................................ 15
Model579 Lower-Half Drawing .................................................................................. 16
Model579 Lower-Half Parts List ................................................................................ 17

CLARKE TECHNOLOGY Operator's Manual 579 Carpetmaster Page 3
OPERATOR SAFETY INSTRUCTIONS
WARNING AVERTISSEMENT ADVERTENCIA
DANGER: Failure to read and observe all DANGER statements could result in
severe bodily injury or death. Read and observe all DANGER state-
ments found in your Owner's Manual and on your machine.
WARNING: Failure to read and observe all WARNING statements could result in
injury to you or to other personnel; property damage could occur as
well. Read and observe all WARNING statements found in your
Owner's Manual and on your machine.
CAUTION: Failure to read and observe all CAUTION statements could result in
damage to the machine or to other property. Read and observe all
CAUTION statements found in our Owner's Manual and on your ma-
chine.
DANGER: Failure to read the Owner's Manual prior to operating or attempting any service
or maintenance procedure to your machine could result in injury to you or to
other personnel; damage to the machine or to other property could occur as
well. You must have training in the operation of this machine before using it. If
you or your operator(s) cannot read English, have this manual explained fully
before attempting to operate this machine.
DANGER: Operating a machine that is not completely or fully assembled could result in
injury or property damage. Do not operate this machine until it is completely
assembled. Inspect the machine carefully before operation. Do not use as a
step or furniture, the machine could move causing injury.
DANGER: Machines can cause an explosion when operated near flammable materials and
vapors. Do not use this machine with or near fuels, grain dust, solvents,
thinners, or other flammable materials.
DANGER: Using a machine with a damaged power cord could result in an electrocution.
Do not use the machine if the power cord is damaged. To prevent damage to
the power cord, do not let the brush touch the power cord when the machine is
running. Always lift the power cord over the machine. Do not use the electrical
cord to move the machine.
DANGER: Electrocution could occur if maintenance and repairs are performed on a unit
that is not disconnected from the power source. Disconnect the power supply
before changing the brush or accessories or attempting any maintenance or
service. Maintenance and repairs must be done by authorized personnel.
WARNING: Operating a machine without observing all labels and instructional information could
result in injury or damage. Read all machine labels before attempting to operate.
Make sure all of the labels and instructional information are attached or fastened to
the machine. Get replacement labels and plates from your Clarke Technology distribu-
tor.
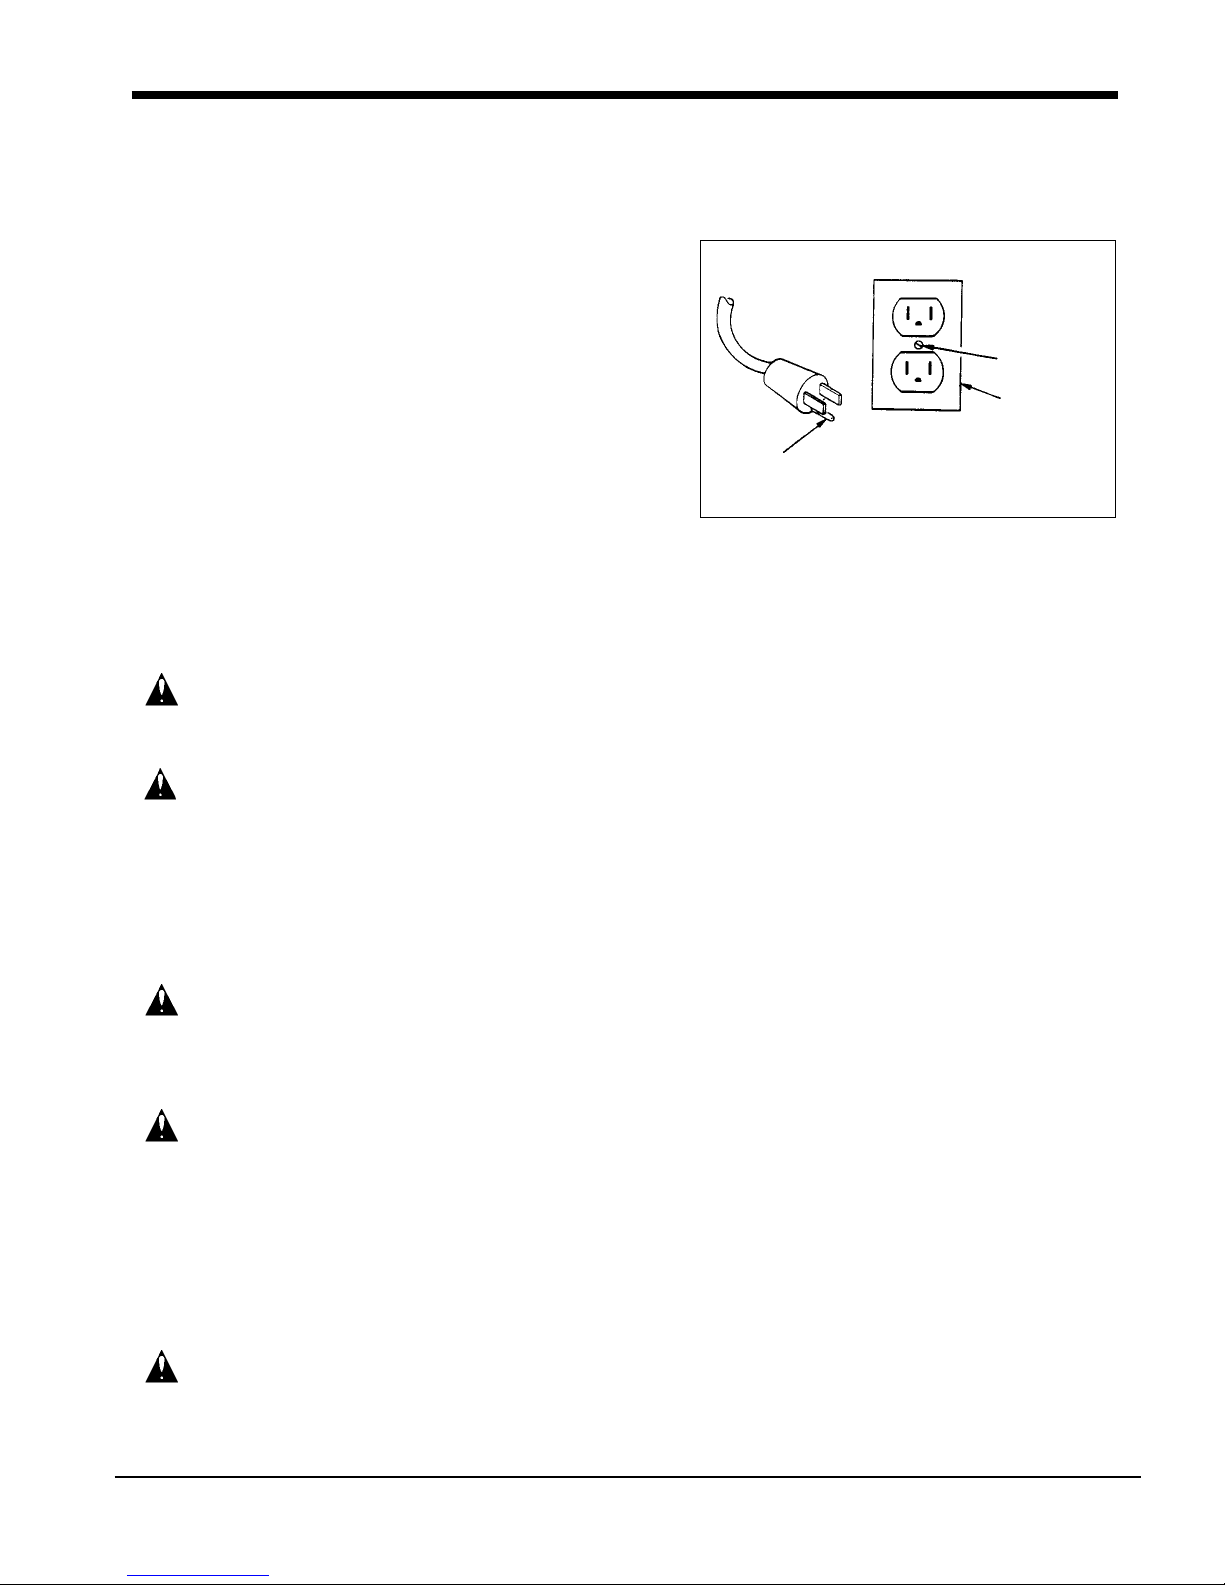
WARNING: Always use a three-wire electrical system connected to the electrical ground. For
maximum protection against electric shock, use a circuit that is protected by a ground
fault circuit interrupter. Consult your licensed electrician and/or contact your local
Clarke Technology distributor for assistance.
WARNING: To prevent electrical shock, do not use this machine on wet surfaces. Protect the
machine from rain, Keep the machine in a dry building. Always clean the machine
with a clean dry cloth.

CLARKE TECHNOLOGY Operator's Manual 579 Carpetmaster Page 4
HOW TO PREPARE THE MACHINE FOR OPERATION
WARNING: To prevent electric shock, do not vacuum
liquids or wet surfaces with this machine.
The Model 577 has five brush settings (1). The adjustment
lever (2) is at the rear of the machine. See Figure 1.
To set the brush height, do the following:
1. Place your foot behind one wheel.
NOTE: Do not push the handle release lever.
2. Pull back on the handle a little.
3. With your other hand, pull the adjustment lever.
4. Put theadjustmentleverin the "High" setting.
5. Move theadjustment lever towardthe"Low" setting.
6. When the brush comes in contact with the carpet, push
theadjustment lever inthedetent.
NOTE: Do not set the brush too low. Shag carpets are gen-
erally best cleaned by the brush in the highest setting.
CAUTION: Becareful when cleaning longshag, the car-
pet can go around the brush, and slow
or stop the brush.
HowTo UseYourMachineAsATankTypeVacuum Cleaner
Youcan useyourCarpetmasterasatanktypevacuumcleaner
to clean overhead and hard to reach areas. Get extension
tubes,hoses,wands,and attachmentsfromyour ClarkeTech-
nologydealer.
To attach the accessories to your Carpetmaster, follow this
procedure.
1. Pull the black standpipe hose (1) off the standpipe tube
(2). The hose is at the lower-right corner of the machine.
2. Slide the hose adapter (3) on the tube.
3. Slide the vacuum hose on the adapter (4). See Figure 2
The accessory switch is on the rear of the housing. To start
onlythevacuum motor, do the following:
1. Make sure the handle is in the vertical position.
2. Press the "Vac Only Switch." See Figure 3.
Figure 1
1. Five Brush Settings
2.AdjustmentLever
Figure 2
1. Black Standpipe Hose
2.StandpipeTube
3.HoseAdapter
4. Vacuum Hose
Figure 3
1. "Vac Only" Switch

CLARKE TECHNOLOGY Operator's Manual 579 Carpetmaster Page 5
120VOLT MACHINES
INSTRUCTIONSFORCONNECTION
TO THE POWER SUPPLY
ANDTHEELECTRICALGROUND
The machine must be connected to the electrical ground to
protect the operator from electric shock. The machine has
an approved power cord with three conductors and a plug
with three terminals. Connect the plug to a receptacle that
has three holes and is connected to the electrical ground.
For maximum protection against electric shock, use a cir-
cuit that is protected by a ground fault circuit interrupter.
Thegreen (or green andyellow)conductor in the cordisthe
ground wire. Never connect this wire to any terminal other
thanthe ground terminal.
This machine uses a 120 volt AC 60 cycle electrical circuit.
Make sure you have the correct frequency and voltage be-
fore connecting the power cord to an outlet. The machine
has a plug as shown in Figure 4. If a receptacle connected
tothe electricalground as shownin Figure4is notavailable,
haveone installedbyanelectrical contractor. Donot use an
adapter.
WARNING: To prevent possible electric shock,
protect the machine from rain. Keep
the machine in a dry building.
WARNING: To prevent possible electric shock,
always use a 3-wire electrical system
connected to the electrical ground.
Formaximum protectionagainst elec-
trical shock, use a circuit that is pro-
tected by a ground fault circuit inter-
rupter. Consult your electrical con-
tractor.
WARNING: Do not cut, remove or break the
ground pin. If the outlet does not fit
the plug, consult your electrical con-
tractor.
WARNING: Have worn, cut, or damaged cords
and plugs replaced by an authorized
service person.
EXTENSIONCORDS
Useonly anapproved extensioncordwith threeconductors,
aplug with three terminals,and a connector bodywiththree
holes. The machine has a power cord with wire size 16
AWG (AWG means American Wire Gauge).
WARNING: If you use an extension cord, use an
extension cord with minimum wire
size 16 AWG. Do not use an exten-
sion cord longer than 50 feet. Do not
join two extension cords.
Figure 4
PLATE
SCREW
OUTLET
MUSTBE
CONNECTEDTOTHE
ELECTRICALGROUND
GROUND
PIN

CLARKE TECHNOLOGY Operator's Manual 579 Carpetmaster Page 6
HOWTOOPERATE YOUR MACHINE
How To Start The Machine
The handle release lever is at the lower left rear corner of the
machine (1). See Figure 5.
To start the machine, do the following:
1. Usingyour foot, push therelease lever forward (1).
2. Lowerthe handle.
Thevacuummotor andthebrushdrivemotor willstartwhenthe
handleislowered. Toactivatethe vacuummotor only,push the
"Vac Only Switch," and lower the handle.
NOTE: When using the vacuum motor and the brush drive
motor, make sure the "VAC Only Switch" is in the off posi-
tion.
How To Stop The Machine
Tostopthevacuummotor and the brush drive motor, push the
handletotheuprightposition.
CircuitBreaker
TheModel577hasacircuitbreaker. If there is an obstruction
in the machine, the brush drive motor will stop. To restart the
motor,follow this procedure:
1. Make sure the handle is in the upright position.
2. Removethe electrical plug from the electrical outlet.
3. Put the machine on its side so that the right side is up.
4. Ifthere is an obstruction, remove the obstruction.
5. Put the machine in the upright position.
6. Put the electrical plug in the electrical outlet.
7. Thereset button isatthe lower rearofthe machine. Push
the reset button. See figure 6
MAINTENANCE
Thissection describes the procedures that must be done by a
personauthorized to do maintenance.
WARNING: To prevent electric shock, always re-
move the electrical plug from the elec-
trical outlet before doing any repairs or
maintenance to this machine.
How To Clean And Install The Filter Bag
WARNING: Do not put a filter bag in an incinerator
or fire. It could cause injury to the op-
erator by causing a fire.
Figure 5
1.ReleaseLever
Figure 6
1.Circuit Breaker Reset Button

CLARKE TECHNOLOGY Operator's Manual 579 Carpetmaster Page 7
Maintenance
How To Clean and Install The Filter Bag (cont)
CAUTION: Do not operate this machine unless a fil-
ter bag is in position. It could damage the
vacuum motor.
Whenreplacing the paper filter bags, follow this procedure:
1. When the bag is ¾ full, open the tank by pushing the knob
(1) on top of the tank. See figure 7
2. Lift out and discard the used bag.
3. Unfolda newpaperbag.
4. Hold the bag by the cardboard inlet tab (2).
5. Slidethe inlet overthestandpipe (3). Donot applypressure
to the back of the bag.
6. Closethe frontcover.
Whencleaningtheclothfilterbag,followthisprocedure:
1. Whenthe bag is¾full, open the tankbypushing the knob
on top of the tank.
2. Pull out the cloth bag.
3. Slide off the clip.
4. Removethe dirt from thebag.
5. Sweepthe insidesurface ofthe bagto removetheremain-
ing dirt.
6. When the bag is clean, fasten the clip.
7. Slide the inlet seal over the standpipe.
8. Closethe frontcover.
How To Clean The Foam Filter
Afoam filter is on the base of the vacuum motor. See figure 8.
The filter helps to prevent dust and debris from entering the
vacuum motor. Wash the foam filter every week. To remove
the filter, slide it off the motor housing.
CAUTION: Make sure the foam filter is completely
dry before you install it. Moisture will
damage the vacuum motor.
How To Install The Micro-Staphicidal® Filter
The Micro-Staphicidal filter is offered as optional equipment.
Usethe Micro-Staphicidal filter with the cloth filterorthepaper
filter. To install the Micro-Staphicidal filter, follow this proce-
dure:
1. Open the tank by pushing the knob on top of the tank.
2. Removethe foam filter from the base of the machine.
3. Make sure the cloth bag or the paper filter bag is in posi-
tion.
4. Pushthe Micro-Staphicidalfilter on thebase of the motor.
Seefigure 9.
5. Closethe frontcover.
Figure 7
1.Knob
2.Inlet
3.Standpipe
Figure 8
1.FoamFilter
Figure 9
1.Micro-Staphicidal®Filter

CLARKE TECHNOLOGY Operator's Manual 579 Carpetmaster Page 8
TheMicro-Staphicidalfilter willtrap minuteairborne particlesdown
to .3 microns in size. The filter traps the bacteria, it does not kill
the bacteria. Clean the filter at least once a month. To clean the
Micro-Staphicidalfilter, follow thisprocedure:
1. Removethe filter.
2. Tap the filter against a hard surface.
3. Blowor vacuum the loose dirt from the filter.
Ifthefilterisnotcleanafterdoingtheabove,dothefollowing:
1. Wash or soak the filter in a detergent and water solution.
CAUTION: Do not wash or soak the filter more than
five minutes.
2. Removethe filter from the solution.
3. Rinsethe filterwith clean water.
4. Drythe filter thoroughly.
TheMicro-Staphicidal filter should be replaced after six months
ofuse.
How To Check For Worn Brushes
Tocheck forwornbrushes,follow this procedure:
1. Put the machine on its side so that the right side is up.
2. Check the bristles, make sure the bristles are not shorter
than 5/16 inch. See figure 10
3. If the bristles are shorter than 5.16 inch, replace the brush.
How to Replace The Brush
Thebrush has a chevron design. Thebrushhas two halves fas-
tenedto asteel tubebyscrews. Toremovethe wornbrushes, do
thefollowing:
1. Removethethreescrewsfrom each half. See figure 11.
2. When installing the brush halves, make sure the center of
each half of the brush points to the front of the machine
whenseen from the bottom.
3. Tightenthe three screws from each half.
4. Alwaysreplace both halves of the brush.
How To Open The Bottom Cover
The bottom of your Carpetmaster®has a cover which is also a
mountingplate forthe frontswivelcasters. Open thecover toget
access to the brush drive motor, belt, switches, and the air tun-
nel. The release lever is at the rear of the machine.
Figure 10
1. Brush Bristles
Figure 11
1. Brush Screws

CLARKE TECHNOLOGY Operator's Manual 579 Carpetmaster Page 9
Toopenthecover, followthisprocedure:
1. Removethe electrical plug from the electrical outlet.
2. Put the machine on its side so that the right side is up.
3. Removethe screw.
4. Pullthe lever(1)and turnitclockwisetorelease thecover.
5. Put the rod in the detent opposite the five brush setting
holes (2). See figure 12
How To Clean The Air Tunnel
The air tunnel cover is located on the bottom of the machine.
Toclean the air tunnel, follow this procedure:
1. Lift the tunnel clamp (1).
2. Removethe cover(2).
3. Removethe object or debris.
4. Put the cover in position.
5. Push the tunnel clamp down. See figure 13
How To Adjust The Brush Drive Belt
To adjust the tension of the belt to drive the brush, use this
procedure:
1. Loosen the four screws that hold the motor.
2. Movethe motortoward the frontof themachineto loosen
thebelt. Move the motortowardthe back of themachine
to tighten the belt.
3. The tension of the belt is correct when you can push the
belt 1/8 inch to 3/16 inch at the belt guard (14 lbs. pres-
sure if you use a belt tension gauge).
4. Tighten the four screws that hold the motor.
Turn the belt by hand to make sure the belt is aligned on the
pulleys. To adjust the alignment of the belt, use this proce-
dure:
1. Loosen the two set screws on the pulley on the motor.
2. Move the pulley to the left or to the right.
3. Tighten the two set screws.
Toput the machine back inoperation,followthis procedure:
1. Closethe bottom cover.
2. Movethe brush adjustment lever to one of the five brush
height settings.
3. Push the lever in the setting detent.
4. Set the machine upright. Make sure the handle is in the
verticalposition.
WARNING: Do not operate this machine unless it is
fully assembled. The machine could be
damaged or injury could occur to the
operator
Figure 12
1.Lever
2.BottomRight Side Detent
Figure 13
1.Tunnel Clamp
2.TunnelCover

CLARKE TECHNOLOGY Operator's Manual 579 Carpetmaster Page 10
How To Remove The Drive Motor
Themotortodrivethebrush needsnopreventivemaintenance. If
themotormust bereplaced,followthisprocedure:
1. Removethefourmountingscrews(1). Seefigure14
2. Liftthemotortoremove thetwoscrews fromthemotorplate.
3. Disconnect the six spade connectors.
4. Removethemotorfromthemachine.
Maintenance Of The Vacuum Motor
This machine uses a universal motor that has a commutator and
carbon brushes. The commutator and carbon brushes must be
checked every six months, or 600 hours of operation, whichever
comes first.
WARNING: Electrical inspections must be made by a
person authorized to do maintenance.
Electrical repairs must be made by a per-
son authorized to make electrical repairs.
WARNING: To prevent electrical shock, always re-
move the electrical plug from the electri-
cal outlet before doing any repairs or
maintenance to this machine.
How To Check The Commutator and The Carbon Brushes
Tocheckthecommutatorandthecarbonbrushes,followthispro-
cedure:
1. Remove the screws that hold the motor baffle. The motor
baffleis at the rear of the machine.
2. Removethebaffle.
3. Remove the wire clip mounting screw and the grounding
mountingscrew.
4. Removethewirenuts.
5. Removethevacuummotormountingscrews.
6. Removethemotorfromthetank.
7. Inspectthecommutator. TakethemachinetoaClarkeTech-
nology Authorized Repair Location if you see any of the
followingconditions:
a. Smallholesinthesurfaceofthecommutator. See
figure15A
b. Unevencolor. Lookfor anevendarkbrowncolor.
Cleanareasorverydarkareasindicateaproblem.
Seefigure15B
c. Highmica. Themicainsulationmustbelowerthan
thecommutatorbars. See figure15C
8. Removethecarbonbrushassembliesandcheckthecarbon
brushes. Replace both carbon brush assemblies if either
brushisshorter than3/8 inch. Ifeitherbrushisshorter than
1/2 inch, order replacement brushes. Be ready to replace
bothcarbonbrushesearlierthanthenormalinspectiontime.
9. Installthemotor, themotor baffle,andthefasteners.
WARNING: The machine must be tested for electrical
safety after electrical repairs are made.
NOTE: For safe operation have your machine checked by a Clarke Technology
Authorized Repair Person every 12 months. Always use Clarke Technology re-
placementparts.
Figure 14
1.MountingScrews
Figure 15

CLARKE TECHNOLOGY Operator's Manual 579 Carpetmaster Page 11
PROBLEM CAUSE ACTION
HOW TO CORRECT PROBLEMS IN THE MACHINE
The machine does not run. 1. There is no power 1. There is an obstruction. See
"CircuitBreaker"inthemanual.
2. The electrical outlet, power cord,
electrical switches and motor
brushes are to be checked. Elec-
trical inspections must be made
byaperson authorized to do
maintenance. Electricalrepairs
must be made by a person
authorized to make electrical repairs.
The machine doesnot 1. The filter bag is dirty. 1. If the bag is ¾ full, discard the
remove debris fromthe floor. paper bag. clean the bag if it is a
cloth bag. If the machine is used
topickup heavy debris, discard
or clean the bag before it is ¾ full.
2. There is an obstruction in 1. Remove the hose from the stand-
thestandpipe. pipetube.
2. Startthevacuummotor.
3. Holdyour hand over the stand-
pipetube. Ifyoufeel no suction,
thestandpipehas an object in it.
4. Shut off the vacuum motor.
5. Remove the object.
3. There is an obstruction in the 1. Remove the hose from the stand-
hose. pipetube.
2. Remove the obstruction.
4. There is an obstructionin the 1. Checktheair tunnel.
airtunnel. 2. Replace the gasket if it is worn or
broken.
5. The tank gasket is wornorbroken. 1. Checktheentire gasket (top,bottom, and
sides)where the front
tanksealsagainst the rear tank.
2. Replace the gasket if it is worn or
broken.
6. The brush does not turn clockwise 1. Return the machineto a ClarkeTechnology
whenseenfromthe right-hand Service Branch or a Clarke Technology
sideof the machine. Service Center to havethe motor
wiredcorrectly.
7. The brush setting is not correct. 1. Change thebrush setting. If the
brush is set too low on a deep pile
carpet,the housing can stop the
airflow.
8. The brush is worn. 1. Replace thebrush.
9. The foam filter isdirty. 1. Cleanthefoam filter.
Thebrush does not rotate. 1. Thereis an obstruction in the 1.Removetheobstruction.
brushhousing.
2. There is an obstructionin the bear- 1. Remove the obstruction.
ingson the end of the brush.
3. The belt is brokenorloose. 1.Replaceor tighten the belt.
4. There is low line voltage. 1. Removeotherappliancesonthe
lineorprovide a separate circuit.
5. The brush drive motorwill not run. 1. Pushthecircuit breaker button.

CLARKE TECHNOLOGY Operator's Manual 579 Carpetmaster Page 12
CLARKETECHNOLOGY
Model 579 Upright Vacuum
Wiring Diagram 8/98
Ref PartNo. Description Qty
1 44606A Motor Asm. - Brush ¼HP 120V 1
44602A Motor Asm. - Brush ¼HP 220V 1
2 48500A Tubing 1
3 911562 Switch (Main) 1
4 609047 Tubing 1
5 42186B Cord Asm. (Power Supply) 1
6 657501 Strain Relief 3
7 911413 Wire Nut 3
8 606440 Plate, Grounding 1
9 41954A CordAsm. (Vac Motor) 1
Ref PartNo. Description Qty
10 912294 Lead Asm. 1
11
12 912262 Switch - Accessory 1
13 990716 Tape - Electrical 1
14 44900A Motor-Vac 120V 1
44901A Motor-Vac 220V 1
15 912263 Circuit Breaker, 120V 1
912270 Circuit Breaker, 220V 1
CAUTION: Repairs by qualified personnel only.
ARHTUNG: Reparaturen nur durch facharbeiter.
PRECAUCION: Reparations par personnel specialise seulement.
PRECAUCION: Unicamente personal calificado deberian hacer reparaciones.
CLARKETECHNOLOGY
Model 579 Upright Vacuum
Electrical Schematic 8/98

CLARKE TECHNOLOGY Operator's Manual 579 Carpetmaster Page 13
Notes

CLARKE TECHNOLOGY Operator's Manual 579 Carpetmaster Page 14
CLARKETECHNOLOGY
Model 579 Upright Vacuum
Drawing Upper Half 8/98
17
18
19
16
9
11
64
109
78
65
4321
47 49
64
53
52
54
56
57
62
60
61
4559
58
55
66
43
42
31
44
12
45
46
37
38
39
40
41
36
21
35
67
65
34
15
14
12
13
14
24
21
20
22
63
67
25
9
26
27 28 29
68
30

CLARKE TECHNOLOGY Operator's Manual 579 Carpetmaster Page 15
Ref # Part No. Description Qty
1 42186BKCordAssembly, Power 1
2 604040 Holder, handle cord 1
3 607340 Ring Split 1
4 609041 Tube Asm., Handle RH 1
5 33500A Filler, Tank Flange 1
6 603940 Handle 1
7 962965 Screw, 10-24 x 5/16 Set 2
8 603443 Gasket, Tank 1
9 962964 Screw 10-24 x 7/16 Pan Hd 7
10 875072 Knob 1
11 38902BKTank, Rear 1
12 930113 Rivet, Pop 1/8Dia. Open End 14
13 602440 Catch, Latch 1
14 920200 Nut, 10-24 Hex Hd. 4
15 86100A Screw 10-24 x 13/8Soc. Hd. 1
16 60700A Bag, Cloth 1
17 600641 Bag, Paper (Pkg. of 6) 1
18 39300A Tube, Standpipe 1
19 625184 Label 1
20 623380 Flange, Backup 1
21 911413 Nut, Wire 2
22 602442 Cord, Asm., Nylon 1
23 215104 Label, Warning 1
24 65500A Latch, Tank 1
25 30003AKTank,Front 1
26
27 925546 Pin, 3/16 x ½ Roll 1
28 66100A Pivot, Front Tank 1
29 930120 Rivet, 1/8Dia Pop 3
30 601340 Backup, Tank Lower 1
31 930077 Rivet, 1/8x .482 Lg. Cl. End 4
32 73273A Label, Warning, Electric Shock 1
33 67303A Shelf, Bag Support 1
34 623382 Filter, Vac Can 1
35 44900A Motor, Vacuum (120V) 1
44901A Motor, Vacuum (220V) 1
Ref # Part No. Description Qty
36 623443 Gasket, Vacuum Motor 1
37 627680 Seal, O'Ring 1
38 603341 Flange, Retainer 1
39 962957 Screw, 10-16 x ½ Pan Hd 2
40 602041 Clamp, Hose 1
41 604140 Hose, Standpipe 1
42 61200A Bracket, Asm., Pivot 1
43 85810A Screw 5/16 -18 x 5/82
44 609040 Tube, Asm., Handle LH 1
45 962546 Screw 10-24 x ½ Rd. Hd. 6
46 605147 Label, Tank Latch 1
47 607245 Retainer, Cord 1
48 705134 Label, Warning (Canada) 1
49 805151 Label, Exhaust Baffle 1
50 215103 Label, Caution 1
51 215110 Label, Caution, Spanish 1
52 911926 Terminal, Clip #6 1
53 962970 Screw 10-16 x 1¼ 5
54 60004AKBaffle,Asm., Exhaust 1
55 37000A Pad, Noise 1
56 657501 Strain, Relief 1
57 600854 Bracket, Bushing 1
58 912064 Terminal Clip, #10 1
59 980603 Washer, #SH 1110 1
60 911262 Terminal, Female 1
61 911927 Clip, Terminal 1
62 41954AKCordAsm.,VacMotor 1
63 872102 Clip, 5/16 Dia. Nylon 1
64 930108 Rivet, 1/8Diameter Lg. Fl. 8
65 603642 Guard, Vac Motor Fan 1
66 980652 Washer, 5/16 Lock 2
67 51419A Brush, Carton (2 Pack) 1
68 962161 Screw, 10-24 x 3/81
NOTE: Kindicates a change has been made since the last
publicationofthismanual.
CLARKETECHNOLOGY
Model 579 Upright Vacuum
Parts List Upper Half 8/98

CLARKE TECHNOLOGY Operator's Manual 579 Carpetmaster Page 16
CLARKETECHNOLOGY
Model 579 Upright Vacuum
Drawing Lower Half 8/98
9
106
103
107
9
103
102
40
4
108
57
55
57
40
69
73
68
66 9
70 66
82
64 63
82
67
71
57
72
75
82
76
82
78
9
113
61
52
53
54
51
50
9
55
56
57
58 82
79
80
81
85
74
47
48 49
9
25
43
44
45
82
42
40
41
39 38
9
37
36
35
34
33
32
9
46
9
111
28
22
24
9
21
20
13
27
26
25
18
19
17
16
15
14
11
62
9
12
10 110
8
7
6
31 30 29
5
3
4
88 91 93
89
90 92 94
82
87 82
95
96 97
98
99 91100 101
9
81
109

CLARKE TECHNOLOGY Operator's Manual 579 Carpetmaster Page 17
CLARKE TECHNOLOGY Model 579 Upright Vacuum
Parts List Lower Half 8/98
Ref# Part No. Description Qty
1
2
3 617522 Roller Asm. - Side 1
4 34008BKFrame-Main 1
5 962968 Screw - #10-24 x ½ Pn 2
6 962964 Screw - #10-24 x 7/16 Pan 2
7 912263 Circuit Breaker 120V 1
7A 912270KCircuit Breaker 220V 1
8 32334BKCover, Electrical 1
9 962957KScrew 10-16 x ½ 38
10 61196AKPlate, Cam Rod 1
11 962958 Screw #8-18 x ½ 2
12 612050 Clamp 1
13 657501 Relief, Strain 2
14 608245 Spacer, Cam Rod 1
15 628382 Spring, Rod Return 1
16 980646 Washer ¼ Plain 1
17 67100A Rod, Cam 1
18 42186BKCordAssembly,Power 1
19 41954AKCordAsm., Vac Motor 1
20 912262 Switch 1
21 980407 Washer, Shakeproof 1
22 605143 Label, Rear Cover 120 Volt 1
23 605144KLabel230Volt 1
24 605145 Label, Brush Adjustment 1
25 911208 Terminal, Clip 1
26 911927 Terminal, Ring Tongue 1
27 911262 Terminal, Clip 1
28 602341 Cover, Bottom Electrical 1
29 606440 Plate, Grounding 1
30 920200 Nut #10-24 Hex 1
31 602040 Clamp, Tunnel 1
32
33
34 603441 Gasket, Tray 1
35 68300A Tray Asm., Cleanout 1
36 603440 Gasket, Inlet Cover 1
37 602345 Cover, Inlet 1
38 628383 Spring 1
39 607044 Pivot, Tank Assembly 1
40 61200A Bracket Assembly, Pivot 1
41 980091 Washer, Thrust 1
42 600842 Bracket, Spring Mounting 1
43 962212 Screw 6-32 x 7/8Pn 2
44 48500A Tubing, Electrical 1
45 600841 Bracket, Switch Mounting 1
46 962979 Screw, 6-32 x ½ Pan 3
47 911562 Switch, cherry 1
48 920056 Nut 6-32 ESNA 2
49 602342 Cover, Switch 1
50 925602 Pin, 3/16 Spiral 1
51 605140 Lever, Switch 1
52 920256 Nut 5/16 -18 Hex 2
53 980652 Washer 5/16 Lock 2
54 61181A Bracket, Cover & Caster 1
55 629780 Wheel 2
56 38700A Spacer, Wheel 1
57 38701A Spacer, Wheel 4
Ref# Part No. Description Qty
58 607041 Pivot, Wheel Right Hand 1
59 NI Plate, Model & Serial (120V) 1
NI Plate, Model & Serial (220V) 1
60
61 629770 Caster 2
62 46712A Strain Relief 1
63 61007A Brace, Lever Assembly 1
64 607741 Shaft, Lever Release 1
65
66 920110 Nut, ESNA 2
67 16701A Lever, Assembly, Release 1
68 607040 Pivot, Wheel Left Hand 1
69 610853 Bracket, Spring 1
70 608340 Spring 1
71 621181 Bushing, Pivot 1
72 628380 Spring 1
73 66140A Pivot, Tank Assembly 1
74 620891 Bracket, Assembly, Motor 2
75 603641 Guard, Belt 1
76 962027 Screw 8-32 x ½ Rd. Hd. 4
77
78 44606A Motor, Brush Drive (120V) 1
44602A Motor, Brush Drive (220V) 1
79 962165 Screw 10-24 x 3/16 St 2
80 616950 Pulley, Driver 1
81 903042 Belt 1
82 962547 Screw 10-24 x 1 22
83
84
85 609047 Tubing, Electrical 1
86
87 607942KShoe 1
88 621182 Bushing, Shaft 1
89 980442 Washer, Wave 1
90 623681 Guard, Thread 1
91 902648 Bearing 2
92 626671 Plate, End 1
93 607740KShaft,Brush 1
94 609042KTube,Brush 1
95 600940KBrush,Half(Set of 2) 1
96 962821 Screw 8 x 5/8Flat Head 6
97 607640 Seal, Brush End 1
98 925589 Pin 1/8x ½ Roll 2
99 606943 Pulley, Driven 1
100 623680 Guard, Thread 1
101 607246 Retainer, Brush Shaft 1
102 60019AKPlate 1
103 31201AKBumper 1
106 607243KRetainer,BumperFront 1
107 607247 Retainer, Bumper Left Hand 1
108 920343 Nut 3/16 Palnut 6
109 605146 Label, Bottom Cover 1
110 672412 Connector, Wire (220 volt) 1
111 980607 Washer #1106 Shakeproof 4
112 602346 Cover 1
113 962546 Screw 10-24 x ½ Pan 1
NOTE: Kindicates a change has been made since the last
publicationofthismanual.

Notes

ALTO® PRODUCT SUPPORT BRANCHES
PRODUCTION FACILITIES
ALTO Danmark A/S,Aalborg
Blytaekkervej 2
DK-9000Aalborg
+45 72 18 21 00
ALTO Danmark A/S,Hadsund
Industrikvarteret
DK-9560Hadsund
+45 72 18 21 00
SALES SUBSIDIARIES
ALTO Canada Ltd., RexdaleOntario
24ConstellationCt.
(416)675-5830
ALTO Overseas Inc., Sydney (Australia)
1B/8ResolutionDrive
CaringbahNSW2229
+61295246122
ALTO Cleaning Systems Asia Pte Ltd.,Singapore
No.17 LinkRoad
Singapore619034
+652681006
ALTO Deutschland GmbH, Frondenberg(Germany)
Ardeyer Str.15
D-58730Frondenberg
+492373754200
ALTO Cleaning Systems (UK) Ltd.,Penrith
GilwillyIndustrialEstate
Penrith
CumbriaCA119BN
+441768868995
ALTO France S.A.Strasbourg
B.P.44, 4 Place d’Ostwald
F-67036Strasbourg
Cedex 2
+33388288400
ALTO Nederland B.V.Vianen
Stuartweg 4C
NL-4131NJVianen
+31347324000
ALTO SverigeAB, Molndal (Sweden)
Aminogatan18
Box4029
S-43104Molndal
+4631 706 73 00
ALTO Norge A/S, Oslo (Norway)
Bjornerudveien24
N-1266
+4722751770
CLARKE TECHNOLOGY
AMERICAN SANDERS TECHNOLOGY
A.L. COOK TECHNOLOGY
Customer Service Headquarters and Factory
2100Highway265
Springdale,Arkansas72764
(501)750-1000
Technical Service
1-800-356-7274
U. S. A. Locations European Locations
HEAD OFFICE
ALTO U.S.Inc., St.Louis, Missouri
16253SwingleyRidgeRoad,Suite200
Chesterfield,Missouri63017-1725
PRODUCTION FACILITIES
ALTO U.S.Inc., Springdale,Arkansas
2100Highway265
Springdale,Arkansas72764
(501)750-1000
Customer Service - 1-800-253-0367
Technical Service - 1-800-356-7274
ALTOU.S.Inc., BowlingGreen,Ohio43402
1100 Haskins
ALTOU.S.Inc., Clearwater,Florida33765
1500N.BelcherRoad
SERVICE FACILITIES
ALTO U.S.Inc., Carlstadt, New Jersey 07072
150CommerceRoad
(201)460-4774
ALTO U.S.Inc., Elk Grove, Illinois 60007
2280ElmhurstRoad
(847)956-7900
ALTO U.S.Inc., Denver,Colorado80204
1955West 13th Ave.
(303)623-4367
ALTOU.S.Inc., Houston,Texas77040
7215 North Gessner Road
SALES AND SERVICE FACILITIES
ALTO U.S.Inc., Madison Heights,Michigan48071-0158
29815JohnR.
(810)544-6300
ALTO U.S.Inc., Marietta, Georgia 30062
1355WestOakCommonLane
(770)973-5225

CLARKE TECHNOLOGY U.S. WARRANTY
This Clarke Technology Industrial/Commercial Product is warranted to be free from defects in materials and
workmanshipundernormaluse and service foraperiodofoneyearfrom the date ofpurchase,whenoperatedand
maintainedin accordance with ClarkeTechnology'sMaintenanceandOperationsInstructions.
This warranty is extended only to the original purchaser for use of the product. It does not cover normal
wear parts such as electrical cable, rubber parts, hoses, bearings, casters, and belts.
If difficulty develops with the product, you should:
(a). ContactthenearestauthorizedClarkeTechnologyrepairlocation orcontacttheClarkeTechnologyService
OperationsDepartment,2100 Highway 265, Springdale,Arkansas 72764,forthenearestauthorizedClarkeTech-
nologyrepairlocation. Only theselocationsare authorized to make repairstothe product under this warranty.
(b). Return the product to the nearest Clarke Technology repairlocation. Transportationchargestoandfromthe
repairlocation must beprepaidbythepurchaser.
(c). ClarkeTechnologywillrepairtheproductandorreplaceanydefective partswithout charge within areason-
abletimeafter receipt of the product.
Clarke Technology's liability under this warranty is limited to repair of the product and/or replacement of parts
andisgiven to purchaserinlieuofall otherremedies,includingINCIDENTALANDCONSEQUENTIALDAMAGES.
THERE ARE NO EXPRESS WARRANTIES OTHER THAN THOSE SPECIFIED HEREIN. THERE ARE NO
WARRANTIES WHICH EXTEND BEYONDTHE DESCRIPTION OFTHEFACE HEREOF. NO WARRANTIES,
INCLUDING BUT NOT LIMITED TO WARRANTY OF MECHANTABILITY, SHALL BE IMPLIED. A warranty
registrationcardisprovidedwith your ClarkeTechnologyproduct. Returnthecard to assist ClarkeTechnologyin
providingtheperformanceyou expect from your new floor machine.
ALTO U.S. Inc., 2100 Highway 265, Springdale, Arkansas 72764.
CLARKE TECHNOLOGY reserves the right to make
changes or improvements to its machine without notice.
Always use genuine Clarke Technology Parts for repair.
CLARKE TECHNOLOGY
2100 Highway 265
Springdale, Arkansas, 72764
Table of contents
Other Alto Vacuum Cleaner manuals

Alto
Alto 577 Carpetmaster User manual

Alto
Alto ALTO LV-30H Quick start guide

Alto
Alto SB Station Reference guide

Alto
Alto Filtra-Vac 14 User manual

Alto
Alto Clarke S12PF User manual

Alto
Alto STC 2000 User manual

Alto
Alto STV-20 User manual

Alto
Alto 560 B User manual

Alto
Alto TW 300 CAR User manual

Alto
Alto TW 300 S User manual

Alto
Alto 40C/CA User manual

Alto
Alto Filtra-Vac 14 User manual

Alto
Alto SB Station User manual

Alto
Alto WAP SQ 850-11 User manual

Alto
Alto Aero SQ series User manual

Alto
Alto KC 1000 E Quick start guide

Alto
Alto S-12 User manual

Alto
Alto S-12 Use and care manual

Alto
Alto Filtra-Pac 02150A User manual

Alto
Alto PTV-15 User manual