Alyseum Q-VCA User manual

Q-VCA User’s manual © - Revision 2.4 - Page 1
ALYSEUM - Q-VCA - User manual 2.4 - (Firmware 1.1)
1 Introduction
The Q-VCA module is a versatile dynamic and high-quality Quad VCA.
However it offers much more than similar modules on the market.
The classic features are:
● Insert a jack into the CV IN input and the corresponding VCA is
100% Analog.
● Each VCA can be controlled linearly or exponentially.
● Inputs chaining for multiple VCA
● No connected output is routed to the MIX output.
In addition 4 unique VCA control modes are:
1. Manually via the potentiometer.
2. By a programmable MIDI controller.
3. Use with the MATRIX II – Requires crossing between the
potentiometer & VCA values and then activates the VCA update.
4. Use with the MATRIX II – Turn the potentiometer and the VCA are
updated directly
In resume for point 3 & 4: One Q-VCA module add mix 4 sources for each
MATRIX II input - OR - One Q-VCA module add mix 4 destinations for
each MATRIX II output .
ALYSEUM
Q-VCA
>
1 2
>
1 2 3 4
LOCK
3 4
LIN/EXPMODE
MIDI
OUT 2 OUT 3 OUT 4OUT 1
MIXTHRU
MIDI
CV 1 CV 2 CV 3 CV 4
IN 3IN 2IN 1 IN 4
IN

Q-VCA User’s manual © - Revision 2.4 - Page 2
2 Hardware
2.1 Pac age Content
● One Q-VCA module with Eurorack compliant front panel.
● One plastic bag containing:
o Four M3 screws + nylon washers.
o One 10/16 pins power ribbon cable.
o One short DIN/jack MIDI cable + one short jack/jack MIDI cable
● Warranty & user manual access card.
2.2 Features
● Full analog path
● High quality VCA type AS3360
● Simple firmware upgrades by the front panel MIDI port.
● Polarized power header and protection against reverse polarity.
2.3 Specifications
● Front panel width: 50 mm (10HP)
● Module maximum depth: 26 mm
● Power requirements (full LED On): +12V= 65mA / -12V= 20mA.
2.4 Bloc diagram.
Q-VCA
MCU
A/D1
A/D2
A/D3
A/D4
MIDI IN
LOCK
12 3 4
><
D/A
12V
12V
BUF
VCA
BUF
VCA
BUF
VCA
BUF
VCA
CV IN 4
CV IN 3
CV IN 2
CV IN 1
IN 4
IN 3
IN 2
IN 1
D/A 1
D/A 2
D/A 3
D/A 4
OUT 1
OUT 2
OUT 3
OUT 4
OUT MIX
MIDI PGM
MODE PGM
LIN/EXP
LIN/EXP
LIN/EXP1
LIN/EXP2
LIN/EXP3
LIN/EXP4
BOOT

Q-VCA User’s manual © - Revision 2.4 - Page 3
2.5 Installation
Choose the installation location of your unit carefully:
● Avoid placing it in direct sunlight or close to a source of heat.
● Avoid locations subject to vibrations excessive dust heat cold moisture or rain.
● Make sure to discharge any built-up static electricity from yourself and your devices before touching or
connecting one device to another.
Procedure:
1. Only connect the module to a Eurorack bus board powered by a specified A-100 power supply.
2. Switch OFF and disconnect the Eurorack case from the main power supply by unplugging it from the wall
socket!
3. Make absolutely certain that the ribbon cable has the right orientation by connecting the indicated red stripe
on the negative 12 Volt side of your Eurorack case bus board.
4. Carefully place the module on an appropriately spaced spot on your Eurorack and fasten it firmly in place with
the supplied screws and nylon washers. Replace any covers or blanking plates that you removed to install the
module and screw them in firmly.
5. Reconnect the Eurorack case power cable back into the main power supply and switch the case power on.
6. If it doesn’t seem to be working as expected (Initialisation LED sequence) immediately disconnect the system
from the main power supply again. In this case double-check the connections making completely sure that
the ribbon cable is the right way round where it connects to the module and the bus.
Use with the MATRIX II:
● Q-VCA modules must be powered by the same power supply or generally powered ON/OFF simultaneously
with the MATRIX II.
● The MATRIX II MIDI Out must be connected to the MIDI Input of the Q-VCA module. You can easily chain
several modules please connect the MIDI THRU to the MIDI IN of the next module and more as necessary.
NB: We use a very high speed optocoupler with only 4μS delay. The goal is to be able to cascade a large number of
modules without adding a delay on the MIDI. the use of a THRU BOX to avoid a delay is totally useless.

Q-VCA User’s manual © - Revision 2.4 - Page 4
3 How to use
3.1 Initialization Sequence
1. Turn the Eurorack case power ON.
2. All LEDs Turn ON one by one.
3. Last Mode saved in the EEPROM is loaded.
THE Q-VCA is ready!
3.2 Linear or Exponential VCA Selection
Available with all modes.
● Press the black button LIN/EXP more as 1 second the red LED > blink.
● Use the potentiometer corresponding to the VCA
o Turn 0 to 50% to select Linear and the LED LOCK turn ON.
o Turn 50 to 100% to select Exponential and the LED LOCK turn OFF.
● Afterwards keep press more as 2 seconds to confirm OR a time out of 15 seconds.
● Red LED > turn OFF.
3.3 Mode Selection
● Press the red button MODE more as 1 second the red LED < blink.
● Press several times to obtain wished mode the Mode selected turn ON the corresponding green LED LOCK.
MODE # Configuration LOCK LED
1 Standalone (default) 1
2 External MIDI device 2
3 Use with the MS-MATRIX or MATRIX II – Crossing VCA & potentiometer values
3
4 Use with the MS-MATRIX or MATRIX II – Turn potentiometer for direct update
4
(5) Insert a Jack plug into CV IN to control by CV the corresponding VCA No matter
● Afterwards keep press more as 2 seconds the red button MODE to confirm your choice the selected green
LEDs flash 2 times to confirm the mode is programmed OR press less a 1 second the button MODE to leave
OR a time out of 15 seconds.
● Red LED < turn OFF.
● The selected green LEDs flash 3 times to confirm the mode is programmed.
3.4 Mode 1 - Use in standalone
Just turn a potentiometer and the corresponding VCA are updated.
At each time you turn the potentiometer the corresponding green LED LOCK blink one time.

Q-VCA User’s manual © - Revision 2.4 - Page 5
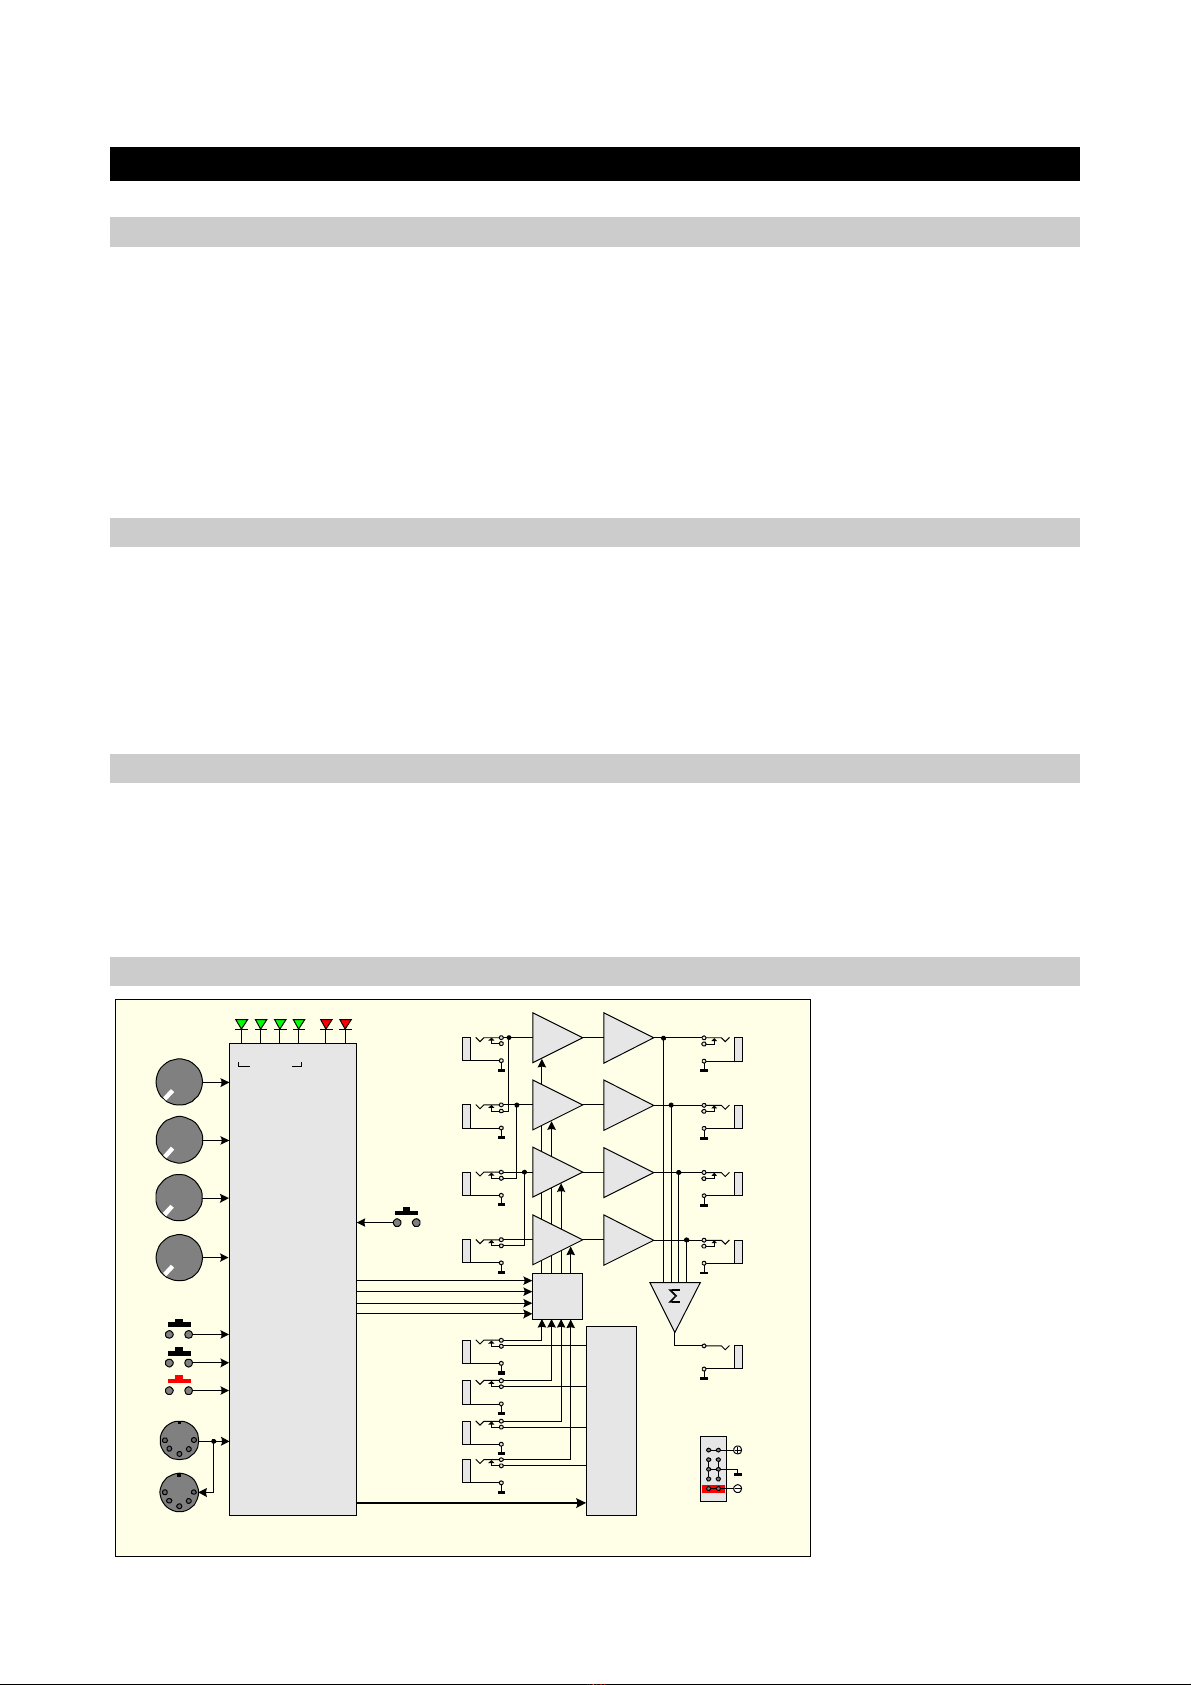
3.5 Mode 2 - Controlled by an extrenal MIDI devices
Programming MIDI command
Only programmable if the Q-VCA module is configured in mode 2.
● Connect an external MIDI controller device on the MIDI input.
● Press the button MIDI more as 1 second the 2 red LEDs < > blink.
● Afterwards:
o The first valid MIDI command assign the VCA 1 (MIDI CH + CC) the 2 red LEDs < > flash 3 times to
confirm MIDI channel and CC are programmed.
o OR - Press 2 seconds the button MIDI to quit.
o OR - Time out of 15 seconds.
● The 2 red LEDs turn off.
NB 1: The VCAs 2 3 and 4 are assigned to the 3 CC that follow the VCA 1.
NB 2: If you change the mode Q-VCA module keep the MIDI CH + CC in EEPROM.
Use MIDI command
Similar as the Mode 1 but here the control is operate by any external MIDI device with CC.
At each time a VCA receive a valid MIDI CH+CC blink twice time the corresponding LOCK LED.
NB: The 4 potentiometers are not operant in this mode.
3.6 Mode 3 & 4 - Use with MS-MATRIX or MATRIX II
Mode 3 - Crossing
To avoid any significant jump of the level signal between a preset and a new value you need to find with the
potentiometer the same value of the VCA before being able to activating any change.
Two cases:
1) You are lucky: the green LED LOCK of the potentiometer that controls the VCA you want to change is ON just
rotate the potentiometer to set the new value of the VCA.
2) More generally: the green LED LOCK of the potentiometer that controls the VCA you want to change is OFF
slightly rotate the potentiometer towards any direction until the < or > red LED is turned ON.
● If the > red LED is ON rotate the potentiometer clockwise until the LOCK LED is turned ON.
● If the < red LED is ON rotate the potentiometer counter-clockwise until the LOCK LED is turned ON.
● Once the green LED LOCK is On the VCA is under the control of the potentiometer.
Mode 4 - Turn
Just turn a potentiometer and the corresponding VCA are updated in combination with the MS-MATRIX or MATRIX II
and her Bank & Preset management.
At each time you turn the potentiometer the corresponding green LED LOCK blink one time.
BANK & PRESET from the MATRIX II
The current Bank & Preset number are SAVE/LOAD and displayed via the front panel of the MATRIX II but the values
are saved inside the Q-VCA module.
Please read the user Manual of the MATRIX II to load and save Bank & Preset.
● A LOAD operation recall the values of the 4 VCAs to the Bank & Preset number displayed by the MATRIX II.
● A SAVE operation save the values of the 4 VCAs to the Bank & Preset number displayed by the MATRIX II.
During SAVE & LOAD operations LOCK LEDs blink one time.

Q-VCA User’s manual © - Revision 2.4 - Page 6
MIDI SYS-EX.
These commands are generated by the MATRIX II of course if you will control the Q-VCA by any software welcome!
Commands SYS EX Header + ID Device + Command # + Data + End
Load a Bank & Preset F0 00 20 09 00 1F 00 XX YY F7 (XX=00 until 06 - YY= 00 until 1F)
Save a Bank & Preset F0 00 20 09 00 1F 01 XX YY F7 (XX=00 until 06 - YY= 00 until 1F)
3.7 Firmware upgrade
The Q-VCA module is pre-programmed with the ability to receive firmware upgrades (for bugfixes extra features
customizations etc...) via MIDI protocol (SysEx commands).
Please fill in the page Firmware Upgrade http://alyseum.com/firmwareupdate to receive all new firmwares for your
product.
In order to flash new firmware please follow the instructions below:
1. Turn the Eurorack case power off.
2. Close all MIDI software on your computer.
3. Connect the computer and the Q-VCA with a MIDI cable.
4. Download Sys Ex utility at http://www.elektron.se/support-and-downloads (WIN and OSX).
5. Press and hold the BOOT button while turning the Eurorack case power back on. The BOOT button is located
behind the small hole in Q-VCA front panel – In the middle of the 4 potentiometers and can be pressed using
a thin long object like for example a toothpick.
6. All the LEDs flash 3 times then release the BOOT button.
7. Open the Elektron C6 Sys Ex utility software click Load find the new firmware file and click Open.
8. Click Configure select a MIDI Out port set 400mS for Delay in the textbox select x1 for Turbo limit field and
click OK.
10. Click Send. During the firmware update the 6 LEDs light up one after the other.
11. Wait until sending is complete. All the LEDs flash 3 times and the module reboots to normal operating mode
with new firmware.
NB: Please note that for the software to be able to send the MIDI commands successfully no other software or
Active Sensing message should be using the MIDI device simultaneously.
All parameters (lowest note last used preset last used midi channel or cv input preset save mode) and all Banks +
Presets are erased during new firmware flashing.
Thanks to Émilie Gillet from Mutable Instrument for his open Bootloader code: https://github.com/pichenettes/avr-
midi-bootloader.

Q-VCA User’s manual © - Revision 2.4 - Page 7
4 Miscellaneous
4.1 Disclaimer
All rights reserved. Reproduction in whole or part of this document is prohibited without the express permission of
ALYSEUM.
© 2011-2099 ALYSEUM.
The information and specifications described in this manual are subject to change without prior notice.
Throughout this manual trademarked names might be used. We state herein that we are using the name to the
benefit of the trademark owner with no intention of infringement.
4.2 Warranty and repair
ALYSEUM warrants to you the original purchaser that each of its products will be free from defects in materials and
workmanship for a period of two years following the date of purchase.
This warranty does not apply to any products which have been repaired or altered by other than ALYSEUM or which
have been subject to ESD moisture abuse accident improper installation or use.
ALYSEUM assumes no liability as a consequence of such events under the terms of this Warranty.
Please consult your dealer for more details or visit our support page on alyseum.com/support before any action.
4.3 Special Than s
Vyronas Dokimakis (the programmer) Philip Thoma Cyril Colomb and some users for your comments or feedback.
Table of contents
Other Alyseum Recording Equipment manuals
Popular Recording Equipment manuals by other brands

Aim
Aim AMCX1553 Hardware manual

INFLUX MEASUREMENTS
INFLUX MEASUREMENTS SprinklerSense FTI GUIDE TO THE INSTALLATION, OPERATION & MAINTENANCE

CoPOS
CoPOS CoTERM user guide

Apollo
Apollo SL15 Series Operation manual

Toshiba
Toshiba G1IF1 instruction manual

ASL INTERCOM
ASL INTERCOM VIPET Installation and maintenance guide

Synthesis Technology
Synthesis Technology MOTM-110 Ring Mod & VCA Assembly instructions

Metra Electronics
Metra Electronics AX-ADBOX1 installation instructions

JB Systems
JB Systems DJSCA451 Operation manual

FONESTAR
FONESTAR SM-1860U instruction manual

Arturia
Arturia DIST OPAMP-21 user manual

Art
Art MULTIVERB III manual