TABLE OF CONTENTS
Features . . . . . . . . . . . . . . . . . . . . . . . . . . . . . . . . . . . . . . . . . . . . . . . . . . . . . . . . . . . . . . . 2
Remote Control Battery Installation. . . . . . . . . . . . . . . . . . . . . . . . . . . . . . . . . . . . . . . . 2
Charging The ASC-2500 Li-Poly Battery. . . . . . . . . . . . . . . . . . . . . . . . . . . . . . . . . . . . . 2
Installing The ASC-2500 Battery . . . . . . . . . . . . . . . . . . . . . . . . . . . . . . . . . . . . . . . . . . . 2
How To Expand And Fold Your ASC-2500 Arms . . . . . . . . . . . . . . . . . . . . . . . . . . . . . . 2
ASC-2500 Diagram . . . . . . . . . . . . . . . . . . . . . . . . . . . . . . . . . . . . . . . . . . . . . . . . . . . . . . 3
Control Diagram . . . . . . . . . . . . . . . . . . . . . . . . . . . . . . . . . . . . . . . . . . . . . . . . . . . . . . . . 3
Flight Preparation. . . . . . . . . . . . . . . . . . . . . . . . . . . . . . . . . . . . . . . . . . . . . . . . . . . . . . . 4
Syncing Your ASC-2500 . . . . . . . . . . . . . . . . . . . . . . . . . . . . . . . . . . . . . . . . . . . . . . . . . . 4
Now You Are Ready To Fly . . . . . . . . . . . . . . . . . . . . . . . . . . . . . . . . . . . . . . . . . . . . . . . . 5
Recognizing The Front & Rear Of The ASC-2500. . . . . . . . . . . . . . . . . . . . . . . . . . . . . . 5
Starting & Stopping The Rotors. . . . . . . . . . . . . . . . . . . . . . . . . . . . . . . . . . . . . . . . . . . . 5
Auto Start / Auto Land . . . . . . . . . . . . . . . . . . . . . . . . . . . . . . . . . . . . . . . . . . . . . . . . . . . 5
Manual Start/Stop . . . . . . . . . . . . . . . . . . . . . . . . . . . . . . . . . . . . . . . . . . . . . . . . . . . . . . 5
Speed Select Button . . . . . . . . . . . . . . . . . . . . . . . . . . . . . . . . . . . . . . . . . . . . . . . . . . . . . 5
Optical Flow. . . . . . . . . . . . . . . . . . . . . . . . . . . . . . . . . . . . . . . . . . . . . . . . . . . . . . . . . . . . 5
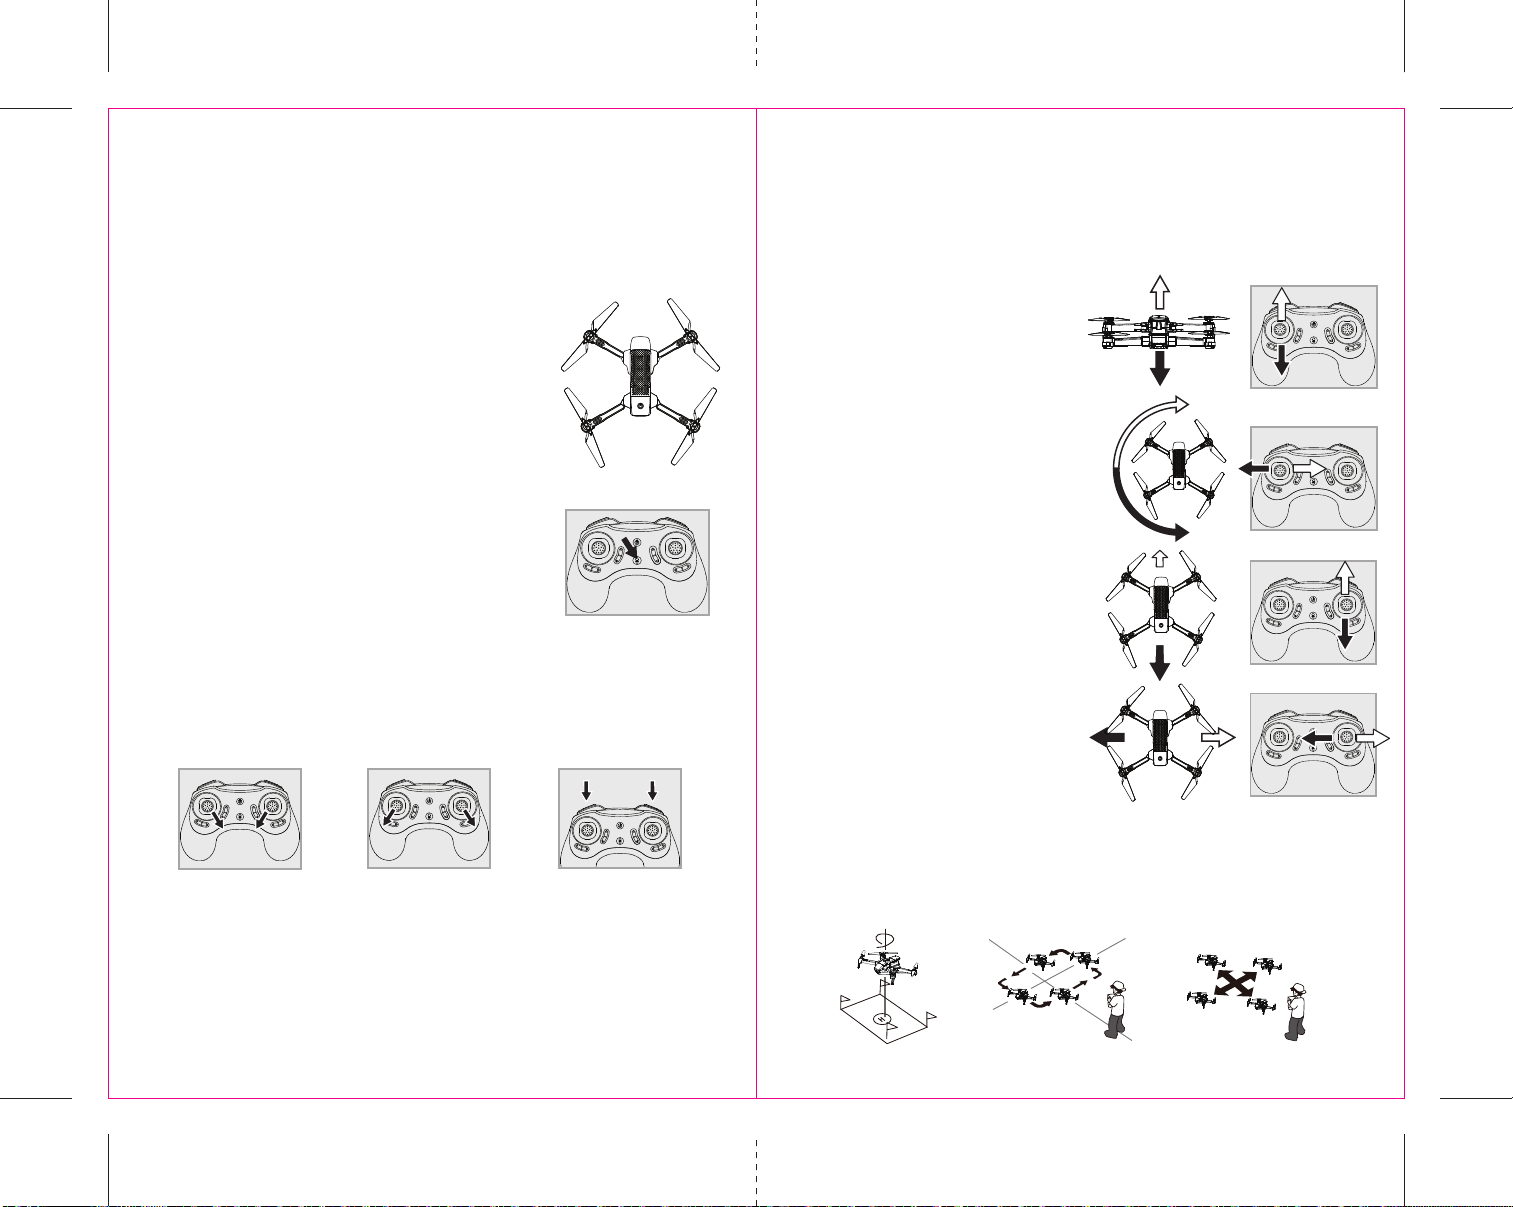
Flight Control. . . . . . . . . . . . . . . . . . . . . . . . . . . . . . . . . . . . . . . . . . . . . . . . . . . . . . . . . . . 6
Flight Practice . . . . . . . . . . . . . . . . . . . . . . . . . . . . . . . . . . . . . . . . . . . . . . . . . . . . . . . . . . 6
Adjusting The Trim . . . . . . . . . . . . . . . . . . . . . . . . . . . . . . . . . . . . . . . . . . . . . . . . . . . . . . 7
Calibrating The ASC-2500 . . . . . . . . . . . . . . . . . . . . . . . . . . . . . . . . . . . . . . . . . . . . . . . . 8
How To Perform 360º Stunt Rolls . . . . . . . . . . . . . . . . . . . . . . . . . . . . . . . . . . . . . . . . . . 8
Recording Videos And Taking Photos With Your ASC-2500 Drone. . . . . . . . . . . . . . . 9
Installing Your Phone Holder . . . . . . . . . . . . . . . . . . . . . . . . . . . . . . . . . . . . . . . . . . . . . 10
Camera Video And Photo Streaming Setup. . . . . . . . . . . . . . . . . . . . . . . . . . . . . . . . . . 11
Troubleshooting Your ASC-2500. . . . . . . . . . . . . . . . . . . . . . . . . . . . . . . . . . . . . . . . . . . 12
Replacing The Propeller Blades. . . . . . . . . . . . . . . . . . . . . . . . . . . . . . . . . . . . . . . . . . . . 12
Warnings . . . . . . . . . . . . . . . . . . . . . . . . . . . . . . . . . . . . . . . . . . . . . . . . . . . . . . . . . . . . . . 13
Battery Warnings . . . . . . . . . . . . . . . . . . . . . . . . . . . . . . . . . . . . . . . . . . . . . . . . . . . . . . . 13
Care and Maintenance . . . . . . . . . . . . . . . . . . . . . . . . . . . . . . . . . . . . . . . . . . . . . . . . . . . 13
Limited 90-Day Warranty . . . . . . . . . . . . . . . . . . . . . . . . . . . . . . . . . . . . . . . . . . . . . . . . 14
FCC Information . . . . . . . . . . . . . . . . . . . . . . . . . . . . . . . . . . . . . . . . . . . . . . . . . . . . . . . . 15
Thank you for purchasing the ASC-2500 Drone. Please read this instruction booklet as it contains valuable
information on how to properly fly and care your ASC-2500.
1 2
B.
A.
D
E F
FEATURES
• 1080p HD camera streams directly to your mobile phone for instant video recording
• On Board Micro SD card Slot allows for optional SD Card video recording for highest resolution
• New optical flow technology for longtitude and lattitude position holding
• Push button Auto Start, Hover, and Auto Land technology
• Built-in 6 Axis Gyro + Altitude Sensors for incredibly stable flight
• High Efficiency Li-poly battery extends drone flight time*
• "Go-Anywhere" Folding Frame design for easy transportation
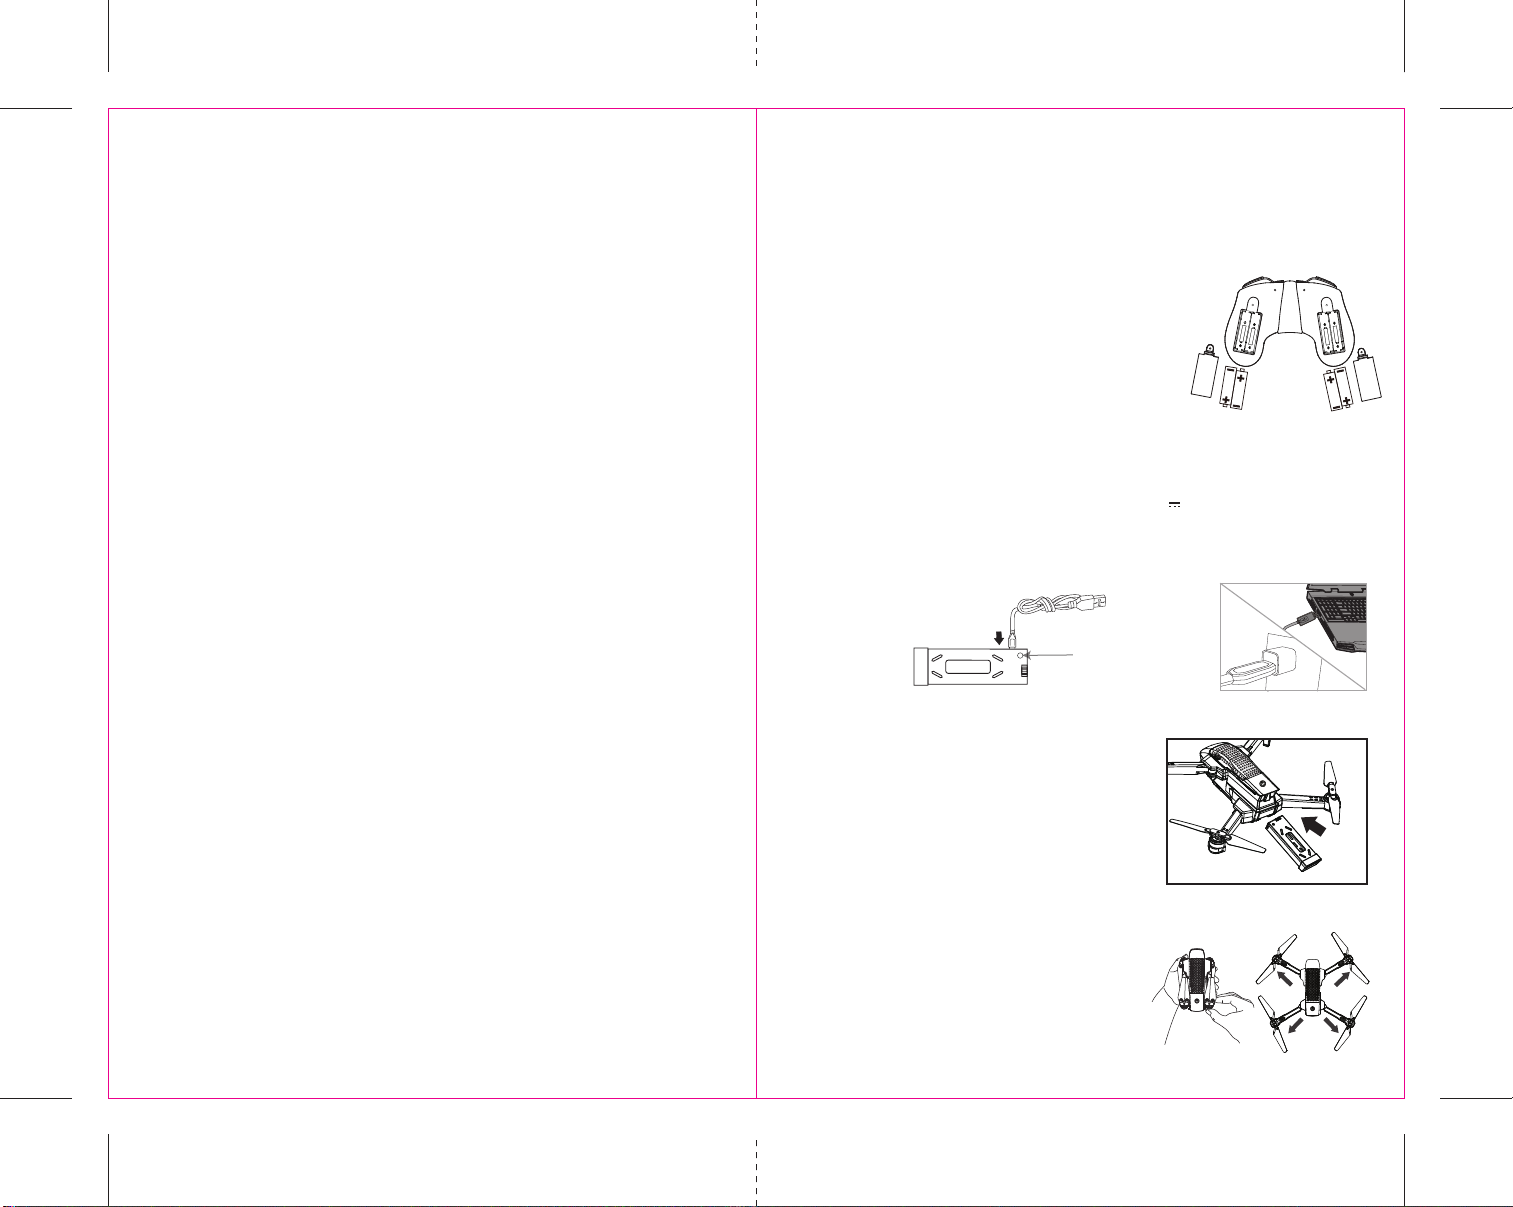
REMOTE CONTROL BATTERY INSTALLATION
1. Unscrew and remove the battery cover from the back of the controller.
2. Install 4 AAA alkaline batteries into the controller as shown in diagram A.
Replace the battery cover and secure it.
3. Turn over the controller front side up and press the power button.
If you hear two beeps and the power indicator light turns on, you
have installed your batteries correctly.
INSTALLING THE ASC-2500 BATTERY
HOW TO EXPAND AND FOLD YOUR ASC-2500 ARMS
Before flying your ASC-2500, you need to expand the foldable arms out.
1. Make sure the drone power is turned off
2. Holding the folded ASC-2500 drone in the palm of your hand
(see diagram E) proceed to open the arms by starting with the
Front Arms (Upper Arms) and then Rear Arms (Lower Arms)
3. Make sure the arms are fully extended and locked into place
(see diagram F). Note you will feel some additional pressure
indicating the arm is properly locked into place.
4. When folding in the arms simply reverse steps 1-3 above.
NOTE: Never use hard force when opening and closing the ASC-2500 Arms
Carefully Push the fully charged battery into the ASC-2500 battery
compartment all the way in until it stops and is flush with back of
the drone (see diagram D).
NOTE: The battery only fits one way into the battery compartment. Never force it.
LED indicator
C.
Li-Poly Battery
CHARGING THE ASC-2500 LI-POLY BATTERY
1. Insert the USB charger into the battery charging socket (see diagram B).
2. Connect the USB end of the cable to your computers USB port or a USB wall charger (see diagram C).
3. A red LED indicator light will illuminate while charging and then turn off when charging is complete.
4. Average charging time is approximately 130-150 minutes (via 5.0V 2A USB wall charger). A fully
charged ASC-2500 can fly for 15-18 minutes depending on environment and user input.
IMPORTANT: ALWAYS REMEMBER TO UNPLUG YOUR CHARGING CORD WHEN NOT IN USE!
4×1.5 volt “AAA” Alkaline Batteries
(not included)


 user manual")