AMC LIVE Radio User manual

User
Manual
Live Radio
Media Player

Table of contents
USER MANUAL Live Radio Media Player
Safety instructions
USER MANUAL Live Radio Media Player
Before you start
Introduction......................................................................................................................................................2
Features................................................................................................................................................................2
Operation
Front/rear panels of Live Radio............................................................................................................3
Remote control functions.......................................................................................................................4
Front/rear panel functions.................................................................................................................5-6
Getting started................................................................................................................................................6
Quick setup guide........................................................................................................................................6
Setup wizard.....................................................................................................................................................6
Network connect..........................................................................................................................................6
WPS setup..........................................................................................................................................................7
Mode menu......................................................................................................................................................7
Internet radio ...................................................................................................................................................8
Manual tune .....................................................................................................................................................9
Bluetooth receiver.....................................................................................................................................10
Podcast..............................................................................................................................................................10
Music player...................................................................................................................................................11
When using this electronic device, basic precautions
should always be taken, including the following:
1 Read all instructions before using the product.
2 Do not use this product near water (e.g., near a bathtub, washbowl,
kitchen sink, in a wet basement or near a swimming pool etc.)
3 Use this device when you are sure that music player has a stable base and
it is xed securely.
4This product, in combination with loudspeakers and amplier may be
capable of producing sound levels that could cause permanent hearing
loss. Do not operate for a long period of time at a high volume level or at
a level that is uncomfortable. If you experience any hearing loss or ringing
in the ears, you should consult with otorhinolaryngologists.
5 The product should be located away from heat sources such as radiators,
heat vents, or other devices that produce heat.
6 The product should be connected to a power supply that is described
in the operating instructions or are marked on the product.
7The power supply should be undamaged and never share an outlet
or extension cord with other devices. Never leave device plugged
into the outlet when it is not being used for a long period of time.
8Care should be taken that objects do not fall into liquids and liquids
would not be spilled on the device.
9The product should be serviced by qualied service personnel if:
– The power supply or the plug has been damaged.
– Objects have fallen into or liquid has been spilled on the product.
– The product has been exposed to rain.
– The product has been dropped or the enclosure damaged.
10 There are some areas with high voltage inside, to reduce the risk of electric
shock do not remove cover of the microphone receiver or power supply.
The cover should be removed by the qualied personnel only.
CAUTION
To reduce the risk of electric shock, do not remove screws.
No user-serviceable parts inside. Refer servicing to qualied
service personnel. To reduce the risk of re, electric shock
or product damage, do not expose this apparatus to rain,
moisture, dripping or splashing and that no objects lled
with liquids, such as vases, shall be placed on the apparatus.
RISK OF ELECTRIC SHOCK
DO NOT OPEN
Spotify................................................................................................................................................................11
System settings ...........................................................................................................................................12
Equalizer...........................................................................................................................................................12
Streaming audio quality........................................................................................................................12
Network settings........................................................................................................................................12
Controlling with mobile app..............................................................................................................14
Specications
General specications.............................................................................................................................18

USER MANUAL Live Radio Media PlayerUSER MANUAL Live Radio Media Player
Before you start
02
Live Radio is an internet radio and podcast player with a built-in Spotify* connect.
USB ash drive player, FM and DAB+ tuner, Bluetooth receiver, Wi-Fi, and Ethernet connections.
Device can be controlled remotely via iOS and Android apps. Comes with IR remote control in the
box.
FEATURES
• Live Radio
• Spotify connect
• Podcast
• USB ash drive player
• FM and DAB+ tuner
03
1. Main power plug |2. WiFi antenna | 3. RCA audio output | 4. 3.5mm audio output |5. LAN cable socket (RJ45) |6. Optical & Coaxial output
7. DAB/FM antenna
Front Panel | Live Radio
Rear Panel | Live Radio
1. Power switch |2. USB port |3. Remote control sensor |4. Mode |5. Backward |6. Play/Pause |7. Forward | 8. Display |9. Internet radio
10. Preset |11. Menu/Info |12. Back |13. Menu navigation and volume control
Operation
• Bluetooth receiver
• iOS and Android app control
• Color LCD
• Analog and digital audio outputs
INTERNET RADIO MENUINFO
OK
PRE/MEM. BACK
USB IN
MODE
Background color – Black
Print color – PANTONE 429C
AC INPUT
W-LAN
AUDIO OUT
ETHERNET OPTICAL COAXIAL
DIGITAL OUT
DAB/FM-ANT
ANALOG OUT
R
L
34 5
26 7 98 1310 1211
1
INTERNET RADIO MENUINFO
OK
PRE/MEM. BACK
USB IN
MODE
Background color – Black
Print color – PANTONE 429C
AC INPUT
W-LAN
AUDIO OUT
ETHERNET OPTICAL COAXIAL
DIGITAL OUT
DAB/FM-ANT
ANALOG OUT
R
L
1 2 4 65 73
*SPOTIFY FOR PERSONAL USE ONLY
As laid in Spotify Terms and Conditions, Spotify service is only for personal, non-commercial use.
This means it is not allowed to broadcast or play Spotify publicly from a business.

USER MANUAL Live Radio Media PlayerUSER MANUAL Live Radio Media Player
Remote Control No Name Function
1. Spotify This is a shortcut button to activate Spotify music player.
Please follow instructions the screen to play music from your premium Spotify account.
2. Backward Press this button to change the audio track on Spotify or media player.
Press and hold this button to start radio station scanning.
3. Play/pause Stops/starts playing audio from Spotify, USB flash, or other music sources.
A long press of this button enables or disables Live radio wireless connection.
4. Repeat button Two repeat options are available there. Repeat the same audio track or repeat all playlists.
5. Random playback All tracks on the USB or Spotify playlist can be played in random order. During playback mode press the RANDOM button
on the remote control. After all the tracks have been played, the playback will stop automatically.
6. Info Press this button to show menu of the playing music source.
7. Back Press this button to go back to the previous menu page.
8. Mode Select one of the following music sources: Internet radio, pods casts, Spotify, music player, Dab radio, FM or Bluetooth.
9. Menu navigation Allows users to navigate the menus. Press OK button to confirm selection.
10. Volume control Buttons to adjust the volume level.
11. Menu Button to enter the menu.
12. Mute This button setVolume level to 0
13. Stop Button to stop the track.
14. Forward Press this button to change the audio track on Spotify or media payer. Press and hold this button to start radio station scanning.
15. Internet radio Activates internet radio.
16. LCD backlight dim There is a possibility to adjust LCD screen brightness. User can select three LCD backlight brightness levels.
17. Equalizer presets Live radio has an equalizer set. User can choice between seven already setup EQ presets or set it’s own EQ profile.
18. FM and DAB scan Press and hold this button to activate FM and DAB radio stations auto-scan.
19. Preset menu navigation Navigation buttons to open and navigate presets list. Select preset from the list and press OK to start playing.
20. Preset numeric keypad It’s a shortcut keypad for quick access to saved presets. Short press starts playing preset of corresponding number.
21. Preset menu Every music source has its separate presets list. Long press this button to save preset: select preset from the list and press OK.
Short press this button to view saved presets list. Select preset from the list and press OK to start playing.
1
19
19
21
10
13
15
17
14
16
18
2
4
6
8
9
10
11
12
3
5
7
Operation Operation
Front panel
POWER SWITCH
LIVE RADIO main power on/o.
Standby mode power consumption is 1.9 W.
USB PORT
supports up to 128GB size USB2.0 and USB3.0 ash drives.
REMOTE CONTROL SENSOR
Detector to receive IR control command from remote control.
MODE
Select one of the following music sources: Internet radio, podcasts, Spotify, music
player, Dab radio, FM or Bluetooth.
BACKWARD
Press this button to change the audio track on Spotify or media payer.
Long press starts radio station auto-scanning.
PLAY/PAUSE
Stops/starts playing audio from Spotify, USB ash, or other music sources. A long
press of this button enables or disables Live radio wireless connection.
FORWARD
Press this button to change the audio track on Spotify or media payer.
Long press starts radio station auto-scanning.
DISPLAY
color LCD display shows menu status of the device and main information about
the radio station or track. Dierent type of information can be displayed on the
screen by pressing MENU/INFO button.
INTERNET RADIO
Shortcut to activate internet radio.
MENU/INFO
Press and hold this button to show menu of the playing music source. The menu
content depends on music source: FM radio, internet radio, music player or
Spotify have a dierent menu. After a short press, this button works like an info
button. LCD screen shows information about the currently playing station and
additional information about the artist and the title of the track. Press MENU/
INFO button multiple times to display dierent type of information.
PRESET
Every music source has its own preset list, press this button to show presets, use
rotary encoder to navigate and select.
BACK
Allows navigate menu, goes back to the previous menu page.
MENU NAVIGATION AND VOLUME CONTROL
Rotate encoder in default screen to adjust device volume or push it to change
LCD look. Inside main menu this encoder is used to navigate and enter menu.
Rear panel functions
AC INPUT
This is main power plug. Use power cable included to the package.
WIFI ANTENNA
SMA male connector for Wi-Fi antenna. Antenna is included.
04 05
20

USER MANUAL Live Radio Media PlayerUSER MANUAL Live Radio Media Player
Operation Operation
06 07
RCA AUDIO OUTPUT
Main stereo audio output RCA type connectors.
3,5MM AUDIO OUTPUT.
Stereo audio output 3,5mm. TRS Jack type connector.
OPTICAL & COAXIAL OUTPUT
Digital Audio outputs. TOSLINK and RCA connectors.
FM/DAB ANTENNA
F type female connector. Antenna is included in the box.
Getting started
Connect the power cord to the power outlet after completing all other
connections.
QUICK SET UP GUIDE
Please ensure that WLAN and DAB/FM antennas are connected.
Connect the audio cables and the main power cable. Turn on the radio by
pressing the POWER button.
To change the device language before starting the setup wizard, press the
following:
Main menu > System settings > Language
SETUP WIZARD
After the rst power on unit runs through a setup
wizard to congure settings for date, time, and network.
Once this has nished, the system is ready to use in
most modes.
Note! To change these settings later or start the setup
wizard again: select Menu > System settings > Setup
wizard
The Network settings can be set later by manually running the Network wizard,
selecting Menu > System settings > Network >Network wizard.
Select Yes to start the setup wizard. If you choose No, a second screen will ask you
to run the setup wizard next time and system starts without congured time/
date and network settings.
Note! If the main power goes down while the wizard is in progress, the wizard
will run again next time
NETWORK CONNECT
Live radio is compatible with all commons network protocols and encryption
methods, includingWi-Fi Protected Setup (WPS). To connect Live radio to the wireless
network, you need to know a Wi-Fi wireless router or access point’s password.
To enter the network’s key (password), use the rotary encoder to highlight the
next relevant character and press select.
Backspace, OK, and Cancel are located to the right of the password screen. These
menu options can be achieved using the rotary encoder or pressing the MENU/
INFO button. The MENU/INFO button allows an instant jump to the Backspace
option and back again.
WPS SETUP
WPS encrypted networks are identied by‘[WPS]’at the
start of the Network name and have two connection
methods.
Select one and follow the methods:
Push Button: Allows connecting to Wi-Fi network by
pressing the WPS button on the router.
1. Activate Push button option.
2. Press the WPS button on the router or access point.
3. Press the rotary encoder on the Live radio to start connecting.
PIN: Generates an 8-digit code number which you enter into the wireless router
WPS Menu
Push Button
PIN
Skip WPS
>
>
>
SSID
Your Wi-Fi
Other Wi-Fi 1
Other Wi-Fi 2
Other Wi-Fi 3
Other Wi-Fi 4
or access point.
Skip WPS: Live radio asks to enter a Wi-Fi password on the next window. Use a
rotary encoder to select the password letters and numbers and select OK.
If connecting fails, return to a previous screen to try again. Use the Back or Menu
buttons to exit.
Note: Live radio remembers the last four wireless networks it has connected to
and automatically tries to connect to whichever one of them it can nd. You can
see the list of registered networks through Menu > System settings >Network >
Network prole
You can delete unwanted networks by turning and pressing the rotary encoder
dial and then conrming delete.
There are also other options for viewing and manually adjust network settings.
Skilled users who have experience with network setups may nd more options
for diagnosing and xing network problems.
Please nd more settings there:
Menu > System settings > Network.
MODE MENU
Live radio supports FM and DAB radio, Spotify, a Podcast
player, a USB music payer, and a Bluetooth receiver.
Any of these listed music sources can be found and
selected in the MODE menu. Use the rotary encoder to
navigate the menu. Press it activates the selected music
source.
Setup wizard
Start now?
NOYES
Key:
CANCEL
BKSP
OK
0 1 2 3 4 5 6
7 8 9 . _ - @
, a b c d e
f g h i j k l
m n o p q r s
a
Internet Radio

USER MANUAL Live Radio Media PlayerUSER MANUAL Live Radio Media Player
To recall the radio station, click the preset button on the remote control or in the front
panel. Select a radio station by using a rotary encoder and press it to save the preset.
DAB AND FM RADIO. Press the MODE button and use the rotary encoder to select
DAB radio or FM from the Home menu. When you activate the radio the rst time, it
will perform an auto-tune to nd all available stations and tune into one when nished.
DAB radio settings: Live radio automatically scans for
radio stations at the rst
DAB radio activation.
All the found stations will be stored automatically. Radio
station scanning can be activated manually by selecting
the “SCAN” option in the DAB radio menu.
Radio station searching: There is the option to search through Internet
broadcasts for stations with particular keywords in their title. Select the search
function and add keywords to the search submenu.
Location: Choose an Internet broadcast from any location. Select a continent
from the Live radio menu. A list of countries in the selected area will be available
to check. Select a country and available internet radio stations list will be
displayed. Click on liked radio station to listen.
Popular: This is a list of the most popular internet stations from around the world.
Discover: Allows you to select from a list of stations dened by their origin
(Country), Genre (style of music), or language. Navigate through the category
options; once you have made your selection, a screen conrms your selected
category and the number of stations within that category. To see the list, select
the option showing the number of available stations.
Now playing information. While the stream is playing,
the screen shows its name and description. If artist and
track information is available, it also will be displayed. To
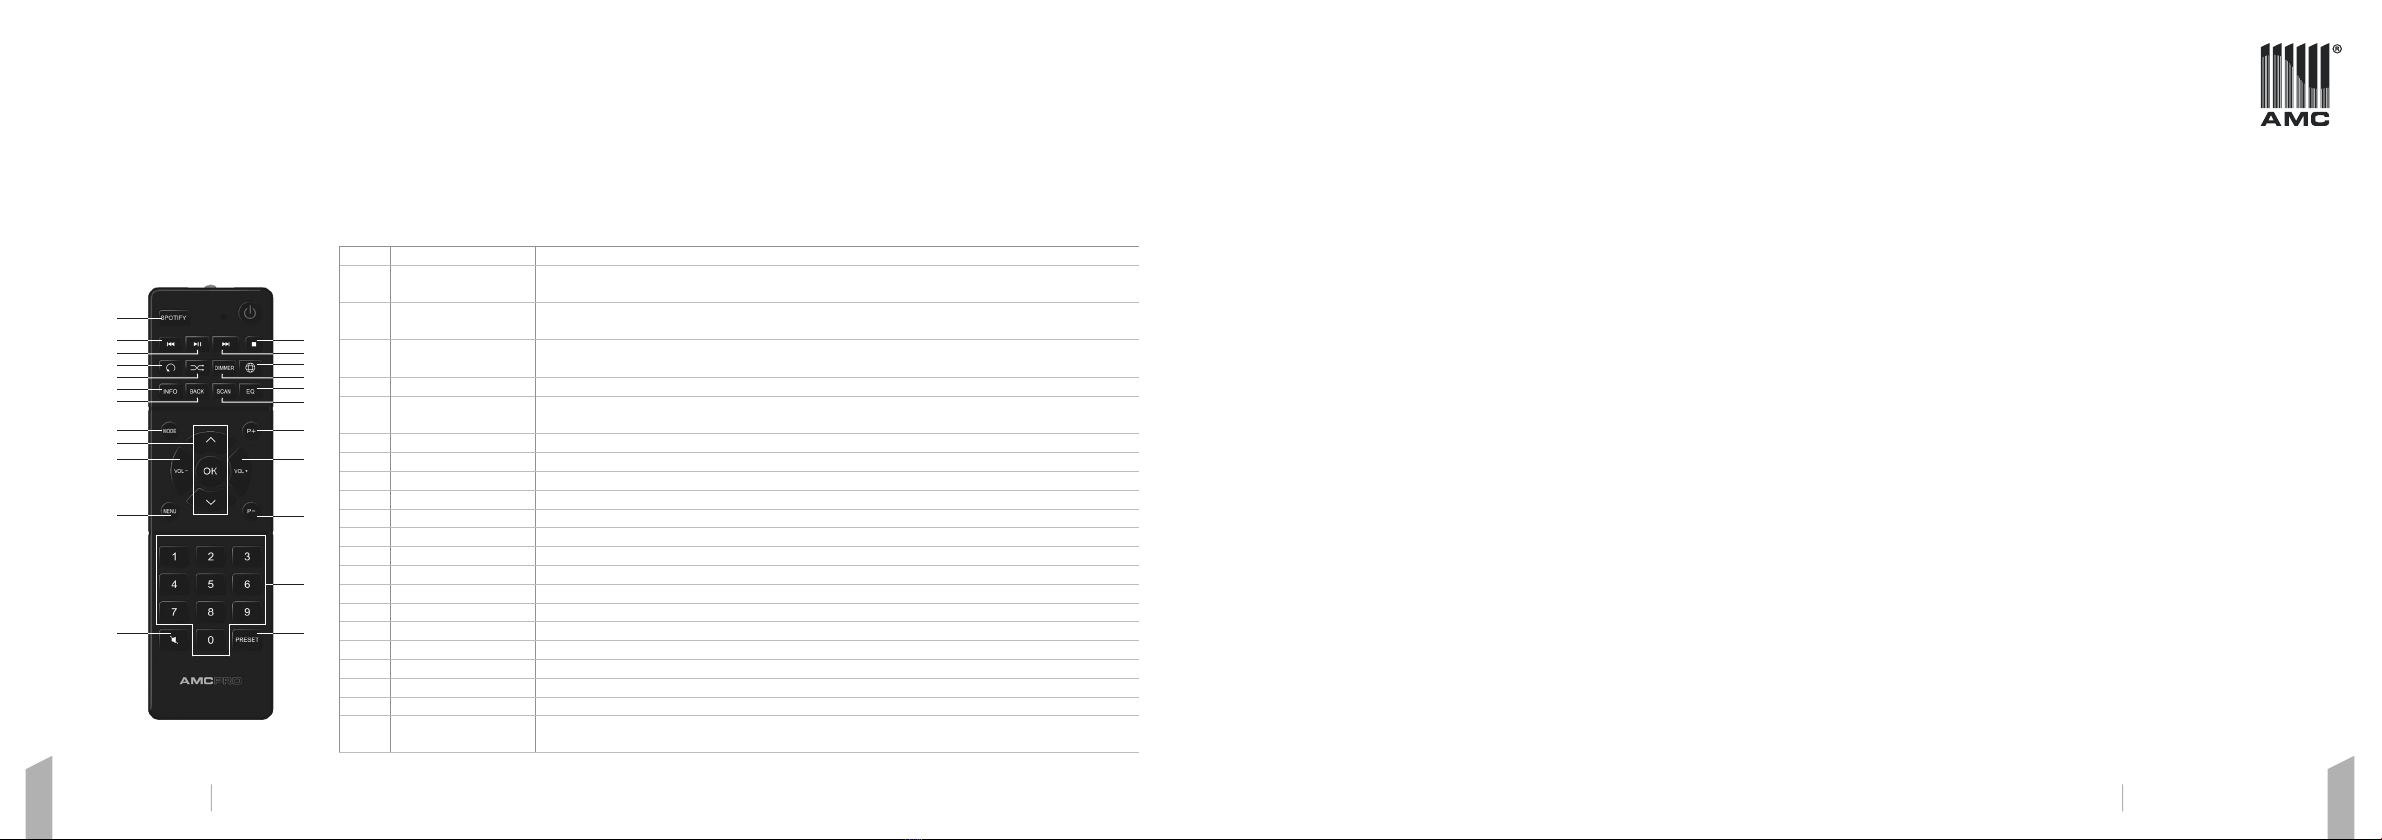
view further information press the MENU/INFO button.
Each time you press the MENU/INFO button, another
set of information is displayed, cycling through the
following details: Artist, Slogan (default; where available),
Language/Location, Codec and sampling rate, Playback buer, Today’s Date.
Add radio station to preset: There is an option to add radio stations to presets.
To store the currently playing station, press and hold the preset button on the
remote control or in the front panel. When selecting the preset number, push the
rotary encoder to save the radio station to preset.
INTERNET RADIO. Live radio gives access to thousands of internet radio
stations and podcasts. When you access the Internet radio menu, the LIVE RADIO
automatically receives the list of Internet radio stations.
The service ensures that you always have a reliable
selection of stations. Use the rotary encoder or remote
control to navigate the pre-sorted station list.
To start listening internet radio press the MODE
button and select the internet radio icon. Live radio
automatically starts playing the last listed radio station.
You can listen to a wide range of radio stations. Press the BACK or hold the MENU
button to select one of the following options:
Last listened: This is a list of last played radio stations
to help quickly nd and play radio stations one more
time. Live radio updates this list whenever the user
plays a new radio station.
Five radio stations in total are listed on this menu.
Local radio stations: Live radio automatically
detects location and suggests
users to listen local radio stations. To start using this
option click the rotary encoder to discover radio
stations in your country.
Internet radio
Last listenedPIN
Station list
System settings
Main menu
>
>
>
>
Last listened
European Hit RadioPIN
Kelyje Kaunas
M-1
Radio Paradise Mellow Mix
Radio Paradise Main Mix
Recall from Preset
Radio Paradise Mellow Mix
2. BBC Radio 6 Music
3. [Not set]
4. [Not set]
5. [Not set]
DRC
DRC high
DRC low
DRC o
Save to preset
1. Radio Paradise Mello...
2. BBC Radio 6 Music
3. [Not set]
4. [Not set]
5. [Not set]
Internet radio
LithuaniaPIN
Search
Location
Popular
Discover
>PIN
>
>
>
>
Internet radio
Radio Paradice Mellow Mix
16:00
Bit rate: 319 kbps
Code: ACC
Sampling rate:
44.1 kHz
DAB
Station listSearch
Scan
Manual tune
Prune invalid
DRC
>PIN
>
>
MANUAL TUNE. As well as the auto-tune function, you can manually tune the
receiver. It allows adding new stations missed during auto-tuning. To activate the
manual tune hold the MENU/INFO button to bring the main menu. Select the
Manual Tune option to start.
Prune Invalid: To remove all unavailable stations
from the list, press and hold the MENU/INFO button
to activate the main menu. Select the "Prune invalid"
menu option and press the rotary encoder. Live radio
will show a new window to conrm the selection.
DRC (Dynamic Range Compression): If you are
listening to music with high dynamic range in a noisy
environment, you may wish to compress the audio
dynamic range to equalize the quietest and loudest
audio tracks. There are three options to select. Use
rotary encoder or remote control navigation buttons to
set compression level.
FM radio settings: There are two options how to
scan radio stations. The rst one is auto-scan. Press
and hold the backward, and forward buttons or hold
the rotary encoder to start the scan function. Live radio
stops scanning while next to a strong signal FM radio
station. The second way is manual FM tuning. Press the
backward or forward buttons briey it allows adjusting
Prune Invalid
This removes all invalid
stations, continue?
NOYES
FM
Scan settingsPIN
Audio settings
System settings
Main menu
>
>
>
Operation Operation
DAB Radio FM Radio
08 09

USER MANUAL Live Radio Media PlayerUSER MANUAL Live Radio Media Player
the radio frequency by 0.05MHz steps.
There is a menu to adjust some scan and audio settings. Scan settings give a
choice to select the station with a strongest radio signal. It helps to avoid
detecting static noise as a radio station or stop scanning on weak FM signals.
Audio settings menu - option to set audio signal type: mono or stereo.
BLUETOOTH RECEIVER. Before you can stream audio, you need to pair your
phone or tablet rst. Bluetooth pairing varies on dierent mobile devices. See
your mobile device manual for specic information.
Press the MODE button and turn and press the rotary encoder to select the
Bluetooth icon from the Home screen.
Pairing Bluetooth: The ashing Bluetooth icon indicates that receiver not paired
to the Bluetooth device.To pair, select the option to add a new Bluetooth device on
your smartphone according to your smart device instructions. Live radio will be
displayed on the list of available devices that appear on the mobile device screen.
Your mobile device will connect automatically once pair. After pairing Bluetooth
icon stops blinking.
Setup Bluetooth: You can only have one mobile device connected via Bluetooth
at a time. If you want to stream audio from a dierent mobile device, you need
Bluetooth
Bluetooth Discoverable
16:00
Please connect with
a device to:
Live Radio
Bluetooth 16:00
0:00 0:00
to disconnect the device that is currently connected. There are two ways how to
disconnect Bluetooth. The rst way is: Open Bluetooth settings on a smartphone
or tablet and disconnect the Live radio by following device instructions.
Second way: Push and hold the MENU/INFO button on
Live radio and select the Setup Bluetooth menu. Live
radio automatically disconnects the current device after
this step.
View details: menu shows the connected device name,
AVRCP version, paired device list, and current paired
devise name.
PODCAST. When you access the podcast radio
menu, the LIVE RADIO automatically receives the list of
available podcasts. The online service ensures that you
always have a fresh podcast list. Use the rotary encoder
to select the last listed podcast or go to the podcast list
to search and select new. The podcast menu is similar to
the internet radio menu:
Last listened: This is a list of last played podcasts
to help quickly nd and play it one more time. Live
radio updates this list whenever the user plays a new
broadcast. There is a memory of the ve last played.
The podcast list gives availability to select more options
and nd broadcasts according to your needs.
Local podcast: Live radio automatically detects the location and suggests user
listen local broadcast. To start using this option, click the rotary encoder in your
Bluetooth
Setup BluetoothPIN
View details
System settings
Main menu
>
>
>
>
Podcasts
Last listened
Podcast list
System settings
Main menu
>
>
>
>
Music player
USB playback
My playlist
Repeat play: On
Shue play: On
Clear My playlist
>PIN
>
country name and select the needful broadcast to
listen.
Search: There is an option to search for podcasts with
particular keywords in their title. Select the search
function and add keywords to the search submenu.
Location: Choose podcasts from any location. Select a
continent from the Live radio menu. A list of
countries in the selected area will be available to check. Select a country and available
podcast list will be displayed. Click on liked to start listen.
Discover: This menu allows you to select from a list of broadcasts dened by their
origin, genre, or language. Navigate through the category options once you have made
your selection, Live radio shows your selected category and the number of matching
podcasts. To see the list, select the show podcasts menu. The number near this menu
indicates the total number of matching broadcasts.
MUSIC PLAYER. Live radio supports USB 2.0 and USB 3.0 ash disks up to 128GB.
The player supports basic control options: Play/pause, backward/forward, repeat,
and shue play.
Press the play/pause button to pause the track that is
currently playing. If you have paused before, press again
to resume playback. During Play or Pause mode, click
the button “Backward” or “Forward” to go to the next
track or go back to the beginning of the current audio
track.
Repeat Playback: Press repeat once on the remote control or in the menu
window to start the repeat folder. The repeat symbol on the screen indicates an
active function.
Random playback: Audio tracks on the USB can be played in a random order.
During playback mode, Press the “random” button on the remote control or use
the menu. The random indicator will show on the display.
NOTE! The unit can only play MP3 and WMA le formats from USB.
The unit may not be compatible with all USB devices.
SPOTIFY. Live radio payer can be used to play audio from the Spotify account. To
start playing open Spotify app on your mobile device or computer and start playing
any content in Spotify. Press device selection icon at the left bottom of the screen and
select Live radio player to link audio from Spotify to the Live radio player.
Podcasts
LithuaniaPIN
Search
Location
Discover
>PIN
>
>
>
Operation Operation
Bluetooth audio FM Radio
10 11

USER MANUAL Live Radio Media PlayerUSER MANUAL Live Radio Media Player
There is an option to start playing Spotify on the Live radio.To do this need to activate
Spotify on the main live radio menu and press the play button. In this case, live radio
starts to play the last listening playlist used on Live radio or link the current playing
playlist on the last used device.
SYSTEM SETTINGS. Menu allows setting all main live
radio parameters. These settings are available from any
other Live radio menu, usually located at the end
of other menu choices. Press and hold the menu/info
button and use the rotary encoder to scroll and nd the
system settings menu.
EQUALIZER: Live radio already have a wide range of EQ
presets. Despite this there is an option to set its own EQ
preset. To set custom EQ, select "My EQ prole setup" and
set bass and treble level according your needs. Save your
settings and change EQ preset to My EQ.
NETWORK SETTINGS. Live radio menu for network conguration.
Network wizard: Please check the setup wizard in the quick setup guide located
at the beginning of this user manual.
PBC WLAN setup: Wi-Fi Protected Setup (WPS) designed connect to a secure
wireless network device easier. To connect Live radio to the local wireless
network, please activate the PBC WLAN setup and push a WPS button on the
router. Follow the guide on the screen and click the rotary encoder to start a
connection. Note! Not all Wi-Fi routers and access points support WPS functions.
Please check your Wi-Fi routers and access point's user manual or visually check
the WPS button on the network device.
Manual settings: This menu is for setting-up network
parameters manually. Live radio supports wired and
wireless connections. After manual setup, device
keeps these connection settings untill factory reset
or reconguration. Live radio only uses connection
methot that is selected and does not switch between
wired and wireless connections automatically.
Wired: This connection type requires Ethernet cable. Two network options
available here: using DHCP or enter IP address manually. "DHCP enable" menu
option should be selected In order to use DHCP service.
1. Enter to PBC Wlan setup.
2. Press WPS button on Wi-Fi router or access point.
3. Click the rotary encoder to start a connection.
View settings: menu designed to show all network settings of the Live radio
player.
STREAMING AUDIO QUALITY: Live radio supports the setup of audio quality to
save internet data usage or sure uninterrupted streaming
if data bandwidth is limited. There are three options to
choose from: Low quality / Normal quality / High quality.
Audio bitrate depends on the radio station stream. Device
selects from available bitrates to match these three audio
quality presets. The exact audio bit rate and codec can be
found on the Live radio screen by pressing the info button.
System settings
EqualizerPIN
Streaming audio quality
Network
Time/Date
Inactive Standby
>PIN
>
>
>
>
Spotify
Press Play...
16:00
Operation
Equalizer
Classic
Pop
News
My EQ
My EQ prole setup >
Steaming audio quality
Low quality
Normal quality
High quality
Network settings
Network wizard
PBC Wlan setup
View settings
Manual settings
NetRemote PIN setup
Equalizer
Classic
Pop
News
My EQ
My EQ prole setup >
Bass
Bass 4 dB
-14 0 +14
Treble
Treble 6 dB
-14 0 +14
WPS Setup
Push WPS button
at the other end
Press SELECT to continue
Network settings
Please wait
Connecting. \
View settings
Active connection:
Wired is active
MAC address:
4C:09:FA:1C:14:0E
Wlan region:
Operation
Spotify
In this case Live radio connects to LAN automatically.
In order to setup all networks parameters manually
"DHCP disable" should be selected. In this case user can
manually enter IP address, subnet mask and gateway
address.
Wireless: This connection type in the same way as wired method will ask to
enable or disable DHCP. Also enter the wireless network name (SSID) and select
authentication method.
Connection type 1/9
WiredPIN
Wireless
>PIN
>
DHCP 2/5
DHCP enablePIN
DHCP disable
>PIN
>
IP settings 3/5
IP address
0 . 0 . 0 . 0
Subnet mask
255 . 255 . 255 . 0
Gateway address 4/5
Gateway address
4 . 1 . 1 . 0
Connection type 1/9
Wired
Wireless
>
>
SSID 6/9
0 1 2 3 4 5 6
7 8 9 . _ - @
, a b c d e
f g h i j k l
m n o p q r s
CANCEL
BKSP
OK
Authentication 7/9
Open
WEP
WPA/WPA2
>
>
>
>
>
12 13

USER MANUAL Live Radio Media PlayerUSER MANUAL Live Radio Media Player
Operation
Key: 9/9
CANCEL
BKSP
OK
01 2 3 4 5 6
7 8 9 . _ - @
, a b c d e
f g h i j k l
m n o p q r s
There are available three authentication methods:
Open: This option dedicated to the wireless network
without the password.
WEP – Older generation Wired Equivalent Privacy
encryption and user authentication method.
WPA/WPA2 – Most widely used authentication method.
Note: WEP or WPA/WPA2 depends on the Wi-Fi router
or access point conguration. Ask your network administrator if you are unsure
which method is applied to your network, or try both WEP and WPA/WPA2.
NetRemote PIN Setup: Live radio can be control by smartphone using UNDOK
App. To prevent unauthorized control PIN code for access to live radio can be set
in the Live radio menu named“NetRemote PIN Setup”. UNDOK app does not ask
PIN code if the default PIN set to Live radio, otherwise app will ask to enter a PIN
code to allow control.
The default PIN code is 1234.
Controlling with mobile app: The device can be control by using iOS or
Android smartphone or tablet. Users can choose to download one of two
available apps: UNDOK or OKTIV. Users can view and control all main device
functions. Search for UNDOK or OKTIV apps in Google Play or Apple Store, and
install it on your smartphone or tablet.
Before using the app, ensure that the device and the smartphone/tablet are on
the same WiFi network. Launch the app and scan for live Radio in the network.
NetRemote PIN Setup
CANCEL
BKSP
OK
0 1 2 3 4 5 6
7 8 9
1 2 3 4
Time/Date settings: The clock will automatically set itself using your Network,
digital or FM radio signal. If the time or date does not update automatically, you
can manually set it using this option.
Note: Any time or date updates received by a digital broadcast will override
manual settings.
To set the time and date manually, open the “Set time/Date” menu option. Turn
the rotary encoder to set the day and press it to save settings and jump to month,
year and time adjustment. Live radio brings back to the Time/Data menu after all
data parameters will be set.
Network prole
AMC2017
Clear network settings?
NOYES
Network settings
Keep network connected?
NOYES
Network settings
System settings
Equaliser
Streaming audio quality
Network
Time/Date
Inactive Standby
>
>
>
>
Time/Date
Set Time/Date
Auto update
Set format
Set timezone
Daylight Standby
>
>
Set Time/Date
12 - 12 - 2099
22:27
Operation
Auto update: Live radio can synchronize the time and
date by using a control signal from the FM, digital radio,
or network signal. To specify the clock synchronization
options enter to Auto update menu and press the
rotary encoder to choose between the ‘Update from
DAB’, ‘Update from FM’, ‘Update from Network’, and ‘No
Update’clock synchronization options.
Set format: Set time format, choose between 12 or 24
hours.
Auto update
Update from DAB
Update from FM
Update from Network
No update
12/24 hour format
2412
Date/Time
14 15
Network Prole: It's a list of ever-used Wi-Fi networks.
This list helps to easily reconnect to the previously used
network.
OKTIV
for Android
OKTIV
for iOS
UNDOK
for Android
UNDOK
for iOS
Clear network settings: Menu option to clear list and
settings of ever used networks.
Keep network connected: This option keeps the
network connected even if the Live radio stays in
standby mode.

USER MANUAL Live Radio Media PlayerUSER MANUAL Live Radio Media Player
Operation
Set Time zone: This option allows setting time zone
according to your location. It helps to set up the correct
time if auto-update functions are activated.
Daylight saving: This function moves the clocks forward one hour from
standard time during the summer months and changes them back again in the
fall. Menu has two options, it’s possible to enable this function or disable it.
Inactive standby: Use the Inactive Standby to turn o the unit after a certain
time in play mode. It’s available to set timer from 2 till 6 hours.
Language: Setting to set Live radio menu language.
Default Language – English.
Info: This menu holds all the information about the
Live radio device, like rmware and Spotify version,
Radio ID and name.
On level: Option to set up default LCD backlight brightness. There are three
options to choose High, Medium, or Low.
Dim level: Setting to adjust dimmed LCD backlight brightness. Two options are
available: Medium and low.
Backlight: Option to adjust screen backlight
brightness.
Timeout: allows adjusting the duration of the bright
backlight, till it goes to dimmed stage. Time can be set
in a 10 – 180 sec period. Set this parameter to ON, to
specify that the backlight should always remain active.
Factory reset: Recover Live radio factory parameters.
Software update: This menu setting up software update feature. There are two
options to choose: Automatic software update and instant update checking.
Auto update function should be enabled in Auto-Check
setting menu. For instant rmware checking press
“Check now”menu. Text message on the screen informs
rmware status if software is up to date, otherwise
rmware update wizard will show up on the screen.
Follow the wizard to update if Live radio detects new
rmware.
Software update
Auto-check settings
Check now
Proceed?
NOYES
Factory reset
Check periodically for
new versions?
NOYES
Software update
Checing for
new versions... /
Software updateLanguage
German
French
English
Spanish
Dutch
Software up to
date
Info
SW version:
Update ir-cui-FS2340-0000-0465_
V4.9.5.8c22c0.EX9_3-1A7
Spotify version:
HEAD-v3.200.445-gf142e
Backlight
Timeout
On level
Dim level
>
>
>
Operation
Set timezone
UTC +02:00: Athens, Cairo
UTC +02:30:
UTC +03:00: Moscow, K...
UTC +03:30: Tehran
UTC +04:00: Abu Dhabi...
16 17

USER MANUAL Live Radio Media Player18
General Specications
Live Radio Media Player
Max power consumption 4 W
Power supply 220-240V ~50Hz
Standby power consumption 1.9 W
Music sources
Internet radio, Spotify connect, Podcasts payer,
Bluetooth, DAB+ radio, FM radio, USB flash disk player
USB flash support - USB2/USB3 up to 128 GB
Inputs 75 Ω unbalanced FM antenna terminal 2.4 GHz SMA
terminal for Wi-Fi antenna RJ45 (Ethernet) cable terminal
Outputs Stereo RCA, Stereo 3,5 mm Jack, Optical output
TOSLINK, Digital Audio RCA
Max output level 0 dBu
FM frequency range 87.5 – 108 MHz RDS support
DAB+ frequency range 174–240 MHz
FM preset stations 30
Internet radio preset stations 30
The specications are correct at the time of printing
this manual. For improvement purposes, all specications
for this unit, including design and appearance, are
subject to change without prior notice.
Other manuals for LIVE Radio
3
Table of contents
Other AMC Media Player manuals