American Printing House PageBlaster 1-08075-00 User manual

PageBlaster
User Guide
Copyright © 2020


Table of Contents
I
ntr
odu
cti
o
n t
o
the Em
bo
sser
5
Safet
y
Information
5
Gettin
g
Started
6
U
npackin
g
the Embosser
6
In the box 6
P
h
y
sical Descri
p
tion
7
T
o
p F
ace
8
Under the Lid 8
Control Panel 9
Embosser Status Backlight 10
S
p
eech Feedback
11
L
eft Si
d
e
11
R
i
g
ht Side
12
Ba
ck Si
d
e
12
H
ow to Set up Pa
g
eBlaster Before Use
1
4
I
nstallin
g
the Printer Driver
15
I
nstallin
g
the Windows Driver
15
Mac OS X 16
Linux (Debian/Ubuntu) 16
M
akin
g
Network Connections
1
7
Connectin
g
to a Wired Network
1
7
Connectin
g
to a Wi-Fi Network
18
Connectin
g
via Wireless Protected Setup (WPS)
1
9
U
sin
g
BrailleApp to Control Pa
g
eBlaster
1
9
I
nstallin
g
BrailleApp
1
9
P
airin
g
to Your Embosser Usin
g
Bluetooth
20
U
pdatin
g
the Embosser Firmware
21
3

U
pdatin
g
Usin
g
an Internet Connection
22
U
pdatin
g
Usin
g
a USB Flash Drive
22
E
mbossin
g
in Braille
23
U
sin
g
an External Braille Translator
23
E
mbossin
g
with BrailleBlaster Translator
23
E
mbossin
g
with Direct-Braille-Braille Translator
25
E
mbossin
g
Tactile Graphics Usin
g
Firebird App
26
L
oadin
g
and Usa
g
e of Braille Paper
2
7
Su
pp
orted Pa
p
er Sizes
2
7
L
oadin
g
Paper into the Embosser
28
U
tilizin
g
the Buttons and Menu
2
9
E
m
bo
sser B
u
tt
o
n
O
verview
2
9
Bu
tt
o
n F
u
ncti
o
n T
ab
les
30
M
en
u
F
u
ncti
o
n T
ab
les
33
U
tilizin
g
Layout Settin
g
s
40
U
tilizin
g
Embosser Wizards
40
Layout Wizards Tables 41
Proper Trademark Notice and Attributions 45
C
ontactin
g
APH
C
ustomer
S
ervice
45
Warranty 46
App
rovals
47
F
CC Com
p
liance
47
I
C com
p
liance
48
Conformité aux normes d’IC 49
B
luetooth
Q
ualification
50
4

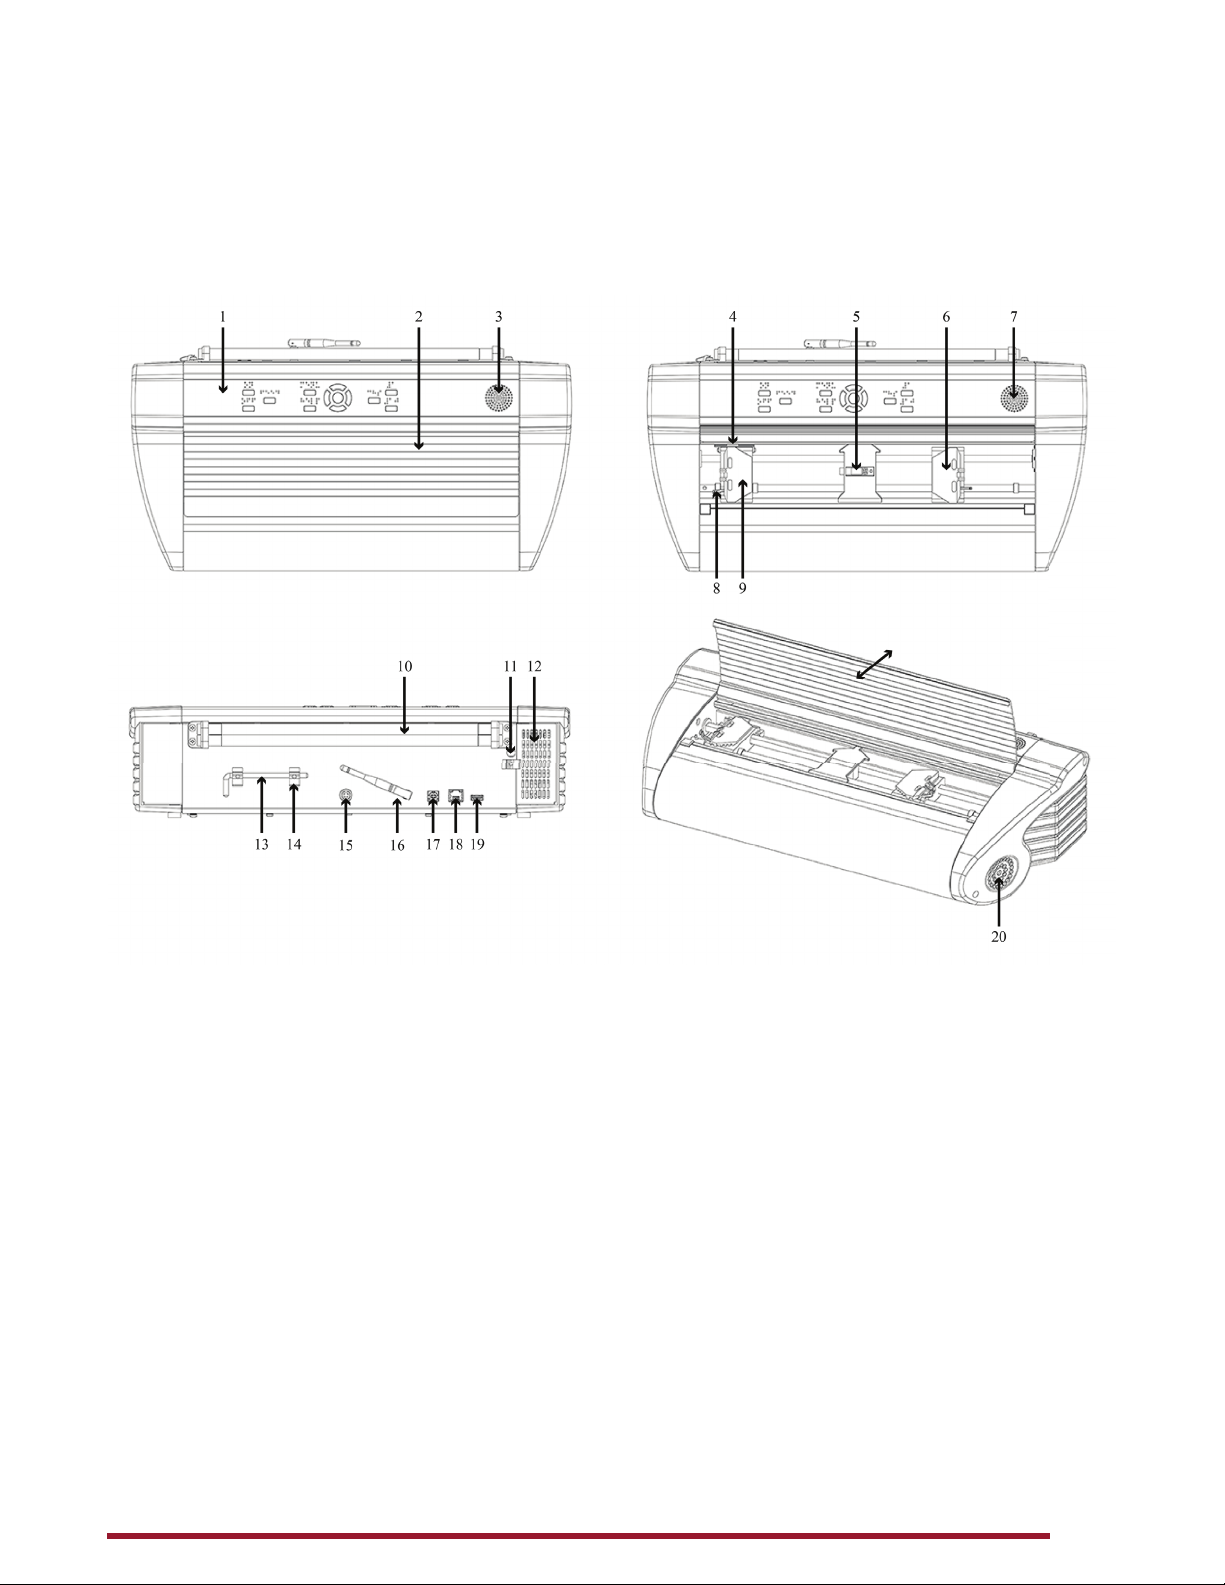
Introduction to the Embosser
The Pa
g
eBlaster embosser provides double-sided embossin
g
for braille text with capabilities to include sin
g
le-sided tactile
g
raphics.
PageBlaster is compatible with third party products such as
BrailleBlaster™ and Duxburyversion 12.5 or above, Braille
2000 version 2.275 or above, braille translation software. You
can use it to print braille from braille note takers such as the
Braille Note Touch and Braille Note Touch Plus.
P
a
g
eBlaster uses Firebird software takin
g
tactile
g
raphics to a
n
e
w l
e
v
e
l.
Up
dates and additional information is available on the APH
P
a
g
eBlaster webpa
g
e at https://www.aph.org/product/
pageblaster/
.
Safety Information
P
lease read the safety instructions before usin
g
the embosser.
I
n addition, abide by all warnin
g
s and instructions marked on
the em
bo
sser itself.
•
P
lace the
p
rinter on a secure, stable surface.
•
D
o not block the ventilation inlets and outlets for
p
ro
p
er
a
irfl
o
w m
a
inten
a
nce.
•
Connect the embosser to a
g
rounded power outlet only.
WARNING:This is a class A product. In a domestic
environment, this product maycause radio interference,
in which case the user maybe required to take adequate
measures.
WARNIN
G
:
The user is recommended to use ear
p
rotection
o
r an Acoustic Hood to reduce the sound pressure. Lon
g
-time
e
xposure without protection can lead to hearin
g
loss.
5

Getting Started
Unpackin
g
the Embosse
r
P
lease unpack the embosser
g
ently, and check to make sure
a
ll liste
d
items
a
re in the
bo
x.
IMPORTANT: Save the box, packin
g
material, and
Trans
p
ort Lock. If any dama
g
e occurred durin
g
shippin
g
,
the packa
g
in
g
is required to settle the insurance claim. The
packa
g
in
g
materials are also required to ship the embosser
for service. When packin
g
the embosser, carefully wrap tape
a
round the box to prevent the bottom from fallin
g
out durin
g
s
hippin
g
.
V
i
s
it www.aph.org/product/pageblaster/ t
o
w
a
tch the
U
nboxin
g
video.
In th
e bo
x
•
P
a
g
eBlaster embosser
•
N
orth American
p
ower ada
p
ter cord
(
T
yp
e B
)
•
2
International
p
ower ada
p
ter cords
(
T
yp
es F and G
)
•
P
ower su
pp
l
y
•
U
SB-A to USB-B
p
rinter cable
•
P
a
g
eBlaster USB flash drive (includes driver, User Guide,
a
nd software
)
•
P
rint and Braille Quick-Start
g
uide
s
•
H
ardcopy tactile
g
raphic/braille samples
6

Phy
s
i
ca
l D
escr
ip
t
i
o
n
The embosser has a roughly rectangular shape with the front
side curved downwards. This curved edge should be facing
you.
1. Control panel f
2. Lid
3.Speaker
4.Optical paper
movement
sensor
5.Optical paper
edge sensor
6. Right tractor
7.Speaker
8.Tractor release
lever
9. Left tractor
10.Paper rollers
11.Hole for
Transport Lock
12.Ventilation
intake
13.Trans
p
ort Lock
14.Transport Lock
holder
15.
P
ower in
p
ut
4
8V D
C
16.Wi-Fi and
Bluetooth
antenna
17.
U
SB
2
.0 T
yp
e B
device
p
or
t
18.
E
th
e
rn
e
t
N
etwork
p
ort
(
100 MB
)
19.
U
SB
3
.0 T
yp
e A
host
p
or
t
20.
V
entil
a
ti
o
n
ou
tle
t
7

T
o
p F
ac
e
The to
p
face is divided into two sections: the front section and
the
ba
ck secti
o
n.
On the front section is a metallic lid with ei
g
ht horizontal
g
rooves. This lid covers the embosser's paper feedin
g
mechanism and opens by pullin
g
the front upwards and
raisin
g
it towards the back of the embosser.
On the back section is the embosser's control
p
anel.
Under the Lid
The area under the lid holds the embosser's tractor feedin
g
mechanism. This includes left and ri
g
ht tractors mounted
o
n two horizontal rails. The tractors are made of
p
lastic and
a
re rou
g
hly rectan
g
ular. Each tractor includes a trapezoid-
s
haped plastic clip protectin
g
the tracks. These clips, called
tractor doors, need to be open when insertin
g
paper into your
e
mbosser. The left and ri
g
ht clips open by raisin
g
them to the
left and to the ri
g
ht, respectively.
The left tractor is locked in
p
lace and cannot be moved. The
ri
g
ht tractor is mobile and slides horizontally on the rail by
liftin
g
the tractor release lever located on the front-ri
g
ht side
o
f the ri
g
ht tractor. When finished movin
g
the tractor, lock the
release lever for stabilit
y
of the
p
a
p
er feed.
I
n the center of the rails is a small s
q
uare
p
lastic
p
iece. This
is the o
p
tical
p
a
p
er sensor.
8

C
ontrol Pane
l
The Control
p
anel is located above the lid on the to
p
face and
c
onsists of a wide rectan
g
ular strip containin
g
buttons with
braille identification above them, an LED-backlit embosser
s
tatus area, and a s
p
eaker.
F
rom left to ri
g
ht:
•
P
a
g
eBlaster lo
g
owith the em
bo
sser m
od
el n
u
m
b
er
b
el
o
w i
t
•
On and Off butt
o
n
s
– On is the to
p
button; Off is the
bo
tt
o
m
bu
tt
o
n
•
F
eed butt
on
– used for feedin
g
paper throu
g
h the
e
m
bo
sser
•
M
enu and Hel
p
button
s
– Menu is the to
p
button; Hel
p
is the
bo
tt
o
m
bu
tt
o
n
•
5-button ke
yp
a
d
– Up, Down, Left, and Ri
g
ht Arrow
bu
tt
o
ns
a
n
d a
center
O
k
bu
tt
o
n
•
CHS butt
on
– stands for Chan
g
e Si
g
n
•
(
Numbers
)
1
and 10 butt
o
n
s
– 1 is the to
p
button; 10 is
the
bo
tt
o
m
bu
tt
o
n
•
E
mbosser Status backli
g
ht – rectan
g
ular area with LED
backli
g
ht; provides embosser status information
•
S
p
eake
r
–
p
rovides text-to-s
p
eech
(
TTS
)
feedback
9

Embosser
S
tatus Backli
g
h
t
There
a
re f
ou
r r
o
ws
o
f in
d
ic
a
t
o
rs in the Em
bo
sser St
a
t
u
s
backli
g
ht area. The indicators li
g
ht up when a connection is
e
stablished or a messa
g
e is bein
g
relayed.
Startin
g
with the top row, from left to ri
g
ht:
Ro
w
1
:
•
B
luet
oo
t
h
icon – Blinkin
g
when available, steady when
co
nnecte
d
•
Wi-Fi icon – Blinkin
g
when available, steady when
co
nnecte
d
•
Wired netw
o
rk icon – Blinkin
g
when available, steady
w
hen c
o
nnecte
d
•
iDB indicator (Direct-Braille) – Blinkin
g
durin
g
translation,
li
g
hts up durin
g
printin
g
with Direct-Braille
Ro
w 2:
•
P
aper Ed
ge
– Leadin
g
ed
g
e of paper detected
•
H
ea
d
– Li
g
hts up when the print head is in the home
p
osition
1
0

Ro
w
3
:
•
P
a
p
er
M
ove
–
Indicates paper is movin
g
throu
g
h
e
m
bo
sser
•
F
a
n
– Li
g
hts up when the fan is on
•
P
a
p
er
J
a
m
– Li
g
hts up when there is a paper
j
a
m
Row 4:
•
E
rr
or
– Li
g
hts up when there is an error; press Help
bu
tt
o
n f
o
r m
o
re inf
o
•
Up
dat
e
– Activated onl
y
when the embosser is network
c
onnected – Li
g
hts up when an update is available;
blinkin
g
durin
g
a firmware update
•
Out of Pa
p
er
–
Li
g
hts up when there is no paper in the
p
a
p
er
t
rac
t
or
S
peech Feedbac
k
To the far ri
g
ht of the Control panel is the speaker, throu
g
h
w
hich the TTS
p
rovides s
p
eech feedback. The s
p
eech
feedback uses En
g
lish mode by default and can be chan
g
ed
into other lan
g
ua
g
es from the Control panel.
P
a
g
eBlaster embosser uses Acapela synthetic speech, which
s
upports the followin
g
lan
g
ua
g
es: En
g
lish (India, UK, US),
A
rabic
(
UAE
)
, Chinese
(
China
)
, Danish, Dutch, Finnish, French
(
France
)
, German, Greek, Italian
(
Ital
y)
, Ja
p
anese
(
Ja
p
an
)
,
Korean, Norwe
g
ian, Polish, Portu
g
uese (Brazil, Portu
g
al),
R
ussian, S
p
anish
(
Caribbean, Colombia, Mexico, S
p
ain
)
,
Swedish, and Turkish.
Left
S
ide
W
ith the curved side (front) facin
g
you, on the left side and
c
l
o
se t
o
the c
u
rve
d
fr
o
nt is
a
c
o
nc
a
ve circle
o
f six h
o
les. This
is the air intake used to cool down
y
our embosser. Make
s
ure this area is not covered to
p
revent the embosser from
o
verheatin
g
.
1
1

F
urther back is a deeper and lar
g
er hollow area used for
holdin
g
and carryin
g
your embosser.
Right
S
id
e
On the ri
g
ht side and close to the curved front is a lar
g
e
co
nc
a
ve circle
o
f
3
1 h
o
les. This is the ventil
a
ti
o
n
ou
tlet. M
a
ke
su
re this
a
re
a
is never c
o
vere
d
.
F
urther back is a deeper and lar
g
er hollow area used for
holdin
g
and carryin
g
your embosser.
Back
S
id
e
A
t the to
p
of the back side are two horizontal
p
a
p
er rollers
touchin
g
each other. Embossed documents are fed throu
g
h
these paper rollers. Make sure you have enou
g
h space behind
y
our embosser to avoid crumplin
g
the paper as it comes out
o
f the r
o
llers.
10.Paper rollers
11.Hole for Transport Lock
12.Ventilation intake
13.Transport Lock
14.Transport Lock holder
15.Power input 48V DC
16.Wi-Fi and Bluetooth antenna
17.USB 2.0 Type B device port
18.Ethernet Network port (100
MB)
19.USB 3.0 Type A host port
1
2

W
ith the back side positioned toward you, to the ri
g
ht o
f
the rollers is a metal cover with a lattice
p
attern. This is the
v
entil
a
ti
o
n int
a
ke. M
a
ke s
u
re this
a
re
a
is never c
o
vere
d
.
Sli
g
htly below the rollers and directly to the left of the
v
entilation intake is the Trans
p
ort Lock. The Trans
p
ort Lock
is a metal rod with a
g
reen tip and is latched under a metal
s
prin
g
clip.
NO
TE: The Trans
p
ort Lock has to be removed before
y
ou
s
tart embossin
g
.
Startin
g
on the left alon
g
the bottom are six items from left to
ri
g
ht:
1
.
T
ransport Lock holder – For Transport Lock stora
g
e after
it is removed from ori
g
inal transport location beside the
r
o
llers
a
n
d
ventil
a
ti
o
n int
a
ke.
2
.
48
V
DC power input - Connects usin
g
the power adapter
co
r
d
3
. Wi-Fi antenna - For better Wi-Fi reception
NOTE: Make sure the Wi-Fi antenna is not pointingup to
avoid obstructingthe paper flow as the paper exits the
embosser.
4
.
U
SB 2.0 T
yp
e B device client – Used for connection to a
c
om
p
u
t
er
5
.
E
thernet Network – Connects usin
g
an Ethernet cable
NO
TE: Plastic protector plu
g
inside must be removed for
u
s
e
.
6
.
U
SB 3.0 T
yp
e A host
p
ort – For
p
ortable flash drives
13

How to Set up PageBlaster Before
Use
U
se the followin
g
steps to be
g
in settin
g
up your Pa
g
eBlaster
e
m
bo
sser:
1
. Connect the multi-pron
g
ed end of the power adapter cord
into a
p
ower outlet, and the other end into the back o
f
y
our embosser.
The Power
p
ort is circular and is located in the back o
f
y
our embosser, in the center bottom. The connector has
a
movable
p
lastic lock. Pull back on the
p
lastic lock with
the flat side facin
g
up and insert the metal head into the
p
ort. When
y
ou release the
p
lastic lock, the cable should
be securel
y
in
p
lace.
2
.
R
emove the Transport Lock by rotatin
g
the
g
reen tip o
f
the rod towards the Wi-Fi antenna and pullin
g
it strai
g
ht
o
ut
(
located on the back side of the embosser, towards
the ri
g
ht side).
3
.
P
ower on the embosser by pressin
g
the On button (the
first button in the to
p
left of the Control
p
anel
)
.
IMPORTANT: Do this step BEFORE connectin
g
the
U
SB c
o
rd.
Th
e
Wizard to remove Transport Lock
s
ta
r
t
s
a
utomaticall
y
. The Wizard onl
y
starts if the
I
n
s
ert
T
rans
p
ort Loc
k
wizard was completed before shutting
down the embosser. Proceed to “Installin
g
Drivers” if the
W
iz
a
r
d do
es n
o
t r
u
n.
k
4
. Press Ok, and follow the Wizard to remove Transport
Lock steps.
W
hen com
p
leted the embosser restarts and is read
y
to
f
o
r
u
se.
1
4

You now have the choice to connect your embosser directlyto
acomputer usingthe included USB cord, or connect it using
Wi-Fi, an Ethernet cable, or Bluetooth®wireless technology.
NO
TE: Drivers must be installed before establishin
g
any
co
nnecti
o
n. Be s
u
re t
o
install drivers BEFORE connectin
g
the USB c
o
r
d
as this ensures the embosser is
p
ro
p
erl
y
reco
g
nized.
Installing the Printer Driver
You can install PageBlaster software and printer drivers from
the PageBlaster USB flash drive included with the embosser or
by downloadingthem from the PageBlaster product page
on
the APH website.
I
f this is the first installation of the
p
rinter driver, then
p
lease
follow the steps for your operatin
g
system outlined in the
res
p
ective sections.
IMPORTANT: You must install the Pa
g
eBlaster printer
driver on your computer BEFORE connectin
g
the
e
mbosser to the USB
p
ort.
I
nsta
lli
n
g
t
h
e
Wi
n
d
ows
D
r
i
ve
r
To install Pa
g
eBlaster Driver 8.5 or hi
g
her suitable for
W
indows XP, Vista, Win 7, 8, and 10:
1
. Close all a
pp
lications on
y
our PC.
2
.
D
ownload Pa
g
eBlaster Driver 8.5 or hi
g
her from aph.org/
product/pageblaster/
.
3
.
R
i
g
ht click or use the Context Menu key on the driver
installation file, and select Run as administrator.
4
.
Fo
ll
o
w the inst
a
ll
a
ti
o
n wiz
a
r
d
.
5
. Connect the su
pp
lied USB cord.
6
.
Po
wer
o
n the em
bo
sser.
15

NO
TE: For Windows 7 and later versions, the plu
g
and play
Fou
n
d
new h
a
r
d
w
a
re wizard com
p
letes the USB installation.
Mac
OS X
T
o install Pa
g
eBlaster printer driver for Mac OS X 10.8 and
ne
w
e
r:
1
.
D
ouble-click on the
p
rinter driver file.
2
.
F
ollow the installation
p
rom
p
ts for
y
our version of Mac OS
X
.
3
. Go to S
y
stem Preferences and select Printers & Scanners.
4
. Connect the embosser to the com
p
uter via the USB
p
ort.
5
.
Po
wer
o
n the em
bo
sser.
6
.
W
hen you
g
et the start-up messa
g
e, press the Add button
in the dialo
g
box.
7
. Click
o
n the em
bo
sser n
a
me.
8
. Choose Select Printer Software… in the Print Usin
g
list box.
9. Select Index Everest in the dialog.
10.Press Ok, and then Add.
11.Exit System Preferences to complete the embosser
installation.
12.Connect the supplied USB cord to the USB port.
Linux
(
Debian
/
Ubuntu
)
T
o install Linux
p
rinter driver 1.1.0:
1
.
D
ownload the Linux
p
rinter driver.
2
.
I
nstall the printer driver followin
g
the standard installation
p
rocess for
y
our Linux version.
3
. Connect the su
pp
lied USB cord to the USB
p
ort.
4
.
F
ollow the
g
eneral installation process for your Linux
d
istri
bu
ti
o
n.
1
6

Making Network Connections
Connectin
g
to a Wired Networ
k
To connect to a wired network,
y
ou need the IP address for
the embosser. Print the IP address by pressin
g
the Help key
followed b
y
the 1 ke
y
on the embosser Control
p
anel.
A
lternatively, you can do the followin
g
:
1
.
P
ress Menu on the embosser Control
p
anel.
2
.
S
elect Print.
3
. Select Print Test D
o
c
u
ment.
4
. Select Print Netw
o
rk Inf
o
rm
a
ti
o
n.
The network information pa
g
e prints in letter
g
raphics and in
braille and includes the followin
g
information:
•
E
m
bo
sser m
od
e
l
•
Seri
a
l n
u
m
b
er
•
WIRED NET
•
Ma
c
add
ress
•
D
HCP on
/
of
f
•
I
P
add
ress
•
S
ub
net m
a
sk
•
WI
-
FI NET
•
Ma
c
add
ress
•
SS
ID
•
I
P
add
ress
•
S
ub
net m
a
sk
1
7

C
onnectin
g
to a Wi-Fi Networ
k
B
efore connectin
g
to a Wi-Fi network, you must edit the Wi-
F
i Setu
p
file. To do this,
y
ou need to download a text/source
c
ode editor application to chan
g
e the Network Name and
P
assword. If
y
ou do not alread
y
have one, two installers for
the free source code editor Note
p
ad++ are included in the
A
dditional Software folder on your Pa
g
eBlaster flash drive.
N
ote
p
ad++ installer file names:
•
3
2 bit version: n
pp
.7.8.7.Installer.exe
•
6
4 bit version: n
pp
.7.8.7.Installer.x64.exe
After downloadingthe text editor, follow these steps to begin
the Wi-Fi Setup:
1
. Open the text file ESC_C-Re
g
isterWiFi.ibe located on
the USB Flash Drive in the Support Files folder usin
g
N
ote
p
ad++
(
file name: ESCC”SSID””NETWORKNAME”,
”PassPhrase””PASSWORD”;
)
.
T
he file l
oo
ks like this
o
n the fl
a
sh
d
rive:
2.Chan
g
e NETWORKNAME to the name of your Wireless
network. The SSID name is case sensitive and ma
y
c
ontain s
p
aces.
3.Chan
g
e PASSWORD to the password of your wireless
network. The
p
ass
p
hrase is case sensitive.
4.
R
i
g
ht click or use the Context Menu key on the file,
a
nd select Send to direct-Braille, to send the file to the
e
m
bo
sser.
To check
y
our network connection,
p
ress the Hel
p
ke
y
followed b
y
the 10 ke
y
on the embosser Control
p
anel.
I
f connected, it sa
y
s "wireless network" and then
y
our IP
a
ddress. If not, it sa
y
s, "No network connected."
1
8

C
onnectin
g
via Wireless Protected
S
etup
(
WP
S)
To connect usin
g
WPS, do the followin
g
:
1
.
P
ress Menu on the embosser Control
p
anel and select
Co
mm
u
nic
a
ti
o
n.
2
. Select Wi-Fi Netw
o
rk.
3
.
Tu
rn
O
n Wi-Fi netw
o
rk.
4
.
E
nable WPS by selectin
g
Enable Wireless protected setup.
5
.
P
ress
O
k.
6
.
W
ithin 2 minutes,
p
ress the WPS button on
y
our router.
T
he embosser automaticall
y
connects to the internet.
Using BrailleApp to Control
PageBlaster
B
railleApp is a web application that
g
ives you complete control
o
ver
y
our embosser from an
y
com
p
uter or smart
p
hone on
y
our network.
Installin
g
BrailleAp
p
1
.
M
ake sure
y
our embosser is connected to
y
our network.
2
. Obtain your embosser’s IP address by either voicingor
printingyour network information.
To voice the information, press the Helpkeyand then the
10 button.
To print, press the Helpkeyfollowed bythe 1 keyon the
embosser Control panel, OR you can do the following:
a
.
P
ress the Menu ke
y
and select Print.
b
. Select Print Test D
o
c
u
ment.
c
. Select Print Netw
o
rk Inf
o
rm
a
ti
o
n.
19

3
. On a device connected to
y
our network
(
com
p
uter, tablet,
s
mart
p
hone, etc.
)
, t
yp
e the embosser’s IP address in the
w
e
b b
r
o
wser
add
ress
ba
r.
4
. Press Enter.
BrailleApp opens in your browser and is readyfor use.
Pairing to Your Embosser Using
Bluetooth
To pair your embosser with a device usin
g
Bluetooth:
With the C
o
ntr
o
l Panel:
1
.
P
ress the Menu ke
y
on the embosser Control
p
anel and
s
elect C
o
mm
u
nic
a
ti
o
n.
2
. Select Mana
g
e Bluetooth.
3
.
P
ress
O
k.
4
.
A
ctivate Bluetooth on your embosser by clickin
g
the
B
luetooth On
/
Off switch.
5
. Select Make Printer Discoverable and
p
ress Ok.
T
he
p
rinter sa
y
s "Scan from
y
our device and select the
e
m
bo
sser."
6.O
p
en the Bluetooth menu from the device to
p
air with
the embosser, then scan for available devices.
Y
our device should discover Pa
g
eBlaster.
7
. Click C
o
nnect.
T
he embosser sa
y
s "Press ok if the number is the same
o
n the other device" followed b
y
a number.
8
.
I
f the number is the same as the one on
y
our other
device,
p
ress Connect to
p
air device with
y
our embosser.
2
0
Table of contents