manuals.online logo
Brands
  1. Home
  2. •
  3. Brands
  4. •
  5. Ameriwood
  6. •
  7. Indoor Furnishing
  8. •
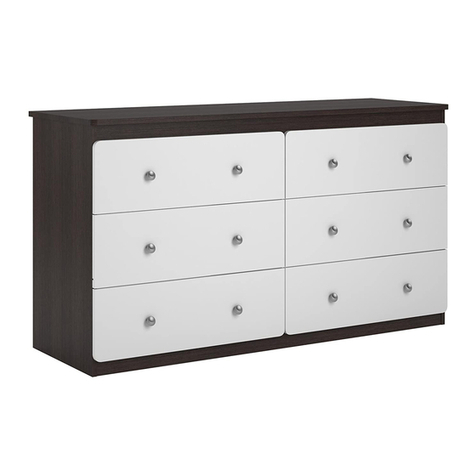
  9. Ameriwood Essential Home Grayson 6 Drawer Dresser User manual

Ameriwood Essential Home Grayson 6 Drawer Dresser User manual

PARTS - PIEZAS
B345935309K00
page 3
left panel
panel izquierdo
35935309010
right panel
panel derecho
35935309020
top
cime
35935309040
bottom
fondo
35935000050
back panel
panel trasero
K55320001
6 drawer bottoms
6 cajónes inferiores
35935302140
6 drawer backs
6 cajónes traseros
35935302130
partition
partición
35935309030
2 kicks
2 retrocesos
35935309060
6 left drawer sides
6 lado del cajónes izquierdo
35935302070
6 right drawer sides
6 lado del cajóesn derecho
35935302080
This piece is paperboard
construction. It is not made from
wood but is required for the
assembly of your unit.
Esto pedazo son la construcción
del cartón. Ello no son hecho de
madera, pero se requlere para la
asamblea de su unidad.
left upper drawer front
frente del cajón superior
izquierdo
35935309090
right upper drawer front
frente del cajón superior
derecho
35935309100
2 left drawer fronts
2 frentes de cajón izquierdo
35935309110
ABC
D
E
FGH
IJKL
M
N
O
2 right drawer fronts
2 frentes de cajón derecho
35935309120
PARTS - PIEZAS
B345935309K00
page 4
right cabinet memberleft cabinet member left drawer runner right drawer runner
corredera de mueble derechacorredera de mueble izquierda deslizador izquierdo de cajón deslizador derecha de cajón
1
11
16
x
#A56030
cd
ba
1
x
24
#A51406
handle
el tirón
x
34
#A51401
knob
perilla
x
41
#A84050
safety bracket kit
juego del soporte de seguridad
x
7
14
cam bolt
#A22510
perno de leva
60
#A11080
9
7/16" cabeza plano
7/16" flat head
x
x10 37
#A21110
nail
clavo
x
11
32
#A12120
7/16" pan head
cabeza redondo 7/16"
x
12 4
#A53600
angle bracket
anaquel del ángulo
x
13 24
#A11600
1-1/4" flat head
cabeza plano 1-1/4"
x14 12
#A17400
7/8" machine screw
7/8" tornillo
x15 12
#A80250
shelf support
soporte de estante
4b
4a 4d
4c
x
512
#A54220
drawer bracket
soporte de cajón
arandela
washer
816#A25400
x
x
#A22570
cam lock
cerradura de leva
614
2
3½ turn to fully
lock.
½ se vuelven a
totalmente
cerradura.
4
Tighten to fully seat. Do not over
tighten.
Apriétese a totalmente asiento. No
haga encima de apriétese. Proper orientation of cam.
La orientación apropiada de leva.
1
This illustration shows how the CAM fastening system works.
Esta ilustración muestra el sistema de fijación de leva y como funciona.
Lock
Apretar
Titus
Titus
Titus
x
84
#A21500
steel dowel
clavija de acero
B345935309K00
page 5
1
x
99
x
7
2
1a
x
3
Finished Edge
Borde Acabado
7
1a 9
A
x
62
6
proper orientation of cam lock
posicion correcta de la cerradura de leva
marked with an "L"
marcado con un "L"
B345935309K00
page 6
2
b
3
x
1
x
7
2
x
99
7Finished Edge
Borde Acabado
91b
B
x
62
6
proper orientation of cam lock
posicion correcta de la cerradura de leva
marked with an "R"
marcado con un "R"
B345935309K00
page 7
3
x
7
4
1a
x
3
x
918
b
3
x
1
Finished Edge
Borde Acabado
77
1a
1a
1a
9
9
9
9
9
91b
1b
1b
CC
right surface
superficie derecha
left surface
superficie izquierda
9
9
9
9
9
9
9
9
9
9
9
x
62
6
proper
orientation
of cam lock
posicion
correcta de
la cerradura
de leva
marked with an "L"
marcado con un "L" marked with an "R"
marcado con un "R"
B345935309K00
page 8
4
x
7
6
x
41
4b
4a
4a
4b
D
Finished Edge
Borde Acabado
7
B345935309K00
page 9
5
x
11
812 4x
1/16"
End View
Vista Final
6
11
11
12
E
F
x2
6
x
68
x
84
8
8
proper orientation of cam lock
posicion correcta de la
cerradura de leva
B345935309K00
page 10
6
C
E
E
F
F
Finished Edge
Borde Acabado
UNLOCKLOCK
APRETAR
DESAPRETAR
x4
B345935309K00
page 11
7
A
B
E
E
F
F
UNLOCKLOCK
APRETAR
DESAPRETAR
x4
B345935309K00
page 12
8
A
B
C
D
UNLOCKLOCK
APRETAR
DESAPRETAR
x6
B345935309K00
page 13
9
Carefully turn the unit over on its face as shown.
Cuidadosamente voltee la unidad en su cara como se muestra.
B345935309K00
page 14
10
Assure that the unit is square.
Distance from corner to corner must be equal as shown.
Asegura que el unidad es cuadrada.
Distancia de esquina a esquina debe ser igual como se
muestra por favor.
Flush the edge of the back panel with the bottom
edge of the bottom shelf. Align squarely and nail
straight through into back edges.
alinie el borde del panel trasero con el borde
inferior del estante inferior. Allinee en ángulo recto
y clave derecho dentro o en los bordes traseros.
Notch location
Ubicación de la muesca
and/or serious injury.
Por favor asegúrese que el Panel Trasero se atan
firmemente. Todos los clavos deben manejarse en las
partes recto. El fracaso para hacer para que podría causar
inestabilidad, derrumbamiento del producto, y/o la lesión
seria.
Failure to do so could cause instability, product collapse
All nails must be driven into the parts straight.
Please make sure that the Back Panel is attached securely.
ADVERTENCIA
WARNING
10 x 37
10
O
B345935309K00
page 15
11 Please Note:
The top of the unit is not shown for visibility of the safety bracket attachment. DO NOT
remove the top of the unit.
Observe por favor:
La unidad de encima no demuestra la visibilidad del accesorio del soporte de seguridad.
No quite la parte de encima de la unidad.
Option 1;
Securely screw (4c) into solid area of
the wall as shown.
Opción 1;
Firmemente el tornillo (4c) en el área
sólida de la pared como mostrado.
Option 2:
Drill a 3/16" diameter hole (5mm) in
the wallboard. Tap the wall
anchor(4d) into the hole until it is
flush. Fasten the wall bracket (4a) to
the wall anchor (4d) with the screw
(4c).
Opcion 2:
Taladre un agujero de 3/16" de
diámetro (5mm) en la pared. Golpea
la ancla de pared (4d) en el agujero
hasta que sea parejo. Abroche la
escuadra de pared (4a) al la ancla
de la pared (4d) con el tornillo (4c).
stud
montante
wallboard
muro
hole
agujero
x
41
4c 4d
4c
4d
4a
B345935309K00
page 16
12
Lay the drawer sides down on a flat hard surface. Carefully line up the drawer bracket with the holes in the
drawer side as shown. Using a hammer, tap each drawer bracket stem part way into each hole. Repeat this
process until the drawer bracket is fully seated on the drawer side.
Coloque los lados del cajón sobre una superficie plana y dura. Alinee cuidadosamente el soporte del cajón con
los agujeros en el lado del cajón, como se muestra. Con un martillo, golpee cada vástago del soporte del cajón
parcialmente en cada orificio. Repita este proceso hasta que el soporte del cajón esté completamente asentado
en el lado del cajón.
Finished Edge
Borde Acabado
Finished Edge
Borde Acabado
Bracket Orientation
Orientación del soporte
Bracket Orientation
Orientación del soporte
GH
x
512
55
x6 x6
B345935309K00
page 17
13
1c
x
6
1d
x
6
x
924
99
1c 1d
Finished Edge
Borde Acabado
GH
x6 x6
marked with an "L"
marcado con un "L" marked with an "R"
marcado con un "R"
B345935309K00
page 18
14
x
11
24
11 11
11
11
GG
G
G
HH
H
H
I
J
K
L
x2
x2
x1
x1
B345935309K00
page 19
15
15 12x
H
G
N
Finished Surface
Superficie Acabado
15
x6
Insert a drawer bottom (N) into all six drawer components as shown.
Inserte todos los componentes de seis cajones como se muestra a un fondo de cajón (N).
B345935309K00
page 20
16
x
13 24
13
13
M
H
x6
Attach a drawer back (M) to all six drawer components as shown.
Conecte un cajón detrás (M) a todos los componentes de seis cajones como mostrado.

Other Ameriwood Indoor Furnishing manuals
Ameriwood 5668308PCOM User manual

Ameriwood

Ameriwood 5668308PCOM User manual

Ameriwood BASIC 7641320COM User manual

Ameriwood

Ameriwood BASIC 7641320COM User manual

Ameriwood AX1 User manual

Ameriwood

Ameriwood AX1 User manual

Ameriwood 9294196COM User manual

Ameriwood

Ameriwood 9294196COM User manual

Ameriwood good to GO 3600303KP User manual

Ameriwood

Ameriwood good to GO 3600303KP User manual

Ameriwood 5945307T User manual

Ameriwood

Ameriwood 5945307T User manual

Ameriwood 5669323PCOM User manual

Ameriwood

Ameriwood 5669323PCOM User manual

Ameriwood COSCO 7448059P User manual

Ameriwood

Ameriwood COSCO 7448059P User manual

Ameriwood AX1 9810196COM User manual

Ameriwood

Ameriwood AX1 9810196COM User manual
Ameriwood 5206015GM User manual

Ameriwood

Ameriwood 5206015GM User manual

Ameriwood 5065322PCOM User manual

Ameriwood

Ameriwood 5065322PCOM User manual

Ameriwood 9416207P User manual

Ameriwood

Ameriwood 9416207P User manual

Ameriwood 4105012PCOM User manual

Ameriwood

Ameriwood 4105012PCOM User manual

Ameriwood 5829306PCOM User manual

Ameriwood

Ameriwood 5829306PCOM User manual

Ameriwood COSCO 5871216PCOM User manual

Ameriwood

Ameriwood COSCO 5871216PCOM User manual

Ameriwood Basics 7391015COM User manual

Ameriwood

Ameriwood Basics 7391015COM User manual

Ameriwood 5389500COM User manual

Ameriwood

Ameriwood 5389500COM User manual

Ameriwood 7642320COM User manual

Ameriwood

Ameriwood 7642320COM User manual

Ameriwood 5497012PCOM User manual

Ameriwood

Ameriwood 5497012PCOM User manual

Ameriwood AX1 User manual

Ameriwood

Ameriwood AX1 User manual

Ameriwood AX1 9293096COM User manual

Ameriwood

Ameriwood AX1 9293096COM User manual

Ameriwood 9645325PCOM User manual

Ameriwood

Ameriwood 9645325PCOM User manual

Ameriwood 348012PCOM User manual

Ameriwood

Ameriwood 348012PCOM User manual

Ameriwood 9155 User manual

Ameriwood

Ameriwood 9155 User manual

Popular Indoor Furnishing manuals by other brands

Regency LWMS3015 Assembly instructions

Regency

Regency LWMS3015 Assembly instructions

Furniture of America CM7751C Assembly instructions

Furniture of America

Furniture of America CM7751C Assembly instructions

Safavieh Furniture Estella CNS5731 manual

Safavieh Furniture

Safavieh Furniture Estella CNS5731 manual

PLACES OF STYLE Ovalfuss Assembly instruction

PLACES OF STYLE

PLACES OF STYLE Ovalfuss Assembly instruction

Trasman 1138 Bo1 Assembly manual

Trasman

Trasman 1138 Bo1 Assembly manual

Costway JV10856 manual

Costway

Costway JV10856 manual

moss DESIGN Caisson Credenza Assembly instructions

moss DESIGN

moss DESIGN Caisson Credenza Assembly instructions

Aquaglide FULL DECK 15.0 owner's manual

Aquaglide

Aquaglide FULL DECK 15.0 owner's manual

AREBOS AR-HE-SW30 user manual

AREBOS

AREBOS AR-HE-SW30 user manual

Till-Hilft Fulda 87005.330 Assembly instructions

Till-Hilft

Till-Hilft Fulda 87005.330 Assembly instructions

Twoey Outside 2010 quick start guide

Twoey Outside

Twoey Outside 2010 quick start guide

Hettich Easys 200 operating instructions

Hettich

Hettich Easys 200 operating instructions

The bedboss RELAX 404 Series owner's manual

The bedboss

The bedboss RELAX 404 Series owner's manual

Oeseder Möbelindustrie Bern 991 720 Assembly instructions

Oeseder Möbelindustrie

Oeseder Möbelindustrie Bern 991 720 Assembly instructions

Costway HW68469 user manual

Costway

Costway HW68469 user manual

Next ALIX A27743 Assembly instructions

Next

Next ALIX A27743 Assembly instructions

BROSA Hans Assembly guide

BROSA

BROSA Hans Assembly guide

Prodigg MINIKA PBA015T-FUR installation manual

Prodigg

Prodigg MINIKA PBA015T-FUR installation manual

manuals.online logo
manuals.online logoBrands
  • About & Mission
  • Contact us
  • Privacy Policy
  • Terms and Conditions

Copyright 2025 Manuals.Online. All Rights Reserved.