Amigo RT Express Quick start guide

Serial Number:
Date of Purchase:
Amigo RTX
Amigo RD Amigo HD
AMIGO OPERATIONAL MANUAL
RT Express, RD and HD
Read this manual before operating your Amigo

Nearly 50 years ago in Bridgeport, Mich., a
young man was working as a plumbing and
heating contractor when a family member
began to lose mobility due to multiple sclerosis.
Witnessing this loss of independence, Al
Thieme worked in the evenings to invent the
first ever power-operated vehicle, the Amigo.
Consequently, Amigo Mobility International, Inc.
was founded and an entire industry was born.
As Amigo's Chairman & Founder, Al Thieme
continues to run the company daily. Hands-on
and focused, he is passionate about Improving
Lives Through Mobility®. Today, all Amigos are
manufactured in Bridgeport, Mich. and are
shipped worldwide.
We would like to thank you for choosing
Amigo. We are committed to providing you
with personalized, innovative electric mobility
products and customer satisfaction, today, and
into the future. Wishing you happiness and
good health from all of us at Amigo.
Sincerely,
Amigo Mobility International, Inc. (AMI)
Amigo Mobility International, Inc.
(AMI) disclaims any responsibility for
personal injury or property damage
resulting from the improper or
unsafe use of its products.
TABLE OF CONTENTS
Safety First 3
Location of Controls 4
Adjusting Your Amigo 5
Operating Your Amigo 6-7
Riding Your Amigo 7-8
Helpful Hints for Everyday Use 8
Battery & Charging Information 9-10
Cleaning Instructions 11
Maintenance 11-12
Troubleshooting 13-14
Electromagnetic Interference 15
Wiring Diagrams 16-17
Exploded Views & Parts Lists 18-23
Amigo Mobility Healthcare Warranty 24
Amigo RTX
Amigo RD Amigo HD

SAFETY FIRST
For your convenience and understanding, signal words are defined below:
WARNING IS USED TO INDICATE THE PRESENCE OF A HAZARD, WHICH CAN CAUSE SEVERE PERSONAL INJURY, DEATH
OR SUBSTANTIAL PROPERTY DAMAGE IF THE WARNING IS IGNORED.
CAUTION IS USED TO INDICATE THE PRESENCE OF A HAZARD WHICH WILL OR CAN CAUSE MINOR PERSONAL INJURY
OR PROPERTY DAMAGE IF THE CAUTION IS IGNORED.
AMI is not responsible for any damage or injury incurred due to improper or unsafe use of the POV. AMI specifically disclaims
responsibility for any bodily injury or property damage that may occur during any use which does not comply with applicable federal,
state or local laws or ordinances. Use the following guidelines for safe operation and use of your Amigo. Please contact Amigo with
questions about safe operation of your Amigo. Consult your personal physician with questions on your ability to operate your Amigo.
Do
• Read the operating manual before using your Amigo.
• Always turn the key switch off before getting on or off your Amigo.
• When transferring on or off your Amigo, make sure the seat lock is in the locked position.
• Always remain seated while the vehicle is in operation.
• Keep legs on the platform while driving.
• Drive to a complete stop before attempting to reverse.
• Always drive in a slow, sensible manner.
• Drive slowly while turning and on inclines.
• Always drive straight up and down inclines.
• Always be careful when maneuvering on inclines or ramps. Not all ramps are constructed according to federal standards. The
federal standard for wheelchair ramps is one-inch (2.5 cm) rise per foot (30 cm).
• Avoid sudden starts, accelerate gradually.
• Always approach obstacles at a low speed if you are to drive over them.
• Be aware of mechanical pinch points, especially when assembling and disassembling your Amigo.
• Always drive with the power seat lift in its lowest position.
• Always lock seat during vehicle operation.
Do Not
• Do not exceed the maximum weight capacity. Exceeding the weight capacity voids your warranty and may result in personal
injury and damage to your Amigo. Amigo will not be responsible for injuries and/or property damage resulting from failure to
observe weight limitations.
• Do not drive over or off obstacles more than 1 inch (2.5 cm) high. This could be unsafe and could damage your Amigo.
• Do not turn your Amigo at high speeds, as this could result in tipping.
• Do not reverse down or park on a steep hill or incline.
• Do not sit on the unit in a moving vehicle.
• Do not allow anyone to ride with you.
• Do not operate your Amigo near stairs, steps, curbs or terraces where you might accidentally drop a wheel off the edge.
• Do not operate your Amigo on streets or other areas with vehicular traffic.
• Do not disengage the brake on a slope.
• Do not leave the brake release in freewheeling position.
• Do not disengage the brake while someone is on the vehicle.
• Do not remove handle from steering column when transporting your Amigo. Instead, fold the handle down to the seat. Place the
handle down so the controls will not be damaged. Tighten the knob to secure the handle.
• Do not use the handle to assist in transferring.
• Do not lift rear section of platform by holding the rear wheel.
• Do not push or force the retractable cord reel into the rear cover.
• Do not remove the ground wire (part number 8675 shown on pages 16 and 17), as it aids in static discharge.
www.myamigo.com 3

LOCATION OF CONTROLS
4 (800)248-9131•(989)777-0910
Hi/Lo Speed Adjustment Handle (Figure 1)
Handle controls include: speed adjustment buttons, ON/OFF key switch, battery status gauge, speed level gauge and horn button.
The ON/OFF key switch, located on the right side of the handle control cover, will turn the power of the Amigo on or off. Turning off
the Amigo will prevent drainage of batteries and unauthorized use. Every time a button is activated on the touchpad, you will hear a
“chirp.”
TouchTron Handle (Figure 2)
Handle controls include: speed adjustment buttons, ON/OFF key switch, battery status gauge, speed level gauge, horn button, brake
release, turn indicator lights, headlight/taillights and power seat lift adjustment buttons. The ON/OFF key switch, located on the right
side of the handle control cover, will turn the power of the Amigo on or off. Turning off the Amigo will prevent drainage of batteries
and unauthorized use. Every time a button is activated on the touchpad, you will hear a “chirp.”
1. Accelerator lever (left and right)
2. Battery status gauge
3. ON/OFF key switch
4. Rabbit button – press to increase top speed
5. Turtle button – press to decrease top speed
6. Left turn indicator light button
7. Brake release button – press twice
8. Speed gauge – indicates level of top speed
9. Power seat lift (PSL) UP button –
press to raise seat
10. Power seat lift (PSL) DOWN button –
press to lower seat
11. Right turn indicator light button
12. Front headlight and rear tail lights button
13. Horn button
14. Forward and reverse diagrams for accelerator levers
Figure 1
(Hi/Lo)
Figure 2
(TouchTron)

ADJUSTING YOUR AMIGO
To adjust your Amigo to a comfortable driving position, you can alter the handle, seat and armrests as follows:
EZ-Tilt Handle Adjustment
To adjust the angle of the handle, turn the adjustment lever counterclockwise. Move the handle to the desired position. Tighten the
adjustment lever by turning it clockwise (Figure 3). The placement of the spring-activated adjustment lever, itself, can be moved
out of the way for your comfort. Pull the adjustment lever straight out. Turn in either direction. Release adjustment lever at desired
placement (Figure 4).
DO NOT USE THE ADJUSTMENT LEVER AS A FOOT REST. SUCH USE MAY CAUSE THE ADJUSTMENT LEVER TO LOOSEN
THE HANDLE AND CAUSE PERSONAL INJURY.
Seat Installation
1. Unlock the seat lock.
2. Insert the upper seat post into the opening of the lower seat post.
3. Spin seat around to make sure it rotates freely.
4. To lock the seat, pull the seat lock lever toward the rear of the seat.
Adjusting Seat Height Without a Power Seat Lift
To adjust seat height, remove the nut and screw that holds the seat collar in place on the
seat post, then adjust and reinstall in the desired hole on the seat post (Figure 5).
IT IS RECOMMENDED THAT THE SEAT LOCK BE INSTALLED IN THE SECOND HOLE POSITION FROM THE SEAT ON A
FOLDING SEAT AND THE PREMIER II SEAT.
Seat Lock Lever
This allows the seat to rotate 360 degrees and lock in any position desired. The seat lock
lever is a bar with a vinyl cap on its end, located under the seat (Figure 6). Push the lever
forward to rotate to any position. Lock seat during vehicle operation.
Adjustable Armrest Width
The armrest width is determined by loosening the armrest knobs and tightening them
when the arms are at the desired width.
Flip-Up Armrest
By pulling up on the end of either armrest, the armrest will flip back for easy transfer in and out of the Amigo.
www.myamigo.com 5
Figure 3 Figure 4
Figure 6
Figure 5

OPERATING YOUR AMIGO
To operate your Amigo, use the following procedures:
Turning on and Driving Your Amigo
• For all Amigo rear drive models, the key switch is located on the top of the handle. Insert and turn the key provided.
• Regulate your maximum speed with the rabbit and turtle buttons. To increase your top speed, press the rabbit button. To lower
the top speed, press the turtle button. You may have to press the turtle or rabbit button several times to see a change on the
speed gauge. Continuous “chirping” sounds indicate highest and lowest speed settings.
• Press the forward accelerator lever or the reverse accelerator lever to move the Amigo. To move forward, pull the right side of the
accelerator lever toward you (Figure 7). You can also move forward by pushing the left side of the accelerator lever away from
you. To operate in reverse, pull the left side of the accelerator lever toward you (Figure 8) or push the right side of the accelerator
lever away from you.
• For optional “reverse polarity” handles, accelerator lever operation will be the opposite – to move forward, pull the left side
of the accelerator lever toward you or push the right side accelerator lever away from you. To move in reverse, pull the right
side of the accelerator lever toward you or push the left side accelerator lever away from you.
• To stop, release the accelerator lever and the vehicle will come to a gradual stop. Turning the Amigo off using the key switch may
be used for emergency stops.
• The horn button should be used to avoid confrontation with pedestrians or other mobile entities.
• When the Amigo is used at night, you can turn the lights on by pressing the light button (TouchTron only).
Brake Release for Manual Pushing
All models are equipped with a manual brake release lever. To engage the
freewheeling mode, push the brake lever forward. The freewheeling mode will allow
you to push the unit, if necessary. To terminate the freewheeling mode, pull the
brake lever toward the rear of the Amigo (Figure 9). When pulled into “normal,” the
vehicle will be back into “drive” mode.
Models with TouchTron controls have an additional brake release button located on
the handle (Figure 10). To electronically release the brake, push the brake release
button twice. The low-speed segment of the speed gauge will blink to indicate
you are now in the freewheeling mode. To terminate the freewheeling mode
when selected electronically, activate any control button (except horn button)
on the TouchTron handle, or pull accelerator lever.
Sleep Mode
A battery indicator and diagnostic system are incorporated into the touchpad
of all Amigo rear drive models. The battery status gauge will be lit whenever
the key is in the ON position. However, if the Amigo is inactive for more than
25 minutes, the Amigo automatically switches to “sleep mode.” This feature
reduces power to conserve the battery range. To reactivate your Amigo, switch
it off and then on again to regain full function. It is recommended that you
turn the key to the OFF position each time you are through using the Amigo
to ensure the power is completely turned off. Figure 10
Electronic
brake switch
6 (800)248-9131•(989)777-0910
Figure 7 (forward) Figure 8 (reverse)
Figure 9

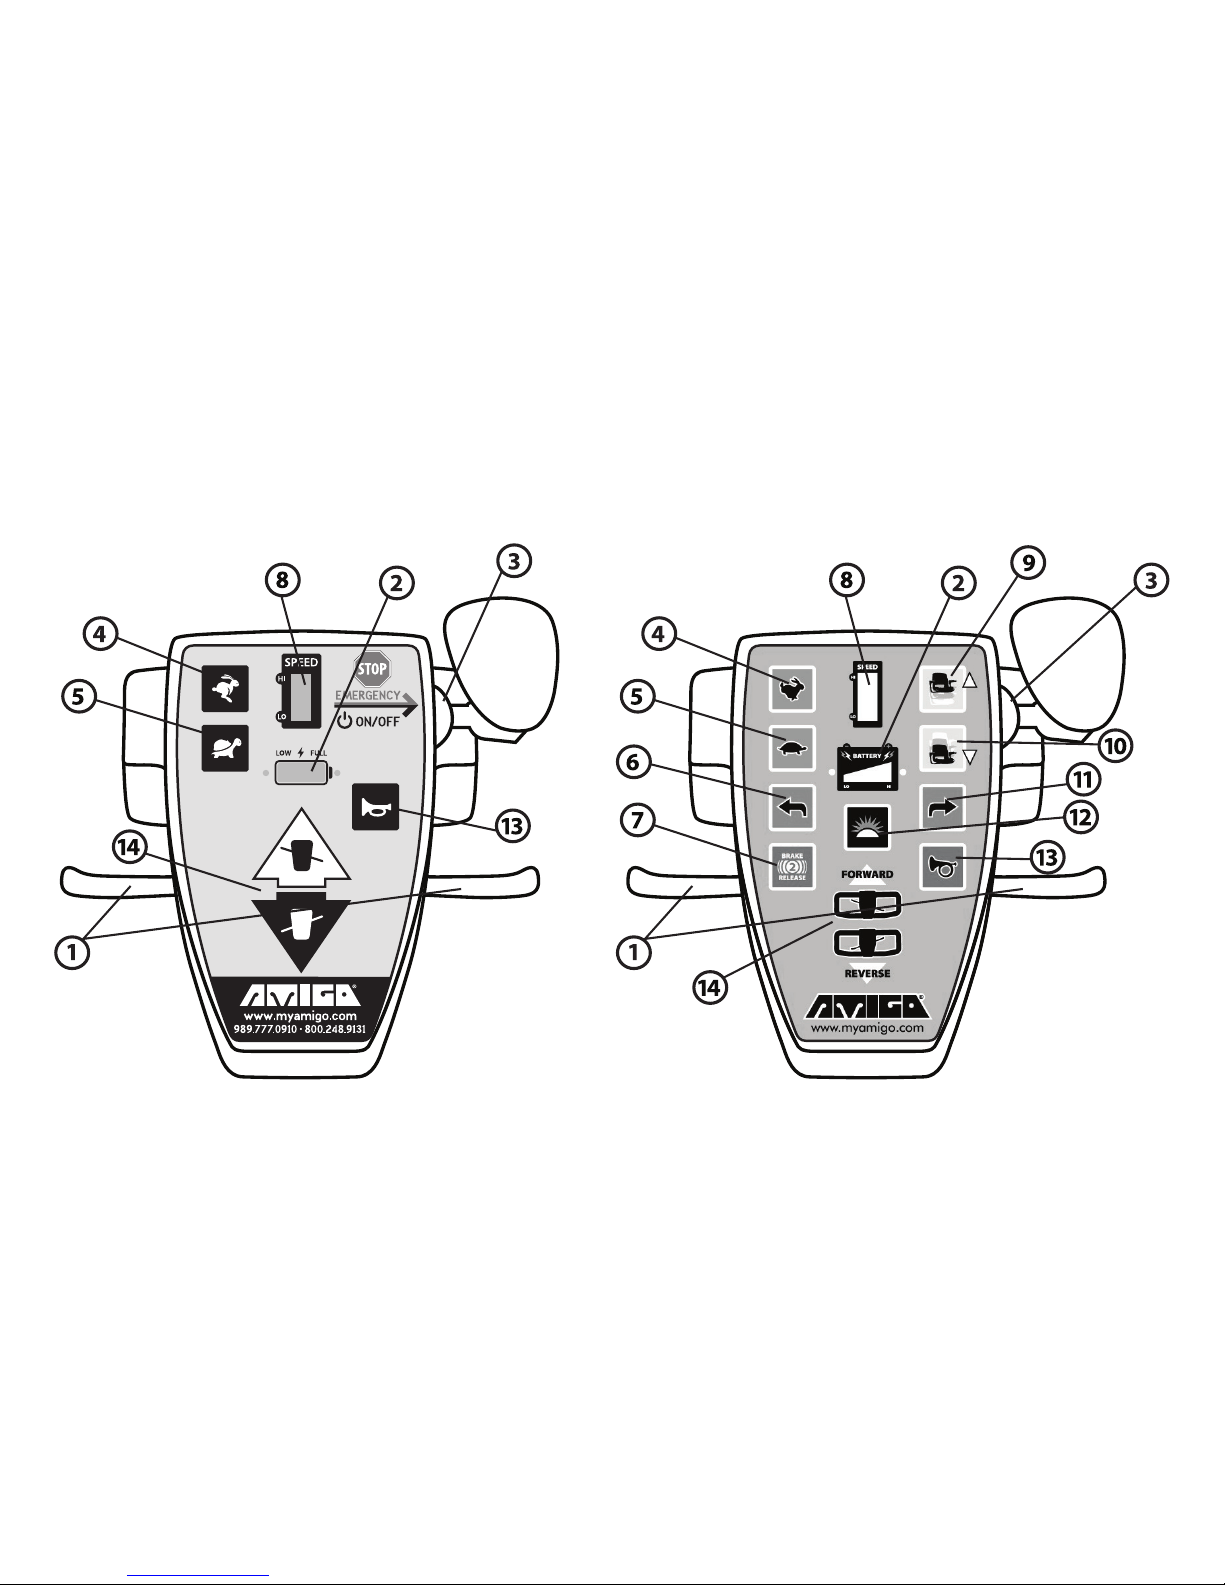
Power Seat Lift Operation (Optional)
To operate the power seat lift on Amigo models with a TouchTron handle,
press the seat/directional arrow buttons to raise or lower the seat (Figure 11).
To lift the seat to desired height, press the seat button with the arrow pointing
up. To lower the seat, press the seat button with the arrow pointing down. The
power seat lift can be activated only when you are not moving. Always drive
with the power seat lift in its lowest position.
TO AVOID DAMAGING THE MOTOR OF THE POWER SEAT LIFT,
RELEASE THE SEAT BUTTON AFTER THE SEAT HAS REACHED ITS
HIGHEST OR LOWEST POINT.
High Intensity Light Package Operation (Optional)
The optional lighting package available with the TouchTron handle includes a front headlight, rear taillights and turn signals. The
power must be on to operate the headlight or taillights. The headlight and taillights can be activated by pressing the headlight
button (Figure 11). Press this button again to turn the lights off.
The turn signals can be activated by pressing the left or right turn indicator buttons (Figure 11). Indicate a “hazard” condition by
pressing both turn indicator buttons. The power must be on to operate the lights.
RIDING YOUR AMIGO
Basic Driving
Be sure you are on a level surface. Once seated, for safe transfer or driving, push seat lock lever (located under seat) forward to easily
position the seat as needed. Engage lever back to the locked position.
• Make sure you are properly seated and insert key into key switch and turn counterclockwise to the ON position.
• Ensure the speed adjustment gauge is at the lowest setting. Note that reverse movement of vehicle may not occur with speed
adjustment at lowest setting.
• On handle, gently pull the accelerator lever as described earlier. You will gently accelerate. The further you pull the accelerator
lever, the faster you will go. Release the lever and you will gently stop. Reverse speed is slower than forward speed. Practice these
two basic functions until you get used to them.
• Steering the Amigo is easy and logical. Just be sure to remember to give wide clearance when turning so that the rear wheels
clear any obstacle.
• Shortcutting a sidewalk corner can cause the back wheel to go off the sidewalk. Avoid this at all times by steering an
exaggerated wide arc around the obstacle. If you must steer in a tight spot, such as entering a doorway or when turning around,
stop and then apply power gently. For more on maneuvering through obstacles, see the next section.
Driving Through Doorways
Approach an unfamiliar door slowly. Does it have a knob or push bar? Does it open toward or away? Think in terms of using the
power of the Amigo to do the work for you. Hold the doorknob or bar in one hand and apply the power with the other hand. If it
is a self-closing door, you can go through allowing the door to close behind you. If it is not a self-closing door, just stop when you
are clear of the door and push it closed. If the door opens toward you, hold the knob or bar with one hand and gently press on your
reverse accelerator lever and allow the gentle reverse power to do the work. When the door is open wide enough, pull the forward
accelerator lever to move forward, leaving your hand on the door to keep it free of the Amigo and letting go as you pass the door
jamb.
Driving on Ramps
With the ADA (Americans with Disabilities Act), buildings require ramps for POV (power-operated vehicle) access. Some have U-turns
in the middle where good cornering is required. Take wide swings with your front wheels around any tight corners so the rear wheels
follow a wide arc to stay clear of the corner. When you have stopped while facing uphill, starting up again simply requires that you
apply forward power. Accelerate gently after stopping on an incline. When proceeding up a ramp or curb, lean forward in your seat
for maximum stability and safety. Going down any ramp or hill, drive slowly to ensure a safe descent.
Driving Over Grass, Gravel and Grades
The Amigo performs admirably in grass, gravel and on hills, but you must NOT exceed the parameters set down in this manual.
Please refer to the safety suggestions for use. Safety must come first. If you are unsure about any situation, avoid it. Common sense
is your best protection. Always act with caution. Feel free to use your Amigo on lawns or in park areas. Avoid long unkempt grass;
otherwise just follow the safety suggestions.
Figure 11
Headlight/
taillights
Turn
indicators
www.myamigo.com 7
DownUp

Transport
Amigos are NOT designed or tested for use as seats for users in private or public transporting vehicles. AMI advises against
transporting POVs in vehicles unless either the unit is dismantled and placed in the trunk of your car, or the assembled unit is placed
in the vehicle and strapped down. Any straps should be secured to non-removable parts of the unit, i.e. platform. Even when
strapped down, Amigos should not be used as seats in private or public transporting vehicles.
To Disassemble and Transport Your Amigo:
1. Turn your Amigo off.
2. Unlock the seat and remove it completely.
3. Unlock the seat and remove it completely.
4. Fold handle down to platform by loosening the handle adjustment knob.
5. Lift the rear into the trunk of the vehicle and slide the rest of the Amigo into the trunk.
6. To prevent wheels from rotating when batteries are removed, the brake release lever must be in the "normal" position.
7. Place seat and batteries into the trunk.
8. If your Amigo has a power seat lift, we suggest placing a cut-out tennis ball or something similar over the seat post to protect it.
Transport Your Amigo With a Lift-All®
For greater convenience, obtain a Lift-All®to assist you when loading and unloading. For more information
on the Lift-All®, contact your authorized dealer. We recommend using vans with ramps, not elevating van lifts.
Airline Travel
"Special Handling" tags are suggested when transporting your Amigo by air. Visit the "Service"
section of www.myamigo.com for a pre-designed tag (Figure 12). Non-spill, gel cell batteries are
approved for commercial airline travel by the Civil Aeronautics Board (CAB). When you make your
reservation, notify the airline and request escort assistance. This will assure that your Amigo will be
picked up and delivered at the boarding desk. For additional helpful hints for airline travel, visit our
website at www.myamigo.com.
Public Transportation
Some public transportation systems have accommodations for your Amigo. If you must utilize
public transportation (without the proper accommodations), do not sit on the Amigo while the
vehicle is in motion.
HELPFUL HINTS FOR EVERYDAY USE
WHEN TRANSFERRING OR NOT USING THE AMIGO, WE RECOMMEND TURNING THE AMIGO TO THE OFF POSITION.
Bathroom
In the bathroom, maneuvering room is usually limited. Back into bathroom, then position close to the toilet, swivel the seat,
lock it in position and transfer. When using the bathtub, back up parallel to the tub. Swivel the seat and place
your feet in the tub. Engage seat lock and carefully transfer.
DO NOT USE YOUR AMIGO WHILE TAKING A SHOWER. WATER MAY GET INTO THE MICROPROCESSING CONTROLLER
MPC AND CAUSE ELECTRONIC MALFUNCTIONS.
Bedroom
To transfer to the bed, back up parallel to it. Swivel, lock seat into position and ease onto the bed. If charging the batteries overnight,
it may be easiest to plug in the battery charger before transferring. For added ease, when using a power seat lift, raise your seat
slightly higher than the surface to which you are transferring.
Kitchen
For access to a refrigerator, make a parallel approach or back up to the outside of the refrigerator. Swivel the seat. Approach a table,
sink or stove by maneuvering parallel to it. Swivel the seat to the desired position. The handle will be out of the way.
8 (800)248-9131•(989)777-0910
Figure 12

Car
To transfer to a car, make a parallel approach to the side of the car, release the door latch and open the door as you drive
forward. Back parallel to the side of the car and into the door opening. Swivel the seat, lock it in position and carefully slide onto
the car seat. On the driver’s side, you can use the steering wheel for leverage.
Using an Elevator
Backing into an elevator allows you to exit forward. Be sure the elevator is level with the floor.
BATTERY & CHARGING INFORMATION
Battery Information
For maximum range and life, it is recommended to fully charge the batteries before using. Extended charging is good for the
batteries and will not overcharge them. Amigos have an overcharge protection feature so that the batteries can be charged
anytime the Amigo is not being used. It is a popular misconception that batteries should be deeply discharged before
recharging. This is not the proper procedure for all batteries. They can actually be damaged if they are discharged too deeply
before recharging.
Battery range can be affected by many variables, including driver weight, terrain, temperature and age and type of batteries.
Charge your batteries daily when the Amigo is used. Make sure that the charger cord is unplugged from the wall outlet before
moving your Amigo.
Batteries should be charged if the left most segment bar on the battery status gauge is lit and blinking, along with a low,
chirping of the horn, at one-minute intervals. At the beginning of the charging process, the battery indicator light on the handle
will flash for approximately 20 seconds, then it will turn solid color. The batteries are fully charged when the bar on the far right
is blinking. Your Amigo can be charged with the key in the ON or OFF position. The indication will display only while in the
charging mode (when power cord is plugged into AC outlet).
Charging Instructions for Amigo RT Express, RD and HD
1. Place your Amigo near an AC outlet.
2. Pull gently on the cord reel plug in the rear cover near the rear bumper.
3. Pull as much cord as needed (up to 10 feet/3 meters) to reach the AC outlet.
4. Connect the cord reel plug to the AC wall outlet.
5. Upon completion of the charging process, unplug the cord reel plug from the AC wall outlet.
6. Gently tug on the cord to engage the retraction reel. Do not push cord into the hole in the rear cover.
Charging Frequency
• Charge batteries daily when the Amigo is used.
• If not in use for a long period of time, charge for 24 hours, every 30 days.
• Extended charging is good for the batteries and will not overcharge them.
Universal Charger Option
A universal charger is available on many Amigos sold outside the United States. The universal charger uses a range of 90-240
volts AC power input. This makes it possible to charge on any electrical system globally. (The universal charger is an option on
models in the U.S. for people who travel abroad and want this universal charging flexibility.) Your charger is labeled, identifying
which charging system it uses.
DO NOT USE A 24V CHARGER THAT IS CONFIGURED TO A 120V AC POWER INPUT OUTSIDE THE U.S. IN COUNTRIES
USING 220V AC POWER INPUT. DAMAGE WILL OCCUR TO THE CHARGER.
www.myamigo.com 9

Charging Standard Precautions
• Charge batteries fully in a dry location.
• Clean any corrosion on the plug.
• Examine cord periodically for cracking or damage.
• If you remove the batteries from the Amigo, place them on a surface resistant to damage by acid fumes. “Breathing” occurs
whenever a battery is charged and discharged through a cycle. This breathing of batteries emits acid fumes and may mark
surfaces they rest on for long periods of time.
• Each time you charge the Amigo, follow the charging instructions exactly. Working in the vicinity of a sealed lead acid battery
can be dangerous. Batteries can generate explosive gases during normal battery operation.
• Never smoke or allow an open flame in the vicinity of the batteries.
• Use only a charger designed for sealed lead acid batteries. The charger is not intended to supply power to an extra-low voltage
electrical system or to charge dry cell batteries.
• Never charge a frozen battery.
• Do not operate the charger in a closed-in area or restrict ventilation in any way.
• A spark near the battery may cause an explosion. To reduce the risk of spark:
• Prevent external damage to AC and DC cords.
• Connect DC charging cord to the charge plug before connecting charger AC supply cord to the AC electrical outlet.
• When disconnecting the charger, always do so in reverse sequence of connecting procedure. Break first connection as far
away from battery as practical. Distance reduces the chance of explosion if a spark is generated and gas is present.
• Someone should be within range of your voice or close enough to come to your aid, if needed.
• Be extra cautious not to drop a metal tool onto the batteries.
• Remove metal jewelry before servicing batteries.
FAILURE TO FOLLOW THESE SAFETY INSTRUCTIONS MAY RESULT IN PERSONAL INJURY OR PROPERTY DAMAGE.
IF YOUR BATTERIES ARE DAMAGED AND A LEAK IS APPARENT, CALL YOUR AUTHORIZED DEALER IMMEDIATELY. UNDER
NO CIRCUMSTANCES SHOULD YOU TOUCH THE BATTERIES IF THEY ARE LEAKING.
Battery Storage
All the Amigo rear drive models use a battery system that allows the batteries to be removed after they have been disconnected
from the platform battery connections. Each battery has a wire assembly with a two-position connector that slides into the
connector mounted to the platform. The connection system is designed so that either battery may be placed on either side of the
unit. Always turn your Amigo off before removing and installing batteries.
TO AVOID DAMAGE TO BATTERIES DURING STORAGE, DO NOT PLACE THEM ENDTOEND WITH THE POSITIVE + AND
NEGATIVE TERMINALS NEXT TO EACH OTHER FIGURE 13.
If you remove your batteries from your Amigo, put them on a surface that cannot be damaged by acid fumes. Whenever a battery
is charged and discharged through a cycle, it breathes. The breathing of the battery emits acid fumes into the cloth strap (used to
lift the batteries on rear drive models) and may mark surfaces it rests on for long periods of time. Store batteries indoors in a dry
environment, away from any open flames. Temperature range is 0˚C (32˚F) to 40˚C (104˚F).
10 (800)248-9131•(989)777-0910
Figure 13

CLEANING INSTRUCTIONS
Tires
The tires should be cleaned with ordinary kitchen-type cleaners and a damp cloth. Don’t use solvents on tires as they can cause tire
material to break down or become too soft.
Cover
The cover can be easily cleaned. Apply water directly on a cloth, wring, and use the dampened cloth with mild soap to remove dirt
and oils. Use same application to rinse off soap residue in order to eliminate any film build-up. You may also use this same procedure
to clean under the cover by fully removing it (see Fig. 14). DO NOT spray the vehicle with water. This can damage the electrical
components. The cover may be waxed with car body wax and buffed by hand with a soft cloth.
Seat
The vinyl seat can be cleaned with a mild soap or detergent and a damp cloth. A vinyl cleaner can also be used. Cloth seats can be
cleaned with a damp cloth or as any upholstery. Care should be taken not to soak cloth seats, as the interior foam can hold water.
Floor Mat
The floor mat should be cleaned with ordinary kitchen-type cleaners and a damp cloth. Do not use solvents on the floor mat, as they
may cause the floor mat material to break down.
DO NOT EXPOSE AMIGO TO SPRAY-ON CLEANING SOLUTIONS AND EXCESSIVE MOISTURE SUCH AS SPRAYING IT WITH A
GARDEN HOSE, SHOWER OR LEAVING IT UNCOVERED IN RAIN. KEEP CLEANING SOLVENTS AWAY FROM ELECTRICAL WIRES
AND CONNECTIONS.
MAINTENANCE
Minimum maintenance should prevent unnecessary repairs. You can get years of dependable operation if you follow the suggested
maintenance schedule. Check the following:
Daily
Charge batteries daily when the Amigo is used. Charge the battery until fully charged to ensure proper battery operation. Extended
charging is good for the batteries and will not overcharge them.
Monthly
• Check and clean battery terminals and the wire connections as needed with a light piece of emery cloth or brush and mixture of
½ cup baking soda to 1–1½ cups water.
• Clean upholstery, plastic and metal with a mild surface cleaner.
• Inspect batteries for any cracks or damage of any kind.
• Check and tighten any exposed fasteners.
• Make sure all fasteners are tight on all battery connections.
• Check tire pressure on pneumatic tires. When air filling tires, always refer to the manufacturer’s specifications located on the face
of the tire. Uneven tire pressure can cause excessive battery consumption and overheating of the controller, which can lead to
failure of the vehicle.
• Check static ground wire located under vehicle. Replace if damaged or missing. Wire must be in contact with floor when
operating the Amigo.
• If rubber boot on arm rest joint is missing, replace immediately.
DO NOT EXCEED PROPER INFLATION LEVEL SPECIFIED ON TIRE OR TIRES MAY BE DAMAGED.
www.myamigo.com 11

Six Months
• Check all screws and clips (that are holding wheels) for tightness and wear.
• Check all electrical connections for clean, tight contact.
• Charging connection should be inspected for tight connection.
• Check tires for wear.
• Inspect seat posts for wear.
• Lubricate seat bearings on upper seat post.
Yearly
• Have your authorized service center check your Amigo completely.
• Grease axle and wheel hubs.
• Lubricate steering column bearings.
Checking the General Condition
For maintenance operations, consult your authorized dealer who has all the necessary information. Once a year have the authorized
dealer inspect your vehicle thoroughly and carry out in depth maintenance. Regular maintenance allows defective or worn parts to
be identified and improves the normal operation of the vehicle and extends its working life.
Removing the Rear Cover
The Amigo RD and HD units have a hinged rear cover (Figure 14), which can be opened once the seat
is removed. To open cover, tilt the handle fully forward to prevent scratching the rear cover on the
handle screws. Remove rubber boot from lower seat post, pull cover off of the pins in the rear, lift the
cover over the seat post and tilt cover forward. To close cover, reposition the handle to a comfortable
position. Simply tilt cover rearward, guide cover over the seat post, and place cover on the pins in the
rear. Ensure that the power cord is fully retracted after the cover is closed.
Lighting
The Amigo is equipped with a headlight, and with optional tail lights and turn signals. To access the bulb on a standard headlight,
pull the headlight lens out of the cover, by gently prying the rubber seal. To access the bulb on a high intensity headlight, remove
two screws holding the lens assembly in place. To remove the headlight bulb, twist the connector counterclockwise and remove from
lens. Bulb comes straight out of fixture (do not twist bulbs) and should be replaced in reverse order. The rear turn signals and tail
lights must be completely replaced.
Battery Maintenance
VRLA deep cycle batteries are used for operating your Amigo. They are maintenance-free and are transportable on aircraft, buses,
trains, etc. as there is no danger of spillage. By following the charger and battery procedures, you can expect extended battery life.
Fasteners Replacement
Use only Grade 8 (US) or 10.9 DIN (metric) in all applications (Figure 15). For service and
replacement parts, we recommend Amigo authorized parts.
Transaxle Drive Systems
The transaxle drive is a precision assembly lubricated for long service. Do not attempt to open or
service the assembly, this will void the warranty.
Microprocessor Controller
Do not attempt to service the controller or related electronic components, as this will void the warranty.
Circuit Breaker Replacement Instructions
An automatic resetting circuit breaker (Figure 16) protects the wiring and batteries in the event of a short
circuit. If the cart stops, check for overloads or short circuits before continuing to operate. The circuit
breaker is located under the rear cover and attached to the positive terminal on the batteries. Tampering
with electrical or mechanical parts will invalidate your warranty.
DO NOT CONTINUE TO OPERATE THE AMIGO UNTIL THE CIRCUIT BREAKER IS REPAIRED.
12 (800)248-9131•(989)777-0910
Figure 16
(Circuit breaker - part #
7441)
Figure 15
Figure 14

TROUBLESHOOTING
Serial Number Location
For operation or service questions, call the Amigo service hotline at (800) 248-9131 or (989) 777-0910, 8 a.m. to 6 p.m. Monday
through Friday, email service@myamigo.com or visit myamigo.com and click on the chat tab in the bottom right corner of the page.
You can also contact your local service representative. Please reference your serial number when calling.
There are two serial number locations on each Amigo. One serial number is located below the handle on the steering column (Figure
17). The other serial number is located under the rear cover, next to the right wheel, from behind the Amigo (Figure 18).
Battery Indicator LED
The controller has a built-in diagnostic feature that will cause the diagnostic indicator LEDs to flash a numeric code to indicate when
there is a service problem. Please refer to page 14 for detailed information on service codes. Under normal operating conditions, the
battery indicator LED will flash to indicate three different situations. Battery indicator LED locations are shown below on the Hi/Lo
handle (Figure 19) and the TouchTron handle (Figure 20)
• To indicate a low battery condition when driving.
• To indicate the battery charging cycle has started.
• To indicate when the batteries are fully charged during the charging cycle.
www.myamigo.com 13
FIGURE 17 FIGURE 18
Figure 20Figure 19
Battery indicator LEDBattery indicator LED

14 (800)248-9131•(989)777-0910
Diagnostic Codes
The Amigo controller has a built-in diagnostic feature that will
cause the diagnostic LED lights (Figure 21) to flash a numeric code,
indicating service issues to aid in diagnosis. When indicating a service
problem, the diagnostic lights will flash, hesitate for a moment, and
then flash again. Follow the code listings below to determine the
problem. Solutions should be attempted in the order they are written.
If the code indicates a service problem, contact your local service
representative or call the Amigo service department at (800) 248-9131
or (989) 777-0910 for instructions to verify and correct the problem.
Diagnostic light location
CODE CAUSE SOLUTIONS
1-1
1-2
2-1
2-2
2-3
2-4
3-1
4-1
4-2
5-1
5-2
5-3
5-4
5-5
Brake or connections
are shorted
Brake or connections are
open or brake release lever in
"freewheeling position"
Motor windings or connections
are shorted
Motor windings or connections
are open or brake release
lever in "freewheeling position"
Power shortage
PSL motor short
Over temperature condition
Charger is supplying too
much voltage during the
battery charge cycle
Charger not dropping back
into "oat mode" during
battery charging cycle
Controller drive FETS shorted
Controller regenerative
braking FETS shorted
Throttle or throttle circuitry
reading fail band fault
Requires software revision
Component failure
(1) Unplug handle cable and plug back in
(2) Check all wiring connections and output
(3) Disconnect brake and cycle key, if code changes to 1-2, replace brake
(4) Replace controller
(1) Ensure brake lever is in drive position
(2) Unplug handle cable and plug back in
(3) Check all wiring connections and output
(4) Replace brake
(5) Replace controller
(1) Check motor wiring connections
(2) Check running light (shorts)
(3) Disconnect brake and cycle key, if code changes to 2-2, replace motor
(4) Replace controller
(1) Ensure brake lever is in drive position
(2) Check motor wiring connections
(3) Replace motor
(4) Replace controller
(1) Check/replace batteries
(2) Check/replace charger & charge wires
(3) Check/replace controller
(1) Unplug unit and plug back in
(2) Check PSL wiring and connections
(3) Disconnect motor and cycle key, if code goes away, replace motor
(4) Check/replace controller
(1) Allow to sit idle for 15 minutes, restart and see if code disappears
(2) Ensure brake and/or motor is not causing excessive amperage draw
(3) Replace controller
(1) Replace battery charger if voltage is 32 volts or higher
(2) If 31 volts or lower, replace controller
(1) Replace charger wiring
(2) Replace battery charger
(3) Replace controller
(1) Replace controller
(1) Check to ensure handle cable is in good condition
(2) Check that throttle lever moves freely and returns to center
(3) Replace throttle
(1) Replace controller
Figure 21

www.myamigo.com 15
ELECTROMAGNETIC INTERFERENCE
RADIO WAVE SOURCES MAY AFFECT POWERED MOBILE VEHICLE CONTROL.
Electromagnetic Interference (EMI) From Radio Wave Sources
Power-operated vehicles (POV) may be susceptible to electromagnetic interference (EMI), which is interfering electromagnetic
energy (EM) emitted from sources such as radio stations, TV stations, amateur radio (HAM) transmitters, two-way radios and cellular
phones. The interference (from radio wave sources) can cause the POV to release its brakes, move by itself, or move in unintended
directions. It can also permanently damage the POV’s control system.
Three Main Sources of Radiated EMI
There are a number of sources of relatively intense electromagnetic fields in the everyday environment. Some of these sources are
obvious and easy to avoid. Others are not apparent and exposure is unavoidable. Three broad classifications of EMI sources are
listed below.
• Handheld portable transceivers (transmitters-receivers) with antenna mounted directly on the transmitting unit. Examples
include: citizens band (CB) radios, “walkie talkie,” security, fire and police transceivers, cellular telephones and other personal
communication devices. Some of these devices transmit signals while they are on, even when not being used.
• Medium-range mobile transceivers, such as those used in police cars, fire trucks, ambulances and taxis. These devices usually
have the antenna mounted on the outside of the vehicle.
• Long-range transmitters and transceivers, such as commercial broadcast transmitters (radio and TV broadcast antenna towers)
and amateur (HAM) radios.
POV EMI Warnings
Because electromagnetic energy rapidly becomes more intense as one moves closer to the source, the electromagnetic fields
from handheld radio wave sources (transceivers) are of special concern. It is possible to unintentionally bring high levels of
electromagnetic energy very close to the POV’s control system while using these devices. This can affect POV movement and braking.
The warnings listed below are recommended to prevent possible interference with the control system of the POV, which could result
in serious injury.
• DO NOT operate or turn on handheld personal communication devices, such as Citizens Band (CB) radios and cellular phones
while the vehicle is turned on.
• Avoid using your POV near transmitters such as radio stations, TV stations and alarm systems.
• If unintended movement or brake release occurs, turn the vehicle off as soon as it is safe.
• Be aware that adding accessories or components or modifying the vehicle may make it more susceptible to interference from
radio wave sources. There is no easy way to evaluate their effect on the overall immunity of the vehicle.
• Report all incidents of unintended movement or brake release to the mobile vehicle manufacturer, and note whether there is a
source of EMI nearby.
EMI Immunity
The intensity of the interfering EM energy can be measured in volts per meter (V/m). Each POV can resist EMI up to a certain intensity.
This is called its “immunity level.”The higher the immunity level, the greater the protection.
• 20 volts per meter (V/M) is a generally achievable and useful immunity level against EMI (as of May 1994). The higher the level,
the greater the protection.
• The immunity level of this product is not known.

16 (800)248-9131•(989)777-0910
Hi/Lo Handle Controls
(for RD, RTX and HD models)
WIRING DIAGRAMS

www.myamigo.com 17
TouchTron Handle Controls
(for RTX and RD models only)
WIRING DIAGRAMS

18 (800)248-9131•(989)777-0910
EXPLODED VIEW
RT EXPRESS

www.myamigo.com 19
PARTS LIST
#690000 RT EXPRESS PARTS LIST
Item Part# Description Qty/Unit Item Part# Description Qty/Unit
1 1180 Screw 1/4-20 x 1.00 hx hd 2
2 1192 Washer .281 ID .63 OD .06 at 8
3 1253 Nut 5/16-18 hex keps 1
4 1264 Nut #10-32 Keps 2
5 1295 Label seat back 1
6 1344 Screw 1/4-20 X 1.50 hx hd 2
7 1450 Screw 5/16-18 X 2.50 hx hd gr8 1
8 1479 Screw #10-32 X .625 rd hd 2
9 2237 Nut 3/8-24 hex 1
10 2433 Screw #8-32 X 1.25 lg rd hd 2
11 2715 Clip black plastic cable tie 3
12 2822 Screw 1/4-20 X 1.75 hex hd gr8 8
13 3083 Nut 1/4-20 serrated anged 8
14 5209 Cap black used on pnu 8" & 10" 2
15 5630 Nut #8-32 hex keps 2
16 5865 Screw #10-24 X .25 x 1.25 shld 2
17 6073 Seat shell black premier od 1
300369 Seat 18" prem l blk 1
18 6191 Seat post lower weldment 1
19 6227 Nut #10-24 nylon-ins hex 2
20 6304 Velcro dual lock 400/IN 2"pc 2
21 6305 Velcro dual lock 170/IN 2"pc 1
22 6505 Screw 3/8-24 X 4.5 lg hx hd gr8 1
23 7281 Screw 1/4-20 X .88 shcs 2
24 7441.20 Circuit breaker 25a auto w/wir 1
25 7852.10 Wire charger to controller 1
26 7912.10 Wheel 09" rer TL blk hub 2
27 7997 Key extension (key with fob) 1
28 8216 Charger 24v 03a 1
29 8223.21 Enclosure Hi/Lo button he key 1
8221.20 Enclosure touch he key 1
30 8300 Strap battery retaining 1
31 8417 Cord reel ac to chgr 1
32 8534 Plug tube square 2
33 8670.20 Wheel 01.6" stab HC brkt lt 1
34 8670.21 Wheel 01.6" stab HC brkt rt 1
35 8675 Ground wire assembly RD 1
36 8890.11RT Controller RT Hi/Lo button he 1
9300.10RT Controller RT touch he 1
37 8944 Band mounting cpu & chgr 1
38 9247 Arm rt remove 1
210203 Armpad molded single w/screws 1
39 9248 Arm lt remove 1
210203 Armpad molded single w/screws 1
40 9307.20 Battery 12v 17a 2
41 10011 Bumper trim RTX mini 1
42 10050 Bearing headset 1-1/8" 1
43 10064.21 Cover RT red classic 1
44 10151 Foam insert adhesive backed 2
45 10289.20 Basket HC 1
46 10335.21 Handle w/o encl red classic 1
47 10516 Handle boot lower pvc free 2
48 10539 Light-headlight low w/hilo 1
49 10554 Clip wire guide 2
50 10702 Platform RT champagne 1
51 10709 Fork weldment rtx platform 1
52 10710 Mat RTX 1
53 10765.20 Seat post upper std acc ad 1
54 10970-RAW Tape velcro loop 1.5 wide 2
55 10971-RAW Tape velcro hook 1.5 wide 2
56 10976 Clip wire guide 3
57 11041 Drive rer 11041 w/11087 RT 1
58 11082 Plate controller mounting 1
59 11174 Clamp drive 2
60 11187 Label serial number AMI 1
61 11289 Wire asm interface 10940/11200 1
62 11311 Washer lock heavy split 1/4" 4
63 11320.20 Wheel 06" 2.5 wd frt grey 1
64 11556 Pan rear RT platform 1
65 11861 Cable tie 8" 1
66 267000 Seat lock rt 1

20 (800)248-9131•(989)777-0910
EXPLODED VIEW
RD
Other manuals for RT Express
2
This manual suits for next models
2
Table of contents
Other Amigo Scooter manuals

Amigo
Amigo Shabbat Amigo Quick start guide

Amigo
Amigo Ahabbat Amigo Quick start guide

Amigo
Amigo SMARTSHOPPER User manual

Amigo
Amigo RT Express Operation manual

Amigo
Amigo Fiesta One User manual

Amigo
Amigo E-Line User manual

Amigo
Amigo FD User manual

Amigo
Amigo RT Express Quick start guide

Amigo
Amigo Shabbat Amigo User manual

Amigo
Amigo FD User manual