Installation Guide
MMS Servers - Rack Rail Kit
Overview
All MMS Multimedia servers come with a Rack Rail Installation Kit, which
includes the hardware required to mount the MMS servers in a standard
19-inch (48-cm) rack.
MMS-900 Servers use a more heavy-duty version of the installation kit to
accommodate their size and weight. The rack-rail kit that comes with the
MMS-900 comes with its own installation instructions.
Each Rack Rail Installation Kit supports one server, and the parts included
in the rack rail hardware kit include:
• Two Outer Slide Rails
• Two Inner Server Rails
• Two Long Extension Brackets
• Two Short Extension Brackets
• Four 3-hole Locking Plates (with large holes)
• Four 3-hole Locking Plates (with small holes)
•Variety of screws (20 large, 20 small/long and 20 small/short)
Note: You may not need all the parts included in the rack rail hardware kit
for every installation. You may have some parts left over.
The basic steps for installing the MMS server into a rack are:
1. Prepare the Slide Rail Assemblies: The Inner and Outer Rails must be
separated before they can be attached to the MMS and the rack.
2. Attach the Inner Server Rails to the MMS Server.
3. Attach the Extension Brackets to the Outer Slide Rails.
4. Install the Outer Slide Rails in the server.
5. Slide the server (with Inner Server Rails attached) into the Outer Slide
Rails in the rack.
Each step is described in more detail in the following subsections.
Step One: Prepare the Slide Rail Assemblies
The two Outer Slide Rails, and two Inner Server Rails come assembled in
the rack rail hardware kit. You must separate these pieces before beginning.
The Inner Server Rails will be attached to the MMS chassis.
To detach the server rails from the slide rail assemblies:
1. Place the two slide rail assemblies on a flat surface.
2. Extend the Inner Server Rail from the slide rail assembly until the Inner
Server Rail release latch clicks and locks.
3. Holding down the latch on the back side of the Inner Server Rail, slip
the server rail out of the inner slide.
4. Repeat Steps 2 and 3 for the second slide rail assembly.
Set the Inner Server Rails aside. You will attach them to the MMS chassis
(as described in the next section).
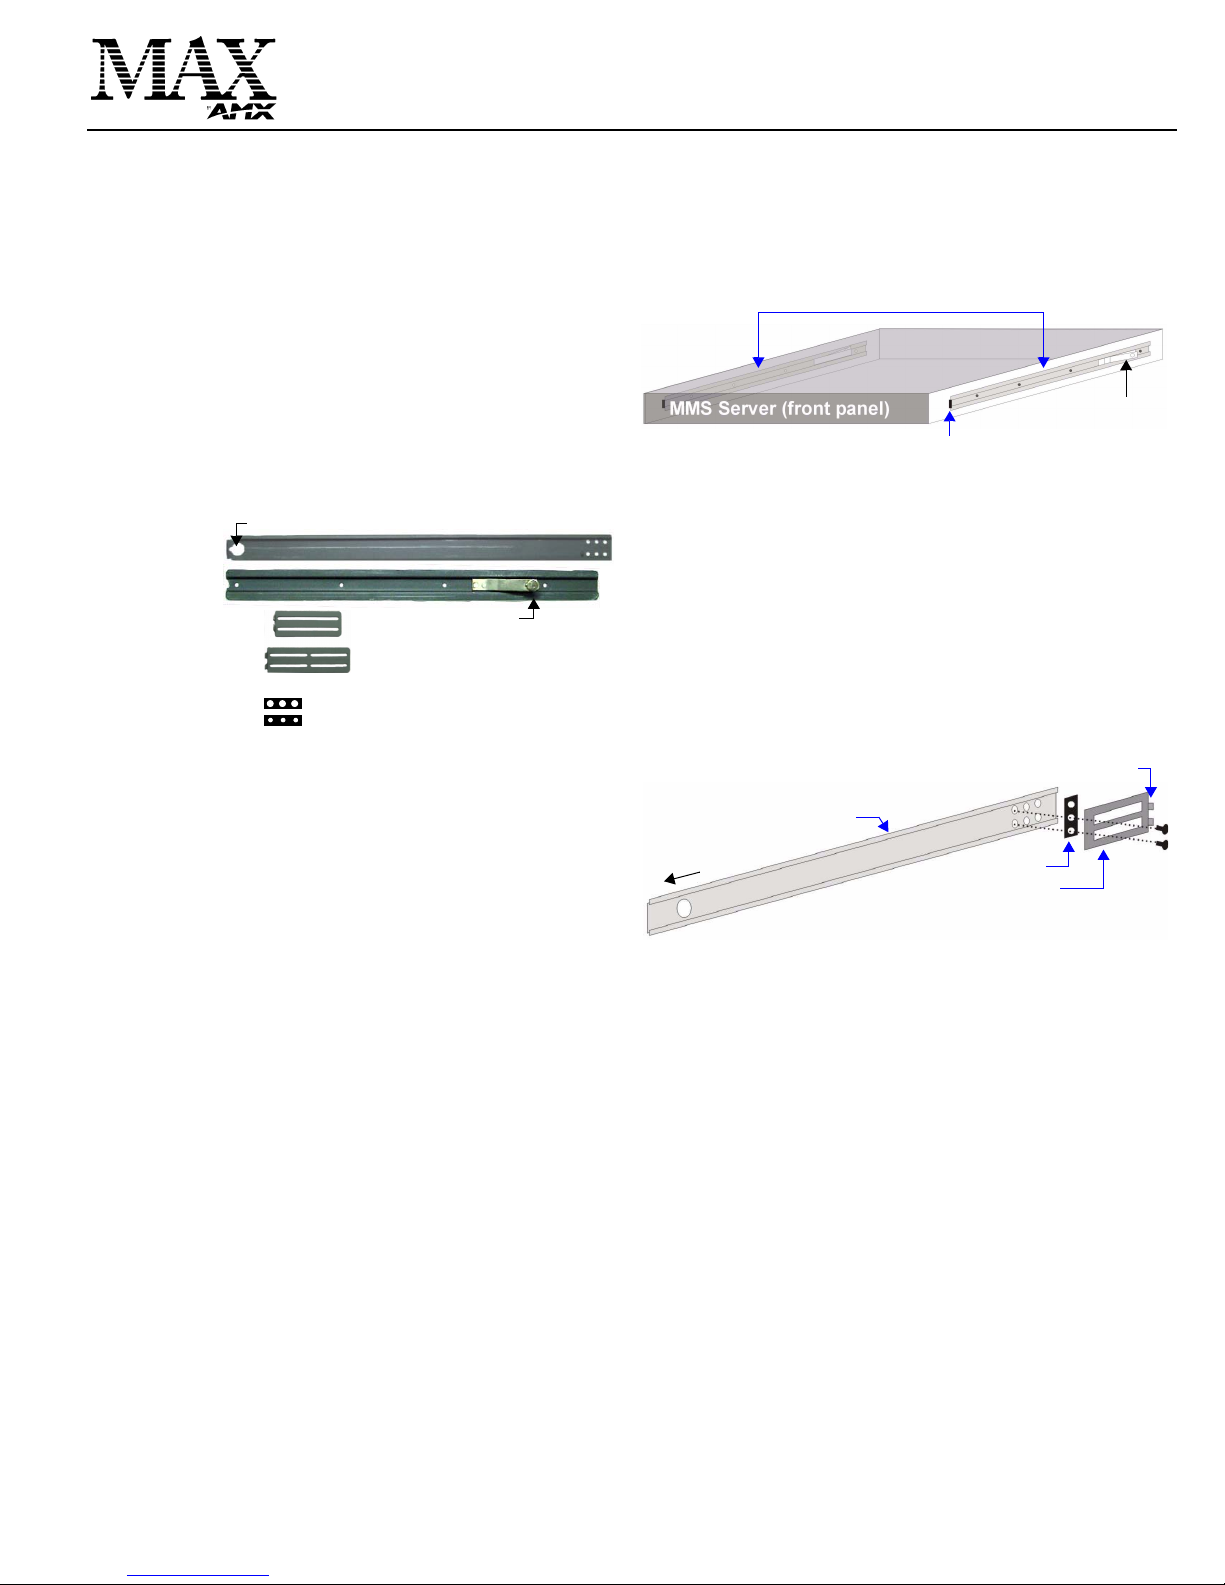
Step Two: Attach the Inner Server Rails to the MMS chassis
The inner slide rails attach to the MMS server chassis, with the locking
Release Tab facing out from the server, as indicated in FIG. 2.
Slide the notched end of the rail under the tab in the front of the server and
screw into place towards the rear of the rail using the small/short screws
(four per side).
Step Three: Attach the Extension Brackets to the Outer Rails
The Extension Brackets attach to the outer rails (using the 3-hole locking
plates). You will choose either the Short Extension Brackets, or the Long
Extension Brackets, depending on the depth of the rack you are mounting
the MMS into.
1. Attach the Extension Bracket to the Outer Rail using the small/long
screws and a 3-hole Locking Plate, as shown in FIG. 3. Select the type
of locking plate (large or small holes) that works best with the rack you
are using.
Note: Depending on the type of rack you are using, you may need to
use Extension Brackets on the front of the server as well.
2. The feet of the Extension Bracket are placed at the end of the rail. The
type of cabinet/rack you are using will dictate whether the Extension
Bracket feet should point in towards the server or out towards the rack.
3. Repeat the process for the opposite Outer Rail.
Step Four: Install the Outer Rail/Extension Racket Assemblies In the
Rack
Once both of the Outer Rail/Bracket assembles (from the previous step) are
prepared, they can be installed into the rack cabinet. Follow these steps for
both of the Outer Rail/Bracket assemblies:
1. Insert the Outer Rail/Bracket assembly into the rack. Make sure that
the Extension Bracket is situated towards the rear of the rack.
2. Attach the rear end of the Outer Rail/Bracket assembly to the rack with
two screws, (securing the Extension Bracket, Locking Plate and Outer
Rail to the rear flange of the rack cabinet).
3. Align the front of the Outer Rail/Bracket assembly to the front flange on
the rack, and secure using two screws.
FIG. 1 Included Rack Kit Parts
Locking Tab Hole
Locking Release Tab
xtension Bracket (2 Short)
Extension Bracket (2 Long)
Outer Slide Rail (2)
Inner Server Rail (2)
Screws:
• 20 - Large
• 20 - Small/Long
• 12 - Small/Short
3-hole locking plates:
4 - Large holes
4 - Small holes
FIG. 2 Attaching the Inner Server Rails to the MMS chassis
FIG. 3 Attaching the Extension Bracket to the Outer Rail (using a Locking Plate)
Attach the Inner Server Rails to the MMS chassis (4 small/short screws per side)
Slide the end of the Inner Server Rail under the
tab protruding from the side of the MMS server.
Locking Release tab
Locking plate
Extension bracket
Outer Rail
Extension Bracket Feet
front


