Anatomic SITT Anatomic Hygiene Sit User manual

EN
Rev. 2.3 - 2022-01-26
Anatomic
Hygiene Sits
User manual
User manual, mounting and adjustment
instructions, service and maintenance

User manual Anatomic Hygiene Sits www.anatomicsitt.com | +46 11 16 18 00
Table of contents
This product is manufactured by Anatomic Sitt i Norrköping AB
Postal address Anatomic Sitt AB, Box 6137, SE-600 06 Norrköping, Sweden
Street address Anatomic Sitt AB, Terminalgatan 1, SE-603 61 Norrköping
Phone +46 11-161800
Email info@anatomicsitt.com
Webb anatomicsitt.com
Instructions movies youtube.com/anatomicsitt
Follow us on facebook.com/anatomicsitt
Eudamed-registration number/SRN: SE-MF-000002240
Manufacturer
This user manual refers to individual made seat Anatomic Hygiene Sits
with accessories. For a complete overview of the intended accessories,
see the product orderform.
Manufacturer..................................................... 2
Introduction ...................................................... 3
General ...........................................................................3
Correspondence - marking ..................................3
Declaration of conformity.....................................3
Symbol list......................................................... 4
Safety precautions .......................................... 4
Education and qualifications...............................4
Warnings and precautions....................................5
Control before use....................................................6
Remaining risks..........................................................6
Approved combinations ........................................6
Divergency/Incidents ..............................................6
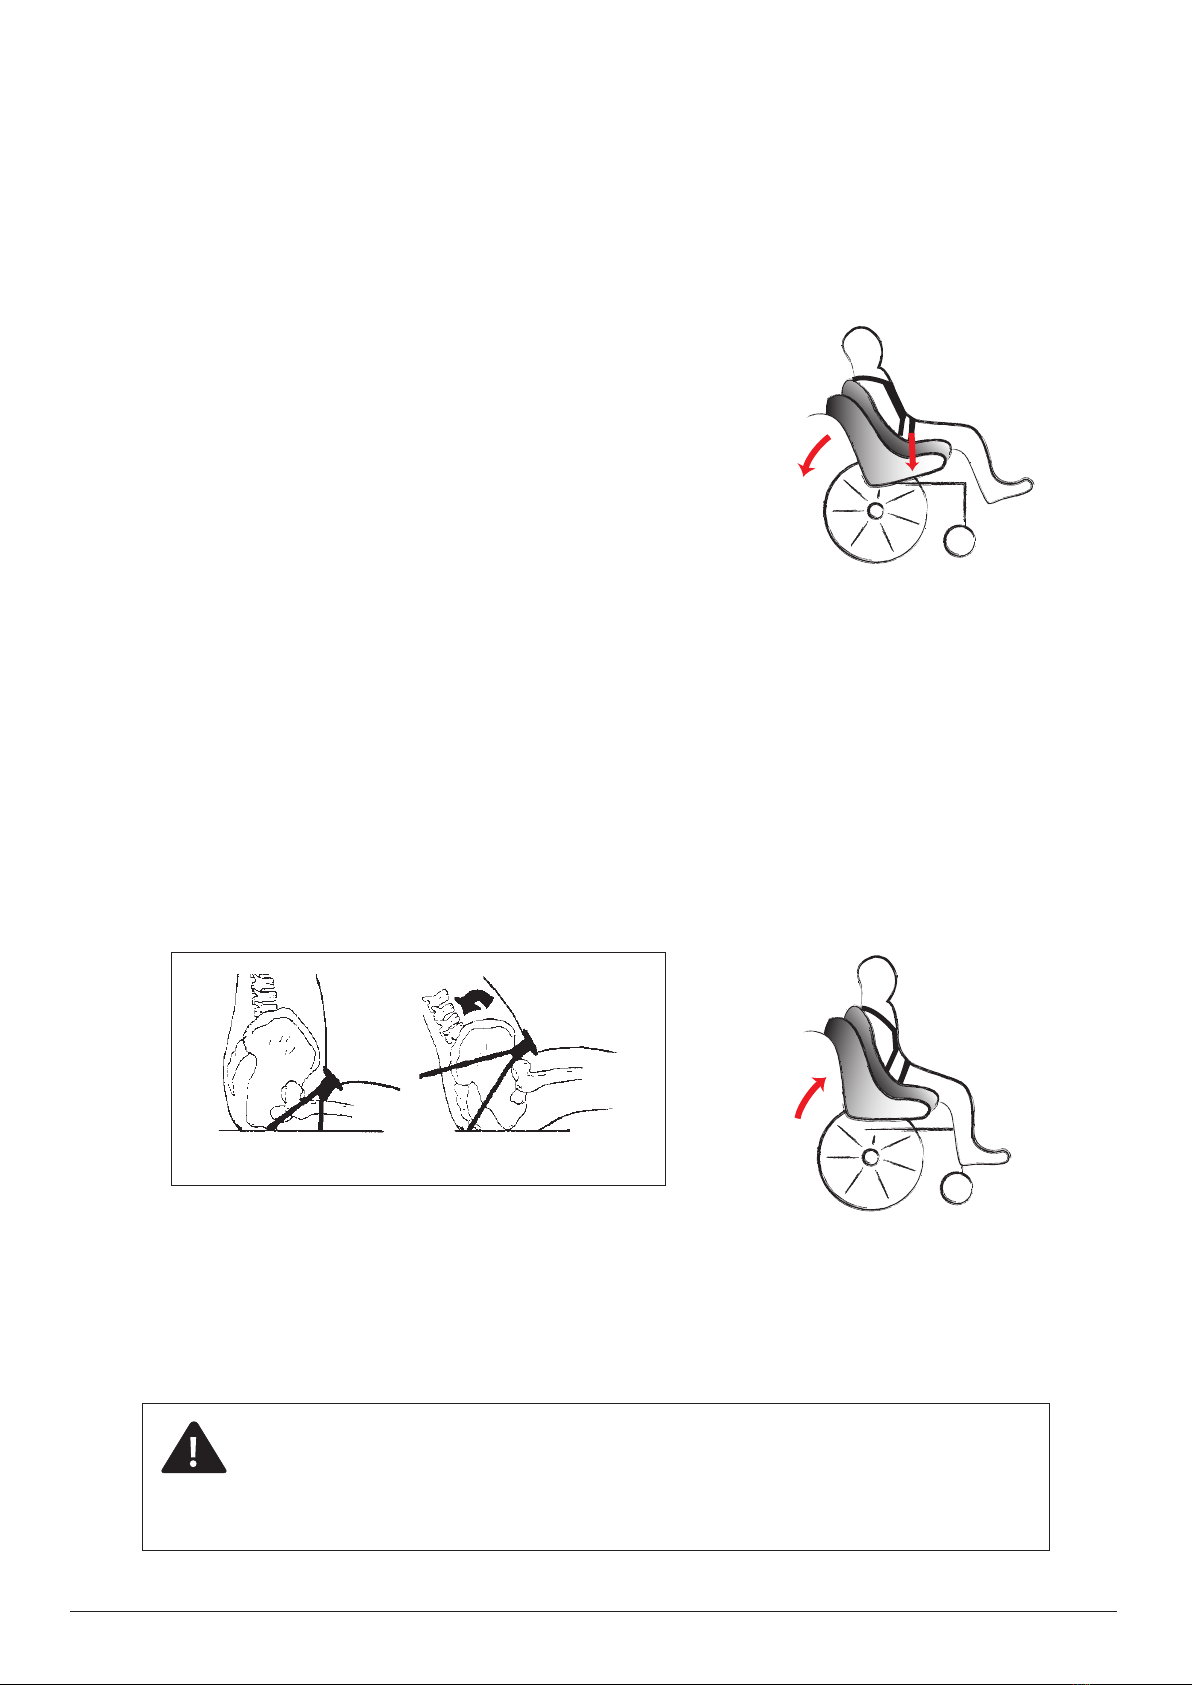
Use of the seat.................................................. 7
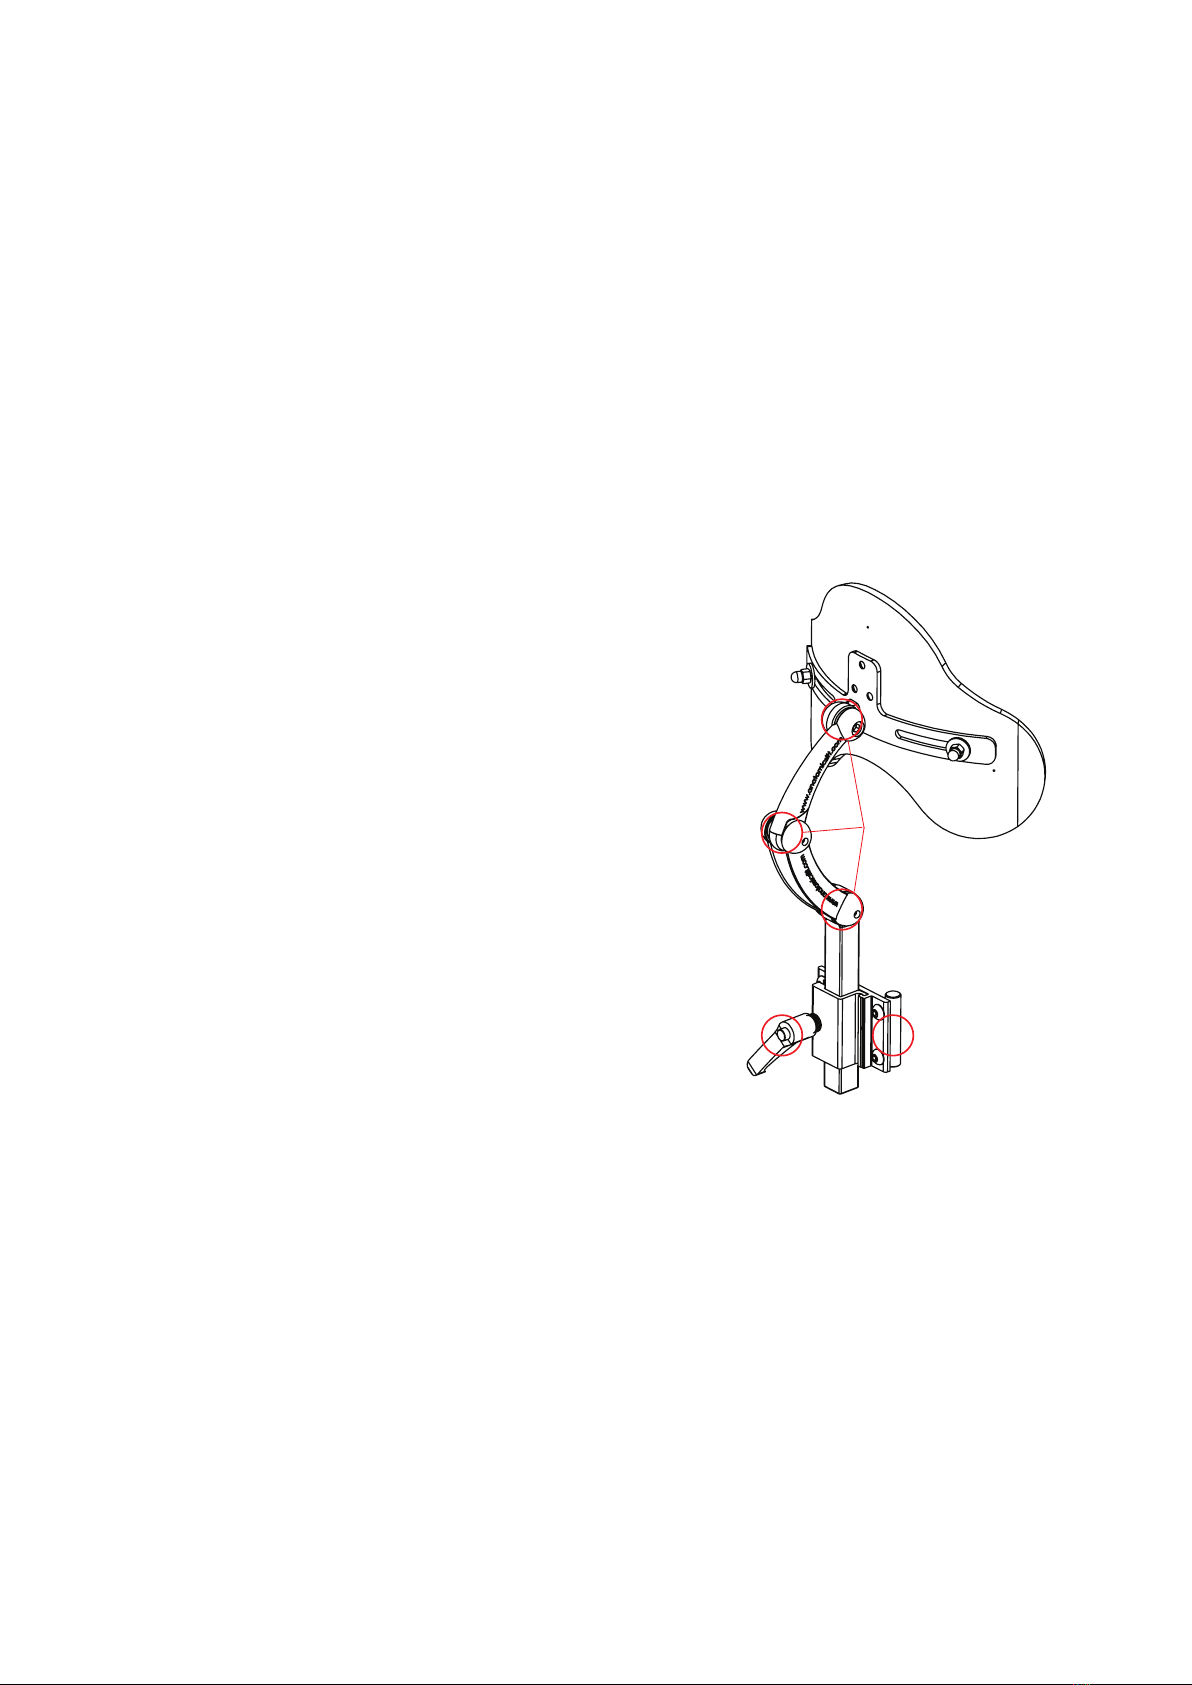
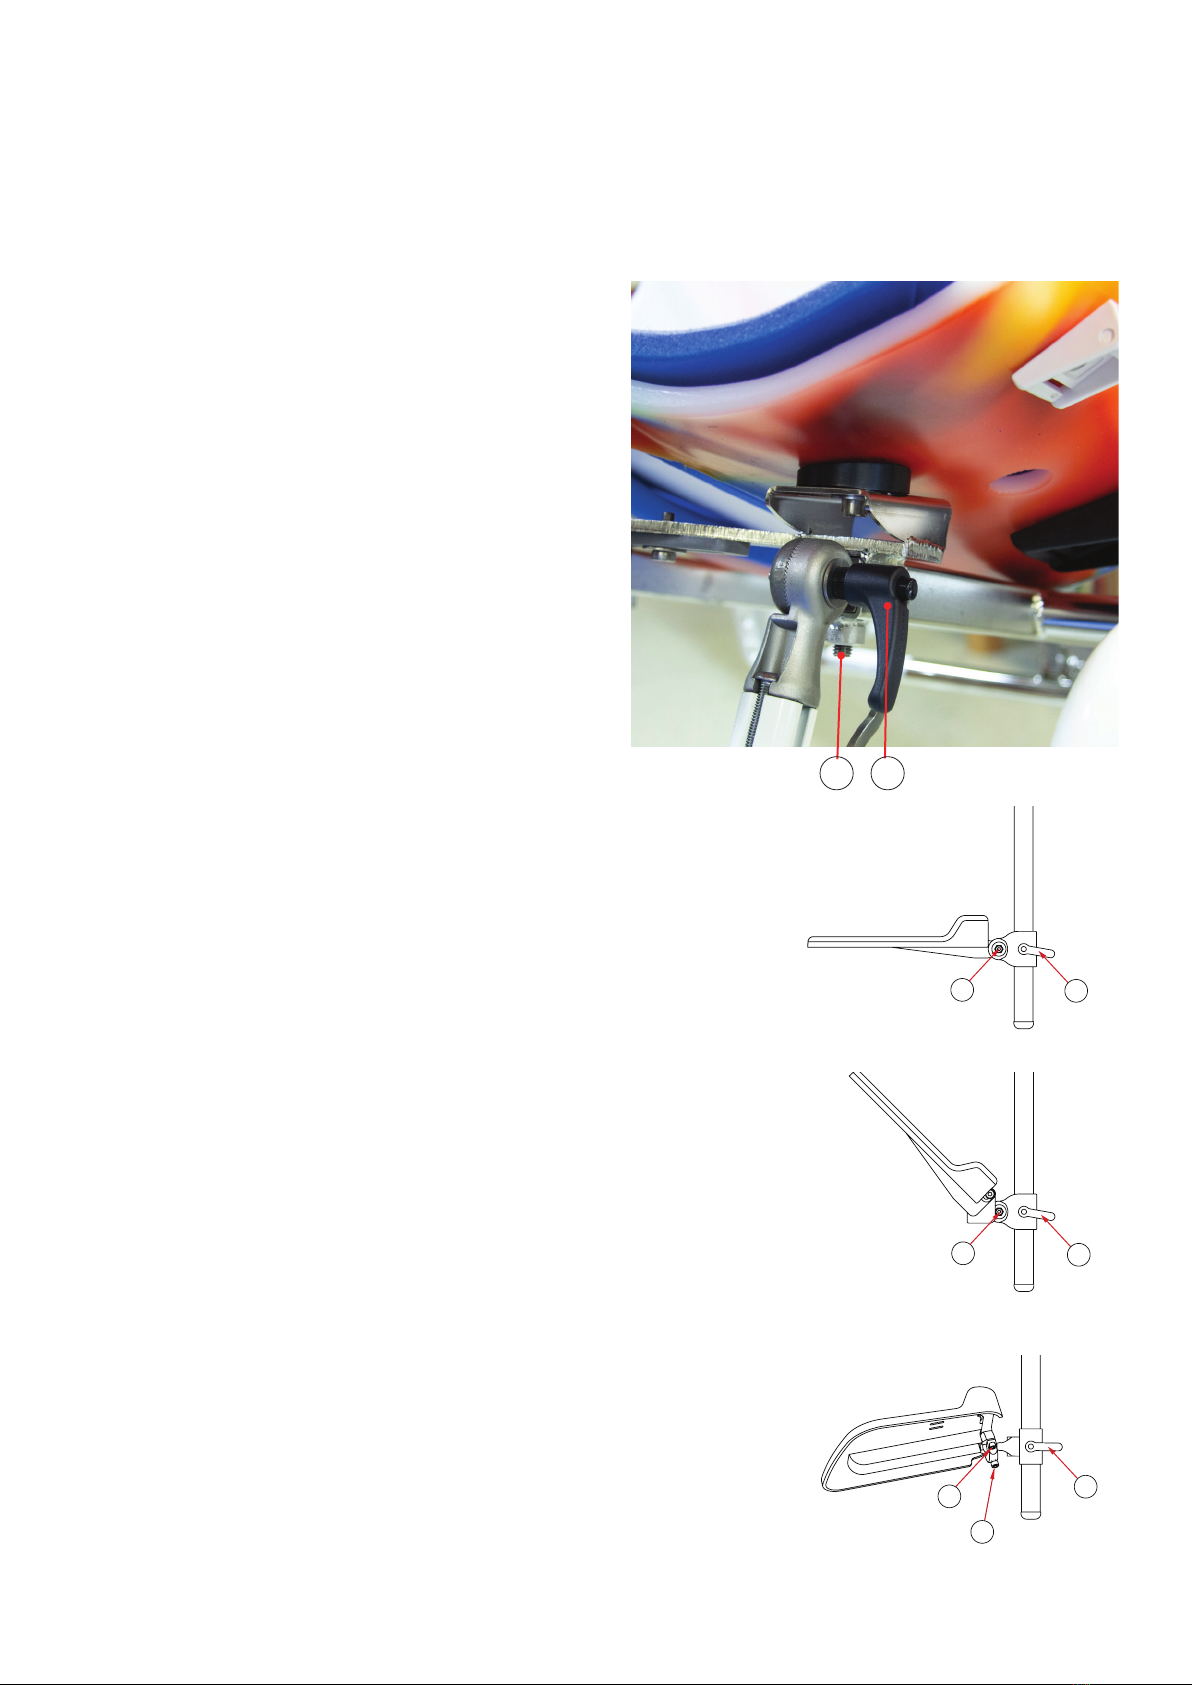
Mounting and adjustment instructions ......... 8
Headsupport................................................................8
Justerbar höftvinkel.................................................9
Footrest .......................................................................10
Calfsupport ................................................................. 11
Table .............................................................................. 12
Summary and follow-up................................13
Service and maintenance..............................13
Control before use.................................................. 13
Service and maintenance....................................14
Recycling ..........................................................14
Warranty ...........................................................15
Revision.............................................................15

3User manual Anatomic Hygiene Sits www.anatomicsitt.com | +46 11 16 18 00
Introduction
General
In order for you to make full use of the aid in a safe way, it is important that you
read this user manual properly. This concerns the caregivers and family who are
nursing the user. The user is the person sitting in the device and the caregiver is the
person operating the device.
Save the user guide/manual for future reference. New editions are available for
download from our website www.anatomicsitt.com. Information about the latest
revision can be found on the front page along with the date.
Correspondence - marking
The product label and its packaging contains the reference number (REF) and serial
number (SN - for main products) or batch number (LOT - for accessories). The label
is placed on the inside of the seat shell on the back or seat. These numbers shall be
provided in correspondence with Anatomic Sitt.
Declaration of conformity
The device complies with the requirements for medical devices under Regulation
(EU) 2017/745 on medical devices. See the current EU declaration of conformity for
product variants and accessories, see www.anatomicsitt.com/documents

User manual Anatomic Hygiene Sits www.anatomicsitt.com | +46 11 16 18 00
Safety precautions
Education and qualifications
• Mounting, service and reconditionering must always be done by qualified
personnel, (technicians at an aidcenter or equivalent).
• Decisions on adaptation/special adaptation must be made by qualified medical
personnel and performed by qualified professional personnel (technicians at an
aidcenter or equivalent).
• Settings, adjustments and testing of the aid must always be carried out by
qualified medical personnel (specialist personnel at an aidcenter or equivalent).
• The aids prescriber or person with equivalent competence and knowledge of
the user and the aid must always do a risk assessment before use.
Symbol list
Alerts the reader to important
safety information, etc.
The symbol indicates instructions
and tips which makes it easier
when using the product.
Always read the instructions
before use.
Read the user manual for
important safety information.
Manufacturer (possibly also
date of manufacture).
Medical device.
Reference number/item number
for product identification.
Unique identifier of product and
manufacturer.
Indicates the manufacturer’s serial
number so that a specific technical
product can be identified.
The batch/batch number of the
manufacture for identification purposes.

5User manual Anatomic Hygiene Sits www.anatomicsitt.com | +46 11 16 18 00
Warnings and precautions
Check the product for function before handing it over to a user.
After all mounting and adjustment or service work is done, check and tighten
all fastening screws and nuts.
Prescriber or person with equivalent competence and knowledge of the user
to balance in the selected seat to ensure that any tipping risk is excluded.
Always lift in the chassis - never in the seat.
Never use the footplate when getting in and out of the aid.
The person who are prescribing the aid is responsible for instructing the user
and/or other persons in its immediate environment how to use the product
safely. Always check the function of the product before use.
Never do service while using the product.
Note that if the user grabs objects outside the aid or leans too far out of the
aid, a center of gravity shift can occur, which can lead to an increased risk of
tipping.
Never leave the user unattended when using the aid.
Settings may only be done by qualified professionals. It is only permitted to
make settings in the manner described in this user manual.
Always check after use to detect redness or pressure marks on the patient.

User manual Anatomic Hygiene Sits www.anatomicsitt.com | +46 11 16 18 00
Control before use
Tillsyn och kontroll ska utföras före varje användning enligt nedan punkter:
• Check the product and its accessories for loose parts, wear and damage.
In particular, check screws and nuts and knobs.
• Check that the seat is properly fixed to the chassis.
• Check the stability of the product.
• Check belts and harnesses for wear, function and attachment.
If defects are noticed, do not use the product. Contact your distributor of the aid
for action.
Remaining risks
Be aware that the product and its accessories are set correctly so that the user
does not suer any discomfort or injury during use.
If this is the case, adjustments must be made or suitable accessories fitted.
Approved combinations
In order for the product to retain its CE marking, the aid may only be provided with
accessories and spare parts supplied by Anatomic Sitt AB. See the products order
form for possible accessories and exploded view of spare parts.
Divergency/Incidents
If the product is unusable product, contact your aids center or dealer/manufacturer.
If a serious incident occurs, it should be reported to Anatomic Sitt AB and to the
country’s competent authority.

7User manual Anatomic Hygiene Sits www.anatomicsitt.com | +46 11 16 18 00
Use of the seat
Many users are only able to sit in an active sitting position for short
periods of time. By changing from active sitting to relaxing position
several times a day, the user gets a more comfortable sitting and also
the pressure is distributed. This prevents the appearance of skin redness.
Right pulling direction
The pelvis falls backward
Wrong pulling direction
Figure 1
Use of the seat
1. Make sure the seat is firmly attached to the chassi
and can be tilted.
2. Make sure the parking brake is locked and the
wheelchair is on a stable surface.
3. Start by tilting/tipping the seat back as far as
possible, before the patient is placed in the seat.
4. Place the patient in the seat. Make sure that the user
gets into the seat properly. Check with your hand
at the sides of the hip. The pelvis should be in the
intended position as at the fitting of the seat. Adjust
if necessary.
5. Fix the pelvis with the hip belt (see fig. 1). Start by tensioning the strap on the
side the user turns / buckles out. Adjust the position of the belt through the rear
straps / attachment points. Adjust the buckle to center on the user. If the buckle
is not centered, there is a risk that the straps will run in the buckle (the buckle
will not lock). Tighten the hip belt. The hip belt should sit so well that the user’s
pelvis is stable. One rule is that you can just get a finger between the thighs and
the belt. Check that the buckle is properly closed and the adjustment straps
suciently tightened.
6. Secure the harness and other belts if used.
7. Tilt the chair back in normal mode. Use the tiltfunction during the day to create
variation in the pressure distribution on the body.
8. From time to time, check that the user is seated correctly and stably.

User manual Anatomic Hygiene Sits www.anatomicsitt.com | +46 11 16 18 00
Mounting and adjustment instructions
Mounting must always be done by qualified personnel, (technicians at an aidcenter
or equivalent). Instruct the user and/or other people close to the user about the
product’s functions so that the aid can be used safely.
Headrest
Mounting / adjustment of headrest
* Remove the protective cover on the backrest.
* Mount the headrest bracket (B) to the
backrest.
* Loosen the screws (A) suciently to allow
adjustment by hand.
* Place the user in the seat and adjust to the
desired position.
* Tighten all the screws and the lever handle
and replace the cover.
The headrest is easy to remove:
• Loosen the lever handle (C) to remove
the headrest.
C
B
A

9User manual Anatomic Hygiene Sits www.anatomicsitt.com | +46 11 16 18 00
Increase the hip angle
Loosen the screws (A) slightly on the sides
of the seat. Unfold the angle bracket (B)
slightly and bend the back backwards until
the screws fit into the bottom groove.
Tighten the screws (A) securely.
Reduce the hip angle
Loosen the screws (A) slightly on the sides of
the seat. Unfold the angle bracket (B) slightly
and bend your back forward until the screws
fit into the top groove.
Tighten the screws (A) securely.
Adjustable hip angle
The adjustable hip angle makes it possible to change the seat angle for the hip. The
seat is always delivered in the middle of three positions and can be either closed or
opened with respect to the seat angle at the hip.
Check that the seat is balanced on the chassis to avoid the risk of tipping.
A
B

User manual Anatomic Hygiene Sits www.anatomicsitt.com | +46 11 16 18 00
Footrest
Adjustment
Loosen the handle (H) at the seat and
ensure that the angle is not too transverse
so that the stand grips the frame of the
base or the ground when tilting.
Adjust to the desired height of the footrest
and finish with the desired angle at the
ankle joint (4 mm Allen key). Check that
the castor wheels move freely.
Removal
To remove the entire footrest, loosen
the screw (J).
JH
Height adjustment of the footplate
To adjust the height of the footrest, loosen the lever
handle (A) slightly to adjust to the desired height. Then
tighten the lever handle.
Angle adjustment of the footplate
Fixed footrest bracket: To adjust the angle at the ankle,
loosen the screw (E) and adjust to the desired angle.
Then tighten the screw.
Fixed footrest bracket: to adjust the angle at the ankle,
loosen the screw (E) and adjust to the desired angle.
Then tighten the screw.
Folding footrest bracket: To adjust the angle at the
ankle, loosen the screw (E) and adjust to the desired
angle. Then tighten the screw. To use the folding
function, lift the front edge of the footrest plate.
Tilt adapter: To use the tilt function, first loosen screws
(B) and (C) and adjust to the desired position. Then
tighten the screws (B) and safety lock position with
screw (C).
D
F
1 2 2
3
4 4 4
3 3
A
A
A
B
A
C
A
A
A
A
A
C
A
B
A
A
A
A
A
A
A
A
A
E
A
E
A
E
D
F
1 2 2
3
4 4 4
3 3
A
A
A
B
A
C
A
A
A
A
A
C
A
B
A
A
A
A
A
A
A
A
A
E
A
E
A
E
D
F
1 2 2
3
4 4 4
3 3
A
A
A
B
A
C
A
A
A
A
A
C
A
B
A
A
A
A
A
A
A
A
A
E
A
E
A
E
Fixed
Foldable
Balljoint

11User manual Anatomic Hygiene Sits www.anatomicsitt.com | +46 11 16 18 00
Mounting of calfsupport
Before you can install the wadding, you must first remove any footrests. Start by
removing the end cap (G) and then loosen the lever handle (F) that holds the
footrest in place on the footrest bar. Then pull the footrest plate and its fittings
downwards.
Install the footrest by sliding the rail pin (C) into the footrest frame, adjusting to the
desired height and tightening the screws (E). Then refit the footrest and end cap
(G).
Height and depth adjustment
To adjust the height and depth of
the calfsupport, loosen the screws
(E) slightly and then adjust to the
desired height/depth. Then tighten
the screws (E).
Width adjustment
To adjust the width of the
calfsupport, loosen the screws
(A) slightly and then adjust to the
desired width. Then tighten the
screws (A).
Calfsupport
F
E
A
E
G
B
D
C
Footplate
Footrest stay

User manual Anatomic Hygiene Sits www.anatomicsitt.com | +46 11 16 18 00
Table
Assembly of the table
Place the table on the armrest plates and
then screw the table’s locking arms (H)
under the armrest plate (G) until they are
squeezed . If you have chosen a table with
reinforcement and which can be swung
away, there is a tube to which the table
should be attached under the armrest plate. G H
Adjustment
Check that there is sucient support surface
under the table against the armrests. If the
support surface is too small and the table feels
wobbly, loosen the two screws (B) and (C)
under the armrests and slide them forward to
the intended holes, see hole pattern under the
armrest plates. Make sure that the table is not too
close to the belly to cause discomfort.
C
B

13User manual Anatomic Hygiene Sits www.anatomicsitt.com | +46 11 16 18 00
After mounting and/or adjustment, check that the products (main product and
accessories) are mounted correctly according to the user manual and works as
intended.
Check the settings of the product and its accessories so that the user has a correct
sitting position.
After all assembly, adjustment or service work, all lever handles, fastening screws
and nuts should be checked and tightened.
If defects are noticed, do not use the product. Contact your distributor of the aid
for action.
Summary and follow-up
Control before use
In order for the device to work properly, regular service and inspection must be
performed.
Inspection and control must be performed before each use according to below:
• Check the product and its accessories for loose parts, wear and damages. In
particular, check screws and nuts as well as knobs.
• Check that the seat is securely attached to the chassis.
• Check the stability of the product.
• Check the product’s moving functions, such as back angle, etc. regarding
mobility and locking.
• Check belts and harnesses for wear, function and attachment.
If defects are noticed, do not use the product. Contact your distributor of the aid
for action.
Service and maintenance

User manual Anatomic Hygiene Sits www.anatomicsitt.com | +46 11 16 18 00
The plastic part (PEHD) of the seat may be washed with a sponge or soft brush.
Use a light detergent and, if necessary, a disinfectant.
Padding
After bathing/showering, loosen all paddings (the blue material closest to the
body) for shorter drying time and longer life.
The paddings shall be hand-washed or cleaned with a mild antibacterial/
disinfectant. You can use a soft sponge.
The paddings should be dried at room temperature, or in a low temperature drying
cabinet, and should not be placed directly against a heat source. They should not
be dried in a tumble dryer, as they may lose their shape. Turn the paddings inside
out when drying if possible.
Regarding positioning supports (belts and harness) from Anatomic SITT AB follow
the washing advice on the label on each product.
Care and washing instructions
Recycling
A used part or product should be dismantled and discarded. The parts should
be separated by material type and taken to a recycling station.

15User manual Anatomic Hygiene Sits www.anatomicsitt.com | +46 11 16 18 00
Revision
In this version of the manual, the following changes have been made:
Correspondence - marking
The paddings shall be hand-washed or cleaned with a mild antibacterial/
disinfectant.
Revision list
ver. 2.0 - 2020-03-10
ver. 2.1 - 2021-05-26
ver. 2.2 - 2021-12-29
Warranty
Warranty and complaint
Warranty generally applies for one (1) year against manufacturing defects from
delivery date or according to agreement. Warranty is not provided for external
influences or abnormal handling. For warranty treatment is required incorrect item
in return. Always enclose a delivery note.
In order to best assess the complaint, the product must be dry and cleaned when it
is sent back.
Describe the error and the possible cause for this as thoroughly as possible. Claim
repairs or possible replacement under warranty. Always attach a copy of the invoice
and state that the product should be returned to you after repairs. Provide a
shipping address, a contact person and a phone number. Form for complaints can
be downloaded from our website.
Pack the dry and clean product well to protect it from any shocks during transport.
Do not forget to write down the shipment number or similar on your documents.
This is so that you can track the shipment if something should happen during
transport.

User manual Anatomic Hygiene Sits www.anatomicsitt.com | +46 11 16 18 00
Anatomic Sitt AB (manufacturer)
Box 6137, SE-600 06 Norrköping, Sweden
Phone +46 11 16 18 00
Fax +46 11 16 20 05
Visiting address
Terminalgatan 1, SE-603 61 Norrköping, Sweden
anatomicsitt.com
info@anatomicsitt.com
facebook.com/anatomicsitt
youtube.com/anatomicsitt
Table of contents
Other Anatomic SITT Mobility Aid manuals