Anatomic SITT Zitzi Guppy G2 User manual

User manual
Zitzi Guppy G2
EN
ver. 2.0 - 2020-04-15

2User manual Zitzi Guppy G2 www.anatomicsitt.com | +46 11 16 18 00
Safety precautions ���������������������������������4
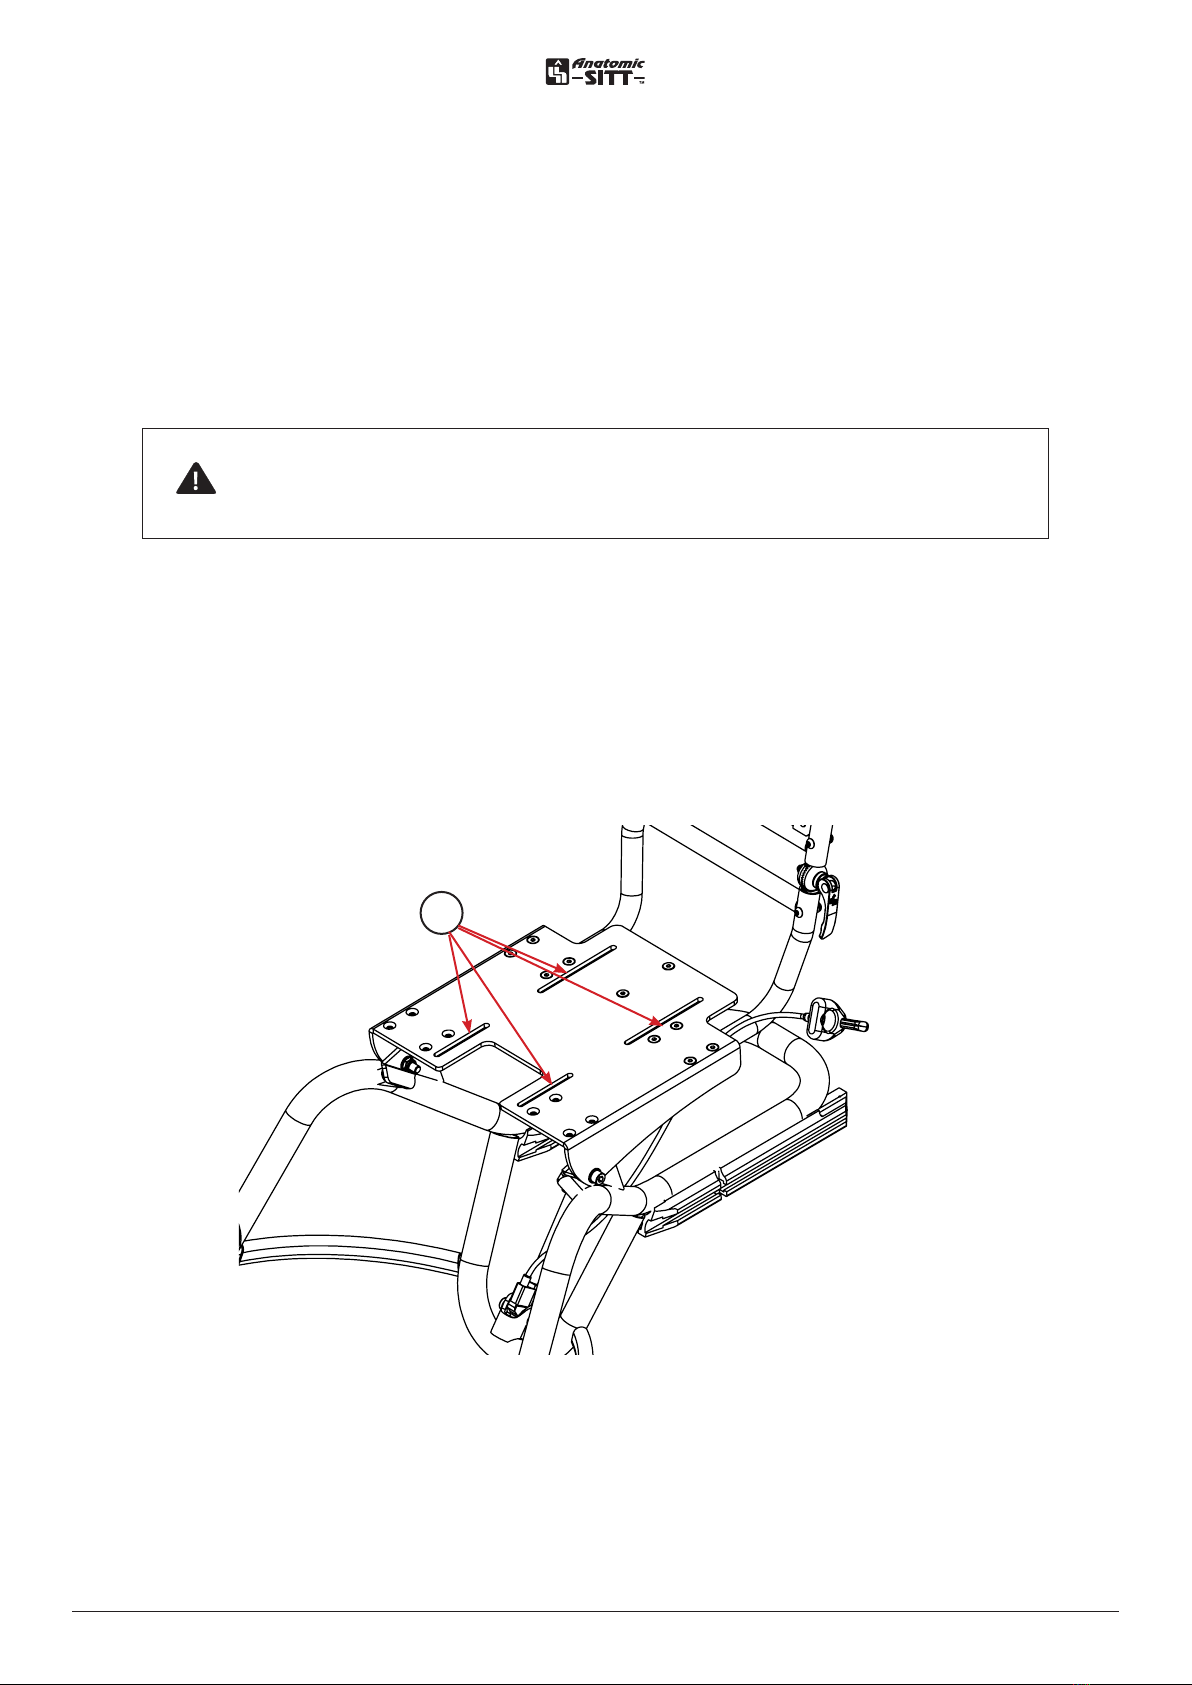
Seat part ���������������������������������������������������6
Mounting of seatsystem .............................6
Tilt��������������������������������������������������������������� 7
Seat tilt................................................................7
Armrest on driving bow ������������������������ 8
Height adjustment.........................................8
Width adjustment ..........................................8
Angle adjustment up/down......................8
Depth adjustment armrest plate ...........8
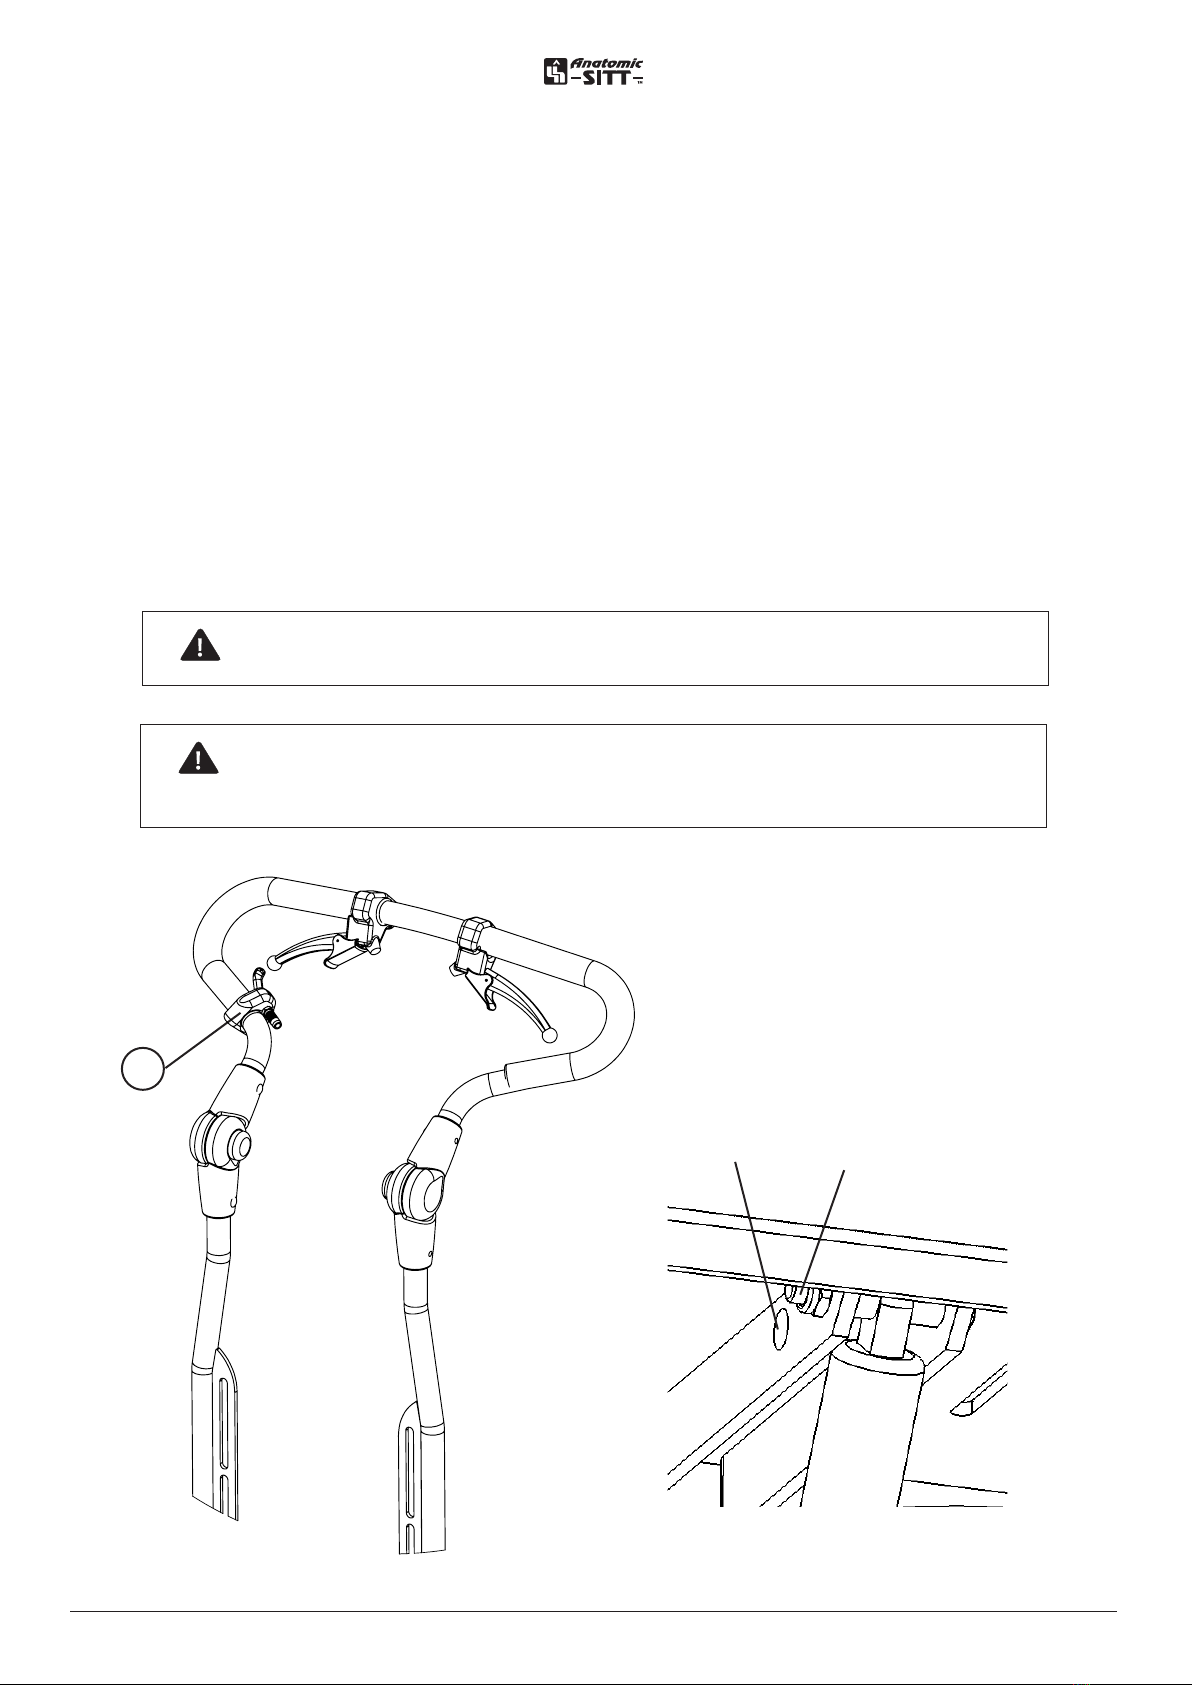
Driving bow�������������������������������������������� 10
Mounting of driving bow.......................... 10
Depth adjustment of driving bow........10
Angle adjustment of driving bow ........10
Angle adjustment of driving bow
handle ................................................................10
Folding of driving bow..............................10
Wheels������������������������������������������������������12
Mounting of wheels w. quick-release ..........12
Releasing the wheels w. quick-release .......12
Wheels������������������������������������������������������13
Wheel position .............................................. 13
E-drive ����������������������������������������������������� 14
Caster��������������������������������������������������������15
Installation of caster house on frame..........15
Mounting of the caster on a fork ...................15
Caster positioning........................................... 15
Adjusting of caster fork................................. 16
Angle adjustment of caster fork ................ 16
Brake ���������������������������������������������������������17
To use drum brake........................................17
Locking of wheels.........................................17
Releasing wheels...........................................17
Mounting of drum brake........................... 18
Troubleshooting of drum brake ...........20
Parking brake������������������������������������������21
Mounting of parking brake.......................21
To use parking brake ...................................21
Footrest���������������������������������������������������22
Mounting of footrest ................................. 22
Safety stop ..................................................... 22
Adjusting angle of the knee-joint........ 22
Adjusting height of the footrest .......... 22
Calf support �������������������������������������������23
Mounting calf support .............................. 23
Adjusting the height.................................. 23
Adjusting the width ................................... 23
Footrest brackets����������������������������������24
Fixed footrest brackets ............................ 24
Suspended footrest bracket.................. 24
Turn-up footrest bracket ......................... 24
Ball joint adapter......................................... 24
Footrest high-edge ������������������������������26
Anti-tipper����������������������������������������������27
Mounting of anti-tipper.............................27
To use anti-tipper.........................................27
Stepbar����������������������������������������������������28
Mounting stepbar........................................ 28
To use stepbar .............................................. 28
Table of contents

3User manual Zitzi Guppy G2 www.anatomicsitt.com | +46 11 16 18 00
Direction lock ����������������������������������������29
Installation direction lock ........................ 29
Activate direction lock.............................. 29
Releasing direction lock........................... 29
Mud flap ������������������������������������������������� 30
Mounting of mud flap ...............................30
Adjusting the mud flap.............................30
Transportation in a vehicle ������������������31
Guidelines transport in a vehicle .......... 31
Crashtested and approved...................... 31
Transportation kit ���������������������������������32
Mounting of the front bracket .............. 32
Mounting of the rear bracket ................ 32
Mounting of security bracket................ 32
Using transportation brackets.............. 32
Service and maintenance��������������������33
Service intervals........................................... 33
Cleaning and washing instructions .... 33
Gas piston....................................................... 33
Warranty..........................................................34
Combinations................................................34
Spare parts..................................................... 34
Marking ............................................................34
Recycling.........................................................34
Reconditioning ��������������������������������������35
Introduction ................................................... 35
Cleaning........................................................... 35
Finishing .......................................................... 35
Marking ............................................................ 35
Wheels.............................................................. 35
Paint................................................................... 35
Stability ............................................................ 36
Tubular frame and details ....................... 36
Forks.................................................................. 36
Driving bow and push-handle .............. 36
Brakes ............................................................... 36
Folding mechanism and tilt ................... 36
Function control .......................................... 36
Adaptation and customization������������� 37
Recommendations ..................................... 37
Allowed adaptations.................................. 37
Risk analysis................................................... 37
Marking ............................................................ 37
Terms of sale ������������������������������������������38
Warranty.......................................................... 38
Warranty claims........................................... 38
Returning products.................................... 38
Technical data����������������������������������������39

4User manual Zitzi Guppy G2 www.anatomicsitt.com | +46 11 16 18 00
Introduction
In order to use the Zitzi Guppy G2 in its full extent, it is important that you read this
manual. This applies to everyone close to the user.
The product is intended for users with seating problems and fits many dierent
kinds of diagnoses. Adaptation/fitting of Zitzi Delfi Pro must be done by a
medically qualified person.
If you need additional information, please contact Anatomic SITT AB.
Field of application
The product is only intended for use as a seating system together with chassis
produced by Anatomic SITT AB (Zitzi Delfi Pro, Zitzi Sharky Pro, Zitzi Active &
Anatomic SITS). If other uses are desired, please contact Anatomic SITT AB.
Maximum load weight is 75 kg.
Correspondence
Zitzi Delfi Pro and its accessories are CE marked products. A unique serial number
is located on a label placed under the activation housing. This serial number should
be quoted in any correspondence regarding the product.
Crash tested & approved
Zitzi Guppy G2 is crash tested and approved according to ISO 7176-19 for 75 kg in a
car.
Safety precautions
If a serious incident occurs, it should be reported to Anatomic Sitt AB and to the
country’s competent authority.
.
NOTE
Assistant prescriber or person with similar competence and knowledge
of the user and the device should always perform a risk analysis before
use. If this analysis shows that there may be a risk of serious personal
injury, the user must never be left unattended when using the device.
NOTE!
Be careful to avoid risk of pinching when changing the tilt.
Keep your hands away from under the seat during adjustments.

5User manual Zitzi Guppy G2 www.anatomicsitt.com | +46 11 16 18 00
Check the check box if the product
is CUSTOMIZED.
The CE Mark is no longer valid and
should be removed.
Place of label
This product is manufactured by Anatomic SITT i Norrköping AB
Postal address Anatomic SITT AB, Box 6137, SE-600 06 Norrköping
Street address Anatomic SITT AB, Terminalgatan 1, SE-603 61 Norrköping
Phone +46 11-161800
Email info@anatomicsitt.com
Webb anatomicsitt.com
Instructions movies youtube.com/anatomicsitt
Follow us on facebook.com/anatomicsitt

6User manual Zitzi Guppy G2 www.anatomicsitt.com | +46 11 16 18 00
A
A
2 : 7
B
B
This document is the property of Anatomic Sitt AB. The information in this,
or parts thereof, may NOT be copied, altered or in other ways used
unless previously allowed by Anatomic Sitt AB. Nor may the information
be disclosed to third parties or in other ways be made available to
unauthorized company or person.
Denna handling är Anatomic Sitt AB’s egendom. Informationen i denna,
eller delar därav, får EJ kopieras, ändras eller på annat sätt nyttjas utan
föregående medgivande från Anatomic Sitt AB. Ej heller får
informationen delgivas tredje part eller på annat sätt göras tillgänglig
för icke behörigt företag eller person.
Format: A2
Guppy G2 kpl
-
Rev.
19-1220
Anatomic SITT AB
Box 6137
600 06 Norrköping
+ 46 (0)11 16 18 00
Titel / Description
Ytbehandling / Surface treatment
Datum / Date
Tolerans/Tolerance
E
Ritad / Drawn
Kontr. / Checked
Ritn. Nr.
DWG No.
Material / Material
Skala / Scale
Blad/Sheet
Filnamn: 19-1220 Guppy G2 kpl
1:5
FH
Matas in
2020-03-05
ISO 2768-m
1/1
Seat part
Mounting the seatplate
The seat systems mounting plate is easily mounted on the chassis seat plate by use
of four (4) screws, washers and nuts in marked tracks (A).
A
NOTE! For further information on mounting plates, see the respective
user manuals for the chosen seating system.

7User manual Zitzi Guppy G2 www.anatomicsitt.com | +46 11 16 18 00
Tilting the seat
Guppy G2 has two dierent tilt positions, which are set using holes under the seat-
plate. If the piston is attached to the standard hole at the bottom (as shown below)
tilt is obtained at 0° to 31°. If the piston is attached to the hole above, a tilt of -6°
to 29° is obtained. To tilt the seat, push the lever (A) while holding the driving bow
with one hand and push it down / forward. Release the slider (A) when you have
reach the desired tilt.
To reset the seat angle to the original position, press the slider (A) and drag
the driving bow up / to behind.
Tilt
A
Montering av negativ tilt Guppy
Guppy har två olika lägen för tilt vilket ställs in med hjälp av hål under sittplattan. Om kolven fästs in i
hålet längst bak (som på bild nedan) erhålls tilt på 0-32O. Om kolven fästs in i hålet framför erhålls en
tilt på -7-25O.
Standard
tilt
Negative
tilt
NOTE! Be careful to avoid risk of pinching.
NOTE! Be aware that the tipping risk may increase when tilting the
seat.
A
A
2 : 7
B
B
This document is the property of Anatomic Sitt AB. The information in this,
or parts thereof, may NOT be copied, altered or in other ways used
unless previously allowed by Anatomic Sitt AB. Nor may the information
be disclosed to third parties or in other ways be made available to
unauthorized company or person.
Denna handling är Anatomic Sitt AB’s egendom. Informationen i denna,
eller delar därav, får EJ kopieras, ändras eller på annat sätt nyttjas utan
föregående medgivande från Anatomic Sitt AB. Ej heller får
informationen delgivas tredje part eller på annat sätt göras tillgänglig
för icke behörigt företag eller person.
Format: A2
Guppy G2 kpl
-
Rev.
19-1220
Anatomic SITT AB
Box 6137
600 06 Norrköping
+ 46 (0)11 16 18 00
Titel / Description
Ytbehandling / Surface treatment
Datum / Date
Tolerans/Tolerance
E
Ritad / Drawn
Kontr. / Checked
Ritn. Nr.
DWG No.
Material / Material
Skala / Scale
Blad/Sheet
Filnamn: 19-1220 Guppy G2 kpl
1:5
FH
Matas in
2020-03-05
ISO 2768-m
1/1

8User manual Zitzi Guppy G2 www.anatomicsitt.com | +46 11 16 18 00
Armrest on driving bow
Mounting on the driving bow
Losen the screws (A) on both sides. Mount the armrest bracket towards the back of
the backrest on suitable height by repositioning the screws (A) and then tighten.
Height adjustment
Losen the screws (A) and adjust to desired height. Tighten the screws.
Width adjustment
Losen the screws (B) a little and adjust to desired width.. Tighten the screws.
Angle adjustment up / down
To adjust the angle of the armrest, loosen the hand lever (C) a little and adjust to
desired angle.
Depth adjustment of the armrest plate
Losen the screws (D) under the armrest plate and move to desired depth using the
holes below the plate.

9User manual Zitzi Guppy G2 www.anatomicsitt.com | +46 11 16 18 00
D
B
A
C

10User manual Zitzi Guppy G2 www.anatomicsitt.com | +46 11 16 18 00
Driving bow
Mounting of driving bow
Insert the driving bow into the brackets at the rear edge under the seat part plate.
Tighten the screws (A) after mounting.
Depth adjustment of the driving bow
To deep adjust the driving bow (extending the seat depth), loosen the screws (A)
slightly, under the rear part of the seat plate. Move the driving bow to the desired
depth. Tighten the screws (A).
Angle adjustment of driving bow
The driving bow can be adjusted according to seating system. Release the locking
of the bow by loosening both levers (B) and adjust to the desired angle. Then tigh-
ten both lever handles (B).
Angle adjustment of driving bow handle
To adjust the driving handle angle, press the buttons (C) the inside of the frame
joints and then adjust to the desired angle.
Folding of driving bow
Losen both lever handles (B) and lower the chassis forward. Then tighten the levers
(B) again.
NOTE! The driving bow should always rest against the back of the
seat system during transportation in a vehicle.
NOTE! Do not hang bags or heavy objects on the chassis. This, together
with other factors, can cause the chassis to tip backwards.

11User manual Zitzi Guppy G2 www.anatomicsitt.com | +46 11 16 18 00
A
B
C
A
A
2 : 7
B
B
This document is the property of Anatomic Sitt AB. The information in this,
or parts thereof, may NOT be copied, altered or in other ways used
unless previously allowed by Anatomic Sitt AB. Nor may the information
be disclosed to third parties or in other ways be made available to
unauthorized company or person.
Denna handling är Anatomic Sitt AB’s egendom. Informationen i denna,
eller delar därav, får EJ kopieras, ändras eller på annat sätt nyttjas utan
föregående medgivande från Anatomic Sitt AB. Ej heller får
informationen delgivas tredje part eller på annat sätt göras tillgänglig
för icke behörigt företag eller person.
Format: A2
Guppy G2 kpl
-
Rev.
19-1220
Anatomic SITT AB
Box 6137
600 06 Norrköping
+ 46 (0)11 16 18 00
Titel / Description
Ytbehandling / Surface treatment
Datum / Date
Tolerans/Tolerance
E
Ritad / Drawn
Kontr. / Checked
Ritn. Nr.
DWG No.
Material / Material
Skala / Scale
Blad/Sheet
Filnamn: 19-1220 Guppy G2 kpl
1:5
FH
Matas in
2020-03-05
ISO 2768-m
1/1

12User manual Zitzi Guppy G2 www.anatomicsitt.com | +46 11 16 18 00
Wheels
Mounting of driving wheel with quick-release
The driving wheels can easily be mounted and removed from the chassis with
quick-release. This can be very useful during transport purposes.
To mount the driving wheels (A), press and hold the button (B) in the wheel center,
while you stick the axle into the chassis until it stops. Release the press button (B).
Secure that the wheel is installated properly by trying to pull it outwards without
pressing the quick-release button (B).
Release the driving wheel with quick-release
To release the wheel, press and hold the button (B) in the wheel center as you pull
o the wheel from the chassis.
B
A
NOTE! Make sure that the wheels are in locked position after using
the quick-release function.

13User manual Zitzi Guppy G2 www.anatomicsitt.com | +46 11 16 18 00
Wheels
Wheel positions
To maintain a correct centre of gravity it is possible to change positions of the
driving wheels depending of the seat systems position on the chassis seat plate.
To adjust the wheel in depth, release four screws (A) on the underside of the wheel
shaft and adjust to the desired depth. Check with ruler or folding rule that the wheel
shaft sits at the same depth on both sides.
16” wheels are mounted in holes B + C.
20”, 22” and 24” are mounted in holes D + E.
AB
C
E
D
NOTE! Changing the wheelposition might increase the risk of tipping.
NOTE! The screws should not be completely unscrewed, just slightly.

14User manual Zitzi Guppy G2 www.anatomicsitt.com | +46 11 16 18 00
E-drive
E-drive together with Guppy G2
E-drive is an electrical package that makes Guppy power-operated. E-drive is
available for Guppy with 16” and 20” driving wheel size.
Mounting of E-drive
E-drive replaces existing driving wheels and assembles according to separate
user manual, in the intended hole pattern on the side of the wheelchair frame
with spacer, washer, screw, nut and hub shaft. The hand control is fitted with the
supplied details on the driving handle.
Using E-drive
E-drive makes Guppy an attendent operated electrical wheelchair and controlled
by a hand control.l.
NOTE! For more detailed information about e-drive, refer to
separate installation instructions for E-drive on Guppy.

15User manual Zitzi Guppy G2 www.anatomicsitt.com | +46 11 16 18 00
Mounting of caster house on the frame
Insert the pin (A) in intended hole underneath the chassis as illustrated. Then mount
the front wheel house using screw (B), washer (C) and the eccentric nut (D) and
tighten.
Caster positioning
You can adjust the castors in four (4) dierent height positions. This allows you to
adjust the castor height after positioning the driving wheels.
Caster
Mounting of the caster on the caster house fork
Choose between four (4) dierent castors positions and then mount the caster
wheel (F) using the supplied wheel axle (G), washer (H) and lock nut (I) in the
desired mounting hole on the castor fork (K).
Place the caster (F) in the castor fork (K) according to the picture. Place a washer
on the wheel axle (G) and then insert it into the desired hole on the castor fork.
Then meet on the opposite side with washer (H) and lock nut (I). Tighten the nut.
Then exit by inserting your nut caps (J) over the lock nut.
I
J
G
A
D
C
B
H
J
F
K
E
NOTE! Secure that the screws is properly tighten after the
adjustment.

16User manual Zitzi Guppy G2 www.anatomicsitt.com | +46 11 16 18 00
Adjustment of caster fork
You may need to adjust the caster fork (A) if the wheelchair doesn’t roll properly.
This can occur when adjusting the caster position without adjusting the caster fork
(A).
Make sure that the position of the caster attachment (B) is 90° in proposition to the
ground as illustrated.
Angle adjustment of caster fork
Loosen and rotate the eccentric nuts (C) on the caster attachment (B) until the cor-
rect angle is obtained.
Tighten the screws properly after adjusting the caster fork.
Ground
90°90°
C B
A
NOTE! Make sure the screws are properly tightened after the
adjustment.

17User manual Zitzi Guppy G2 www.anatomicsitt.com | +46 11 16 18 00
Brake
Using drum brake
The chassis is equipped with drum brakes that can be activated by the attendant.
Always check that the brakes are working properly before use.
Press the right brakehandle (A) while pushing the wheelchair forward.
The rear wheel shall brake and stop spinning. The brakehandle (A) should not be
possible to press all the way to the driving handle. About 5-10 mm should remain
when brakes are set.
Repeat the procedure with the left brake handle.
Setting the brakes
To activate locking of the wheel, press the lever handle (A) and push the red
locking lever (B) forward to desired position.
Releasing the brakes
To release locking of a wheel, press the brakehandle (A) and the locking device (B)
will release automatically. Then let go of the brakehandle (A).
A
A
2 : 7
B
B
This document is the property of Anatomic Sitt AB. The information in this,
or parts thereof, may NOT be copied, altered or in other ways used
unless previously allowed by Anatomic Sitt AB. Nor may the information
be disclosed to third parties or in other ways be made available to
unauthorized company or person.
Denna handling är Anatomic Sitt AB’s egendom. Informationen i denna,
eller delar därav, får EJ kopieras, ändras eller på annat sätt nyttjas utan
föregående medgivande från Anatomic Sitt AB. Ej heller får
informationen delgivas tredje part eller på annat sätt göras tillgänglig
för icke behörigt företag eller person.
Format: A2
Guppy G2 kpl
-
Rev.
19-1220
Anatomic SITT AB
Box 6137
600 06 Norrköping
+ 46 (0)11 16 18 00
Titel / Description
Ytbehandling / Surface treatment
Datum / Date
Tolerans/Tolerance
E
Ritad / Drawn
Kontr. / Checked
Ritn. Nr.
DWG No.
Material / Material
Skala / Scale
Blad/Sheet
Filnamn: 19-1220 Guppy G2 kpl
1:5
FH
Matas in
2020-03-05
ISO 2768-m
1/1
B
A

18User manual Zitzi Guppy G2 www.anatomicsitt.com | +46 11 16 18 00
Installation of drum brake
You need to remove the wheel from the wheelchair to mount the drum brake. Press
the button on the quick-realease axle and pull the wheel and axle out from the
drum brake.
Mount the drum brake on the chassis by putting the large spacer (A) over the
drum brakes threaded axle and push it in the intended hole for the desired position.
Attach the big nut (B) to the inside of frame side plate and tighten something. It is
important to not tighten too hard.
Stick the screw (C) through the hole for rotation lock in the brake drum through the
small spacer (D) and through the holes in the frame side.
Attach with washer (E) and nut (F) on the inside of the frame side plate.t.
Tighten both nuts (B) and (F) so that the brake drum is securely tightened.
Take the quick-release axle with the wheel and push until the wheel attaches. Test
by pulling the wheel slightly outwards (without pressing the quick release button).
Brake
NOTE! Nut (B) (and skrew C if choosen 16”) shall be secured with
thread locking such as Loctite 243 or equivalent.
NOTE! For more information about using quick-release, see
page 12.
NOTE! If using 16” wheels the screw (C) shall be threaded direct
into the plate
NOTE! The mounting principle of drum brake is the same
regardless of wheel size.

19User manual Zitzi Guppy G2 www.anatomicsitt.com | +46 11 16 18 00
C
A
B
FE
D

20User manual Zitzi Guppy G2 www.anatomicsitt.com | +46 11 16 18 00
Detailed view
of drum brake
C
D
E
Brake trouble shooting
First check the tension of both brakewires. If a wire has low tension, try to tens it by
loosen the screw (C) and then tighten again. If the adjustment is not enough try the
following quick-setup guide to re-tighten the brake cables.
1) Tighten the screw (C) to its bottom position
2) Loosen the nut (D)
3) Squeeze the brake by lifting the drum brake arm (E) and move the nut (D)
further up the wire.
4) Tighten the nut (D) and adjust the tension with the screw (C).
Table of contents
Other Anatomic SITT Mobility Aid manuals
Popular Mobility Aid manuals by other brands

Invacare
Invacare Discontinued 1/00 parts catalog

Orliman
Orliman actius Botimed ACV903 quick start guide

Pride Mobility
Pride Mobility Jazzy 610 Series owner's manual

Z-Tec
Z-Tec ZT-TRI-WLK-RED user manual

Timago
Timago TGR-R RA 888 Instructions for use

Invacare
Invacare 6291E Junior Assembly, installation and operating instructions

FREERIDER
FREERIDER COMPANION User instruction manual

Invacare
Invacare Dolomite Step Up user manual

aidapt
aidapt Transfer Turntable Usage and maintenance instructions

Vitea Care
Vitea Care WHEELER user manual

Drive DeVilbiss Healthcare
Drive DeVilbiss Healthcare HW009 Instructions for use

keep living
keep living Pressalit Care R7434 Mounting instruction