Anatomic SITT Zitzi Pengy User manual

User manual
Zitzi Pengy Pro Seat
EN
2020-01-08

2User manual – Pengy Pro Seat 2www.anatomicsitt.com | +46 11 16 18 00
Table of contents
Safety precautions ��������������������������������� 3
Introduction �������������������������������������������������������������������������3
Field of application�����������������������������������������������������������3
Correspondence ����������������������������������������������������������������3
Crash tested�������������������������������������������������������������������������3
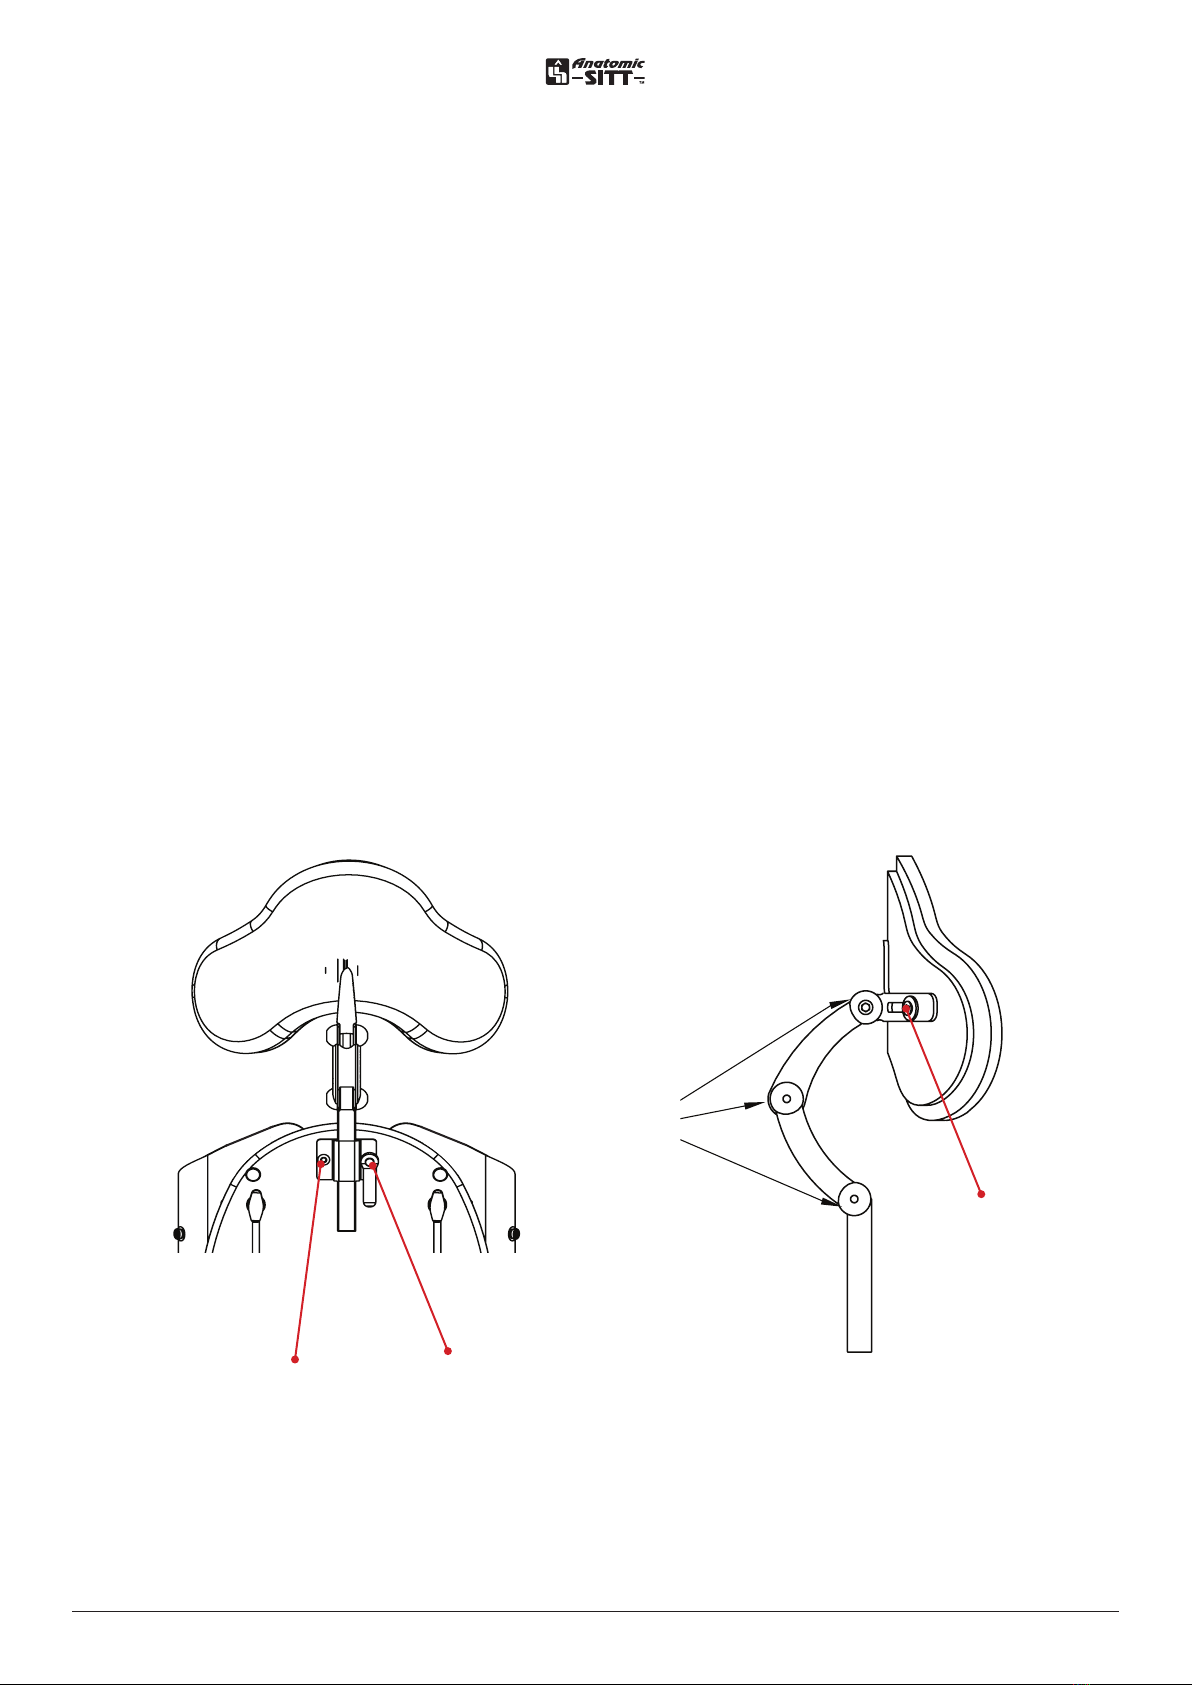
Headrest����������������������������������������������������4
Mounting the headrest �������������������������������������������������� 4
Height adjusting ��������������������������������������������������������������� 4
Angle adjusting����������������������������������������������������������������� 4
Adjusting the headrest plate sideways ���������������� 4
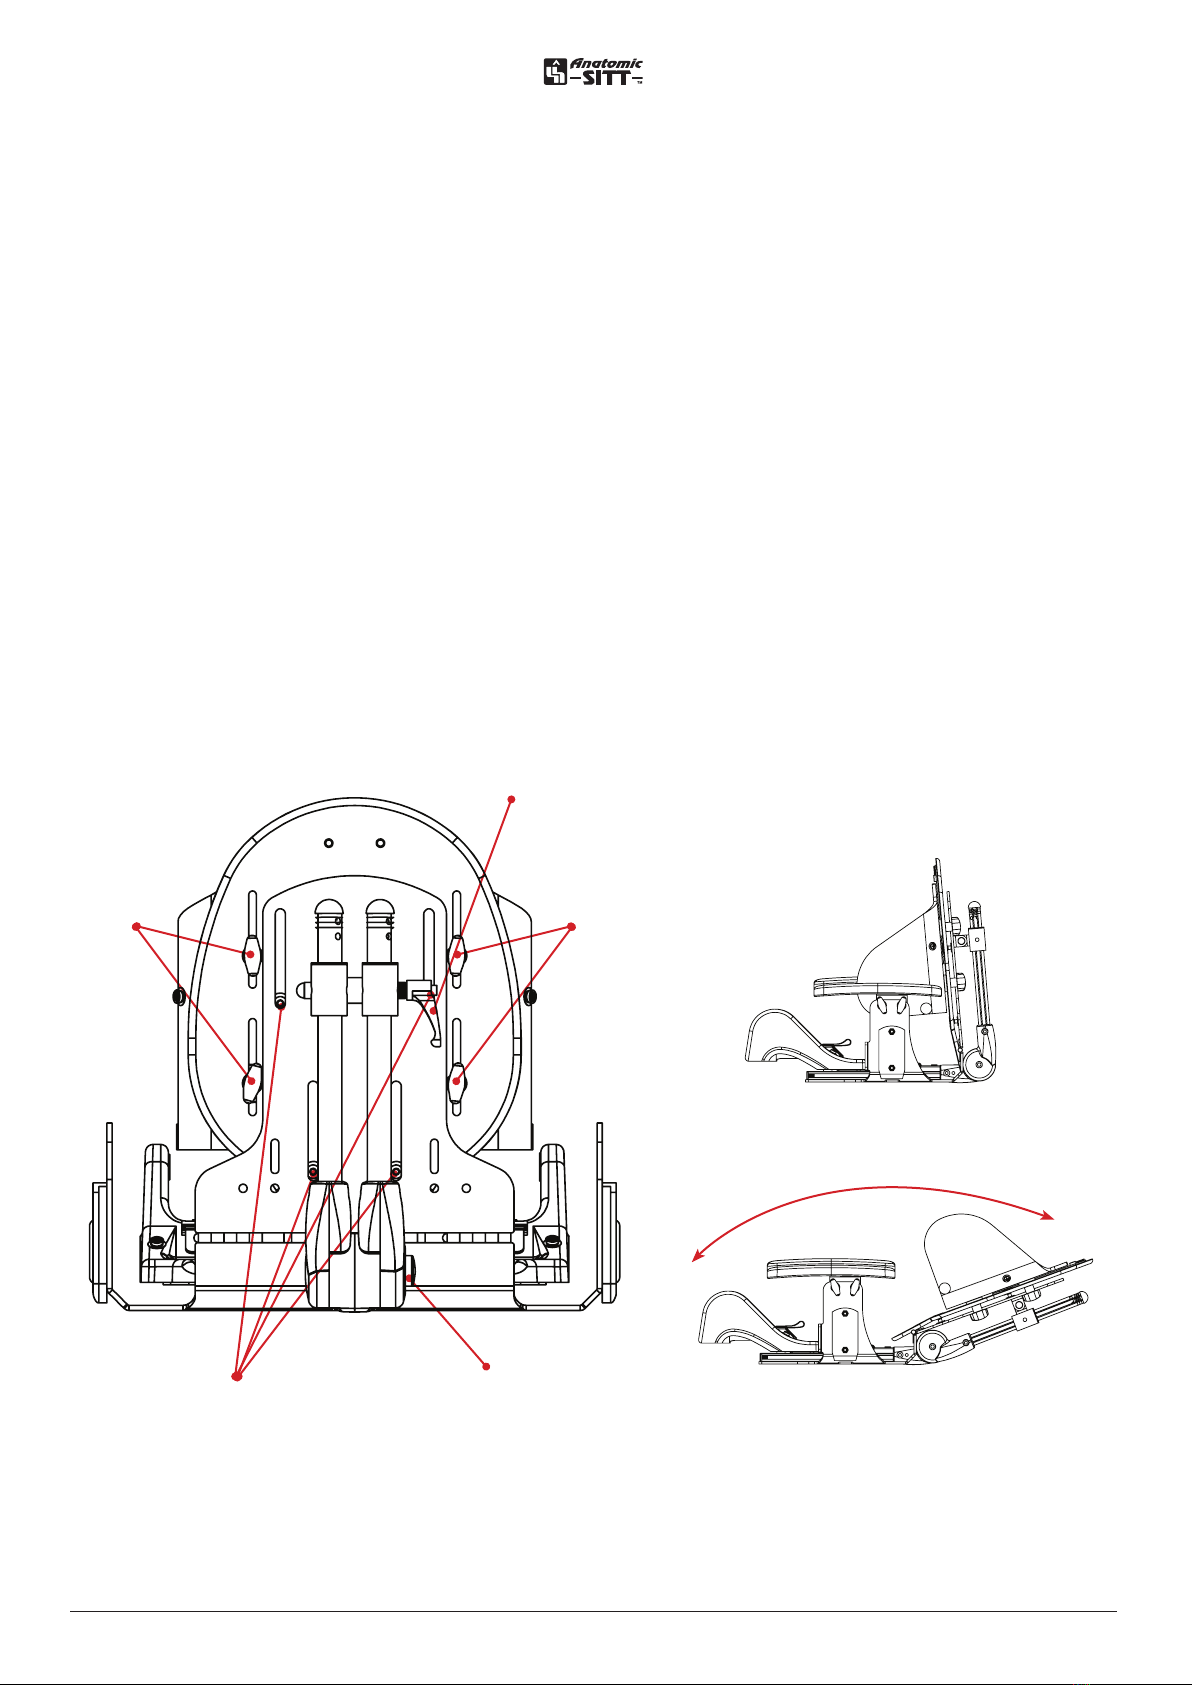
Backrest ���������������������������������������������������� 5
Adjustment of backrest height�����������������������������������5
Adjustment of the lateral support ���������������������������5
Adjusting the backrest angle ��������������������������������������5
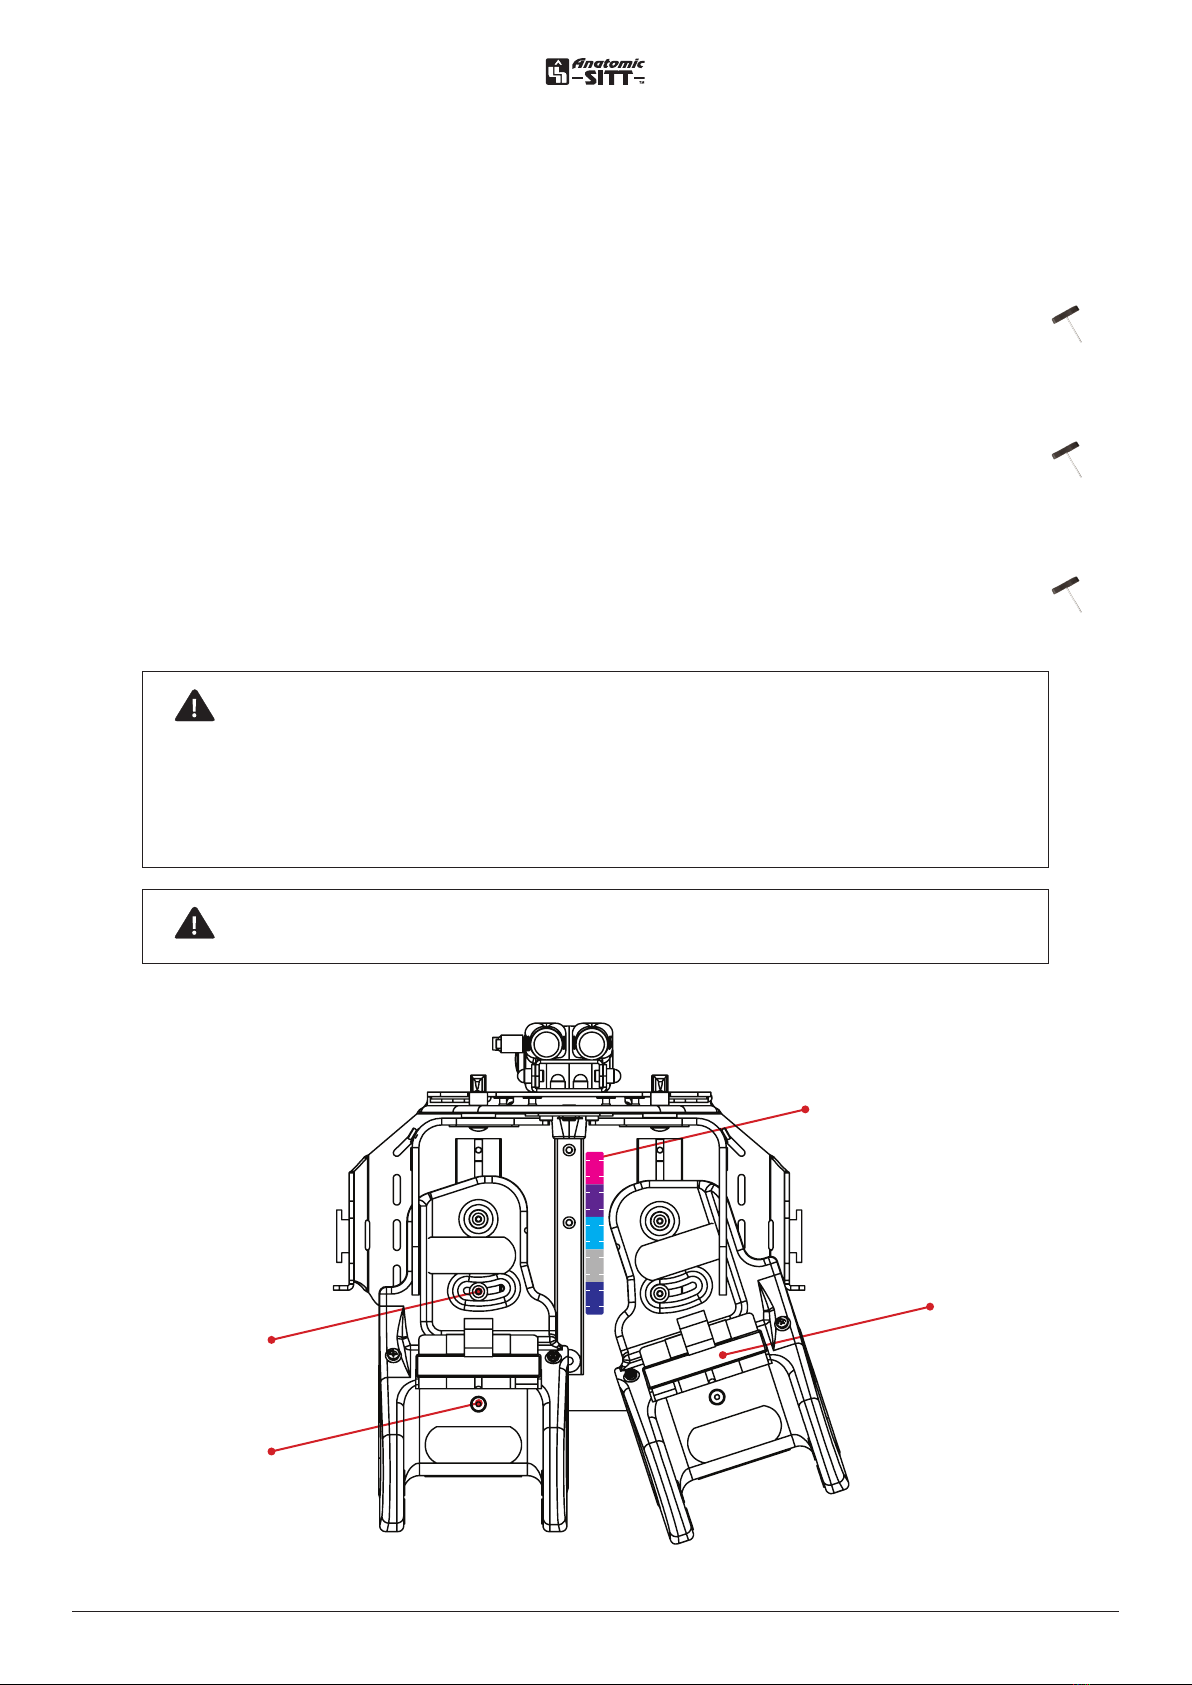
Seat part ���������������������������������������������������6
Seat depth and leg length dierence �������������������� 6
Abduction, adduction and windswept������������������ 6
Adjusting the seat pocket�������������������������������������������� 6
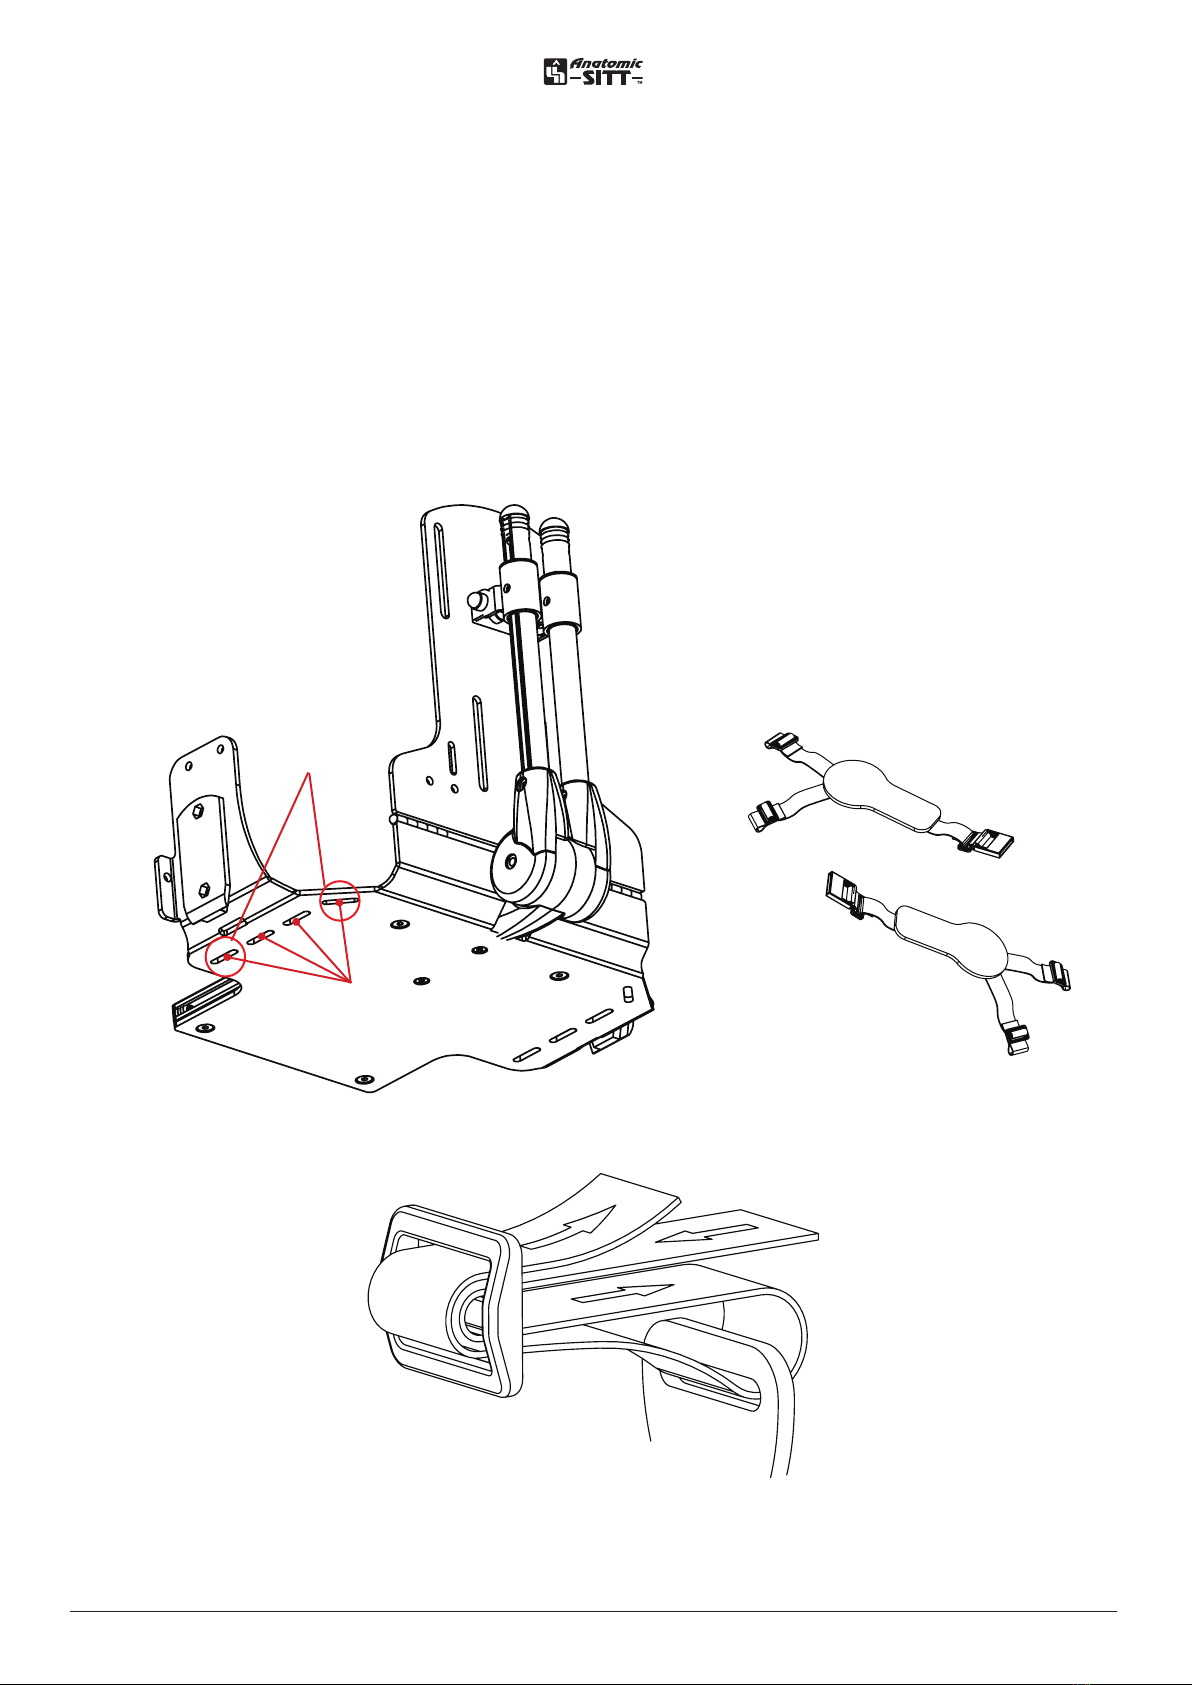
Hip belt������������������������������������������������������ 7
Adjusting the hip belt �����������������������������������������������������7
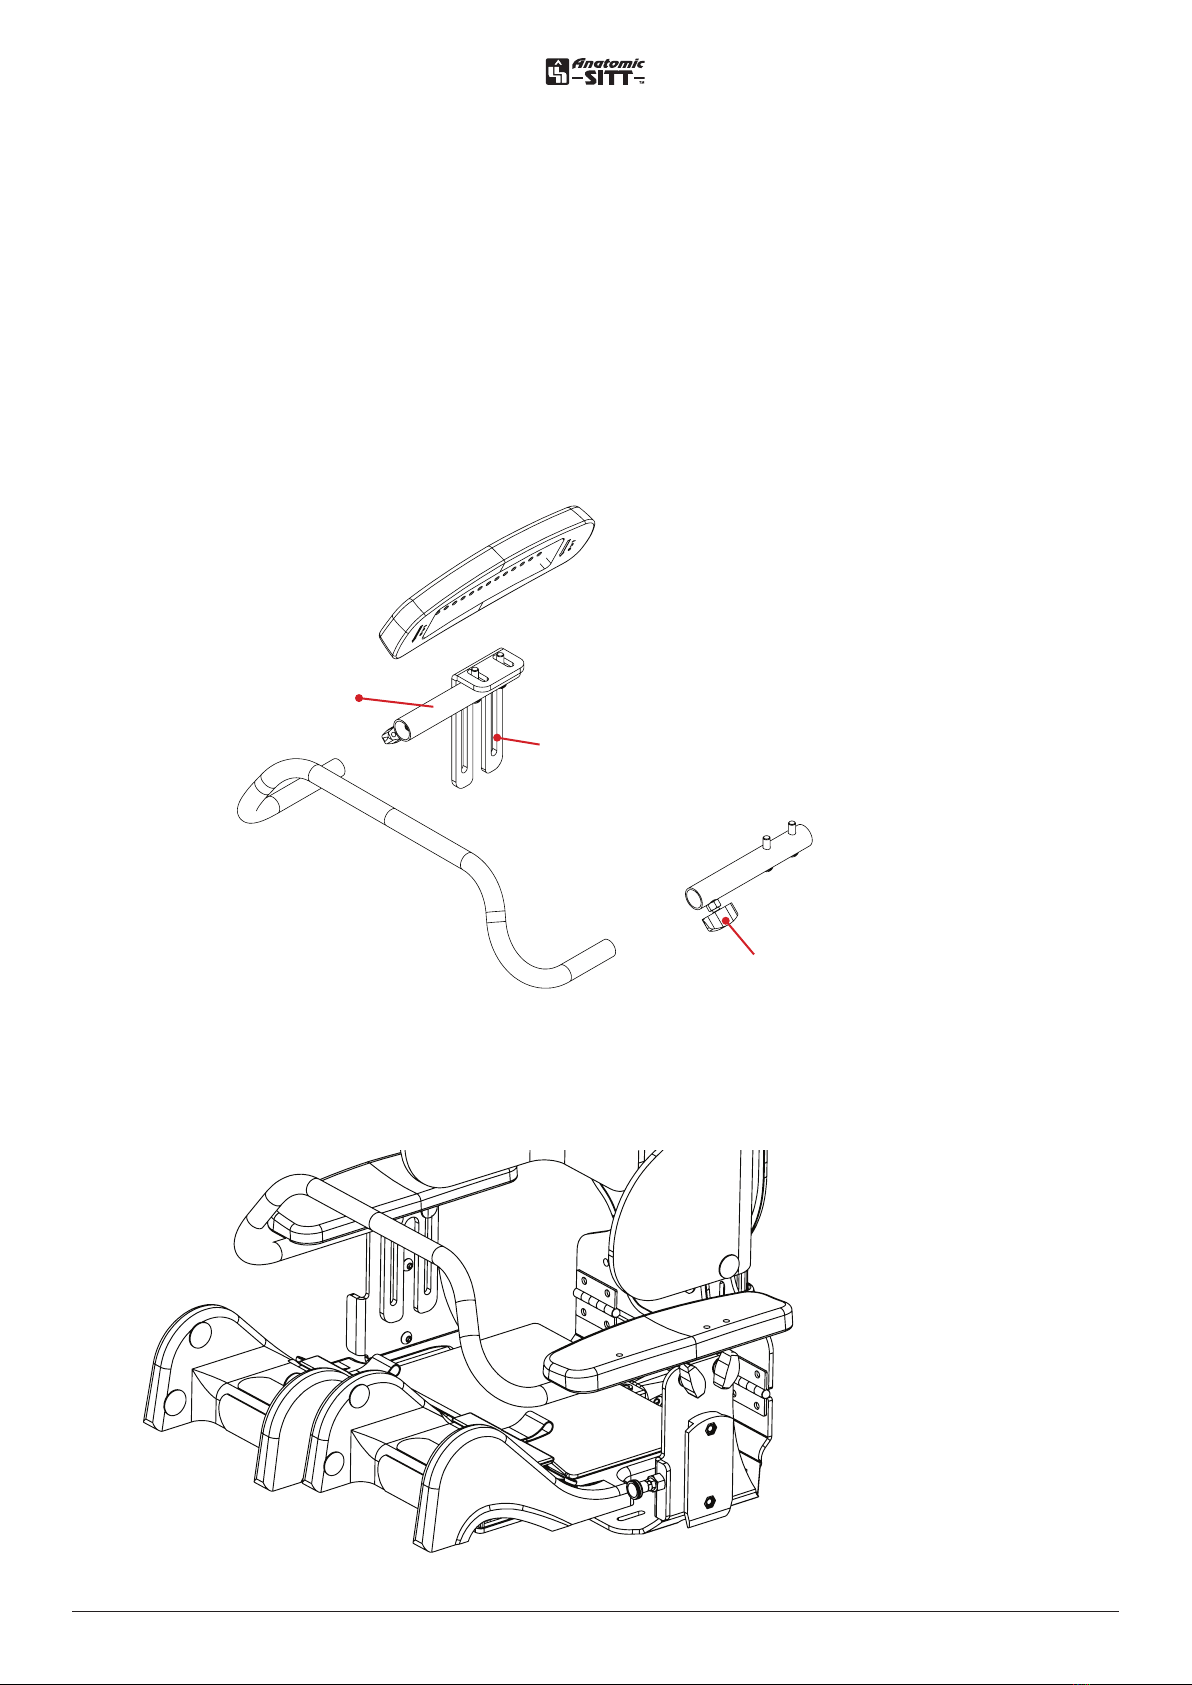
Armrest ����������������������������������������������������� 8
Width adjustment �������������������������������������������������������������8
Height / angle up-down adjustment�����������������������8
Rotating the armrest plate �������������������������������������������8
Table, solid������������������������������������������������9
Mounting the table���������������������������������������������������������� 9
Crossbar�������������������������������������������������� 10
Installation of crossbar �������������������������������������������������10
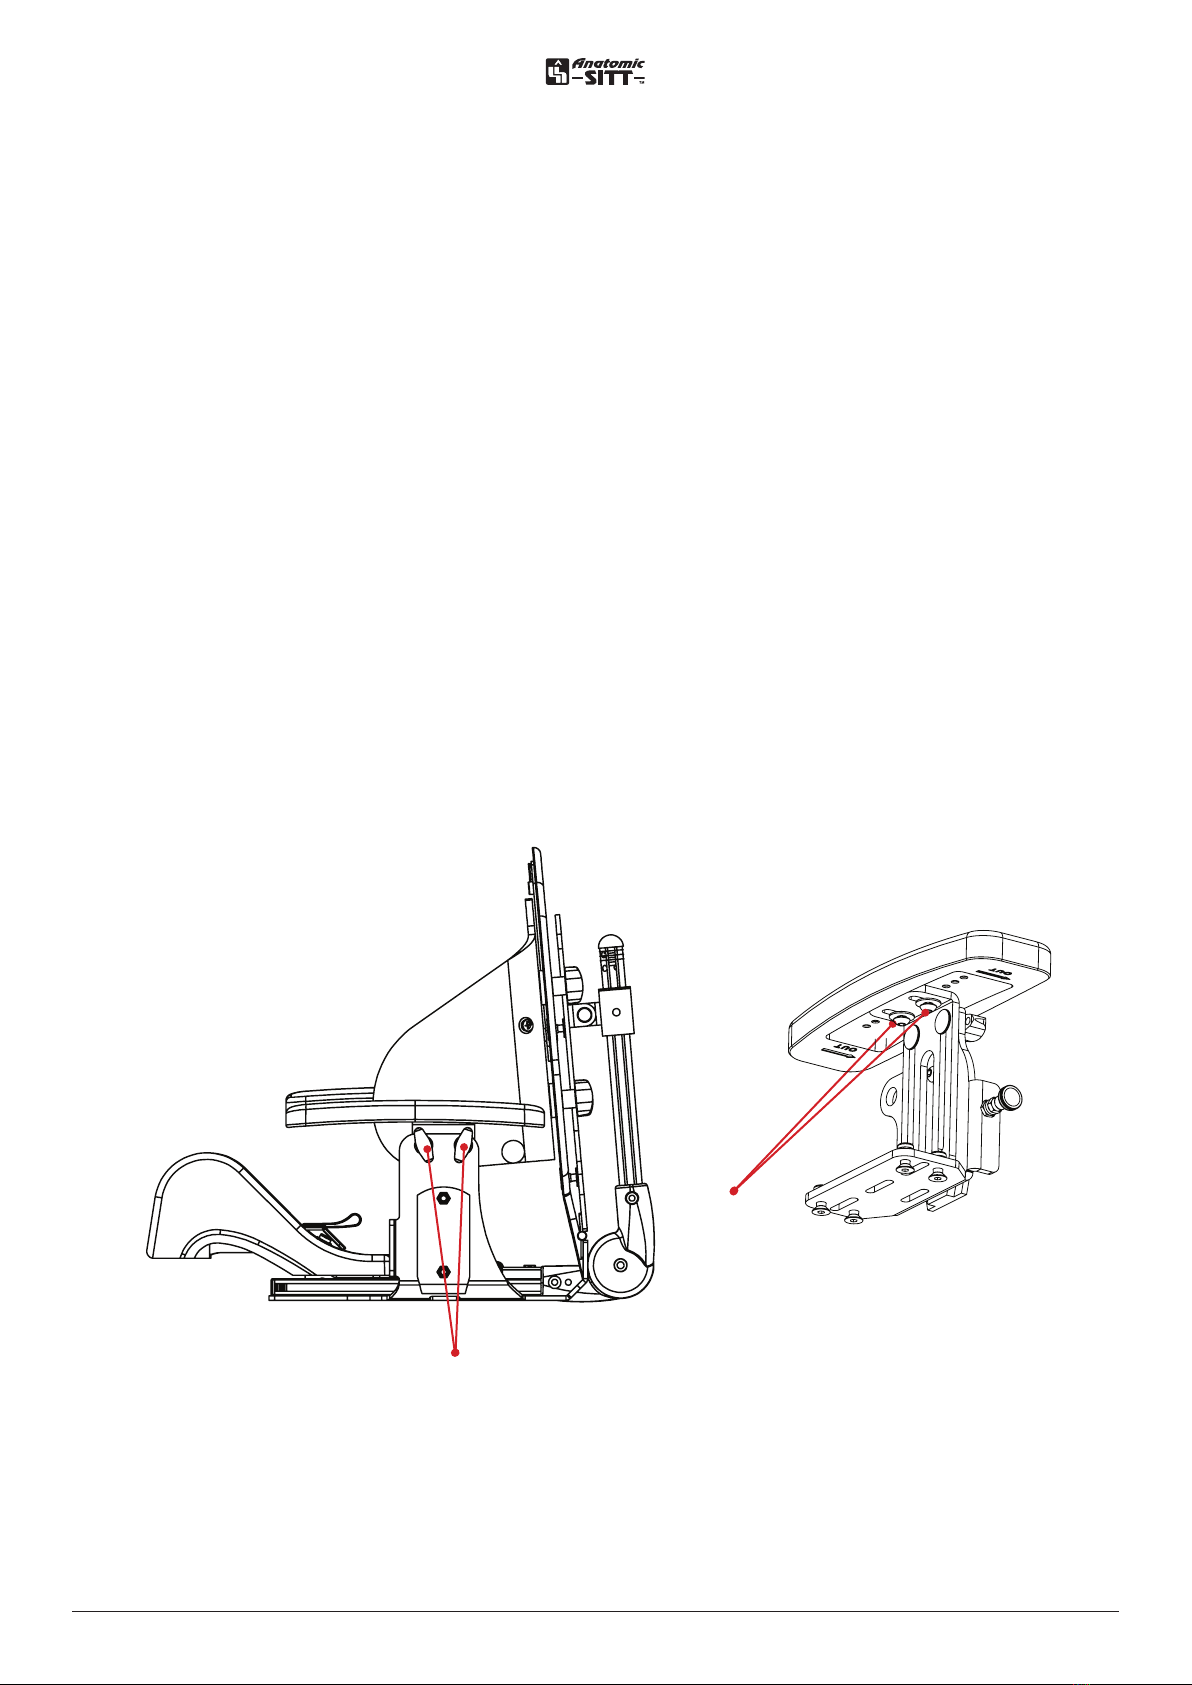
Hip support ��������������������������������������������� 11
Mounting of hip support����������������������������������������������� 11
Sun cover ������������������������������������������������� 11
Mounting of suett �������������������������������������������������������� 11
Chest harness������������������������������������������12
Mounting of upper support bracket���������������������� 12
Mounting on Pengy sulky ��������������������13
Mounting on Pengy sulky�������������������������������������������� 13
Unmounting from Pengy sulky��������������������������������� 13
Advanced footrest������������������������������� 14
Mounting and adjusting����������������������������������������������� 14
Calf support advanced footrest����������15
Ankleholder��������������������������������������������� 15
Foot strap������������������������������������������������ 16
Maintenance instructions���������������������17
Service intervals��������������������������������������������������������������� 17
Cleaning and washing instructions ������������������������ 17
Tools��������������������������������������������������������������������������������������� 17
Warranty������������������������������������������������������������������������������ 17
Spare parts������������������������������������������������������������������������� 17
Reconditioning ����������������������������������������������������������������� 17
Marking �������������������������������������������������������������������������������� 17
Recycling����������������������������������������������������������������������������� 17
Summary and follow-ups ���������������������18
Follow-up inspections��������������������������������������������������� 18
Adaptation and customization�����������18
Guidelines and recommendations ��������������������������18
Terms of sale������������������������������������������ 19
Warranty ����������������������������������������������������������������������������19
Warranty claims���������������������������������������������������������������19
Returning products��������������������������������������������������������19

3www.anatomicsitt.com | +46 11 16 18 00User manual – Pengy Pro Seat
Introduction
For you to use all advandtages of the Zitzi Pengy Pro, it is important that you read
this manual thoroughly� This applies to all persons who are in the vicinity of the
user� The product is designed for users with seating problems and fits many dier-
ent types of diagnoses� Adjustment of Pengy Pro should always be performed by
medically qualified person�
If you need additional information, please contact Anatomic SITT AB�
Field of application
The product is intended for use as a seating system together with the chassis
produced by Anatomic SITT AB� If the desire for another use can be found, please
contact Anatomic SITT AB�
Correspondence
Zitzi Pengy and its accessories are CE marked products� A unique serial number is
located on a label placed on the back or under the seat� This serial number should
be quoted in any correspondence regarding the product�
Crash tested
The Pengy seating system is crashtested and approved together with the Pengy
sulky according to ISO 7176-19
Check the checkbox if the product
is CUSTOMIZED�
The CE Mark is no longer valid and
should be removed�
Place of label
This product is manufactured by Anatomic SITT AB
Postal address Anatomic SITT AB, Box 6137, SE-600 06 Norrköping
Street address Anatomic SITT AB, Terminalgatan 1, SE-603 61 Norrköping
Phone +46 11-161800
Fax +46 11-162005
Email info@anatomicsitt�com
Webb anatomicsitt�com
Instructions movies youtube�com/anatomicsitt
Follow us on facebook�com/anatomicsitt
Safety precautions

4User manual – Pengy Pro Seat 4www.anatomicsitt.com | +46 11 16 18 00
Mounting the headrest
Mount the main support bracket with lever handle (B) and its washer and screw
(A)� Note that the screw (A) should not be to tightened, it shoulde be possible to
move up and down when the lever knob (B) is loosened�
Height adjusting the headrest
To adjust the height of the headrest, loosen the lever handle (B) and move the
headrest to desired position� Then tighten lever handle (B)�
Angle adjusting the headrest
When adjusting the 3-joint headrest, loosen the screw (C) in the joint you
wish to adjust� Once you reach the desired position, tighten the screw (C) again�
Adjusting the headrest plate sideways
Loosen the screws (D)� Adjust the headrest plate to desired position and tighten
the screws (D) again�
Headrest
Lever handle (B)
Screw (A)
E
(C)
(D)

5www.anatomicsitt.com | +46 11 16 18 00User manual – Pengy Pro Seat
Backrest
Lateral
support (B) Lateral
support (B)
Back and hip angle (C)
Back and hip
angle (D)
Back height (A)
160°
Adjustment of backrest height
To adjust the back height, loosen the screws (A) using the adjustment
key and then adjust it to desired height� When you are satisfied with the
setting tighten the screws (A) again�
Adjustment of lateral support
To width and height adjust the lateral supports, loosen the knobs (B) and then
adjust to the desired height and width� Tighten the knobs (B) when you reach the
desired position�
Adjusting the back angle
To adjust the angle of the back first loosen lever (C), press the button (D) and ad-
just to the desired angle / position, tighten lever (C)�

6User manual – Pengy Pro Seat 6www.anatomicsitt.com | +46 11 16 18 00
Adjust seat depth and Leg length dierence
Loosen the screw (A) on the leg part with the help of the adjustment key, and then
adjust the leg part to the desired length� Then tighten the screw (A) again�
Abduction, adduction and windswept
To adjust the leg part to any of these positions, loosen the screw (A) using allen
key, and move the leg part to desired postion� Tighten the screw (A)�
Adjusting the seat pocket
When adjusting the seat depth, the seat pocket should also be adjusted�
Loosen the leg parts screws (B) with the allen key� Use the color code of the seat
depth and adjust the seat pocket to the desired position� Tighten the screws (B)�
Seat part
Size label/Colour code
Seat pocket plate
A
B
Note! You don’t have to remove the screws completely to adjust, just
loosen them slightly�
Tip! To get a good starting point for setting the seat depth, the color
scale on the seatbase and depth adjustment plate can be used as a
guide� For example if the seat depth is adjusted to blue field the depth
adjustment plate should also be set to the blue field� This ensure a
correct seat pocket size according to the seating position� Always fine-
tune the settings after each users requirements�
100 mm
11 mm 15 mm
40 mm
8 mm
10 mm
STORLEK 1 SKALA 1:1
PENGY
DETTA SKA VARA PÅ EGET ARK
21
22
23
24
25
26
27
28
20
19
21
22
23
24
25
26
27
28
20
19

7www.anatomicsitt.com | +46 11 16 18 00User manual – Pengy Pro Seat
Adjusting the hip belt
When mounting the hip belt in the hip belt tracks, use a tri-glide buckle�
For assembly according to the tri-glide method, see picture�
Hip belt
Hip belt tracks
Standard
positionons
of hip belt

8User manual – Pengy Pro Seat 8www.anatomicsitt.com | +46 11 16 18 00
Width adjustment
To change the width of the armrest, loosen the screw (B) and then move the
armrest to the desired positon, then tighten the screw (B)�
For more with adjustment remove the screw (A) and turn the angle bracket 180°,
then tigthen the screws (A)�
Height adjustment / Angle adjustment up/down
To adjust the height of the armrest, loosen the lever handle (A) and move
the armrest to the desired height and angle, then tighten lever handle (A)�
Lateral adjustment angle
To adjust the height of the armrest, loosen the screws (B) and rotate
the armrest to the desired position, then tighten the screws (B)�
Armrest
A
B

9www.anatomicsitt.com | +46 11 16 18 00User manual – Pengy Pro Seat
Locking lever
Mounting the table
Put the table on the armrest plates and then rotate the locking lever of the
table into position below the armrest plate� The locking lever must be rotated
until it is inside the rim of the raised armrest plate�
Table, solid

10User manual – Pengy Pro Seat 10 www.anatomicsitt.com | +46 11 16 18 00
Installation of crossbar
The bracket for the crossbar (A) is mounted under the armrest plates with the
supported screws and fittings with grooves (C)� The bow is pushed in and tightened
with knob (B) on both sides�
The crossbar can be pulled out on the left side and rotaded away while the right
side is still remains in the fitting pipe�
Crossbar
A
B
C
Loosen the knobs in the mounting bracket under the armrest plates�
Insert the bow and lock the knobs�

11 www.anatomicsitt.com | +46 11 16 18 00User manual – Pengy Pro Seat
Mounting of hip support
As an option, hip support is available for better positioning of pelvis laterally�
The hip support is mounted as shown below� Fit the hip support using the carriage
bolt (A) and the knob (B)�
To adjust the hip support in width, loosen the knob (B), adjust to the desired
position and lock the knob�
Hip support
Carriage bolt (A)
Knob (B)
Mounting of sun cover
Loosen the screws (A) and insert the
latch pins (B) into the groove (C)� Adjust
to correct height and tighten the screws�
The sun cover can be removed from the
bracket by loosening the knob (D) and
pulling the sun cover upwards�
Sun cover
B
D
A
C

12User manual – Pengy Pro Seat 12 www.anatomicsitt.com | +46 11 16 18 00
Mounting of upper support bracket
Put the support bracket on the vertical head stay�
Lock the screw (A)�
When installing the chest harness, attach the upper mounting straps in the 725
buckle� Lower stripes are mounted in the groove (C) using a tri-glide buckle�
To adjust the width of the harness, you need a Phillips screwdriver and a wrench in
size 8 (B)�
Chest harness
Screw (A)
Phillips screw
and nut M5 (B)
(C)
(D)

13 www.anatomicsitt.com | +46 11 16 18 00User manual – Pengy Pro Seat
Locking pin
Mounting on the Pengy sulky
Hold the Pengy seat in the armrests and guide the seat towards the lines as the
picture shows� The locking pin automatically locks when the seat reach the lowest
point in the bracket�
Unmounting from the Pengy sulky
To unmount Pengy seat from Pengy sulky, first loosen the locking pin (A) by pulling
it out and turning it 90°� When the locking pin is loosened, lift the armrests up-
wards�
Mounting on Pengy sulky
Note! The seat can be mounted both forwards and backwards
according to the desired needs�
Note! The locking pin must always be in locked position while using
the seat
A

14User manual – Pengy Pro Seat 14 www.anatomicsitt.com | +46 11 16 18 00
8
Only the advanced footrests can be mounted
in the seat� The standard footrest is mounted in
the sulky (see Pengy Sulky operating instruc-
tions)�
The instruction applies to both whole and
divided footrests�
Installation of footrests - A
Attach the footrest to the mounting (square
tube) between the leg parts (A)� Lock the foot-
rest with the locking screw�
Knee joint angle adjustment - B
Release the knob (B) and then adjust to the
desired angle� Lock the knob when the desired
angle is reached�
Note - After adjustment, the tags must go in
each other so it locks� Tighten the screw hard!
Adjustment of ankle angle - C
Loosen the screw and adjust the angle� Lock
the screw when correct angle is reached�
Height adjustment of foot plate - D
Release the knob and adjust the angle� Lock
the knob when correct height is reached�
(D) knob for adjusting height
(C) Skrew for adjusting angle
= Adjusting wrench
Advanced footrest
B
A

15 www.anatomicsitt.com | +46 11 16 18 00User manual – Pengy Pro Seat
Loosen the screws A to adjust to the
height and depth of the calf support
plates�
Tighten the screws when correct setting
is achieved�
Loosen the screws B to adjust the width
of the calf support plates�
Tighten the screws when correct setting
is achieved�
A
B
= Adjusting wrench
Calf support for advanced footrest
The footplate is prepared for mounting of ankleholder�
Mounting of ankleholders are done under the footplate through the holes�
Make sure that the pad
does not fold on the
ankleholder�
!
!
Ankleholder

16User manual – Pengy Pro Seat 16 www.anatomicsitt.com | +46 11 16 18 00
The footplate is prepared for mounting of foot straps�
Mounting the foot straps on all footplates is done by pulling the strap down and up
through two of the pre-drilled holes in the footplate� The foot strap can be mounted
in the front or rear hole sets�
Foot strap
alt� hole

17 www.anatomicsitt.com | +46 11 16 18 00User manual – Pengy Pro Seat
Spare parts
For the CE marking of the Zitzi Pengy to be valid, the seating system may only be
fitted with spare parts delivered by Anatomic SITT AB�
Service intervals
In order for the device to work properly, regular service and inspection must be
performed� The need for service depends on frequency of use and wear�
Check all moving parts and fasteners for wear� Service should always be performed
by professional and qualified personnel� If you are unsure, please feel free to contact
Anatomic SITT AB�
Cleaning and washing instructions
Plastic and metal parts can be wiped o with a damp cloth, or washed with
antibacterial liquid or similar� Think green, think about the environment!
Use biodegradable detergents�
Cushions, fabrics and belt cushions are washed in 60odegrees delicates and
may not be tumbled but can be dried in a drying cupboard� Follow the directions
on the respective laundry label� The same washing rules applies to positioning
harnesses and hip belts from Anatomic SITT AB�
Tools
The tool (4 mm hexagon key) you need to make adjustments is integrated
in the the top of the profile of the backrest on the chair�
Maintenance instructions
Check the condition regularly and perform maintenance when necessary�
Warranty
1 year against manufacturing defects� For more detailed information about the
warranty we provide, see page 15 of this manual�
Marking
Zitzi Pengy and its accessories are CE marked products� A unique serial number is
located on a label placed on the back or under the seat� This serial number should
be quoted in any correspondence regarding the product�
Recycling
A used part or product should be dismantled and discarded� The parts should
be separated by material type, metal, plastic and combustibles (textiles)�
Gas piston is sorted as hazardous material�
Reconditioning
Reconditioning of the product shall only be done with original parts from Anatomic
SITT AB�

18User manual – Pengy Pro Seat 18 www.anatomicsitt.com | +46 11 16 18 00
Follow-up inspections
Continuously perform the follow-ups specified in each point� You should check the
following points every time patient shall use the seating system�
• Regularly examine that all the screws are securely locked�
• Regularly examine the wear of straps and cushions�
• Make sure the balance of the chassis is correct�
• Make sure that all accessories has the correct settings to ensure the patient
has a correct seatposition�
Summary and follow-ups
Guidelines and recommendations
Every time the Pengy Pro is altered in some way, an assessment has to be made to
determine if it is an adaptation or a customization�
An adaptation is any change made in comprehension of the CE mark� All other
changes are customizations� Adaptations must only be made by a person deemed
to be qualified for the task and should always be made in a professional manner�
The CE mark means that the product fulfils all of the essential European safety
requirements�
Note that a risk assessment always should be done for an adaptation as well as for
a customization of a medical aid� The product must never become dangerous to
use after adaptation�
The product should be fitted with a note that it is adapted to a specific user,
so that it cannot be mistaken for a standard model product�
Allowed adaptations of Pengy Pro
Cut footrest profiles
The footrest profile may be shortened to fit the user better�
Adaptation and customization

Terms of sale
Warranty
Warranty against manufacturing errors is valid for one (1) year from delivery
date� Warranty is void if the product has been subjected to external factors or
rough handling� It’s required that the faulty product is returned for us to process a
warranty claim� Always attach the packing slip of the original delivery�
Warranty claims
Describe the error and the possible cause for this as thoroughly as possible� Claim
repairs or possible replacement under warranty� Always attach a copy of the invoice
and state that the product should be returned to you after repairs�
Provide a shipping address, a contact person and a phone number�
Make sure that you pack the product well to protect it from shocks during the
transportion� Note the shipping number in your documentation� This is so that you
can track the shipment should anything occur during transport�
Returning products
In the event of faulty orders or deliveries, the products should be returned
within 20 days from delivery� Always attach a copy of both the packing slip and the
invoice� Provide your reason for returning the products�
Make sure that you pack the product well to protect it from shocks during the
transportion� Note the shipping number in your documentation� This is so that you
can track the shipment should anything occur during transport�
For products returned more than 20 days from delivery
a refund is made of 80% of the invoice value
For products returned more than 60 days from delivery
a refund is made of 60% of the invoice value
For products returned more than 150 days from delivery
a refund is made of 40% of the invoice value
For products returned more than 360 days from delivery
no refund is made for the products
Customized products cannot be returned

anatomicsitt�com
info@anatomicsitt�com
facebook�com/anatomicsitt
youtube�com/anatomicsitt
Anatomic SITT A/S
Viengevej 4, 8240 Risskov, Denmark
Phone +45 86 17 01 74
Fax +45 86 17 01 75
Anatomic SITT AB (manufacturer)
Box 6137, SE-600 06 Norrköping, Sweden
Phone +46 11 16 18 00
Fax +46 11 16 20 05
Street address
Terminalgatan 1, SE-602 29 Norrköping, Sweden
Anatomic SITT Nederland BV
Postbus 6027 / 4000 HA Tiel, Netherlands
Phone +31 344 63 45 40
Fax +31 344 62 33 61
DK
SE
NL
Rehaco OY
Haaransuontie 6 A7, 90240 Oulu, Finland
Phone: +35 840 775 22 88
FI
This manual suits for next models
1
Table of contents
Other Anatomic SITT Mobility Aid manuals
Popular Mobility Aid manuals by other brands

Invacare
Invacare 1085144 Installation and operating instructions

Invacare
Invacare Matrx MX1 manual

Top shelf Orthopedics
Top shelf Orthopedics 501811 Instructions for use

Carex
Carex A33300 0000 Instructions for use

TRAXION
TRAXION WA02010032 user manual

Medline
Medline 100RA User instruction manual & warranty