manuals.online logo
Brands
  1. Home
  2. •
  3. Brands
  4. •
  5. Andersen Windows & Doors
  6. •
  7. Door Lock
  8. •
  9. Andersen Windows & Doors Andersen 200 Series Operating and safety instructions

Andersen Windows & Doors Andersen 200 Series Operating and safety instructions

Other Andersen Windows & Doors Door Lock manuals

Andersen Windows & Doors Andersen 1000 User manual

Andersen Windows & Doors

Andersen Windows & Doors Andersen 1000 User manual

Andersen Windows & Doors A Series User manual

Andersen Windows & Doors

Andersen Windows & Doors A Series User manual

Andersen Windows & Doors FSB 1035 User manual

Andersen Windows & Doors

Andersen Windows & Doors FSB 1035 User manual

Popular Door Lock manuals by other brands

Dorma MUNDUS PREMIUM US 10 Mounting instruction

Dorma

Dorma MUNDUS PREMIUM US 10 Mounting instruction

Defiant LG600BRA4BGT Instructions for installation

Defiant

Defiant LG600BRA4BGT Instructions for installation

TRU-BOLT M1740024 manual

TRU-BOLT

TRU-BOLT M1740024 manual

Opera ARCA SLIDE installation instructions

Opera

Opera ARCA SLIDE installation instructions

tell CODELOCK CL5500 Series installation instructions

tell

tell CODELOCK CL5500 Series installation instructions

ABH LR6000 installation instructions

ABH

ABH LR6000 installation instructions

Assa Abloy effeff 827A-IP Mounting instructions

Assa Abloy

Assa Abloy effeff 827A-IP Mounting instructions

Iseo MA1A installation guide

Iseo

Iseo MA1A installation guide

ID Lock 150 user manual

ID Lock

ID Lock 150 user manual

Lockly ACCESS TOUCH PRO user manual

Lockly

Lockly ACCESS TOUCH PRO user manual

iLoq G50S user guide

iLoq

iLoq G50S user guide

SDC Z7835 installation instructions

SDC

SDC Z7835 installation instructions

ilco 452 Installation

ilco

ilco 452 Installation

Samsung shs-h705 user guide

Samsung

Samsung shs-h705 user guide

TRU-BOLT 08102017 user manual

TRU-BOLT

TRU-BOLT 08102017 user manual

CDVI 500-LADJ quick start guide

CDVI

CDVI 500-LADJ quick start guide

Igloohome Deadbolt 2S Metal Grey Installer/user guide

Igloohome

Igloohome Deadbolt 2S Metal Grey Installer/user guide

eSSL FL-300 user manual

eSSL

eSSL FL-300 user manual

manuals.online logo
manuals.online logoBrands
  • About & Mission
  • Contact us
  • Privacy Policy
  • Terms and Conditions

Copyright 2025 Manuals.Online. All Rights Reserved.

For questions call 1-888-888-7020. For more information and/or guides visit andersenwindows.com.
Please leave this guide with building owner.
Si tiene alguna pregunta llame al 1-888-888-7020. Para obtener más información y/o guías, visite andersenwindows.com.
Deje esta guía con el dueño de la construcción.
Incorrect installation may affect home security. Make
sure lock mechanism is installed correctly, read and
follow each step of this instruction guide.
Incorrect installation may affect home security. Make
sure lock mechanism is installed correctly, read and
follow each step of this instruction guide.
Follow manufacturers’ instructions for hand or power
tools. Always wear safety glasses. Failure to do so may
result in injury and/or product damage.
Siga las instrucciones del fabricante para el uso de
herramientas eléctricas o manuales. Utilice siempre
gafas de seguridad. Si no lo hiciera, podrían producirse
lesiones y/o daños al producto.
“Andersen” and all other marks where denoted are trademarks of Andersen Corporation. ©2006-2015 Andersen Corporation. All rights reserved.
“Andersen” y las demás marcas que aparezcan son marcas registradas de Andersen Corporation. ©2006-2015 Andersen Corporation. Todos los derechos reservados. 0005426 BB-00 Revised 11/30/15
Lock Mechanism Replacement
Reemplazo de mecanismo de cerrojo
for Andersen® 200 Series Hinged Patio Door - Inswing
para la puerta de patio con bisagra - puerta con batiente, serie 200 de Andersen®
Thank you for choosing Andersen. / Gracias por elegir Andersen.
▶Read guide from beginning to end before starting installation. Read all warnings and cautions during unit installation.
Lea completamente la guía antes de comenzar la instalación. Lea y respete todas las advertencias y precauciones durante la instalación de la unidad.
Active Lock
Mechanism
Mecanismo
de cerrojo
para panel
de apertura
Parts Included / Partes Incluidas
(1) Installation Guide / Guía de instalación
(1) Active Lock Mechanism /
Mecanismo de cerrojo para panel de apertura
Tools Needed / Herramientas necesarias
∙Safety Glasses / Lentes de seguridad
∙1/8” Hex Key / Llave hexagonal de 1/8”
∙Phillips Screwdriver / Destornillador Phillips
∙T10 Torx Bit / Punta de Torx T10
▶Check with your local building code ofcial to identify and conrm compliance with local building code requirements.
Consulte los códigos locales de construcción para identicar y conrmar que se cumplan los requisitos del código de construcción.
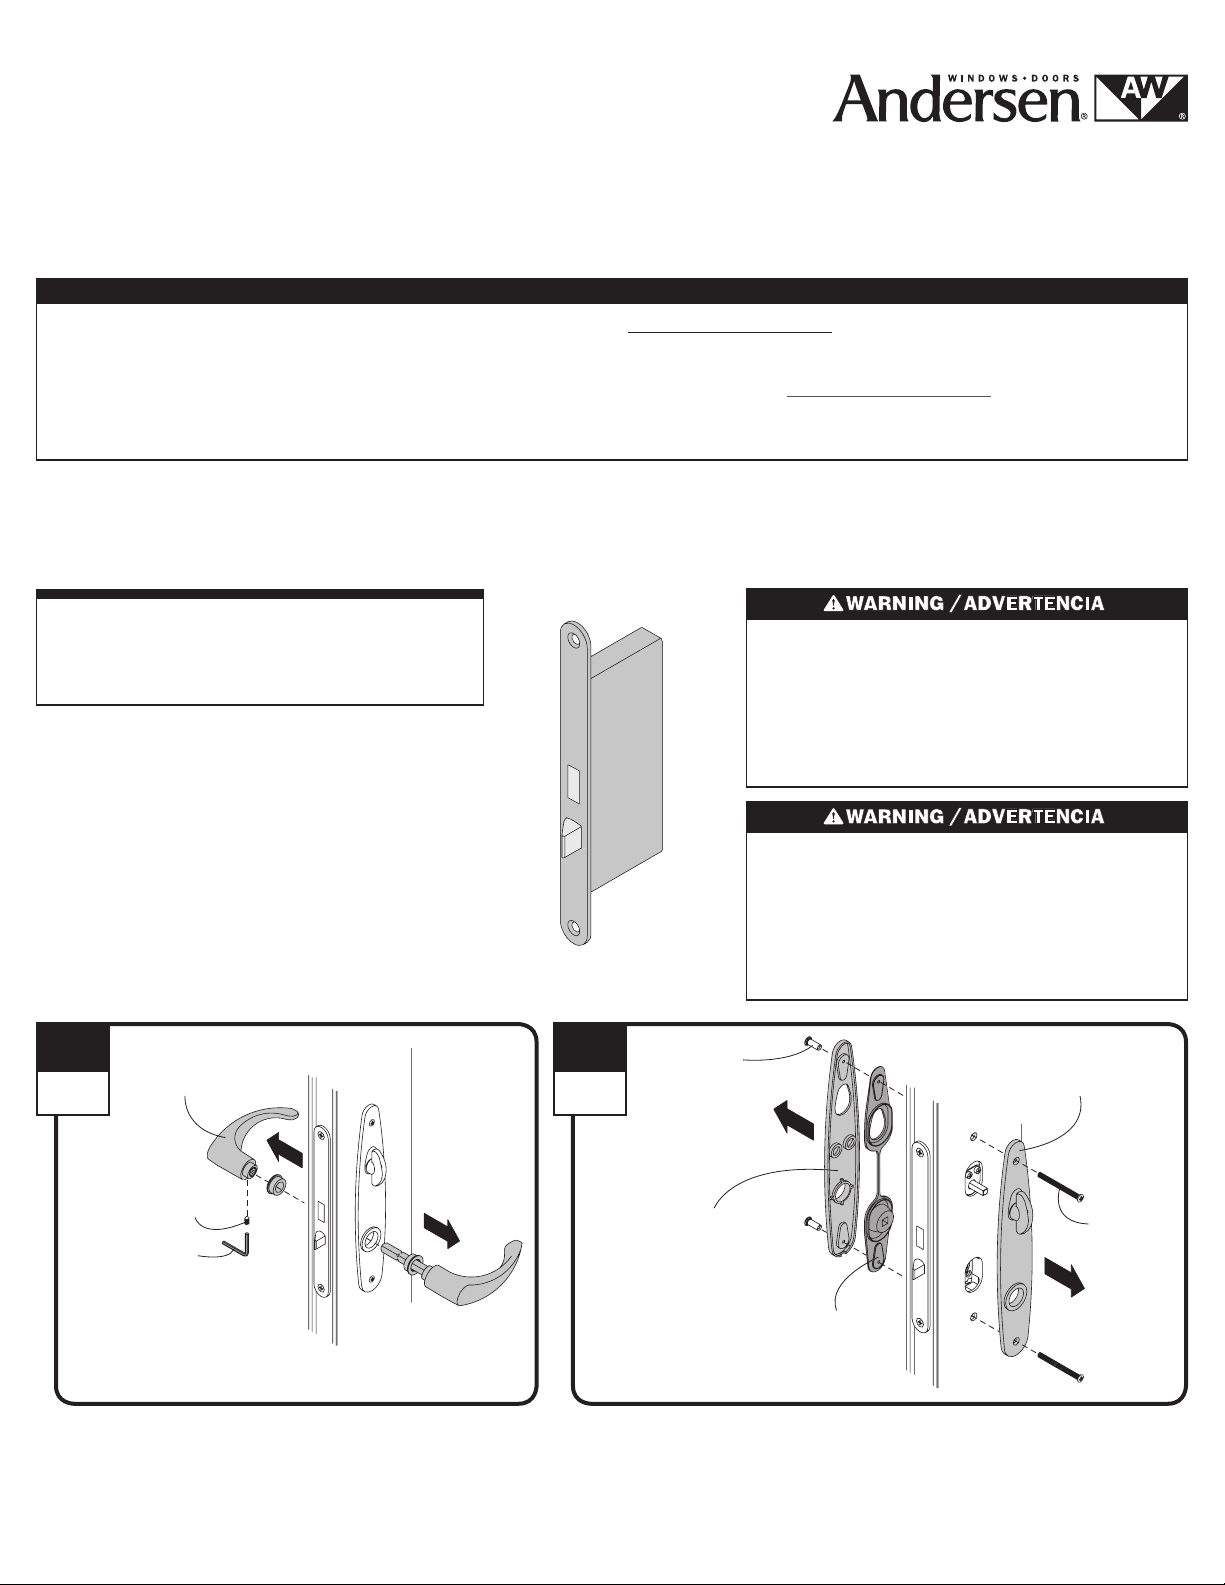
Support both handles when
loosening set screw.
Sostenga ambas manijas cuando
afloje el tornillo de fijación.
Set Screw
Tornillo de
jación
1/8" Hex Key
Llave hexagonal
de 1/8”
Interior Handle
Manija interior
Exterior Handle
Manija exterior
1
Interior
2
Interior
Support both escutcheon
plates when loosening bolts.
Sostenga ambos escudetes
cuando afloje los pernos.
Escutcheon
Plate Bolts
Pernos del
escudete
Exterior Escutcheon Plate
Escudete exterior
Gasket
Junta
Escutcheon
Plate Stud
Espárrago
del escudete
Interior Escutcheon Plate
Escudete interior
Tribeca®Trim
Set Shown
Aquí se
muestra el
juego de
manijas
decorativas
Tribeca®
Loosen set screw on underside of exterior handle and remove
handles. Keep all hardware and fasteners for reinstallation.
Aoje el tornillo de jación en el lado inferior de la manija
exterior y extraiga las manijas. Conserve toda la tornillería y los
ajustadores para volver a instalar.
Remove escutcheon plate bolts, interior and exterior escutcheon plates
and gasket. Keep these parts.
Extraiga los pernos del escudete, el escudete exterior e interior y la junta.
Conserve estas piezas.
4
Interior
6
Interior
Remove screws from lock mechanism and pull out of door panel. Keep
screws for reinstallation.
Extraiga los tornillos del mecanismo de cerrojo y jale este fuera del
panel de la puerta. Conserve los tornillos para volver a instalar.
Position lock mechanism into door panel and fasten with screws.
Coloque el mecanismo de cerrojo dentro del panel de la puerta y ajuste
con los tornillos.
Lock Mechanism
Mecanismo de
cerrojo
Door Panel
Panel de la puerta
0005426
7
Interior
Support handles and escutcheon plates when securing bolts.
Sostenga las manijas y los escudetes cuando asegure los pernos.
Exterior Escutcheon Plate / Escudete exterior
Interior
Escutcheon
Plate
Escudete interior
Escutcheon Plate Bolts
Pernos del escudete
Gasket
Junta
Set Screw
Tornillo de
fijación
Hex Key
Llave hexagonal
Interior Handle
Manija interior
Reapply trim set reversing steps 1, 2 and 3.
Vuelva a aplicar los pasos para instalar el juego de manijas de decorativas (paso 1, 2 y 3).
Lock Actuator / Accionador del cerrojo
Limiting Plate / Placa limitadora
Cylinder Mounting Bolts / Pernos de montaje del cilindro
Escutcheon Plate Stud
Espárrago del escudete
Cylinder / Cilindro
Screw
Tornillo
Check lock handing against existing lock. If correct go to step 6. if not
correct, call customer service.
Verique la orientación del cerrojo contra el cerrojo existente. Si está
correcto, continúe al paso 6. Si no está correcto, llame a servicio al cliente.
5
Interior
Right
Handed
Door
Puerta
derecha
Left
Handed
Door
Puerta
izquierda
Sloped portion of latch should contact latch receiver first.
La parte oblicua del pestillo debe hacer contacto primero
con el receptor del mismo.
2
Remove cylinder mounting bolts, limiting plate, lock actuator and
cylinder. Keep these parts.
Extraiga los pernos de montaje del cilindro, la placa limitadora, el
accionador del cerrojo y el cilindro. Conserve estas piezas.
3
Interior
Cylinder
Cilindro
Lock Actuator
Accionador del cerrojo
Limiting Plate
Placa limitadora
Cylinder Mounting Bolts
Pernos de montaje del
cilindro
Lock Mechanism
Mecanismo de
cerrojo
Door Panel
Panel de la puerta
Screw
Tornillo