Andrew Alliance Waters Shaker+ User manual

USER MANUAL
Plate Heater-Shaker+
Copyright © 2021 Waters Corporation

• The device must always be completely switched o (cables
removed) before moving it.
• The device must be handled with caution as it contains
moving parts.
• The user must maintain a distance of at least 20cm from the
product (WiFi antenna) while it is being installed and operated.
• The device is intended for indoor use only.
• Device maintenance has to be done exclusively by an Andrew
Alliance representative.
• If the device is used in a manner not specied by the manufac-
turer, the protection provided by the device may be impaired.
• All the input/output ports are Safety Extra Low Voltage (SELV)
circuits. SELV circuits should only be connected to other SELV
circuits.
Risk of burns!
Exercise caution when touching the housing parts and the
heating plate. The heating plate can reach temperatures in ex-
cess of 99°C. Pay attention to the residual heat after switching
o. The device may only be transported when cold!
Do not cover the heating surface with anything except
compatible labware.
Safety instructions
Do not touch moving parts during operation!
The user must never put their ngers or any objects on and
around the moving platform.

About this manual
Read the user manual before using this device. Strictly follow usage and maintenance instruc-
tions provided in the manual. It is the user’s responsibility to become familiar with all available in-
formation concerning the correct use, care and limitations of these products. If you are uncertain
about the correct use or limitations of the products, contact Andrew Alliance service and support.
The manufacturer, the distributor and their respective owners, employees, agents and represen-
tatives are not responsible or liable for errors or omissions.
Information in this User Manual is subject to change without notice and does not represent a
commitment on the part of Andrew Alliance. Andrew Alliance assumes no responsibility for any
inaccuracies that may be contained in this User Manual. Andrew Alliance makes no commitment
to update or keep current the information in this User Manual, and reserves the right to make
improvements to this User Manual and/or to the products described in this User Manual, at any
time without notice.
If you nd information in this manual that is incorrect, misleading, or incomplete, we would ap-
preciate your comments and suggestions.
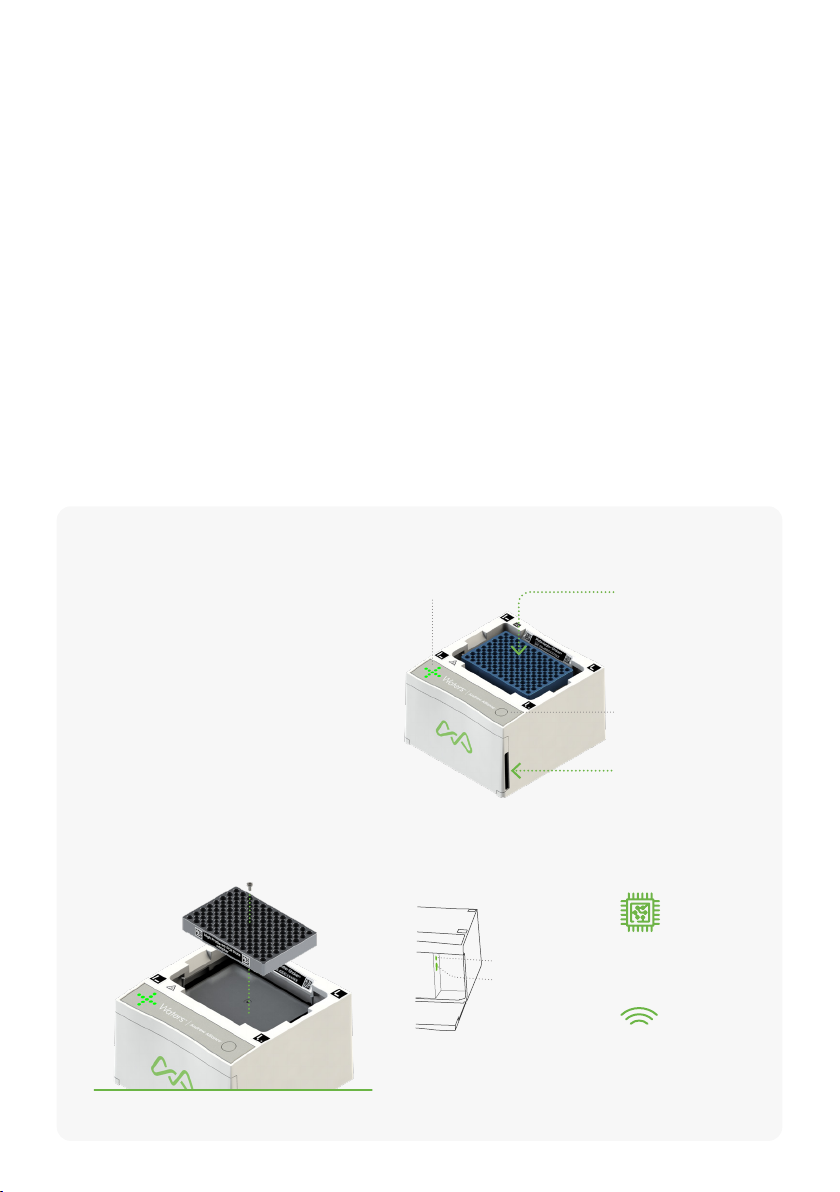
Product
overview
Power socket
Ethernet for
cable connection
Built-in wireless
adapter
Built-in
computer
LED indicator Labware holder/
Plate Adapter
mounting area
Power button
Open hatch
from here
Removal and positioning
of Plate Adapter
1. Switch OFF the power supply of the instrument
and make sure the heating elements are cold.
2. Remove labware (if any).
3. Loosen (rotate counterclockwise) the Torx
screw by using the supplied
screwdriver (T8).
4. Remove the Plate Adapter from the Device+
and place it on a soft surface.
5. Insert the new Plate Adapter straight into the
plate holder and make sure it
is well aligned.
6. Insert and tighten the Torx screw (rotate
clockwise).

Getting started
Plug your Plate Heater-Shaker+
into a power source.
Wait for the LED indicator to
turn blue and blink.
After a couple of
minutes, the Plate
Heater-Shaker+ will
inform you when it is
in installation mode.
Connect your computer, tablet or smartphone
to the Plate Heater-Shaker+
Launch a web browser, type http://192.168.2.1
and follow the on-screen steps to continue installation.
A. Go to your Wi-Fi settings
and select the network named HeaterShaker-5xx.4xxx.xxxxx
12
3
4
scan me
Please note that the
installation page might
open automatically.
If you do not have access to a
Wi-Fi compatible device, please
refer to our online help:
help.andrewalliance.com
!
!
xxxx.xxxxx is the device serial number (you can nd it on top of your device)
B. The LED indicator will stop blinking when it’s successfully connected.
If the Plate Heater-Shaker+ doesn’t auto-
matically enter installation mode, press
the power button 5 times.
!
http://192.168.2.1
Before
you begin
If you do not have a OneLab account, please create one by going to:
https://onelab.andrewalliance.com/signup
The device will automatically start up.
Only use the provided AC/DC
power supply unit and cords.
HeaterShaker-5xx.4xxx.xxxxx

Operations
Design your protocol
Execute experiment with
your Plate Heater-Shaker+
Start the experiment and let OneLab
control your device
Please note that after turning on the device (for the rst time or after a previous
use), if after 5 minutes the inside sensor doesn’t reach a thermal plateau, the cur-
rent temperature of the Plate Heater-Shaker+ will be automatically set at 18°C.
This will allows you to select your device for an experiment that needs a lower
temperature without waiting that it reaches the room temperature.
!
Our drag-n-drop editor makes it easy to design a
precise and complete protocol with all that you
need to run your experiment perfectly.
Create a Shaking or Heating action by
clicking on this menu, which is located in the
left of the screen.
Please note that you will be able to set a
temperature in a Shaking action.
Feel free to contact
the Andrew Alliance
support team Send us an email to
Chat with our support team
directly in OneLab
We reply within 1 business day
Actions
Follow the visual instructions based on the protocol
being used and you will be guided through your
experiment.
Each step of the experiment will be recorded and
available in OneLab.
OneLab will automatically select your
Plate Heater-Shaker+ and allows you to use it with
every available experiment set-up, either manual,
semi-automated or fully automated operation.
Choose your desired experiment setup and then
prepare all the required materials.

Technical data
Labware
compatible
Check the OneLab Domino
Catalog at andrewalliance.com/
domino-catalog
Temperature
range
Ambient to 99°C
Temperature
resolution
0.1°C
Temperature
accuracy
±0.1°C (Accuracy of the device
without Plate Adapter mounted)
Mixing frequency 200 rpm up to 2500 rpm
(The maximum speed may dier
according to the type of used
labware)
Mixing orbit
constant
2 mm
Speed setting
resolution
1 rpm
Mixing regulation
accuracy
±25 rpm
Relative humidity 80% at 37°C
Maximum
operating altitude
2000 m
Environment
temperature
operating range
+4 to +37°C
User interface Through OneLab software
Ingress protection IP20*
Dimensions
(W x L x H)
170 x 162 x 100 mm
(The specied dimensions are
subject to change according to
the labware)
Weight 2.55 kg
External power
supply
Input 100-240 VAC, 1.4 A / out-
put 24 VDC, 5 A, 120 W
Power or
current rating
5 A
Overvoltage
category DC port
Cat I
Operating voltage 24 VDC
Network
connectivity
• Gigabit Ethernet
• Wi-Fi 2.4 GHz and 5 GHz
Pollution degree
of the intended
environment
Pollution degree 2
Cleaning Only with a wet tissue or
isopropanol
Warranty 1 year
Certication CE, FCC, RoHS, WEEE
1. Place your connected
devices as indicated by OneLab.
2. Open the hatches.
3. Plug the power cables into your devices
power socket.
4. Pass the cables in front of devices and then
insert them into the dedicated path.
5. Close the hatches.
Multiple connected devices
installation
Operating device
Power on
Power o
When the device is in standby mode
(plugged to power source but turned
o), press the power button to turn
on the device.
Note: The device will automatically
start up when you plug it to a power
source.
When the device is in its idle state
(no experiment running), press the
power button for 5 seconds to turn
o the device.
5s
*Avoid spilling liquid on the device.

Unit end of life
When a unit reaches the end of its useful life, contact Andrew Alliance for
directions and information on the end-of-life policy.
This is in accordance with the European Union Directive 2002/96/EC on
Waste Electrical and Electronic Equipment (WEEE).
Certications
Electrical safety
EMC
RADIO
FCC
RoHS
I. IEC 61010-1: 2010
II. IEC 61010-1/A1: 2016
III. UL 61010-1:2012
IV. CAN/CSA 22.2#61010-1-12
I. EN 61326-1: 2013
II. EN 301 489-1 V2.2.0
III. EN 301 489-17 V3.1.0
I. EN 300 328 Ver 2.1.1
II. EN 301 893 V2.1.1
I. FCC 47 CFR part 15 subpart B section 15.107 (b) and section 15.109 (b and g)
Class A all over other device tested per ANSI C63.4 (Ed. 2014) procedures
II. This device complies with Part 15 of the FCC Rules. Operation is subject to the
following two conditions:
(1) this device may not cause harmful interference, and (2) this device must accept
any interference received, including interference that may cause undesired opera-
tion.
RoHS 3 (EU) 2015/863

Waters Corp
34 Maple Street
Milford, MA 01757
USA
Phone: +1-508-478-2000
Andrew Alliance S.A.
(Headquarters)
Chemin Grenet 21
1214 Vernier (Geneve)
Switzerland
Phone: +41 22 518 0357
Part number: 518.025.2 | 2021 © Andrew Alliance - A Waters Company.
Table of contents
Other Andrew Alliance Laboratory Equipment manuals
Popular Laboratory Equipment manuals by other brands

BIO RAD
BIO RAD QX200 instruction manual

Molecular Devices
Molecular Devices QPix 420 user guide

Ultravation
Ultravation UVS Series owner's guide

VERDER
VERDER Carbolite Gero AX 120 Installation, operation and maintenance instructions

Blue-White industries
Blue-White industries CHEM-FEED C-1500N manual

Milestone
Milestone ultraWAVE 3 Operator's manual