Hanil Micro 12 User manual

OperatingManual
Serial No.
Micro
Centrifuge
Purchase Date
Place of purchase
Micro 12

www.ihanil.com
2/20
Copyrightⓒ2017 Hanil
Scientific
Inc.
All
rights
reserved.
Contact Us
Ifyouhaveanyquestions,contactHanil ScientificInc.orplace of purchase.

CONTENTS
2.Productdescription --------------------------6
2.1 Appearance -6
3 .
Installation -------------------------------------8
3.2 Installation -8
4.
Operation
--------------------------------------12
4.1 Controller
-12
4.2
Setting RPM
-13
4.3
Setting run time -13
4.4
Starting/End the centrifugaion -13
4.5
Pulse function -13
5.
Maintenance----------------------------------14
6.Troubleshooting---------------------------15
7.
Rotor
and
accessories ----------------------17
3.1
Packing
inspection -8
3.3
Connect
power -9
1. General Considerations -----------------------4
1.1 Safety -4
1.2Transport & Storage -4
1.3Safety labe -5
1.4Electric safety information -5
2.2 Delivery package -6
2.3 Specifications -7
3.4 Opening/closing the lid -9
3.5Loading and removal of the rotor -10
3.6Loading tubes -11
5.1Careinstructions-14
5.2Cleaning-14
6-1Possibleproblems-15,16

4 www.ihanil.com
1. General Considerations
1. The centrifuge shouldbeinstalled on flatsurface tomaintainlevel.
2. Check the voltage tobeused,before connecting thecentrifuge to thepower source.
4.Donot exceed themaximumrated speedof therotor orbuckets oraccessories inuse.
6. If the centrifuge is contaminated by toxic or radioactive samples or infectious blood samples, remove contaminants
completely
7. Substances that may generate volatile or explosive vapor can not be centrifuged.
8. The balancing workof samples shoudbe done inadvancebefore operation.
11.Only centrifuge withrotor androtorlid firmly tightened.
12.Donotblock vents.
Do
not
insert
foreign
objects
into
the
holes
of
the
device.
14. Repairs must be carried out by a technologist authorized by Hanil scientific Inc.
15.According to IEC61010-2-020 maintain a 30cm“clearance envelope”around the centrifuge while the rotor is spinning.
16.
Please
contact
the
place
of
purchase
or
Hanil
Scientific
Inc.(techsupport@ihanil.com/info@ihanil.com)
for
product
repairs.
1.2 Transport &Storage
1.1 Safety
Ambient temperature 5℃~35℃
Maximum relativehumidity 30% ~ 85%
Airpressure 500 ~1060hpa
Followprecautions and all the safetyrequirements described on thisuser manual to prevent any
damages and failure of equipment and loss of lives.
Abnormal vibration iscaused when the device isinstalled onan inclined surface.
3.Onlyuserotors,parts, andaccessoriesprovidedby
Hanil
Scientific
Inc.
Hanil
Scientific
Inc.
is
not
responsible
for
damages
of
the
device
and
accidents
caused
by
using
parts
and
accessories
not
recommended.
5. Make sure to prepare necessary safety measures before using samples that are toxic or radioactive samples or pathogenic
or samples or infectious blood.
and take needful actions such as ventilation or isolation of centrifuge.
9. Before operation, rotor and chamber should be dry.
10.Donotattempt toslow or stop thespinningrotor byhand.
13.
Storage Transport
Ambient temperature -10℃~ 40℃
Maximumrelativehumidity 10% ~ 90%
Airpressure 500 ~1060hpa

5
1. General Considerations
1.3 Safety label attached to products
1.4 Electric safety information
Electric shock
1. Use a power cord only provided with the device.
2. Use sockets with a protective earth conductor and suitable power cord.
3. Do not use an extension cord.
4. Do not place anything on the power cable
5. Do not block vents.
6. If you have the following emergencies, shut off the power supply and unplug the power cord from outlet
and
Do not open lid until rotor stops completely.
Rotation direction of the rotor.
contact
your
place
of
purchase or Hani lScientific Inc.
-Unusualnoisesorsmellfrom theequipment.
-Damageor wearof apowercord.
-Breakdownof circuitbreaker, fuseorsafetydevice.
-If you spillliquidon the equipment.
-If theequipmentisexposedtowater.
-If Someofequipmenthasbeendamaged.
6 www.ihanil.com
2. Product description
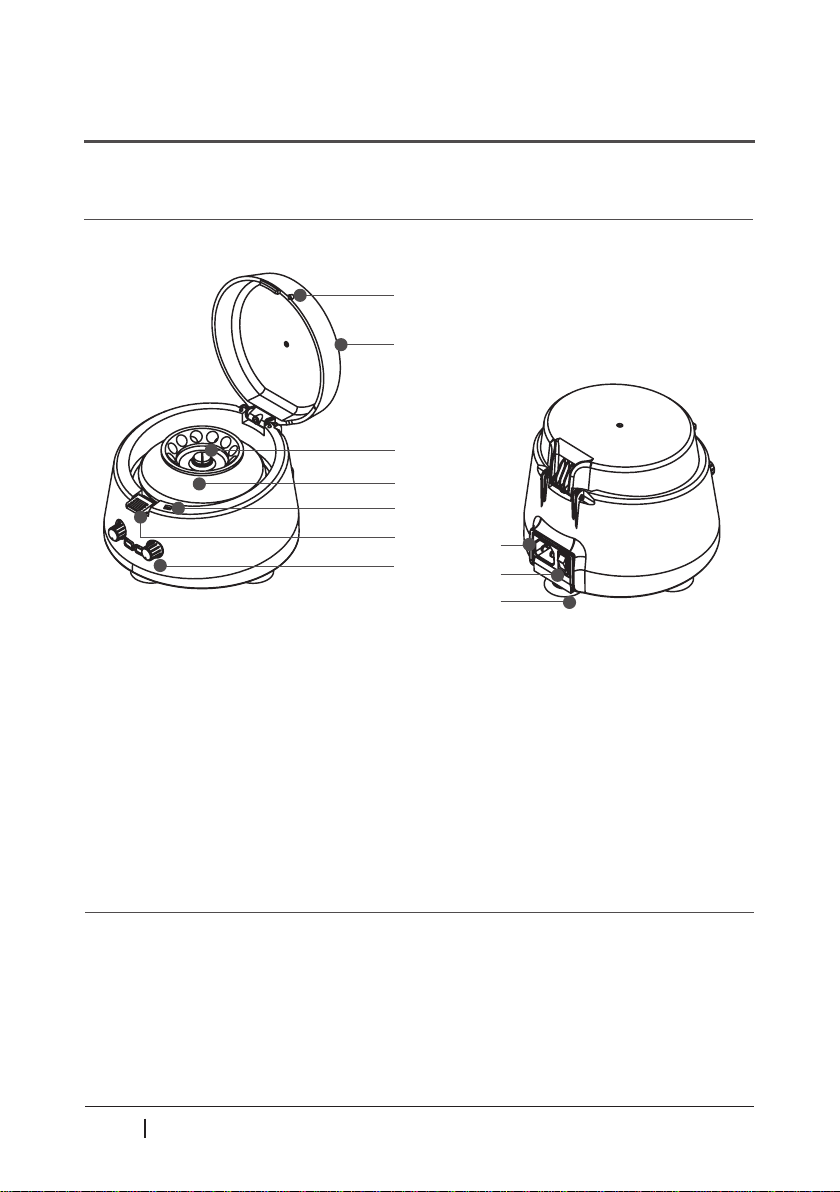
2.1 Appearance
① Lid : Lidprotects theinside ofthe chamber.
②
Rotor
locking
screw:
Connect
the
rotor
to
the
motor
shaft.
③
Rotor:
Connected
to
the
motor
shaft
for
centrifugal
separation
④Lid
sensor
:
Detect
whether
lid
is
cloesd
⑤
Lid
open
switch:Press
the
button
to
open
to
the
lid.
⑥Controller
:
Keys
and
knobs
for
operating
the
centrifuge.
⑦Power
socket
:
Connection
for
power
cord.
⑧Power
switch
:
Switch
for
switching
the
centrifuge
on/off.
⑨Absorbent
rubber
:
Fix
the
device
on
the
laboratory
bench.
①Standard
offering
-
-Micro12main
body
(Rotor
included
:
A2.0-12)
- Power
cable
(300/500V,
6A)
-User
manual
②Optionalproducts[see7.Rotor and accessories]
-
PCR
strip
rotor
(A0.2-32)
①
②
⑥
⑤ ⑦
⑧
⑨
③
④
④
2.2 Delivery package

info@ihanil.com/techsupport@ihanil.com 7
2. Product description
2.3 Specifcations
*RPM, RCF value is for A2.0-12.
* Thisdevice doesnotprovide automaticrecognition of therotor.
So donot exceed 6,000rpm when using thePCRrotor.
Max. RPM 13,500 rpm
Max. RCF 12,032 xg
Time ≤ 15 min, Pulse
Acc. time to max. speed ≤18 sec
Dec. time from max. speed ≤8 sec
Tube Capacity 1.5/2.0ml x 12
Power supply AC110/220V, 50/60Hz
Dimension (W x D x H, mm) 190 x 202 x 129
Weight (kg) 1.5
※ RCF Table
* Rcf value was calculated based on the bottom of the rotor hole.
RPM
A2.0-12
RPM
A0.2-32
0.2ml 0.5ml 1.5/2.0ml 0.2 ml
Inner line
0.2 ml
Outer line
3,000 443 545 594 3,000 313 ~ 443 464 ~ 560
6,000 1,231 1,515 1,651 5,000 870 ~ 1,231 1,289 ~ 1,556
8,000 3,151 3,877 4,226
6,000
[ Max.]
1,253 ~ 1,773
1,857 ~ 2,241
10,000 4,924 6,058 6,603
12,000 7,090 8,724 9,508
13,500 8,973 11,042 12,032

8 www.ihanil.com
3. Installation
3.1 Packinginspection
3.2 Installation
▶Checkthedelivery forcompleteness.
·Checkpackingconditions verycarefullybeforeunpacking.
·ContactHanilScientificimmediatelyifdamagesfound.
·Checkthedelivery forcompleteness.
·Youcan getcontactdetails onpackingbox orback of themanual.
▶Check all parts for damage.
Installationonhardand flatground.
•Centrifugeshouldbeinstalledonhardand flatplace.
•If thecentrifugeisinstalledinaninclinedplace, theshaftmaybebentdue
to theweightof therotor.
Goodventailation.
•Foraircirculationandsafety,maintaina30cm“clearanceenvelope”around
thecentrifugewhile therotorisspinning.
Constanttemperature/humidity
•Centrifugeequippedwith thesensitiveelectronicsoftware whichis fragile
withhumidityand temperature.
•Mustavoiddirectrayorheater andbeput in theambienceofcontrolled
temp.andair.
Avoidthecorrosivegas
•Install thecentrifugeinaplace wherecorrosivegasisnot generated.
•Sulfurdioxidegasandchlorinegasmaycausecorrosion.
Leveling
• Theshaft shouldbeputexactly verticalon thehotizontaliy flat groundby
theleveling tool.

3. Installation
3.3 Connectpower
3.4 Opening/Closing the lid
·Connect thedevice to voltagesourceswhichcorrespond to theelectricalrequirementson
When closing the lid, close it completely until it clicks.
(O) (X)
· Use sockets with a protective earth conductor and provided power cord.
the label attached to the device.
1. Connectthepower cable tothepower socketon therightside of theproduct andplug thecord
into theoutlet.
2. Switch thecentrifugeonusing thepower switchon theright sideof the device.
▶It is normal product to hear a beep when power is connected.
thelid-
1. Press the 'lid open' switch.
-Opening-Closing thelid-
1.Put thelid onandpress theedge of thelid
If thelidisnot completelyclosed, thedevicewillnotoperate.
info@ihanil.com/techsupport@ihanil.com 9
10 www.ihanil.com
3. Installation
3.5 Loading and removal of the rotor
Motor Hub
(Motor Shaft)
· This device is equipped with a rotor .
· Only use rotors, parts, and accessories provided by HanilScientific Inc .
· Do not use a defective rotor .
1.
Using
a
flat
head
screwdriver,
turn
the
rotor
locking
screw
counterclockwise
and
pull
it
completely
out
with
the
washer
under
the
screw.
2.
Lift
up
the
rotor
from
the
motor
shaft .
3.Load
the
rotor
into
the
motor
shaft .
4.
Align
the
washer
with
the
hole
at
the
top
of
the
rotor .
5.
Insert
the
rotor
lock
screw
into
the
screw
hole
in
the
center
of
the
rotor
and
turn
it
clockwise
using
a
flat
head
screwdriver
to
completely
lock
it
6.
Check
that
the
rotor
is
completely
locked .
Flat head screwdriver
Rotor lock screw
Washer
Rotor
Follow the steps below to remove or replace the rotor.

info@ihanil.com / techsupport@ihanil.com 11
3. Installaion
3.6 Loading tubes
Caution
Wrong arrangement
·Onlyuse tubesprovidedorapprovedbyHanilScientificInc.
· Always use the same type of tube .
· Tubes should be loaded symmetrically .
·Do not exceed the
maximum
rated
speed
of
the
tube .
·Same volume of sample should be
put
on
tubes .
·Check symmetric loading by
balncing
tubes
with
scales .
1. Check the inside of the rotor hole for moisture or foreign matter.
2. Tubes must be loaded symmetrically.
Correct arrangement
12 www.ihanil.com
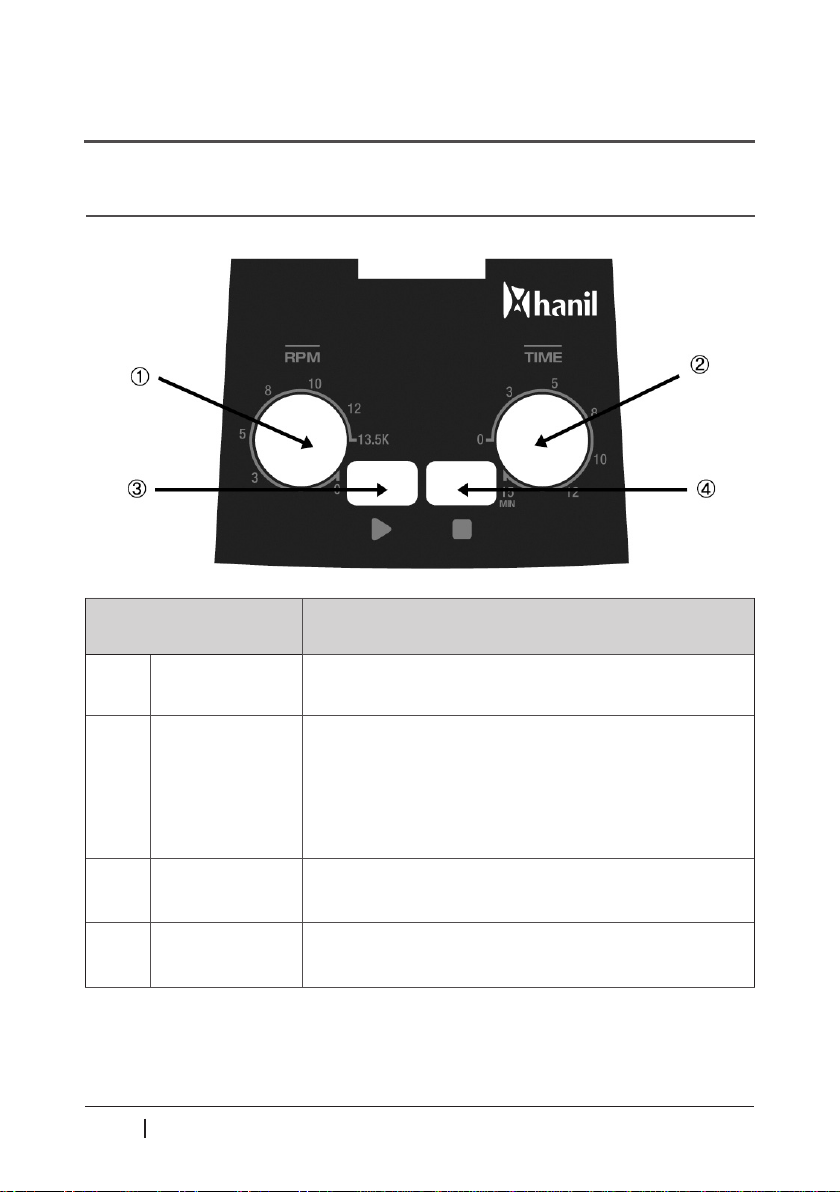
4.1 Operationpanel
4. Operation
버튼 설명
①RPM setting knob
②Time setting knob Rotate clockwiseorcounterclockwise to set therun time.
(Tousepulse function, set the timeto '0' and press the start
key.)
③Start key
④Stop key
※ When using a A0.2-32(PCR strip rotor) do not exceed 6,000rpm.
Rotate clockwiseorcounterclockwise to set therpm value.
Start key
Stop key

info@ihanil.com / techsupport@ihanil.com 13
4.2 Setting RPM
4.3 Setting run time
4.4 Starting/Endthecentrifugation
4.5 Pulsefunction
4. Operation
Rotatethe'RPMsettingknob'clockwiseorcounterclockwisetoset therpm value.
▶Whenusinga A0.2-32(PCRstriprotor)donotexceed6,000rpm.
Rotate'Timesettingknob'clockwiseorcounterclockwise toset therun time.
▶0~15min.
1.Checktheallparametersarecorrectand thelidisclosed.
2.Press the'Start'key(Operationbegins withabeep.)
▶If thelidisnotcompletelyclosed,it willnotoperate.
▶Whenthesettimeisover,thedeviceisdeceleratedandstopswithbeepsound.
▶Press'Stop'key toabortcentrifugation.
▶Set the'Rpmsettingknob' or'Timesettingknob' to'0' toabort centrifugation.
▶Whenthelidisopenedduringoperation,itdeceleratesandstops.
1.Set the'Timesettingknob'to'0'
2.Press theStartkey.
3. Thedevicedeceleratesand stops whenthesetrpmisreached.
4.2 Setting RPM

14 www.ihanil.com
5.Maintenance
5.1Care instructions
• The followingproceduresshouldbeperformedregulary.
1. Regularlyinspect therotorchamberforcheck themotorshaftisnomal.
2.Rotate theshaftwith yourhand tomakesureit turnssmoothly.
3.Use thestopwatchtocheckthat the timesettingiscorrect
5.2 Cleaning
•Oustsideof thedevice
1.Cleantheoutsideofequipmentwithasoftanddrycloth.
▶If thedeviceis contaminated,useamild cleaningfluid toclean.
2.Donotuseaggressivechemicalson thedevice suchasalchol,benzene,acetoneorphenol.
3. Usethestopwatchtocheck that thetimesettingiscorrect.
4. Makesuredonotscratch thesurfaceofequipment whencleaningit.
▶Donotuseametalsponge.
▶If thedeviceisrusted,removeitwithamild detergentand wipeit withadrycloth.
•Chamber
1. If therotor chamberisnotdry,wipemoisture from thechamber withadrycloth
2. If therotor chamberis dirty, wipemoisture from thechamber witha drycloth
•Rotor
1. Topreventcorrosion,takeout therotor from therotorchamber.
2. Ifanysampleisspiltinside therotor,washanddry therotor well
• Disposal
Incaseofproductis tobedisposedof, thelocal wasteslawsandregulationsard tobe
observed.

info@ihanil.com / techsupport@ihanil.com 15
증상 확인 사항
전원이 들어오지 않아요. [3.3 전원연결]을 참조하여 전원플러그가 빠져 있는지 확인해주십시오.
동작되지 않아요. Lid가 닫혀지지 않을 경우 동작되지 않습니다. [3.4 Lid 열기]를
참조하여 lid상태를 확인하고 lid를 잘 닫아주십시오.
Lid가 열리지 않아요. Lid 개방 스위치를 눌러 lid를 열 수 있습니다.
Lid 개방 스위치가 파손되었다면 라벡스 기술지원팀으로 문의하여 주십시오.
Lid가 닫히지 않아요. Lid 걸쇠 부위가 파손되었는 지 확인하십시오.
파손되었다면 라벡스 기술지원팀으로 문의해 주십시오.
작동 중에 진동과 소음이 나타
나요.
본체 설치 위치가 불안정하면 본체의 수평과 고정여부를 확인하고,
평평한 곳에 수평을 맞춰 다시 설치하십시오.
로터 장착상태가 불량한 경우 로터 탈착 후 로터 외관을 확인하고
파손된 부위가 있다면 로터 사용을 즉시 중지하십시오.
또한 장착 방법이 잘못되었다면 [3.5 로터 장착과 분리]를 참조하여
로터를 정확하게 장착하십시오.
튜브 삽입이 비대칭이거나 무게가 맞지 않는 경우에는 [3.6 튜브 장착]을
참조하여 튜브 무게를 확인하고 대칭적으로 삽입하십시오.
6.Troubleshooting
6.1 Possibleproblems
Please check the following information,if the device is faulty.

16 www.ihanil.com
Lid sensor replacement may be required.
Need to repair the dial or knob.
Mainbodyorlidrepairmayberequired.
6. Troubleshooting
6.2 Possible problems
1. Thedevicedoesnot operate.
2. Thedevicestopsduringopertaion.
3. Thereisnobeep soundwhenpower
isconnected.
Need torepair thecontroller.
Please contact yourdealer.
1.Itoperateswhen thelidisopen.
2.Whenpressthe'start'key,onlybeeps.
1.'Rpm/Time knob'dosenotrotate.
2.'Start/stop'keydoesnotpress.
1. The lid does not close.
2. The lid does not open.
ProblemRecommendedAction
info@ihanil.com / techsupport@ihanil.com 17
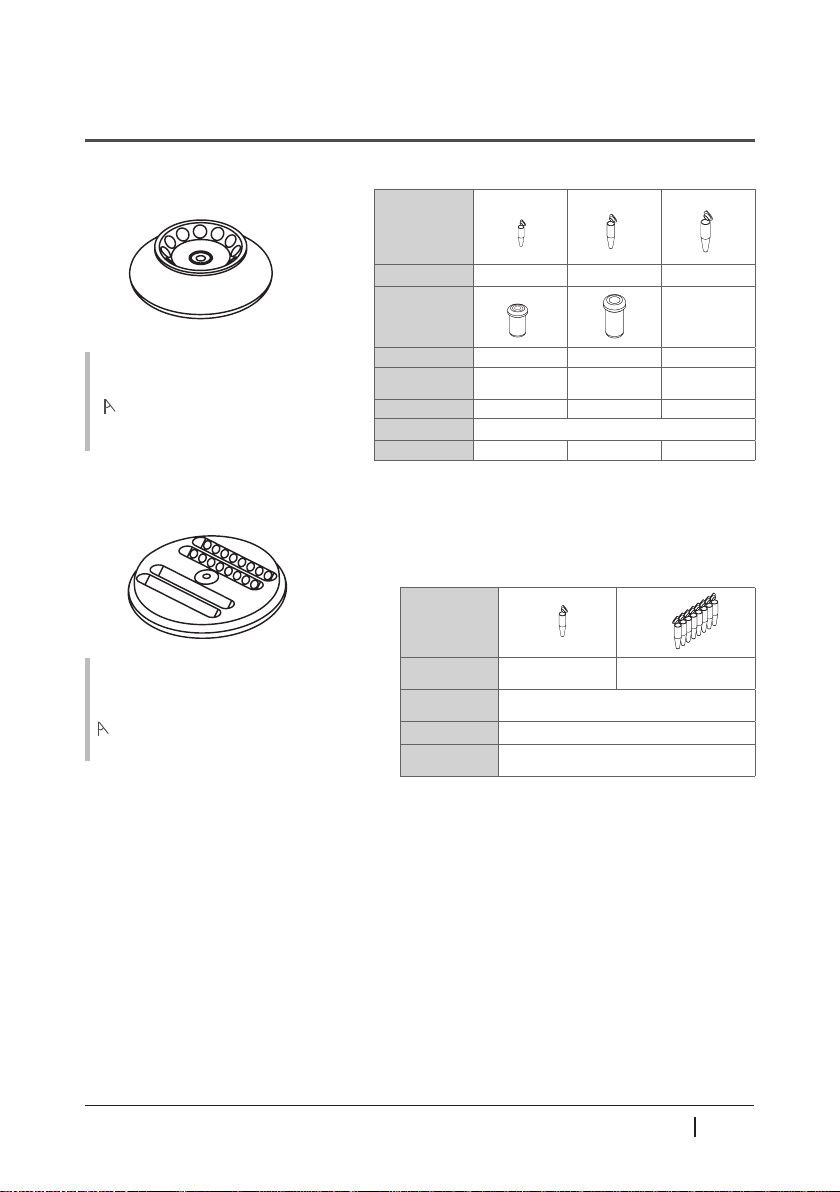
7. Rotor and accessories
12
x
1
.
5
/
2
.
0
ml
45o
Hole
diameter
(
m
m) :
11.5
Max
.
height
for
tube
t
(
mm
) :
48
Fixed Angle Rotor, A2.0-12
Tube
Tube capacity 0.2 ml 0.5 ml 1.5/2.0 ml
Adaptor None
Cat. No. -
Adaptor bore
(Фx L, mm) 6x 21 8 x 37 -
Radius (mm) 44 5959
Max. RPM 13,500
Max. RCF 8,965 12,032
Tube
Tube
capacity
(ml)
0
.
2 8
-
tube
PCR strip
Radius
(m
m)
Inner line : 31.13 ~ 44.06
Outer line : 46.13 ~ 55.68
Max
.
RPM 6
,
000
Max
.
RCF
(
g
-forc
e)
Inner line : 1,773 / Outer line : 2,241
4
x
8
-
tube
P
CR
s
trips, 32 x 0.2 ml
45o
Hole
diameter
(
m
m) :
6
.
5
PCR Rotor,
A0.2-32
TR0.2 TR0.5
12,032

HanilScientificInc.
16Arayukro,Gimpo10136,Rep.of KOREA
T.82-2-3452-8965
www.ihanil.com
Table of contents
Other Hanil Laboratory Equipment manuals

Hanil
Hanil M 13 User manual

Hanil
Hanil Component wR User manual

Hanil
Hanil ARA Smart 6 User manual

Hanil
Hanil Ultra 5.0 User manual

Hanil
Hanil M15R User manual

Hanil
Hanil Component R6 User manual

Hanil
Hanil Cellspin II User manual

Hanil
Hanil HyperVAC HVC-2124 User manual

Hanil
Hanil Fleta 5 User manual

Hanil
Hanil J1250 User manual

Hanil
Hanil Supra R30 User manual

Hanil
Hanil T04B User manual

Hanil
Hanil Fleta5 User manual

Hanil
Hanil FLETA 40P User manual

Hanil
Hanil Smart 13 User manual

Hanil
Hanil T04 User manual

Hanil
Hanil T05R User manual

Hanil
Hanil Ultra 5.0 User manual

Hanil
Hanil Smart 15 Plus User manual

Hanil
Hanil FLETA 4 User manual


