Andrew Alliance Waters Vacuum+ User manual

USER MANUAL
Copyright © 2021 Waters Corporation
Andrew Alliance Vacuum+

About this manual
Read the user manual before using this device. Strictly follow usage and mainte-
nance instructions provided in the manual. It is the user’s responsibility to become
familiar with all available information concerning the correct use, care and limita-
tions of these products. If you are uncertain about the correct use or limitations of
the products, contact Andrew Alliance service and support. The manufacturer, the
distributor and their respective owners, employees, agents and representatives are
not responsible or liable for errors or omissions.
Information in this User Manual is subject to change without notice and does not
represent a commitment on the part of Andrew Alliance. Andrew Alliance assumes
no responsibility for any inaccuracies that may be contained in this User Manual.
Andrew Alliance makes no commitment to update or keep current the information in
this User Manual, and reserves the right to make improvements to this User Manual
and/or to the products described in this User Manual, at any time without notice.
If you nd information in this manual that is incorrect, misleading, or incomplete, we
would appreciate your comments and suggestions.
Safety instructions
• The device must always be completely switched o (cables
removed) before moving it.
• The user must maintain a distance of at least 20cm from the
product (WiFi antenna) while it is being installed and operated.
• The device is intended for indoor use only.
• Device maintenance has to be done exclusively by an Andrew
Alliance representative.
• If the device is used in a manner not specied by the manufac-
turer, the protection provided by the device may be impaired.
• All the input/output ports are Safety Extra Low Voltage (SELV)
circuits. SELV circuits should only be connected to other SELV
circuits.

Product overview
Vacuum+
bridge
Power
switch
Vacuum
pump
Vacuum+
Domino
Rear view
(connectors face)
USB cable
Pump power
supply cord
Vacuum pump
pipe
Power suppy
cords
LED indicator Connectors
Power button
Built-in wireless
adapter
Built-in
computer
Vacuum+ bridge
Power
socket
Ethernet
for cable
connection
to network
USB port
(connection to
power switch)
Be sure to use the
provided ground
adator pin when present
(i.e. European sockets)
!

A. Installation
Getting started
Place the vacuum pump on the oor or on a workbench other than the one
being used for your experimental set-up.
Plug pipe between vacuum Domino and vacuum pump.
On the vacuum pump body, turn the switch ON.
Make sure the specially designed shims are placed on the
bottom of the vacuum Domino.
Additional instructions
• Check the performances of vacuum Domino when the μΕlution™ plate is
present.The vacuum should be between 2.5–4 Hg. If not, you may need to
adjust the pump accordingly.
Note: For this step the pump must be powered directly from the wall (not
through the power switch).
• At the beginning of the experiment, a waste consumable must be placed
inside the vacuum Domino, beneath the μElution™ plate.
Connect the power switch to the bridge USB port.
Connect the vacuum pump power cord to the power switch A/C output port.
Plug the power switch power cord to a power source.
1
2
3
7
i
4
5
6
When the pump is ON it could generate vibrations, which may inuence experiment
setup if placed on the same workbench.
Verify the absence of tension in the pipe.
Be sure to use the provided ground adator pin when present (i.e. European sockets).

B. Connection to OneLab
Plug your the Vacuum+ bridge
into a power source.
Wait for the LED indicator to
turn blue and blink.
After a couple of
minutes, the Vacuum+
bridge will inform you
when it is in installa-
tion mode.
Connect your computer, tablet or smartphone to the Vacuum+ bridge.
Launch a web browser, type http://192.168.2.1
and follow the on-screen steps to continue installation.
A. Go to your Wi-Fi settings
and select the network named Vacuum-5xx.6xxx.xxxxx
12
3
4
scan me
Please note that the
installation page might
open automatically.
If you do not have access to a
Wi-Fi compatible device, please
refer to our online help:
help.andrewalliance.com
!
!
xxxx.xxxxx is the Vacuum+ device serial number (you can nd it on top of the
Vacuum+ domino).
B. The LED indicator will stop blinking when it’s successfully connected.
Vacuum-5xx.6xxx.xxxxx
If the Vacuum+ bridge doesn’t automa-
tically enter installation mode, press the
power button 5 times.
!
http://192.168.2.1
Before
you begin
If you do not have a OneLab account, please create one by going to:
https://onelab.andrewalliance.com/signup
The device will automatically start up.
Only use the provided AC/DC
power supply unit and cords.

Feel free to contact
the Andrew Alliance support team
Call us
+41 22 518 0357
Send us an email to
Chat with our support team
directly in OneLab
Mon-Fri: 8:00 - 17:00 CETWe reply within 1 business day
Operations
Design your protocol
Execute experiment with
Vacuum+
Start the experiment and let OneLab
control your device
OneLab will automatically select your
Vacuum+ and allows you to use it with every
available experiment set-up, either manual,
semi-automated or fully automated operation.
Choose your desired experiment setup and
then prepare all the required materials.
Our drag-n-drop editor makes it easy to
design a precise and complete protocol
with all that you need to run your
experiment perfectly.
Create an Apply negative/posi-
tive pressure action by clicking
on this menu, which is located in
the left of the screen.
Actions
Follow the visual instructions based on the
protocol being used and you will be guided
through your experiment.
Each step of the experiment will be recorded
and available in OneLab.

Certications
Electrical safety
EMC
RADIO
FCC
RoHS
I. IEC 61010-1: 2010
II. IEC 61010-1/A1: 2016
III. UL 61010-1:2012
IV. CAN/CSA 22.2#61010-1-12
I. EN 61326-1: 2013
II. EN 301 489-1 V2.2.0
III. EN 301 489-17 V3.1.0
I. EN 300 328 Ver 2.1.1
II. EN 301 893 V2.1.1
I. FCC 47 CFR part 15 subpart B section 15.107
(b) and section 15.109 (b and g) Class A all over
other device tested per ANSI C63.4 (Ed. 2014)
procedures
II. This device complies with Part 15 of the FCC
Rules. Operation is subject to the following two
conditions: (1) this device may not cause harm-
ful interference, and (2) this device must accept
any interference received, including interfe-
rence that may cause undesired operation.
RoHS 3 (EU) 2015/863
Technical data
Control connec-
tivity
USB
Relative humidity 80% at 37°C
Maximum
operating altitude
2000 m
Environment
temperature
operating range
+4 to +37°C
User interface Through OneLab software
Ingress protection IP20*
Dimensions
(W x L x H)
120 x 120 x 35 mm
Weight 0.30 kg
External power
supply
Input 100-240 VAC, 1.4 A / out-
put 24 VDC, 5 A, 120 W
Power or
current rating
5 A
Overvoltage
category DC port
Cat I
Operating voltage 24 VDC
Network
connectivity
• Gigabit Ethernet
• Wi-Fi 2.4 GHz and 5 GHz
Pollution degree
of the intended
environment
Pollution degree 2
Cleaning Only with a wet tissue or
isopropanol
Warranty 1 year
Certication CE, FCC, RoHS, WEEE
Labware
compatible
Check the OneLab Domino
Catalog at andrewalliance.com/
domino-catalog
Vacuum+
manifold
Based on Waters Extraction
Plate Manifold for Oasis 96-Well
Plates (186001831)
Dimensions of
Vacuum+ domino
(W x L x H)
228.8 x 127 x 100 mm
Weight of
Vacuum+ domino
1.81 kg
Kit compatible Waters GlycoWorks Ra-
piFluor-MS N-Glycan Kit 96
(176003635)
Vacuum pump
requirements
Vacuum pump rated for at least
25 – 30 in.-Hg
*Avoid spilling liquid on the device.
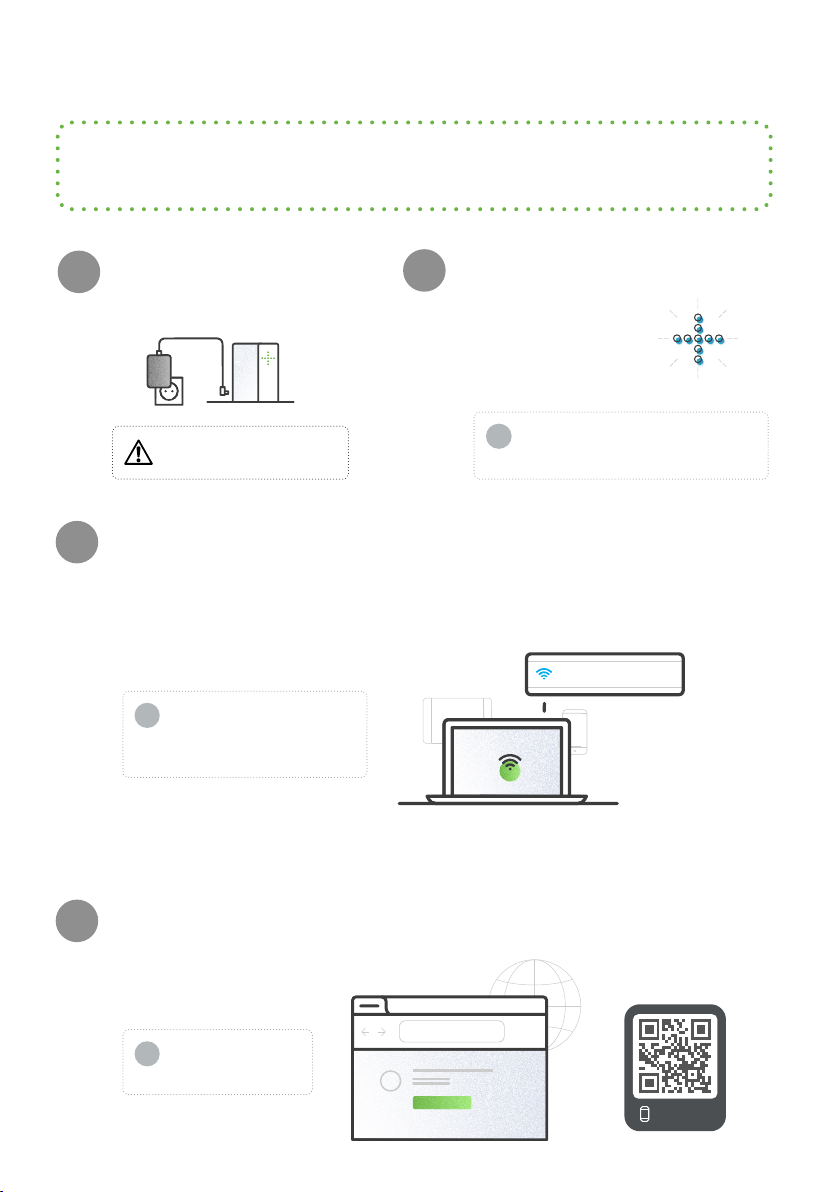
Vacuum+ domino
Vacuum+ bridge
Operating Vacuum+ bridge
Power on
When the device is in standby mode
(plugged to power source but turned
o), press the power button to turn
on the device.
Note: The device will automatically
start up when you plug it to a power
source.
Power o
When the device is in its idle state
(no experiment running), press the
power button for 5 seconds to turn
o the device.
5s

Andrew Alliance S.A.
Chemin Grenet 21
1214 Vernier (Geneve)
Switzerland
Phone: +41 22 518 0357
Unit end of life
When a unit reaches the end of its useful life, contact Andrew Alliance for
directions and information on the end-of-life policy.
This is in accordance with the European Union Directive 2002/96/EC on
Waste Electrical and Electronic Equipment (WEEE).
Table of contents
Other Andrew Alliance Laboratory Equipment manuals