Ansmann Racing xBase Deluxe User manual

xBase Deluxe
OPERATING INSTRUCTIONS DBEDIENUNGSANLEITUNG
FMANUEL D’UTILISATION
1_manual_xbase_07-01.indd 11_manual_xbase_07-01.indd 1 11.01.2007 16:43:36 Uhr11.01.2007 16:43:36 Uhr
Prozessfarbe SchwarzProzessfarbe Schwarz

2
OPERATING INSTRUCTIONS xBase Deluxe
FOREWORD
Dear Customer,
Thank you for deciding to buy the ANSMANN RACING xBase Deluxe charger. With your new xBase Deluxe you have now a charger that can
charge the classic NiCd, NiMH and Lead Acid batteries as well as the new Li-Ion and Li-Polymer batteries universal from a mains power supply system,
a car battery or another high current 11-15 V DC supply.
This charger gives a maximum flexibility to the user when exercising his hobby product indoors or outdoors.
These operating instructions will help you to use all substantial and challenging features of your xBase Deluxe charger in an optimum way. Please
read the operating instructions carefully before use.
We wish you a lot of fun with your new xBase Deluxe charger.
Your ANSMANN RACING Team
CONTENTS
Description Page
Foreword / Contents 2
Safety measures and precautions 3
Technical Data 3
Connections 4
Layout 4
Display 5
Product Description 6
Index 7
Operation 7
Menu Navigation 7
NiCd / NiMH 8
Li-Ion / Li-Po 9
Lead Acid 10-11
Error Message and Error correction 12
Contents Supplied 12
Disclaimer 12
1_manual_xbase_07-01.indd 21_manual_xbase_07-01.indd 2 11.01.2007 16:43:44 Uhr11.01.2007 16:43:44 Uhr
Prozessfarbe SchwarzProzessfarbe Schwarz

3
SAFETY MEASURES AND PRECAUTIONS
! Read the operating instructions carefully before use
! Charge only NiCd / NiMH / Lead Acid or Li-Po/Li-Ion batteries. NOT primary cells - Risk of Explosion and chemical danger
! Check the battery manufacturer’s instructions. Do not charge batteries with too high charge current. - Risk of Explosion and chemical danger
! Connect the charger to a suitable power supply only.
! Connect the batteries with right polarity to the charger.
! When not in use, disconnect the battery from the charger and the charger from the mains.
! Do not charge hot batteries. Batteries must be at ambient temperature before charging.
! Do not expose the battery charger to rain, damp or hot conditions.
! Do not charge the batteries twice. Charging is only allowed after a prior discharge.
! Do not leave the charger unattended during operation.
! Do not open equipment or carry out repairs. Authorized personnel may only carry out repairs.
! Do not cover equipment or obstruct ventilation, otherwise it may over-heat. Do not expose to direct sunlight.
! Do not charge more than one battery pack simultaneously.
! Charge only cells of the same type and capacity as a battery pack.
! Keep batteries, battery charger and cables away from combustible materials.
! Avoid sparking as there maybe gases present from the batteries.
! Never place the charger inside the engine compartment. Keep leads away from moving parts.
TECHNICAL DATA
xBase Deluxe Art. Nr. 151000010
Input voltage: 230 V/50 Hz 11-15 V DC
Battery Type's: 1-14 NiCd cells
1-14 NiMH cells
1-5 LiIon / LiPo cells
1-6 Lead Acid cells
Charge current: 0.1A – 5.0 A (max. 50 W)
Trickle charge (NiCd/NiMH): 100 mA
Weight: 590 gr
Dimensions L x W x H in mm: 119 x 102 x 85
1_manual_xbase_07-01.indd 31_manual_xbase_07-01.indd 3 11.01.2007 16:43:45 Uhr11.01.2007 16:43:45 Uhr
Prozessfarbe SchwarzProzessfarbe Schwarz

4
CONNECTIONS
1. Input clips (Crocodile clips)
red = plus, black = minus to connect to the 11 – 15 V DC power supply
2. Mains cable with Euro plug
to connect to a 230 V mains socket
3. Output sockets (Banana Sockets)
red = plus, black = minus to connect the batteries
LAYOUT
4. Button “BATT / TYPE“
To select the battery type; NiCd, NiMH, Li-Ion, Li-Po or Lead Acid
5. Button “DEC“ (DECREASE)
To decrease or change the charge current, voltage and number of cells
6. Button “INC“ (INCREASE)
To increase or change the charge current, voltage and number of cells
7. Button “ENTER / START / STOP“
To set the adjustments, to START / STOP the charge
456731
2
1_manual_xbase_07-01.indd 41_manual_xbase_07-01.indd 4 11.01.2007 16:43:45 Uhr11.01.2007 16:43:45 Uhr
Prozessfarbe SchwarzProzessfarbe Schwarz

5
DISPLAY
2 rows with 16 digits
1. Shows the different battery type and the function
NiCd = NiCd battery
NiMH = NiMH battery
LiIo = LiIon battery
LiPo = LiPo battery
PB = Lead Acid battery
CHG = Charge
2. Shows the battery type (Chemistry) during charge / Capacity / charge current
NC = NiCd battery
NH = NiMH battery
LI = LiIon battery
LP = LiPo battery
PB = Lead Acid battery
CAP = capacity (at NiCd or NiMH)
C = capacity (at LiIon, LiPo or Lead Acid)
C = charge current
3. Shows the adjusted charge current
+1.40 = charge current of 1.40 A
4. Shows the expired time of the adjusted charge mode, Format in MMM:SS (M= Minutes S= Seconds)
5. Shows the actual measured battery voltage in V
6. Shows the charged capacity in mAh
CHG 0:22 00005
NC+1.40A 9.524V
6
2
135
4
1_manual_xbase_07-01.indd 51_manual_xbase_07-01.indd 5 11.01.2007 16:43:49 Uhr11.01.2007 16:43:49 Uhr
Prozessfarbe SchwarzProzessfarbe Schwarz

6
PRODUCT DESCRIPTION
The xBase Deluxe charger is an automatic charger, developed to charge NiCd / NiMH batteries packs from 1 to 14 cells (1.2-16.8V DC), Li-
Ion / Li-Po batteries from 1 to 5 cells (3.6-18.5V DC) or Lead Acid batteries from 1 to 6 cells (2.0-12.0V DC). Due to its AC and DC input on
the primary side this charge can be used universal from a mains power supply system, a car battery or another 11-15V DC high current supply.
The Micro controller inside the xBase Deluxe charger will ensure that all set modes are controlled in a very precise way.
The charge cut off for NiCd / NiMH battery packs is made with the ”Minus Delta Peak” system. An additional safety timer where the time is
automatically calculated due to the set battery capacity adjusted by the user is running in the background. A defined pre-charge, 3 minutes with 1C,
will make sure that the battery pack is recognized and charged correctly. After the fast charge cut-off a trickle charge current will compensate for
the self discharge of the battery.
Li-Ion / Li-Po and Lead Acid batteries are charged with the CCCV charge characteristic (Constant Current / Constant Voltage). First the batteries will be
charged with a high constant current until the end charge voltage is reached. Afterwards the charge process changes to constant voltage. The charge
current is reducing during this mode. When the charge current is lower than a pre-defined charge current the charger will switch off. This prevents any
damage to the battery. A safety timer is working in the background.
The charge current has a continuous adjustment from 0.1 to 5.0 A. All procedures will be shown on a display with 2 lines and 16 digits. The input as
well as the output circuit have a protection against wrong polarity. The output circuit is also short circuit protected.
1_manual_xbase_07-01.indd 61_manual_xbase_07-01.indd 6 11.01.2007 16:43:50 Uhr11.01.2007 16:43:50 Uhr
Prozessfarbe SchwarzProzessfarbe Schwarz

7
INDEX
Function Parameter Action
AC Input 230 V 50 Hz Normal function
DC Input
11 - 15 V DC Normal function
under 11 V or over 15 V Display: INPUT VOLTAGE ERROR
Connected with wrong polarity no function
Charge sockets After pushing the Button “ENTER / START / STOP“: no battery connected Display: NO BATTERY
Charge sockets After pushing the Button “ENTER / START / STOP“: Battery connected
with wrong polarity Display: WRONG POLARITY
Charge current NiCd / NiMH / LiIon / LiPo / Lead Acid 0,1 - 5,0 A ± 10%
max. 50 Watt Display: Values will be displayed
Charge end voltage LiIon 4,1 V / cell ± 1% • LiPo 4,2 V / cell ± 1%
Lead Acid 2,45 V / cell ± 1% Charge finished
OPERATION
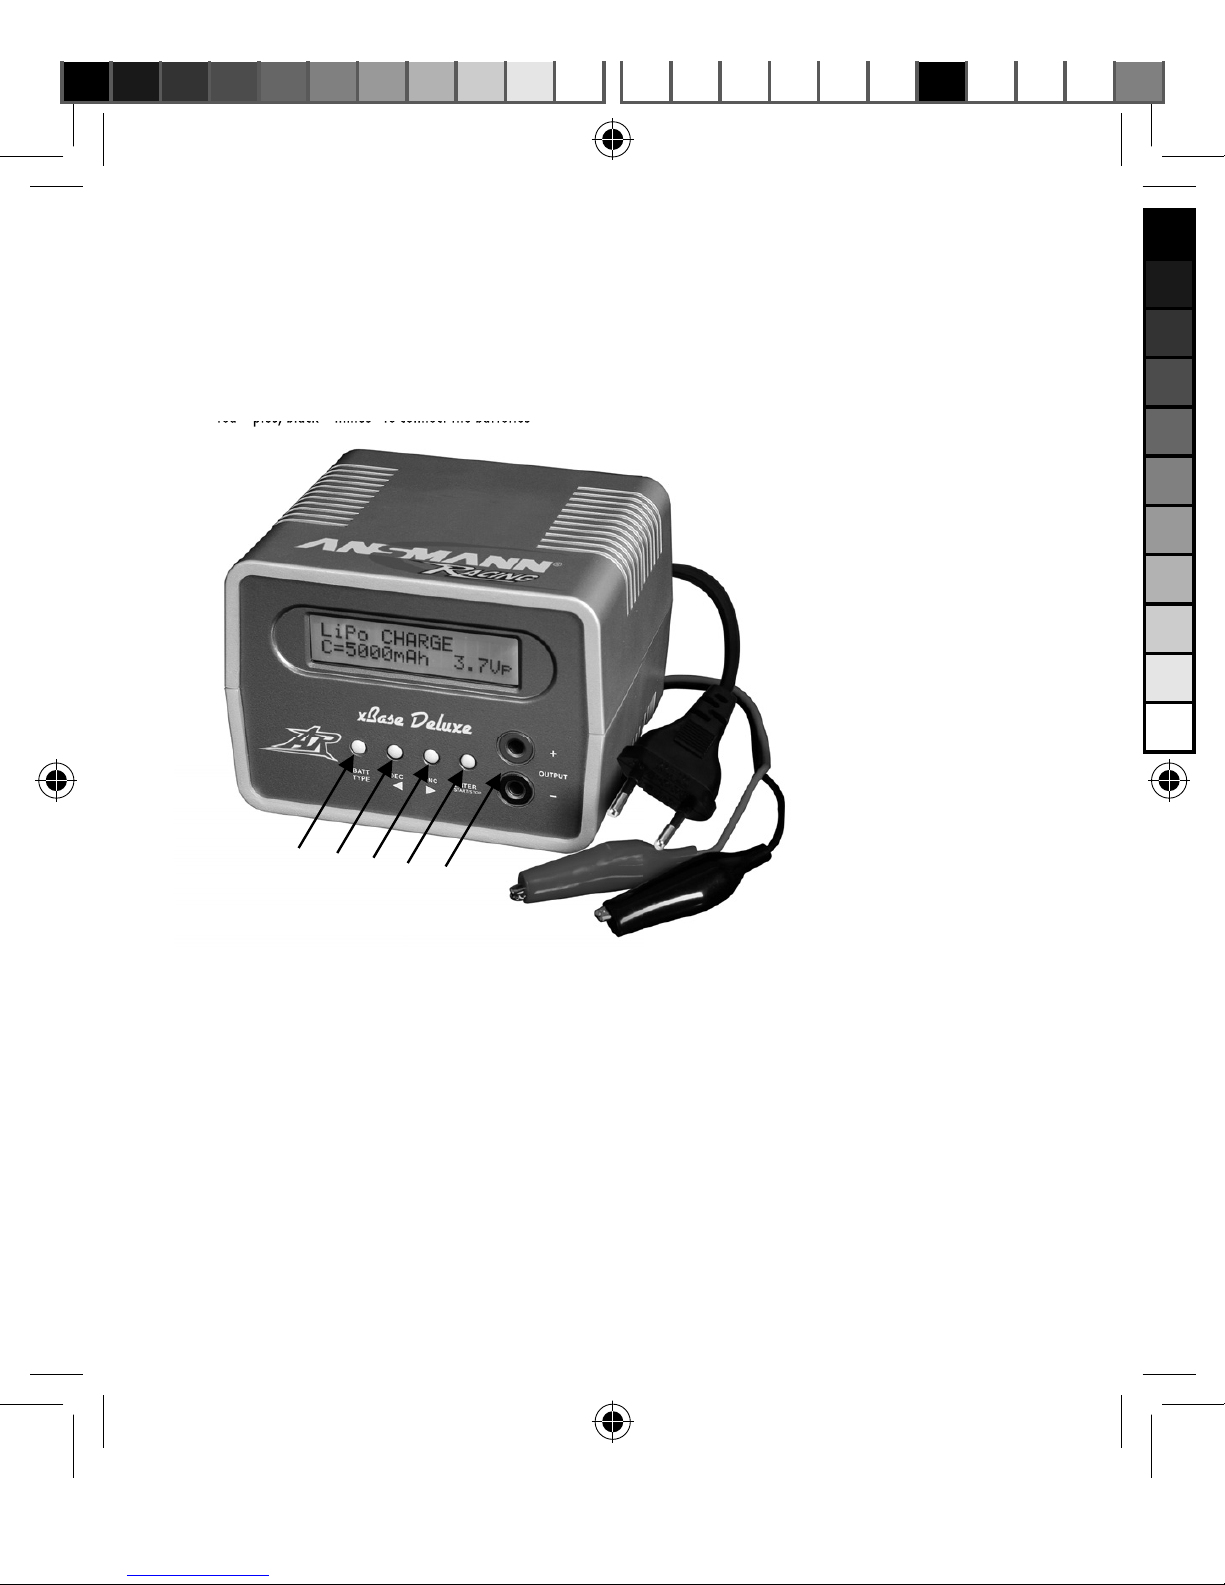
ConnectthexBase Deluxechargerwiththemainscabletoa230Vmainssupplyorwiththecrocodileclipstoa11-15VDCsupply.Pleasetakecaretouse
therightpolarity:red=+plus,black=-minus.Whenthechargerisconnectedintherightwayyouwillgetanaudiblesignalandthedisplayshowsthecharge
menu.Ifthedisplaydoesn’tshowanythingthepowersupplyisnotconnectedcorrectly.Iftheinputvoltageis<11Vor>15Vthedisplayshows”INPUTVOLTAGE”.
Now connect the battery pack with a suitable cable to the charger (Banana sockets). Please take care to use the right polarity: red = + plus, black
= - minus. If the polarity of the battery is wrong the display shows “WRONG POLARITY”. If there is no battery connected and the Button “START” is
pushed the display shows “NO BATTERY”. For further adjustments please follow the attached Menu Navigation.
MENU
After you have connected the xBase Deluxe charger the right way you have to chose right battery type by pushing the button “BATT TYPE”. By
pushing the button “BATT TYPE” once the displayed battery type will start flashing. By pushing “BATT TYPE” again the display changes between the
battery types (NI=NiCd; NH=NiMH; LI=Li-Ion; LP=Li-Po; PB=Lead Acid). Flashing of the battery type display will stop when pushing another button or
after a short time if no button is pushed.
The last used configuration will be saved.
1_manual_xbase_07-01.indd 71_manual_xbase_07-01.indd 7 11.01.2007 16:43:50 Uhr11.01.2007 16:43:50 Uhr
Prozessfarbe SchwarzProzessfarbe Schwarz

8
NiCd-BATTERIES
NiCd CHARGE
Push the button “BATT TYPE” until the display shows “NiCd”. Now use the “INC” or “DEC” button to get to “CHARGE” and then push “ENTER”
to confirm. After your confirmation the display will change to the capacity “CAP”. Now please set the capacity of your battery with the
buttons “INC” or “DEC” from 100 mAh to 5000 mAh and confirm with “ENTER”. The display changes to the charge current “C” which can be
set with the “INC” or “DEC” buttons from 0.1 A to 5.0 A. The parameters shown on the display are set and stop flashing if no push button is
pressed for 3 seconds. To start charging, now push the “ENTER / START / STOP” button for 2 seconds. The display shows “BATTERY CHECK
WAIT PLEASE“. After a short check of all parameters the display shows the battery type “NC”, the charge mode “CHG”, the charge current e.g.:
“+1.50A” and the actual measured battery voltage “V”. The clock starts running in seconds and the display shows also the charged capacity.
When the charging is finished you will get an audible signal. The display shows the trickle charge current and the capacity charged into the battery.
Adjustments and the associated display can be seen in the following chart:
NiMH-BATTERIES
The menu setup of NiMH is equivalent to NiCd.
#"555:1&
&/5&3
%&$ */$
&/5&3
45"35
%&$ */$
NiCd CHARGE
CAP=3000mAh
NiCd CHARGE
CAP=3000mAh
NiCd CHARGE
C=3.0A
Battery check
Wait please...
CHG 0:00 00000
NC + 3.00A 4.65V
1_manual_xbase_07-01.indd 81_manual_xbase_07-01.indd 8 11.01.2007 16:43:51 Uhr11.01.2007 16:43:51 Uhr
Prozessfarbe SchwarzProzessfarbe Schwarz

9
LiION-BATTERIES
LiIo CHARGE
Push the button “BATT TYPE” until the display shows “LiIo”. Now use the “INC” or “DEC” button to get to “CHARGE” and then push “ENTER”
to confirm. After your confirmation the display will change to the capacity “C”. Now please set the capacity of your battery with the buttons
“INC” or “DEC” from 100 mAh to 5000 mAh and confirm with “ENTER”. The charge current is automatically set to 1C. The display changes to
the no. of cells / cell voltage which can be set with the “INC” or “DEC” buttons from 1 cell = 3.6Vp; 2 cells = 7.2Vp; 3 cells = 10.8Vp; 4 cells =
14.4Vp to 5 cells = 18.0Vp. The parameters shown on the display are set and stop flashing if no push button is pressed for 3 seconds. To start
charging, now push the “ENTER / START / STOP” button for 2 seconds. The display shows “BATTERY CHECK WAIT PLEASE“. After a short check of
all parameters the display shows the battery type “LI”, the charge mode “CHG”, the charge current e.g.: “+3.00A” (if the battery capacity is set
to 3000mAh) and the actual measured battery voltage “V”. The clock starts running in seconds and the display shows also the charged capacity.
When the charging is finished you will get an audible signal. The display shows the capacity charged into the battery.
Adjustments and the associated display you can be seen in the following chart:
Liio CHARGE
C=3000mAh 10.8Vp
Liio CHARGE
C=3000mAh 10.8Vp
Liio CHARGE
C=3000mAh 10.8Vp
Battery check
Wait please...
CHG 0:00 00000
LI + 3.00A 10.75V
#"555:1&
&/5&3
%&$ */$
&/5&3
45"35
%&$ */$
1_manual_xbase_07-01.indd 91_manual_xbase_07-01.indd 9 11.01.2007 16:43:52 Uhr11.01.2007 16:43:52 Uhr
Prozessfarbe SchwarzProzessfarbe Schwarz

10
LiPO-BATTERIES
The menu setup of Li-Po is equivalent to Li-Ion. There is only a difference in the charge voltage per cell.
CELL VOLTAGE:
Li-Ion = 3.6 V/cell • Li-Po = 3.7 V/cell
Adjustments and the associated display you can be seen in the following chart:
Lipo CHARGE
C=3000mAh 11.1Vp
Lipo CHARGE
C=3000mAh 11.1Vp
Lipo CHARGE
C=3000mAh 11.1Vp
Battery check
Wait please...
CHG 0:00 00000
LP + 3.00A 11.05V
#"555:1&
&/5&3
%&$ */$
&/5&3
45"35
%&$ */$
1_manual_xbase_07-01.indd 101_manual_xbase_07-01.indd 10 11.01.2007 16:43:53 Uhr11.01.2007 16:43:53 Uhr
Prozessfarbe SchwarzProzessfarbe Schwarz

11
LEAD ACID BATTERIES
PB CHARGE
Push the button “BATT TYPE” until the display shows “PB”. Now use the “INC” or “DEC” button to get to “CHARGE” and then push “ENTER” to confirm.
After your confirmation the display will change to the charge current “C” which can be set with the “INC” or “DEC” buttons from 0.1 A to 5.0 A. After
pushing “ENTER” again the display changes to the no. of cells / cell voltage which can be set with the “INC” or “DEC” buttons from 1 cell = 2V pack; 2
cells = 4V pack; 3 cells = 6V pack; 4 cells = 8V pack, 5 cells = 10.0V pack to 6 cells = 12V pack. The parameters shown on the display are set and stop
flashing if no push button is pressed for 3 seconds. To start charging, now push the “ENTER / START / STOP” button for 2 seconds. The display shows
“BATTERY CHECK WAIT PLEASE“. After a short check of all parameters the display shows the battery type “PB”, the charge mode “CHG”, the charge
current e.g.: “+3.00A” andthe actualmeasuredbattery voltage “V”. The clock starts running in seconds and the display shows also thecharged capacity.
When the charging is finished you will get an audible signal. The display shows the capacity charged into the battery.
Adjustments and the associated display you can be seen in the following chart:
PB CHARGE
C=3.0A 12Vpack
PB CHARGE
C=3.0A 12Vpack
PB CHARGE
C=3.0A 12Vpack
Battery check
Wait please...
CHG 0:00 00000
PB + 3.00A 12.25V
#"555:1&
&/5&3
%&$ */$
&/5&3
45"35
%&$ */$
1_manual_xbase_07-01.indd 111_manual_xbase_07-01.indd 11 11.01.2007 16:43:54 Uhr11.01.2007 16:43:54 Uhr
Prozessfarbe SchwarzProzessfarbe Schwarz

12
ERROR MESSAGE AND ERROR CORRECTION
Error message Possible reason Possible Solution
INPUT BATTERY
VOLTAGE ERROR
Input voltage
under 11,0 V or over 15,0 V
Check input power supply
adjust or change
NO BATTERY No battery or broken battery connected when
pushing the start button Check battery or battery connection
OUTPUT BATTERY
REVERSE POLARITY Polarity of battery wrong Check battery connection
red = + plus black = - minus
OUTPUT CIRCUIT
PROBLEM Charger overloaded Check battery connection, start again
CHECK THE BATT.
OPEN CIRCUIT Battery connection opened during charging Check battery connections
CHECK THE BATT.
OVER VOLTAGE Battery voltage set to high Check voltage/ cell setup
CHECK THE BATT.
LOW VOLTAGE
Battery voltage set to low,
battery broken
Check voltage/ cell setup
Check battery pack
CONTENTS SUPPLIED
1 x Charger xBase Deluxe
1x Operating Instructions
DISCLAIMER
Information in these operating instructions can be changed without prior notice. ANSMANN ENERGY cannot accept liability for direct, indirect,
accidental or other claims or consequential damages originated by using this charger and information given in these operating instructions.
ANSMANN ENERGY GMBH
Industriestrasse 10
D-97959 Assamstadt / Germany
e-Mail: hotline@ansmann-energy.com • www.ansmann-energy.com
Technical details subject to change without prior notice. No liability accepted for typographical errors or omissions. 01/2007
1_manual_xbase_07-01.indd 121_manual_xbase_07-01.indd 12 11.01.2007 16:43:55 Uhr11.01.2007 16:43:55 Uhr
Prozessfarbe SchwarzProzessfarbe Schwarz

13
DBEDIENUNGSANLEITUNG xBase Deluxe
VORWORT
Sehr geehrte Kundin, sehr geehrter Kunde,
herzlichen Dank, dass Sie sich für das Ladegerät xBase Deluxe von ANSMANN RACING entschieden haben. Mit Ihrem neuen xBase Deluxe steht Ihnen
nun ein Ladegerät zur Verfügung mit welchem Sie sowohl die klassischen NiCd-, NiMH- und PB Akkus wie auch die neuen LiIon- und LiPo Akkus,
universell aus dem Stromfestnetz wie auch aus einer Autobatterie oder einer anderen 11-15 V DC Spannungsversorgung aufladen sowie regenerieren
können. Es bietet somit dem modellsportbegeisterten Anwender ein höchstes Maß an Flexibilität bei der Ausübung seines Hobbys sowohl im Indoor
wie auch im Outdoor Bereich.
Die vorliegende Bedienungsanleitung wird Ihnen helfen, die umfangreichen und faszinierenden Funktionen Ihres xBase Deluxe optimal zu nutzen.
Bitte lesen Sie diese Bedienungsanleitung bevor Sie das Ladegerät in Betrieb nehmen.
Wir wünschen Ihnen viel Freude mit Ihrem neuen xBase Deluxe Ladegerät.
Ihr ANSMANN RACING Team
INHALTSVERZEICHNIS
Beschreibung Seite
Vorwort / Inhaltsverzeichnis 13
Sicherheits- Vorsichtsmassnahmen 14
Technische Daten 14
Anschlüsse 15
Bedienelemente 15
Display 16
Produktbeschreibung 17
Index 17
Inbetriebnahme 18
Menüführung 18
NiCd / NiMH 19
LiIon / LiPo 20-21
PB 22
Fehlermeldungen und Fehlerbehebung 23
Lieferumfang 23
Haftungsausschluss 23
Garantie uns Service 23
1_manual_xbase_07-01.indd 131_manual_xbase_07-01.indd 13 11.01.2007 16:43:55 Uhr11.01.2007 16:43:55 Uhr
Prozessfarbe SchwarzProzessfarbe Schwarz

14
SICHERHEITS- UND VORSICHTSMASSNAHMEN
! Vor Inbetriebnahme Bedienungsanleitung lesen
! Nur NiCd-/NiMH-/LiPo-/LiIon- oder PB Akkus laden, keine Primärzellen
! Unbedingt Herstellerangaben der Akkuhersteller Beachten. Akkus nicht mit zu hohem Ladestrom aufladen. Explosions- und Ätzgefahr!
! Ladegerät nur an dafür geeignete Spannungsquellen anschließen
! Zu ladende Akkus polrichtig am Ladegerät anschließen
! Bei längerem Nichtgebrauch Spannungsversorgung des Gerätes trennen und angeschlossene Akkus abklemmen
! Keinen überhitzten Akkupack laden – der Akkupack muss zuvor auf Umgebungstemperatur abgekühlt sein
! Das Ladegerät darf keinesfalls Regen, Feuchtigkeit oder großer Hitze ausgesetzt werden
! Wiederholen Sie nicht mehrere Ladevorgänge ohne vorherige Entladung
! Ladegerät während des Betriebes nicht unbeaufsichtigt lassen
! Gerät nicht öffnen oder Änderungen vornehmen. Reparaturen dürfen nur von autorisiertem Fachpersonal durchgeführt werden.
! Gerät nicht abdecken. Für ausreichende Kühlung sorgen. Nicht direkter Sonneneinstrahlung aussetzen.
! Nicht mehrere Akkupacks gleichzeitig laden.
! Nur Zellen gleichen Typs und Kapazität als Akkupack aufladen.
! Akku, Ladegerät und Leitungen von brennbaren Gegenständen fernhalten.
TECHNISCHE DATEN
xBase Deluxe Art. Nr. 151000010
Betriebsspannung: 230 V 50 Hz 11-15 V DC
Akku Typen: 1-14 NiCd Zellen
1-14 NiMH Zellen
1-5 LiIon / LiPo Zellen
1-6 PB Zellen
Ladestrom: 0.1A – 5.0A(max. 50 W)
Erhalteladung (NiCd/NiMH): 100 mA
Gewicht: 590 gr
Abmessungen L x B x H in mm: 119 x 102 x 85
1_manual_xbase_07-01.indd 141_manual_xbase_07-01.indd 14 11.01.2007 16:43:56 Uhr11.01.2007 16:43:56 Uhr
Prozessfarbe SchwarzProzessfarbe Schwarz

15
ANSCHLÜSSE
1. Eingangsklemmen (Krokodilklemmen)
rot = plus, schwarz = minus zum Anschluss an der 11 – 15 V DC Spannungsversorgung
2. Netzanschlusskabel mit Euro Stecker
zum Anschluss an eine 230 V Steckdose
3. Ausgangsbuchsen (Bananenbuchsen)
rot = plus, schwarz = minus zum Anschluss des Akkus
BEDIENELEMENTE
4. Taste “BATT / TYPE“
zur Auswahl des zu ladenden Akkutyps; NiCd, NiMH, LiIon, LiPo oder PB
5. Taste “DEC“ (DECREASE)
zur Verringerung/Änderung des Ladestroms; Spannung; Zellenzahl;
6. Taste “INC“ (INCREASE)
zur Erhöhung/Änderung des Ladestroms; Spannung; Zellenzahl;
7. Taste “ENTER / START / STOP“
zur Bestätigung der Einstellungen sowie STARTen / STOPpen des Ladevorganges
456731
2
1_manual_xbase_07-01.indd 151_manual_xbase_07-01.indd 15 11.01.2007 16:43:56 Uhr11.01.2007 16:43:56 Uhr
Prozessfarbe SchwarzProzessfarbe Schwarz

16
DISPLAY
2 Zeilen mit je 16 Zeichen
1. Zeigt die verschiedenen Akku Typen und den Betriebsmodus
NiCd = NiCd Akkus
NiMH = NiMH Akkus
LiIo = LiIon Akkus
LiPo = LiPo Akkus
PB = Blei Akkus
CHG = Charge / Laden
2. Zeigt den gewählten Akku Typ (Chemie) während dem Ladevorgang / Ladestrom / Kapazität
NC = NiCd Akkus
NH = NiMH Akkus
LI = LiIon Akkus
LP = LiPo Akkus
PB = Blei Akkus
CAP = Kapazität (bei NiCd oder NiMH)
C = Kapazität (bei LiIon, LiPo oder PB)
C = Ladestrom
3. Zeigt den eingestellten Lade- bzw. Entladestrom
+1.40 = Ladestrom mit 1.40 A
4. Zeigt die abgelaufene Zeit des eingestellten Lademodus, Format in MMM:SS (M= Minuten S= Sekunden)
5. Zeigt die aktuell gemessene Akkuspannung in V
6. Zeigt die geladene bzw. entladene Kapazität in mAh
CHG 0:22 00005
NC+1.40A 9.524V
6
2
135
4
1_manual_xbase_07-01.indd 161_manual_xbase_07-01.indd 16 11.01.2007 16:43:59 Uhr11.01.2007 16:43:59 Uhr
Prozessfarbe SchwarzProzessfarbe Schwarz

17
PRODUKTBESCHREIBUNG
Das xBase Deluxe Ladegerät ist zum automatischen Laden von NiCd-/NiMH Akkupacks mit 1 bis 14 Zellen (1,2-16,8V DC), LiIon-/LiPo Akkupacks mit
1 bis 5 Zellen (3,6-18,5V DC) oder PB Akkus mit 1 bis 6 Zellen (2,0-12 V DC) konzipiert. Durch seinen primärseitigen AC und DC Anschluss kann dieses
Ladegerät universell aus dem Stromfestnetz wie auch aus einer Autobatterie oder einer anderen 11-15 V DC Spannungsversorgung betrieben werden.
Der beim xBase Deluxe Ladegerät eingesetzte Microcontroller stellt sicher, dass die vom Anwender eingestellten Betriebsmodi mit höchster Präzision
gesteuert werden.
Die Abschaltung des Ladevorganges erfolgt bei NiCd-/NiMH Akkupacks nach dem „Minus Delta Peak“ Verfahren. Eine zusätzliche Absicherung erfolgt
über einen Sicherheitstimer dessen Laufzeit sich automatisch aus der vom Anwender eingestellten Akkukapazität errechnet. Die definierte Vorladung
über 3 Minuten mit einem Ladestrom von 1C stellt sicher, dass der angeschlossene NiCd-/NiMH Akkupack richtig erkannt wird. Nach erfolgter
Abschaltung wirkt ein Erhalteladestrom der Selbstentladung entgegen.
LiIon-/LiPo-/PB Akkus werden nach dem CCCV-Ladeverfahren (Constant Current / Constant Voltage) geladen. Hier wird der Akku zuerst mit einem
hohen Konstantstrom bis zum Erreichen einer eingestellten Ladeschlussspannung geladen. Anschließend wird der Akku mit einer Konstantspannung
weitergeladen. Hierbei reduziert sich der Ladestrom. Nach unterschreiten eines voreingestellten Ladeendstromes wird die Ladung komplett
abgeschaltet und somit schädliche Dauerladung verhindert. Auch bei LiIon-/ LiPo Akkupacks läuft im Hintergrund ein Sicherheitstimer.
Der Ladestrom ist stufenlos von 0,1 bis 5,0 A einstellbar. Alle Vorgänge werden über ein Display mit 2 Zeilen und jeweils 16 Zeichen angezeigt. Sowohl
der DC Eingangs- wie auch der Ausgangskreis verfügen über einen Verpolschutz. Zusätzlich ist der Ausgang gegen Kurzschluss geschützt.
INDEX
Funktion Parameter Aktion
AC Spannungseingang 230 V 50 Hz Normale Funktion
DC Spannungseingang
11 - 15 V DC Normale Funktion
unter 11 V oder über 15 V Display: INPUT VOLTAGE ERROR
Falsch gepolt Keine Funktion
Ladeausgang Nach drücken der START Taste: Kein Akku angeschlossen Display: NO BATTERY
Ladeausgang Nach drücken der START Taste: Falsch gepolt Display: WRONG POLARITY
Ladestrom NiCd / NiMH / LiIon / LiPo / PB 0,1 - 5,0 A ± 10%
max. 50 Watt Display: Werte werden angezeigt
Ladeschlussspannung LiIon 4,1 V / cell ± 1% • LiPo 4,2 V / cell ± 1%
PB 2,45 V / cell ± 1% Ladung abgeschlossen
1_manual_xbase_07-01.indd 171_manual_xbase_07-01.indd 17 11.01.2007 16:44:00 Uhr11.01.2007 16:44:00 Uhr
Prozessfarbe SchwarzProzessfarbe Schwarz

18
INBETRIEBNAHME
Schließen Sie das xBase Deluxe Ladegerät über den Netzstecker an eine 230 Volt Steckdose oder die Krokodilklemmen an eine
geeignete 11-15 V DC Spannungsversorgung an. Beim Anschluss an eine DC Spannungsversorgung achten Sie bitte auf die
richtige Polarität : rot=+ plus, schwarz= - minus. Bei richtigem Anschluss ertönt ein akustisches Signal und das Display zeigt das
Lademenü an. Erscheint keine Anzeige im Display ist die Spannungsversorgung falsch gepolt oder nicht richtig kontaktiert. Ist
die angeschlossene Versorgungsspannung unter 11 bzw. über 15 V DC wird im Display die Meldung “INPUT VOLTAGE“ gezeigt.
Schließen Sie nun den Akkupack über geeignete Kabel an die Bananenbuchsen an. Auch hier achten Sie bitte auf die richtige Polarität. Ein falsch
gepolter Akku wird im Display mit „WRONG POLARITY“ angezeigt. Wird versucht den Ladevorgang zu starten bevor ein Akku angeschlossen ist wird
dies im Display mit „NO BATTERY“ angezeigt.
Zur weiteren Einstellung folgen Sie bitte der Nachstehenden Menüführung.
MENÜFÜHRUNG
Nachdem der xBase Deluxe richtig angeschlossen ist müssen Sie als Anwender nun zuerst über die Taste “BATT TYPE“ den zu behandelnden Akkutyp
eingeben. Durch kurzes drücken der Taste “BATT TYPE“ blinkt die gegenwärtige Anzeige und es kann durch weiteres drücken der Taste “BATT TYPE“
zwischen den Akkutypen (NI=NiCd; NH=NiMH; LI=LiIon; LP=LiPo; PB=Blei) gewechselt werden. Das Blinken der Batterietypanzeige hört auf wenn
nichts oder eine andere Taste gedrückt wird.
Bei jeder weiteren Verwendung werden die zuletzt eingestellten Werte übernommen.
1_manual_xbase_07-01.indd 181_manual_xbase_07-01.indd 18 11.01.2007 16:44:01 Uhr11.01.2007 16:44:01 Uhr
Prozessfarbe SchwarzProzessfarbe Schwarz

19
NiCd-AKKUS
NiCd CHARGE
Zuerst drücken Sie die Taste “BATT TYPE“ bis im Display “NiCd“ erscheint. Jetzt drücken Sie die Taste “INC“ oder “DEC“ bis “CHARGE“ angezeigt
wird. Drücken der Taste “ENTER“ bestätigt die Einstellung “CHARGE“ und wechselt zur Kapazitätsanzeige “CAP“. Die Akkukapazität kann hier über
die Tasten “INC“ und “DEC“ von 100 mAh bis 5.000 mAh gewählt werden. Nach erneuter Betätigung der Taste “ENTER“ kann der Ladestrom “C“
ebenfalls über die Tasten “INC“ und “DEC“ von 0,1 A bis 5.0 A eingestellt werden. Die Anzeige des Parameters hört auf zu blinken wenn 3 Sekunden
lang keine weitere Eingabe erfolgt.
Durch Drücken der Taste “ENTER / START / STOP“, min. 2 Sekunden, wird der Ladevorgang gestartet und im Display erscheint “BATTERY CHECK WAIT
PLEASE“. Nach kurzer Überprüfung aller Parameter werden im Display der Batterietyp “NC“, der Lademodus “CHG“, der Ladestrom z.B.: “+1.50A“
sowie die aktuelle Akkuspannung “V“ angezeigt. Die vorhandene Uhr läuft im Sekundentakt und die Kapazitätsanzeige beginnt den eingeladenen
Wert anzuzeigen.
Ist der Ladevorgang beendet ertönt ein akustisches Signal und das Display zeigt den Erhalteladestrom und die eingeladene Kapazität an. Es startet
nun automatisch die Erhaltungsladung, welche sicher stellt dass der Akku immer voll geladen bleibt.
Einstellungen und die zugehörige Anzeige im Display sehen Sie in der nachfolgenden Grafik:
NiMH-AKKUS
Die Menüführung bei NiMH entspricht der Vorgehensweise bei NiCd.
#"555:1&
&/5&3
%&$ */$
&/5&3
45"35
%&$ */$
NiCd CHARGE
CAP=3000mAh
NiCd CHARGE
CAP=3000mAh
NiCd CHARGE
C=3.0A
Battery check
Wait please...
CHG 0:00 00000
NC + 3.00A 4.65V
1_manual_xbase_07-01.indd 191_manual_xbase_07-01.indd 19 11.01.2007 16:44:01 Uhr11.01.2007 16:44:01 Uhr
Prozessfarbe SchwarzProzessfarbe Schwarz

20
LiION-AKKUS
LiIo CHARGE
Zuerst drücken Sie die Taste “BATT TYPE“ bis im Display “LiIo“ erscheint. Jetzt drücken Sie die Taste “INC“ oder “DEC“ bis “CHARGE“ angezeigt wird.
Drücken der Taste “ENTER“ bestätigt die Einstellung “CHARGE“ und wechselt zur Akkukapazität “C“ Diese kann über die Tasten “INC“ und “DEC“
von 100mAh bis 5000mAh eingestellt werden. Der Ladestrom ist automatisch auf 1C eingestellt. Nach erneuter Bestätigung mit der Taste “ENTER“
erscheint die Angabe der Zellenzahl bzw. Zellenspannung. Die Zellenzahl bzw. Zellenspannung wird über die Tasten “INC“ und “DEC“ von 1 Zelle =
3.6Vp; 2 Zellen = 7.2Vp; 3 Zellen = 10.8Vp; 4 Zellen = 14.4Vp bis 5 Zellen = 18.0Vp gewählt. Die Anzeige des Parameters hört auf zu blinken wenn 3
Sekunden lang keine weitere Eingabe erfolgt.
Durch Drücken der Taste “ENTER / START / STOP“, min. 2 Sekunden, wird der Ladevorgang gestartet und im Display erscheint “BATTERY CHECK WAIT
PLEASE“. Nach kurzer Überprüfung aller Parameter werden im Display der Batterietyp “LI“, der Lademodus “CHG“, der Ladestrom z.B.: “+3.00A“
sowie die aktuelle Akkuspannung “V“ angezeigt. Die vorhandene Uhr läuft im Sekundentakt und die Kapazitätsanzeige beginnt den eingeladenen
Wert anzuzeigen.
Ist der Ladevorgang beendet ertönt ein akustisches Signal und das Display zeigt die eingeladene Kapazität an.
Einstellungen und die zugehörige Anzeige im Display sehen Sie in der nachfolgenden Grafik:
Liio CHARGE
C=3000mAh 10.8Vp
Liio CHARGE
C=3000mAh 10.8Vp
Liio CHARGE
C=3000mAh 10.8Vp
Battery check
Wait please...
CHG 0:00 00000
LI + 3.00A 10.75V
#"555:1&
&/5&3
%&$ */$
&/5&3
45"35
%&$ */$
1_manual_xbase_07-01.indd 201_manual_xbase_07-01.indd 20 11.01.2007 16:44:02 Uhr11.01.2007 16:44:02 Uhr
Prozessfarbe SchwarzProzessfarbe Schwarz
This manual suits for next models
1
Table of contents
Languages:
Popular Automobile Batteries Charger manuals by other brands

ROLEC
ROLEC QUANTUM ROLEC0411B Installation & operation manual

TecMate
TecMate Optimate 3 TM431 Instructions for use

Taramps Electronics
Taramps Electronics PRO CHARGER 30A instruction manual

Project EV
Project EV NOVO EVA-11S-SE user guide

LEGRAND
LEGRAND ecotap DC30 manual

alfen
alfen Twin 5 Installation and user manual

FRONIUS
FRONIUS Wattpilot Go 11 J quick start guide

Ocular
Ocular LTE Plus user manual

ULTIMATE SPEED
ULTIMATE SPEED ULGD 3.8 A1 Operation manual

Fujikura
Fujikura Quick Charger Connector Maintenance manual

Black & Decker
Black & Decker BDV012I user guide

Free2Move eSolutions
Free2Move eSolutions Annex installation manual