Aolait LED Fresnel Spotlight User manual

LED Fresnel Spotlight
User Manual
Professional lighting equipment
Caution: please read this user manual carefully before you initially start-up

1
Catalogue
1、Overview....................................................................................................3
2、Packing list .................................................................................................4
3、Product data...............................................................................................4
Product name.............................................................................................4
Product features.........................................................................................4
Scope of application ...................................................................................5
Product description ....................................................................................5
4、Technical parameters ..................................................................................6
Technical parameters........................................................................................6
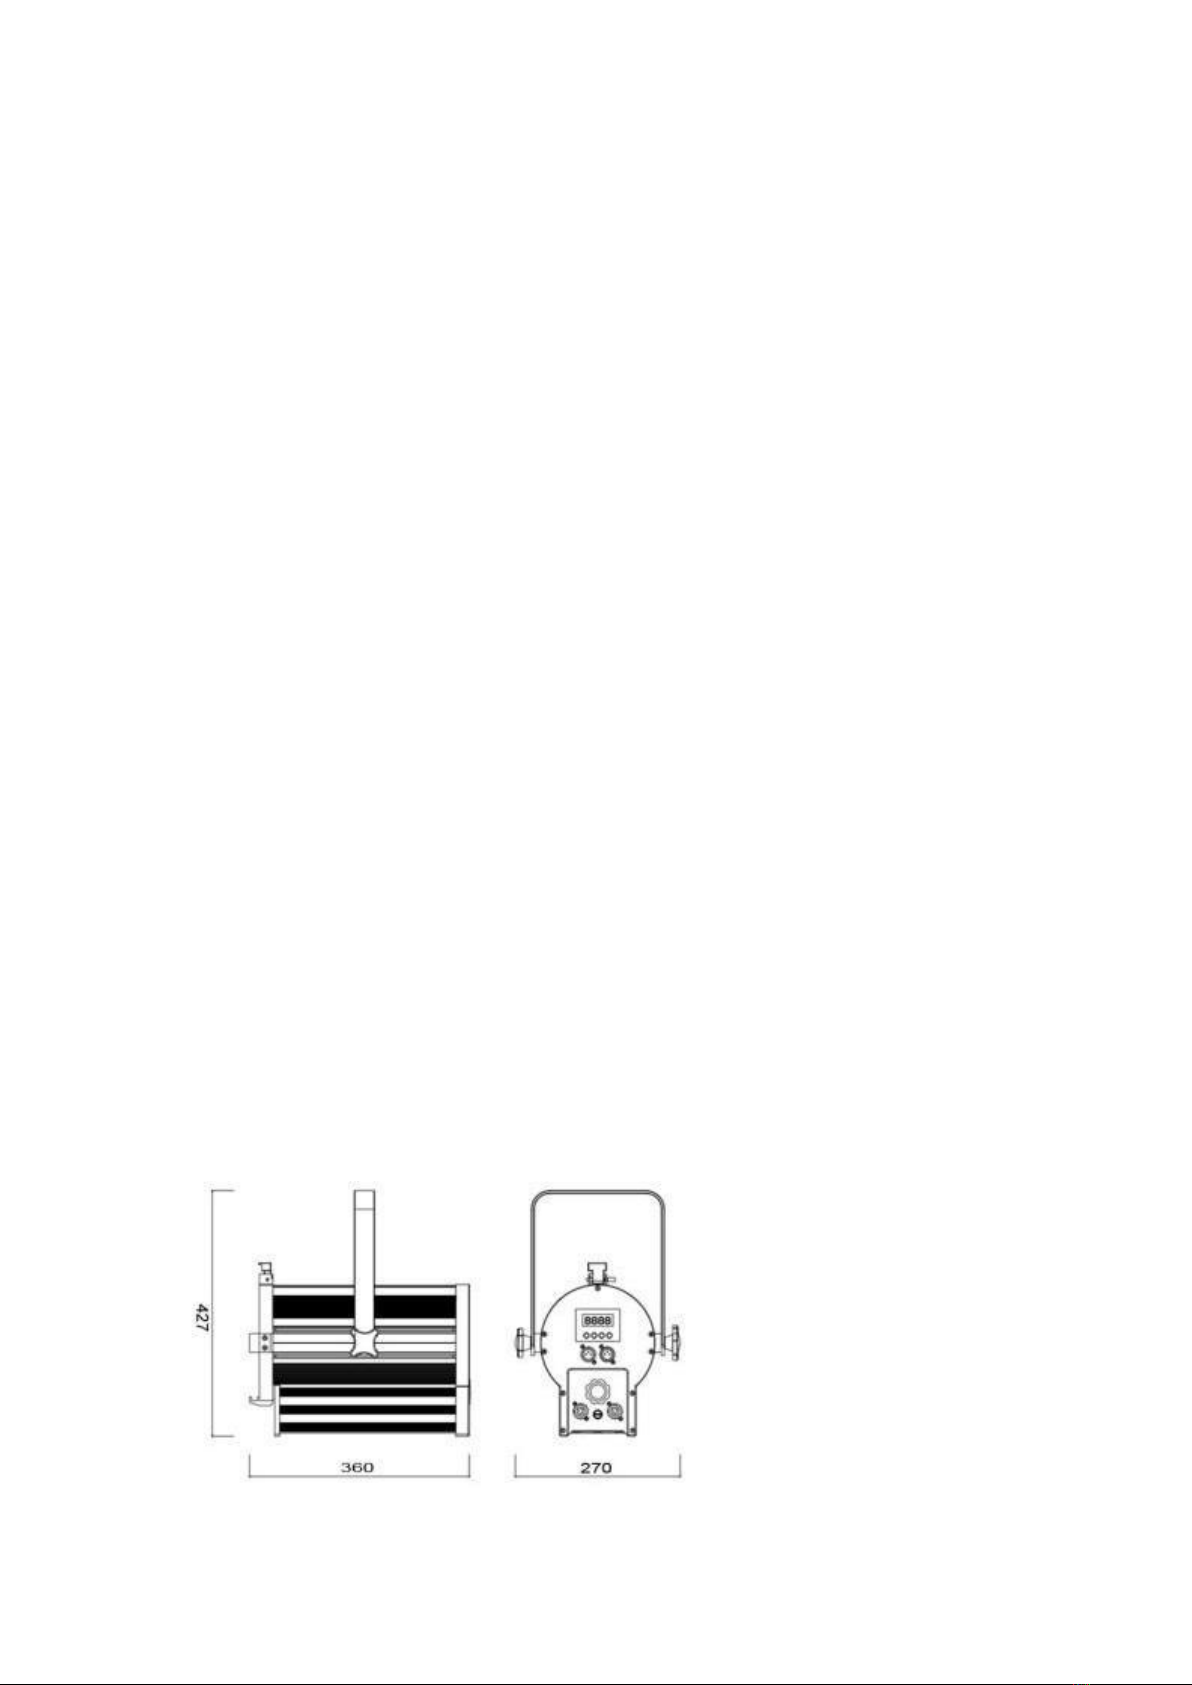
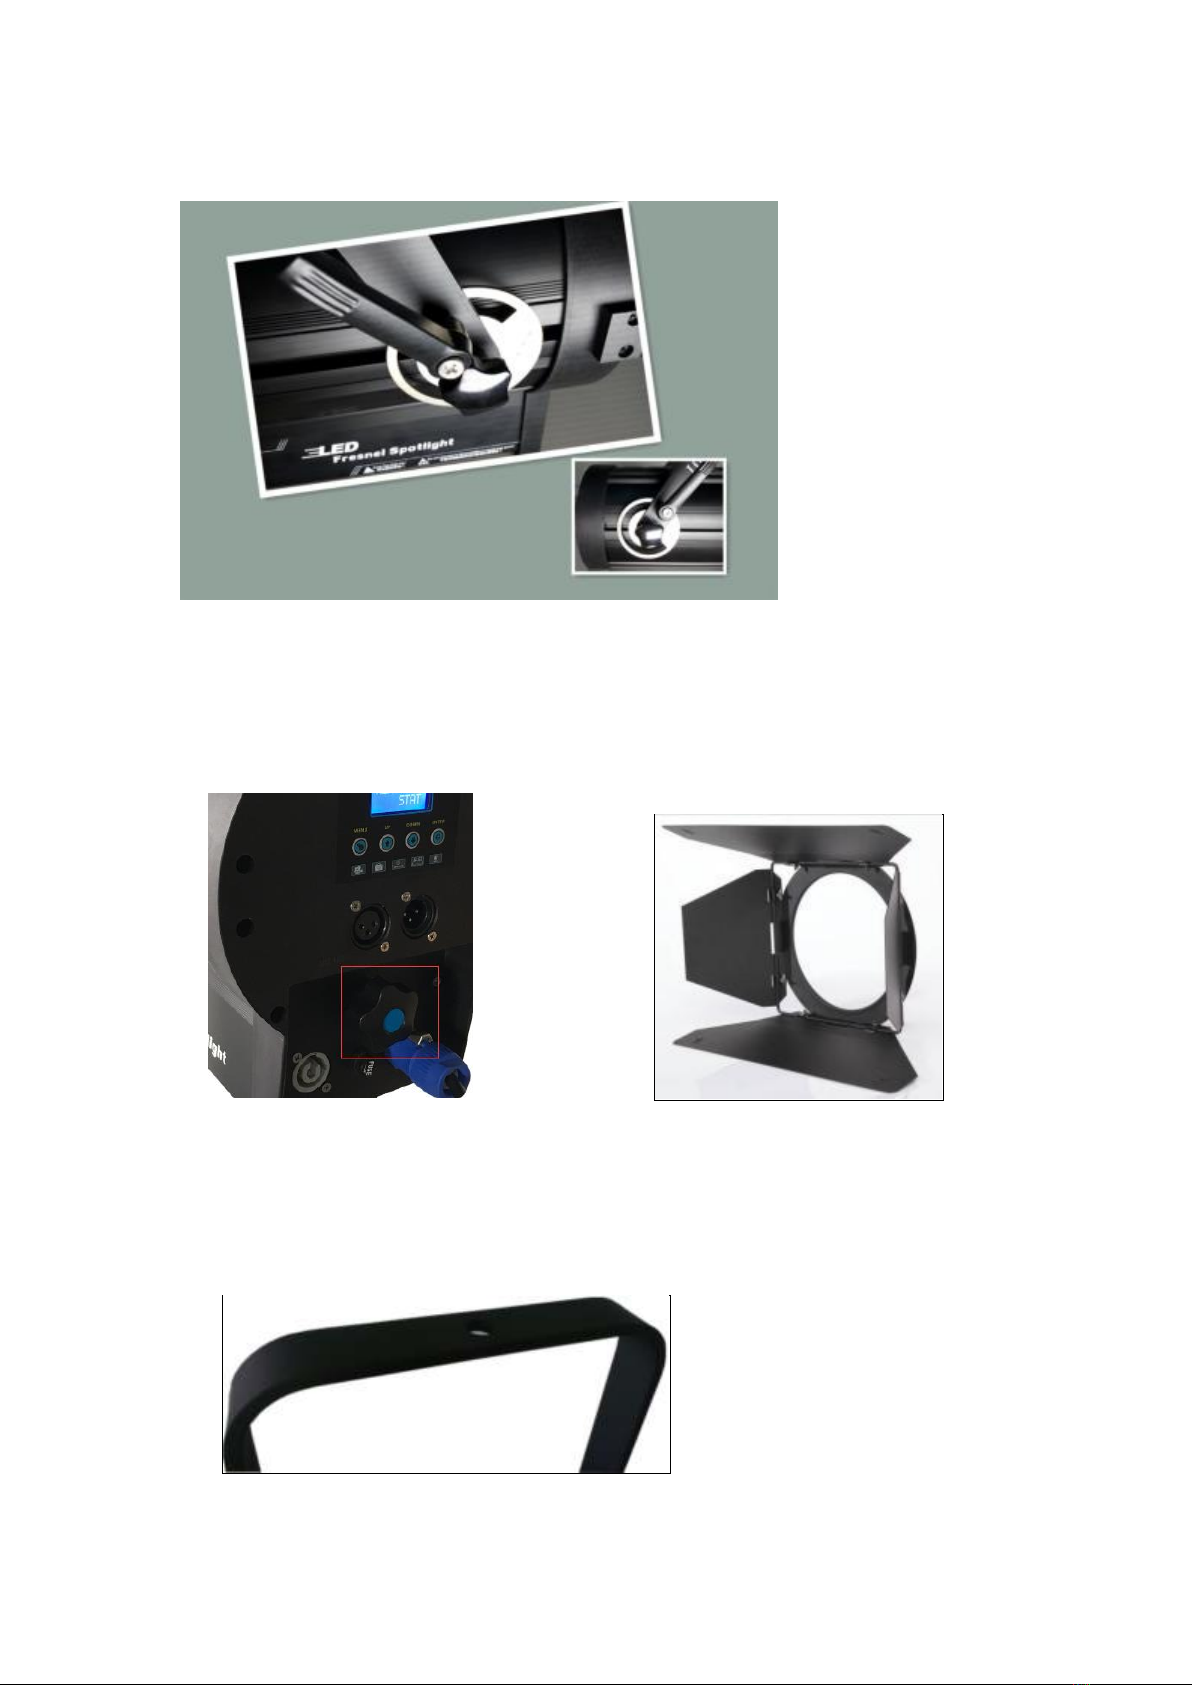
5、Dimension、Mappings & Pictures of fittings...............................................7
Dimension .................................................................................................. 7
Fittings ....................................................................................................8-9
6、Control system description ....................................................................... 10
1)Connection and control of the lamp power source .............................. 10
2)Connection of the lamp signal cable.................................................... 10
7、Operating instructions ......................................................................... 11-14
Menu instruction...................................................................................... 11
The characteristic of control system: ......................................................... 13
Function instruction ................................................................................. 14
8、Safety instructions ............................................................................... 14-15
1)Maintenance:................................................................................... 14
2)Warning:.......................................................................................... 15
9、Notes for installation and operation.......................................................... 16
10、Comparison of common faults................................................................ 17

2
Guarantee card
All products sold by us are covered by 12 months warranty from the
date of purchase. During this period, we will guarantee to keep the
goods in repair if a failure occurs under normal operation.
We assumes no responsibility for the following circumstance
1. Those products that have refitted by the customers;
2. The troubles resulting from customer's careless or abnormal use;
3. The improper installation and the incorrect voltage supply;
4. The damage or faulty performance caused by misuse, improper
installation, careless handling or where repairs have been
attempted by others.
5. The breakdown and the damage caused by the Force majeure.
6. Without guarantee card;
We provide paid service for the products which beyond the guarantee
conditions.
Customer name:
Contact phone No.:
Date of purchase:
Product model No.:
Dealer:

3
Operation, Programming and Safety Manual
1、Overview
Thank you for purchasing our product. Before carrying out any
operations with the product,carefully read this instruction manual and
keep it with cure for future reference. It contains important information
about the installation, usage and maintenance of the unit. Please strictly
follow it.
The product conforms to the international standard DMX512
agreement. The products can be controlled in signal use and also can be
controlled in many units. Sleek and stylish, precise and accurate optical
system design, bring and clear light effects. All above makes our products
applicable to be used within the scope of film and television, theater, live
events, trade show exhibits, educational facilities, retail environments,
and corporate shows, etc.
* The product is compliance with the CE Standard & ROHS Standard.
* The product belongs to our company. The intellectual property is
exclusively reserved. We will file a lawsuit on condition that it is illegally
copied and imitated.

4
2、Packing list
This series of products supply standard carton packaging, flight case
can be supply for your requirement.
Do not extrude the plastic parts for avoiding any breaking or
deformation.
When receiving the product, please carefully check whether there is
any damage caused by the transportation. Check whether the following
fittings are attached:
Manual/Certificate
If you need other fittings, please list them in your order.
3、Product data
Product name: 200W LED Fresnel Spotlight
Product features
1) Made by fire-resistant Nylon material and aluminum profile
which makes the lamp more lighter
2) More smooth light
3) Good performance of cooling system with the Ultra-quiet fan
ensure the usage in the strict noise-control environment
4) Convenient design for in and out ensure the convenient linking

5
and installation
5) Much smoother dimming curve than the competitors
6) Efficient cooperation between the control system and the
power-supply system ensure to avoid the current noise.
Scope of application
The surface light of stage and television, video conference system,
film,etc.
Product description
The sleek and stylish shell of the lamp is made by the aluminum
sections. The LED light source is imported from the United States. The
advanced heat-pipe conduction technology and the active cooling mode
effectively protect the service life and the safety of LED.
The function and performance of it is close to the traditional
competitors. It can directly replace existing Fresnel lens lamp. This LED
lamp has truly realized the performance of Fresnel lens lamp for it can
continuous focusing, and the light is smooth no matter the beam angle is
spot light or floodlight. The light from Fresnel lens lamp, cooperating
with the digital cameras of radio, television and film industry, can adjust
to the optimal color, and make the skin color more soft and vivid.
Focusing properties: the characteristic of traditional Fresnel lens
lamp is its multiple functions; especially it can adjust from spot light to

6
floodlight according to the need.
No matter the large range lighting for taking dolly shot, or the
accumulation point light for high lighting shot, the lamp with continuous
focusing function can be consistent with all shooting demands.
The controlled and adjusted beam: precisely control the beam to
make the actors stand out from the background, effective lighting device
can avoid the overflow effect of astigmatism. It is an important part of
lighting that it can be controlled and adjusted. LED spotlight inherits the
advantages of traditional Fresnel lens lamp. It effectively controls the
beam by the light barrier and the screw. The only difference is the beam
temperature of LED spotlight is extremely low, which not only to create
a comfortable working environment for the actor, but also greatly
reduces the energy consumption of the air conditioner of the studio.
4、Technical parameters
➢Power supply:100V-240V,50Hz/60Hz
➢Light source:Citizen 200w COB LED
➢Power:200W
➢Optical lens:150mm Fresnel Optical Lens
➢Color Temperature: 3200K / 5600K
➢Color Temperature deviation: ±5%
➢Life:50000h

7
➢Color rendering index: CRI 90
➢Manual Dimmer:0%~100%
➢Beam angle: 12°~55°
➢Control system:16 Bit dimming,STM32 control chip,DMX512
➢Max Clock frequency: 72m/Hz
➢Dimming Frequency: 8k/Hz
➢Channels:1CH/2CH/3CH Optional
➢Display screen:LCD
➢Working Environment:-20℃~35℃
➢Tilt:±90°
➢Protection class:IP23
➢Light barrier:Four-leaf(supply for requirement)
➢Weight:5KG
5、Dimension、Mappings & Pictures of fittings
➢Dimension:360x270x427MM
➢Hanging installation: screw holes can be installed 13MM

8
Fittings
Connection of the power line
Connection of the signal line

9
Moving yoke(Rail-type yoke with adjustable barycenter and angel)
Manual zoom fitting Four-leaf Light barrier
Mounting bolt hole(Φ13MM)

10
6、Control system description
Lamp power supply & connection of signal cable
1)Connection and control of the lamp power source
The product uses 1.5 SQMM copper core cables to be the input line for
power supply. When connecting the power line, the maximum of
connecting lamps is 12 under voltage 220V; and the maximum of
connecting lamps is 6 under voltage 110V.
When using the DMX console, the length of wire between console and
the lamp, and the length of wire between the lamps should not be
longer than 60 meters. There must be signal amplifier when the length
of wire is longer than 60 meters.
2)Connection of the lamp signal cable
This LED lamp receive digital signal in DMX512 (1900) format. It can work
in either the master or slaver mode under EDIT and self-propelled mode.
The master-slave mode also connects by DMX line. Using the cylindrical
3 core XLP cable provided by the manufacturer, connect the XLR-XLR
control line from the DMX controller output port to the DMX input port
of 1st lamp, then from the DMX output port of 1st lamp to the DMX
input port of 2nd lamp, etc. Until all the lamps are connected in a chain.
Finally insert the loop into the DMX input port of last lamp for complete
the connection.

11
Diagram of signal connection
7、Operating instructions
Menu instruction
➢Display screen
Press the Menu until one of the following had been displayed:
Menu
1st Menu
2nd Menu
Value
Notes
DMX
DMX address
0-512
Set DMX address
CHAN
CH01
Dimmer
CH02
DimmerFine
CH03
Strobe

12
Use ‘Up’ and ‘Down’ button to select your desired operation, press
‘Enter’ to set all function
Notes:
⚫When there’s a flickering ‘!’ sign appeared, means no signal input for
the fixture.
⚫No operation within 30seconds, LCD display will enter into Screen
protection mode automatic.
⚫When the current temperature is higher than the protecting setting
temperature, 30% of power consumption will be deducted slowly;
Power consumption will be coming to normal when the temperature
gets to normal.
MANUAL
Dim
0-255
Dimmer
D_F
0-255
DimmerFine
STO
0-255
Strobe
Curve
Linear
Linear curve
Index
Index curve
Log
Logarithm curve
RESET
YES/NO
Recover to manufactory default
TEMP
C.000
0-255
Current temperature
T.060
Protecting temperature,factory
setting is 55℃-60℃
FAN
Auto
Fan speed auto control
Manur
0-255
Fan speed manual control
VERSION
A106.4
Software Version

13
DMX512 Channel table
1CH Channel table
Channel
Value
Rate
Control function
CH1
Dimmer
0-255
Dimming, brightness from 0%
2CH Channel table
Channel
Value
Rate
Control function
CH1
Dimmer
0-255
Dimming, brightness from 0%
CH2
DimmerFine
0-255
Brightness micro adjustment
3CH Channel table
Channel
Value
Rate
Control function
CH1
Dimmer
0-255
Dimming, brightness from 0%
CH2
DimmerFine
0-255
Brightness micro adjustment
CH3
Strobe
0-255
0-10 Strobe off, 11-255 Strobe
frequency(from slow to fast)
The characteristic of control system:
16 Bit dimming level: Comparing to the 8 Bit dimming, the changing of
the light is more soft and delicate. The precision stabilizing control chip
STM32; the international signal protocol DMX512.
Maximum clock frequency:72m/Hz;
Output frequency:8k/Hz;
Function instruction:
➢Version number of the program will be shown when power on and

14
then the system will enter the running mode saved before last power
off in 1 second.
➢Running mode: DMX mode and Manual dimming
◼DMX mode: Enter this mode with DMX Address SET interface. In
this mode, the lamp receives the signal from the DMX console;
◼Manual dimming: Enter this mode with Dimmer SET interface. In
this mode, when there are slaves associated with the bus, the
system will synchronous control the slaves as the Master.
➢After modifying the DMX address, DIMMER value and operation
mode, the system will automatically save these parameters in 3
seconds. The saved parameters will not be lost when power off.
8、Safety instructions
1)Maintenance:
➢The lamp has been passed strict examination before leaving the
factory. In order to ensure the normal and safe operation, user
must follow the instructions of this manual;
➢We assumes no responsibility for those products that have
refitted by the customers ,and the troubles resulting from
customer's careless or abnormal use;
➢Keep the lamp work under the required voltage, ensure the use
of voltage is in the voltage range of technical parameters;
➢For using the power line input and output connector, the

15
maximum of lamps is 12 under the voltage 220V; the maximum
of lamps is 6 under the voltage 110V. The number of lamps for
using the DMX512 input and output signal line is not limited;
➢Do not install the lights near the heat source to avoid the rising of
lamp temperature and affecting the normal use of lamps and
lanterns, even damaging the lamp;
➢Check before use the connection of 110V or 220V AC power to
ensure that the connection between power supply and switch is
good. Please use qualified power plug and outlet;
➢During move and installation, make sure the device not crashed
with metal parts and other tough materials.
2)Warning:
➢Unqualified person involved with installation, operation and
maintenance of this lamp is prohibited
➢Don't insert other things into the inside of the lamp, so as to
avoid anything reaching the part with high voltage, then lead to
partial short circuit, or else a fire or electric shock may occur, and
then affect the normal use of the product.
➢Please keep the bulb clean, do not directly touch the bulb glass
by hand.
➢Do not watch the light source straightly for avoid the damage to
the eyes.

16
9、Notes for installation and operation
➢1. Installation
➢(1)Before the location and installation of the lamp, ensure the
stability of its installation point, which can hold at least 10 times the
weight of the lamp.
➢ (2) Installation method: use one piece of professional clamp, M13
bolts, and our own retaining screw to install; pull the safety chain
(distribution or owned) through the yoke or other hanging objects
and tighten the fixation screw. Check if there is any wear of the
safety chain and loosen of the clamp periodically. In addition, cut off
the power supply when remove the lamps to ensure safety. Take the
safety rope first, then remove the hanging, and pay attention to the
safety of pedestrians below.
➢2. Notes:
➢(1)Do not frequently switch the lamp, so as not to affect the
service life of the bulb. Try to avoid the lamp to run for long periods
of time.
➢(2)All screws used for installing the lamp and any of its parts
should be tightly fastened to avoid the strong jarring or pounding.
Don’t use the lamp in a jittering situation.
➢(3)The order of power: When the lamp is in an energized state,
turn on the power of the console, otherwise it will cause serious
consequences.

17
10、Comparison of common faults
Comparison of common faults
Problems
Reason and resolution
Lamp not work
1、Check if the power line is connected
2、Check if the lamp work under the required
voltage
Lamp work,not
control by the
controller
1、Check if the DIP starting address code setting
is correct
2、Check if the XLR signal line is destroyed
Keys not work
Check if any of the keys does not reset
Low light intensity,
brightness decrease
obviously
1、Check if the LED light source at the end of
their life span
2、Make sure the internal and external of the
optical system is clean
Beam impure (with
halo)
Clean the bulk and lens from impurities caused
by dust and oil
Table of contents
Other Aolait Lighting Equipment manuals
Popular Lighting Equipment manuals by other brands

Commercial Electric
Commercial Electric LS580-1M Use and care guide

Greenlite
Greenlite 17W/T8/4B/35K/DE installation guide

Fly Dragon
Fly Dragon LIGHT SKY LED TX1810 BEAM user manual

Lumisave
Lumisave SL760 Series Installation and Product Manual

MaxLite
MaxLite HLRM Series operating instructions

Elation
Elation Fuze SFX user manual