apivio IP336PoE User manual

User’s Manual

To use the phone correctly and safely and prevent an
accident, it is essential for you to heed the warning and
information provided. Keep the manual in an easily
accessible place after read it for future reference.
- Please avoid installing in excessively hot, cold, dusty or
humid place or in locations with strong vibrations or
exposed to direct sunlight.
- Because the phone generates heat when it operates,
please do not install it in locations where heat resistance or
durability is low.
- Please do not use a damaged cord or plug, or loose outlet
to prevent fire or electric shock hazard.
- Please do not touch power outlet with wet hands.
It can cause the electric shock.
- Please do not locate it on inclined places.
It may inflict injury or break down by dropping.
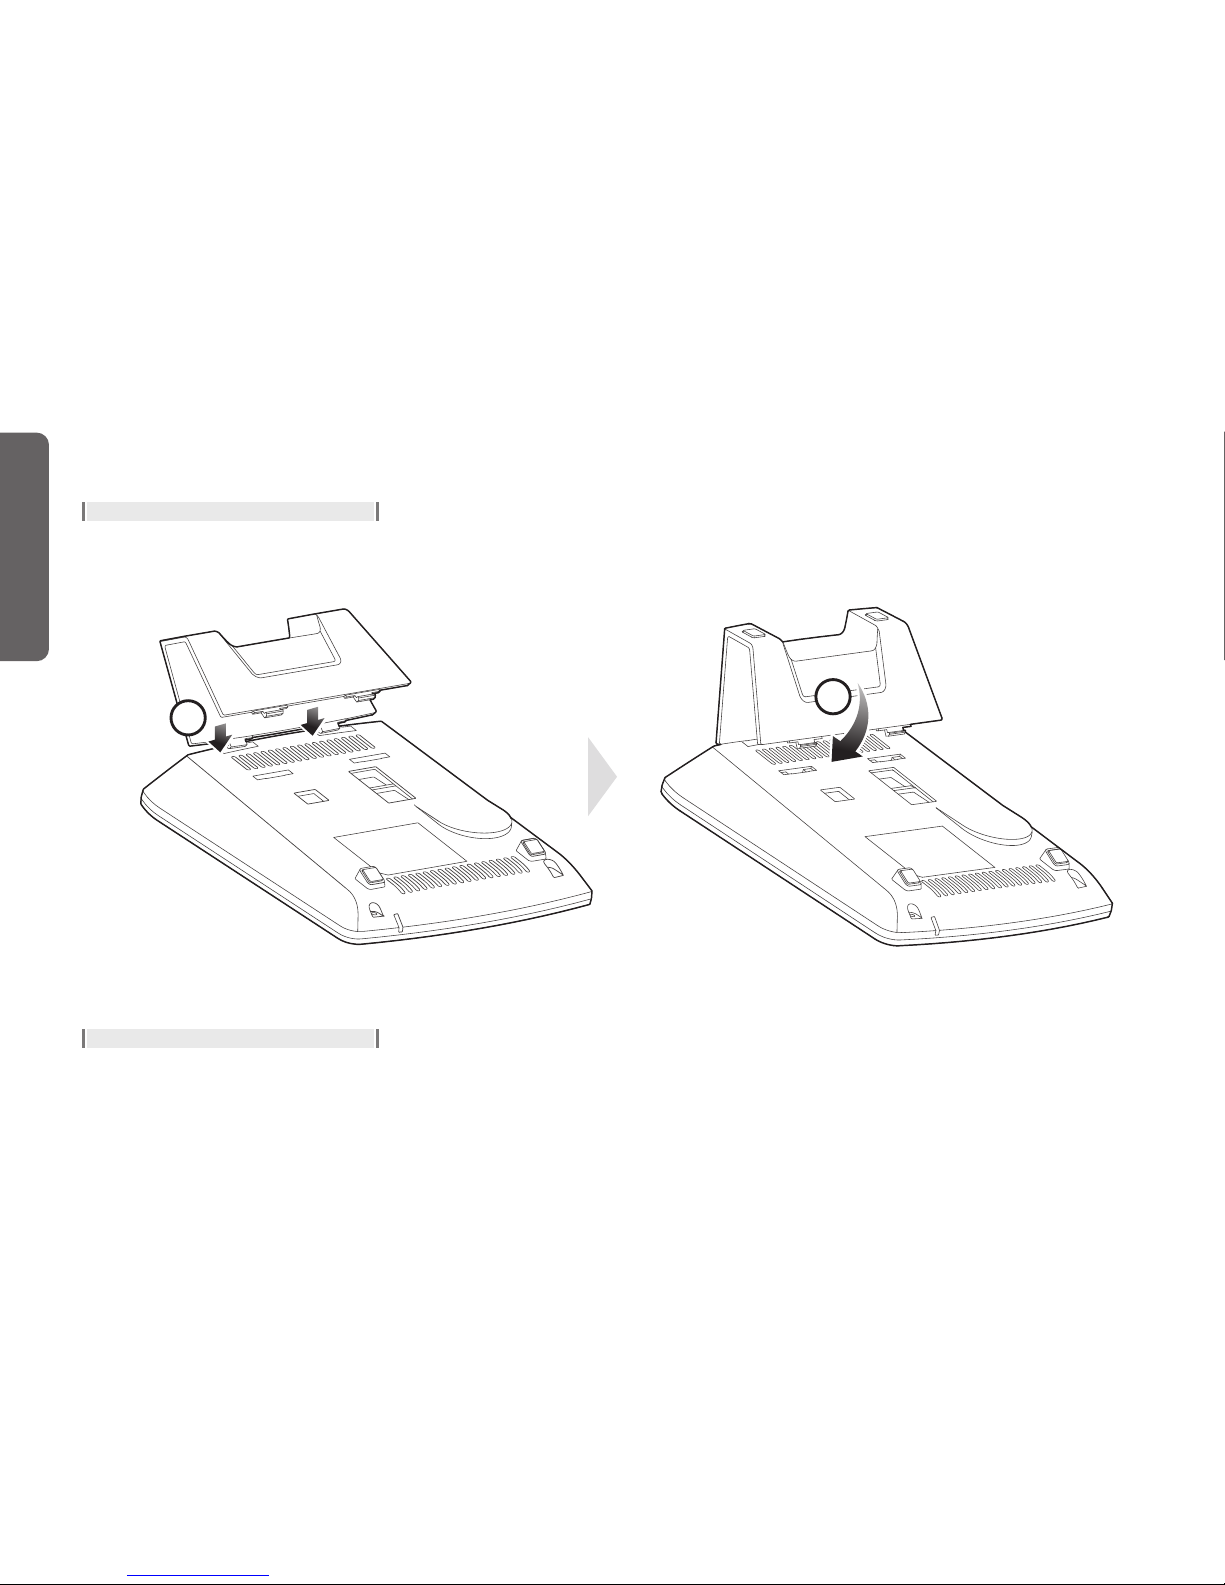
Precaution when installing
- Any damages due to unauthorized disassembly and
intentional damages by users are not covered by the warranty.
- Please do not pull the power plug and adaptor when you
unplug it.
- When the phone makes any strange noise, smell or smoke,
please unplug the adaptor and cable immediately and contact
with service center.
- Please do not use the phone in places with flammable
or explosive materials.
- Please do not touch the phone with wet hands.
- Please do not use the phone for any other purposes.
Precaution when using
- Please use dry and soft cloth when you clean the phone.
- Please do not use chemicals such as benzene, thinner or etc.
- Please wipe the power plug with dry cloth if it is wet or dusty.
It may cause the fire or electric shock hazard.
Precaution when cleaning
- It may result in some errors if you change specific settings
after the phone installed.
- Please give prior notice when you need to change the
settings.
Precaution when setting
USER PRECAUTION
Please read the instruction carefully to protect yourself and others from personal injury or damage to property.
2
PRECAUTION

3
CONTENTS
CONTENTS COMPONENTS
The components must be checked when the
package is opened. Please contact the store where
you purchased it if there are any missing items.
User Precaution
Components
About Phone
Product Assembly / Disassembly
LCD Status
Installation
Networks Setting
Service Setting
Setting via WEB
Trouble Shooting
Basic Functions
Setting BLF Keys
How to Function Menu
Treatment before Disposal
Warranty
Damage Compensation
Product Specification
02
03
04
06
07
09
11
12
13
15
16
22
23
24
25
26
27
...............................................
.....................................................
....................................................
...............
........................................................
.........................................................
.............................................
.................................................
...............................................
.............................................
...............................................
............................................
..................................
............................
............................................................
.................................
.....................................
IP336 –Phone Receiver with connecting cable
Lan cable
User
’
s manual
Phone stand Power adaptor User’s manual

4
Front
ABOUT PHONE
ABOUT PHONE
LCD screen
Message
CFA
DND
Handset
Numbers /
Characters
Call Log/Enter
Volume ▲/▼
Pickup
3 way call
Transfer
Redial
Menu / Hold
Silent / Delete
Headset
Speaker phone
1
2
3
4
6
8
9
10
11
12
13
14
15
16
17
19
Indicate status for network, message and etc.
Start message menu.
Directly forward incoming calls to the typed phone number.
Do Not Disturb.
5
Phone book /
Cancel
Search saved phone numbers. /
Cancel settings.
Call with handset.
7
Memory
dial keys
Call to the registered phone numbers at each button.
(provide 6 memory dial keys)
Enter the numbers to call and character to send message.
18
Microphone
Transmit voice via microphone when you call through
speaker phone.
Search recent call histories. / Confirm selected item.
Adjust the volume.
Allow to answer another ringing phone in the extensions.
Join 3 different people and call together at once.
Transfer a phone call to another telephone.
Call to the latest dialed number.
Enter to setting menu. / Turn to hold mode during call.
Set the silent mode to mute your voice. / Delete typed contents.
Call with headset.
Call with speaker phone.
1
23 4 56
78
9
10
11
12
13
18
19
14
15
16 17

5
ABOUT PHONE
Side Back
ABOUT PHONE
Headset jack
Microphone jack
Handset
connecting jack
1
2
3
Connect and use headset to call.
Connect and use microphone to call.
Connect and use handset to call.
12
3
※Please use 3.5㎜plug type of headset and microphone jack.

Please assemble phone stand on the back side of product as shown the picture below.
(Please do not press too hard while inserting the stand. It may damage the product.)
6
Product Assembly
Please follow the steps above with backward order.
Product Disassembly
2
ABOUT PHONE
Product Assembly / Disassembly
1

7
LCD STATUS
LCD STATUS CASES
LCD screen
Case 1 “No Service”
In this case, phone does not properly communicate with IP-PBX.
- Causes 1) Network connection failure
2) Blocked by firewall(security equipment) port
3) Non registered account information
Case 2 “Check the account”
In this case, phone information of IP-PBX is incorrect.
- Causes In this case, phone settings and IP-PBXs are different.
Contact server manager to solve the problem.
PM 10:15
03/11/Fri
1
2
3
4
5
1
2
3
4
5
Indicate the connection status
between LAN and PC network.
Not available.
Indicate current time.
Indicate if the phone is available to use.
(Service is not available when the icon
is flickering)
Service
status
Alarm
Time
Network
connecting
status
Message
alert
If the icon is shown on the LCD,
new message is received.
StatusNo Explanation
PM 10:15
03/11/Fri
No Service
PM 10:15
03/11/Fri
Check the
account

8
CASES
LCD STATUS
Case 3 “IP address is duplicated”
In this case, there is same IP address with other PC
or phone.
- Solution Check and properly change IP settings.
If there are any inquiries, please contact with
network manager.
Case 4 “Network connection problems”
In this case, that cable line is not connected with LAN port.
- Solution 1) Check if the internet line is connected well
with LAN port.
2) Check if the router or switch is connected well
Case 5 “Starting”
In this case, system does not start for more than
1 minute due to IP setting problem.
- Solution Press menu button and check IP setting.
Case 6 “IP is being allocated”
IP is not allocated for more than 1 minute at dynamic IP setting.
- Solution 1) Check the router setting if you use router.
2) Contact with the network manager.
PM 10:15
03/11/Fri
Duplicated Addr
PM 10:15
03/11/Fri
apivio
Staring…
PM 10:15
03/11/Fri
LAN Disconnected
PM 10:15
03/11/Fri
Searching DHCP

9
INSTALLATION
Connecting cables (Back)
How to install phone according to
internet using environment
A. Customers who use directly connected optic fiber LAN.
1. Connect internet line of optic fiber LAN to LAN port.
2. Connect computer line to PC port.
3. Connect power adaptor.
A-1. How to connect optic fiber LAN to router.
1. Connect internet line of optic fiber LAN to WAB port of router.
2. Connect LAN port of router to LAN port of phone.
3. Connect computer line to PC port.
4. Connect power adaptor.
INSTALLATION
1
2
3
PC port
LAN port
Power adaptor port
100Mbps Ethernet interface(RJ45)
5V / 2A adaptor
Power adaptor port
3
PC connecting port RJ45
1
LAN connecting port RJ45
2
LAN internet line
PC computer line
DC 5V Power
optic fiber LAN(internet) line
WAN port LAN internet line
PC Computer line
DC 5V Power
wire/wireless
router

10
INSTALLATION
How to install phone according to
internet using environment
B. Customers who use ADSL, VDSL or cable modem
1. Connect internet line to LAN ports of modem and Phone
2. Connect computer line to PC port
3. Connect power adaptor
* PPPoE setting is needed when ADSL is used.
B-1. Customers who use router with ADSL, VDSL, or cable modem
1. Connect WAN port and LAN port of modem
2. Connect LAN port of phone and router
Connect computer line to PC port.
Connect power adaptor.
* PPPoE setting is needed when ADSL is used.
INSTALLATION
LAN internet line
PC computer line
DC 5V Power
ADSL, VDSL,
Cable modem
wire/wireless router
PC computer line
DC 5V Power
ADSL, VDSL, Cable modem
optic fiber LAN(internet) line LAN internet line

11
NETWORK SETTING
Detail settings according to protocol
1. How to use dynamic IP
- Press shortcut keys as shown below, and set dynamic IP.
- “Dynamic IP” is set as default value.
2. How to use static IP
- Press shortcut keys as shown below,
and move to static IP setting
Enter IP address of your phone
and press confirm.
You can insert “.” to use
“*” button.
Enter subnet mask address
and press confirm button
Enter gateway address and
press confirm button.
Enter dominant DNS server
address and press confirm
button.
Enter DNS sub-domain
address and press confirm
button.
NETWORK SETTING
Message
Status Info
Function settings
Phone settings
Network settings
Static IP
Dynamic IP
PPPoE
Wizard
Network settings
Service
NAT
IP address
192.168.0.100
Subnet mask
255.255.255.0
Gateway
192.168.0.1
DSN server
164.124.101.2
DNS sub-domain
168.126.63.1

12
NETWORK SETTING SERVICE SETTING
Service (VoIP) detail settings
3. How to use PPPoE
- Press shortcut keys as shown below, and move to
PPPoE setting 1. LCD screen settings
NETWORK SETTING
*If you forget your ID or password please contact service provider.
Enter ID and press confirm button.
Press menu button to swift input
mode to number or English
upper/lower case.
Enter password and press confirm
button. Press menu button to swift
keyboard mode from number to
English upper/lower case.
Default value is 1452.
Please do not change the value
and press confirm button.
Press menu button and after
message is appeared on the
LCD screen as shown on the right,
press [4] button or move to menu
no.4 and press confirm.
Press [1] button or move to
menu no.1 and press confirm.
Set the network settings according
to the network environment.
(For IP setting, please refer
“Network Settings”.)
After setting IP, enter user’s
phone numbers to use numeric
keys and press confirm button.
ID
skbroadband
Password
skbb1234
MSS
1452
Message
Status Info
Function settings
Phone settings
Wizard
Static IP
Dynamic IP
PPPoE
Wizard
Network settings
Service
NAT
Phone numbers

13
SERVICE SETTING
Phone settings Web settingsPhone settings Web settings
SERVICE SETTING SETTING VIA WEB
1. Check IP to use numeric keys of phone.
2. Enter http://IP address:8000 in the address
bar on your internet browser.
3. Enter ID :user, Password :0000
Ex)If IP address of your phone is 192.XXX.XXX.XXX,
enter http://192.XXX.XXX.XXX:8000 in the address bar.
Enter ID :user,
Password :0000
- If the display name is shown on the LCD screen,
service registration is completed.
- If the display name is not entered, phone numbers
will be shown on the screen.
Enter authentication ID
to use numeric keys and
press confirm.
To use numeric keys, enter
the name and press confirm.
The name will be displayed on
LCD screen during waiting mode.
Enter password to use numeric
keys and press confirm. Press
menu button to swift keyboard
mode from number to English
upper / lower case.
Password
ID
Display name

14
SETTING VIA WEB
SETTING VIA WEB
First page when you access the settings via web
1
2
3
4
5
Dynamic IP setting
Static IP setting
PPPoE setting
DNS server setting
NAT setting

15
TROUBLE SHOOTING
Solution for simple symptoms
– Following symptoms may occur when the phone is not broken.
Symptoms How to solve
1. I cannot use hold mode during call.
2. I cannot pickup calls.
- Please check hold during call setting on your phone. (Menu+3+2)
- Group must be set to use pickup.
- Please ask the service manager about group setting.
- Please check if the pickup code is correctly entered.
3. Time is not shown.
- In this case, time is not downloaded from time server.
Server has to be replaced.
- To replace time server, please ask the service manager.
4. Ringtone is too quiet.
- Put down the receiver and press volume [
▲/▼
] buttons to adjust ringtone volume.
5. Caller’s voice is too quiet to hear.
- Pick up the receiver and press volume [
▲/▼
] buttons to adjust.
6. Incoming caller ID does not show.
- Additional service is required to apply.
Please ask the service manager.
7. There is background noise
during call.
- VoIP phone transmits voice over network.
There may be background noise according to the network conditions.
8. Non-registered.
- In this case, server is set incorrectly or OS does not accord with the service.
Please contact with service manager.
- Server cannot be connected due to the problems of network condition or
consistency.
Please contact with service manager and check.
TROUBLE SHOOTING

16
BASIC FUNCTIONS
Tip! Speed dial
- Press button from phone numbers list.
- Press speed dial number.
- Press last digit of the phone numbers for more than 2 seconds.
Tip! Make another call during an ongoing call
- Press [HOLD] button while you call and press another phone numbers.
- Press [HOLD] button again to return to your previous call.
Call through Handset Call through speaker phone
- You can call through speaker phone as pressing phone numbers and
[SEND] button. While using speaker phone to call, sound can be cut off.
Tip! Simple dial
- You can make a call by picking up the receiver right after pressing
phone numbers.
Make a Call
BASIC FUNCTIONS
Pick up
the receiver Memory dialHang up
the phone Call through
handset Call through
speaker phone Enter phone
numbers Function
button/Enter
Ringtones
Enter phone
numbers
Enter phone
numbers
Memory
dial
Enter speed
dial number
You can call the
phone numbers saved at
memory dial.
Search
for lists
Enter phone
numbers
Enter phone
numbers
Memory
dial
Enter speed
dial number
select phone
number
Enter
phone
numbers
during
call
make
another
call

17
BASIC FUNCTIONS
BASIC FUNCTIONS
Answer a Call
Tip! Answer another call during an ongoing call : In this case, hold during call function has to be set.
After set the function, press [HOLD] button to answer another
call during an ongoing call. Press [HOLD] button again to return
to your previous call.
Call through handset Call through handset
Phone
rings
Phone
rings
during
call
answer the
other call
another
incoming call
Phone book Call
You can also make a call as searching the phone book
and pressing [SEND] button.
Enter
name
select
phone
number
Add contact number
You can search and add contact from call log to your phone book.
Maximum of 100 speed dials consisted of 2-digit numbers is provided. Ex) [00], [01], [02], ... [99]
Tip! How to add contact from the phone book.
Set
ringtone Set
group
Select
speed dial
number
Enter
phone
number
Enter
name

18
BASIC FUNCTIONS
BASIC FUNCTIONS
Setting groups of phone book
You can set group where you save phone numbers.
Maximum 10 groups can be set.
- Edit name : Change the name of group.
- Select ringtone : Select each group ringtone.
10. Select group
①You can hold incoming call if you cannot answer the call.
②You can press [HOLD] button to answer another call during an ongoing call.
Press [HOLD] button again to return to your previous call.
Hold
Call log
Press [MENU] and [3 – call log]. You can check the lists of
outgoing, incoming and missing calls.
Search for lists
Memory buttons(six speed dial keys)
- Save number : After entering phone numbers, press
memory button and the number will be saved.
- Change number : After entering phone number, press
memory button and the number will be replaced.
- Delete saved number : Please access managing web site to delete the saved numbers.(Refer to page 13)
Search for
lists
Memory button
to store

19
BASIC FUNCTIONS
BASIC FUNCTIONS
Redial
You can call to the latest dialed number.
Silent
Press [SILENT] during an ongoing call to
mute your voice.
Message
You can send or receive short text message.
Please contact to service manager to use the service.
Pickup
The function allows you to answer another
ringing phone in the network.
To check ‘Pickup code’, you need to
contact the manager.
Please refer page 23, function menu
→
function setting
→
pickup menu.
Conference call
Allow you to join 2 different people and call together at once through
‘Make another call during an ongoing call’ and ‘Hold during call’.
l Method 1 l
Make another call during an ongoing call
During
call
Make
another
call
Enter
phone
number
to call
l Method 2 l
Answer another call during an ongoing call
During
call
answer the
another call
Another
incoming call

20
BASIC FUNCTIONS
Adjust volume
1. Adjust call volume : Put down the receiver and press volume[
▲/▼
] buttons to adjust ringtone volume
2. Adjust ringtone volume : Pick up the receiver and press volume[
▲/▼
] buttons to adjust.
3. Adjust speaker volume : Press speaker phone button and press volume[
▲/▼
] buttons to adjust.
Transfer
Allow you to transfer a call to another telephone in group.
BASIC FUNCTIONS
l Method 1 l Transfer after call
You can call the other person and
inform about the call which you
will transfer.
Inform
about
the call
Enter
phone
numbers
to transfer
During
call
l Method 2 l Transfer directly
Transfer call to
another person directly.
Enter phone numbers
to transfer
During call
Table of contents
Other apivio IP Phone manuals