manuals.online logo
Brands
  1. Home
  2. •
  3. Brands
  4. •
  5. Aprimatic
  6. •
  7. Accessories
  8. •
  9. Aprimatic DM41 User manual

Aprimatic DM41 User manual

This manual suits for next models

1

Other Aprimatic Accessories manuals

Aprimatic ER12-24V Owner's manual

Aprimatic

Aprimatic ER12-24V Owner's manual

Aprimatic ER-REF Owner's manual

Aprimatic

Aprimatic ER-REF Owner's manual

Popular Accessories manuals by other brands

Hillco 2810 Operator's manual

Hillco

Hillco 2810 Operator's manual

Siemens QSA2700D Basic documentation

Siemens

Siemens QSA2700D Basic documentation

Contours ZY024 manual

Contours

Contours ZY024 manual

Saivod VS621 manual

Saivod

Saivod VS621 manual

SCE ENVIRO-THERM SCE-TE170B24VSS user manual

SCE

SCE ENVIRO-THERM SCE-TE170B24VSS user manual

Z-Wave HSD-200Z user manual

Z-Wave

Z-Wave HSD-200Z user manual

turck FMX-IM-2UPLI63FX quick start guide

turck

turck FMX-IM-2UPLI63FX quick start guide

Decagon Devices 10HS manual

Decagon Devices

Decagon Devices 10HS manual

UPPAbaby Cup Holder user manual

UPPAbaby

UPPAbaby Cup Holder user manual

Elko SmartSensor Leakage Wireless manual

Elko

Elko SmartSensor Leakage Wireless manual

Grizzly H8371 instructions

Grizzly

Grizzly H8371 instructions

Panasonic HG-T Series user manual

Panasonic

Panasonic HG-T Series user manual

IFM Electronic Efector 250 Series Brief instructions

IFM Electronic

IFM Electronic Efector 250 Series Brief instructions

Virtuox VirtuCLEAN 2.0 user manual

Virtuox

Virtuox VirtuCLEAN 2.0 user manual

DigiDesign 888/24 I/O installation guide

DigiDesign

DigiDesign 888/24 I/O installation guide

PROZIS QUAY user manual

PROZIS

PROZIS QUAY user manual

patagonia PSI Vest user manual

patagonia

patagonia PSI Vest user manual

SFC Energy EFOY GO! manual

SFC Energy

SFC Energy EFOY GO! manual

manuals.online logo
manuals.online logoBrands
  • About & Mission
  • Contact us
  • Privacy Policy
  • Terms and Conditions

Copyright 2025 Manuals.Online. All Rights Reserved.

5
1
2
4
3
DM41
Specifications are subject to changes without prior notice.
Measured in specific conditions
TECHNICAL SPECIFICATIONS
DESCRIPTION
ENGLISH
Bidirectional opening sensor
for automatic doors
Technology:
Transmitter frequency:
Transmitter radiated power:
Transmitter power density:
Detection mode:
Min. detection speed:
Supply voltage:
Mains frequency:
Max. power consumption:
Output:
Max. contact current:
Max. contact voltage:
Mounting height:
Degree of protection:
Temperature range:
Dimensions:
Tilt angles:
Material:
Weight:
Cable lenght:
Norm conformity:
microwave doppler radar
24.150 GHz
< 20 dBm EIRP
< 5 mW/cm²
motion
5 cm/s (measured in sensor axis)
12 V to 24 V DC +30% / -10%
50 to 60 Hz
< 2 W
solid-state-relay (free of potential change-over contact)
250 mA
50 V DC/V AC
from 1.8 m to 3 m
IP54
from -20 °C to + 55 °C
80 mm (W) x 60 mm (H) x 50 mm (D)
0° to 90° vertical; -30° to +30° lateral
ABS & polycarbonate
70 g
2.5 m
EN 300 440-2 V1.4.1; EN 301 489-1 V1.9.2; EN 301 489-3 V1.6.1.; EN 62311; EN 62479
Other use of the device is outside the permitted purpose and can not be
guaranteed by the manufacturer. The manufacturer cannot be held responsible
for incorrect installations or inappropriate adjustments of the sensor.
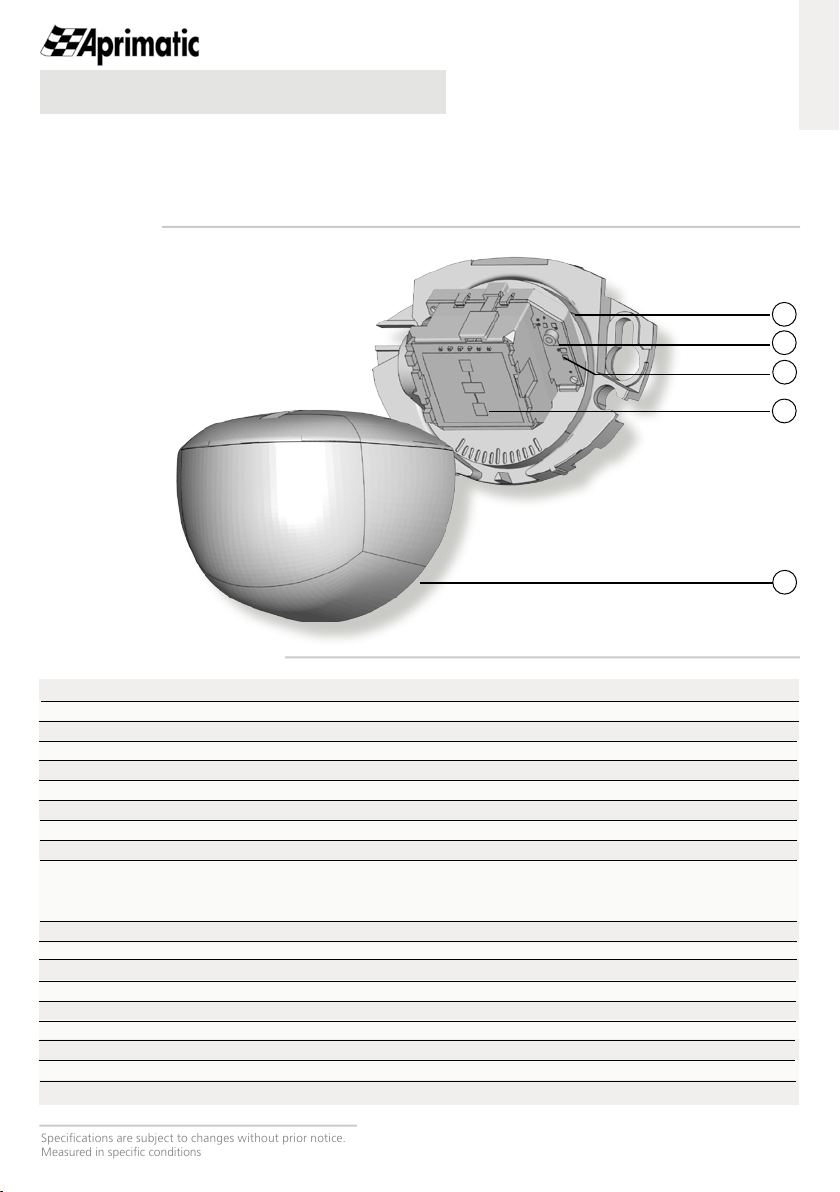
For product version 0300 and more
1. main connector
2. potentiometer for field size adjustment
3. LED
4. radar antenna (wide field)
5. cover
Please keep for further use
Designed for colour printing
Before fixing After fixing
Avoid proximity to neon
lamps or moving objects.
Do not cover the sensor.Avoid vibrations.Do not touch electronical
parts.
Wall mounting above sliding or
revolving doors Ceiling mounting in front of sliding,
revolving or swing doors
(outside of the door motion range)
OPENING THE SENSOR
TIPS
APPLICATIONS
2
23
1
MIN MAX
1
FIELD ADJUSTMENTS
Apply the mounting template.
Drill 1 hole for the cable.
Drill 2 holes for the screws.
Fix the sensor firmly.
ANGLE
2.2 m
2.2 m
Connect the cable and insert it
through the hole.
Connect the wires as follows:
SIZE
field size: max
vertical angle: 30°
2.2 m 2.2 m
MOUNTING & WIRING
BROWN - POWER SUPPLY -
GREEN - POWER SUPPLY +
WHITE - NO
YELLOW - COM
1
1
2
3
1
1
2
1
1
2
BEA SA | LIEGE Science Park | ALLÉE DES NOISETIERS 5 - 4031 ANGLEUR [BELGIUM] | T +32 4 361 65 65 | F +32 4 361 28 58 | [email protected] | WWW.BEA-SENSORS.COM
BEA hereby declares that the DM41 is in conformity with the basic requirements and the other relevant provisions of the
directives 2014/53/EU and 2011/65/EU.
The complete declaration of conformity is available on our website.
TROUBLESHOOTING
The door remains
closed.
The LED is OFF.
The sensor power is off. Check the wiring and the power supply.
The door does not
react as expected.
The door closes and
opens constantly.
Improper output
configuration on the sensor.
The sensor is disturbed by
the closing of the door or
vibrations caused by the
door motion.
The door opens for
no apparent reason.
It rains and the sensor
detects the motion of the
rain drops.
Make sure the sensor is fixed properly.
Increase the antenna angle.
Reduce the field size.
Change the antenna angle.
Decrease the field size.
Install the MRA (rain accessory).
In highly reflective
environments, the sensor
detects objects outside of its
detection field.
In airlock vestibules,
the sensor detects the
movement of
the opposite door.
Change the antenna angle.
For EC countries: according to the directive 2012/19/EU for Waste Electrical and Electronic Equipment (WEEE)
Make sure the door is in automatic mode.
Make sure that the logic of the opening signal on
the door is set to NO.
BEA | Original instructions | 47.0152 / V1 - 02.17