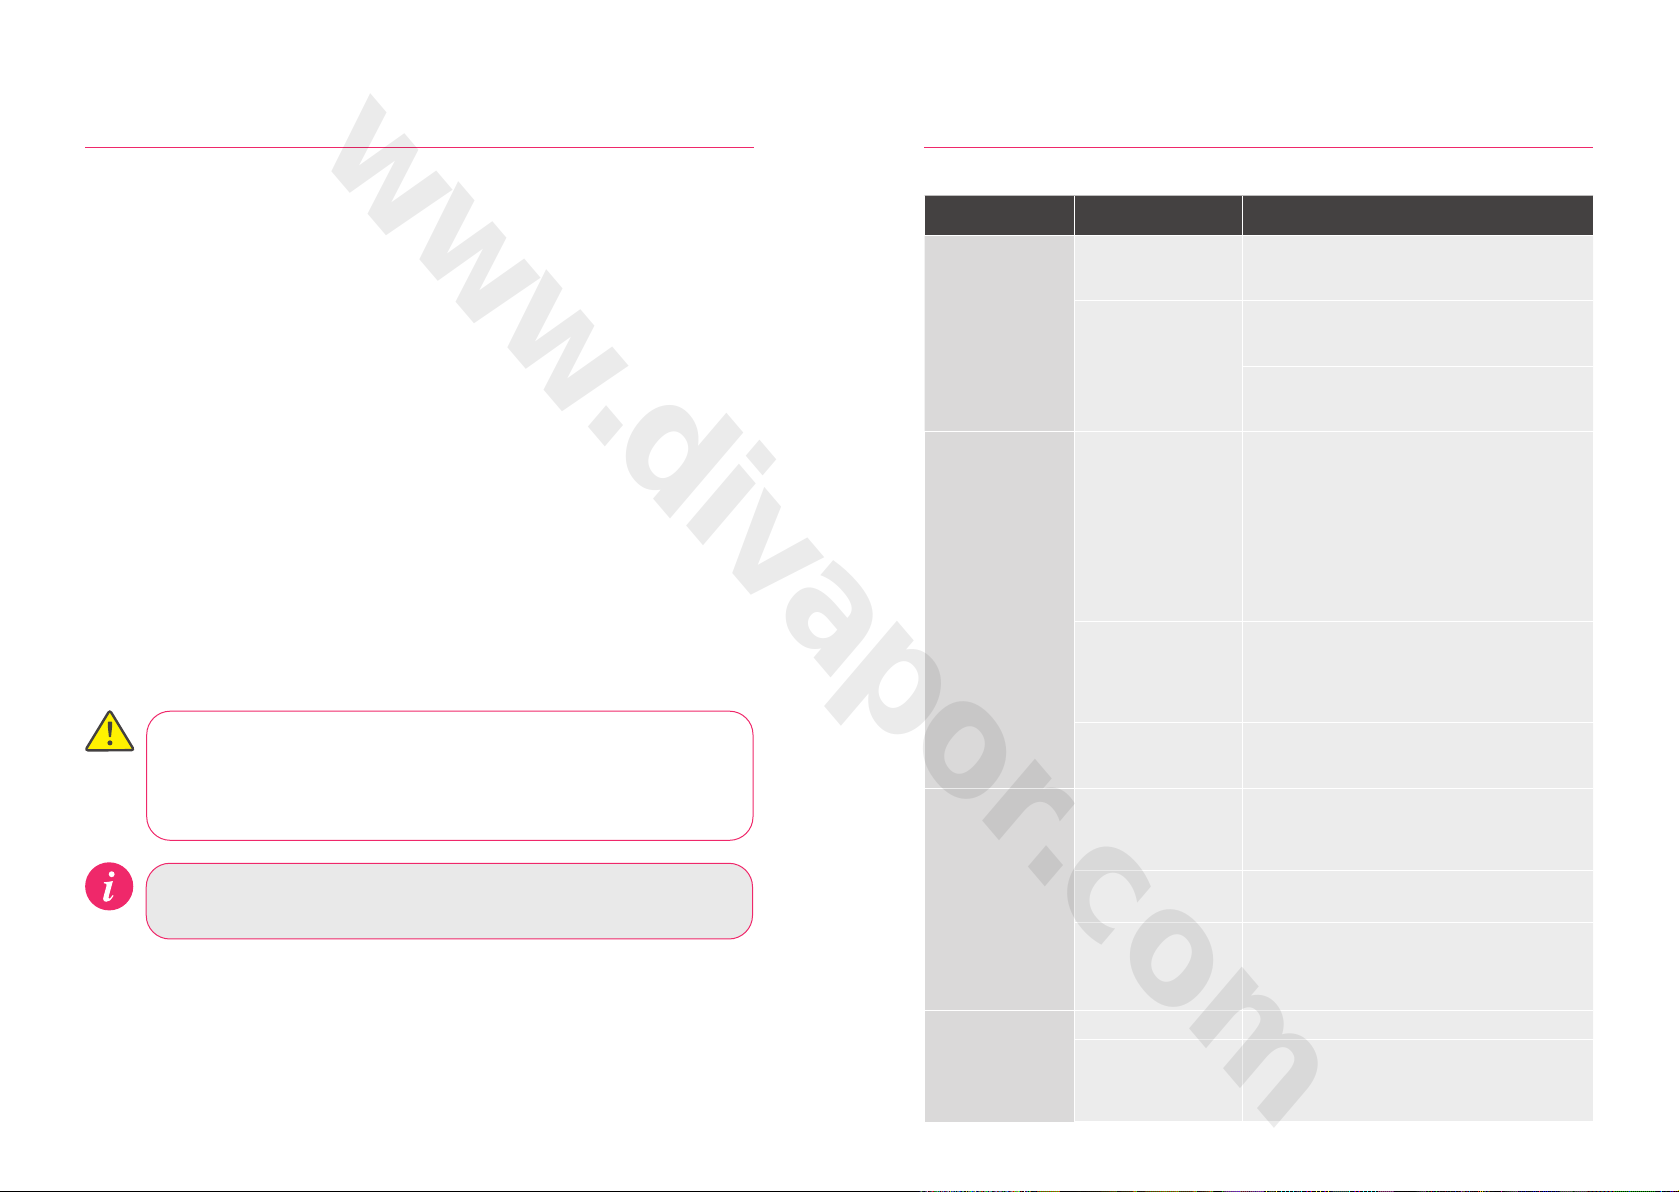
Troubleshooting
Symptom Possible cause Action
Controller
unresponsive -
No Lights / Blank
Power supply turned
o to Aqualisa
SmartValveTM
Check power supply is turned on - Green power
light should be illuminated on the Aqualisa
SmartValve™.
Loss of
communications
Check data cable connections are making good
contact and are fully inserted and that there is no
visible damage.
Check that the wiring schematics are as per
installation instructions in the Smart Installation
Guide.
Pump noisy and
low / no flow
Air lock (for Gravity
fed systems only)
For models utilising an adjustable head kit;
disconnect the handset from the hose, see Head
section on page 9, lower the hose into the shower
tray or bath. Set the temperature to fully cold
and then start the shower. As the water starts to
flow and increase in volume gradually turn up the
temperature. If the flow starts to splutter, stop
moving the temperature control until the flow
again stabilises, then continue to move the dial
towards the hottest setting.
Restriction in the
waterway
Check for debris in the inlet filters of the
Aqualisa SmartValve™, diverter and Fixed Head
connection washer. Must be conducted by a
qualified person. NOTE: The water supplies MUST
be isolated when checking the inlet filters.
Blocked or kinked
hose liner
Where a flexible hose is fitted, unscrew the
shower hose from the outlet connection and turn
the shower on.
Boost button does
not increase flow
Combination boiler
output does not
meet the flow
demand
Check with boiler manufacturer for
specification details.
Aqualisa SmartValveTM
is set to ECO mode
Refer to Setting Water System Mode section in
the Smart Installation Guide.
Seasonal conditions During the cooler months the mains water
temperature drops and this will reduce the
performance of combination boilers. Check with
your boiler manufacturer for details.
Low / no flow Seasonal conditions See above point.
Incorrect Aqualisa
SmartValveTM fitted
If water supplies are gravity fed, the PUMPED
Aqualisa SmartValveTM must be used (unless a
separate stand alone pump is being utilised).
Refer to the Smart Installation Guide.
Cleaning tip: To keep your shower eortlessly clean, we recommend
drying all shower components with a soft cloth after use.
Caring for your Shower
Over time, your shower may be aected by hard water scaling. To keep your shower
working eectively, we recommend that you clean your shower regularly.
Your product should be cleaned using only a soft cloth and washing up liquid. The
bath system ‘click clack’ waste plug mechanism (if applicable) should be kept clear of
debris to ensure the plug maintains a watertight seal. The plug can be unscrewed and
removed to check and clean the mechanism.
Cleaning the shower head
To reduce the need for chemical descaling in hard water areas, your shower head
incorporates a ‘clear flow’ system, whereby any scale build up can be broken down
by gently rubbing the flexible tips of the jets during use. This procedure should be
completed regularly, as often as once a week in some hard water areas, as scale build
up can aect the spray pattern and cause the shower to perform poorly. Failure to
descale the shower head can aect the internal seals and may aect the warranty.
Should descaling of the head using a cleaning agent become necessary, remove the
shower head fully and immerse in a mild proprietary descaler (e.g. vegetable based or
plain white vinegar). Cleaning and maintenance should not be undertaken by children
without supervision by a person responsible for their safety.
DO NOT USE ABRASIVE CLEANERS. It is imperative that descaling
is carried out in accordance with the manufacturer’s instructions,
substances that are not suitable for plastics and electroplated surfaces
must not be used.
Changing water system?
If switching from a gravity-fed water system to a mains pressure system (e.g.
Combination boiler) you will need to change your Aqualisa SmartValve™. Contact a
member of our Customer Service team for further information.
Refer to page 19 for App Troubleshooting.
14 15
www.divapor.com


