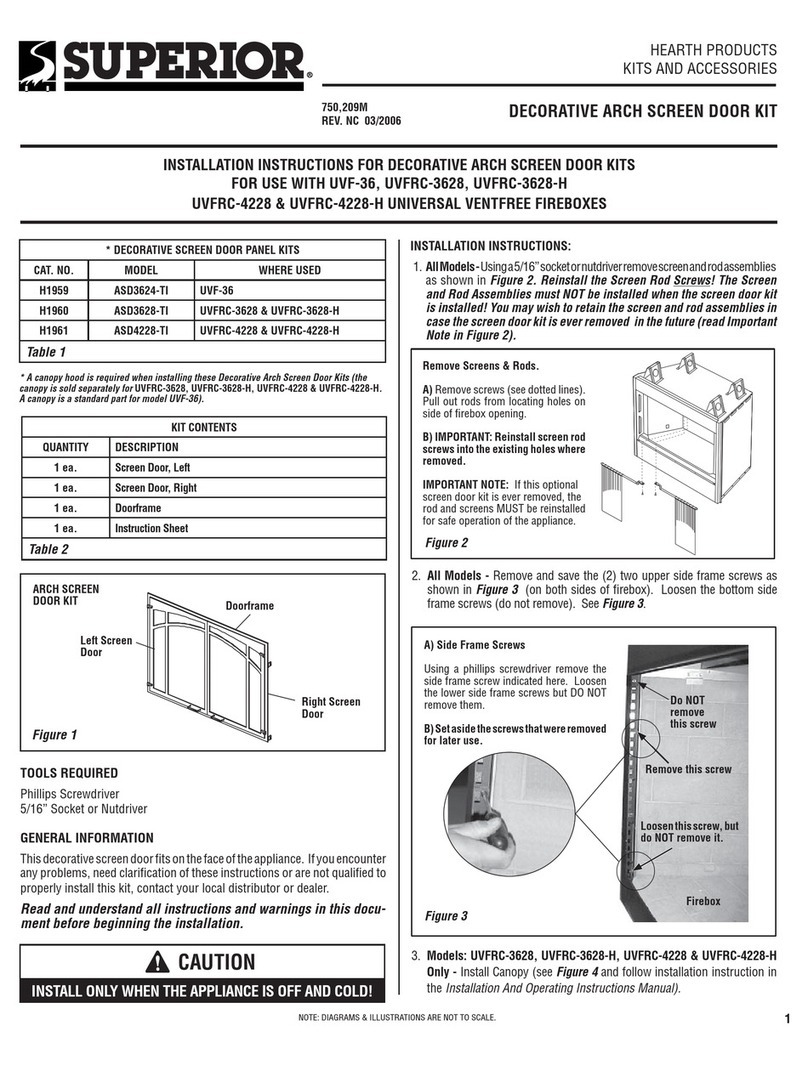
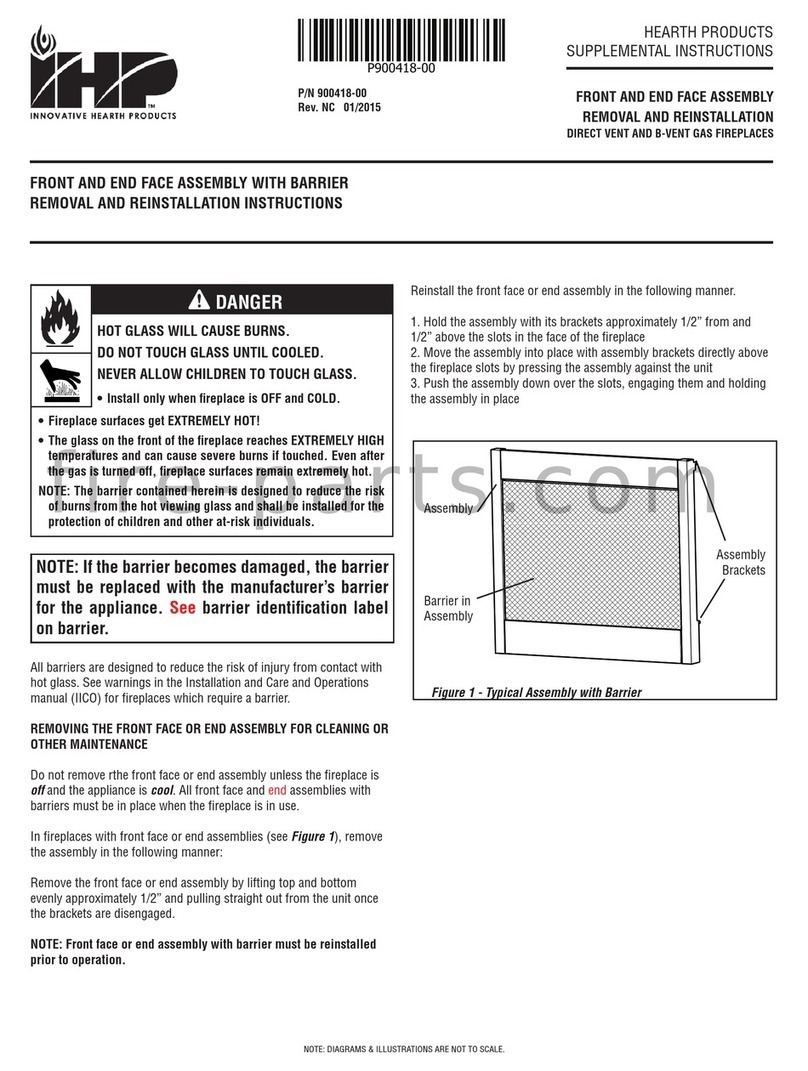
Arada M Series Quick start guide

Issue Date : 18/04/2023
Technical Guide
Glass Replacement : M – Series
BK 774 Rev 01

PAGE 2 BK774 Rev01
PLEASE NOTE : This technical guide is applicable for the following appliances :
M-Series (All Models) Cast, Glass Or Steel door.
WARNING : HEALTH & SAFETY
• Please ensure the appliance is cold and unlit before commencing fitting the replacement
glass.
• Competent persons should only undertake the work detailed in these instructions.
• Please refer to the main instruction booklet, relevant to your stove, for guidance on the
installation and operation of the appliance.
• Arada Ltd will not be responsible for any consequential or incidental loss or injury however
caused.
• Please consult Health & Safety guidelines for advice on handling heavy and / or large items.
• When lifting, we recommend you always obtain assistance.
• If when manual handling, keep the heaviest load close to the body for as long as possible,
good posture is important, face the load to be lifted, bend your knees, ensuring your back is
kept straight, ensure a firm grip. Do not twist when you lift.
• When handling glass components, it is recommended to wear suitable gloves and eye
protection to prevent hand and eye injuries.
TECHNICAL GUIDE—Replacement Glass M-Series

TECHNICAL GUIDE—Replacement Glass M-Series
BK774 Rev01 PAGE 3
CONTENTS :
STAGE 1: Identification Of M-Series Door Version & Door Removal
STAGE 2: Specific Instructions : Cast Door
STAGE 3: Specific Instructions : Steel Door
STAGE 4: Specific Instructions : Glass Door

TECHNICAL GUIDE—Replacement Glass M-Series
PAGE 4
Fitting Instructions :
It is recommended to remove the door assembly and to position onto a suitable protective flat
surface to prevent damage to the front face of the door.
STAGE 1: Identification Of M-Series Door Version & Removal
Fully open the fire door. Carefully support the door, from underneath or obtain additional assistance
and follow below, depending upon the door version of the stove being worked upon.
Cast Iron Door Version ONLY :
Glass & Steel Door Version ONLY :
NOTE : Using PZ2 Pozi screwdriver, remove 4x screws
highlighted, together with the hinge retaining plates.
Retaining plates
BK774 Rev01
NOTE : Using a 3mm Hex key, remove 2x screws highlighted
together with the top hinge. NOTE : DO NOT REMOVE LOWER
HINGE & FIXINGS. Lift door assembly clear from lower hinge.
Lower hinge
& fixings
Top hinge

TECHNICAL GUIDE—Replacement Glass M-Series
PAGE 5BK774 Rev01
STAGE 2: Specific Instructions—Cast Door
With the fire door removed from the appliance, carefully place the assembly onto a work bench or
similar level surface, with the FRONT face down onto a soft surface, to prevent damage.
Cast Iron Door Version ONLY :
• Using a 8mm spanner or socket remove the 4x M5 x 8mm hex fixings and washers, together
with the glass retaining clips.
• Carefully remove any pieces of broken glass and glass sealing gasket, wearing suitable
gloves as protection. Take note of the position and joint location of the glass sealing rope
gasket. This is generally positioned under one of the lower glass retaining clips.
• Ensure door casting surface is dry and clean, start at centrally at one of the lower glass clip
mounts, push the adhesive side of the rope gasket into the groove around the window
aperture. Gradually work your away around until the ends of the rope meet, trim excess with
knife or scissors.
Glass
retaining
clip
M5 hex
screw
Washer
Glass rope
gasket joint

TECHNICAL GUIDE—Replacement Glass M-Series
STAGE 2, Continued :
• Re-seat a new piece of glass, ensuring the glass sits flat against the rope gasket.
• Replace the 4x glass retaining clips, washers and M5 x 8mm hex screws, that were removed
earlier.
• DO NOT OVER TIGHTEN the fixings, as damage may occur to the glass. The hex screws are
only required to be tightened enough to pinch the retaining clips to the glass panel, to prevent
movement when you apply pressure with the palm of your hand in a side ways motion against
the glass.
• Refit the bottom hinge retaining plate, but do not fully tighten the screws.
• Locate the hinge retaining plate over the bottom hinge pin. Rotate the door assembly
horizontal against the top hinge pin.
• Refit the top hinge retaining plate and fully tighten screws.
• Fully tighten the bottom hinge retaining plate screws,
check operation of door and catch / latching operation.
• If any adjustment is required for the door latching please consult BK 773
(Door catch and pin adjustment for M Series stove), available online at
www.aradastoves.com.
PAGE 6 BK774 Rev01
Top hinge pin
resting
against door
casting
Bottom hinge
pin located
behind
retaining
plate.

TECHNICAL GUIDE—Replacement Glass M-Series
STAGE 3: Specific Instructions—Steel Door
With the fire door removed from the appliance, carefully place the assembly onto a work bench or
similar level surface, with the FRONT face down onto a soft surface, to prevent damage.
Steel Door Version ONLY :
• Using a 8mm spanner or socket remove the 4x M5 hex nuts and glass retaining clips, together
with the spacers.
• Carefully remove any pieces of broken glass and glass sealing gasket, wearing suitable
gloves as protection. Take note of the position and joint location of the glass sealing rope
gasket. This is generally positioned under one of the lower glass retaining clips.
• Ensure the steel door surface is dry and clean, start at one of the lower glass mounts. Place
the adhesive side of the rope gasket approximately 10mm in bound from the window aperture
(See image below). Gradually work your away around until the ends of the rope meet, trim
excess with knife or scissors.
M5 hex nut
Glass
retaining
clip
Spacer
Glass rope gasket joint,
central to lower glass mount
10mm
approx.
PAGE 7
BK774 Rev01

TECHNICAL GUIDE—Replacement Glass M-Series
BK774 Rev01PAGE 8
STAGE 3, Continued :
• Re-seat a new piece of glass, ensuring the glass sits flat against the rope gasket.
• Replace the 4x spacers, 4x glass retain clips and 4x M5 nuts, that were removed earlier.
• DO NOT OVER TIGHTEN the fixings, as damage may occur to the glass. The hex nuts are
only required to be tightened enough to pinch the retaining clips to the glass panel, to prevent
movement when you apply pressure with the palm of your hand in a side ways motion against
the glass.
• On the door, locate the bottom hinge hole over the lower hinge pin. Engage the pin and lower
onto bottom hinge.
• Drop the top hinge assembly pin into the door and
rotate the assembly to meet the hinge holes within
the front of the stove body.
• Affix to stove body using the 2x M5 Pozi head screws,
removed earlier.
• Fully tighten screws and check the latching operation
of the door catch.
• If any adjustment is required for the
door latching please consult BK 773
(Door catch and pin adjustment for M
Series stove), available online
www.aradastoves.com.
Bottom hinge
pin located

PAGE 9BK774 Rev01
STAGE 4: Specific Instructions—Glass Door
With the fire door removed from the appliance, carefully place the assembly onto a work bench or
similar level surface, with the REAR face down onto a soft surface, to prevent damage.
Glass Door Version ONLY :
• PLEASE NOTE : Extra care is needed to remove the old damaged glass and adhesive.
Always use eye protection and gloves to avoid injuries.
• Using a Stanley knife, score around the silicone seal between the outer glass and the inner
door metal frame work.
• Once this has been done, use a flat bladed paint scrapper, prise off the broken glass.
• With all the glass removed, any residual silicone adhesive must be removed, again using the
paint scraper or sandpaper remove this old adhesive.
• Clean the inner door metal work surface with a clean rag, please ensure that any remains of
the old adhesive are removed, as this will effect the bonding strength of the replacement
glass.
TECHNICAL GUIDE—Replacement Glass M-Series
Silicone seal between outer
glass and metal door

TECHNICAL GUIDE—Replacement Glass M-Series
PAGE 10
STAGE 4, Continued :
• With the inner door metal work placed as
shown on right, take the tube of RTV
silicone and cut the nozzle at a 45 degree
angle, so that you can produce a bead of
silicone approx. at least 3mm in width.
• Apply a continuous bead of adhesive around the window aperture, note, DO NOT apply
directly on the edge, keep the adhesive in bound by approx. 10mm (As shown above).
• With the central bead of adhesive in place around the window aperture, apply a zig zag bead
of adhesive around the outside, taking care not to apply the adhesive close to the outside
edge of the door or in the lower LH area as marked by the red circle, (As shown below) as this
will be visible via the emblem in the door glass.
Top
Hinge
Side
(LH)
Handle
(RH)
3mm Adhesive bead
3mm Zig-Zag bead
Do Not Apply Adhesive Here
BK774 Rev01
Cut nozzle at 45 Degrees
Bottom
10mm
approx.

TECHNICAL GUIDE—Replacement Glass M-Series
PAGE 11BK774 Rev01
STAGE 4, Continued :
• Carefully place the replacement glass panel,
onto the adhesive NOTE: ensure the emblem
is placed in the lower left hand corner (As
shown on right).
• Ensure the overhang gap is even on all four
sides and apply a gentle pressure to the glass
panel, to ensure a good bond with the
adhesive. If any excess adhesive is present
on the glass, clean this off.
• Leave in a flat (horizontal) position for a
minimum of 12 hours, to allow the adhesive to cure.
• Allowing for the silicone adhesive to cure, locate the door bottom hinge hole over the lower
hinge pin. Engage the pin and lower onto bottom hinge.
• Drop the top hinge assembly pin into the door and
rotate the assembly to meet the hinge holes within
the front of the stove body.
Emblem lower LH corner
Bottom hinge
pin located

Arada Ltd
The Fireworks, Weycroft Avenue - Axminster - Devon, EX13 5HU, UK
www.aradastoves.com T: +44 (0)1297 632050 Email : info@aradastoves.com
BK774 Rev01
Issue Date : 18/04/2023
STAGE 4, Continued :
• Affix to stove body using the 2x M5 Pozi head screws, removed earlier.
• Fully tighten screws and check the latching operation of the door catch.
• If any adjustment is required for the door latching please consult BK 773 (Door catch and pin
adjustment for M Series stove), available online www.aradastoves.com.
TECHNICAL GUIDE—Replacement Glass M-Series
Table of contents
Other Arada Fireplace Accessories manuals
Popular Fireplace Accessories manuals by other brands

Valor
Valor Horizon Matte Black Front 672MBF installation manual

Northline Express
Northline Express DuraFlex SS installation instructions

IHP
IHP AK4 quick start guide

Gason
Gason Eureka Jindara Duet installation instructions

Hearth & Home
Hearth & Home BRICK-6K-TG installation instructions

Napoleon
Napoleon PSL36SS installation instructions

Valor
Valor H3 Series installation manual

Sirocco
Sirocco Eco4 MKIII Installation and user instructions

Heta
Heta Scan-Line 900 operating instructions

WT Knowles & Sons
WT Knowles & Sons Leeds 3 Fitting instructions

New Buck Corporation
New Buck Corporation 80ZC user manual

Majestic fireplaces
Majestic fireplaces 20010751 installation instructions