Arcan CP201 User manual

SHOP PRESS
ASSEMBLY INSTRUCTIONS
CP201 - 20 TON AIR OVER SHOP PRESS
P.O. Box 58 Travelers Rest, SC 29690 Phone: (800) 879-7316 Fax: (864) 834-0073
A - Total Height
B - Inside Width
C - Press Feet Length
D - Bed Width
E - Stroke (ram travel distance from fully retracted position to fully extended position)
F - Pin Diameter
G - Motor Control
H - Press Plates Included
PRESS SPECIFICATIONS
Arcan Model No. A B C D E F G H
CP201 66.5" 24" 24" 11.25" 4.75" 1" Air Assist Y (2)
© Copyright 2007, Arcan Professional Tools

CP201 Operation Manual 1
SAFETY INFORMATION
This symbol alerts you to the possibility
of serious injury or death if instructions
are not followed.
This symbol alerts you to the possibility
of damage to or destruction of equipment
if instructions are not followed.
Failure to heed these warnings may result in loss
of load, damage to the press and/or failure
resulting in property damage, personal or fatal
injury. This operating manual contains important details concerning the safe
operation of this tool. The user must read and understand these details
before any use of the tool. This manual must be retained for future reference.
• Read, study, and understand all instruction manuals packed with this
press before operating.
• Always wear safety goggles.
• Parts being pressed may splinter, shatter, or be ejected from the
press at a dangerous rate of speed. Because of the variety of press
applications, it is your responsibility to always use adequate guards
and wear eye protection and heavy protective clothing when operating
the press.
• Visual inspection should be made before each use of the press, checking
for signs of cracked welds, bent bed pins, loose or missing bolts, leaks,
or any other structural damage.
• Do not go near leaks. High pressure oil can puncture skin and cause
serious injury, gangrene, or death. If injured, seek emergency medical
help. Immediate surgery is required to remove oil.
• Keep hands and ngers out of the press and away from parts that may
shift and pinch. Do not stand in front of work area when load is applied.
• Always use an accurate pressure gauge to measure pressing force.
• Do not exceed the rated capacity of this press.
• Never tamper with hydraulic system pressure settings.
• Do not substitute bolts, pins or any part of the components. Use only
genuine factory replacement parts.
• Always center load on ram plunger. Offset loads can damage ram and
may cause load to eject at a dangerous rate of speed.
• Remove all loads from press bed before attempting to adjust bed height.
Beware of possibility of falling bed.
• Press only on loads supported by press bed and included press plates.
Do not support loads on oor or press frame.
• When using any accessories such as arbor plates, be certain they are
centered on press bed and are in full contact with press bed.
• Before applying load, be certain all press bed supporting pins are fully
engaged.
• Always use a bearing shield when pressing bearings. Use caution when
positioning work to be pressed to ensure that the item that is to be
pressed cannot be dislodged or broken during press work. This may
result in the item being ejected from the press at a dangerous rate of
speed.
• Release hydraulic pressure before loosening any ttings.
• Maintain proper hydraulic uid levels.
• Do not make any alterations to the press.
OWNER/USER RESPONSIBILITY
The owner and/or user must have an understanding of the manufacturer's
operating instructions and warnings before using this press. Personnel
involved in the use and operation of equipment must be careful, competent,
trained, and qualied in the safe operation of the equipment and its proper
use when servicing motor vehicles and their components.
Warning information should be emphasized and understood.
If the operator is not uent in English, the manufacturer's instructions and
warnings must be read to and discussed with the operator in the operator's
native language by the purchaser/owner, making sure that
the operator comprehends its contents.
Owner and/or user must study and maintain for future reference the
manufacturer’s instructions. Owner and/or user is responsible for keeping all
warning labels and instruction manuals legible and intact. Replacement labels
and literature are available from the manufacturers.
INSPECTION
Visual inspection of the shop press should be made before each use of the
press, checking for damaged, loose or missing parts. Each press must be
inspected by a manufacturer’s repair facility immediately if subjected to an
abnormal load or shock. Any press which appears to be damaged in any way,
is found to be badly worn, or operates abnormally must be removed from
service until necessary repairs are made by a manufacturers's authorized
repair facility. It is recommended that an annual inspection of the press be
made by a manufacturer’s authorized repair facility and that any defective
parts, decals or warning labels be replaced with manufacturer’s specied
parts. A list of authorized repair facilities is available from the manufacturer.
SAFETY INSTRUCTIONS
• CHECK YOUR LOCAL, STATE AND FEDERAL REGULATIONS
REGARDING THE SAFE USE OF THIS EQUIPMENT.
• Your safety is a top priority. Please handle equipment with care.
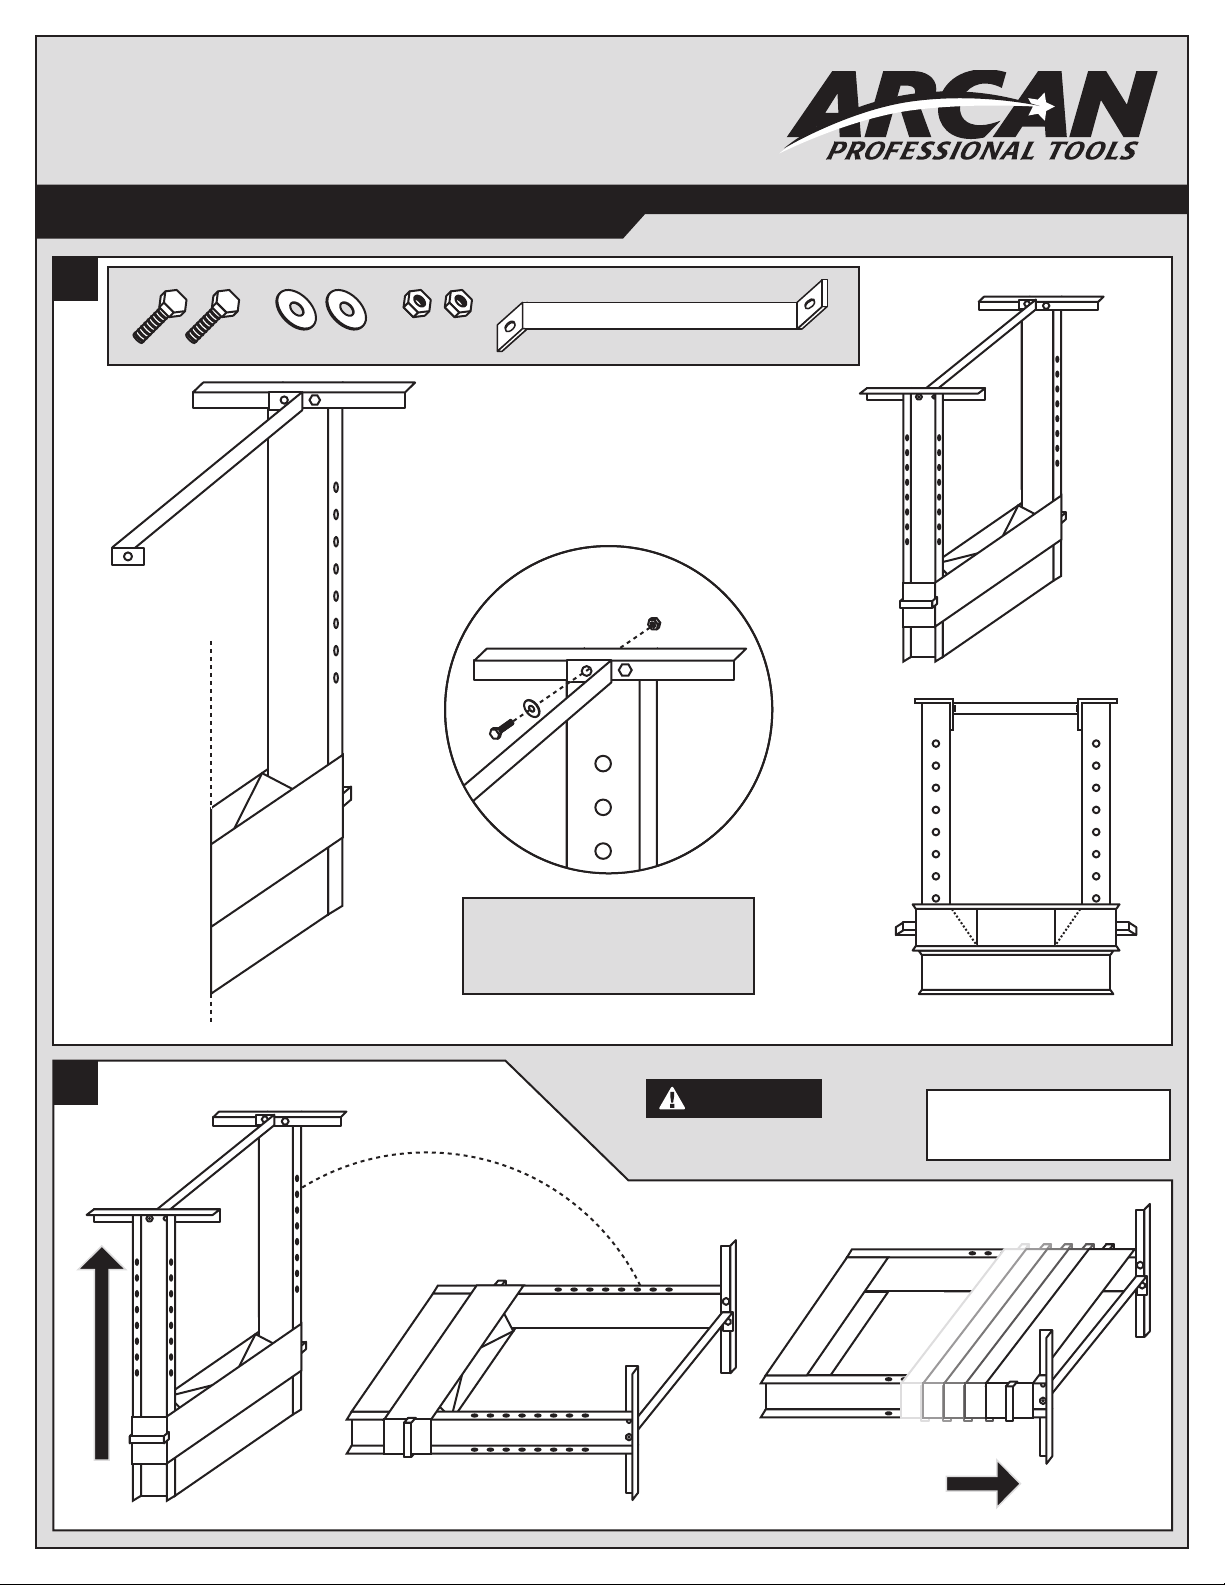
• Fully retract unit and remove all items from the press bed frame.
• Support the press bed and remove the pins.
• Raise or lower bed to desired height and reinstall press pins. Be certain
pins are fully engaged in the parallel anges of the upright columns.
• Position press on a at, level, hard surface, preferably concrete.
Make sure all nuts and bolts are tight.
• Clear the area of bystanders, especially small children, before using.
• Set the press bed to the required height. The press is most effective
when the work piece is located 1 inch below the ram’s retracted position.
The compression stroke can include the entire 5 inch working range.
• The press is designed to exert a force on anything which is positioned
beneath its ram. The work piece can be ejected from under the ram at
a high rate of speed and can injure someone.
• Pressing Bearings: It is essential that you use the bearing shield when
pressing bearings are on or off.
OPERATION
1. Press beds are adjustable up and down to fully take advantage
of available ram travel and numerous work pieces.
2. Slowly open release valve on power unit. With the power unit
in its stored position, remove all items from the press bed.
3. Be sure press bed is supported properly and remove press bed pins.
4. Raise or lower press bed to desired height, and reinstall press
bed pins. Be certain pins are completely through both sides
of frame, as these pins are the major support mechanism for the bed.
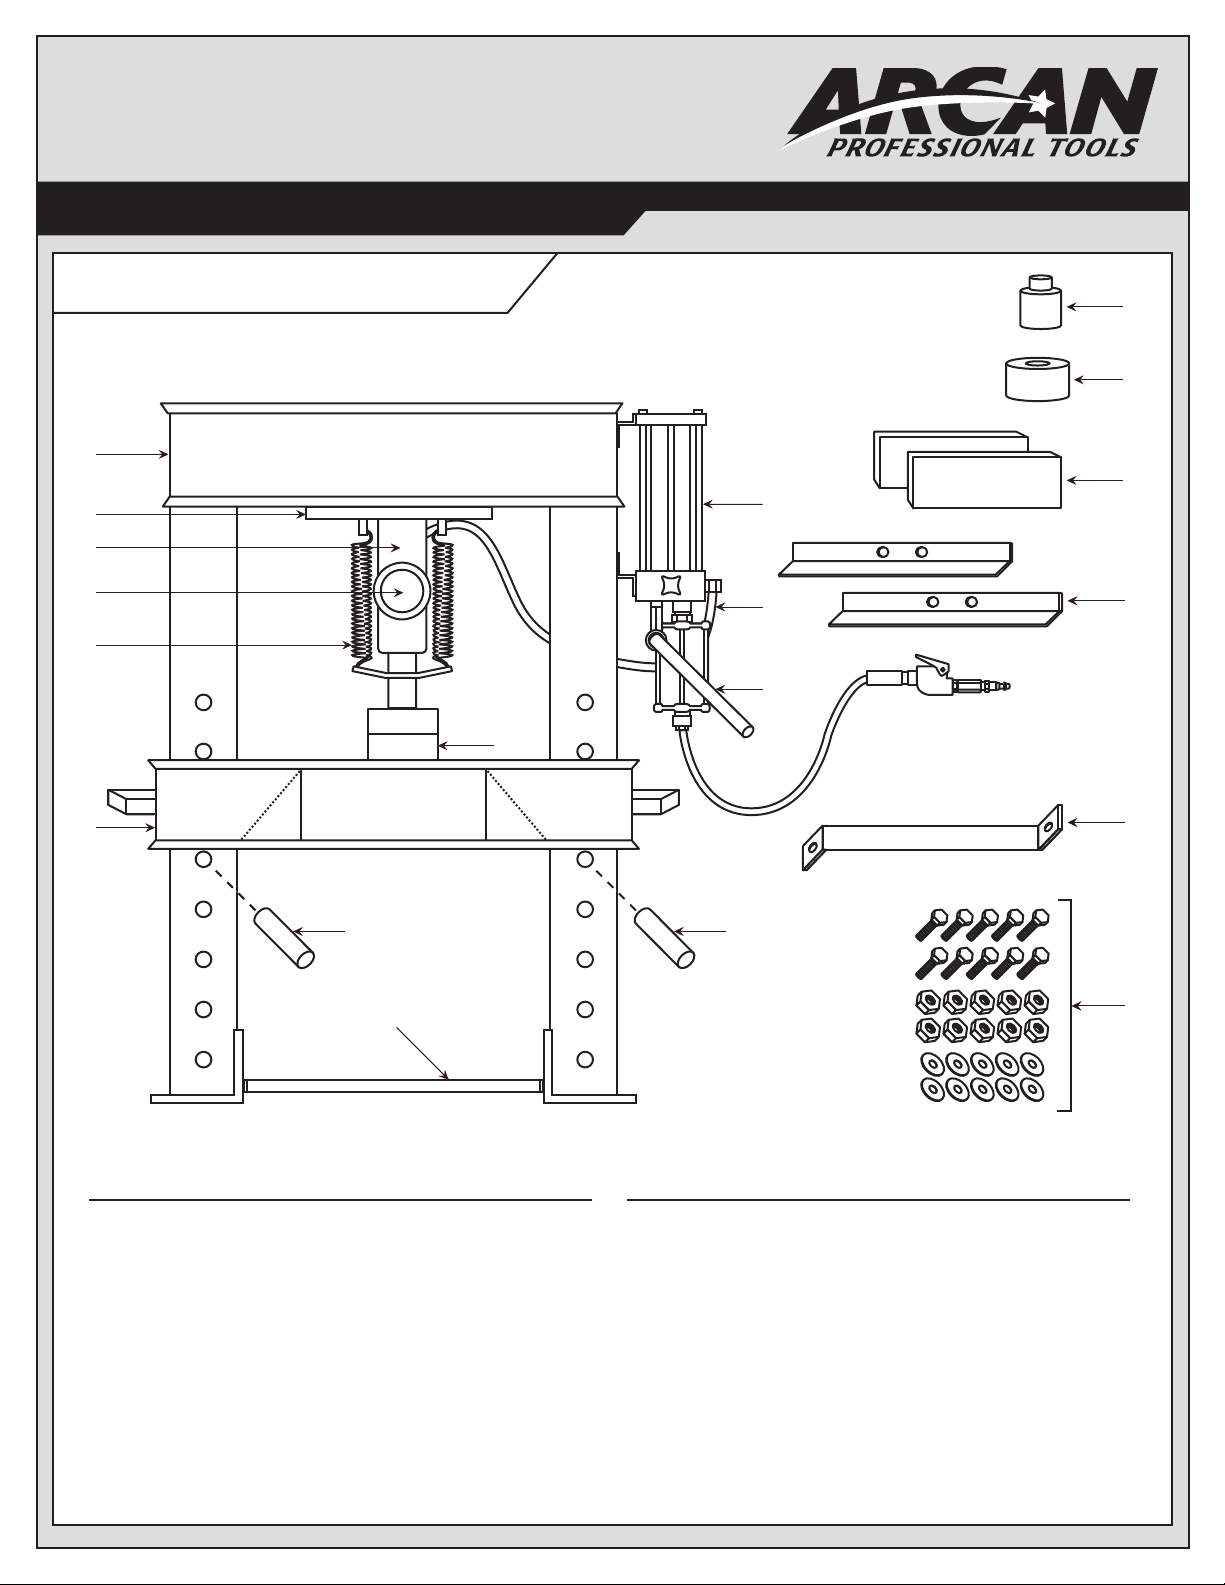
We want to know if you have any problems with our products.
If you are missing any parts or nd any damage, call Arcan directly,
and we will remedy the situation. Please do not call the store where
you purchased this product.
Phone: (800) 879-7316
WARNING
WARNING
CAUTION

PARTS LIST
Press Frame - 1
Press Bed - 1
Press Feet - 2
Z Bar - 1
1/2"-13 x 1-1/2"
Hex Head Bolts - 10
1/2" Nuts - 10
Washers - 10
1" x 12" Press Pins - 2
Air Motor
Pump and Ram - 1
Ram Frame - 1
Pump Extension Handle - 1
3/4" x 3" x 12"
Press Plates - 2
Accessory only -
Not needed for assembly
Pushing Adapter - 1
Accessory only -
Not needed for assembly
Bearing Shield - 1
Accessory only -
Not needed for assembly
ESTIMATED ASSEMBLY TIME: 30 MINUTES
Examine box contents, then proceed with the following instructions.
TOOLS NEEDED
CP201 Operation Manual 2
3/4" and 9/16" sockets and wrenches
ACCESSORIES

Note: Position press feet on each side of the press.
Attach one bolt, washer and nut on each side.
Bolts should be attached OFFSET from one another.
Front view
Stand frame upside down Slide bed onto frame Slide bed down to bottom of frame
ASSEMBLY INSTRUCTIONS
1
3
2
Inside of frame
CAUTION
Be aware of jagged edges
on frame. Not all welds are smooth.
Press bed can pinch or crush fingers.
Wear safety gloves.
Note: In the upright position,
inner bracing should form an
inverted "v" with the narrower
space facing the top of the press.
CP201 Operation Manual 3
WARNING
Leg ends and press feet are sharp
and potentially dangerous. Wear
safety gloves and safety goggles.

Cross-section of press
Front view
Use bolts, washers and nuts to attach
Z Bar to both sides of the press.
Note: Check all bolts for tightness.
If press rocks, or is not level, loosen press
feet slightly to compensate and retighten.
WARNING
Bed must be at the BOTTOM of the frame
before proceeding to the next step.
ASSEMBLY INSTRUCTIONS CONTINUED
4
5
Front view
Slide bed down to bottom of frame
Note: When sliding bed to frame
bottom, DO NOT use bed handles.
CP201 Operation Manual 4

PUMP AND RAM ASSEMBLY
Stand unit upright Slide bed above holes and hold in place Secure pins underneath bed, one at a time
12
6WARNING Pins must be COMPLETELY through BOTH SIDES of frame.
7
This end up
1. Place ram frame
sideways on bed.
2. Drop ram into
frame, between
parallel bed bars.
3. Ram should sit
inside ram frame.
Note: Handle ram carefully to avoid
damage to gauge or gauge face.
Do not disconnect hoses prior to
assembly.
CP201 Operation Manual 5

PUMP AND RAM ASSEMBLY CONTINUED
74. Rest pump against
press and ram
frame for support.
5. Pump must be threaded
through ram frame and
back out so the hose is
on the outside of the frame.
See Step 6.
6. Once pump and ram are
on press bed as shown,
you are ready to move
on to mounting the pump
assembly.
WARNING
Hose must be on the OUTSIDE of ram frame, or it will NOT be mountable to the press.
8
A
Note: There are two sets of holes for bolts. Use centermost holes on the side.
This end up
Note: Ram has been dropped into
ram frame, resting on the bed.
Note: Hose from pump’s outer side must run BEHIND
the frame. Hose with nozzle will be used later.
B
This end up
Attach bolts up through ram frame to matching holes in press.
Hand tighten. Wrench tighten after both bolts have been installed.
Ram is now able to move left and right within ram frame.
CP201 Operation Manual 6

Note: Air motor
must be operating
at the same time.
PROCEDURE FOR BLEEDING AIR
91. Turn valve handle on FRONT of
pump CLOCKWISE until closed.
DO NOT OVERTIGHTEN.
5. Put cradle in the
DOWN position.
Use an adapter on
your air hose and
allow air to flow
through the opening
in the petcock valve
into the pump.
3. Move press bed into highest position
and lock bed into place with both pins.
6. Air that has flowed into the pump
causes the cradle to move up and
the ram to move down. If this happens,
proceed to step 7. If not, check all
hoses and connections and repeat
the procedure.
Air Hose Trigger
WARNING
Do not allow the ram to
extend more than 5.5".
4. Place press plates DIRECTLY
under ram, on press bed.
9. Turn valve handle on pump
COUNTERCLOCKWISE
a maximum of one (1)
turn to open valve.
Ram will retract as
pressure is released.
7. Squeeze trigger on air hose.
Air will enter motor and extend
the ram. Pump ram against press
plates until gauge reads "5 Tons".
8. Insert pump handle into HIGH
PRESSURE CRADLE for more precise
control. Pump ram against press
plates until gauge reads "10 Tons".
High Pressure Cradle
US TONS
US TONS
WARNING
DO NOT attempt to operate pump unless the BREATHER VALVE IS OPEN.
Valve is closed prior to shipping to prevent the loss of hydraulic fluid.
CAUTION Bed must be in UP position, or
you will over extend ram.
CP201 Operation Manual 7
2. Turn petcock valve
(breather) on TOP of pump
COUNTERCLOCKWISE to open.

PUMP INSTRUCTIONS
10
WARNING
DO NOT attempt to operate pump unless the BREATHER VALVE IS OPEN.
Valve is closed prior to shipping to prevent the loss of hydraulic fluid.
CAUTION
HAND TIGHTEN VALVE ONLY.
Excess pressure could
damage the valve assembly.
CAUTION
DO NOT TURN RELEASE VALVE
MORE THAN ONE FULL TURN
or equipment may be disabled.
WARNING This symbol alerts you to the possibility
of serious injury or death if instructions
are not followed.
Failure to heed these warnings may result in loss of load, damage to the press and/or failure resulting in property damage, personal or fatal injury.
This operating manual contains important details concerning the safe operation of this tool.
The user must read and understand these details before any use of the tool.
This manual must be retained for future reference.
1. BEFORE OPERATING PUMP, open
petcock valve (breather) located
on TOP of pump assembly by
turning COUNTERCLOCKWISE.
2. CLOSE the valve located on
the FRONT of the pump assembly
by turning CLOCKWISE.
3. Squeeze air hose trigger until ram
comes into contact with item to be pressed.
4. Once ram is in contact with the item to be pressed,
insert pump handle into high pressure cradle. Using
the high pressure pump moves the ram less with
each stroke and requires less effort to apply pressure.
5. To relieve pressure and retract
ram, turn valve located on FRONT
of pump assembly ONE FULL
TURN COUNTERCLOCKWISE.
Air Hose Trigger High Pressure Cradle
CP201 Operation Manual 8
Top view of pump

REPLACEMENT PARTS LIST
CP201 - 20 TON AIR OVER SHOP PRESS
12
15
8
2
1
14
13
3
4
55
11
10
ITEM NO. ARCAN PART NO. DESCRIPTION QTY.
1 RS345009 Spring 2
2 * CP20102 Press Bed 1
3 * CP20103 Press Frame 1
4 * CP20104 Ram Frame 1
5 RS550034 Press Pin 2
6 RS310012 Pushing Adapter 1
7 RSBS1 Bearing Shield 1
8 RS550041 Press Plate 2
9 RS20FT Press Feet 2
ITEM NO. ARCAN PART NO. DESCRIPTION QTY.
10 RS550051 Z Bar 1
11 RSCBP1209 Pump Handle 1
12 RS20P Pump (includes handle) 1
13 RS20R Ram 1
14 RS20G Gauge 1
15 RSCBP1204 Hose & Fitting 1
16 RS40MPPHK Press Hardware Kit 1 set
1/2"-13 x 1-1/2" Hex Head Bolt 10
1/2" Nut 10
Washer 10
10
9
16
CP201 Operation Manual 9
8
6
7
Items identified with a star (*) are not available separately.

NOTES
CP201 Operation Manual 10

NOTES
CP201 Operation Manual 11
Table of contents
Other Arcan Jack manuals

Arcan
Arcan BLACKLINE XL20B User manual

Arcan
Arcan CRJ30 User manual

Arcan
Arcan XL20 User manual

Arcan
Arcan HJ1800AU User manual

Arcan
Arcan ALJ2T User manual

Arcan
Arcan A20002 User manual

Arcan
Arcan BLACKLINE SAJ25TB User manual

Arcan
Arcan BLACKLINE XL40B User manual

Arcan
Arcan A20018 User manual

Arcan
Arcan CEALJ2T User manual