Archgard I.H.E.A.T. Advantage 999-IHT-540 User manual

ARCHGARD FIREPLACE PRODUCTS
7116 Beatty Drive
Mission, BC V2V 6B4 Canada 200-1308-01
October 17, 2019
English and French Installation Manuals available through
your local dealer or visit our website at:
www.archgard.com
Les manuels d'installation en anglais et en français son
disponibles chez votre détaillant local ou en visitant notre
site web: www.archgard.com
INSTALLER:
LEAVE THIS MANUAL WITH THEAPPLIANCE.
CONSUMER:
RETAIN THIS MANUAL FOR FUTURE REFERENCE.
INSTALLATION MANUAL
After removing the parts from packaging, inspect them to ensure
that no damage has occurred. Please report any damage
immediately to your authorized Archgard dealer.
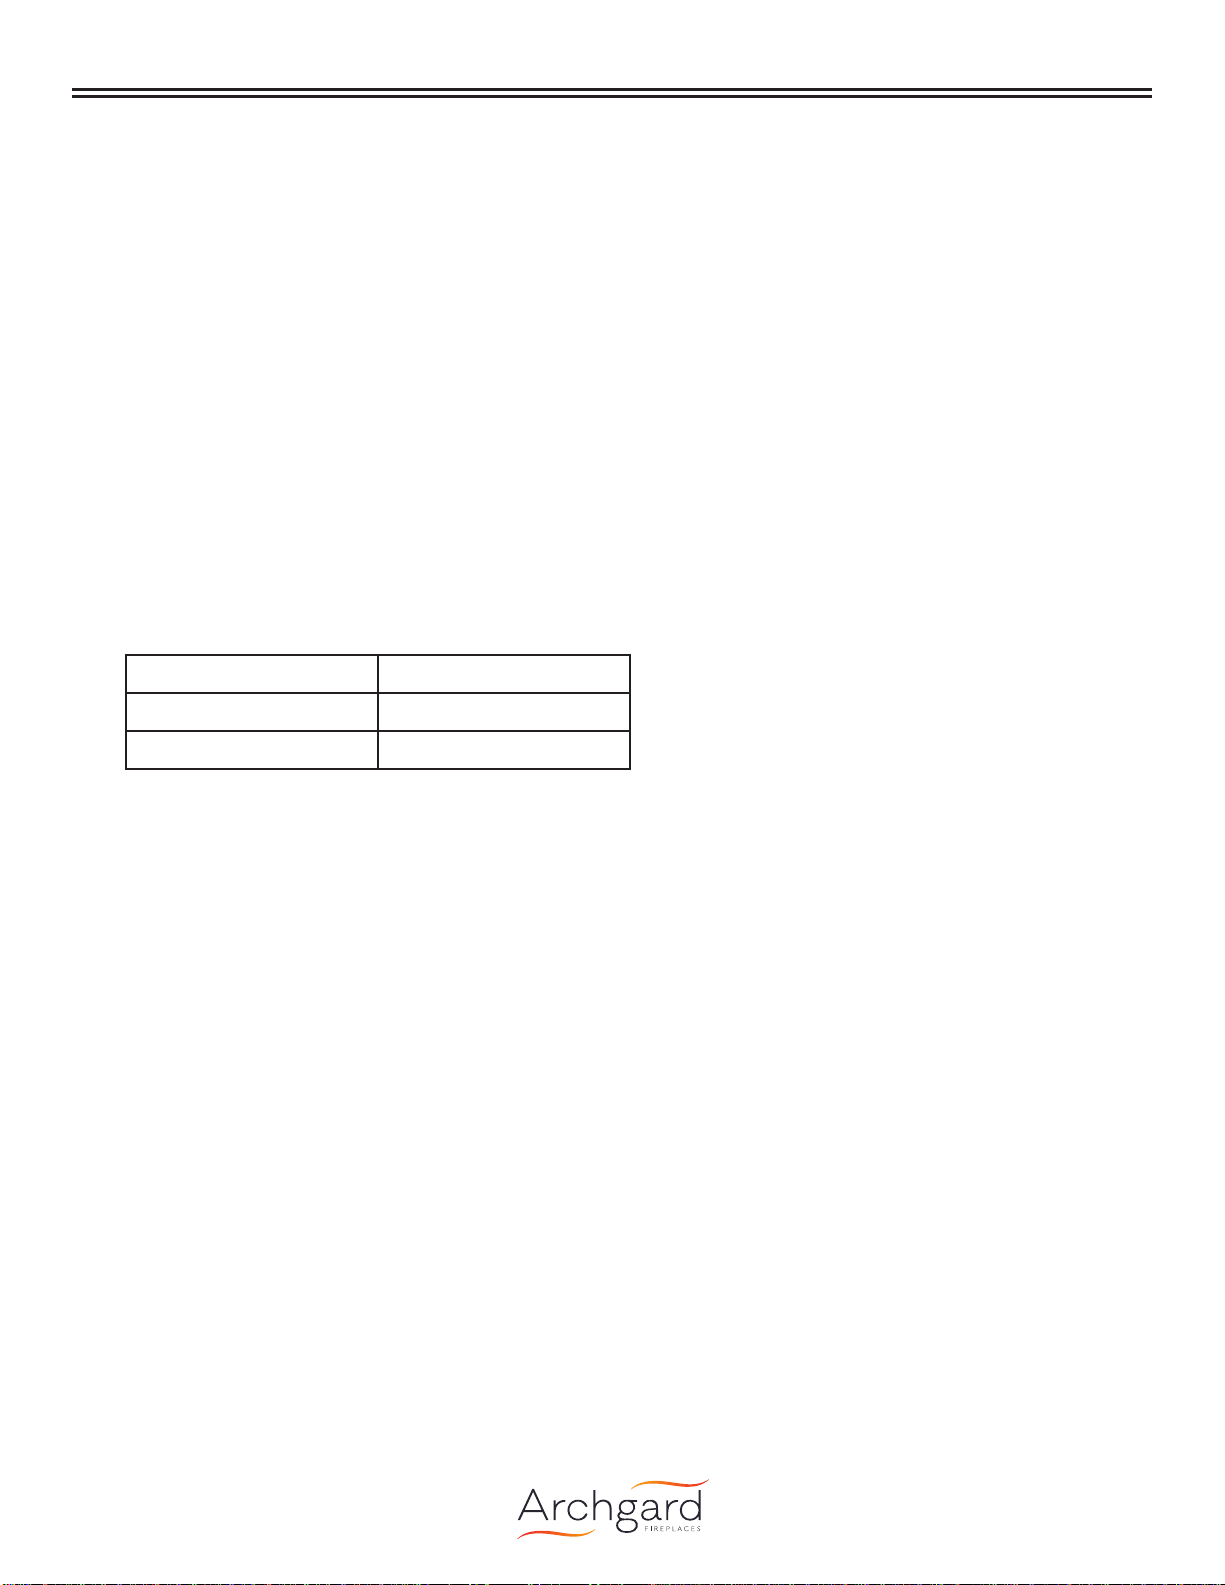
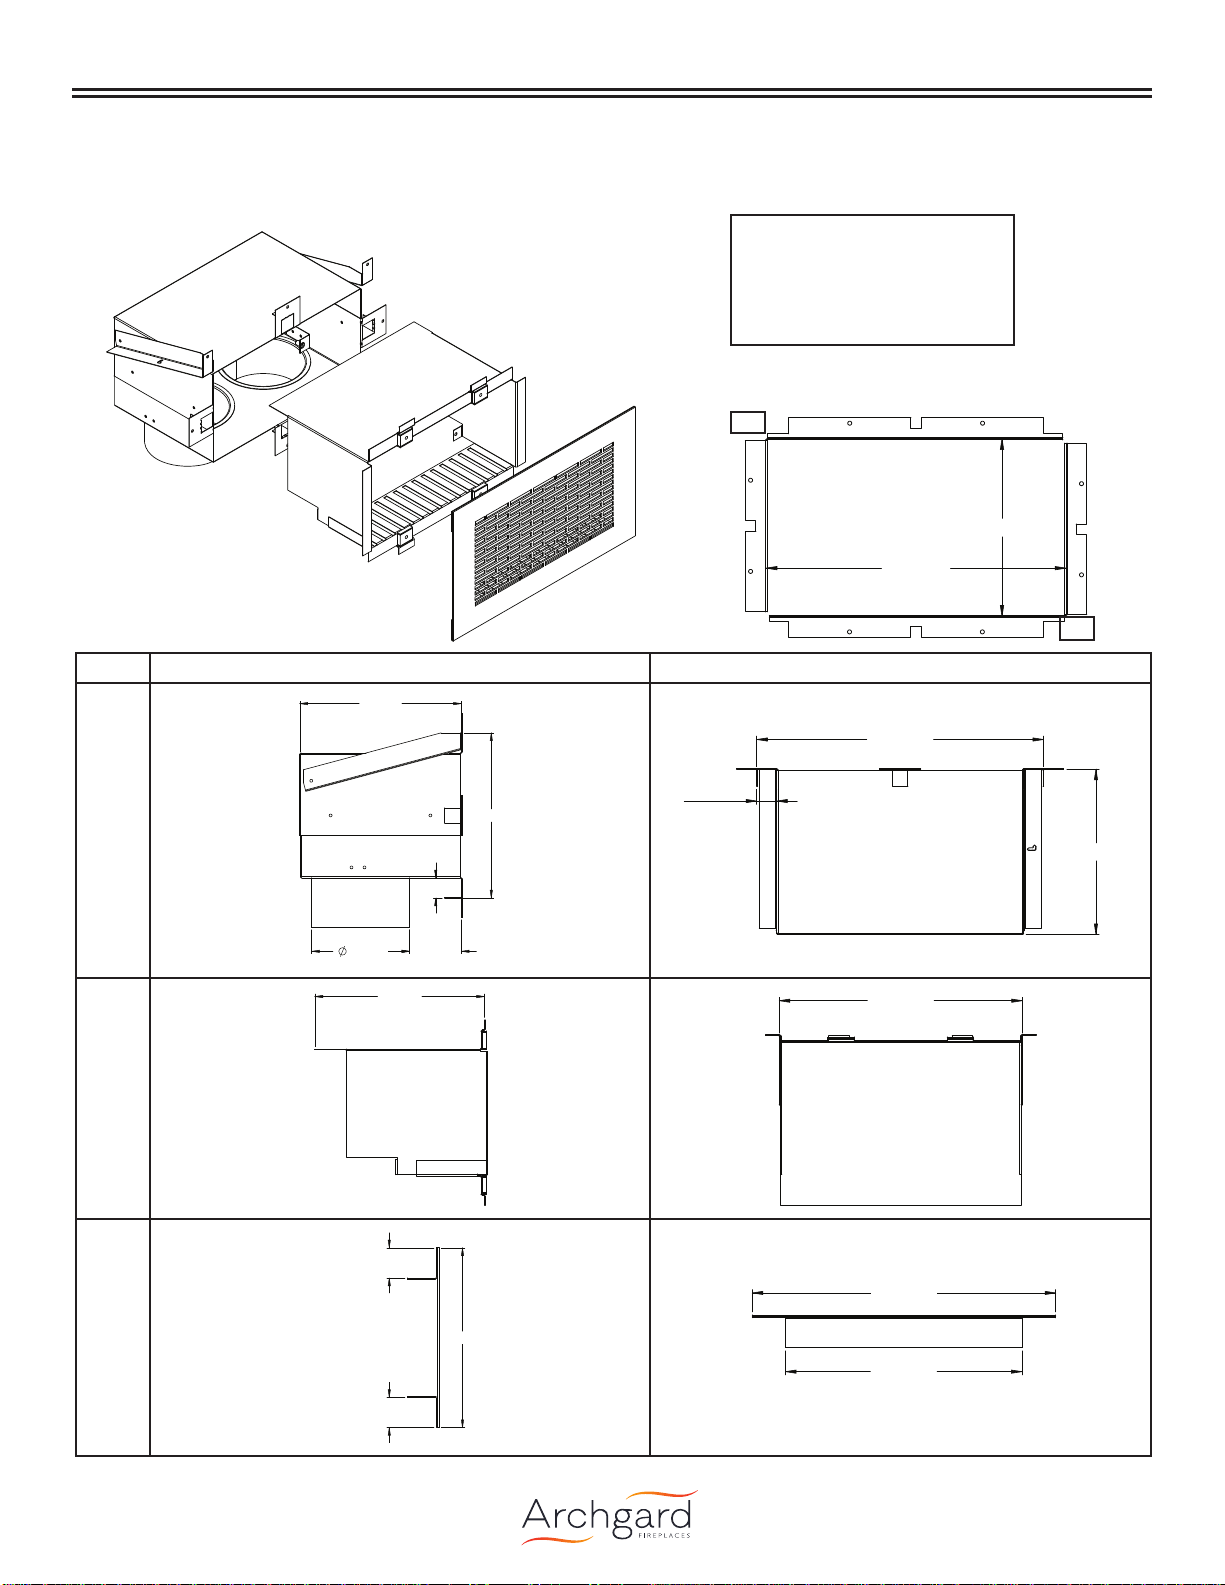
Only kits supplied by the manufacturer may be used.
MODELS:
999-IHT-540 999-IHT-12B2B
999-IHT-51212 999-IHT-12B2W
999-IHT-54012 999-IHT-5FS
999-IHT-40B1B 999-IHT-5V10
999-IHT-40B1W 999-IHT-5V25
I.H.E.A.T. Advantage
Intelligent Heat Exchange
and Air Transfer
Do not store or use gasoline or other flammable vapors or
liquids in the vicinity of this or any other appliance.
WHAT TO DO IF YOU SMELL GAS:
• Do not try to light any appliance
• Do not touch any electrical switch; do not use any phone in
your building
• Immediately call your gas supplier from a neighbors phone.
• Follow the gas suppliers instructions
• If you can not reach your gas supplier, call the fire
department
Installation and service must be performed by a qualified
installer, service agency or the gas supplier.
WARNING: If the information in this manual is not followed
exactly, a fire or explosion may result causing property
damage, personal injury or loss of life.
For installation on 41-DVTE41LN-2
(see the Installation, Operation, and
Maintenance Manual included with the
fireplace)
IMPORTANT
Please review and understand the information in this manual in full
PRIOR to beginning your installation.

2 TABLE OF CONTENTS
1.0 Introduction 3
2.0 Safety Information 4
3.0 Technical Information 5
3.1 Certification 5
3.2 Installation Codes 5
3.3 Specifications 5
4.0 Installation Checklist 6
5.0 Dimensions 7
5.1 12" x 6" Discharge Head 7
5.2 40" Discharge Head 8
5.3 I.H.E.A.T. Intake Dimensions 9
6.0 I.H.E.A.T. Kits and Accessories 10
7.0 Installation Overview 11
7.1 Planning Your Installation 11
7.2 I.H.E.A.T. Configurations 12
8.0 I.H.E.A.T. Framing 14
8.1 Fireplace Framing 14
8.2 12" Discharge Head Framing 15
8.3 40" Discharge Head Framing 16
8.4 Firestop Framing 17
8.5 Corner Installation Framing 18
9.0 Fireplace Clearances with I.H.E.A.T. 19
9.1 Mantel Clearances 19
9.2 Installing a TV or hangingArtwork 20
9.3 Ceiling and Floor Clearances 21
9.4 Adjusting for Variable Wall Thicknesses 23
10.0 Ducting Run Guide 24
11.0 Installation 25
11.1 Installing the 12" x 6" Discharge Head 25
11.2 Installing the 40" Discharge Head 28
11.3 Second Story Installation 31
11.4 Installing a Horizontal Firestop 34
11.5 Installing a Vertical Firestop 35
11.6 Modifying the Fireplace for I.H.E.A.T. 36
12.0 Maintenance 38
12.1 Cleaning and Routine Maintenance 38

3
General Information
1.0 Introduction
Thank you and congratulations for choosing the Archgard I.H.E.A.T. Advantage.
The I.H.E.A.T. Advantage allows you to distribute heat from your Archgard fireplace to wherever you need it the most. It is solidly
designed using the latest technology and manufactured to the highest quality. It is our aim to provide you with a heating experience that
brings many trouble-free years of reliable service.
Some of the many features of your I.H.E.A.T. Advantage are:
• Versatility Direct the heat from your fireplace to where you need it the most with multiple configuration options
• Television orArt Installation This kit reduces the amount of heat directly above the fireplace. This allows heat sensitive objects
such as electronics or decor to be placed above the fireplace (see Section 9.2). It also allows a
lower mantel installation (see Section 9.1)
• Styling Options Many possible finishes to match any decor

4
General Information
2.0 Safety Information
Any alteration to the product that causes carbon or soot deposits that results in any damage or requires cleaning is not the
responsibility of the manufacturer.
Caution
FOR YOUR SAFETY - Do not install or operate your I.H.E.A.T.Advantage without reading and understanding
this manual. Any installation or operational deviation from this instruction manual voids the warranty and may
prove hazardous.
• This product must be installed by a qualified installer and the installation must conform to the installation
codes
• Provide adequate clearance around air openings into combustion chamber
• Provide adequate clearances for proper operation and servicing of the appliance and airways
• The appliance must be properly connected to an approved venting system and must not be connected to a
chimney flue serving a separate solid fuel burning appliance
• Flow of combustion and ventilation air must not be obstructed - always provide adequate combustion and
ventilation air
• Always provide adequate clearance around the intake and exhaust openings
Safety
• Due to high temperatures, the discharge head(s) should be located out of traffic and away from furniture
and draperies
• Never obstruct discharge air
• Children and adults should be alerted to the hazards of high surface temperature and stay away to avoid
burns or clothing ignition
• Young children should be carefully supervised when they are in the same room as the discharge heads.
Toddlers, young children, and others may be susceptible to accidental contact burns. A physical barrier is
recommended if there are at risk individuals in the house. To restrict access to the fireplace or discharge
heads, install an adjustable safety gate to keep toddlers, young children and other at risk individuals out of
the room and away from hot surfaces
• Do not store or place combustibles, gasoline, and other flammable vapors and liquids near the appliance or
discharge heads
• Clothing or other flammable material should not be placed on or near the appliance or discharge heads
• Any safety screen or guard removed for servicing must be replaced prior to operating
• Installation and Repair should be done by a qualified service person. The appliance and ducting should be
inspected before use and at least annually by a professional service person. More frequent cleaning may
be required due to excessive lint from carpeting, bedding materials, etc. It is imperative that the circulating
air passageways are kept clean

5
General Information
3.0 Technical Information
3.1 Certification
This optional kit is listed for use with the 41-DVTE41LN-2 by QAI Laboratories Inc.
Commonwealth of Massachusetts: This kit has been manufactured in accordance with Massachusetts code 248 CMR 5.00.Approval
Code: TBD. (https://licensing.reg.state.ma.us/pubLic/pl_products/pb_pre_form.asp).
Please contact Archgard Industries Ltd., if you have any questions regarding the certification of this kit.
3.2 Installation Codes
This kit must be installed by a qualified gas installer. The installation must conform with the local codes or, in the absence of local
codes, with the current National Fuel Gas Code ANSI Z223.1/ NFPA 54 in the US, or Installation Code CAN/CGA-B149.1 in Canada.
Electrical connections and grounding must conform with local code, or current National Electrical code ANSI/NFPA No. 70-1987 in the
US, and in Canada the current Canadian Electrical Code CSA C22.1.
We recommend that our gas hearth products be installed and serviced by professionals who are certified in the U.S. by the
National Fireplace Institute® (NFI) as NFI Gas Specialists.
3.3 Specifications
Max Air Volume 100 CFM
Max Temperature 200⁰F(93.3⁰C)
Max Duct Length 30' (914.4 cm)

6
General Information
4.0 Installation Checklist
This standard installation checklist is to be used by the installer in conjunction with, not instead of, the instructions contained
within this installation manual.
Customer: Date Installed:
Install Address: Location of Fireplace:
Installer:
I.H.E.A.T. Setup: YES IF NO, WHY NOT?
Do the clearances comply with those specified in this manual?
Does the framing dimensions comply with those specified in this manual?
Appliance Install: (Section 9.0) YES IF NO, WHY NOT?
Verified that the chase is insulated and sealed.
Standoffs, side nailing flanges, and top nailing flange extension are installed.
I.H.E.A.T. is leveled and secured.
Ducting: (Section 10.0) YES IF NO, WHY NOT?
Ducting configuration complies with diagrams in this manual.
Ducting installed and secured in place maintaining proper clearances.
Maintained 1/4" rise for every 1 ft. on horizontal run.
I.H.E.A.T. Discharge head is highest point in vent assembly.
Finishing (Section 12.0): YES IF NO, WHY NOT?
Clearances meet installation manual requirements.
Mantels and/or projections comply with install manual.
Comments:

7
Installation
5.0 Dimensions
5.1 12" x 6" Discharge Head
A
B
C
SIDE VIEW TOP VIEW
A
LQ
LQ
LQ
LQ
LQ
LQ
LQ
LQ
B
LQ
LQ
C
LQ
LQ
LQ
LQ
LQ
Included in:
• 999-IHT-51212
• 999-IHT-54012
• 999-IHT-12B2B
• 999-IHT-12B2W
Figure 5.1.01:
LQ
LQ
FINISHING STRIPS
1
2

8
Installation
5.2 40" Discharge Head
SIDE VIEW TOP VIEW
A
LQ
LQ
LQ
LQ
LQ
LQ
LQ
LQ
B
LQ
LQ
C
LQ
LQ
LQ
LQ
LQ
Included in:
• 999-IHT-540
• 999-IHT-54012
• 999-IHT-40B1B
• 999-IHT-40B1W
A
B
C
Figure 5.2.01:
LQ
LQ
FINISHING STRIPS
1
2

9
Installation
5.3 I.H.E.A.T. Intake Dimensions
LQ LQ
LQ
LQ
LQ
SIDE VIEW
TOP VIEW
The dimensions shown below relate to the dimensions of the I.H.E.A.T. Intake only. For appliance dimensions, please see the Installa-
tion, Operation, and Maintenance Manual included with the fireplace.
Figure 5.3.01:

10
Installation
6.0 I.H.E.A.T. Kits and Accessories
Kit Model Number Description
999-IHT-540 40" Long Discharge System with 5" Collars
999-IHT-51212 Two 12" x 6" Discharge System with 5" Collars
999-IHT-54012 One 40" Long Discharge and one 12" x 6" Discharge System with 5" Collars
999-IHT-40B1B 40" Bezel, Clean Design, Satin Black
999-IHT-40B1W 40" Bezel, Clean Design, White
999-IHT-12B2B One 12" Bezel, Slotted Design, Satin Black
999-IHT-12B2W One 12" Bezel, Slotted Design, White
999-IHT-5FS Two 5" Fire Stop
999-IHT-5V10 5" 2 Ply Aluminum Flex Ducting, 10' long, certified to UL1777 or UL2112, and ULC S635
999-IHT-5V25 5" 2 Ply Aluminum Flex Ducting, 25' long, certified to UL1777 or UL2112, and ULC S635
Bezel Options
999-IHT12B2B: 12" Slotted Design, Satin Black 999-IHT12B2W: 12" Slotted Design, White
999-IHT-40B1B: 40" Clean Design, Satin Black
999-IHT-40B1W: 40" Clean Design, White
Figure 6.0.01: Figure 6.0.02:
Figure 6.0.03:
Figure 6.0.04:
Note: Bezels may be painted to match decor using a high temperature paint of choice.

11
Installation
7.1 Planning Your Installation
7.0 Installation Overview
To install I.H.E.A.T. with your fireplace, take the following steps:
1. Pick a location for installation of the fireplace - be aware of traffic areas and the location of furniture
2. Choose the location(s) for the I.H.E.A.T. Discharge Head(s)
3. Install the framing according to Section 8 of this manual
4. Install the I.H.E.A.T. Discharge HeadA(See Section 5.1 and Section 5.2).
5. Install any firestops.
6. Install the Intake on the 41-DVTE41LN-2.
7. Install the 41-DVTE41LN-2.
8. Make sure the ducting connections are tight.
9. Install the finish strips.
10. Finish the fireplace according to the Installation, Operation, and Maintenance Manual included with the fireplace.
11. Install I.H.E.A.T. Discharge Head B (See Section 5.1 and Section 5.2). This may be adjusted to accommodate different wall
thicknesses or finish materials such as tile or brick.
12. Install the I.H.E.A.T. Discharge Bezel (item C, see Section 5.1 and Section 5.2).

12
Installation
7.2 I.H.E.A.T. Configurations
Figure 7.2.01: I.H.E.A.T. Cutaway view with ducting (999-IHT-540)
With I.H.E.A.T. there are many possible configurations to distribute the heat to wherever you need it the most. The following images
show a few examples of common configurations.
$
'(7$,/$
6&$/(
Figure 7.2.02: I.H.E.A.T. second story heat distribution (999-IHT-54012)

13
Installation
Figure 7.2.06: I.H.E.A.T. with television and 40"
discharge head (999-IHT-540)
Figure 7.2.04: I.H.E.A.T. with dual 12" discharge
heads (999-IHT-51212)
Figure 7.2.05: I.H.E.A.T. with television and dual 12"
discharge heads (999-IHT-51212)
Figure 7.2.03: I.H.E.A.T. second storey heat distri-
bution with television (999-IHT-54012)

14
Installation
8.0 I.H.E.A.T. Framing
IMPORTANT
Framing dimensions should allow for wall covering thickness and fireplace facing materials. If using a hearth, adjust rough opening
size as necessary to maintain at least minimum clearance requirements. Non–combustible facing material may be applied over (but
not directly to) fireplace face. This will prevent facing material from falling offdue to heat expansion.
Do not obstruct the flow of ventilation air.
WARNING
Provide adequate clearances around air openings into the combustion chamber. Do not obstruct upper and lower grill openings.
Room air enters through lower passage, is heated and exists through upper passage. Blocking these passages may result in
overheating, creating a potentially hazardous situation.
The layout of the framing differs from the Installation,
Operation, and Maintenance Manual included with the
fireplace to accommodate the ducting used when installing
I.H.E.A.T.
Determine exact position of your fireplace, including hearth
height, width, and depth (if applicable). If possible, place
fireplace in such a manner that vent termination will be
between two studs, eliminating the need for additional
framing.
Consider height of hearth finish material (stone, brick etc.)
when building fireplace platform.
Install fireplace on hard metal or wood surface extending
the full width and depth of fireplace.
If masonry is to be used (optional), prepare the necessary
foundation for the masonry load. When masonry
construction is used, a lintel iron must be used over top
of fireplace to support the added weight. Never use this
fireplace to support additional weight.
Build hearth to desired size and height. If a hearth
extension is desired, combustible material may be used.
See the Installation, Operation, and Maintenance Manual
included with the fireplace.
LQ
LQ
LQ
LQ
Wall Board Thickness
(Nailing Flange Setting) *Framing Depth
3/8" 20.625"
1/2" 20.5"
5/8" 20.375"
3/4" 20.25" Figure 8.1.01
FIRE HAZARD
DO NOT install directly on carpet, vinyl, or any
combustible material other than wood.
8.1 Fireplace Framing
*

15
Installation
8.2 12" Discharge Head Framing
FP
LQ
0,1
FP
LQ
0,1
LQ
LQ
LQ
127([0XVWEHWXUQHG
LQ
LQ
LQ
LQ
127([0XVWEHWXUQHG
Figure 8.2.01

16
Installation
8.3 40" Discharge Head Framing
FP
LQ
0,1
FP
LQ
0,1
LQ
LQ
LQ
127([0XVWEHWXUQHG
FP
LQ
FP
LQ
LQ
LQ
127([0XVWEHWXUQHG
Figure 8.3.01

17
Installation
8.4 Firestop Framing
LQ
LQ
LQ
LQ
Horizontal Installation
Vertical Installation
Figure 8.4.01
Figure 8.4.02

18
Installation
8.5 Corner Installation Framing
%LQ
$LQ
'LQ
&LQ
(LQ
)LQ
'LQ
+LQ
'LQ
LQ LQ
LQ
LQ
LQ
*LQ
$LQ
Dimension 3/8" Wall Board 1/2" Wall Board 5/8" Wall Board 3/4" Wall Board
A 71.25" 71" 70.75" 70.50"
B 50.75" 50.75" 50.75" 50.75"
C 44.40" 44.40" 44.40" 44.40"
D 45.42" 45.25" 45.07" 44.89"
E 86.63" 86.63" 86.63" 86.63"
F 32.12" 35.50" 31.87" 31.74"
G 64.24" 64" 63.75" 63.50"
H 17.33" 17.33" 17.33" 17.33"
Note: See Section 8.2 and Section 8.3 for Discharge Head framing specifications.
Figure 8.5.01

19
Installation
9.0 Fireplace Clearances with I.H.E.A.T.
9.1 Mantel Clearances
FP
LQ
FP
LQ
FP
LQ
Noncombustible
material only
in this zone
22.00 in
[55.88 cm]
20.00 in
[50.8 cm]
18.00 in
[45.72 cm]
16.00in
[40.64cm]
16.00 in
[40.64 cm]
18.00 in
[45.72 cm]
20.00 in
[50.8 cm]
14.02 in
[35.61 cm]
Figure 9.1.01
Note: Mantel clearances
are measured from the top
of the fireplace opening.

20
Installation
9.2 Installing a TV or hanging Artwork
WARNING
Most television manufacturers instruct the homeowner to never place a television above a heat source.
Placing heat sensitive objects such as televisions or artwork above a heat source may affect the longevity of the item and negate any
warranty the item may have. If you do place heat sensitive objects above the fireplace, please be aware of the large amount of heat
generated by the fireplace. We recommend placing the item above a mantel to reduce the amount of heat that can reach the object.
Archgard Industries does not take responsibility for any negative impact to objects placed near the fireplace.
WARNING
Never install objects over the face of the fireplace. Always maintain a 14.02" clearance from the top of the fireplace opening. Be sure
to protect any wires, cables, and other heat sensitive components from hot objects including the fireplace, ducting, discharge heads,
and venting.
3" [7.6 cm]
MIN
14.02"
[35.61 cm]
MIN
Figure 9.2.01
3" [7.6 cm]
MIN
14.02"
[35.61 cm]
MIN
This manual suits for next models
9
Table of contents
Other Archgard Fireplace Accessories manuals
Popular Fireplace Accessories manuals by other brands

FireplaceXtrordinair
FireplaceXtrordinair 864 TRV (Top/Rear Vent) manual

pleasant hearth
pleasant hearth FA990SA quick start guide

Quadra-Fire
Quadra-Fire LOGS-QFI35FB Log Placement Instructions

Dimplex
Dimplex ALBANY ECO ABN15 E manual

IHP
IHP Superior 900347-00 Removal and Reinstallation Instructions

Heatilator
Heatilator CFL-24NG Log Placement Instructions