Archos 605 WiFi User manual

Annex No.5
Page 1 of 75
User Manual
(User Manual ARCHOS 605 WiFi – v.0.1)
ARCHOS 605 WiFi

Dear Customer,
Thank you for choosing this ARCHOS product. We hope that you will enjoy
using it and that it will give you entire satisfaction for many years to come.
Please do register your product on our website (www.archos.com/register) to
ensure that you get access to our help line and to be informed of free software
updates for your product.
Wishing you the best Multimedia experience,
The ARCHOS Team.
All the information contained in this manual was correct at the time of pub-
lication. However, as our engineers are always updating and improving our
products, your device’s software may have a slightly different appearance or
modied functionality than presented in this manual.
ENGLISH
Please visit www.archos.com/manuals to download the latest version of this manual.
605 WIFI
ENGLISH USER MANUAL
Version 1.0

MANUAL
V1.0
605 WIFI TABLE OF CONTENTS > p. 2
TABLE OF CONTENTS
ARCHOSDESCRIPTION ............................................. 4
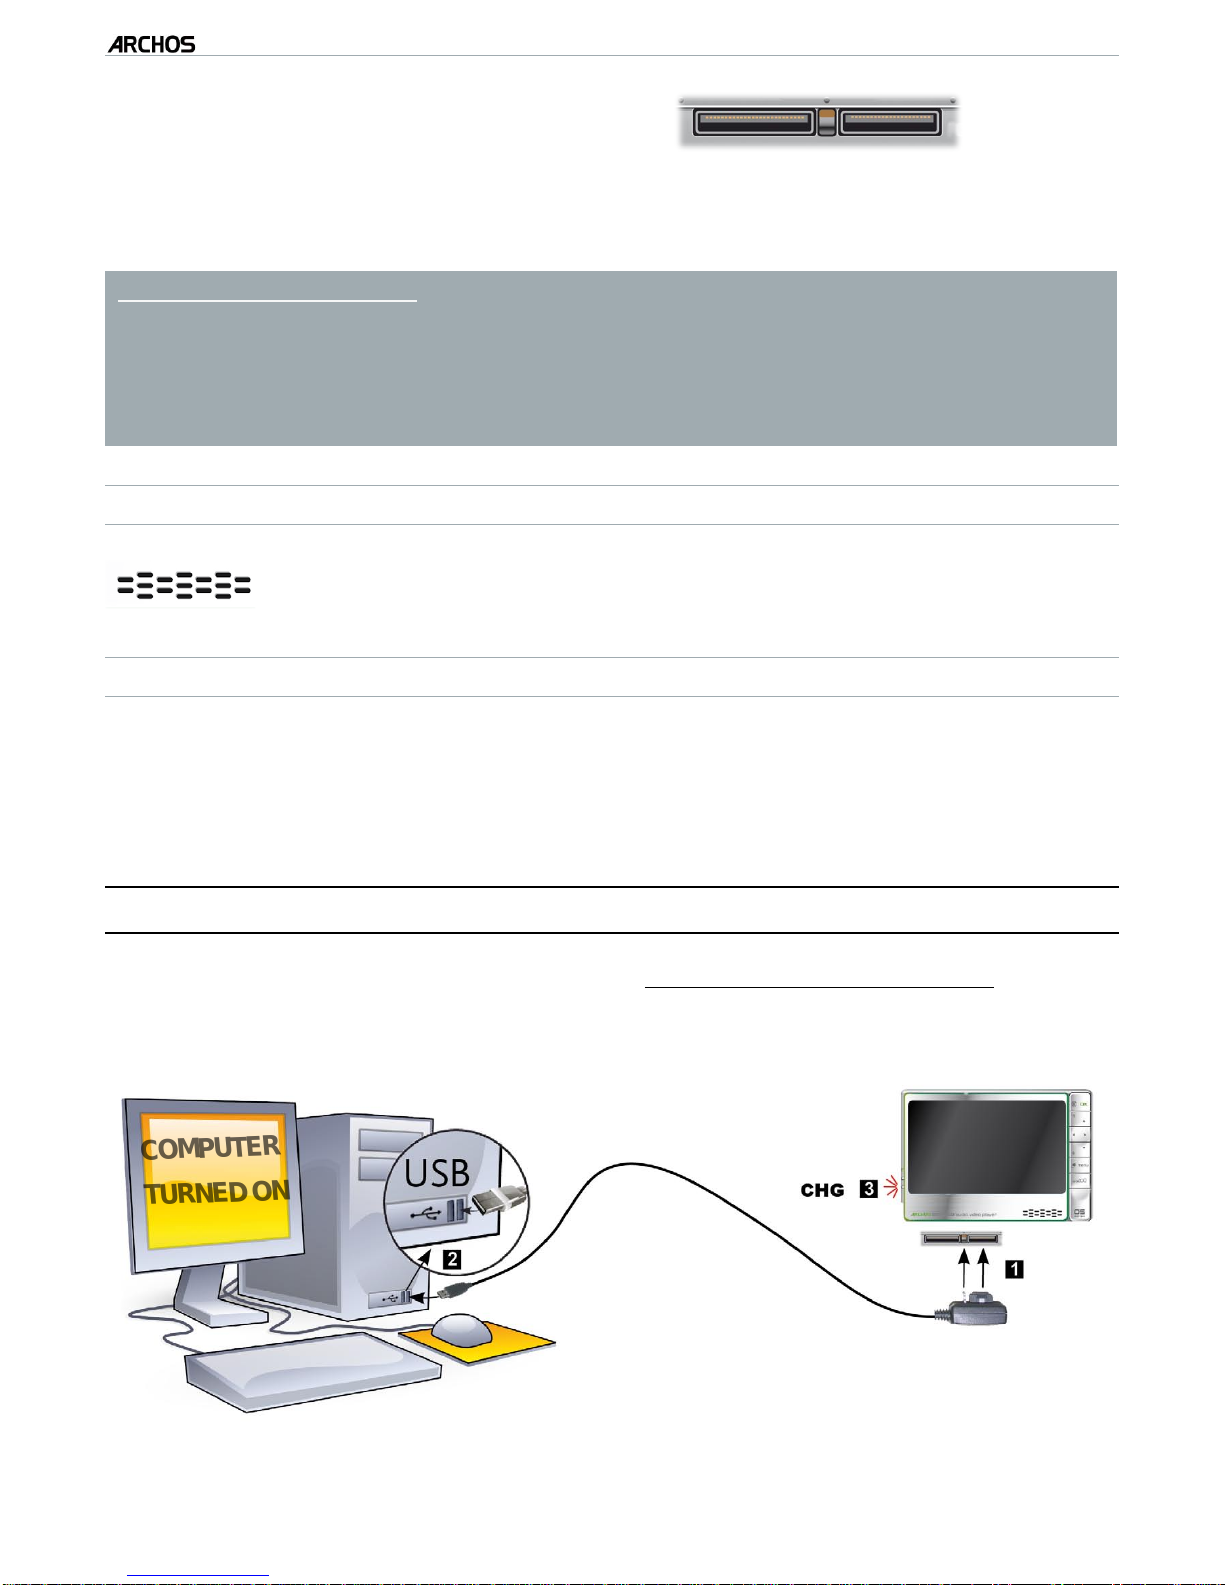
FIRST TIME USAGE: CHARGING THE BATTERY . . . . . . . . . . . . . . . . . . . . . . . . . . . 5
TURNINGTHEARCHOSON/OFF....................................... 6
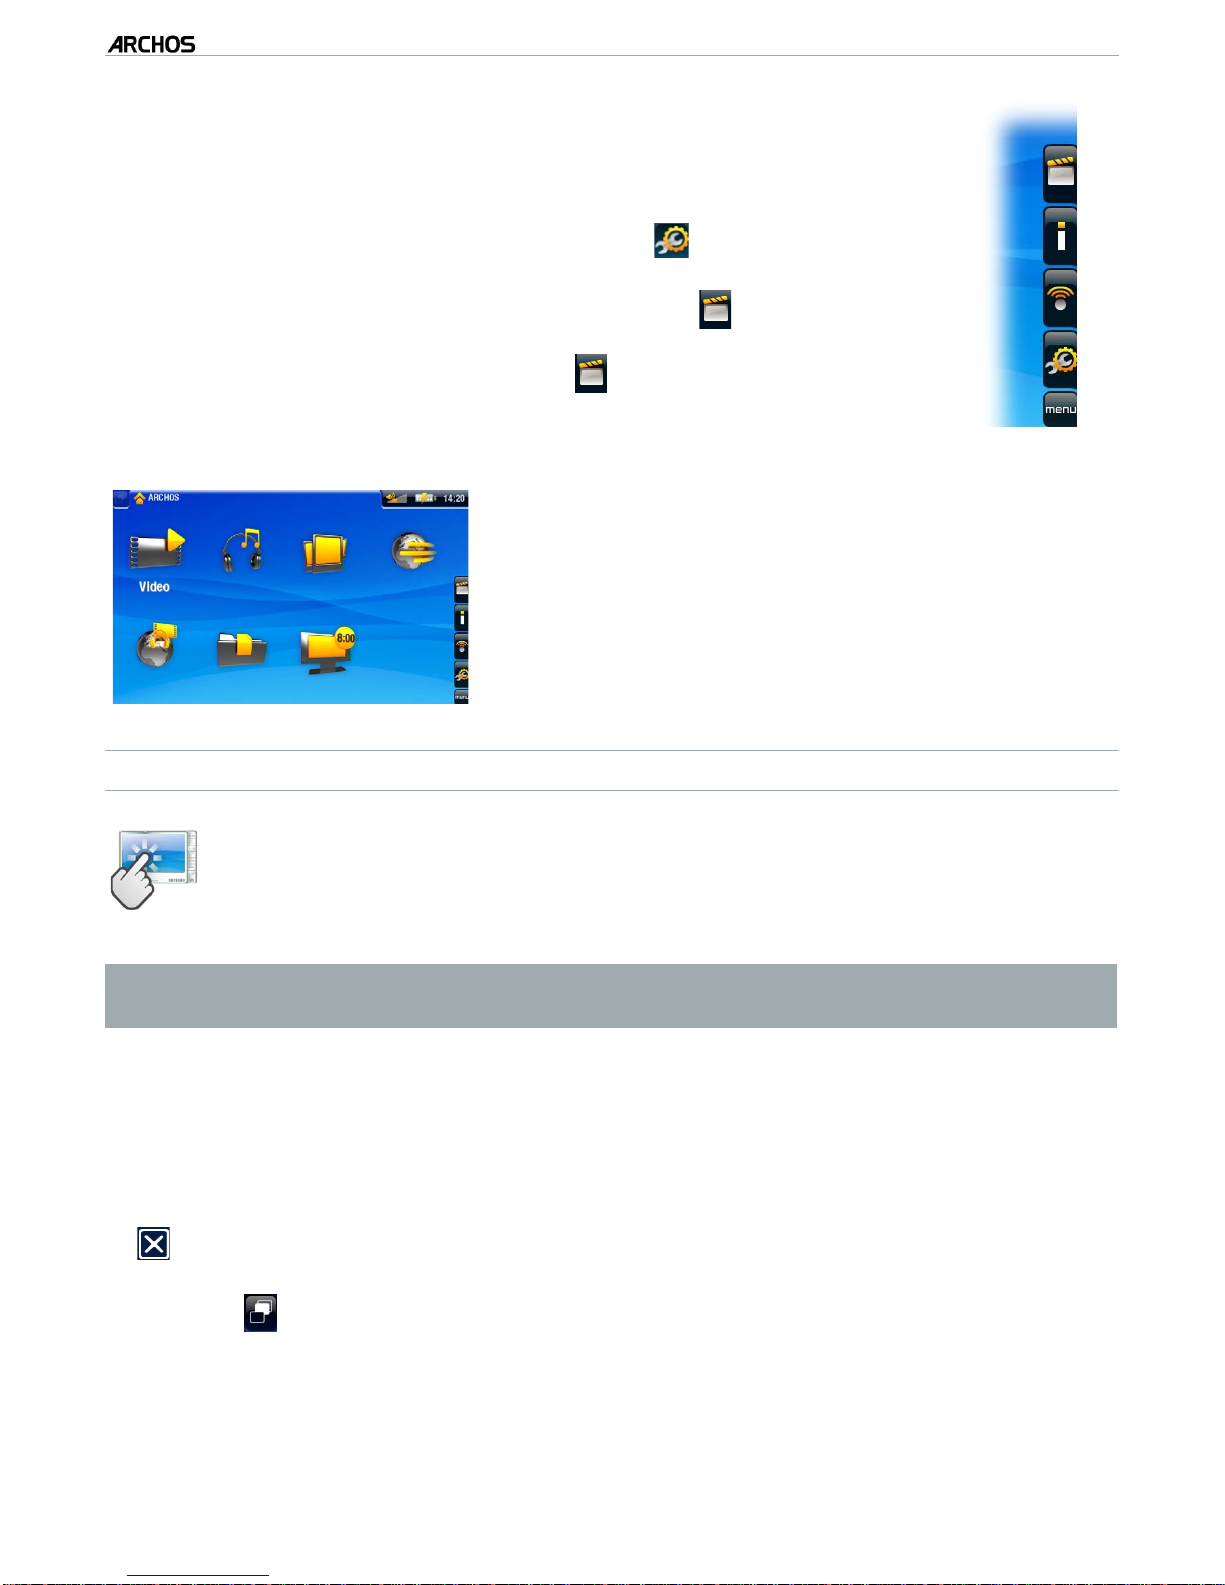
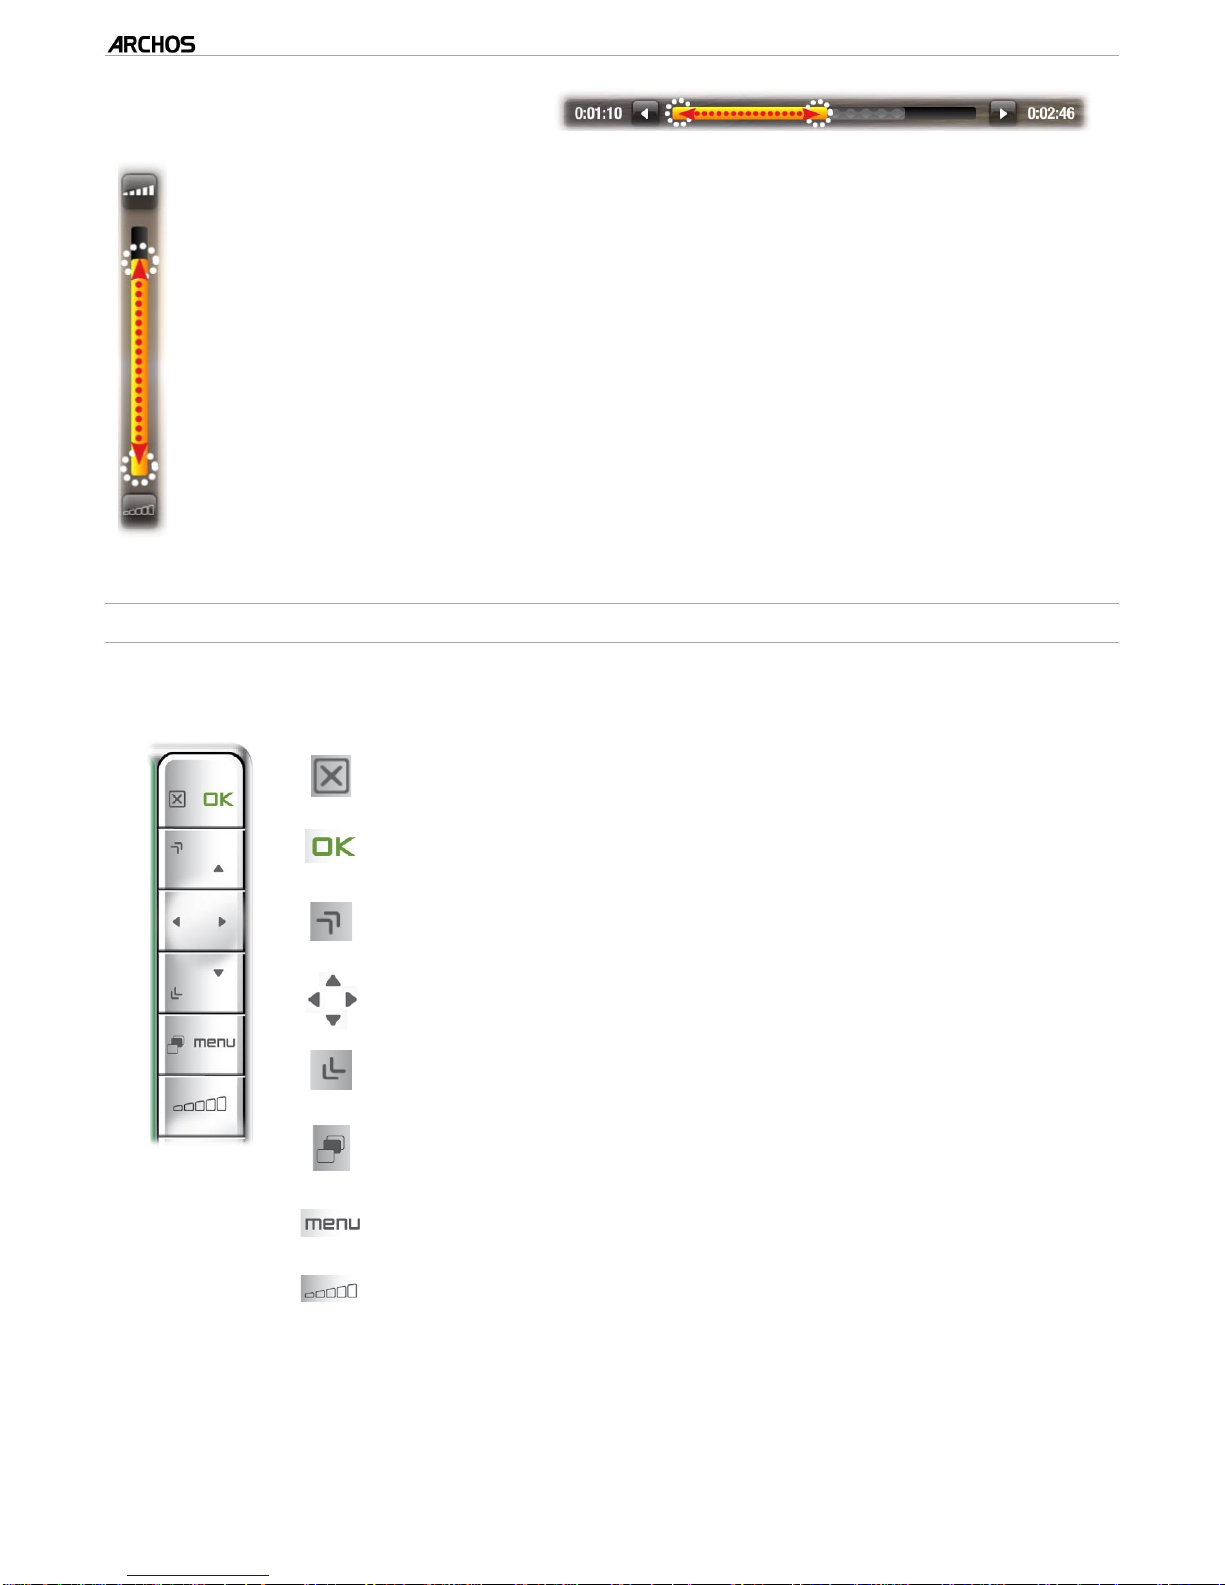
USINGTHEARCHOSINTERFACE...................................... 6
CHANGINGTHELANGUAGE.......................................... 9
PRODUCT CARE .................................................. 10
1. PLAYING VIDEO ........................................................................................................ 12
1.1 BROWSING THROUGH YOUR VIDEOS. . . . . . . . . . . . . . . . . . . . . . . . . . . . . . . 12
1.2VIDEOPLAYBACK ............................................. 13
1.3VIDEOSETTINGS.............................................. 15
1.4 PUTTING VIDEOS ONTO YOUR ARCHOS. . . . . . . . . . . . . . . . . . . . . . . . . . . . . 16
1.5RECORDINGVIDEO ............................................ 17
1.6 PLAYING YOUR PC’S SHARED VIDEOS . . . . . . . . . . . . . . . . . . . . . . . . . . . . . 18
2. PLAYING MUSIC...................................................................................................... 19
2.1 BROWSING THROUGH YOUR MUSIC FILES . . . . . . . . . . . . . . . . . . . . . . . . . . 19
2.2MUSICPLAYBACK............................................. 20
2.3MUSICPLAYERSETTINGS....................................... 23
2.4PLAYLISTS................................................... 25
2.5 PUTTING MUSIC ONTO YOUR ARCHOS . . . . . . . . . . . . . . . . . . . . . . . . . . . . . 27
2.6RECORDINGAUDIO ............................................ 28
2.7 PLAYING YOUR PC’S SHARED MUSIC . . . . . . . . . . . . . . . . . . . . . . . . . . . . . . 29
3. VIEWING PHOTOS ................................................................................................ 30
3.1 BROWSING THROUGH YOUR PHOTOS . . . . . . . . . . . . . . . . . . . . . . . . . . . . . . 30
3.2PHOTOVIEWER............................................... 31
3.3PHOTOSETTINGS.............................................. 33
3.4PLAYINGASLIDESHOW......................................... 34
3.5 VIEWING PHOTOS WHILE LISTENING TO MUSIC . . . . . . . . . . . . . . . . . . . . . . 34
3.6 PUTTING PHOTOS ONTO YOUR ARCHOS . . . . . . . . . . . . . . . . . . . . . . . . . . . . 35
3.7 PLAYING YOUR PC’S SHARED PHOTOS . . . . . . . . . . . . . . . . . . . . . . . . . . . . . 35
4. USING THE FILE BROWSER ............................................................................ 36
4.1NAVIGATION.................................................. 36
4.2USINGTHEVIRTUALKEYBOARD.................................. 38
4.3 BROWSING OTHER COMPUTERS ON THE NETWORK. . . . . . . . . . . . . . . . . . . 40
4.4USINGTHEPDFREADER........................................ 40
5.
CONNECTING TO A WIFI NETWORK .......................................................................................................43
5.1WIFICONNECTIONPROCEDURE .................................. 43
5.2WIFINETWORKCONFIGURATION ................................. 44
6. THE WIFI FEATURES .......................................................................................... 47
6.1BROWSINGTHEWEB........................................... 47
TABLE OF CONTENTS CONTINUED ON NEXT PAGE...

MANUAL
V1.0
605 WIFI TABLE OF CONTENTS > p. 3
6.2 PLAYING YOUR PC’S SHARED MEDIA FILES . . . . . . . . . . . . . . . . . . . . . . . . . 50
6.3THEARCHOSCONTENTPORTAL.................................. 52
7. TRANSFERRING FILES....................................................................................... 53
7.1 CONNECTING THE ARCHOS TO A COMPUTER . . . . . . . . . . . . . . . . . . . . . . . . 53
7.2PUTTINGFILESONTOTHEARCHOS ............................... 54
7.3DISCONNECTING.............................................. 54
8. MAIN SETTINGS.................................................................................................... 57
8.1SOUNDSETTINGS ............................................. 57
8.2DISPLAYSETTINGS............................................ 59
8.3FILESERVERSETTINGS......................................... 61
8.4APPEARANCESETTINGS........................................ 62
8.5 LANGUAGE AND REGION SETTINGS . . . . . . . . . . . . . . . . . . . . . . . . . . . . . . . 63
8.6TVCONTROLSETTINGS......................................... 63
8.7CLOCKSETTINGS.............................................. 64
8.8POWERSETTINGS............................................. 65
8.9SYSTEMSETTINGS ............................................ 66
8.10 FIRMWARE AND PLUGINGS SETTINGS . . . . . . . . . . . . . . . . . . . . . . . . . . . . 68
8.11UPDATINGTHEFIRMWARE ..................................... 69
9. OPTIONAL FUNCTIONALITIES........................................................................ 70
9.1ARCHOSACCESSORIES......................................... 70
9.2ARCHOSPLUGINS ............................................. 71
9.2SCHEDULINGATVRECORDING................................... 72
9.3 RECORDING EXTERNAL VIDEO MANUALLY . . . . . . . . . . . . . . . . . . . . . . . . . . 72
9.4 RECORDING EXTERNAL AUDIO MANUALLY. . . . . . . . . . . . . . . . . . . . . . . . . . 72
9.5 RECORDING EXTERNAL AUDIO MANUALLY. . . . . . . . . . . . . . . . . . . . . . . . . . 72
TECHNICAL SUPPORT INFORMATION............................................................. 74

MANUAL
V1.0
605 WIFI INTRODUCTION > p. 4
INTRODUCTION
ARCHOS DESCRIPTION
MAIN BUTTONS
On top of the device:
Press and hold to turn your ARCHOS on/off.
The LED indicator, next to the button, lights up when the device is on.
•
•
TV/
LCD Press once to switch the display of the image between the built-in LCD
screen and a TV (with the optional DVR Station, Mini Dock or Battery Dock,
available at www.archos.com). See
Optional Functionalities
.
When the image is displayed on a TV, the TV LED indicator lights up and the
built-in LCD screen turns off.
Press and hold to lock/unlock the buttons/touchscreen of your ARCHOS.
•
•
•
LED INDICATORS
On the left side of the device:
CHG Battery charge indicator.
light on: the battery is charging
ashing: the battery is fully charged
•
•
HDD Hard Disk Drive activity indicator:
the light ickers when the hard drive is active (playing/transfer-
ring les)
•
TV Video display indicator:
the light is on when the image of the ARCHOS is displayed on a
TV (see TV/LCD button).
•
CONNECTORS
On the left side of the device:
Headphone jack: to connect headphones

MANUAL
V1.0
605 WIFI INTRODUCTION > p. 5
Underneath the device:
Docking connectors:
Connect your ARCHOS to a computer (see
Connecting the ARCHOS to a Computer
)
Charge the battery of your
ARCHOS
(see
Battery Charge
).
With optional accessories: (available from www.archos.com)
Connect a compatible USB device to the ARCHOS, with the optional DVR Station,
Mini dock or Battery Dock.
Record external audio/video, with the optional DVR Station or DVR Travel Adapter.
See Optional Functionalities.
•
•
•
BUILT-IN LOUDSPEAKER
On the right side of the device, below the buttons
LEG STAND
Your ARCHOS is equipped with a leg stand, located on the back of the device.
Carefully pull it out, and it will allow your ARCHOS to stand by itself on a at,
stable surface.
FIRST TIME USAGE: CHARGING THE BATTERY
Before using your ARCHOS for the rst time, completely charge its battery.
The battery of your ARCHOS charges via your computer’s USB port:
Computer
turned on
•
•
•
•

MANUAL
V1.0
605 WIFI INTRODUCTION > p. 6
Plug the ARCHOS USB cable into your ARCHOS,
Plug the USB end of the cable into your computer (which is turned on),
The ARCHOS will turn on and start charging:
A lightning bolt symbol will ash over the battery icon in the task bar while
the battery is charging: .
The CHG indicator LED is on while the battery is charging; it will blink when
the battery is fully charged.
You can also charge your ARCHOS device without a computer, and more rapidly, via
the optional DVR Station, Mini Dock or Battery Dock (available at www.archos.com).
See Optional Functionalities.
TURNING THE ARCHOS ON/OFF
Press and hold the button to turn your ARCHOS on/off.
The LED indicator, next to the button, lights up when the device is on.
USING THE ARCHOS INTERFACE
INTERFACE DESCRIPTION
Status Bar
In the top right corner of the screen, the status
bar indicates the volume, the battery level, the
current time of your device, etc.
•
Tabs
In the top left corner of the screen, the tabs area
shows other available applications and screens. They
vary, depending on where you are in the interface.
When there is only one tab available, the Tab icon
, in the top left corner, is grayed out.
•
•
1.
2.
3.
-
-
•
•

MANUAL
V1.0
605 WIFI INTRODUCTION > p. 7
Contextual Menu
In the lower right corner of the screen, the contextual menu area
shows the menu icons: the available options will vary, depending on
where you are in the interface.
In the Home screen, choose the “Settings” menu item to access
the main settings of your ARCHOS.
In the Home screen, the “Resume” menu item allows you to re-
sume the last-played music or video le, if it was interrupted before
the end. If the “Resume” menu icon does not appear, it means
that no music or video le playback can be resumed.
•
•
•
Home Screen
This is the main screen of your ARCHOS, showing
its main functions.
•
USING THE TOUCHSCREEN
Your ARCHOS is equipped with a touchscreen.
Below is a description of the main tactile screen areas and a few tips on
how to use the touchscreen.
In order to keep your touchscreen in good condition, and to avoid damaging the
screen surface, you should use only the included stylus or your ngernail.
Main Touchscreen Actions
To open an application/screen via its icon or item, tap on the icon/item to high-
light it, and tap on it again.
To close a current application/screen, when it is possible, tap on the Escape icon
(in the top right corner of the screen).
When several tabs are available, you can switch between them by tapping on the
Tab icon (in the top left corner of the screen).You can also tap directly on one
of the tabs to access the corresponding screen.
To execute a menu item’s function, simply tap on its icon. In order to display a
text description of the icon, tap on the menu word.
•
•
•
•

MANUAL
V1.0
605 WIFI INTRODUCTION > p. 8
Other Touchscreen Actions
When watching a video or listening to music, you can tap on the progres-
sion bar to go directly to a different location in the video or song.You can
also use the stylus to drag the cursor in the progression bar to another loca-
tion in the video or song.
In the screens where it appears, the volume bar can be dragged in the same
way.
In the ARCHOS le browser, you can drag the scroll bar up and down to
scroll the le list up and down. You can also scroll faster by tapping above or
below the cursor in the scroll bar.
In the PDF viewer and in the Web browser, you can scroll up and down by
tapping on the page and dragging it up or down (be careful not to tap on a
link!).
•
•
•
•
USING THE BUTTONS
The navigation buttons are located on the right side of the device:
Exit button
(Escape / Back / Stop)
OK button
(Enter/Accept or Play/Pause/Resume)
Up Accelerator button
(high-speed fast forward or list scrolling)
Navigation buttons
(move from an item to another)
Down Accelerator button
(high-speed fast rewind or list scrolling)
Tab button
(tab between available screens)
Menu button
(display a text description of the available menu icons)
Volume button
(increase/decrease volume)

MANUAL
V1.0
605 WIFI INTRODUCTION > p. 9
Main Button Actions:
To open an application/screen via its icon or item, use the Navigation buttons to
highlight the icon/item and press OK.
To close a current application/screen, when it is possible, press the Exit button .
When several tabs are available, you can switch between them by pressing the
Tab button .
To execute a menu icon’s function, press the menu button, select a menu item
with the navigation pad, and press OK.
Other Button Actions
When watching a video or listening to music, you can hold the left/right
Navigation buttons to drag the cursor in the progression bar to another
location in the video or song.
To increase/decrease volume, when it is possible, use the Volume button
.
In the ARCHOS le browser, you can hold the up/down Navigation but-
tons to scroll the le list up and down. You can also scroll faster by using
the Accelerator buttons.
In the PDF viewer and in the Web browser, you can scroll up and down by
holding the up/down Navigation buttons.
•
•
•
•
CHANGING THE LANGUAGE
The interface of your ARCHOS is available in various languages.
If your language is not available, go to the ARCHOS website (www.ar-
chos.com/rmware) and download and install the latest version. New
languages are included in the rmware as they become available. See
Updating the Firmware
.
•
•
To change the system’s language:
In the Home screen, select the “Settings” menu item, and choose “Language
and Region”.
Select a different language using
the left/right arrows (your settings
are saved instantly).
2.
Close the “Language and Region” screen to exit and go back to the Home
screen.
•
•
•
•
1.
3.

MANUAL
V1.0
605 WIFI INTRODUCTION > p. 10
PRODUCT CARE
CARING FOR YOUR ARCHOS
Your ARCHOS is an electronic product that needs to be treated with care:
Do not subject it to unnecessary shock or vibration.
Do not subject it to heat, keep it ventilated (especially when connected to a com-
puter).
Keep it away from water and excessively humid areas.
Keep it away from high electromagnetic elds.
Keep any connected wires neatly arranged: the device could fall if a cable is acci-
dentally pulled by a child.
Do not open it up.There are no user-serviceable parts inside. Opening will void
your warranty.
RESETTING YOUR ARCHOS
In the event that your ARCHOS freezes operation (due to electrostatic phenom-
ena, for example), you can reset it by pressing the button for 15 seconds.
If this does not work, you can also press the “master reset” button as shown be-
low.
Underneath the device:
Note: Resetting your ARCHOS will not erase any data from your device.
SYSTEM RECOVERY
If your ARCHOS does not respond correctly, or does not show certain songs or
videos that you have copied to it, try using the repair and format tools (see:
System Settings
).
If once turned on, the ARCHOS does not show the Home screen, you can try a
system recovery. It allows you to repair the hard drive, format it, etc.
•
•
•
•
•
•
•
•
•
•

MANUAL
V1.0
605 WIFI INTRODUCTION > p. 11
Press the button to turn on your device.
When the built-in LCD screen turns on, immediately press and hold the TV/LCD
button until the Recovery mode starts (blue screen).
To move from an option to another, use the up/down Navigation buttons.
To validate an option, press OK.
•
•
The system recovery mode gives you four options:
“No”
cancels the system recovery.
“Repair Disk”
attempts to repair the le structure on the hard drive.
does not erase any data.
“Format Disk”
formats the hard drive.
all data (music, photos, videos, etc.), licenses and settings are erased.
1.
2.
-
-
-
-
-

MANUAL
V1.0
605 WIFI PLAYING VIDEO > p. 12
1. PLAYING VIDEO
In the Home screen, select the “Video” icon to enter the Video mode.
1.1 BROWSING THROUGH YOUR VIDEOS
The “Video” browser allows you to navigate the Video folder of the ARCHOS’
hard drive.
When browsing in video mode, only subfolders and video les are shown.
THE VIDEO BROWSER
The rst screen of the Video mode
shows you all the videos and sub-
folders located in the Video folder.
To play a video, highlight it, then
open it.
If a video is in a subfolder of the
Video folder, open the subfolder, and
you will see your video.
See:
Using the Browser
.
•
•
•
•
In the “Video” browser, each video le appear with a thumbnail, displayed on the
left of the le name.
To dene a new thumbnail for a video le, open the video, select the “Set” menu
item, and choose “Thumbnail” (see: “Video Playback Menu Items”).
•
•
VIDEO BROWSER MENU ITEMS
“Info”
displays a message box with all the available information about the highlight-
ed video le.
-
“File Management”
“Rename”: allows you to change the name of the highlighted video le using
the virtual keyboard. See:
Using the Virtual Keyboard
.
“Delete”: allows you to delete the highlighted video le. A conrmation
screen will pop up.
-
-
•
•

MANUAL
V1.0
605 WIFI PLAYING VIDEO > p. 13
“Bookmark”
“Resume”: will resume playing the highlighted video from the bookmark.
“Clear”: will remove the bookmark from the highlighted video le.
-
-
“Bookmark” only appears in the menu when a bookmarked video le is highlighted.
“Settings”
“Video”: will display the “Video” settings screen (see
Video Settings
).
“Sound”: will display the “Sound” settings screen (see:
Sound Settings
).
-
-
1.2 VIDEO PLAYBACK
To play a video, highlight the le and open it. The menu overlay will disappear auto-
matically after a few seconds.
VIDEO PLAYBACK SCREEN
1. Exit icon
2. video le name
3. Tab icon
4. volume level
5. play / pause icon
6. video progression bar
7. menu items
VIDEO PLAYBACK TOUCHSCREEN CONTROLS
To pause/resume the video, tap on the Pause / Play icon (see n° 5in the
previous screen).
To display the menu overlay again, tap once anywhere on the screen.To make it
disappear again, wait for a few seconds or tap on the Tab icon , in the top left
corner (see n° 3).
You can tap on the progression bar to go directly to a different location in the vid-
eo.You can also use the stylus to drag the cursor in the progression bar to another
location in the video (see n° 6).
•
•
•

MANUAL
V1.0
605 WIFI PLAYING VIDEO > p. 14
The volume bar can be dragged in the same way (see n° 4).
To execute a menu item’s function, simply tap on its icon. In order to display a
text description of the icon, tap on the menu word (see n° 7).
To stop the video and go back to the “Video” browser, tap on the Exit icon
(see n° 1).
VIDEO PLAYBACK BUTTON CONTROLS
stop the video and go back to the “Video” browser
pause/resume the video
accelerated fast forward
left/right: fast rewind/forward
accelerated fast rewind
display/hide the menu overlay
display available menu items
increase/decrease volume
VIDEO PLAYBACK MENU ITEMS
“Info”
displays a message box with all the available information about the current
video le.
-
“Track”
allows you to select a different audio track (only if the video le contains sev-
eral audio tracks).
allows you to choose subtitles (only if the video le includes subtitles).
-
-
“Track” only appears in the menu if the video le includes subtitles or several audio tracks.
•
•
•

MANUAL
V1.0
605 WIFI PLAYING VIDEO > p. 15
“Format”
allows you to change the way the image is displayed.
“Auto”: adjusts the video size to best adapt to the built-in screen (or TV, with the
optional DVR Station, Mini Dock or Battery Dock: see
Optional Functionalities
).
“Full Screen”: enlarges the picture to ll the screen and cuts some of the im-
age.
“Maximized”: enlarges the picture to ll the screen, considering the image is
encoded in 2.35 format with black bands at the top and bottom.
“Original”: displays the entire picture in its original format.
-
-
-
-
-
“Speed”
will play the current video in slow motion or high speed.
while paused in slow motion, you can advance frame by frame, using the left/
right arrows.
-
-
“Set”
“Bookmark”: sets a bookmark at the current spot in the video. Only one
bookmark per le is allowed. You can bookmark up to 32 les. Bookmarked
videos will appear, in the “Video” browser, with a bookmark symbol and a
progression bar.
to resume playing a video from a bookmark, go to the “Video” browser and
highlight the bookmarked video le. Select the “Bookmark” menu item, then
choose “Resume” (“Clear” will remove the bookmark from the video).
“Thumbnail”: saves the current image as a new thumbnail for this le. In the
“Video” browser, the video’s thumbnail will be replaced by the new one.
“Wallpaper”: the current image will be dened as your device’s background
image.
-
-
-
-
“Settings”
“Video”: will display the “Video” settings screen (see next section).
“Sound”: will display the “Sound” settings screen (see:
Sound Settings
).
-
-
1.3 VIDEO SETTINGS
In the video mode, you can access the “Video” settings screen by selecting the
“Settings” menu item and then “Video”.
Use the left/right arrows to select a different setting for a parameter.
•
•

MANUAL
V1.0
605 WIFI PLAYING VIDEO > p. 16
“PlayMode”, “Repeat & Shufe”
the following table explains how the video player will work according to the set-
tings you chose in “PlayMode” AND “Repeat & Shufe”.
“PlayMode” “Repeat &
Shufe” What will the video player do?
“Single”
“Normal”play the current video le and stop.-
“Repeat”play the current video le repeatedly.-
“Folder”
“Normal”play all the video les of the current folder one after
the other, and stop.
-
“Repeat”play all the video les of the current folder one after
the other. This will be repeated indenitely.
-
“Shufe” play all the videos of the current folder randomly.-
“LCD Backlight”
adjusts the level of backlight of the built-in screen.
1.4 PUTTING VIDEOS ONTO YOUR ARCHOS
There are two main methods to transfer the videos stored on your computer onto the
ARCHOS:
-
-

MANUAL
V1.0
605 WIFI PLAYING VIDEO > p. 17
Copy your videos using Windows Media®Player 10 or higher*:
Use Windows Media®Player (Sync tab) to synchronize your computer’s
video les with the ARCHOS.
See
Putting Files onto the ARCHOS
to learn more about how to transfer
your computer’s video les with Windows Media®Player.
-
-
* For best performance, we recommend that users update to Windows Media®
Player 11 or higher.
Copy and paste your video les from your computer into the Video folder of your
ARCHOS.
See
Transferring Files
to learn how to connect/disconnect the ARCHOS from your
computer.
CREATING COMPATIBLE VIDEO FILES WITH YOUR COMPUTER
If some of your videos don’t play on your ARCHOS, you may need to transcode them
to a compatible format:
The easiest way to do this is by using Windows Media® Player 10 or higher to
transfer videos to your ARCHOS. Windows Media® Player will automatically con-
vert most formats to the WMV format that your device can play.
See your Windows Media®Player help instructions for more information.
If you don’t want to use Windows Media® Player, a search on the Internet should
allow you to nd suitable utility programs to do this job.
If you would like to simply copy and paste DVD video les onto your ARCHOS
without converting them to WMV format, you can purchase the Cinema plug-
in from the ARCHOS website (www.archos.com).The same is also true for video
podcasts in the H-264 format. In this case, purchase the Video Podcast plug-in.
1.5 RECORDING VIDEO
With the optional DVR Station or DVR Travel Adapter (available at
www.archos.com), your ARCHOS will be able to record video from
most any standard video source.
See:
Optional Functionalities
.
•
•
•
•
•
•
•

MANUAL
V1.0
605 WIFI PLAYING VIDEO > p. 18
With the optional DVR Station, you will have the possibility to
schedule TV recordings very easily, via the Electronic Program Guide
(EPG).
See the manual of your DVR Station to learn more about this fea-
ture.
•
•
DVR TRAVEL ADAPTER DVR STATION
1.6 PLAYING YOUR PC’S SHARED VIDEOS
Your ARCHOS gives you the possibility to watch, directly on your
device, shared videos stored on a PC.
For this to work, you will only need a WiFi connexion and Windows
Media® Player 11 or higher installed on your PC.
If you want to learn more about this feature, see:
Playing your PC’s
Shared Media Files
.
•
•
•

MANUAL
V1.0
605 WIFI PLAYING MUSIC > p. 19
2. PLAYING MUSIC
In the Home screen, select the “Music” icon to enter the Music mode.
2.1 BROWSING THROUGH YOUR MUSIC FILES
There are two types of views for you to browse through your songs: the Music
Library and the Music Browser.
In both views, you can go back one level in the hierarchy by closing the current
screen .
When browsing through your music, only music les are shown.
THE MUSIC LIBRARY
The Music Library (default view)
shows your music sorted by cat-
egories (Artist, Album, Genre, etc.) if
your music les contain these tags.
When new music is copied to the
ARCHOS, the Music Library will be
updated automatically.
If some of your music les do not
contain tags, they will be classied
as (Unknown) in the Music Library.
•
•
•
THE MUSIC BROWSER
The music browser allows you to
navigate the Music folder of your
device’s hard drive. It is based on the
ARCHOS File Browser.
To use it, select “Browse Hard
Drive” in the initial Music Library
view.
See:
Using the Browser
.
•
•
•
•
•
•
Other manuals for 605 WiFi
2
Table of contents
Other Archos Media Player manuals
Popular Media Player manuals by other brands

Home Multimedia Center
Home Multimedia Center Movie Cube-R700 user manual

Audiolab
Audiolab M-NET User instructions

Velleman
Velleman MMPL1 user manual

Eastern Times Technology
Eastern Times Technology S531 Operation manual

FJ Display
FJ Display Eyezone B1080P-1 quick start guide

Walkercam
Walkercam M6 user manual