Ardo CDR05E User manual

made for you.


3
SM2260
NOTE E CONSIGLI PER L’UTILIZZATORE 3-4
• Dati tecnici 3
DESCRIZIONE DELLA MACCHINA 5
• Accessori optional 5
INSTALLAZIONE DELLA MACCHINA 5-6
• Installazione 5
• Messa in piano del’asciugatore 6
• Collegamento all’impianto elettrico 6
• Modifica rotazione porta 6
UTILIZZO DELLA MACCHINA 7-8
• Descrizione del pannello di controllo 7
• Raccomandazioni prima dell’asciugatura 7
• Tabella programmi 8
• Come asciugare 8
• Precauzioni per tessuti 8
MANUTENZIONE 9-10
• Scarico serbatoio dell’acqua di condensa 9
• Pulizia e manutenzione 9-10
• Individuazione guasti 10
• Soluzione dei problemi 10
INDICE
MODELLO: ...........................................................................................................................................................................................................
NUMERO DI FABBRICAZIONE: ........................................................................................................................................................
DATA D’ACQUISTO: ......................................................................................................................................................................................
ITALIANO
Gentile Cliente,
La ringraziamo per aver scelto un nostro prodotto.
La preghiamo di leggere attentamente le istruzioni per l’uso prima dell’allacciamento e dell’uti-
lizzo della macchina. La conoscenza dei principi di funzionamento garantirà un corretto e sicuro
sfruttamento dell’apparecchio. Le istruzioni per l’uso contengono molte indicazioni utili circa il
funzionamento, oltre ai particolari tecnici della macchina che La aiuteranno ad ottimizzare l’utilizzo
di questa macchina.
In caso di vendita, oppure di cessione dell’asciugatore, bisogna ricordarsi di consegnare al nuovo
utilizzatore anche il libretto delle istruzioni per l’uso.
IT
NOTE E CONSIGLI PER L’UTILIZZATORE
Larghezza cm.:
Altezza cm.:
Profondità cm.:
Dimensioni:
59.5
85.0
60.4
5,0 kg. Asciutti
vedere targhetta dati
Capacità massima
Potenza Nominale
Tensione di alimentazione
DATI TECNICI

4
SM2260
NOTE E CONSIGLI PER L’UTILIZZATORE
▼L’uso di questo apparecchio dovrà essere quello
di asciugatore per uso domestico ogni altro
utilizzo è da considerarsi improprio e quindi
pericoloso.
▼Conservare il presente manuale d’uso sempre
vicino all’asciugatrice in modo da poterlo con-
sultare rapidamente se necessario.
▼Qualsiasi modifica o tentativo di manomissione
dell’apparecchio può essere pericolosa per
l’utilizzatore e provocare danni al prodotto.
▼Alla consegna dell’elettrodomestico, verificare
che risulti indenne da eventuali danneggia-
menti dovuti al trasporto. Se si rilevassero
danneggiamenti, rivolgersi immediatamente
al rivenditore.
▼Non coprire l’asciugatrice con biancheria o altro.
▼Nel posizionare l’apparecchio assicurarsi che
il cavo di alimentazione non subisca piegature
ne compressioni e sia accessibile, per eventuali
interventi.
▼Chiudere sempre la porta dopo l’utilizzo del-
l’elettrodomestico.
In tal modo si impedirà che i bambini si appoggi-
no alla porta facendo ribaltare l’asciugatrice.
▼E’ vietato l’uso della macchina ai bambini, se
non sorvegliati.
▼Non asciugiugare indumenti sporchi nell’asciu-
gatore.
▼Non far mai asciugare indumenti che sono
stati sporcati con sostanze come oli di cucina,
petrolio, acetone, alcol, benzina, kerosene,
smacchiatori, trementina, cere.
▼Rimuovere queste sostanze con un lavaggio a
caldo e una quantità addizionale di detersivo
prima di essere caricati nell’asciugatore.
▼Non far asciugare articoli come gomma piuma,
lattice di gomma, impermeabili, tessuti a tenuta
d’acqua, tappeti in gomma articoli e vestiti o
cuscini preformati con blocchi di gomma piuma
in quanto potrebbero sciogliersi e danneggiare
altri capi di biancheria o addirittura l’elettrodo-
mestico stesso.
▼Ammorbidenti per tessuti, o prodotti simili,
devono essere usati rispettando le istruzioni
d’uso inserite nella confezione
▼Se l’elettrodomestico viene venduto o regalato, si
ricordi di consegnare anche il presente manuale
che consentirà al successivo proprietario di uti-
lizzare l’asciugatrice in modo corretto e sicuro.
▼Non si può tentare di riparare da soli i guasti del-
l’apparecchio perché le riparazioni effettuate da
non professionisti possono provocare seri danni
e tolgono il diritto alle riparazioni di garanzia.
▼Le riparazioni dell’apparecchio possono essere
effettuate esclusivamente da personale autoriz-
zato dei centri di assistenza. Per le riparazioni
devono essere usate solo parti di ricambio
originali.
▼Centrifugare o strizzare bene la biancheria pri-
ma di caricarla nell’asciugatore.La biancheria
ben centrifugata si asciugherà più in fretta.
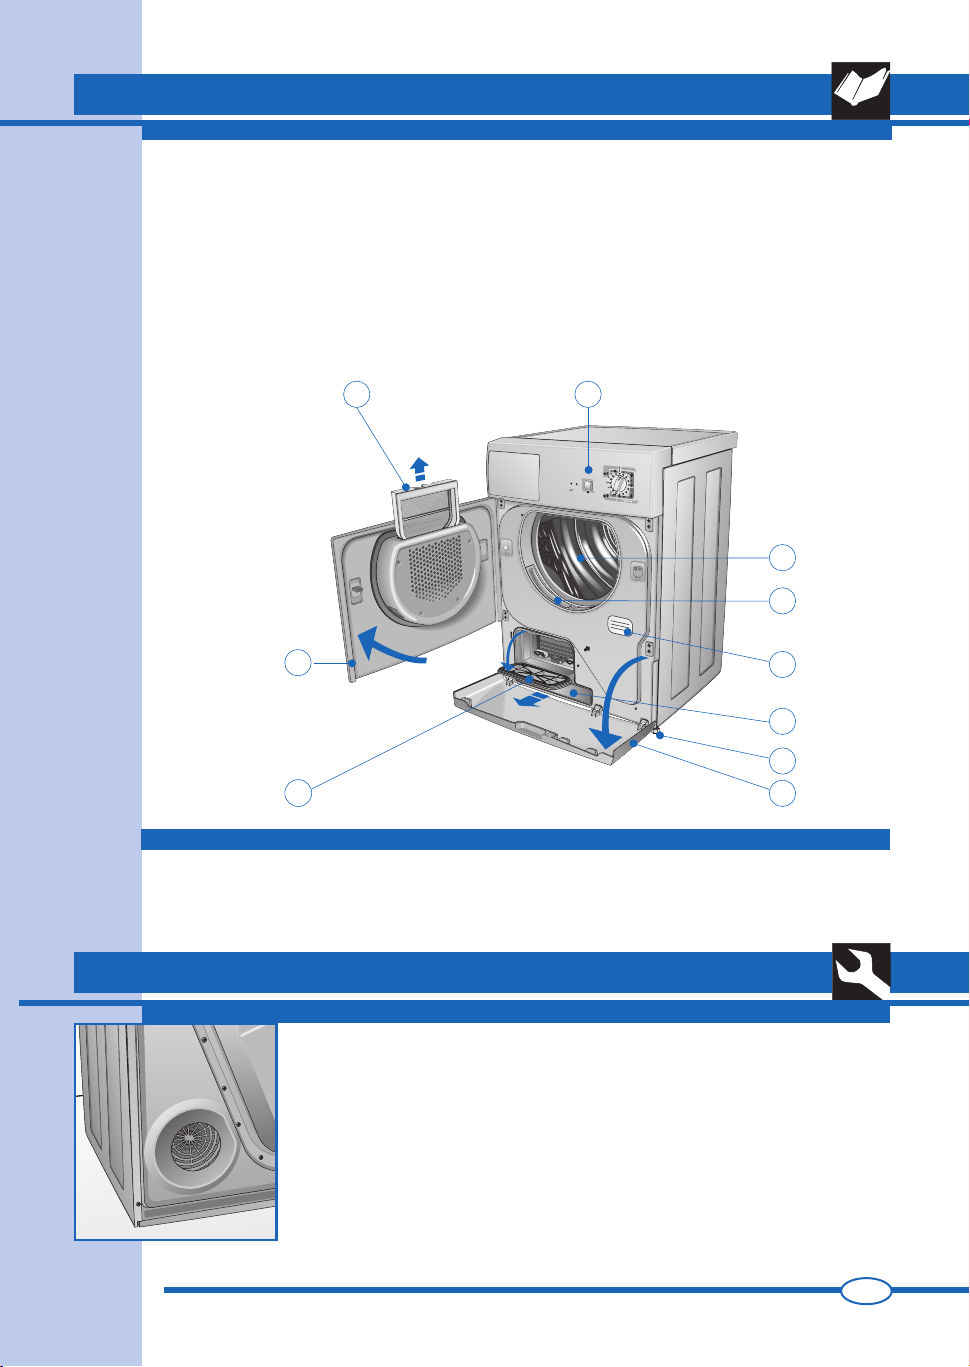
▼Pulire bene il filtro ogni volta che si utilizza
l’asciugatrice, in modo da garantire una per-
fetta circolazione dell’aria.
▼Non attaccare oppure staccare la spina dalla
presa della corrente elettrica con le mani
bagnate.
▼La macchina deve essere collegata ad una
presa di corrente elettrica provvista di messa a
terra e conforme alle esigenze di sicurezza.
▼E’vietato collegare la macchina alla presa elet-
trica utilizzando prolunghe o spine multiple.
▼Non esporre l’apparecchio ad agenti atmosferici.
▼Eseguendo le revisioni o le pulizie ricordarsi
di staccare l’apparecchio dalla presa della
corrente elettrica.
Nel caso si voglia staccare la macchina dalla
presa della corrente non tirare il cavo elettrico
ma la spina.
▼Questo apparecchio è contrassegnato in
conformità alla Direttiva Europea 2002/96/EC,
Waste Electrical and Electronic Equipment
(WEEE). Assicurandosi che questo prodotto
sia smaltito in modo corretto, l’utente contri-
buisce a prevenire le potenziali conseguenze
negative per l’ambiente e la salute.
Il simbolo sul prodotto o sulla docu-
mentazione di accompagnamento indica che
questo prodotto non deve essere trattato come
rifiuto domestico ma deve essere consegnato
presso l’idoneo punto di raccolta per il riciclag-
gio di apparecchiature elettriche ed elettroniche.
Disfarsene seguendo le normative locali per lo
smaltimento dei rifiuti. Per ulteriori informazioni
sul trattamento, recupero e riciclaggio di questo
prodotto, contattare l’idoneo ufficio locale, il ser-
vizio di raccolta dei rifiuti domestici o il negozio
presso il quale il prodotto è stato acquistato.
ATTENZIONE!!! Le superfici in cui
appare questo simbolo durante il
funzionamento possono riscaldarsi.
IT
LA DITTA PRODUTTRICE DECLINA QUAL-
SIASI RESPONSABILITÀ PER EVENTUALI
INCIDENTI PROVOCATI DALLA NON OS-
SERVANZA DELLE NORME DI SICUREZZA
NONCHÉ DELLE ISTRUZIONI D’USO

5
SM2260
9
10
8
6
5
7
*
4
32
1
DESCRIZIONE DELLA MACCHINA
IT
DESCRIZIONE DELLA MACCHINA
1Porta cestello.
2Filtro porta cestello.
3Pannello di controllo.
4Cestello asciugatore.
5 Filtro bocca cestello.
6Targhetta caratteristiche tecniche.
7Serbatoio condensa inferiore*.
8Piedini regolabili.
9Portello condensatore.
10 Portello inferiore.
INSTALLAZIONE DELLA MACCHINA
▼L’installazione deve essere effettuata da personale professionalmente qualifi-
cato, secondo le istruzioni del costruttore, perché una errata installazione può
causare danni a persone e cose.
▼Non tenere l’asciugatrice in locali dove potrebbe gelare. Il gelo potrebbe com-
promettere l’elettronica.
▼Posizionare l’asciugatrice in un locale provvisto di ventilazione.
▼Non coprire il foro di ventilazione sul lato posteriore (fig. 2) e non posizionare
la macchina su moquette spessa.
▼Pulire l’interno del cestello di asciugatura con un panno umido per togliere
l’eventuale polvere che vi si deposita.
2
INSTALLAZIONE
1
ACCESSORI OPTIONAL
È disponibile presso il vostro venditore l’accessorio per completare la diversa installazione che
vi permetterà di fissare la vostra asciugatrice sopra una lavabiancheria carica frontale per poter
economizzare lo spazio. Il modello di macchina che vi permetterà di fare questo montaggio vi sarà
consigliato dal vostro installatore.

6
SM2260
INSTALLAZIONE DELLA MACCHINA
MESSA IN PIANO DELL’ASCIUGATORE
IT
5
4
▼Premere la porta sulla destra (fig. 5) (la porta si apre). Se la porta è stata rove-
sciata premere sulla sinistra.
▼È possibile modificare il senso di rotazione della porta cestello secondo le proprie
necessità (fig. 9).
N.B.: Questa operazione deve essere eseguita esclusivamente da personale
specializzato.
Contattare il servizio assistenza tecnica.
▼Accertarsi che la tensione elettrica indicata nei dati tecnici della targhetta posta
sul retro dell’apparecchio, corrisponda a quella della rete elettrica.
▼Salvavita, cavi elettrici e presa della rete devono avere parametri tali da per-
mettere di sopportare il carico massimo indicato sulla targhetta stessa.
▼A seguito dell'installazione, l'accesso all'alimentazione di rete deve essere
garantito da un interruttore onnipolare.
▼La presa di corrente alla quale viene allacciata la macchina deve essere munita
di messa a terra.In caso contrario, il produttore declina qualsiasi responsabilità
per eventuali incidenti (fig. 4).
▼Se il cavo d’alimentazione è danneggiato in qualche modo, contattare il centro
di assistenza tecnica specializzato.
▼E’ vietato allacciare l’asciugatore alla rete attraverso elementi indiretti come
prolunghe e prese multiple.
▼Posizionare l’apparecchio in modo che il cavo alimentazione sia facilmente
accessibile in modo da poterlo disconnettere in caso di necessità.
Importante: Alla fine del ciclo di asciugatura, scollegare l’asciugatrice dalla rete per impedire
che un bambino possa eventualmente metterla in funzione.
COLLEGAMENTO ALL’IMPIANTO ELETTRICO
APERTURA E MODIFICA ROTAZIONE PORTA
6
Piedini regolabili. Mettere l’asciugatrice in posizione verticale in modo che appoggi
saldamente su tutti e quattro i piedini. Livellare la macchina registrando i piedini
come di seguito descritto
▼Sollevare leggermente la macchina.
▼Regolare i piedini all’altezza giusta (fig. 3).
▼Abbassare la macchina.
N:B: Una macchina mal livellata può danneggiare i cuscinetti ed usurarsi
prematuramente. Questo asciugatore non necessita di fissaggio al suolo. 3

7
SM2260
UTILIZZO DELLA MACCHINA
IT
RACCOMANDAZIONI PRIMA DELL’ASCIUGATURA
SUDDIVISIONE DELLA BIANCHERIA
Prima di asciugare la biancheria, bisogna
centrifugarla con il numero di giri adatto al tipo
di biancheria. Centrifugando con il numero di
giri massimo consentito, si risparmia fino a
35% di tempo di energia. Più è alta la velocità
di centrifuga, migliore è l’asciugatura ottenuta.
L’uso dell’ammorbidente nel lavaggio permette di
ottenere una migliore asciugatura e un risparmio
di tempo. Prima di asciugare la biancheria
nell’elettrodomestico, controllare se è adatta ad
asciugatura meccanica.Consultare perciò i simboli
riportati sulle etichette di lavaggio.
Se non si trova il simbolo dell’asciugatura
sull’etichetta, attenersi alle regole seguenti:
▼Biancheria bianca/colorata e biancheria antipiega
si asciugano a temperatura normale con il pro-
gramma di asciugatura scelto appositamente.
▼Asciugare la biancheria delicata, per esempio
gli acrilici, sempre a temperature basse.
Consigli generali:
Jersey si restringe spesso non soltanto con il
lavaggio ma anche con l’asciugatura.
Puro lino.
▼Asciugare soltanto se indicato dal fabbricante
sull’etichetta di lavaggio.
Altrimenti il tessuto potrebbe diventare
ruvido.
▼Non asciugare biancheria colorata scura in-
sieme con biancheria colorata chiara; questo
per evitare che stinga.
DESCRIZIONE PANNELLO DI CONTROLLO
P. Manopola programmi serve a selezionare i
programmi desiderati socondo il tipo di tessuto
e alle proprie necessità, se si desiderasse va-
riarlo, o si decidesse in un secondo momento
di aggiungere altra biancheria all’interno della
macchina, basta semplicemente posizionare
la manopola del programmatore nella posizione
di “STOP”, quindi reimpostare la manopola
sul nuovo programma desiderato e premere il
pulsante “START”.
NB.Attenzione!! si consiglia di utilizzare
questa funzione solo se strettamente
necessario e soltanto se il programma da
resettare è iniziato da non più di 3 minuti.
S. Tasto Start premendo questo tasto l’asciuga-
tore inizia il ciclo d’asciugatura impostato.
Ls. LED Start spento indica la posizione di
“STOP”; acceso fisso indica ciclo in corso;
lampeggio veloce indica programma imposta-
to da avviare; lampeggio lento indica la fine
del programma.
Lv. LED allarme vaschetta piena il lampeggio
indica che la vaschetta è piena ed è neces-
sario svuotarla (il ciclo si ferma); acceso fisso,
dopo aver reinserito la vaschetta indica che
la funzione si stà riattivando ; spento indica
sicurezza ripristinata (il ciclo riparte).
LVLS
S
P
7
modello con controllo
asciugatura a tempo

8
SM2260
TABELLA PROGRAMMI
UTILIZZO DELLA MACCHINA
IT
COME ASCIUGARE
1) Caricare la biancheria nel cestello e chiudere
la porta.
2) Con le mani asciutte inserire la spina del-
l’asciugatore nella rete.
3) Posizionare la manopola del programmatore
sullo Stop per resettare eventuali programmi
precedenti, quindi ruotarla sul programma
più idoneo per il tipo di tessuto, la quantità
di biancheria caricata nel cestello, e il grado
d’asciugatura desiderato (vedi Tabella Pro-
grammi).
4) Premere il tasto START per iniziare l’asciu-
gatura.
5) Finita l’asciugatura segnalata dal lampeggio
del led start riportare il selettore nella posi-
zione di STOP.
6) Aprire la porta del cestello ed estrarre la
biancheria.
7) Richiudere la porta.
8) Con le mani asciutte staccare la spina del-
l’asciugatore dalla rete.
* Tempo di asciugatura necessario dopo centrifuga a 800 giri/min.
** Tempo di asciugatura necessario dopo centrifuga a 1000 giri/min.
20 min.
*130 min.
**110 min. *110 min.
** 90 min. * 90 min.
** 70 min. * 70 min.
** 50 min.
*110 min.
** 90 min. * 90 min.
** 70 min. * 70 min.
** 50 min. * 50 min.
** 30 min.
* 80 min.
** 60 min. * 60 min.
** 40 min. * 40 min.
** 30 min.
Extra
secco Secco
da riporre Umido
da stiro Molto
umido
Tipo tessuto Umido +/-
Max 5.0 kg.
Max 2.5 kg.
Max 2.5 kg.
min.
120 - 60 min.
120 - 60 min.
60 - 40
20 min.
Resistenti
min.
60 - 40
Extra secco Secco
da riporre Umido da stiro Molto umido
Delicati
Resistenti
Delicati
Max
5.0 kg.
Max
2.5 kg.
Max
5.0 kg.
Max
2.5 kg.
PROGRAMMI A CONTROLLO ELETTRONICO DELL'UMIDITÀ
PROGRAMMI A TEMPO
PROGRAMMI PER ASCIUGATORE CON CONTROLLO DELL'ASCIUGATURA A TEMPO
PRECAUZIONI PER TESSUTI
In caso di dubbi sul tipo di tessuto, controllare l’etichetta sul capo stesso.
Quasi tutti i capi che possono essere asciugati indicano specificamente che sono idonei per asciugatura
a macchina.
Per evitare l’elettricità statica sui capi, durante i cicli di risciacquo della lavatrice usare un ammorbi-
dente.
Togliere subito dal cestello i capi sintetici per evitare che sgualciscano.

9
SM2260
8
SCARICO DEL SERBATOIO DELL’ACQUA DI CONDENSA
MANUTENZIONE
9
10
IT
Togliere la tensione dell’apparecchio prima di iniziare a pulire. E’ importante pulire
l’apparecchio dopo ogni lavaggio, per far risparmiare tempo all’asciugatura e quindi
energia.
1. Filtro per filacci nello sportello (fig. 10).
2. Filtro per filacci nel l’apertura di carico (fig. 11).
3. Condensatore (fig. 12).
▼ Rimuovere il filtro tirandolo verso l’alto e pulirlo (fig. 10).
▼ Inoltre è possibile rimuovere i due filtri filacci dall’apertura di carico e pulirli (fig.
11).
NB. La presenza di fibre nel filtro non dipende dall’asciugatura. I filacci
provengono dalle fibre dei tessuti rotti o sfilacciati durante il lavaggio e
soprattutto per usura del capo d’abbigliamento.
La pulizia è più semplice facendoci scorrere sopra l’acqua calda.
▼ Si raccomanda di pulire il condensatore due o tre volte all’anno (fig. 12/15).
▼ Aprire la porta ruotare la levetta in posizione verticale e rimuovere il coperchio
(fig. 12).
L’acqua di condensa viene raccolta nel serbatoio (fig. 8). Il serbatoio deve essere
svuotato dopo ogni ciclo di asciugatura.
Per svuotare il serbatoio procedere come segue:
▼ Estrarre il serbatoio dell’asciugatrice (fig. 8);
▼ Svuotare il serbatoio; l’apertura di scarico si trova sul lato superiore destro (fig.
9);
▼ Dopo averlo svuotato riposizionare fino in fondo;
▼ Quando si dimentica di svuotare il serbatoio o quando si riempie durante
l’asciugatura, il led d’allarme della vaschetta dell’acqua condensa lampeggia e
l’asciugatrice si arrestera. In seguito procedere come descritto sopra.
▼ Per proseguire il programma interrotto, premere il tasto Start (fig. 7 ).
11
12
PULIZIA E MANUTENZIONE

10
SM2260
MANUTENZIONE
PULIZIA E MANUTENZIONE
Se la macchina non parte
• assicurarsi che:
1) Verificare di aver effettuato il collegamento
all’alimentazione di rete.
2) Verificare che la presa sia efficiente:
2a) è saltato il fusibile? (Il controllo è facile,
basta collegare un’altra apparecchiatu-
ra come una lampada da tavolo).
2b) Sono state seguite tutte le istruzioni del
manuale d’istruzioni?
Se la macchina non parte
• assicurarsi che:
1) La porta sia stata chiusa correttamente.
2) Sia stato premuto il tasto start.
La biancheria non si asciuga
• assicurarsi che:
1) È possibile che il foro scarico aria sia ostrui-
to.
2) È possibile che il filtro sia intasato.(Si ricordi
che quando si apre l’oblò, le parti interne
dell’asciugatrice e la biancheria possono
essere molto calde).
Se dopo l’esecuzione delle funzioni descritte, l’apparecchio continua a non funzionare
correttamente segnalare il difetto al centro assistenza tecnica autorizzato più vicino. Si
prega cortesemente di comunicare il modello, il numero di fabbricazione ed il tipo di guasto.
Queste informazioni permettono all’operatore dell’assistenza tecnica di procurarsi le parti
di ricambio necessarie e, quindi, garantiscono una veloce ed efficace esecuzione della
riparazione.
SOLUZIONE DEI PROBLEMI
15
13
14
Tutte le apparecchiature elettriche sono soggette a guasti.
Si ricordi che in questi casi si dovrà chiamare un tecnico qualificato. Potrete comunque risolvere voi
stessi molti dei problemi che si verificano.
Importante: In caso di cattivo funzionamento, si ricordi di scollegare immediamente la
macchina dalla rete d’alimentazione.
Prima di chiamare il nostro Centro Assistenza,verificare i punti di seguito indicati.
INDIVIDUAZIONE GUASTI
▼ Ruotare le 3 levette in posizione verticale ed estrarre il condensatore (fig. 13).
▼ Lavare il condensatore anteriormente e poste-
riormente e sui lati orientando il getto d’acqua
come indicato (fig.14/15).
Per ottenere uno sgocciolamento perfetto del
condensatore, appoggiarlo su un lato sopra un
asciugamano.
▼ Quando è ben asciutto, rimontare il condensatore
rifacendo le operazioni in ordine contrario.
IT

11
SM2260
CONTENTS
MODEL: ...................................................................................................................................................................................................................
SERIAL NUMBER: .........................................................................................................................................................................................
DATE OF PURCHASE: ................................................................................................................................................................................
ENGLISH
Dear Customer,
Thank you for choosing our product.
Please read these instructions carefully before connecting and using the appliance.
Knowledge of the operating principles will help guarantee correct and safe use of the appliance.
This instruction booklet contains the technical characteristics of the drier and is full of useful infor-
mation regarding its operation, all designed to help you get the best out of your appliance.
If the appliance is sold or handed over for use by others, remember to give the new user the
instruction booklet.
GB
NOTES AND ADVICE FOR THE USER
Width cm.:
Height cm.:
Depth cm.:
Dimensions:
59.5
85.0
60.4
5,0 kg dry
see characteristics plate
Max. capacity
Power rating
Voltage
TECHNICAL DATA
NOTES AND ADVICE FOR THE USER 11-12
•Technical information 11
DESCRIPTION OF THE APPLIANCE 13
• Optional accessories 13
INSTALLING THE APPLIANCE 13-14
• Installation 13
• Levelling the drier 14
• Connecting to the mains supply 14
• Changing the door opening direction 14
USING THE DRIER 15-16
• Description of the control panel 15
• Recommendations prior to drying 15
• Programme table 16
• How to dry 16
• Precautions for fabrics 16
MAINTENANCE 17-18
• Draining the condensation reservoir 17
• Cleaning and maintenance 17-18
• Troubleshooting 18
• Resolving problems 18

12
SM2260
NOTES AND ADVICE FOR THE USER
▼ This appliance has been designed for use as a
domestic drier. Any other use is considered as
improper and therefore dangerous.
▼ Keep this instruction book near to the appliance
always, so that it can be easily consulted when
necessary.
▼ Any modifications or attempts to interfere with
the appliance can be dangerous for the user and
may damage the product.
▼ On delivery of the appliance, check that it has
not been damaged during transport. If any
damage is discovered, report the matter to the
retailer immediately.
▼ Do not cover the drier with washing or any other
items.
▼ When positioning the appliance, ensure that the
power supply cable is not kinked or squashed
and is accessible.
▼ Always close the door after using the drier.
This will prevent children from leaning on the
door and possibly overturning the drier.
▼ The appliance must not be used by children
unless supervised.
▼ Do not use the drier for drying dirty clothes.
▼ Never dry items that have been soiled with
substances such as cooking oil, petroleum,
acetone, alcohol, petrol, kerosene, stain
removers, turpentine, wax.
▼ Remove these substances in a hot wash using
an additional quantity of detergent prior to
loading the items in the drier.
▼ Do not dry items such as foam rubber, latex,
raincoats, waterproof fabrics, rubber mats,
preformed items, clothes or cushions with foam
rubber inserts, as these may melt and damage
other items in the washing or even the appliance
itself.
▼ Fabric softeners, or similar products, must be
used respecting the manufacturer's instructions
on the packaging.
▼ If the appliance is sold or given away, remember
to hand over this instruction book with it.This will
help the new owner use the drier both correctly
and safely.
▼ Do not attempt to repair any appliance faults
alone, in that repairs carried out by a non-
professional may cause serious damage
and will invalidate any rights to repairs under
guarantee.
▼ Repairs to the appliance can only be carried
out by personnel authorised by the customer
service centres. All repairs must make use of
original spare parts only.
▼ Spin dry or wring the washing well before
loading it into the drier. Spun dry washing will
dry quicker.
▼ Clean the filter thoroughly each time the
drier is used in order to guarantee perfect air
circulation.
▼ Never insert or remove the plug from the mains
socket with wet hands.
▼ The drier must be connected to a mains socket
fitted with an efficient earth complying with
current safety standards.
▼ Do not use extension leads or multiple plug
adapters to connect the appliance to the mains
supply.
▼ Do not expose the appliance to atmospheric
agents.
▼ When servicing or cleaning the appliance,
remember to disconnect it from the mains
supply.
▼ Do not pull the power supply cable to unplug
the appliance from the mains supply. Pull the
plug only.
▼This appliance is marked as complying
with European Directive 2002/96/EC, Waste
Electrical and Electronic Equipment (WEEE).
Make sure that the product is disposed of in a
correct manner.The user is obliged to contribute
towards preventing any negative consequences
for health and the environment.
The symbol affixed to the product or
accompanying documents signifies that the
product must not be treated as normal domestic
refuse, but must be delivered to an authorised
collection centre to enable the electric and
electronic equipment to be recycled.
When disposing of the appliance, comply with
local waste disposal regulations.
For further information on the treatment,
recovery and recycling of this product, refer to
the appropriate offices, local domestic waste
collection service or the retailer from where the
appliance was purchased.
Warning!!! Surfaces on which
this symbol appears may heat up
during normal operation.
GB
THE MANUFACTURER WILL NOT BE HELD
RESPONSIBLE FOR ANY INCIDENTS
RESULTING FROM NON-COMPLIANCE WITH
SAFETY STANDARDS ORTHE REQUIREMENTS
OF THIS INSTRUCTION BOOK.

13
SM2260
9
10
8
6
5
7*
4
32
1
DESCRIPTION OF THE APPLIANCE
GB
DESCRIPTION OF THE APPLIANCE
1Drum door.
2Drum door filter.
3Control panel.
4Drier drum.
5 Drum mouth filter.
6Rating plate.
7Lower condensation water reservoir*.
8Adjustable feet
9Condenser door.
10 Lower door.
INSTALLING THE APPLIANCE
▼ Installation must be carried out by qualified personnel in line with the instructions
supplied by the manufacturer. Incorrect installation may result in damage and/or
injury.
▼ Do not install the drier in rooms subject to freezing temperatures. Freezing
temperatures could damage the electronics.
▼ Position the drier in a well-ventilated room.
▼ Do not cover the ventilation hole on the back (fig. 2) and do not place the drier on
thick carpet.
▼ Clean the inside of the drying drum using a damp cloth to remove any dust
deposits.
2
INSTALLATION
1
OPTIONAL ACCESSORIES
The retailer can provide an accessory to enable the drier to be mounted on top of a front - loading washing
machine, thus saving space. The installer will inform you of the appliance model for which this option is
possible.

14
SM2260
INSTALLING THE APPLIANCE
LEVELLING THE DRIER
GB
5
4
▼Press the right side of the door (fig. 7) to open it. If the door has been reversed,
press the left side.
▼The direction of the drum door opening can be modified according to needs (fig.
8).
- N.B.:This operation must only be carried out by a qualified technician.
Contact the customer service centre.
▼ Make sure that the voltage indicated on the identification plate attached to the
back of the appliance corresponds to that of the mains supply.
▼ All cut-outs, electric wiring and mains sockets must have a rating such that enables
them to support the maximum load indicated on the identification plate.
▼ Once the appliance has been installed, it must be connected to the mains supply
through a single-pole switch.
▼ The mains supply to which the appliance is connected must be fitted with an
earthing system. If this is not the case, the manufacturer will not be held liable for
any incidents that may occur (fig. 4).
▼ If the power supply cable is damaged in any way, contact the appropriate
specialised customer technical service centre.
▼ The drier must not be connected to the mains supply using indirect methods such
as extension leads or multiple adapters.
▼ Position the appliance so that the power supply cable is easily accessible for
disconnection when the need arises.
Important: On completion of the drying cycle, disconnect the appliance from the mains supply
to prevent young children from operating the drier.
CONNECTING TO THE MAINS SUPPLY
OPENING THE DOOR AND CHANGING THE OPENING DIRECTION
6
Adjustable feet. Place the drier upright so that it rests firmly on all four feet.
Level the drier by adjusting the feet as follows:
▼ Lift the drier slightly.
▼ Adjust the feet to the correct height (fig. 3).
▼ Lower the drier.
NB.A badly levelled appliance may cause damage to the bearings and lead to
their premature wear. This drier does not need to be anchored to the floor. 3

15
SM2260
USING THE DRIER
GB
RECOMMENDATIONS PRIOR TO DRYING
SORTING THE WASHING
Before drying the washing, spin it at the recommended
rpm for the type of load. Spinning at maximum rpm
will result in up to a 35% saving in energy. The
higher the spin speed, the better the drying result.
Using a softener in the wash cycle will improve
drying and save time. Before drying the washing in
the drier, check the items to make sure they can be
machine dried. Refer to the clothing care symbols
on the labels.
If the label has no drying symbol, proceed as
follows:
▼White/coloured washing and crease-proof
washing can be dried at normal temperature
using the appropriate drying programme.
▼Delicate washing, acrylics for example, must
always be dried at low temperature.
General advice:
Jersey often shrinks, not only in the wash but also
during drying.
Pure linen.
▼Only dry garments with specific drying
instructions on label, otherwise, the fabric could
roughen.
▼In order to avoid staining, never dry dark
coloured washing together with light coloured
washing.
DESCRIPTION OF THE CONTROL PANEL.
P.
Programmer knob. Used to select the required
programmes according to the types of fabrics and
their specific needs.If, for any reason, you want to
change the programme or add more washing to
the load during the drying cycle, simply place the
programmer knob in the "STOP" position. Then
re-position the knob on the required program and
press the "START" button.
NB.Warning!! Only use this function if strictly
necessary and then only if the programme
to reset has been running for less than 3
minutes.
S. Start Button. Press this button to start the
programmed drying cycle.
Ls. Start Led. Off indicates the "STOP" position.
On fixed indicates the cycle is running. Fast
flashing indicates the set programme is ready
to start. Slow flashing indicates the end of the
drying programme.
Lv. Reservoir full alarm Led. A flashing light indicates
that the reservoir is full and needs to be emptied
(the drying cycle stops). After the container has
been replaced, a fixed light indicates that the
function is restarting. Light off indicates that the
alarm has been reset (the cycle restarts).
LVLS
S
P
7
Model with timer controlled
drying

16
SM2260
GB
* Drying time necessary after spinning at 800 rpm.
** Drying time necessary after spinning at 1000 rpm.
20 min.
Extra
dry Wardrobe
dry Iron
damp Very
damp
Fabric type Damp +/-
min.
120 - 60 min.
120 - 60 min.
60 - 40
20 min.
Resistant
min.
60 - 40
Extra dry Wardrobe
dry Iron damp Very damp
Delicates
Resistant
Delicates
ELECTRONIC DAMPNESS CONTROL PROGRAMMES
TIMED PROGRAMMES
PROGRAMMES FOR DRIERS WITH TIMED DRYING CONTROL
*130 min.
**110 min. *110 min.
** 90 min. * 90 min.
** 70 min. * 70 min.
** 50 min.
*110 min.
** 90 min. * 90 min.
** 70 min. * 70 min.
** 50 min. * 50 min.
** 30 min.
* 80 min.
** 60 min. * 60 min.
** 40 min. * 40 min.
** 30 min.
Max 5.0 kg.
Max 2.5 kg.
Max 2.5 kg.
Max
5.0 kg.
Max
2.5 kg.
Max
5.0 kg.
Max
2.5 kg.
PROGRAMME TABLE
USING THE DRIER
HOW TO DRY
1) Load the washing in the drum and close the
door.
2) With dry hands, insert the plug in the mains
socket.
3) Position the programmer knob on Stop to reset
any previous programmes, then rotate it to
the ideal programme for the type of fabric, the
amount loaded in the drum and the required
degree of drying (see Programme Table).
4) Press the START button to start the drying
cycle.
5) At the end of the drying cycle, signalled by the
flashing start led, return the selector to the
STOP position.
6) Open the drum door and remove the
washing.
7) Re-close the door.
8) With dry hands, remove the plug from the
mains socket.
PRECAUTIONS FOR FABRIC TYPES
In the case of doubt as to the type of fabric, read the label on the item itself.
Almost all items that can be machine dried have this information specified on the label.
To avoid static electricity being generated in the items, add a conditioner to the rinse cycle of the washing
machine.
Remove synthetic materials from the drum immediately to prevent them from creasing.

17
SM2260
8
DRAINING THE CONDENSATION WATER RESERVOIR
MAINTENANCE
9
10
GB
Disconnect the drier from the mains supply before cleaning. It is important to clean
the drier after each drying cycle in order to save in drying time and consequently save
energy.
1. Door fluff filter (fig. 10).
2. Fluff filter in the loading aperture (fig. 11).
3. Condenser (fig. 12).
▼ Remove the filter by pulling upwards and then clean it (fig. 10).
▼ It is also possible to remove the two fluff filters from the door opening and clean
them (fig. 11).
NB.The presence of fluff in the filter is not the result of the drying procedure.
The fluff comes from the fibres of fabrics damaged or unthreaded during
the wash and, above all, as a result of wear.
The filters can be cleaned by simply placing them under hot running water.
▼ The condenser should be cleaned two or three times a year (fig. 12/15).
▼ Open the door, rotate the lever to the vertical position and remove the cover (fig.
12).
The condensation is collected in the reservoir (fig. 8). The reservoir must be emptied
after each drying cycle.
To empty the reservoir, proceed as follows:
▼ Remove the reservoir from the drier (Fig. 8).
▼ Empty the reservoir. The drain hole is located on the top right (fig. 9).
▼ After emptying, replace the container in its housing making sure it is properly
seated.
▼ If the reservoir is not emptied or it fills up excessively during a drying cycle, the
condensation reservoir warning light will flash and the drier will stop.If this happens,
proceed as described above.
▼ To restart the programme, press the Start button (fig. 7).
11
12
CLEANING AND MAINTENANCE

18
SM2260
MAINTENANCE
CLEANING AND MAINTENANCE
If the drier doesn't start
• Check that:
1)
The appliance is plugged into the mains
supply.
2) The mains socket is working correctly:
2a) The fuse has not blown. (Check by
plugging in another appliance such as a table
lamp and see if that works)
2b)All the instructions in the manual have been
followed.
If the drier doesn't start
• Check that:
1) The door is closed properly
2) The start button has been pressed.
The washing does not dry
• Check that:
1) The air exhaust aperture is not blocked.
2)
The filter is not blocked.(Remember that
when the door is opened, the internal
parts of the drier and the washing may
be very hot).
If, after all these checks have been carried out, the appliance still does not work, inform the
nearest customer service centre. When contacting the service centre, inform them of the
appliance model, serial number and type of fault.This information will help the service centre
operator in procuring the necessary spare parts, thus guaranteeing a speedy and efficient
repair.
RESOLVING PROBLEMS
15
13
14
All electric appliances may break-down at some time.
Remember to call a qualified technician in these cases.However, many problems can be resolved without
the need for external intervention.
Important: If a fault occurs, disconnect the appliance from the mains supply immediately.
Before calling the customer service centre, check the points listed below.
TROUBLESHOOTING
▼ Rotate the 3 levers to the vertical position and remove the condenser (fig. 13).
▼ Wash the front, back and sides of the condenser,
aiming the jet of water as shown (fig.14/15).
To dry the condenser thoroughly, place it on its
side on a towel.
▼ When the condenser is dry, replace it following
the same procedure in reverse order.
GB
Table of contents
Languages:
Other Ardo Dryer manuals