Arizona Shower Door Tycson Series User manual


Tools you will need for this install
Exploded View drawing of shower door
3/16” Masonry drill bit (use 9/64” drill
bit for fiberglass)
1/8” drill bit
Drill
4’ Level
Saw (Electric Chop saw or Hacksaw)
Side cutting pliers
#2 Phillips drill bit
#2 Phillips screwdriver
Tape Measure
Pencil or Pen
Caulking Gun
1-Tube of 100% Clear Silicone (no latex!)
Vacuum Cleaner or Brush for clean up
Glass Cleaner and Paper Towels
Rubber Mallet
File
Arizona Corporate Office
2801 W. Indian School Rd
Phoenix, AZ 85017
800-255-1901 PH
602-447-8208 FAX
Florida
8100-1 Westside Industrial Dr
Jacksonville, FL 32219
855-695-8899 PH
904-786-9025 FAX
Illinois
2601 Bond St #1
University Park, IL 60484
800-861-6120 PH
708-235-0729 FAX
Oregon
2057 Lars Way
Medford. OR 97501
866-773-7905 PH
541-773-7909 FAX
Colorado
3871 Revere Street
Denver, CO 80239
866-574-1766 PH
303-574-1775 FAX
Utah
2594 S. 3600 West Suite A
West Valley City, UT 84119
877-402-5007 PH
801-972-3111 FAX

1) Installing Dam Strip and Wall Jamb.
Find the centerline of where the unit will be
installed. This will usually be the center of the
curboftheshowerpan.(A)Placeacenterline
markateachendofthecurbwhereitmeets
thewall. Thismark willalso representthe cen‐
terofthedamstripZD1026(#1)andwalljamb
ZD1006(#2).Measurewalltowalldistanceon
top of the curb where the door is going to sit.
Cut the ZD1026 to this dimension. (A2)Run a
beadofsiliconeunderneathitthensetinplace
accordingtothemarksyoumade.Usetapeto
holdinplace,preferablybluetape.Thiswillse‐
cure it in place until installation is complete.
Next, place the wall jamb against the wall on
the door side of opening and on top of the
ZD1026. Make sure to leave a 1/16” gap be‐
tween the outside edge of the wall jamb and
the inside lip of the dam strip to allow for the
installationofthedoor.(B)Usealeveltoposi‐
tion the jamb plumb and mark the pre‐drilled
holeswithapenorpencilSetthejambaside
anddrill the 3holesusing a3/16” masonrybit
(Note:forfiberglassuse9/64”bitwithoutusing
anchors). (C)Insertthe(3)screwanchors
ZV935(#18) into the holes. Fasten the ZD1006
walljambinplaceusingthe(3)‐#8X1‐1/4(#16)
PhillipsPanHeadscrewsprovided.
Installation Instructions
for
Model - Tucson
Note:Theseinstructionswillrefertotheitem#’sintheExplodedViewdrawing.Forexample,#1,#2,#3etc…
Pleasereadthroughalloftheinstructionstogetanover‐viewbeforeyouinstalltheshowerdoor.
1/16”
Gap

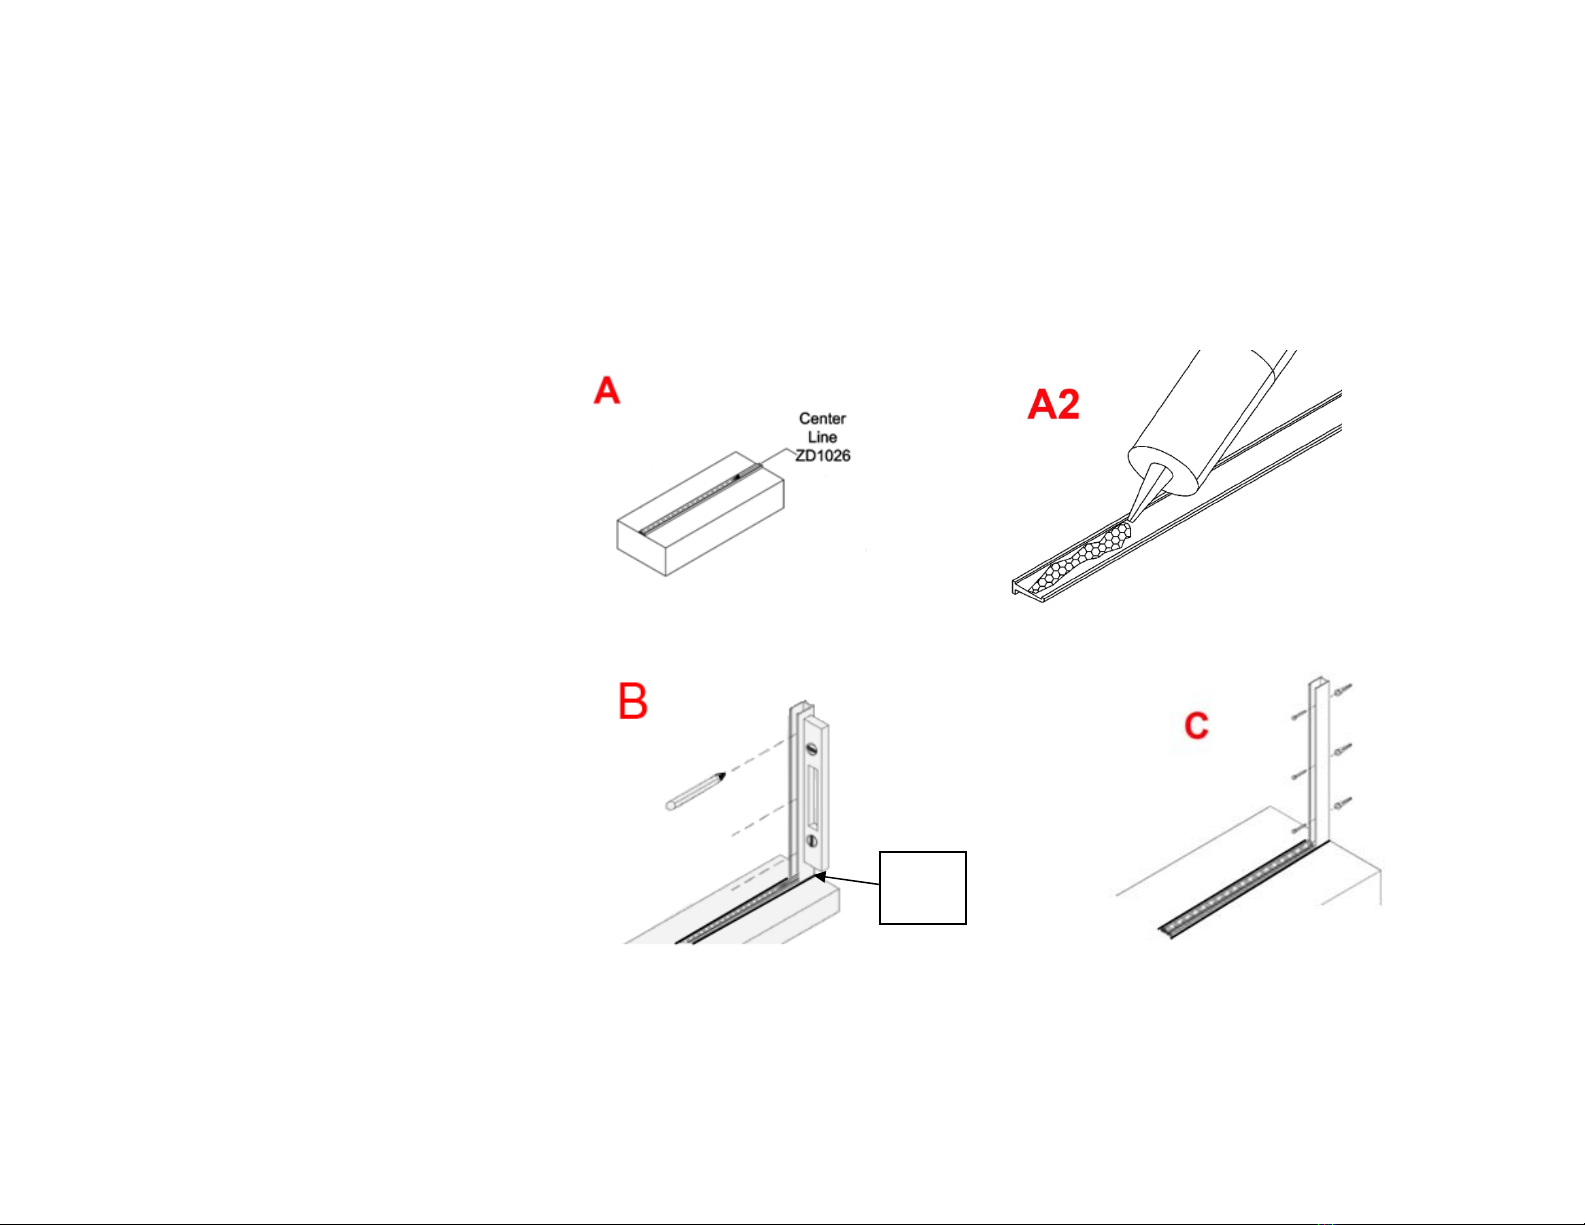
2)CuttingandInstallingtheZSS4104Base
U‐Channel(#4)andWallU‐Channel(#3).
Note:Thebasechannel comes with apre‐
appliedadhesivetape.
Measure the size of the fixed panel glass.
Withthesemeasurements,determinethe
lengthsoftheZSS4104U‐channelsbyusing
theguidelinesontheright.Aftercuttingthe
channel to the proper lengths, remove the
protectivefilmfromthetapeandplacethe
basechannelontopofthedamstripatthe
desiredlocationofthefixedpanelwiththe
outside edge of the u‐channel against the
lip of the dam strip (Note: No gap is re‐
quiredwithu‐channel.)(D)Thepre‐applied
tape will secure the channel in place until
theunitissealed.Toinstallthewallchan‐
nel, first drill three (3) 3/16” holes, one in
the center and one on each end approxi‐
mately6”fromtopandbottomofthewall
channel.Theseholeswillbeusedtosecure
the channel to the wall. Set the wall chan‐
nel on top of the base channel.Use the
sameprocedureasabovewiththeZD1006
toinstalltheZSS4104wallchannel.(E)Use
a level to position the channel plumb and
marktheholeswithapenorpencilSetthe
u‐channel aside and drill the holes using a
3/16”masonrybit(Note:forfiberglassuse
9/64”bitwithoutusinganchors).(F)Insert
the screw anchors ZV935 (#18)intothe
holes.Fastenthewallchannelinplaceusing
the (3)‐#6X1‐1/4 (#17) Phillips Flat Head
screwsprovided.
(#3)WallChannelSize=FixedPanelHeight
–
7/16”
(#4)BaseChannelSize=FixedPanelHeight+5/16”
Note:Thebasechannelwillbeinstalledtighttothewallandthe
wallchannelwillsitontopofthebasechannel.

3) Settingthefixedpanel. Once the base
and wall u‐channel are installed, place two
setting blocks PSB125/PSB250 (#15)inside
the base channel. Place the fixed panel
glassinsidetheu‐channelaligningthepanel
flush with the open side of the base chan‐
nel.Usealeveltomakesurefixedpanelis
setplumbandlevel.(G)
4)InstallingtheStrikeJamb.
Note:StrikejambZVP043884(#21)comes
assembled with magnet MAG4014 (#22)
andstrikesealvinyl ZVP04SEAL84 (#20) al‐
ready installed. Clear tape is used to hold
them in place until installation. Remove
tape after strike jamb installation is com‐
plete.Thestrikejambisdesignedtobeat‐
tached to the fixed panel so that the door
opens out only. When installing the strike
jamb, the magnet should be facing toward
youasyouarestandingontheoutsideof
theshowerlookingin.Themagnetistobe
centered with the handle on the door.
Thereisanotchrequiredatthebottomof
thestrikejambinordertoaccommodate
the u‐channel. (H)Useahacksaworside
cuttingplierstocutthenotch.Ifnecessary,
useafiletocleanupanysharpedges. The
strikejambisdesignedtositontopofthe
dam strip and run the full height of the
fixedpanel.Afternotchingthestrikejamb,
slideit overtheedge oftheglassuntilitis
fullyseated.
**OptionalFlushCut:Strikejambcanbeflush
cuttodoorheightifdesired.Thiscanbedone
afterdoorisinstalledandfinisheddoorheight
isdetermined.

5) Attaching the Door.Slide the ZD2505A
(#3)hingejambovertheZD1006walljamb.Do
notfastenthedooratthispoint.Pleasenote:
It will be helpful to have an assistant at this
pointtoadjustandholdthedoorinplacefrom
theoutsidewhileyoudrillandfastenthehinge
jambfrom theinside. Squareup thedoorand
aligntheedgeofthedoorglassparallelwiththe
strike jamb, leaving a 1/8” gap between the
two. (I)Attach the door by drilling the three
holesontheinsideoftheunitwherethejamb
is pre‐drilled using an 1/8” drill bit and secure
with the (3)‐#6 x 3/8” (#19) Pan head screws
provided.(J)
6)Attaching the CYLP8X8 Handle (#25).
Take the two stud head mounting screws and
sleeve one clear washer on each screw. Next,
insertthecleargrommetsintotheholesinthe
door. From the outside of the door, push the
thread of the screws through the grommets in
theholesintheglass.Ontheinsideofthedoor,
sleeveaclearwasherontothescrews.Takethe
pull that has the threaded hole in the end and
begin to thread the top screw into it and then
thebottomscrew.Tightenthestudheadscrews
down with a screwdriver (not a drill). This pull
will be on the inside of the door. Place the re‐
mainingpull,withthelargeholesandsetscrew,
ontothestudheadsofthescrews. Tightenthe
setscrewswithAllenwrenchprovided.(K)
OutsideView InsideView

Next,attach themagnetcatch MAG4012 (#24)
by placing ZV916 (#23)vinylovertheedgeof
theglassthentappingcatchoverthegasketand
ontotheglasswitharubbermalletaligningitto
themagnetonthestrikejamb.(L)
7) Installing optional Finish Caps.
Placeasmallamountsiliconeonthelegsof
the ZV940 Door Clip (#13) and place it
downintothetopoftheZD1006tocapthe
opening.Youmayhavetotrimthemtofit
with side cutting pliers. (M) Use the same
procedure to install SDCEC38 (#26)tocap
thetopoftheZSS4104wallu‐channel.
8)InstallingtheBottomPolyRail
Note:Ifthedoorwasorderedhingespe‐
cific, this step may already be done. If so
skiptostep7.Cuttolengthandnotchthe
BottomPolyRailZVP14WS(#14),thenpush
it over the bottom edge of the glass (N).
Run a small bead of silicone on the inside
wherethemetal andpolymeet toprevent
waterseepingoutoftheenclosure
9)SealingtheEnclosure.Run a bead of sili‐
cone on the inside and outside where the wall
jamb meets the shower wall and where the
dam strip meets the curb. Inspect the install
andcaulkanygapthatmightletwaterthrough.
Then run a small bead (inside and out) where
theglassmeetstheU‐channel,aswellaswhere
thechannelmeetstheinstallationsurface.(O)
This manual suits for next models
1
Table of contents
Other Arizona Shower Door Other manuals