manuals.online logo
Brands
  1. Home
  2. •
  3. Brands
  4. •
  5. Arlec
  6. •
  7. Accessories
  8. •
  9. Arlec DC678 Manual

Arlec DC678 Manual

5 6
Introduction
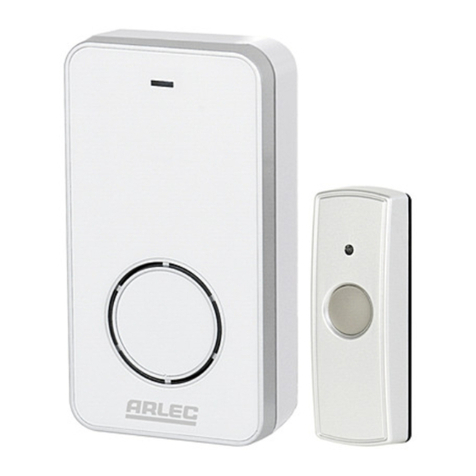
The Wireless Door Chime (DC678) consists
of two separate units:-
1. Push Button Unit
(Transmitter) IP55 weather proof rated
2. Chime Unit
(Receiver)
These units are completely self-contained
and no wiring between them is necessary.
Range
Up to 100 metres.
NOTE: Range depends on location,
temperature, and battery condition.
Important Notes
1. The operation and range of your Wireless Door Chime depends on location,
temperature and battery condition.
2. Try different locations in your home, ideally more than 1 metre from the floor.
Move Chime unit closer to Push Button unit to improve operation.
3. Do not expose either unit to rain or immerse in water.
4. Avoid locations where the Push Button unit is exposed to direct summer sunlight.
5. Do not leave exhausted batteries in Push Button unit.
6. Clean only with a damp cloth and mild detergent. Do not use solvents.
7. In an event of power outage, surge or unstable main power supply, your door chime
will default to factory setting. Please reset the unit according to ‘Resetting the Unit’.
Security
When you are away from home for long periods you may wish to leave your Chime Unit
with one of your neighbours so that they can monitor callers to your house during
your absence.
Trouble Sooting & User Hints
Problem Possible Cause Suggested Remedy
Chime
does not
sound.
1. Units are out of range (max.
range 100m).
Operate the Chime unit within the
operation range (100m).
2. Push Button and Chime units
are not on same frequency
coding.
Re-set the frequency coding (see Code
Selection) or select a different tone (see
Tone Selection).
3. Flat Push Button bat tery. Change the battery.
4. Wrong polarity of battery in
Push Button.
Re-insert battery with polarity to match
markings.
5. Power outage, surge or
unstable main power supply.
Re-set unit according to
‘Resetting the Unit’.
Chime
sounds
without
Push
Button
being
pressed
1. A power interruption to the
Door Chime unit plus a similar
door chime product operating
nearby has caused the chime
unit to reset to the incorrect
House Code
A. Switch off the Chime Unit for at least
1 minute. Switch on again. It should
beep twice. Press the Push Button to
operate the chime. This re-sets the
House Code in the Chime Unit or;
B. Re-set the frequency coding (see Code
Selection
2. A similar Wireless Door Chime
product is operating nearby on
the same House Code.
Re-set the House Code
(see Code Selection).
3. Interference from CBs, Taxis or
remote control toys operating
on the same frequency.
Re-set the House Code
(see Code Selection).
CPIN002726
Wireless Door Chime
with Gloss White Finish
DC678
Installation & Operating
Instructions
CPIN002726
Warranty
Arlec guarantees this product in accordance with the Australian Consumer Law.
Arlec also warrants to the original first purchaser of this product (“you”) from a retailer that
this product will be free of defects in materials and workmanship for a period of 12 months
from the date of purchase; provided the product is not used other than for the purpose, or in
a manner not within the scope of the recommendations and limitations, specified by Arlec,
is new and not damaged at the time of purchase, has not been subjected to abuse, misuse,
neglect or damage, has not been modified or repaired without the approval of Arlec and has
not been used for commercial purposes (“Warranty”).
If you wish to claim on the Warranty, you must, at your own expense, return the product, and
provide proof of original purchase and your name, address and telephone number, to Arlec at
the address below or the retailer from whom you originally purchased the product within 12
months from the date of purchase.
Arlec will (or authorise the retailer to) assess any claim you may make on the Warranty in the
above manner and if, in Arlec’s reasonable opinion, the Warranty applies, Arlec will at its own
option and expense (or authorise the retailer to) replace the product with the same or similar
product or repair the product and return it to you or refund the price you paid for the product.
Arlec will bear its own expenses of doing those things, and you must bear any other expenses
of claiming on the Warranty.
The Warranty is in addition to other rights and remedies you may have under a law in relation
to the product to which the Warranty relates.
Our goods come with guarantees that cannot be excluded under the Australian Consumer
Law. You are entitled to a replacement or refund for a major failure and for compensation for
any other reasonably foreseeable loss or damage. You are also entitled to have the goods
repaired or replaced if the goods fail to be of acceptable quality and the failure does not
amount to a major failure.
Arlec Australia Pty. Ltd. ACN 009 322 105 (“Arlec”) gives the Warranty.
Arlec’s telephone number, address and email address are:
Customer Service: (03) 9982 5111
New Zealand Toll Free: 0800 003 329
Building 3, 31 – 41 Joseph Street, Blackburn North, Victoria, 3130
Blackburn North LPO, P.O. Box 1065, Blackburn North, 3130
Email: [email protected]
Code Selection
The push button unit generates random code sequences to which the chime unit is
able to learn. Should your door chime unit activate intermittently for no apparent
reason, the uncontrolled activation may be caused by another unit nearby or from a
device operating on the same frequency.
Code/Push Button Limiting Switch
Your door chime unit is capable of working with
a maximum of 4 Push Button units at 4 different
frequency channels. If your door chime unit
activate intermittently for no apparent reason,
it might caused by a nearby device working
on a similar frequency channel. To eliminate
frequency channel interruption, Code/Bell
Push Button Limiting Switch is to limit the Push
Button unit and/or frequency channel that your
door chime unit can be activated by.
1. Insert batteries into the Door Chime unit
and press the Push Button unit once, the
door chime will sound to indicate that 1st
operating code is registered and memorized.
This is the factory setting and intended to
limit the activate frequency channel and Bell
Push Button unit to 1.
2. To register 2nd Bell Push Button operating code and/or frequency channel, Press
and hold the code setting switch on the door chime unit for 1 second, it will give a
“Beep” sound to indicate that door chime is ready to learn the 2nd operating code,
press the 2nd Push Button unit once, the door chime will sound to indicate that 2nd
operating code is registered and memorized. This will allow 2 different Push Button
units and/or frequency channels working with the door chime at the same time.
3. Repeat the same procedure for the 3rd and 4th Push Button units. The maximum
amount of Push Button units and frequency channels that the door chime unit can
be work at the same time are 4.
4. To reset Code/Bell Push Button limiting function, remove batteries from the door
chime for at least 10 seconds, and reinsert the batteries, this will reset the door
chime unit to learn 1 Push Button unit and frequency channel only.
NOTE: low battery in doo chime or push button unit will erase or rest the registered
frequency channel between the door chime and push button unit, if the door chime
unit does not sound when push button unit depressed, please replace batteries on
door chime and push button unit, then set up both units again.
Resetting the Unit
To avoid uncontrolled activation:
1. Switch off the Chime Unit for at least 1 minute.
2. Switch back on. A double beep should be heard indicating that the unit is in
learning mode.
3. Press the Push Button. The chime should sound to indicate code selection.
432
WARNING
This product contains a Lithium Coin type battery.
WARNING! Please ensure the coin battery is kept OUT OF REACH OF CHILDREN.
The battery presents a significant choking and burn hazard to young children
should they swallow a battery. Under 4 year-olds are especially prone to
accidental swallowing of objects such as these.
If a lithium coin battery is swallowed, SEEK IMMEDIATE MEDICAL ATTENTION.
Do not let the child eat or drink; Do not induce vomiting.
To keep your children safe:
• Keepdevicesthatusecoinbatteriesoutofreachofsmallchildren
• Keepnewbatteriesintheirpackaginguntilreadytouseandstore
in places out of reach of children
• Safelydisposeofspentbatteriesimmediately
• Sharethisinformationwithyourfamily,friends,caregiversandbabysitters.
We have designed the coin battery holder to require dexterity normally beyond that
of a small child to access, but nevertheless you should always follow the advice
given above.
Push Button
1. Push Button unit is operated by 1 x 3 volt Lithium battery (CR2032 - included).
2. Remove the back of case by pushing in the tab on the bottom with a small, flat
screwdriver.
3. The 3 volt Lithium battery (CR2032) is already installed.
Simply pull off the isolation strip which will allow the battery to make electrical contact.
NOTE: When the push button unit is depressed, an orange LED light will lit on, but this
is not an indicator of the push button unit battery level. It is recommended to replace
batteries once a year to ensure range and transmission reliability.
To Replace the Battery
Remove the locking screw from the battery holder clip and remove old
battery. Insert 1 x 3 volt Lithium battery (type CR2032) in the battery
compartment, ensuring the battery polarity is correct as in Figure 1.
Replace clip and tighten locking screw to hold battery firmly in place.
Chime Unit
Remove battery cover from the rear of the door chime unit by sliding it
towards the bottom edge of the unit.
Insert 2X AA size batteries, alkaline type batteries are recommended, do not use
rechargeable batteries; do not mix old and new batteries or different types. Ensure
batteries are connected at the correct polarity.
Replace the battery cover once batteries are inserted.
When the chime unit is power up, it will emitted a double beep sound, press
the push button unit immediately to register the connection between chime and
push button unit.
Installation
Do not mount the chime and push button unit near metal objects, UPVC frame, heat/
radio source, security door or in close proximity to any radio emitting equipment.
The range of the unit may be substantially reduced.
Push Button Unit
The Push Button unit has two mounting holes on rear plate of unit that must be
pushed through before unit can be mounted.
1. Remove rear plate of unit (see battery installation).
2. Push through tabs in mounting holes.
3. Using the back plate of the Push Button unit as a guide, mark the position
of holes onto mounting surface.
4. Drill appropriately sized holes and insert wall plugs if required.
5. Secure the back plate of Push Button unit to mounting unit.
6. Clip Push Button unit to back plate.
Alternatively the Push Button unit can be attached to smooth mounting surfaces such
as painted wood, glass and plastic using Self-Adhesive Pad (supplied).
Do not mount the push button unit on metal or near metal door frame, security door,
metal furniture or in close proximity to any radio emitting equipment.
The range of the unit may be substantially reduced.
Door Chime Operation
Once the Push Button and Chime units have been installed in their desired locations,
the system is ready for use.
Depress button on Push Button unit momentarily, and chime should sound. Press button
again to repeat. Continual pressing of the button will not repeat the chime. If chime
fails to sound, check batteries in push button and check power is on to Chime Unit.
Tone Selection
The Wireless Door Chime is supplied with 8 built-in chimes.
Westminster Chime Twinkle Twinkle
Double Ding-Dong It’s a Small World
Circus Theme Dog Barking
Banjo on My Knee Telephone Ring
To change the chime tune, remove the Push Button Unit’s rear cover.
Inside the Push Button Unit locate the small Tune Selector push button marked ‘S’
(Ref. Figure 1). Each time that this Tune Selector push button is pressed, the next of
the 8 melodies will be played. You can step through and listen to each in turn. When
you hear the melody you wish to choose, do not press the tune selector again. The
chime will play the selected melody each time the bell press is pushed. At any time
you can select another melody by repeating the tune selector button process.
Refit the Push Button Unit rear cover.
Whenever the Push Button Unit battery is fitted or replaced, the chime tune may
default to the Westminster Chime.
Fig 1.
S
CPIN002726
Code/Bell Push
Button Limiting
Switch
Other Arlec Accessories manuals

Arlec MAL546 User manual

Arlec

Arlec MAL546 User manual

Arlec MAL343 Series 2 Service manual

Arlec

Arlec MAL343 Series 2 Service manual

Arlec DC688 User manual

Arlec

Arlec DC688 User manual

Arlec MAL535 User manual

Arlec

Arlec MAL535 User manual

Arlec DC688 User manual

Arlec

Arlec DC688 User manual

Arlec MAL343 Series 2 User manual

Arlec

Arlec MAL343 Series 2 User manual

Arlec MAL553 User manual

Arlec

Arlec MAL553 User manual

Arlec UC0122 User manual

Arlec

Arlec UC0122 User manual

Arlec MAL553 User manual

Arlec

Arlec MAL553 User manual

Arlec DCS01 User manual

Arlec

Arlec DCS01 User manual

Arlec DC650 Manual

Arlec

Arlec DC650 Manual

Popular Accessories manuals by other brands

Byron DB305 Installation and operation instruction

Byron

Byron DB305 Installation and operation instruction

Sygonix 1557806 App instruction manual

Sygonix

Sygonix 1557806 App instruction manual

Airmar TRIDUCER Smart UDST800 owner's guide

Airmar

Airmar TRIDUCER Smart UDST800 owner's guide

BAMO IER MAXIMAT TC4 operating instructions

BAMO IER

BAMO IER MAXIMAT TC4 operating instructions

Nice Volo S Radio Instructions and warnings for the fitter

Nice

Nice Volo S Radio Instructions and warnings for the fitter

Rutenbeck TC IP 1 operating instructions

Rutenbeck

Rutenbeck TC IP 1 operating instructions

Radica Games M7623 instruction manual

Radica Games

Radica Games M7623 instruction manual

Roland GK-3B owner's manual

Roland

Roland GK-3B owner's manual

Utilitech UT-81 quick start guide

Utilitech

Utilitech UT-81 quick start guide

Skytrak SK2-1001-M Installation, operation & maintenance manual

Skytrak

Skytrak SK2-1001-M Installation, operation & maintenance manual

Fracarro DT1000 quick start guide

Fracarro

Fracarro DT1000 quick start guide

Brentwood Appliances TS-1001 Operating and safety instructions

Brentwood Appliances

Brentwood Appliances TS-1001 Operating and safety instructions

MGI DV1080P user manual

MGI

MGI DV1080P user manual

Vega VEGAPULS SR 68 operating instructions

Vega

Vega VEGAPULS SR 68 operating instructions

HoMedics ARMH-410 instruction manual

HoMedics

HoMedics ARMH-410 instruction manual

ThermoWorks EasyLog WIFI Logger quick start guide

ThermoWorks

ThermoWorks EasyLog WIFI Logger quick start guide

Thermaflow SS675 Resource manual

Thermaflow

Thermaflow SS675 Resource manual

Planar Wallnet Setup & operation

Planar

Planar Wallnet Setup & operation

manuals.online logo
manuals.online logoBrands
  • About & Mission
  • Contact us
  • Privacy Policy
  • Terms and Conditions

Copyright 2025 Manuals.Online. All Rights Reserved.