Armstrong 21-AR User manual

Model 21-AR
Fixed Pivot Air/Gas Vents
Luft/Gas-Entlüfter mit Fixem Hebelmechanismus
Purgeurs d’Air/de Gaz à Axe Fixe
Purgadores de Aire y Gas de Pivote Fijo
Ontluchters - met Vast Draaipunt
Eliminatori d’Aria e Gas da Liquidi in Pressione
Detailed version of this IOM is available on our website at armstronginternational.com.
Reference Bulletin IB-22 – English language (only)
For detailed material specifications, options, approximate dimensions and weights, see Armstrong literature or
consult your local Representative.
Für detaillierte Werkstoffangaben, Zubehör, Abmessungen und Gewichte, sehen Sie die Armstrong Datenblätter
oder fragen Sie Ihre Armstrong-Vertretung.
Pour toute spécification détaillée des matières, options, dimensions et poids, veuillez vous référer à la littérature
Armstrong ou prendre contact avec votre Représentant local.
Para especificaciones de materiales detalladas, opciones, dimensiones aproximadas y pesos, ver catálogos
Armstrong o consultar con su Representante local.
Voor gedetailleerde materiaal specificaties, afmetingen en gewichten, zie de Armstrong documentatie of neem
contact op met uw plaatselijke Vertegenwoordiger.
Per la specifica dettagliata dei materiali, accessori opzionali, dimensioni e pesi approssimativi, vedere la
documentazione appropriata o contattare il Distributore locale.
Armstrong Cast Iron Fixed Pivot Air/Gas Vent
Vertical Connection
Eliminatore d’Aria e Gas da Liquidi in Pressione - In Ghisa
Connessioni Verticali
Armstrong Luft/Gas-Entlüfter aus Grauguß mit Fixem
Hebelmechanismus
Vertikaler Anschluß
Armstrong Gietijzeren Ontluchter met Vast Draaipunt
Verticale Aansluiting
Purgeur d’Air/de Gaz en Fonte, à Axe Fixe
Raccordement Vertical
Purgador de Aire y Gas de Pivote Fijo Armstrong en
Fundición
Conexión Vertical
These instructions should be used by experienced personnel !
Diese Gebrauchsanweisung ist von Fachpersonal zu benutzen !
Ces instructions devraient être utilisées par du personnel expérimenté !
¡Estas instrucciones deben ser utilizadas por personal experimentado !
Onderhoud uitsluitend uit te voeren door ervaren personeel !
Queste istruzioni devono essere utilizzate da personale esperto !
PRODUCT DESCRIPTION - PRODUKTBESCHREIBUNG -
DESCRIPTION DU PRODUIT - DESCRIPCION DEL PRODUCTO -
PRODUKT OMSCHRIJVING - DESCRIZIONE DEL PRODOTTO
Model shown on the picture: 21-AR - Die Abbildung zeigt das Modell 21-AR - Photo: modèle 21-AR
Modelo mostrado en la fotografía: 21-AR - Model op foto: 21-AR - Modello in figura: 21-AR

START-UP PROCEDURE (Bottom Inlet - Top Outlet) - INBETRIEBNAHME (Einlaß
unten - Auslaß oben) - PROCEDURE DE DEMARRAGE (Entrée par le bas - Sortie
vers le haut) - PROCEDIMIENTO DE PUESTA EN MARCHA (Entrada inferior - Salida
superior) - OPSTARTPROCEDURE (Bodem inlaat - Top uitlaat) - PROCEDURA
D’AVVIAMENTO (Entrata sul fondo - Uscita dall’alto)
For detailed hookups and adapted start-up and shut-down procedures, see Armstrong literature or consult your
local Representative.
Für detaillierte Informationen über Installation, Inbetriebnahme und Außerbetriebnahme sehen Sie die Armstrong
Datenblätter oder fragen Sie Ihre Armstrong-Vertretung.
Pour plus de détails à propos des procédures de démarrage et d’arrêt, ainsi que pour l’installation, veuillez vous
référer à la littérature Armstrong ou prendre contact avec votre Représentant local.
Para informarse sobre conexiones detalladas y procedimientos adaptados de puesta en marcha y parada, consulte
los catálogos Armstrong o diríjase a su Representante local.
Voor gedetailleerde montage en installatie instructies zie het betreffende Armstrong documentatieblad of neem
contact op met uw plaatselijke Vertegenwoordiger.
Per procedure dettagliate di collegamento, d’avviamento e di fermata, vedere la documentazione Armstrong o
consultare il Distributore locale.
INSTALLATION - INSTALLATIONSANWEISUNG - INSTALLATION
INSTALACION - INSTALLATIE - INSTALLAZIONE
Possible connections: screwed - Mögliche Anschlußarten: Muffengewinde
Raccordement possible: taraudé - Conexiones posibles: roscada
Mogelijke aansluitingen: draad - Connessioni disponibili: filettate
Not included
nicht enthalten
Non compris
No includo
Niet meegeleverd
Non inclusi
Connection
Verbindung
Connexion
Conexion
Aansluiting
Connessioni
IMPORTANT NOTE - WICHTIGER HINWEIS - NOTE IMPORTANTE
NOTA IMPORTANTE - BELANGRIJK - NOTA IMPORTANTE
The float might be blocked with a fixing device (rod, metal thread or polystyrene) to avoid damages during
transportation.
Make sure the float is free before installing the liquid drainer/air vent. Refer to the product for more information.
Der Schwimmer kann mit einer Befestigungsvorrichtung (Stange, Metallfaden oder Polystyrol) blockiert werden,
um Beschädigungen während des Transports zu vermeiden.
Stellen Sie sicher, dass der Schwimmer frei ist, bevor Sie das Flüssigkeitsablass- / Entlüftungsventil installieren.
Weitere Informationen finden Sie im Produkt.
Le flotteur peut être bloqué à l’aide d’un dispositif de fixation (tige, fil métallique ou polystyrène) afin d’éviter
d’éventuels dégâts lors du transport.
Assurez-vous de libérer le flotteur avant d’installer le purgeur. Reportez vous au produit pour plus d’informations.
La boya podría bloquearse con un dispositivo fijador (vástago, rosca de metal o poliestireno) para evitar daños
durante el transporte.
Asegúrese de que la boya está suelto anttes de instalar el drenador de líquido / venteador de aire. Consulte el
producto para más información.
De vlotter kan geblokkeerd zijn door een aangebrachte fixatie (staaf, metalen draad of polystyreen) om
beschadigingen gedurende transport te voorkomen.
Controleer dat de vlotter vrij kan bewegen voordat het ontwateringsventiel of ontluchter geinstalleerd wordt.
Gaarne informatie hierover op het product betrachten.
Il galleggiante potrebbe essere fissato per mezzo di un dispositivo (astina avvitata, filo metallico o polistirene) per
evitare danni durante il trasporto.
Assicurarsi che il galleggiante sia libero prima di installare il liquid drainer /air vent. Far riferimento al prodotto per
maggiori informazioni.

MAINTENANCE - WARTUNG - MAINTENANCE
MANTENIMIENTO - ONDERHOUD - MANUTENZIONE
For troubleshooting, testing methods, frequency of maintenance and detailed spare parts list, see Armstrong
literature or consult your local Representative.
Für detaillierte Informationen über Fehlersuche, Testmethoden, Wartungsintervallen und Ersatzteillisten fragen Sie
Ihre Armstrong-Vertretung.
Pour le dépannage, les méthodes de test, la fréquence d’entretien et la liste détaillée des pièces de rechange,
veuillez vous référer à la littérature Armstrong ou prendre contact avec votre Représentant local.
Para detección de posibles averías, métodos de test, frecuencia de mantenimiento y lista detallada de repuestos,
ver catálogos Armstrong o consultar con su Representante local.
Voor het oplossen van problemen, test methodes, onderhoud en gedetailleerde onderdelenlijsten, zie de
Armstrong documentatie of neem contact op met uw plaatselijke Vertegenwoordiger.
Per la soluzione di eventuali problemi, metodi di prova funzionalità, frequenza di manutenzione e dettaglio della
lista ricambi, vedere la documentazione Armstrong o consultare il Distributore locale.
SHUT-DOWN PROCEDURE (Bottom Inlet - Top Outlet) -
AUSSERBETRIEBNAHME (Einlaß unten - Auslaß oben)
PROCEDURE D’ARRET (Entrée par le bas - Sortie vers le haut) -
PROCEDIMIENTO DE PARADA (Entrada inferior - Salida superior)
- UIT BEDRIJFNAME (Bodem inlaat - Top uitlaat) - PROCEDURA DI
FERMATA (Entrata sul fondo - Uscita dall’alto)
Equipement under pressure - Operating temperature > 100°C - Make sure trap is cold before
handling!
Armatur steht unter Druck - Arbeitstemperatur > 100°C - Stellen sie sicher, dass die Armatur kalt und
drucklos ist, bevor an dieser gearbeitet wird!
Equipement sous pression - Température en fonctionnement > 100°C - Laisser le purgeur refroidir
avant toute manipulation!
Equipo bajo presión - Temperatura de trabajo > 100°C ¡ - Asegúrese de que el purgador esté frío
antes de manipularlo!
Toestel onder druk - Werktemperatuur > 100°C - Condenspot moet afgekoeld zijn alvorens eraan te
werken!
Apparecchiatura in pressione - Temperatura operativa > 100°C - Assicurarsi che lo scaricatore sia
freddo prima d’intervenire!

I. Internals Maintenance:
- Remove the complete vent from the line;
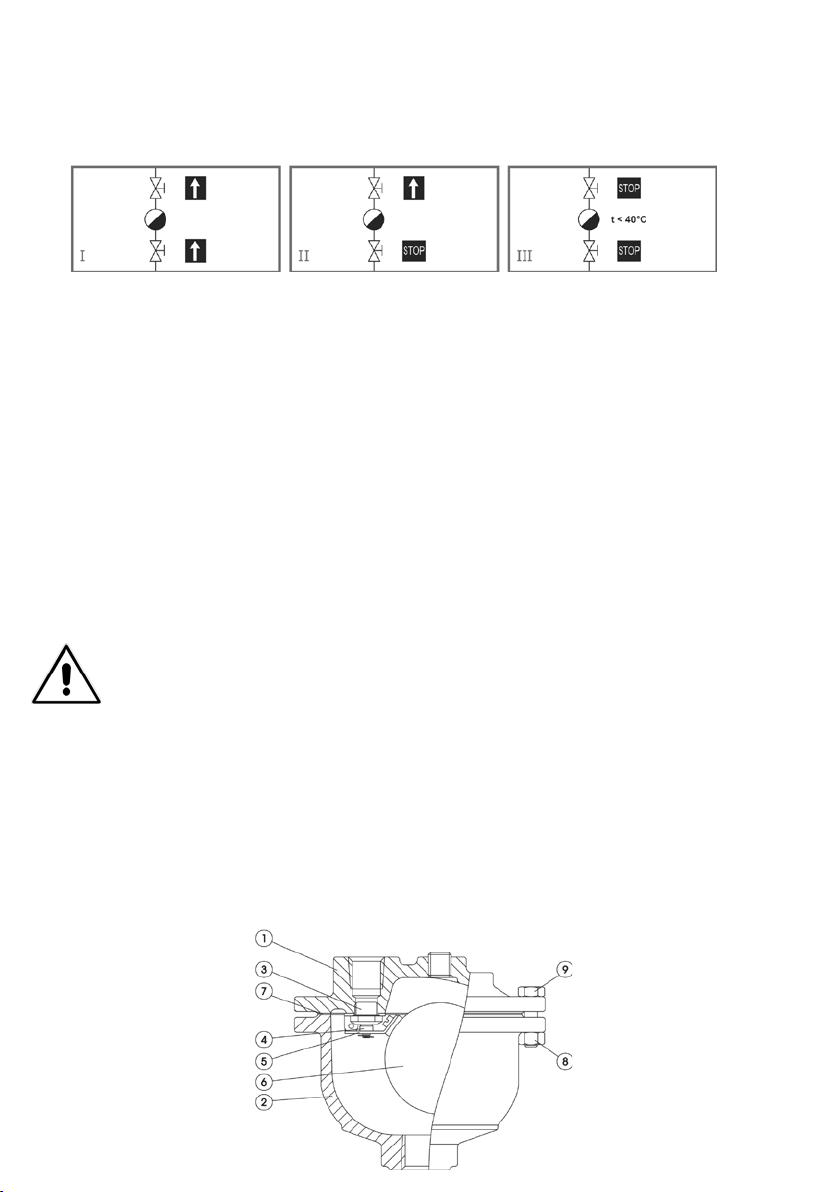
- Unscrew bolts (9) and nuts (8) and remove the cap (1) with the
operating mechanism fixed on it;
- Unscrew the seat (3) and replace the complete Mechanism Less Float
(3, 4, 5);
- Screw back the seat (3) and make sure that the lever (5) is aligned in
the axis of the cap (1). A clearance of 0,1 mm should be left in order to
allow the lever (5) to move horizontally;
- Replace the float (6) if necessary;
- Replace gasket (7);
- Put the cap (1) back on the body (2) and screw bolts (9) and nuts (8).
I. Wartung und Reparatur:
- Komplette Armatur aus der Rohrleitung ausbauen;
- Schrauben (9) und Muttern (8) lösen, Deckel (1) und Mechanismus
abnehmen;
- Sitz (3) abschrauben und gesamten Mechanismus ohne Schwimmer
austauschen (3, 4, 5);
- Sitz (3) wieder montieren, wobei der Hebel (5) auf die Achse des
Deckels (1) ausgerichtet sein muß. Für die horizontale Bewegung des
Hebels (5) einen Abstand von 0,1 mm lassen;
- Schwimmer (6) bei Bedarf erneuern;
- Gehäusedichtung (7) erneuern;
- Deckel (1) auf das Gehäuse (2) setzen, Schrauben (9) und Muttern (8)
wieder anziehen.
I. Mantenimiento de las piezas internas:
- Retire el purgador completo de la línea;
- Afloje los pernos (9) y las tuercas (8) y retire la tapa (1) con el
mecanismo de funcionamiento sujeto a ella;
- Desajuste el asiento (3) y cambie el mecanismo sin boya completo
(3, 4, 5);
- Vuelva a ajustar el asiento (3) y asegúrese de que la palanca (5) está
alineada en el eje de la tapa (1). Debe quedar un espacio libre de 0,1
mm para que la palanca (5) se pueda mover horizontalmente.
- Cambie la boya (6) si es necesario;
- Cambie la junta (7);
- Vuelva a colocar la tapa (1) en el cuerpo (2) y ajuste los pernos (9) y
las tuercas (8).
I. Binnenwerk vervangen:
- Verwijder de gehele ontluchter uit de leiding;
- Verwijder bouten (9) en moeren (8) en verwijder de kap (1) inclusief
het mechanisme;
- Draai zitting (3) los en vervang het complete mechanisme zonder
vlotter (3, 4, 5);
- Monteer de zitting (3) terug en overtuig Uzelf ervan dat de hefboom
(5) is uitgelijnd in de as van het deksel (1). 0,1 mm vrije ruimte moet
aanwezig om de hefboom (5) horizontaal te laten bewegen;
- Vervang de vlotter (6) indien nodig;
- Vervang pakking (7);
- Plaats het deksel (1) terug op het huis (2) en draai bouten (9) en
moeren (8) weer vast.
Armstrong International
North America • Latin America • India • Europe / Middle East / Africa • China • Pacific Rim
armstronginternational.com
1073-A
05/01/2017
© 2017 Armstrong International, SA.
I. Entretien des pièces internes :
- Enlever le purgeur de la conduite;
- Dévisser les boulons (9) et les écrous (8) et enlever le couvercle (1)
avec le mécanisme qui y est attaché;
- Dévisser le siège (3) et remplacer l’équipement mobile complet (3,
4, 5);
- Revisser le siège (3) et s’assurer que le levier (5) soit aligné dans l’axe
du couvercle (1). Un espace de 0,1 mm doit être laissé pour que le levier
(5) puisse se mouvoir horizontalement;
- Remplacer le flotteur (6) si nécessaire;
- Remplacer le joint de corps (7);
- Replacer le couvercle (1) sur le corps (2) et revisser les boulons (9)
et les écrous (8).
I. Manutenzione degli organi interni:
- Smontare dalla linea l’intero eliminatore d’aria;
- Svitare i bulloni (9), i dadi (8) e sollevare la testa (1) con il
meccanismo ad essa solidale;
- Svitare la sede (3) e sostituire l’intero meccanismo (3, 4, 5) senza il
galleggiante;
- Riavvitare la sede (3) ed assicurarsi che la leva (5) sia allineata
sull’asse della testa (1). Per permettere alla leva (5) di muoversi
orizzontalmente bisogna lasciare una luce di 0,1 mm;
- Sostituire il galleggiante (6), se necessario;
- Sostituire la guarnizione (7);
- Rimontare la testa (1) sul corpo (2) ed avvitare bulloni (9) e dadi (8).
Other Armstrong Fan manuals
Popular Fan manuals by other brands

Royal Sovereign
Royal Sovereign DFN-04 owner's manual

WAC Lighting
WAC Lighting CLEAN installation instructions

Milwaukee
Milwaukee M18 AF Original instructions

Strongway
Strongway 52723 owner's manual

Renson
Renson Endura Twist Assembly instructions

Vortice
Vortice Nordik HVSL Super Blade E Series Instruction booklet

MTD
MTD MTD-ERV 350 Installation & operating manual

Home Decorators Collection
Home Decorators Collection JUNEDALE Use and care guide

Munters
Munters GB Series instruction manual

Town & Country Fireplaces
Town & Country Fireplaces TC30.D Installation and operating instructions

Parrot Uncle
Parrot Uncle F6115-SMART Use and care guide

Homewerks
Homewerks 7107-03HW manual