Aroma Quest Microdiffuser AQ-B4 User manual
1
INSTRUCTIONS MANUAL AQ-B4
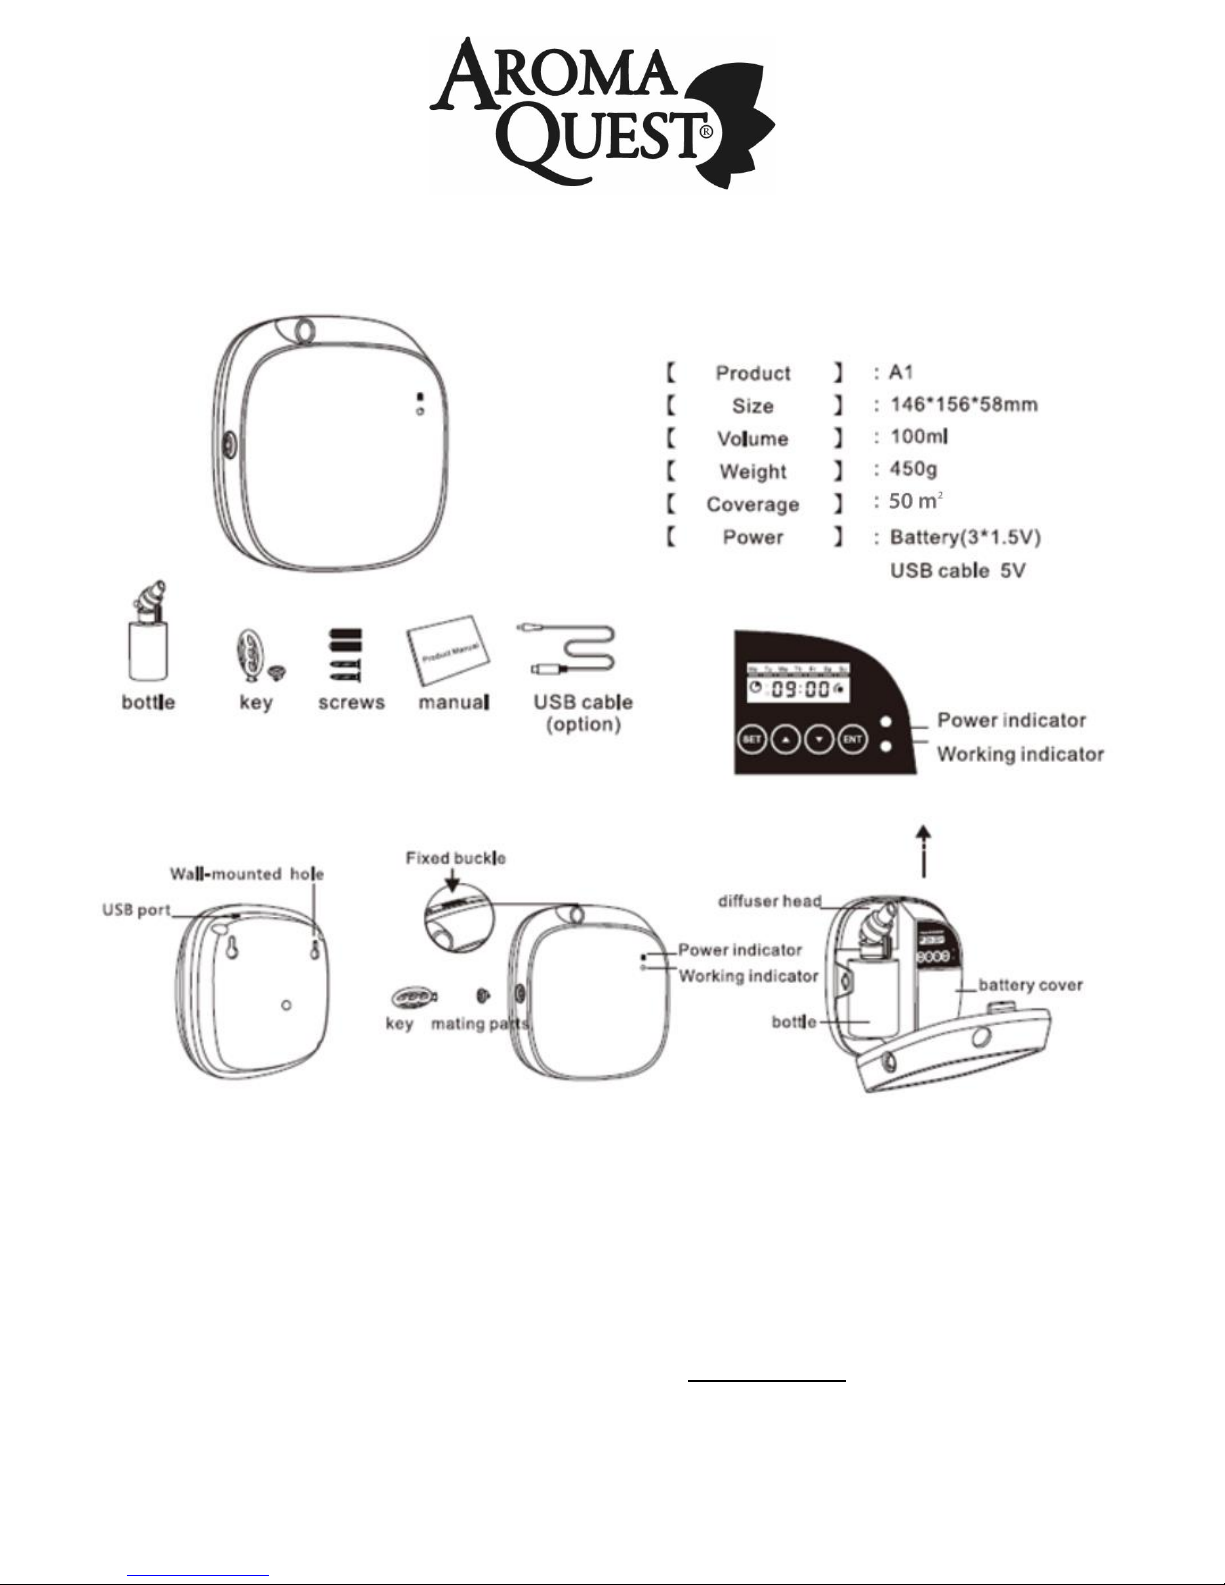
PARTS & SPECS:
Content:
(1) Continuous Fragance Microdiffuser™
(1) Reusable nozzle for the fragrance bottle cap (*)
(1) Key
(1) Padlock
(4) Screws
(*) Each device comes with only one reusable nozzle for fragrances diffusion. Do not dispose them to avoid additional costs.
FOR REPLACEMENTS OR ADDITIONAL PARTS PURCHASE VISIT: www.aromaquest.com

2
Bateries:
Use 3 "AA" alkaline, lithium or rechargeable batteries (not included)
Turn on or off the device with the placement or removal of the batteries
Settings recorded won´t change upon batteries removal
USB power adapter must be purchased separately if desired
Bottle of Fragrance:
Fragrances are sold separately
Place the bottle of fragrance on the device 5 seconds after done all the programming, thus avoiding
contact of the product with eyes and skin
Use only AromaQuest® 100ml bottles of the fragrance of your choice on this equipment
Do not alter the original content of the fragrance in the bottle
The fragrance performance in this equipment has been calculated based on 1 bottle of 100ml (See
the Performance Guide in this manual).
Under any memory settings the fragrance is dispensed for 3 consecutive seconds
INSTALLATION INSTRUCTIONS:
Installation:
Place the screws in the wall with 90mm of space between them and horizontally. Use the Template
to Open Holes attached in this manual to guide yourself. Do not obstruct the scented air outlet in the
microdiffuser of this equipment
Install the equipment on the highest part of walls, ensuring that the bottle nozzle is at least 6" from
the ceiling. If possible, install it near air conditioning outlets or in ventilated places with traffic of
people. Avoid installing it near air exhausters.
To remove dust, stains, or dirt from the device, use a cloth moistened with water on the outside. Do
not clean the nozzle or electronic part of the equipment.
Quick Activation:
1. Insert the key into the left side of the unit and turn it counterclockwise to remove the lock. Press the
hook on the top with your hand to open the lid. Keep the key and lock in a safe place
2. Uncover the battery compartment by pushing it down into the slot. Place the 3 "AA" batteries with the
negative terminal into the metal spring until the display lights on. Close the battery compartment
cover.
3. Set the device schedule and intensity before placing the bottle of fragrance. Read the Programming
Instructions Section for more information

3
4. Remove the original cap from the bottle of fragrance and screw the nozzle into it before installing.
Then insert the bottle vertically into the equipment, pressing the nozzle against the diffuser until it
clicks into place.
5. Close the diffusers ´cover until it clicks. Insert the padlock and lock it with the key
PROGRAMMING INSTRUCTIONS:
Date-Time Settings:
1. If the display is in Standby Mode, press the SET button until it shows the local time to be changed.
Otherwise, go to the next step
2. Press SET until days of the week flashes. Use the arrows to chose the current and press ENT to
approve.
3. Then use the arrows to chose the time (hours and minutes) and press ENT when done. The diffuser
operates under the 24-hour time system.
4. Use ENT as many times as needed to double check date-time settings. Then press SET to accept
these changes when done.
5. If you leave any of the previous steps without saving, the machine will remain on and static until the
schedule resumes, the changes are recorded and the diffusion starts.
Memory Setting:
1. The equipment allows programming up to 5 memories that work simultaneously. Set each of them
so that they do not match in schedules or intensity of fragrances. Otherwise, the diffuser won´t
operate properly.
2. While in Standby Mode, press SET until you see the backlit display. Press SET again to choose
(from 1 to 5) the memory to be programmed and then press ENT to enter. Remember that the first
one is the default memory.
3. Use the arrows to chose the starting time (hour and minutes). Press ENT to accept
4. Use the arrows to chose the finishing time (hour and minutes). Press ENT to accept
5. Chose (from 1 to 10) level of the fragrance, being "1" the softest and "10" the most intense. press
ENT to accept.
Knowing howmany hours per month thediffuserwill work (use the Hours per Month Calculation
Worksheet from this manual) find the closest value to that number in the left column of the
Performance Guide and decide, according to the greys, if you want the smell to be: Soft,
Intermediate or Intense. With that, chose from the duration-in-days suggested and the result
will be, at the top of the table, the appropriate fragrance intensity level to be used when
programming .
6. Set with the arrows (on or off) the days that the diffuser must operate during the newly chosen hours.
Press ENT to accept or reject every day of the week. Each day of the week that is activated will be
underlined and flashing on the display.

4
7. Repeat these steps for each memory you wish to use.
8. Press SET to save the configuration of the memory until you notice the time-setting on the display
and the sound of the microdiffusor.
9. Place the fragrance bottle and finally the lid. Protect and control the contents of the bottle, the
batteries and the lock with the key when closing the equipment.
Quick Fragrance-Intensity Change:
If youwant toquickly change thefragranceintensityfor thecurrent activated memory, with thedisplay
in Standby Mode, pressthe arrows to change optionsfrom 1 to 10 and wait for the machine to confirm
with an immediate diffusion
Quick Restart:
Press ENT for 5 seconds to delete all the programming on the device and the Default Mode will be
active again. When you reset, the time settings also return to Default Mode.
Standby Mode:
Occurs when the screen is off, even if the equipment had been manipulated (batteries placed). This
happens when you stop manipulating the keyboard for more than a minute. Also, if you suddenly
stop programming, the screen will freeze until the function is renewed.
Default Mode:
Is the configuration stored in the first memory of the diffuser and it can be modified to suit the user.
It starts at 7:00 and ends at 21:00 (assuming the base time is 12:00). It operates from Monday thru
Sunday, dispensing fragrance every 1.5 minutes, for 3 consecutive seconds and with an average
yield of 7 days.
HOURS PER MONTH CALCULATION WORKSHEET:
WEEKDAYS
INITIAL TIME
FINAL TIME
TOTAL HOURS
MONDAY
TUESDAY
WEDNESDAY
THURSDAY
FRIDAY
SATURDAY
SUNDAY
TOTAL HOURS PER WEEK:
(x 4 weeks)
(x 4)
TOTAL HOURS PER MONTH:
5
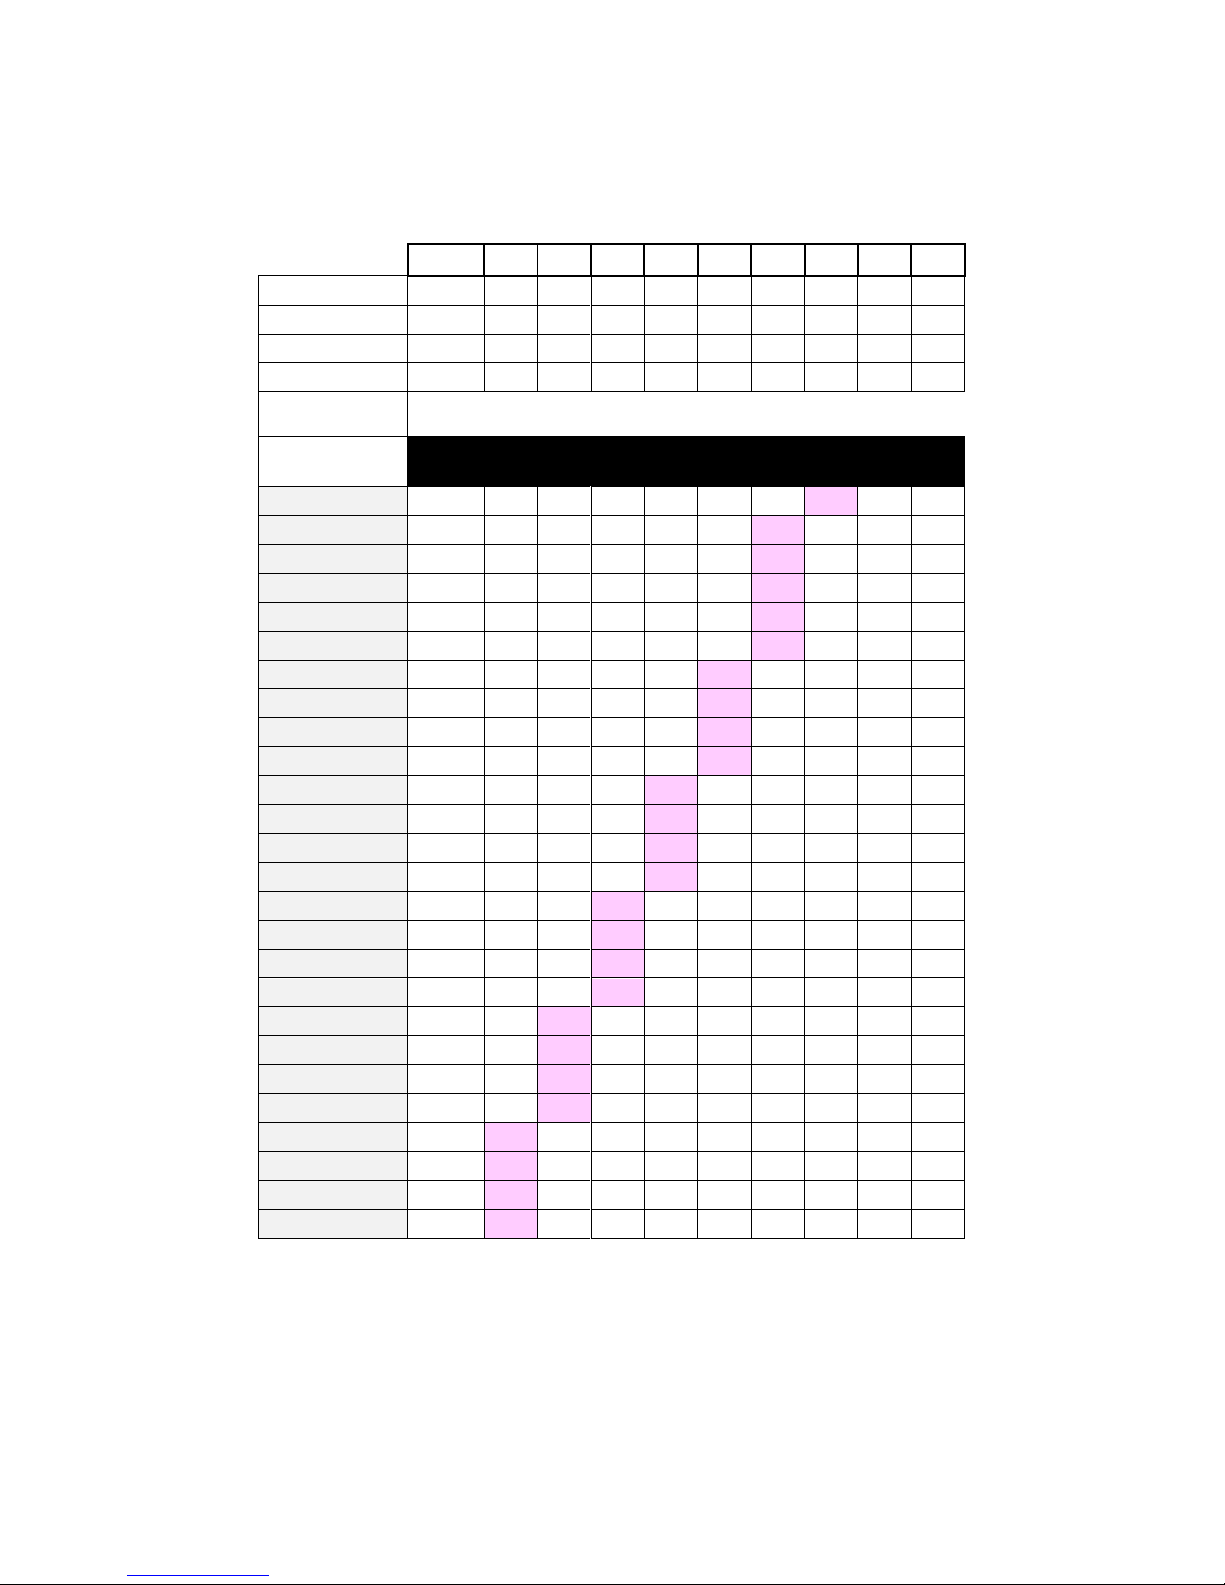
Recommended Settings for Installations –Refill Lifespan 30 + Days
Fragrance Microdifusser AromaQuest AQ-B4
Fragrance Refill/Alkaline Batteries Lifespan Lifespan in Days.
Sprays per 3 AA Alkaline Batteries: 3400
Program
G1
G2
G3
G4
G5
G6
G7
G8
G9
G10
Scent Pause (Min)
15
13.5
12
10.5
9
7.5
6
4.5
3
1.5
Scent Pause (Seg)
900
810
720
630
540
450
360
270
180
90
Scent Work (seg)
3
3
3
3
3
3
3
3
3
3
mL per Hour
0.12
0.13
0.15
0.17
0.20
0.24
0.30
0.40
0.60
1.18
SPRAYS (Per
Hour)
4
4
5
6
7
8
10
13
20
40
Hours per
Month
Duration in Days
240
103
93
82
72
62
52
41
31
21
11
260
95
86
76
67
57
48
38
29
19
10
280
88
79
71
62
53
44
35
27
18
9
300
82
74
66
58
50
41
33
25
17
8
320
77
70
62
54
46
39
31
23
16
8
340
73
65
58
51
44
36
29
22
15
7
360
69
62
55
48
41
34
28
21
14
7
380
65
59
52
46
39
33
26
20
13
7
400
62
56
49
43
37
31
25
19
13
6
420
59
53
47
41
35
30
24
18
12
6
440
56
51
45
39
34
28
23
17
11
6
460
54
48
43
38
32
27
22
16
11
6
480
51
46
41
36
31
26
21
16
10
5
500
49
45
40
35
30
25
20
15
10
5
520
48
43
38
33
29
24
19
14
10
5
540
46
41
37
32
28
23
18
14
9
5
560
44
40
35
31
27
22
18
13
9
5
580
43
38
34
30
26
21
17
13
9
4
600
41
37
33
29
25
21
17
12
8
4
620
40
36
32
28
24
20
16
12
8
4
640
39
35
31
27
23
19
16
12
8
4
660
37
34
30
26
23
19
15
11
8
4
680
36
33
29
25
22
18
15
11
7
4
700
35
32
28
25
21
18
14
11
7
4
720
34
31
27
24
21
17
14
10
7
4
740
33
30
27
23
20
17
13
10
7
3
1. Calculate the Hours per Month that your unit will be running.
2. On the row with your Hours per Month, find the column with the number highligted.
3. Program G-Number on top of the column.
With this settings the refill for your devise will last at least 30 days. If you want to increase fragrance intensity, set a higher
G-Number; if you want to reduce it, set a lower G-Number (on the column that you set you can see the duration in days for
the refill according to your settings).
6
MANUAL DE INSTRUCCIONES AQ-B4
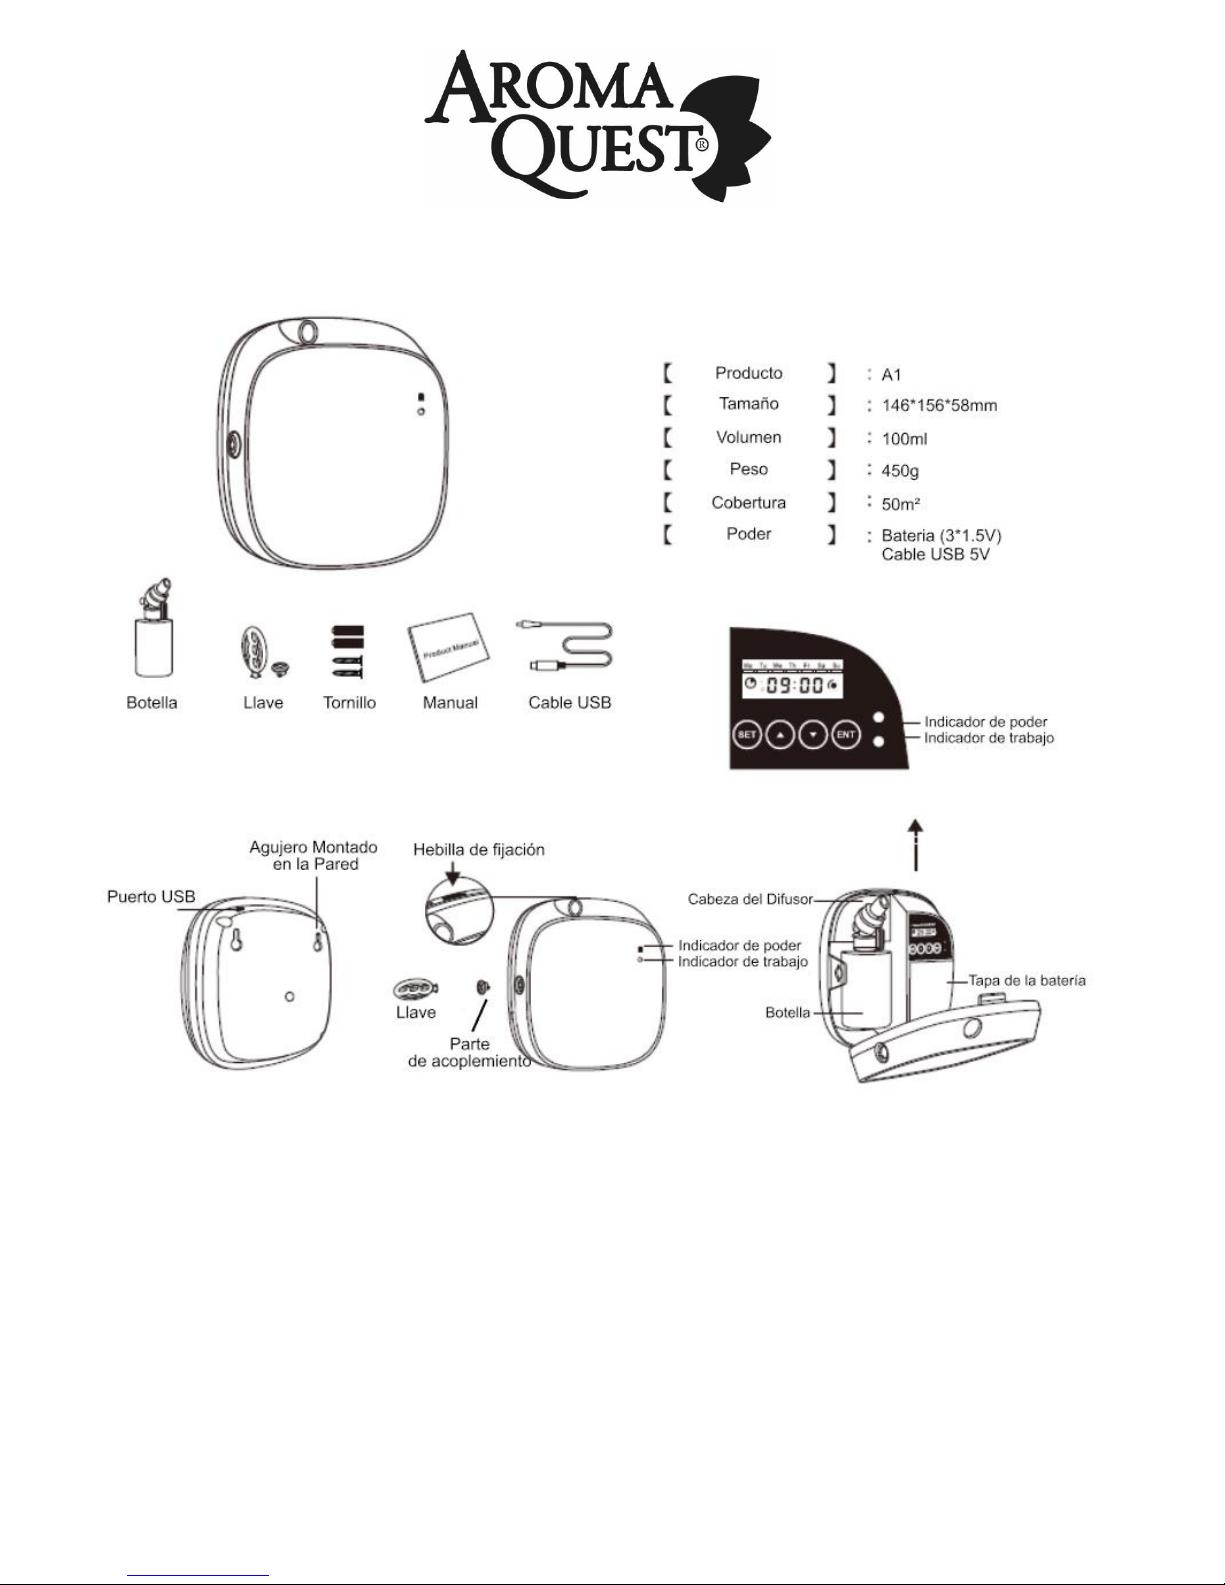
ESPECIFICACIONES Y PARTES:
Contiene:
(1) Microdifusor de Fragancia Continua™
(1) Boquilla reusable para la tapa del frasco de fragancia (*)
(1) Llave
(1) Candado
(4) Tornillos
(*) Cada equipo incluye una sola boquilla reusable para distintas fragancias. No las deseche para evitar gastos adicionales
PARA LA COMPRA DE SUMINISTROS Y PARTES ADICIONALES VISITE: www.aromaquest.com

7
Baterías:
Utilice 3 baterías "AA" alcalinas, de litio o recargables nuevas (no vienen incluidas en el equipo)
Encienda y apague el equipo con la colocación o remoción de las baterías.
Si las baterías son reemplazadas o removidas, la programación grabada en el equipo no se altera
Si desea utilizar un adaptador de corriente USB debe adquirirlo por separado.
Botella de Fragancia:
Las fragancias no vienen incluidas en el equipo. Debe adquirirlas por separado.
Coloque la botella de la fragancia 5 segundos después de haber programado el equipo, evitando
así el contacto del producto con ojos y piel.
Utilice únicamente botellas de 100ml AromaQuest® de la fragancia de su preferencia en este
equipo.
No altere el contenido de la fragancia en la botella.
El rendimiento de la fragancia para este equipo ha sido calculado con 1 botella de 100ml (Ver Tabla
Guía de Rendimiento en este manual). Si se instala una botella con menos cantidad, los valores
de la tabla ya no serían reales.
Bajo cualquier programación, la fragancia es dispensada durante 3 segundos consecutivos.
INSTRUCCIONES DE INSTALACIÓN:
Instalación:
Coloque dos tornillos en la pared con 90mm de espacio entre ellos y de forma horizontal. Utilice la
Plantilla Para Abrir Orificios, de la última página del manual, para guiarse. Evite que la salida de
aire perfumado en el microdifusor de este equipo quede obstruida.
Instale el equipo en partes altas de paredes, procurando que la boquilla de la botella quede a una
distancia mínima de 6" del techo. De ser posible, instálelo cerca de las salidas de aire acondicionado
o en lugares ventilados, con tráfico de personas. Evite instalarlo cerca de extractores de aire.
Para eliminar polvo, manchas o sucio del dispositivo, utilice un paño humedecido en agua, en
la parte exterior. No limpie la boquilla ni la parte electrónica del equipo.
Activación Rápida:
6. Inserte la llave en el lado izquierdo del equipo y gírela hacia la izquierda para sacar el candado.
Presione con lamano el gancho en la parte superior paraque la tapa se abra hacia abajo. Conserve
la llave y el candado en un lugar seguro.

8
7. Destape el compartimiento de las baterías presionándolo en la ranura hacia abajo. Coloque las 3
baterías de "AA" con el terminal negativo hacia el resorte de metal hasta observar el encendido del
equipo. Coloque nuevamente la tapa del compartimiento.
8. Programe el equipo (horarios e intensidad) antes de colocar la botella de la fragancia. Lea las
Instrucciones de Programación para mayor información.
9. Retire la tapa original del frasco y enrosque la boquilla en la botella antes de instalarla. Luego inserte
la botella de forma vertical en el equipo, presionando la boquilla contra el difusor hasta que encaje.
10. Cierre la tapa del equipo. Coloque el candado y ciérrelo con la llave nuevamente.
INSTRUCCIONES DE PROGRAMACIÓN:
Configure Fecha y Hora Actual:
6. Si el equipo está en Modo de Espera, presione SET hasta observar la pantalla iluminada
7. Si visualiza la hora que desea cambiar, deje presionado SET hasta que observe el destello en
cualquier día de la semana.
8. Utilice las flechas para escoger el día y presione ENT para aceptar.
9. Utilice las flechas para escoger la hora y minutos y presione ENT para aceptar. La programación del
equipo se realiza bajo el sistema horario de 24 horas.
10. Presione ENT las veces que sea necesario para revisar que el día y la hora estén correctos.
11. Cuando finalice, presione SET para guardar esa configuración. Si abandona cualquiera de los
pasos anteriores sin haber guardado, el equipo se quedará encendido y estático hasta que se
reanude la programación, se graben los cambios y arranque la difusión.
Configure la Memoria:
1. El equipo permite programar hasta 5 memorias que funcionan simultáneamente. Prográmelas
de manera que no coincidan en horarios o intensidad de fragancias. De lo contrario, el equipo no
funcionará correctamente.
2. Si el equipo está en Modo de Espera, presione el botón SET hasta que pueda observar la pantalla
iluminada. Presione SET nuevamente para escoger (del 1 al 5) la memoria que desea programar
y luego presione ENT para entrar. Recuerde que en la primera memoria está guardado el modo de
fábrica.
3. Con las flechas escoja la hora y minutos de arranque. Presione ENT con cada uno para aceptar.
4. Con las flechas escoja la hora y minutos finales. Presione ENT con cada uno para aceptar.
5. Escoja (entre 1 y 10) el nivel de intensidad de la fragancia, siendo 1 el más suave y 10 el más
intenso. Presione ENT para aceptar.

9
Conociendo cuántas horas por mes desea que el equipo funcione (utilice la Hoja de Trabajo
Para Calcular Horas por Mes), ubique ese valor en la columna izquierda de la Tabla Guía
De Rendimiento y decida, de acuerdo a las tonalidades de gris, si quiere una fragancia:
Suave, Intermedia o Intensa. Con eso, escoja de los sugeridos, cuántos días debe durar la
fragancia y el resultado en la parte superior de la tabla, es el nivel de fragancia que se debe
utilizar en la programación de cada memoria.
6. Con las flechas establezca encendido o apagado en los días que el equipo debe operar durante
los horarios recién escogidos. Presione ENT para aceptar o rechazar cada día de la semana. Cada
día de la semana que esté activado aparecerá subrayado en la pantalla del equipo.
7. Repita los pasos para cada memoria que desee programar.
8. Para guardar y aceptar la programación de cada memoria, presione SET hasta visualizar la hora
y percibir que empieza a funcionar el microdifusor.
9. Coloque la botella de la fragancia y por último la tapa. Proteja y controle el contenido de la
botella, las baterías y el candado con la llave al cerrar el equipo.
Cambio Rápido de Intensidad:
Estando en Modo de Fábrica, cambie la intensidad de la fragancia para la memoria que está
actualmente activa, presionando las flechas para cambiar las opciones del 1 al 10 y espere que el
equipo confirme con una dispensa inmediata.
Rápido Reinicio:
Presione ENT durante 5 segundos para borrar toda la configuración del equipo y el Modo de Fábrica
se volverá a activar. Al reiniciarlo, la hora y el día también vuelven a Modo de Fábrica.
Modo de Espera:
Ocurre cuando la pantalla está apagada, aunque el equipo esté operativo (baterías colocadas),
porque se deja de manipular por más de un minuto. Si el equipo está siendo programado y se deja
de manipular, se quedará encendido y estático hasta que se renueve la programación.
Modo de Fábrica:
Es la programación predeterminada que funciona en la primera memoria del equipo y puede
modificarse a gusto del usuario. Inicia a las 7:00h y culmina a las 21:00h (considerando que la hora
base son las 12:00). Opera de lunes a domingo, dispensando fragancia cada 1.5 minutos, durante
3 segundos continuos y con un rendimiento promedio de 7 días.
10
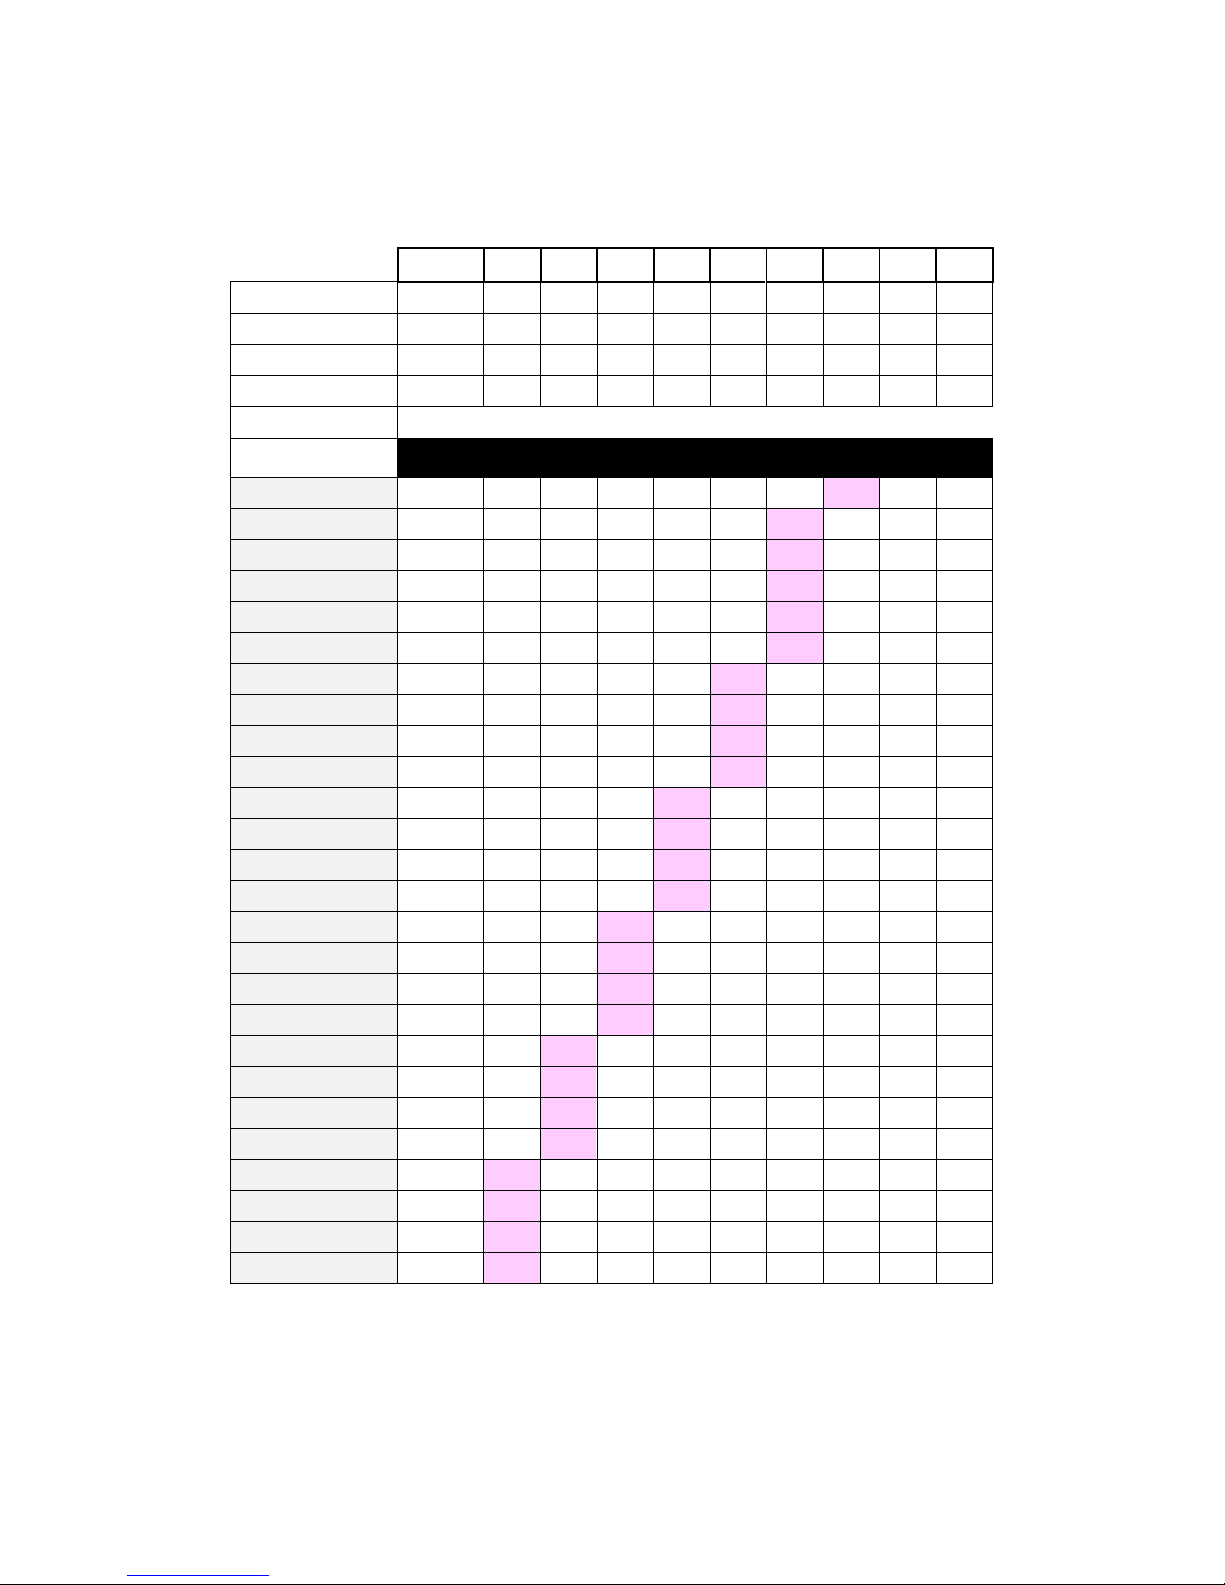
Programación Recomendada para Instalaciones
Microdifusor de Fragancia AromaQuest AQ-B4
Durabilidad de la Recarga de Fragancia/Baterias Alkalinas en Dias.
Dispersiones por 3 baterias AA Alcalinas: 3400
Program
G1
G2
G3
G4
G5
G6
G7
G8
G9
G10
Scent Pause (Min)
15
13.5
12
10.5
9
7.5
6
4.5
3
1.5
Scent Pause (Seg)
900
810
720
630
540
450
360
270
180
90
Scent Work (seg)
3
3
3
3
3
3
3
3
3
3
mL per Hour
0.12
0.13
0.15
0.17
0.20
0.24
0.30
0.40
0.60
1.18
SPRAYS (Per Hour)
4
4
5
6
7
8
10
13
20
40
Horas por Mes
Dias de Duración
240
103
93
82
72
62
52
41
31
21
11
260
95
86
76
67
57
48
38
29
19
10
280
88
79
71
62
53
44
35
27
18
9
300
82
74
66
58
50
41
33
25
17
8
320
77
70
62
54
46
39
31
23
16
8
340
73
65
58
51
44
36
29
22
15
7
360
69
62
55
48
41
34
28
21
14
7
380
65
59
52
46
39
33
26
20
13
7
400
62
56
49
43
37
31
25
19
13
6
420
59
53
47
41
35
30
24
18
12
6
440
56
51
45
39
34
28
23
17
11
6
460
54
48
43
38
32
27
22
16
11
6
480
51
46
41
36
31
26
21
16
10
5
500
49
45
40
35
30
25
20
15
10
5
520
48
43
38
33
29
24
19
14
10
5
540
46
41
37
32
28
23
18
14
9
5
560
44
40
35
31
27
22
18
13
9
5
580
43
38
34
30
26
21
17
13
9
4
600
41
37
33
29
25
21
17
12
8
4
620
40
36
32
28
24
20
16
12
8
4
640
39
35
31
27
23
19
16
12
8
4
660
37
34
30
26
23
19
15
11
8
4
680
36
33
29
25
22
18
15
11
7
4
700
35
32
28
25
21
18
14
11
7
4
720
34
31
27
24
21
17
14
10
7
4
740
33
30
27
23
20
17
13
10
7
3
1. Calcule las Horas por Mes que operara su equipo.
2. Encuentre en línea de Horas por Mes la columna con el número resaltado.
3. Programe el Numero G de arriba de la columna.
De esta manera el relleno de su equipo durara por lo menos 30 días. Si desea aumentar la intensidad de la fragancia, programe un
tiempo de Numero G mayor; si desea reducirla, programe un tiempo de Numero G menor (en la columna podrá ver la duración en
días de su programación).

11
HOJA DE TRABAJO PARA CALCULAR HORAS POR MES:
PLANTILLA PARA ABRIR ORIFICIOS:
DÍAS
HORA INICIO
HORA FINAL
CANTIDAD HORAS
LUNES
MARTES
MIÉRCOLES
JUEVES
VIERNES
SÁBADO
DOMINGO
TOTAL HORAS POR SEMANA:
(x 4 semanas)
(x 4)
TOTAL HORAS POR MES:

12
11/1/18
Table of contents
Languages:
Other Aroma Quest Accessories manuals

Popular Accessories manuals by other brands


Vega Absolute
Vega Absolute SMART-MC0101 user manual

Brentwood Appliances
Brentwood Appliances TS-1001 Operating and safety instructions

Balluff
Balluff BMD 1H Series Condensed guide

Simrad
Simrad PI SeineSounder Quick reference guide

Aritech
Aritech 2000 Series installation guide

Baumer
Baumer UNAM 12P8910/S14OD quick start guide