ASI JD MACDONALD TOUCHDRY Service manual

1
PLEASE CAREFULLY READ THROUGH THIS MANUAL BEFORE USING THE PRODUCT.
OBSERVING ALL SAFETY INFORMATION, WARNINGS AND CAUTIONS WILL PROTECT
YOURSELF AND OTHERS. PLEASE KEEP INSTRUCTIONS FOR FUTURE REFERENCE.
Operating Instructions and Parts Manual
Hand Dryer Surface-mounted Push Button hand dryer
ITEM CATEGORY
Operating Voltage
Output Warm Air Volume
Output Warm Air Temp
Output Air Speed
Motor Type
Motor Thermal Protection
Heater Element
Heater Thermal Protection
Drying Time
Circuit Operation
Output Air Nozzle
Sound Level
Drip Proof
Cover Type
Cover Finish
Net Weight
Shipping Weight
Unit Size
PERFORMANCE DATA
220-240VAC, 50/60Hz, 10A, 2.4KW
255m³/h [150CFM]
60°C 140°F at ambient T = 25°C 77°F[ ] [ ]
47mph (69ft/s) [21m/s {75.6km/h}]
200W, 5500rpm, brush type, dual ball bearings
Auto resetting thermostat turns unit off at 105°C 221°F[ ]
2200W @ 220-240VAC, nichrome 27.2Ω
Auto resetting thermostat turns unit off at 65°C 149°F , resets at 50°C 122°F[ ][ ]
Less than 20 seconds
Push button actuation, preset for 30 seconds
Heavy-Duty chrome plated zinc die casting
63.8dB @ 2m
IPX3
Formed steel or stainless steel, 1.6mm, [1/16"] thick
6.2kg [13.7lbs]
7.0kg [15.4lbs]
300mm W x 251mm H x 219mm D [11-13/16" x 9-7/8" x 8-5/8"]
Motor Heater TotalInput
ASI JD MACDONALD PTY. LTD.
www.asijdmacdonald.com.au 1800 023 441
Powder coating white on steel or bright or satin on stainless steel
VAC
220
230
240
Vac
220
230
240
Inrush A(W)
1.14 (252)
1.18 (276)
1.24 (300)
Operating A(W)
0.76 (168)
0.80 (184)
0.83 (200)
8.40 (1848)
8.78 (2020)
9.17 (2200)
Vac
220
230
240
Inrush A(W)
9.54 (2100)
9.96 (2296)
10.41 (2500)
Operating A(W)
9.16 (2016)
9.58 (2204)
10.0 (2400)
Operating A(W)
DIM’S
mm(inch)
300
(11-13/16")
219
(8-5/8")
251
(9-7/8")
MODEL : TOUCHDRY
HDTDWHTSG - white with silver gloss nozzle & button
TECHNICAL SPECIFICATIONS

Installation
2
Operating Instructions and Parts Manual
Hand Dryer
1. Make sure the power source is switched off. Installation must be carried out in accordance with
the current edition of the local wiring regulations code having jurisdiction. Installation should be
performed only by a qualified electrician.
2. Place template against wall at desired height (see mounting height recommendations) and mark
locations of 4 mounting holes and wire service entry at knockout (KO) location.
Note: For two or more dryers, dryers should be no closer than 24 inches (610 mm) on center.
3. Remove and retain 2 cover screws and cover.
4. For in-wall (concealed) power supply - Provide supply wire to KO location according to local code
and attach securely to chassis at KO with appropriate strain relief connector (not supplied).
5. Attach dryer to wall. For wood wall/studs use 1/4 inch (M6) screws at length that will ensure 1 inch
(25 mm) min. stud penetration. For masonry walls use expansion bolts or anchors for 1/4 inch
(M6) screws to ensure penetration 1/4 inch (6 mm) deeper than anchor. Shim if necessary to
ensure base plate is flat against wall.
6. Connect supply and ground wires to terminal block where indicated or connect supply wires to terminal
block where indicated and connect ground wire to base plate with ground screw (Connections: A.
Connect the live wire (colored Brown or Black) to the terminal block marked "L1". B. Connect the
neutral wire (colored White or Grey) or connect the second live wire (colored Red or Orange) to the
terminal block marked "N/L2". C. Connect the ground wire (colored green or green and yellow or bare
conductor) to the terminal block marked " " or to the green screw marked " "). Colors of live and
neutral wires depend on voltage of supply service and requirements of Building and Electrical Code
having jurisdiction.
7. Replace cover. Do not over-tighten screws.
Surface-mounted Push Button hand dryer www.asijdmacdonald.com.au
1800 023 441
www.asijdmacdonald.com.au
Packing List Quantity
Self-Threading Screws 4
Plastic Expansion
anchor 4
Dryer 1
Security hex wrench
Manual
1
1
Mounting template 1
Power cord 1
General safety information
-- NOTE: Do not install dryer over washbasin --
Disconnect power at the
source before installing or servicing.
This product is intended
for installation by a qualified service person.
All units must be supplied
with a 3-wire service. The ground wire must
be connected to the dryer's backplate.
Failure to properly ground
unit could result in severe electrical shock
and/or death.
ASI JD M acD o na l d Pt y. Ltd .

Single button push operation.
Shake excess water from hands.
Place hands under the nozzle and push button
to start operation.
Run hands lightly and rapidly.
Stops automatically after preset time elapses.
Operation
Periodic cleaning of the unit is recommended to ensure optimum performance.
Disconnect the electrical supply.
Remove the two cover-mounting screws.
Remove the cover.
Clean all dust lint from the interior of the dryer.
Wipe the cover with a damp cloth and mild
cleaning solution. Do not Soak. Never use
abrasives to clean the cover.
Replace the cover. Do not over tighten the screws.
Cleaning and Maintenance
3
Operating Instructions and Parts Manual
Hand Dryer
Recommended mounting heights - from centerline of push button of dryer above
finished floor (AFF)
SEE TEMPLATE 0701191401
Men
Women
Children 4-7 years
Children 8-10 years
Children 11-13 years
Children 14-16 years
Surface-mounted Push Button hand dryer
Circuit Diagram
www.asijdmacdonald.com.au
1800 023 441
www.asijdmacdonald.com.au
1270 mm (50")
1194 mm (47")
889 mm (35")
991 mm (39")
1092 mm (43")
1194 mm (47")
Circuit Board Module
MO2 HE2 NMO1 HE1L
Transistor
Power Switch
G
N
L
Thermostat
G/Y
Blue
Brown
Motor With T hermal Switch 2A
ON
1
Black
Black
Micro switch
Y2
Wave Filter
G/Y
Black
Black
ASI JD M acD o na l d Pt y. Ltd .

4
Operating Instructions and Parts Manual
Hand Dryer
Symptom Corrective Action
Diagnostics and Remedies
If the dryer will not run
If the dryer cycles by itself, runs
all the time, or will not run for
complete cycle
If the element gets hot but the fan
motor does not turn
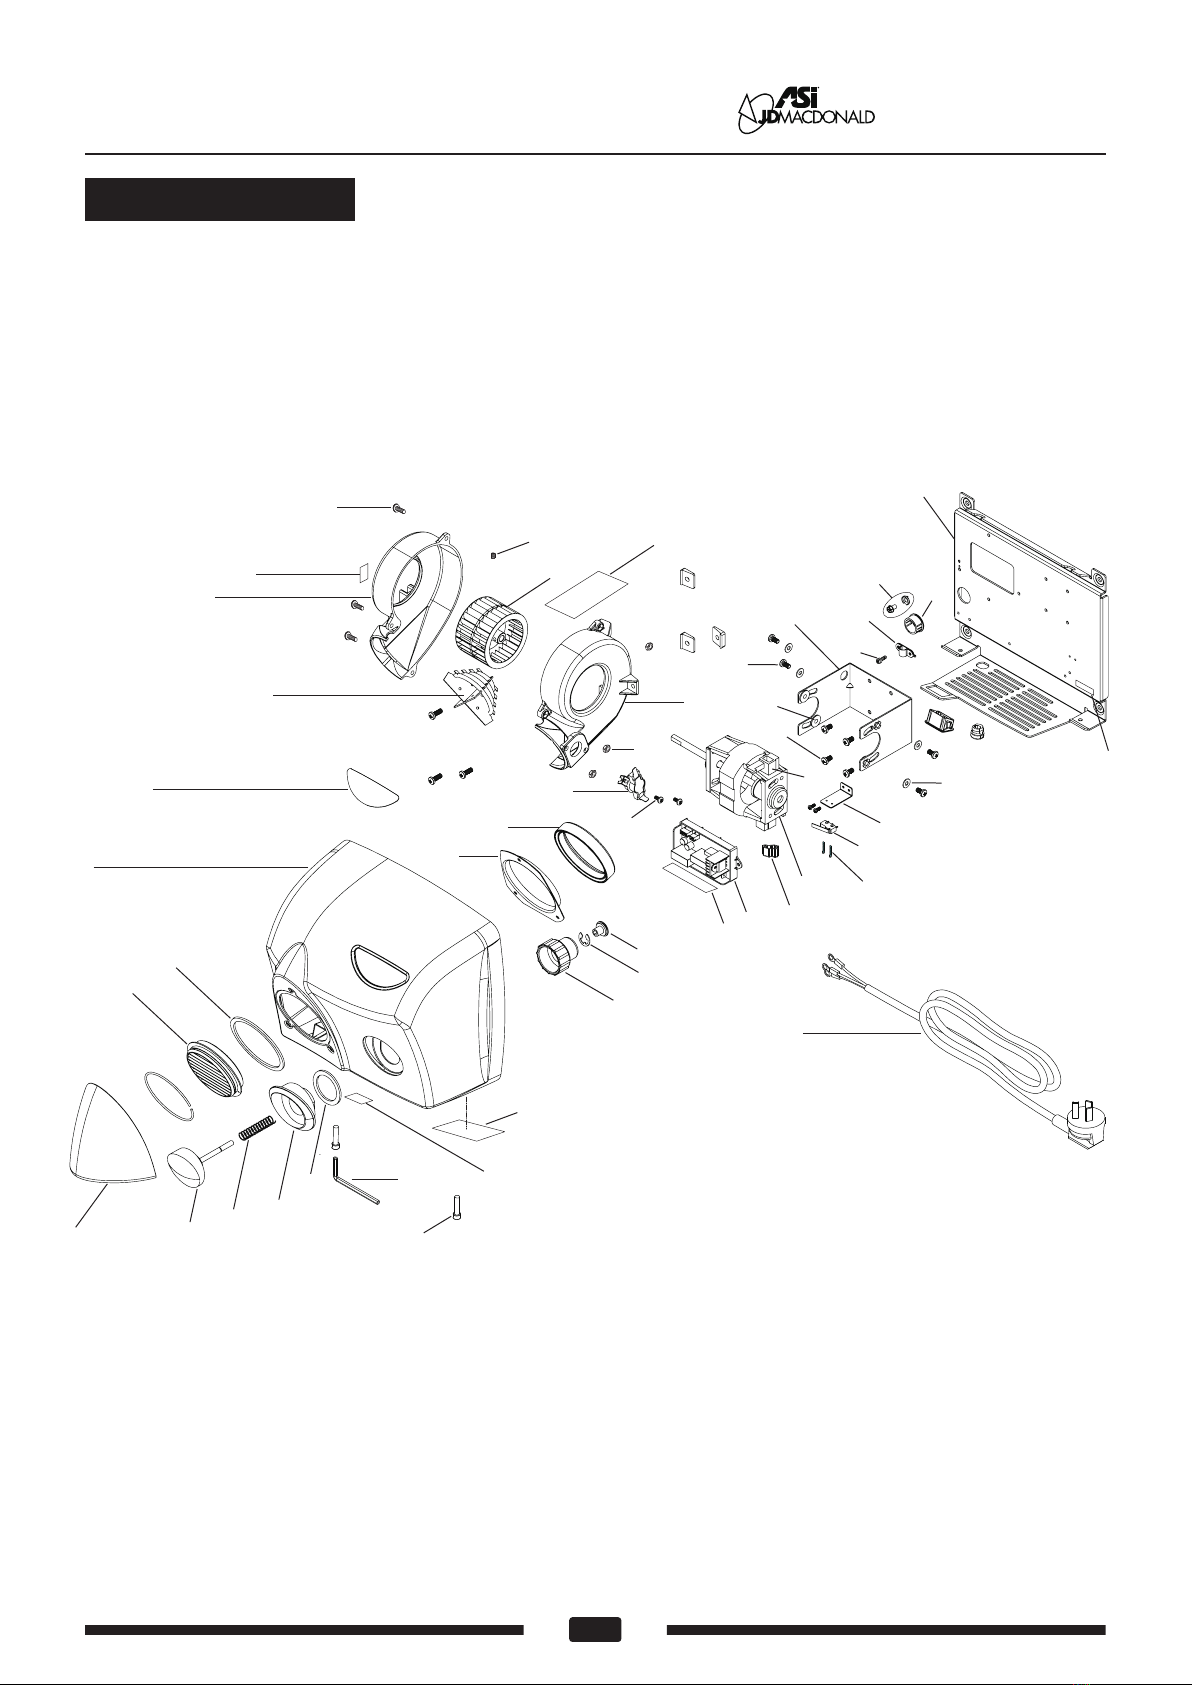
Disconnect the power. Remove the dryer cover and check for
obstructions in the fan housing. Damaged fans must be
replaced. If there are no obstructions, replace the motor.
If the fan motor runs but the element
does not get hot (Dryer blows cold air)
Disconnect the power and remove the dryer cover. Check for
loose or damaged wires. Remove the blower housing.
Check the element for signs of burning or breakage. Damaged
element must be replaced. If the element does not appear
damaged, disconnect it at the timer assembly and check
element wire continuity (see tech spec). An open circuit
indicates damage to the element wire and to the integral
temperature limit control (TLC). Separate the TLC and test for
open circuit. If this is the case, replace the element and/or the
thermostat.
If the motor makes ticking/winding
noise when it runs
If the unit runs but makes a
buzz noise
Replace the timer assembly.
Disconnect the power. Remove the dryer cover and check the
brushes for worn condition (less than 25/64" (10mm) graphite
remains) and replace them, if necessary. Purchase rebuild
kit to perform repair.
First ensure that the breaker supplying the dryer is operational.
If it is, disconnect the power and remove the dryer cover.
Check for obstructions blocking the rotation of the blower and
clear any found. If it spins freely, check the motor, manual
push-button switch and thermostat for proper operation out of
the unit. Replace any failed items. Taking suitable precautions
to avoid shock hazard, reconnect the power and check for
voltage at the terminal block. If there is power and the dryer
will not run, replace the timer assembly.
Disconnect the power. Remove the dryer cover and check the
fan for obstructions and/or rubbing on the housing as it
rotates. Remove any obstructions and replace fan if the
rubbing condition exists.
Surface-mounted Push Button hand dryer www.asijdmacdonald.com.au
1800 023 441
www.asijdmacdonald.com.au
ASI JD M acD o na l d Pt y. Ltd .

5
Repair parts list
Operating Instructions and Parts Manual
Hand Dryer Surface-mounted Push Button hand dryer
1
2
3
4
5
6
7
8
9
10
11
12
13
14
15
16
17
18
19
20
21
22
23
24
25
26
27
28
Key Part #
A0074
A0042
A0043
A0044
A0045
A0046
A0015
A0060
A0048
A0011
A0075
A0356
A0355
A0054
A0055
A0056
A0013
A0057
A0007
A0062
A0026
A0005
A0106
A0059
-
-
-
-
Description
Cover
Name plate
Air outlet Nozzle
Security hex cap head 1/4"-20
x1/2" screw with lock washer
Security hex wrench 5mm
Blower housing - LH
Blower wheel
Heater assembly
2200W@240Vac 24Ω
Base plate
Grounding screw with cup
Actuating Switch
Actuating Switch bracket
Timer assembly
220-240Vac
Air outlet gasket
Air outlet holder
Blower housing - RH
Thermostat (TLC)
Motor bracket
Nylon washer -Motor
Motor
200W @240Vac
Motor brush
Rubber grommet - Motor
Rating label
220-240Vac
Terminal label
Screw (M4x6),headless
set (with 2mm hex key)
Screw #10-24x1/2",
philips truss head
Hex Nut #10-24
Self Threading Screw M4x10,
philips pan head
29
30
31
32
33
34
35
36
37
38
39
40
41
42
43
44
45
46
47
48
49
50
-
-
-
-
-
A0183
A0131
A0065
A0353
A0068
A0069
A0071
A0072
A0277
A0080
A0081
A0082
A0083
A0084
A0085
A0114
A0288
Screw M5x10,
philips pan head
Screw M5x12,
philips pan head
Screw M4x18,
philips pan head
Cable ties (not shown)
Screw M4x10,
philips pan head with
external tooth lock washer
Nylon Cable Clamp
CAUTION 12A Label
S/N Barcode Label
Circuit Diagram Label
CAUTION DISCON PWR
Label
Rubber Boot Brush Insulator
Air outlet grille
Silicon Washer
Nylon Hole Bushing
Push Button Nut
Push Button
C clip
Push Button Lock spring
Push Button Holder
Push Button Cushion
Push Button bumper
Power Cords
Qty
1
1
1
2
1
1
1
1
1
1
1
1
1
1
1
1
1
1
1
4
1
2
1
1
3
3
3
2
Key Part # Description Qty
4
7
2
1
1
1
1
1
1
1
2
1
1
1
1
1
1
1
1
1
1
1
www.asijdmacdonald.com.au
1800 023 441
www.asijdmacdonald.com.au
ASI JD M acD o na l d Pt y. Ltd .

Assembly Diagram
6
Operating Instructions and Parts Manual
Hand Dryer Surface-mounted Push Button hand dryer
1
3
6
www.asijdmacdonald.com.au
1800 023 441
www.asijdmacdonald.com.au
2
4
5
7
8
11
12
13
14
15
19
17 19
20
21
22
29
30
23
24
25
28
31
34
33
37
38
39
43
44
45
49
46 47
48
10
9
36
18
26
27
35
6
40
41
42
50
ASI JD M acD o na l d Pt y. Ltd .
Table of contents
Other ASI JD MACDONALD Dryer manuals