Asko CC4527S User manual

Instructions for use
Mode d’emploi
Built-in unit
Unité encastrée
CC4527S / 4000
CC4727S / 4000
CC4927S / 4000
CC41227S / 4000

EN Manual EN 3 - EN 13
FR Notice dútilisation FR 3 - FR 13
Pictograms used - Pictogrammes utilisés:
Important information - Important à savoir
Tip - Conseil

EN 3
CONTENT
Your built in unit
Description 4
Introduction 4
Use
Controls 5
Maintenance
Cleaning 7
Removing the grease filters 8
Replacing the carbon filter 8
Changing the light bulbs 8
Installation
General 9
Electrical connection 10
Installing the built in unit 11
Technical specifications
12
Appendix
Disposal of appliance and packaging 13

EN 4
Description
A Switch fan on/off
B Reduce extractor capacity
C Increase extractor capacity
D Engage intensive mode
E Clean air function/filter indication
F Timer function
G Switch lighting on/off
H Dim lighting
I Display
Introduction
This user manual gives you a quick overview of all the possibilities
offered by the appliance. You will find information on safety measures
and maintaining the appliance.
Please retain this user manual and the installation guide.
They may be of use to future users of the appliance.
Declaration of conformity
We declare that our products meet the applicable European Directives,
Decisions and Regulations and the requirements listed in the standards
referenced.
Read the separate safety instructions before
using the device!
YOUR BUILT IN UNIT
I

EN 5
USE
Controls
Switching the fan on and off
• Switch the fan on with the on/off button (A) and select the desired
extractor setting with buttons ‘B’ and ‘C’.
The ‘I’ display indicates which setting has been selected.
• Use button ‘D’ to switch on the intensive setting.
“HI” appears in the ‘I’ display.
After 6 minutes the intensive mode is automatically reduced to the
setting previously selected.
Switching the lighting on and off
• Use the ‘G’ button to switch the lighting on and off.
Dimming the lighting
• Dim the lighting with button ‘H’.
The strength of the lighting varies between maximum and minimum,
and vice-versa.
Clean Air function:
With the Clean Air function you can refresh the air in the kitchen
over maximum 24 hours.
• Make sure the extractor cap has been switched off.
• Press on the Clean Air button ‘E’.
Every hour, the extractor cap will switch on for 10 minutes
automatically, at the lowest extraction setting. The display reads
“24” and an indicator flashes at the bottom right.
I

EN 6
USE
Switching on the timer
• Switch on the extractor cap with button ‘A’.
• Set the extraction strength with buttons ‘B’ and ‘C’.
• Press the Timer button ‘F’.
The extractor cap switches off automatically after 30 minutes.
Switch off the Timer function by pressing button ‘F’ again, or by
switching off the extractor cap with button ‘A’. The display shows
the selected speed and the remaining time.
Grease filter indicator
After 100 hours of use the “FF” indicator is shown in the display.
• Clean the grease filters.
• Reset the filter indicator. While the cap is switched off, press button
‘E’ for 3 seconds until the filter indicator disappears.
Carbon filter indicator
After 200 hours of use the “EF” indicator is shown in the display.
• Replace the carbon filters.
• Reset the filter indicator. While the cap is switched off, press button
‘E’ for 3 seconds until the filter indicator disappears.

EN 7
Cleaning
Attention! Before performing any maintenance operation, isolate the
hood from the electrical supply by switching off at the connector and
removing the connector fuse. Or if the appliance has been connected
through a plug and socket, then the plug must be removed from the
socket.
The built in unit should be cleaned regularly (at least with the same
frequency with which you carry out maintenance of the fat filters)
internally and externally. Do not use abrasive products. Do not use
alcohol!
Attention! Failure to carry out the basic cleaning recommendations of
the built in unit and replacement of the filters may cause fire risks.
Therefore, we recommend oserving these instructions.
The manufacturer declines all responsibility for any damage to the
motor or any fire damage linked to inappropriate maintenance or failure
to observe the above safety recommendations.
Built in unit
Clean the built in unit with soapy water and a soft cloth. Then wipe
with clean water to rinse. Do not use aggressive cleaning agents such
as soda. The built in unit paintwork will stay looking nice if you wax it
occasionally.
Stainless steel built in units
Do not use any sort of scourer. Treat with a stainless steel care product
and polish with the structure of the stainless steel.
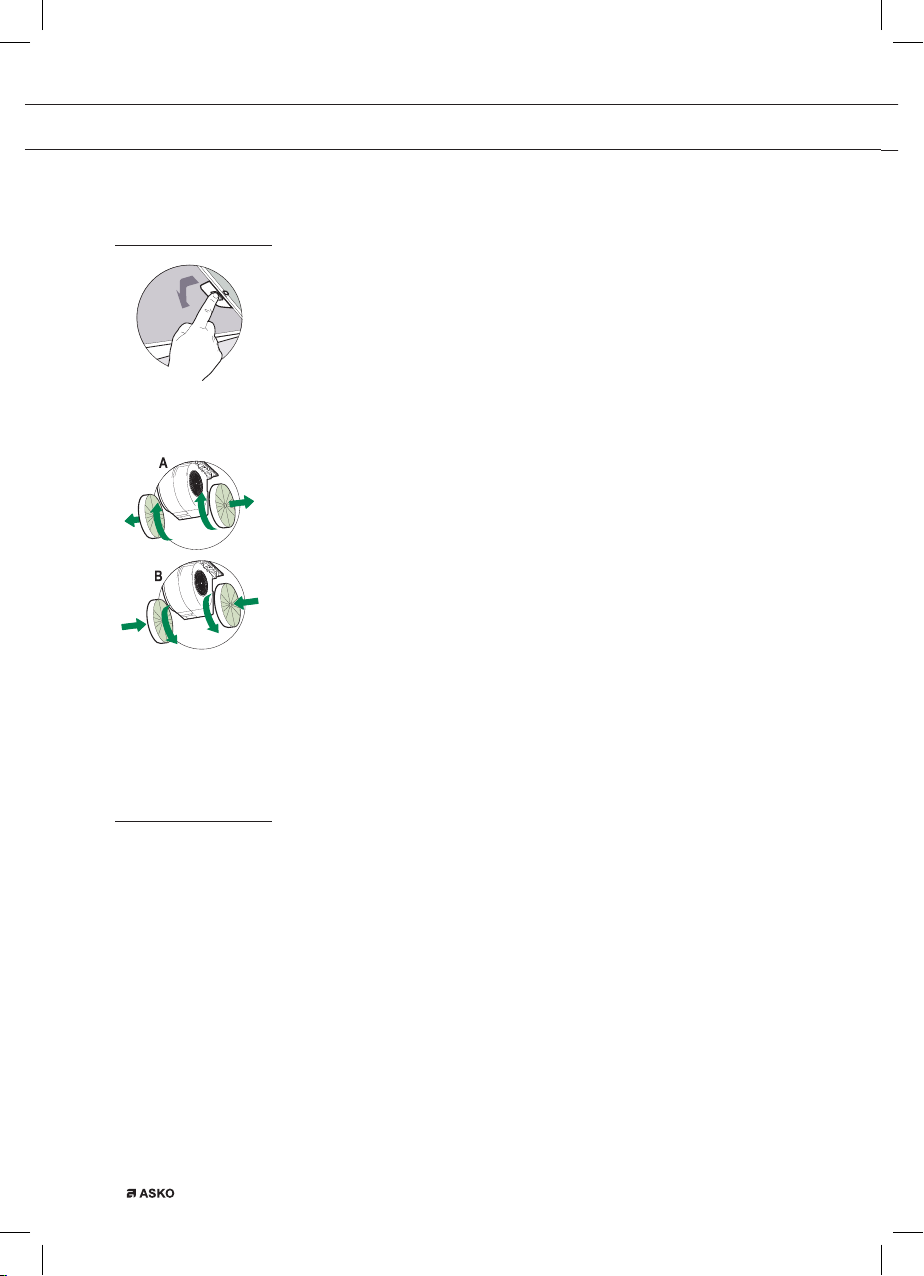
Metal grease filters
These must be cleaned once a month (or when the filter saturation
indication system – if envisaged on the model in possession – indicates
this necessity) using non aggressive detergents, either by hand or in
the dishwasher, which must be set to a low temperature and a short
cycle. The openings must be placed downwards to let the water run
out of the filters. The cleaning agents will make the aluminium filter turn
dull, this is normal.
MAINTENANCE

EN 8
Grease filters
Removing the grease filters
Switch off the electricity! Remove the plug from the socket or switch
the electricity off at the mains. Open the panel and pull the special
handle to remove the filter.
Replacing the carbon filter
The carbon filter must always be used if the built in unit is not ducted.
1. Open the panel.
2. Remove the grease filters.
3. Fit the carbon filter by wedging it into the casing (D).
4. Replace the filter grids in the extractor hood.
Note:
• Saturation of the activated charcoal will eventually occur after more
or less prolonged use, depending on the type of cooking and how
frequently the grease filter is cleaned.
• In all cases it is necessary to replace the cartridge at least every
four months.
• DO NOT wash or reuse the carbon filter. Saturated carbon is not
environmentally friendly, change the filter regularly.
Lighting
Changing the light bulbs
Faulty LEDs must be replaced by a professional installer.
MAINTENANCE

EN 9
INSTALLATION
General
This appliance should be connected to the power supply by a
recognized fitter who is familiar with, and works according to the
correct safety regulations. This appliance meets the European
requirements.
Important that you know:
• The minimum distance between the supporting surface for the
cooking vessels on the gashob and the lowest part of the range
hood must be not less than 65 cm. For use with an electric, ceramic
or induction hob, this distance must be at least 55 cm.
• If the built in unit is to be fitted to an existing duct no other
appliances, such as a geyser or heater, may be connected to that
same duct.
• Consider local regulations with respect to the ventilation of gas
appliances.
• The shorter the duct, and the fewer the bends in it, the better the
built in unit will work.
• Before you start drilling check that there are no installation cables
present.
• The connecting pipe for the built in unit has a diameter of 120 or
150 mm. It is best also to use a flue pipe of the same diameter.
• The installation material supplied with this range hood is designed
for fixing to reinforced concrete or masonry walls. For some types
of walls you may need special plugs and screws.

EN 10
INSTALLATION
Electrical connection
This appliance is manufactured in class I, it must therefore be
connected to the earth system.
Make sure the supply voltage ratings correspond with those stated on
the appliance data plate. The connection to the mains is carried out as
follows:
BROWN = phase L
BLUE = phase N
YELLOW/GREEN = Earth
During the electrical connection make sure that the electrical socket is
equipped with earth connection.
This built in unit has been provided with a power plug. When installing
the hood, make sure that this plug remains accessible.
Attention:
If you want to make a fixed connection, ensure that a multi-pole switch
with a distance between contacts of 3 mm is installed in the supply
cable.
max. 100 mm

EN 11
INSTALLATION
Installation
• Open the panel.
• Remove the grease filter.
• Interrupt the plug connection of the controls.
•
• First remove the 6 screws (2 on the left, 2 on the right, 2 on the
front), followed by the frame.
• Use a saw to create a recess in the bottom side of the cupboard
(at a distance of at least 650 mm from a gas hob). Refer to the
measurement drawing for this.
• Attach the unit with the 10 screws provided (12a).
• Put the frame into position.
• Restore the plug connection of the controls.
• Put the grease filter into position and close the panel.
260
13
494-744-834

EN 12
TECHNICAL SPECIFICATIONS
Hoodtype CC4527S CC4727SCC4927S CC41227S
Type / ApprovalBuilt-in unit
4000
Built-in unit
4000
Built-in unit
4000
Built-in unit
4000
Control typeElectronic push buons Electronic push buons Electronic push buons Electronic push buons
Width611687725
Supply (Voltage, frequency)220~240 V / 50 Hz 220~240 V / 50 Hz 220~240 V / 50 Hz 220~240 V / 50 Hz
Power 082082082082
Power motor 072072072072
Power lights (W) 2 x LED 5.0 W 2 x LED 5.0 W 2 x LED 5.0 W 2 x LED 5.0 W
Level 1
Air flow, Noise, Pressure
Level2
Air flow, Noise, Pressure
Level 3
Air flow, Noise, Pressure
Level 4
Air flow, Noise, Pressure
340 m³/h, 55 dB(A), 420 Pa
505 m³/h, 60 dB(A), 490 Pa
610 m³/h, 64 dB(A), 550 Pa
670 m³/h, 67 dB(A), 580 Pa
340 m³/h, 55 dB(A), 420 Pa
505 m³/h, 60 dB(A), 490 Pa
610 m³/h, 64 dB(A), 550 Pa
670 m³/h, 67 dB(A), 580 Pa
340 m³/h, 55 dB(A), 420 Pa
505 m³/h, 60 dB(A), 490 Pa
610 m³/h, 64 dB(A), 550 Pa
670 m³/h, 67 dB(A), 580 Pa
340 m³/h, 55 dB(A), 420 Pa
505 m³/h, 60 dB(A), 490 Pa
610 m³/h, 64 dB(A), 550 Pa
670 m³/h, 67 dB(A), 580 Pa

EN 13
APPENDIX
Disposal
Disposal of appliance and packaging
By ensuring this product is disposed of correctly, you will help prevent
potential negative consequences for the environment and human
health, which could otherwise be caused by inappropriate waste
handling of this product. The local authorities can provide you with the
relevant information.
The packaging of this appliance is recyclable. It could have been
made from:
• cardboard;
• polythene foil (PE);
• CFK-free polystyrene (PS-hard foam).
You need to dispose of these materials responsibly in accordance with
official regulations.
To draw attention to the fact that the segregated processing of electric
household appliances is compulsory, this appliance carries the symbol
of a crossed-out dustbin. This means that at the end of its working life,
you may not dispose of the appliance as household refuse. Instead, you
should hand it in at a special refuse collection centre run by the local
authority or at a dealer’s providing this service.
Segregated processing of household appliances avoids any negative
effects on the environment and public health that might otherwise
occur.
It enables the recovery of the materials used in the production of this
appliance, thus realising considerable savings in terms of raw materials
and energy.
Declaration of conformity
We hereby declare that our products satisfy the applicable European
directives, orders and regulations, as well as the requirements stated in
the referenced standards.

EN 14

FR 3
CONTENU
Votre hotte cheminée
Description 4
Introduction 4
Utilisation
Commande 5
Entretien
Nettoyage 7
Elimination des filtres 8
Remplacement des filtres à charbon 8
Changement d’ampoules 8
Installation
Généralités 9
Connexion électrique 10
Montage de la hotte cheminée 11
Spécifications techniques
12
Annexe
Mise au rebut de l’appareil et de l’emballage 13

FR 4
Description
A Allumage/extinction du ventilateur
B Diminution de la capacité d’aspiration
C Augmentation de la capacité d’aspiration
D Position de débit maximal
E Fonction Air propre/témoins des filtres
F Fonction Minuterie
G Allumage/extinction de l’éclairage
H Baisser l’éclairage
I Affichage à l’écran
Introduction
Ce mode d’emploi offre une vue d’ensemble rapide de toutes les
fonctions de l’appareil. Il contient des informations relatives aux
consignes de sécurité et à l’entretien de l’appareil.
Conservez ce mode d’emploi et le guide d’installation.
Ils peuvent être utiles aux futurs utilisateurs de l’appareil.
Déclaration de conformité
Nous déclarons que nos produits répondent aux directives
européennes applicables, décisions et règlements et les exigences
énumérées dans les normes de référence.
Veuillez lire les consignes de sécurité fournies
séparément avant la première utilisation de
l’appareil !
VOTRE HOTTE CHEMINÉE
I

FR 5
UTILISATION
Commande
Mise en marche/arrêt du ventilateur
• Mettez le ventilateur en marche à l’aide de l’interrupteur (A) et
choisissez le débit d’aspiration souhaité avec les touches « B » et
« C ».
L’écran « I » indique la position choisie.
• La touche « D » enclenche le débit maximal.
L’écran « I » affiche « HI ».
Après 6 minutes, le débit revient automatiquement à la position
antérieure au débit maximal.
Allumer et éteindre l’éclairage
• Allumez et éteignez l’éclairage avec la touche « G ».
Baisser l’éclairage
• Baissez l’éclairage grâce à la touche « H ».
La puissance de l’éclairage varie entre maximum et minimum.
Fonction Air propre :
La fonction Air propre vous permet de renouveler l’air dans la cuisine
pendant 24 heures au maximum.
• Assurez-vous que la hôte soit éteinte.
• Appuyez sur la touche d’Air propre « E ».
La hotte revient automatiquement sur le débit d’aspiration le plus
faible pendant 10 minutes chaque heure. L’écran affiche « 24 » et le
témoin en-dessous à droite clignote.
I

FR 6
UTILISATION
Activer la minuterie
• Mettez en marche la hotte grâce à la touche « A ».
• Réglez la puissance d’aspiration grâce aux touches « B » et « C ».
• Appuyez sur la touche de la minuterie « F ».
La hotte se coupe automatiquement après 30 minutes. Désactivez
la fonction de minuterie en appuyant encore une fois sur la touche
« F » ou en éteignant la hotte à l’aide de la touche « A ». L’écran
indique à nouveau le débit utilisé et le temps restant.
Témoin du filtre à graisses
Après 100 heures de fonctionnement, le témoin du filtre indique « FF »
dans l’écran.
• Nettoyez les filtres à graisses.
• Réinitialisez le témoin du filtre. Lorsque la hotte est éteinte,
maintenez enfoncé 3 secondes la touche « E » jusqu’à ce que le
témoin du filtre s’éteigne.
Témoin du filtre au charbon de bois
Après 200 heures de fonctionnement, le témoin du filtre indique « EF »
dans l’écran.
• Remplacez les filtres au charbon.
• Réinitialisez le témoin du filtre. Lorsque la hotte est éteinte,
maintenez enfoncé 3 secondes la touche « E » jusqu’à ce que le
témoin du filtre s’éteigne.

FR 7
Nettoyage
Attention! Avant toute opération de nettoyage ou d’entretien,
débrancher la hotte du circuit électrique en enlevant la prise ou en
coupant l’interrupteur général de l’habitation.
La hotte doit être régulièrement nettoyée à l’intérieur et à l’extérieur (au
moins à la même fréquence que pour l’entretien des filtres à graisse).
Ne pas utiliser de produit contenant des abrasifs. Ne pas utiliser
d’alcool!
Attention! Il y a risque d’incendie si vous ne respectez pas les
instructions concernant le nettoyage de l’appareil et le remplacement
ou le nettoyage du filtre.
La responsabilité du constructeur ne peut en aucun cas être engagée
dans le cas d’un endommagement du moteur ou d’incendie liés à
un entretien négligé ou au non respect des consignes de sécurité
précédemment mentionnées.
Hotte
Vous pouvez nettoyer la hotte à l’eau savonneuse et une serviette
douce, puis rincer à l’eau claire. Ne pas utiliser de produits d’entretien
abrasifs. Frotter la peinture laquée de votre hotte avec de la cire pour
qu’elle conserve sa beauté.
Hottes à cheminée en acier inoxydable
Ne pas nettoyer la cheminée avec une éponge à récurer ou avec des
produits abrasifs. Frotter la cheminée en acier inoxydable avec un
nettoyant pour acier inoxydable.
Filtres métalliques
Le filtre doit être nettoyé une fois par mois (ou lorsque le système
d’indication de saturation des filtres – si prévu sur le modèle possédé
– indique cette nécessité) avec des détergents non agressifs, à la main
ou dans le lave-vaisselle à faibles températures et cycle rapide. Placez
les filtres en mettant les ouvertures vers le bas dans le lave-vaisselle
pour permettre à l’eau de s’écouler. Les produits d’entretien donnent
aux filtres en aluminium une couleur terne. Cela est tout à fait normal.
ENTRETIEN

FR 8
Filtres
Elimination des filtres
Coupt ! Débrancher la fiche de prise de courant ou mettre
le disjoncteur en position d’interruption du courant. Ouvrez le panneau
et enlevez le filtre, en tirant sur la poignée prévue à cet effet.
Filtres à charbon
Remplacement des filtres à charbon
Vous devez utiliser le filtre à charbon lorsque la hotte n’est raccordée à
aucun conduit.
Placez le filtre à charbon
1. Ouvrez le panneau.
2. Enlevez les filtres à graisse.
3. Fixez le filtre à charbon en l’insérant dans le compartiment
à filtre (D).
4. Placez les filtres à graisse.
Remarque :
• Le charbon de bois activé sature après une utilisation plus ou moins
prolongée, selon le type de cuisson et la fréquence de nettoyage du
filtre à graisse.
• Dans tous les cas, le filtre à charbon doit, cependant, être remplacé
au moins tous les 4 mois.
• Les filtres à charbon actif ne sont pas lavables et donc pas
réutilisables. Le charbon actif saturé est polluant, donc remplacez le
filtre à temps.
Éclairage
Changement d’ampoules
Les commandes LED défectueuses doivent être remplacées par un
installateur professionnel.
ENTRETIEN
This manual suits for next models
3
Table of contents
Languages:
Other Asko Ventilation Hood manuals
Popular Ventilation Hood manuals by other brands

Faber
Faber LI_991.0427.517 instruction manual

Westin
Westin STRATUS MONO Installation, operation and maintenance manual

Beko
Beko CWB 6410 R user manual

AERMEC
AERMEC VES Series Technical manual

privileg
privileg SY-3388A5IS-E22-C55-L54-900 user manual

Ancona
Ancona WPRL430 User's manual & installation instructions