Asko CCT1252W User manual
INSTRUCTIONS FOR USE
Cooker hood
EN
CCT1252W

3Use ..............................................................
3Introduction ..................................................
4Description hood .........................................
4Description user interface ............................
5Description remote control ..........................
6Operation ....................................................
6Pairing the remote ........................................
6Switching extraction on and off ...................
7Switch on the boost setting ..........................
7Switching on the timer .................................
8Switching on recirculation mode .................
8Switching off recirculation mode .................
8Clean Air function ........................................
9Switching the light on and off ......................
9Changing the colour lighting temperature ....
10Maintenance ...............................................
10Cleaning .......................................................
12Filter indicator ..............................................
12Lighting ........................................................
13Battery of the remote ...................................
14Technical data ............................................
14EU Product Sheet ........................................
14EU Product Fiche .........................................
15Environmental aspects ..............................
15
Tips for energy-efficient cooking with
hoods ...........................................................
15Disposal of the appliance and packaging ....
Contents

Introduction
On reading these user manuals you will soon become familiar with the features of this appliance.
Please read the appliance’s safety and maintenance instructions.
Compliance information
Cooker hood (Built-in Unit)Radio equipment type
2402 -2477 MHz (16 channels)Operating frequency range
-5.2 dBm EIRP average (calculated)Maximum output power
-7 dBiMaximum antenna gain
Hereby, ASKO Appliances AB declares that the radio equipment type Cooker hood (Ceiling unit) is
in compliance with Directive 2014/53/EU.
The following symbols are used throughout the manual and they have the following meanings:
INFORMATION!
Information, advice, tip, or recommendation
WARNING!
Warning –general danger
It is important that you carefully read the instructions.
WARNING!
Before use, read the separate safety instructions first!
3
Use

Description hood
1. User interface
2. LED bar
3. Edge extraction
panel
4. Grease filter
5. Latch
Description user interface
1. Filter reset button, signals when filters require cleaning
2. Speed level 1 indicator
3. Speed level 2 indicator
4. Speed level 3 indicator
5. Speed level 4/boost indicator
4
Use
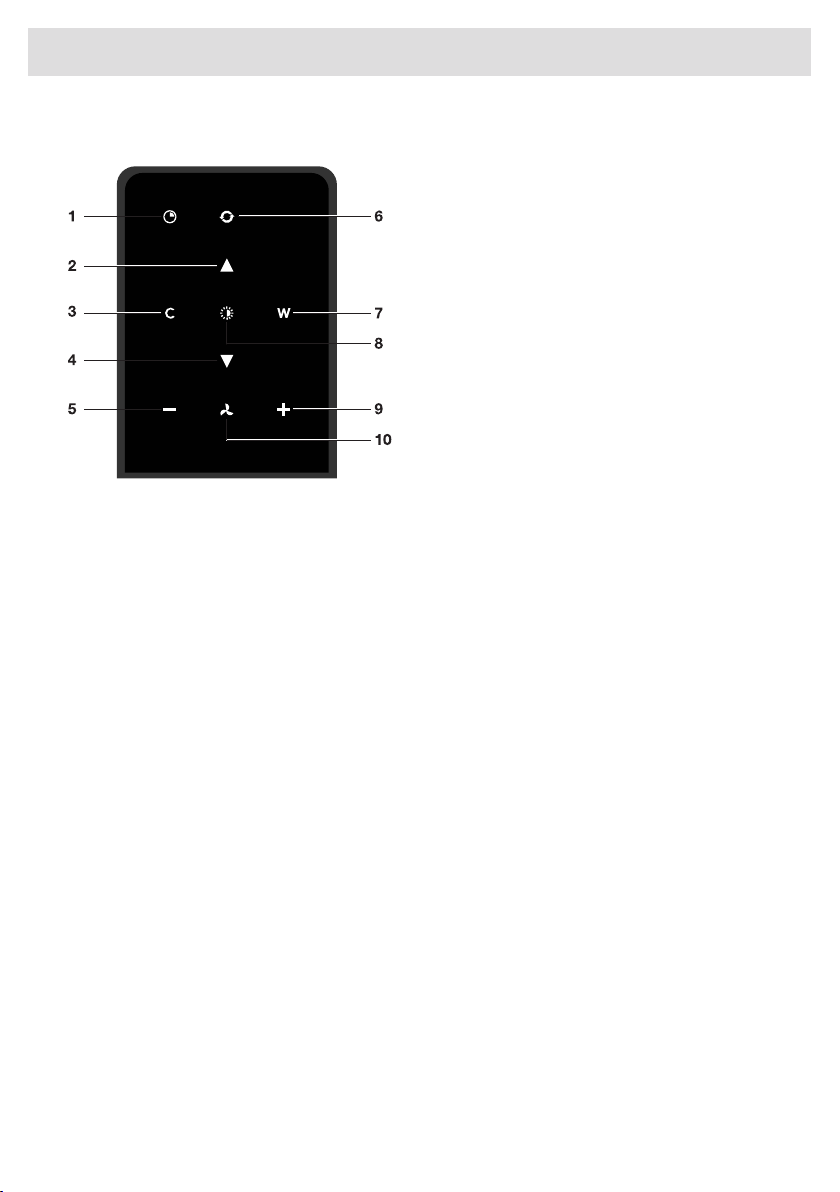
Description remote control
1. Timer function
2. Increase light intensity
3. Colder light temperature
4. Decrease light intensity
5. Decrease air extraction capacity
6. Clean Air function
7. Warmer light temperature
8. Switch on/off lighting
9. Increase air extraction capacity
10. Fan on/off
5
Use

Pairing the remote
This remote control must be paired to the cooker hood before first use.
1. Start up the appliance (power on). The hood will start in ‘pairing mode’for 5 minutes.
2. Activate the ’Remote pairing mode’by holding ‘c’and ‘w’for 3 sec.
3. During pairing all the indicators on the hood and remote will blink. All indicators will turn off when
the connection is established.
If the connection is not established repeat the entire pairing process.
NOTE!
Remote control will go into standby after 30 seconds. The remote will wake up when it is picked
up or detects movement.
Switching extraction on and off
1. Press and hold the ‘Fan’key on the remote for 1 second.
The cooker hood will switch on at the lowest setting.
2. Press the ‘+’key again for a higher fan setting. Press and hold the ‘+’key for 1 second to select
the highest setting (boost).
3. Press the ‘-’key to select a lower setting.
The extraction setting is indicated by the speed level indicators on the hood.
4. To switch off the cooker hood, press and hold the ‘Fan’key for 1 second.
NOTE!
Lighting and motor key must be pressed for at least 1 second. This is to prevent the functions
from being accidentally switched on or off.
6
Operation

Switch on the boost setting
1. Press and hold the ‘+’button for at least 1 second.
The boost setting is switched on for 10 minutes. The speed level 4 indicator will flash during this
period. The original extraction setting will be reactivated after this period.
2. Press and release the ‘-’key to switch off the boost setting.
NOTE!
If the boost setting has been selected, the timer function cannot be activated.
Switching on the timer
1. Press the timer key.
The timer indicator will start to blink.
The cooker hood will switch off automatically after 10 minutes.
2. Switch off the timer function by pressing a random button (except the one for lighting).
TIP!
The cooker hood can be used in extraction mode or recirculation mode. The air extraction capacity
is adapted to the selected mode. The hood will start up in the default extraction mode. Is has to
be reset for recirculation mode.
With an RMS kit (Recirculation modification set) the air will first be cleaned by the grease filters
and then odours will be filtered by the charcoal filter. The cleaned air is recirculated back into the
kitchen.
7
Operation

Switching on recirculation mode
When the light and fan are off, simultaneously hold the timer key and the light key until the filter
indicator flashes 3 times.
The carbon filter indicator is activated.
Switching off recirculation mode
When the light and fan are off, simultaneously hold the timer key and the light key until the filter
indicator lights up for 3 seconds and then turns off.
Clean Air function
The Clean Air function allows you to freshen the air in your kitchen for a maximum of 24 hours at
level 1.
1. Switch off the cooker hood.
2. Press and hold the ‘clean air’key for approximately 3 seconds.
The cooker hood will switch on automatically for 10 minutes every hour at the lowest speed
setting. During extraction the display will show a fast moving ‘snake’. When the hood switches
off after 10 minutes, the display will show a slow moving ‘snake’until the hood switches on again
after 50 minutes.
3. Switch off the Clean Air function by pressing the timer, clean air, ‘-’or ‘+’keys (any key other
than the light key).
8
Operation

Switching the light on and off
1. Press and hold the light key for 1 second.
The light switches on at maximum strength.
2. Press and hold the ‘increase light’or ‘decrease light’key to set the lighting intensity.
3. To turn off the light, press and hold the light key for 1 second.
NOTE!
Lighting and motor key must be pressed for at least 1 second. This is to prevent the functions
from being accidentally switched on or off.
Changing the colour lighting temperature
You can adjust the lighting temperature.
1. Press and hold the light key for 1 second.
The light switches on at maximum strength.
2. Press the ‘C’key to make the light ‘colder’or press the ‘W’key to
make the light ‘warmer’.
9
Operation

Cleaning
WARNING!
Important! For all maintenance, first switch off the mains power to the cooker hood by pulling
the plug out of the socket or by turning off the home's master switch. The hood needs to be
cleaned regularly, both inside as well as outside (at least as often as the grease filter).
Do not use abrasive cleaning products. Do not use alcohol!
If the instructions regarding cleaning of the appliance or replacing the filters are not followed,
this can cause a fire. These instructions must be followed! The manufacturer is not liable for
damage to the hood or fire damage resulting from incompetent maintenance or from
non-adherence to the safety instruction above.
Cooker hood
Clean the cooker hood with soapy water and a soft cloth.
Then rinse with clean water. Do not use aggressive cleaning agents such as caustic soda. The
cooker hood finish stays in good condition if it is buffed periodically following the application of wax.
NOTE!
Stainless steel cooker hoods
Do not use scouring pads or other abrasive cleaners on stainless steel cooker hoods. Finish with
a non-abrasive, non-polishing agent and buff the stainless steel in the direction of the grain.
Metal grease filters
Metal grease filters should be cleaned once a month (or when indicated by the filter cleaning indicator
–if present on the model) using a neutral cleaning agent, either by hand or in the dishwasher on a
short, low-temperature program. Place the grease filters with the openings facing downwards in the
dishwasher so the water can drain out of the filter. Aluminium grease filters become dull as a result
of dishwasher cleaning agents. This is normal and does not effect the working.
10
Maintenance
Table of contents
Other Asko Ventilation Hood manuals


