Asko W600 User manual

Page 1
ENGLISH
WASHER
USE AND CARE GUIDE
ASKO
IMPORTANT!
To get the best performance from
your washer, read all operating
instructions before using it for
the first time
SAVE THESE INSTRUCTIONS FOR FUTURE REFERENCE
CONTENTS
Important Safety Instructions 2
Child Safety Features 2
ASKO Washer Features 3
Preparing the Laundry
The Detergent Drawer 5
Detergents 5
Fabric softeners 6
Recommended Wash Temperatures 6
Care and Cleaning Instructions 7
Common Laundry Problems 8
Fault Codes W600/W620 9
Error Messages W6 0/W660 9
Troubleshooting 10
Customizing the Preset Programs W6 0/W660 11
Installation Instructions 15
ASKO Product Warranty 17
Index 18
FRANÇAISESPAÑOL

Page 2
To reduce the risk of fire, electric shock, or injury to
persons when using your appliance, follow basic
precautions, including the following:
¨Read all instructions before using the appliance.
¨Do not run appliance while you are out of the ho e.
¨Do not allow children to play on or in the appliance.
Close supervision of children is necessary when
the appliance is used near children.
¨Before the appliance is re oved fro service or
discarded, re ove the door to the washing
co part ent.
¨Do not reach into the appliance if the dru is oving.
¨Do not install or store this appliance where it will be
exposed to the weather.
¨Do not ta per with controls.
¨Do not repair or replace any part of the appliance or
atte pt any servicing unless specifically
reco ended in the user-repair instructions or in
published user-repair instructions that you
understand and have the skills to carry out.
¨Do not add gasoline, dry-cleaning solvents, or other
fla able or explosive substances to the wash
water. These substances give off vapors that could
ignite or explode.
¨Under certain conditions, hydrogen gas ay be
produced in a hot water syste that has not been
used for 2 weeks or ore. HYDROGEN GAS IS
EXPLOSIVE. If the hot water syste has not been
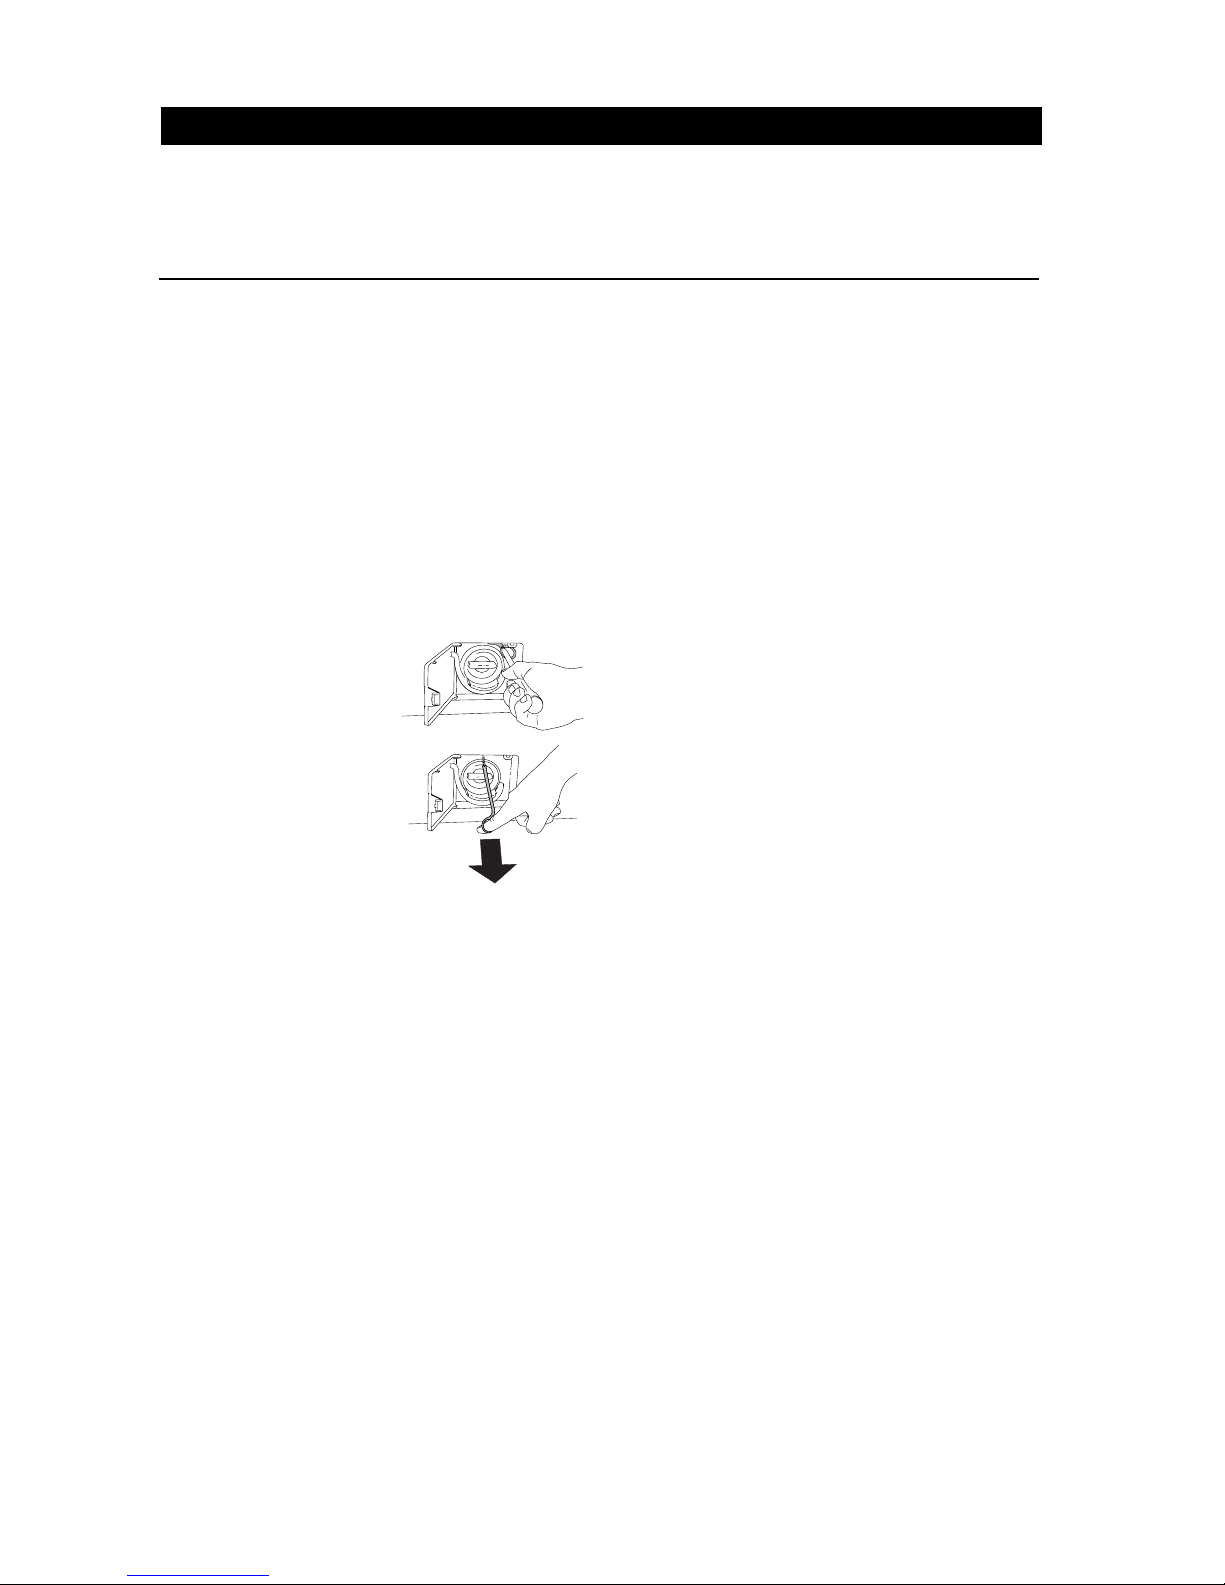
CHILD-SAFE DETERGENT DRAWER
ASKO washers have a child-safety catch on the detergent
drawer that can be engaged to prevent a child fro
opening the drawer and possibly co ing into contact
with the detergent or fabric softener. Refer to page 5 for
instructions on how to engage the child-safe catch.
CHILD-SAFE TEMPERATURE KNOB
Models W600 and W620 have a child-safety catch that
can be engaged to prevent children fro ta pering
with the te perature knob. The catch is located below
the te perature knob behind the edge of the control
panel. To engage it, insert a flathead screwdriver in the
slot on the catch. Press upwards as you turn the catch
clockwise. When you release the catch is should
protrude slightly below the control panel.
Once the catch is engaged, you ust hold it up as you
turn the te perature knob to the desired setting.
CHILD-SAFE START
You can progra Models W640 and W660 not to start
unless the Start button is held down for three seconds.
This is to prevent children fro inadvertently starting
WARNING!
This appliance must be properly grounded.
Improper connection of the equipment grounding
conductor can result in a risk of electric shock.
Check with a qualified electrician or serviceman
if you are in doubt as to whether the appliance is
properly grounded.
The plug must be plugged into an appliance outlet
that is properly installed and grounded in
accordance with all local codes and ordinances.
IMPORTANT SAFETY INSTRUCTIONS
CHILD SAFETY FEATURES
used for such a period, before using a washing
achine or co bination washer-dryer, turn on all
water faucets and let the water flow fro each for
several inutes. This will release any accu ulated
hydrogen gas. As the gas is fla able, do not
s oke or use an open fla e during this ti e.
MORE CHILD-SAFETY TIPS
¨Laundry detergents are corrosive, so always keep
the out of reach of children.
¨Should a child swallow detergent, give plenty to drink
i ediately, i.e., one or two glasses of ilk or water.
Do not try to induce vo iting. Seek edical advice
i ediately: 1-8 -POISON1
¨Always close the door and start the appliance as
soon as you put in the detergent.
¨Always turn the power off to the achine when it is
not in use.
¨Always keep s all children away fro the achine
when it is open. There ay be so e detergent
residue left inside the achine.
¨If laundry detergent gets in so eones eyes, rinse
the with plenty of water for at least 15 inutes.
¨Do not allow children to use or play on or in the
appliance.
Do not wash or dry articles that have been
previously cleaned in, washed in, soaked in, or
spotted with gasoline, dry-cleaning solvents,
cooking oils, other flammable or explosive
substances because they give off vapors that
could ignite or explode.
WARNING!
NOTE: This anual does not cover every possible
condition and situation that ay occur. Use
co on sense and caution when installing,
operating, and aintaining any appliance.
the achine. Refer to page 14 for instructions on how
to progra this safety feature.

Page 3
ENGLISH
Your new energy-efficient ASKO washer is designed to
give you axi u cleaning perfor ance using less
water, energy and detergent. To ake the ost of the
washers functions and features, we reco end that
you read this anual carefully before using your
achine for the first ti e. For operating instructions,
refer to the Quick Start Guide enclosed with this anual.
Below is an illustration of the parts and features of your
ASKO washer.
THE GLASS DOOR
To open the glass door, the power to the achine ust
be on and you ust press the Door Open button ( ).
There will be a few seconds delay before the door
opens.
Models W600 and W620
On these odels, the Progra Control knob ust be
at the end of a progra (at the 12:00 position) to open
the glass door. If you need to stop or interrupt a progra
after you start the achine, turn the Progra Control
knob to 10 (Drain). Any water in the achine will be
pu ped out. Make sure the Progra Control knob is at
the 12:00 position, then press the Door Open button
() to open the door. To restart the washer, close the
door, add detergent (if needed), and turn the controls to
the desired settings.
Models W640 and W660
On these odels, if you need to open the door during a
wash or rinse cycle, press and hold Door Open for three
seconds. The achine will stop and auto atically drain
enough water so the door can be opened safely. The
progra will resu e when you close the door.
Refer to The door wont open section in the
Troubleshooting chart on page 10 for instructions on
how to open the glass door in case of a echanical
failure.
THE OUTER DOOR (W620/W660)
The drop-down outer door is not just to i prove the
appearance of your ASKO washer. You can pile your
ASKO WASHER FEATURES
laundry on the door while loading and unloading the
washer with co plete confidence that the door will hold.
SENSOR LEVEL CONTROL
ASKO washers do not need high, ediu , or low water
level settings to co pensate for different sized loads.
ASKO washers have a Sensor Level Control (SLC)
syste designed to ensure the correct a ount of water
is pu ped into the achine for any size load. It even
co pensates for fabric saturation, letting in ore water
if needed. This eli inates worry about selecting the
right water level setting for each laundry load.
TEMPERATURE CONTROL
Because wash water te perature is a ajor factor in
getting laundry clean, ASKO washers have built-in heating
ele ents and a sensor that keeps the te perature to
within +/-1° F of the selected progra te perature.
ASKO washers are progra ed not to advance in a
cycle until the selected water te perature is reached,
so the length of the cycles ay vary, depending upon
the household cold water te perature, the a ount of
laundry in the washer, and the wash te perature setting.
ENZYME STEP
To successfully re ove all dirt and stains fro fabric,
the enzy es in your detergent need to work at a
te perature between 105° and 140° F for a longer ti e
period. For this reason, the ain wash cycle in a Nor al
wash progra on ASKO washers is 43 inutes (plus
the a ount of ti e it takes to heat the water to the
selected te perature). This longer wash cycle gives
the enzy es in the detergent a ple ti e to re ove
stains, eli inating the need for stain sprays and spot
re overs.
The prewash option should be used only for heavily
soiled loads. Starting the achine at the ain wash
stage will save about 25 inutes.
ECONOMY (E2/ECO) OPTION
This option extends the wash ti e by about 22 inutes.
This extended wash ti e lets you use lower water
te peratures (85°100° F) and still get the sa e
excellent results with lower energy consu ption. This
option is also excellent for getting out stubborn stains
when used with a higher wash te perature.
MORE RINSE CYCLES
Most washers have only two or three rinse cycles; so e
have an option to add a fourth. ASKO washers have five
rinses and a Super Rinse option that adds two ore.
ASKO washers get the soil and detergent out of your
laundry that ost other washers leave in. Thats why
your whites will re ain white and your colored fabrics
will re ain bright.
The Super Rinse option is designed for people with
sensitive skin or who are allergic to detergents. It can
also be used for large, heavily soiled loads.
Detergent and fabric
softener dispenser
Control
panel
Outer door
(W620 and W660)
Front
cover
Glass
door
Power
button

Page 4
PREPARING THE LAUNDRY
We believe ASKO washers clean better than any other
washer available on the arket. With proper attention
to how you prepare your laundry ite s for washing, your
wardrobe and linens will look like new for years.
SORTING THE CLOTHES
Sort clothes by fiber content, color, a ount of soil, lint
shedding properties (e.g., cotton, chenille, and
terrycloth), lint attracting properties (e.g., per anent
press, corduroy, velveteen, flannel and synthetics) and
those requiring a delicate cycle (e.g., washable wool
and silk, nylon).
CARE LABEL INSTRUCTIONS
Most clothes and other washable ite s have per anent
care labels. Read these labels carefully! Care label
instructions and warnings should be followed for the
best cleaning results.
If the care label says "Wash Separately," the fabric is
likely to lose color (excess dye) for the first few washings.
To ini ize the possibility of the color transferring to
white or lighter colored ite s, wash new colored
gar ents with ite s of si ilar color or separately. Bright
reds and oranges on cottons are the dyes ost likely to
transfer colors to the wash load. Fluorescent colors
should always be washed separately.
RECOMMENDED LOAD SIZES
To reduce wrinkling, you should deter ine the load size
based on the type(s) of fabrics being washed. The chart
below gives reco ended load sizes for different fabrics.
Cotton and Linen Fabrics
These ite s should be washed in full loads because
the tu ble action of the tub along with the gentle rubbing
and lifting and falling ove ent of the clothes gives the
best cleaning result.
Permanent Press Fabrics
These ite s need ore roo to ove freely during
washing for the ost wrinkle-free results. Therefore, fill
GENERAL LAUNDRY ADVICE
¨Read and follow the care instructions on new
gar ents.
¨Sort laundry by the care instructions and color of the
fabric.
¨Do no wash colored fabrics with white and light-
colored fabrics.
¨Wash fabrics that produce lint separately (such as
towels).
¨Re ove any sharp orna ents, pins or buckles to
prevent snags.
¨E pty pockets and turn the inside out.
¨Close zippers and hooks to prevent snagging.
¨Tie sashes and strings to prevent tangling.
¨Mend any s all rips to prevent the fro enlarging.
¨Turn colored cotton gar ents, velvet and finer
knitwear inside out before washing.
¨Turn delicate ite s, sweaters and T-shirts inside
out to prevent pilling and to protect the prints.
¨Prewash severely soiled ite s.
¨Wash colored fabrics separately the first ti e.
¨Per anent press ite s should be washed in half-
loads.
¨Thoroughly rinse down ite s, such as co forters
(Super rinse).
¨Use fabric softener to eli inate static electricity in
synthetic gar ents and to soften cotton.
¨Ironing lesser quality cotton ite s can reduce
shrinkage.
Load Size Fabrics
Full Cotton, linen
Half Per press, synthetics, acrylics
Third Special finish cottons, achine
washable wool, silk, acetates
SPIN OPTIONS
ASKO washers have faster spin speeds than ost other
washers, which decreases the ti e it takes to dry your
laundry by up to half. The spin speeds range fro 600
rp to 1600 rp , depending on the odel.
You can also turn the spin cycle off. Using this feature
with the Wool/Hand wash progra is a perfect
substitute for hand washing.
the achine only half full for per anent press loads.
These ite s should have only a brief spin cycle and
they should be re oved pro ptly fro the washer and
put directly into the dryer or hung to dry.
Delicate Fabrics
More delicate fabrics, such as achine washable wool
and silk, should only be washed in one-third size loads
for the best results.
ADVICE FOR PERSONS WITH
SENSITIVE SKIN
ASKO washers are ideal for people allergic to detergent.
Our Heavy, Nor al and Light wash progra s have five
rinse cycles and a Super Rinse option that adds two
ore rinses. This ensures that all the detergent residue
is rinsed out of your laundry.
As an extra precaution, you should use ild detergents
and be careful not to use too uch.

Page 5
ENGLISH
Laundry detergents are available in low-, nor al- and
high-sudsing for ulas. A detergent´s ability to clean is
not relative to the a ount of suds it produces. Excess
suds in a front-loading washer actually interfere with
the cleaning because they cushion the tu bling action.
Also, high-sudsing detergents are ore difficult to
co pletely rinse out.
The use of anything other than a low-sudsing detergent
can cause severe oversudsing, which could cause
suds to backup through the detergent co part ent and
run down the front of the washer onto the floor. If
oversudsing occurs, run the wash through one or ore
rinse progra s until all ite s are thoroughly rinsed.
Re ove the laundry then run the washer through a
Nor al wash progra to get rid of any re aining
detergent.
Should oversudsing occur, the achine will indicate
an error code or essage. (See page 9.)
LIQUID DETERGENTS
We dont reco end liquid detergents because they
tend to produce ore suds than powder detergents
when used in water te peratures of 150° F or higher. If
you should try a liquid detergent, start with a very s all
a ount, such as 1 to 2 tablespoons. Also, liquid
detergent can be used for all progra s without prewash,
so add it into the ain wash co part ent.
DETERGENTS
THE DETERGENT DRAWER
The detergent drawer on ASKO washers auto atically
dispenses the detergent and fabric softener at the
appropriate ti es. Si ply pour the easured a ounts
of detergent and softener into the proper co part ents
(as illustrated) and close the drawer.
RECOMMENDED POWDER
DETERGENTS
ASKO washers use 50% to 75% less detergent than
ost other washers. This is because of their low water
consu ption and the fact that all the wash water is
repeatedly circulated through the laundry, ensuring that
all the detergent is fully utilized. We reco end that
you use powder detergents ade specifically for front-
loading washers. These are so eti es called HE
(High-Efficiency) detergents. Listed below are so e
low-sudsing powder detergents that have been
successfully tested in ASKO washers:
We reco end that you do not use any powder
detergent that doesnt wash co pletely out of the
detergent drawer.
AMOUNT OF DETERGENT TO USE
The a ount of detergent needed varies a ong the
different brands, but for ost detergents, you need only
one or two tablespoons. Using too uch detergent
can result in detergent residue being left in your clothes,
which can cause the to appear gray or dingy. You
should start with a s all a ount of detergent and
increase it only if the cleaning results are unsatisfactory.
Additionally, you should never put detergent in the
prewash co part ent unless you are using a wash
progra that has a prewash cycle. This could cause
excess foa ing, which could da age the achine.
The a ount of detergent needed can also depend on
the hardness of the water in your area. See the
Detergent A ounts Based on Water Hardness section
on the next page for ore details.
We recommend that you dont use bleach in your ASKO
washer. The tu bling wash action, te perature control
options, extended wash ti es and proper a ount of
detergent are sufficient to re ove ost stains.
Child-Safe Catch
All ASKO 600-series washers have a child-safe catch
on the detergent drawer that can be engaged to prevent
a child fro opening the drawer and possibly co ing
into contact with the detergent or fabric softener.
The safety catch is the red plastic piece on the back
right side of the pull-out handle. To engage the catch,
open detergent drawer a little then pull the catch forward
and release it. Once the catch is engaged, you ust
push it to the left each ti e you open the detergent
drawer.
To disengage the catch, push it to the left then back.
¨All
¨Tide HE
¨Wisk HE
¨Fab
¨A way SA8
¨Fresh Start
Should you prefer to use a
liquid detergent, we have
provided a partition piece with
the detergent drawer
specifically for use with liquid
detergents. Insert the partition
in the slot at the back of the
ain wash co part ent
before you pour in the liquid
detergent.
Prewas detergent
Main was
detergent Fabric
softener
Pullout
andle C ild-safety
catc
NOTE: To avoid oversudsing, do not put detergent in
t e prewas compartment unless you are
using one of t e Heavy was programs w ic
as a prewas cycle.

Page 6
RECOMMENDED WASH TEMPERATURES
Different fabrics require different wash te peratures. The
table below gives reco ended wash te peratures
Fabric softeners are available in several concentrations.
We reco end that you use only two tablespoons of
FABRIC SOFTENERS
fabric softener. If ore softening is desired, try adding
slightly ore the next ti e.
The a ount of detergent needed can vary due to
differences in water hardness. To deter ine the water
hardness in your area, contact your local water utility or
area water softening co pany. The harder the water,
the ore detergent you ay need. Refer to the chart
below for the reco ended detergent a ounts based
on water hardness. Re e ber, you should adjust the
a ount of detergent you use by s all a ounts until
you find the correct a ount.
Note that 12 grains and higher is extre ely hard water
and detergent alone ay not be enough. You ay need
Wash Wash Load Spin
Fabric Type Temp. Program Size (1) Options (2)
White cotton w/out elastic 140205° F Nor al Full Long spin, high rp
and/or decorative tri
White cotton w/elastic 120140° F Nor al Full Long spin, high rp
and/or decorative tri
Colored cotton 120140° F Nor al Full Long spin, high rp
Linen (white and colorfast) 120140° F Nor al One-half Short spin, low rp
Cotton/polyester blends 105120° F Nor al/Per anent press One-half Short spin, low rp
Polyester/acrylic blends 105120° F Nor al/Per anent press One-half Short spin, low rp
Rayon and acetate 105° F Delicate/Wool One-half Short spin, low rp
Washable silk and nylon 85° F (cold) Delicate/Wool One-third Short spin, low rp
Washable wool and 85105° F Delicate/Wool One-third Short spin, low rp
wool blends (cold)
Handwash wool & silk (3) 85° F (cold) Delicate/Wool One-third Short spin, low rp
NOTES:
(1) The load size should be deter ined by the type of fabric being washed. (See page 4.)
(2) Spin speed options are not available on all odels.
(3) So e hand-washable wool and silk ite s should not go through a spin cycle. These ite s should be re oved
fro the washer then pressed out in a terry towel to re ove excess water before being hung up or laid flat to dry.
to use a water softener to axi ize the perfor ance of
your washer. Also, in areas with extre ely hard water
(9+) you ay need to wash at lower te peratures to
prevent hard water deposits fro for ing in the tank
and wash syste .
Different brands of detergent have different a ounts of
phosphorous for softening water. If you have hard water
and use a detergent with less than 8.7% phosphorous
content, you ay need to use ore detergent or use a
detergent with a higher phosphorous content.
Recommended Detergent Amounts
Based on Water ardness
Soft (0-3 grains per gal.) 1 teaspoon 1 to 1-1/2 tablespoons
Medium (4-8 grains per gal.) 1 teaspoon 1 to 2 tablespoons
Hard (9+ grains per gal.) 1 teaspoon 2 to 3 tablespoons
Detergent Amounts
Water Hardness Prewash Main Wash
for different fabrics as well as reco ended progra s,
load sizes, and spin options.
Detergent Amo nts Based on Water Hardness

Page 7
ENGLISH
CLEANING THE PIN TRAP
Your washing achine has a pin trap designed to trap
pins, hairpins, coins and si ilar ite s. This trap should
be cleaned occasionally. To do this, follow the steps
below:
1. Make sure as uch water as possible is drained
out of the tub then turn off the power to the achine.
2. Using the flat edge of the
liquid detergent partition
piece, a flathead screwdriver
or si ilar ite , gently pry open
the drain pu p cover, as
illustrated.
4. Pull the s all black
drain hose loose fro
its position on the door
cover and let the water
drain into the pan.
7. Replace the drain cover and return the drain hose to
its position on the door.
5. Unscrew the pin trap cover and lift it out.
3. There is always a s all a ount of water in the drain
pu p area. Before you open the drain cover, place a
shallow container, such as a pie pan, on the floor
below the drain to catch the water.
REMOVING AN OBJECT FROM
BETWEEN THE DRUM AND
OUTER CONTAINER
Occasionally, a s all ite ay fall between the dru
and the outer container. Such ite s should be re oved
because they could corrode and cause rust stains on
the laundry. To re ove the ite , follow the instructions
below:
CARE AND CLEANING INSTRUCTIONS
CLEANING THE DETERGENT
DRAWER
CLEANING THE CONTROL PANEL
To clean the control panel, use only a war , da p rag.
To prevent penetration of water into the door lock and
electrical co ponents, never use a spray of any kind.
Also, never use abrasive cleaners or scouring pads on
the outer surfaces because they will scratch the finish
and they could re ove the writing on the control panel.
So e paper towels ay also scratch the finish.
1. Pull the drawer out as far
as it goes then lift it up and
pull it out co pletely, as
illustrated.
2. Clean the drawer with a
soft brush under war
running water. Do not put
the dra er in a dish asher.
3. Replace the drawer by
tilting it into position.
6. You can now clean out any
grit or s all objects. You
should also clean the
pu p rotor at the back of
the pu p housing.
2. Grip the paddle with your other
hand and pull it toward you.
1. Insert a flathead screwdriver
in the center hole in the
paddle and carefully push it
to the left.
4. Replace the paddle in its fixing hole with the F- ark
toward you. Check that the paddle clips are properly
located in the slots and slide the paddle toward the
back as far as it will go.
3. Lift up the paddle and re ove the object.
REMOVING HARD WATER
STAINS FROM THE DRUM
If you live in an area with hard water, the washer dru
ay beco e coated with a grey-white deposit. To
re ove it, pour about an ounce of citric acid in the dru
and run a Nor al wash progra at 205° F.
Never spray clean t e control panel. You could damage
t e electrical components. Also, never use abrasive
cleaners, scouring pads or paper towels on t e outer
surfaces because t ey will scratc t e finis and t ey
could remove t e writing on t e control panel.
WARNING!

Page 8
Most ite s can be safely washed in an ASKO washing
achine. We reco end that you follow the care label
instructions as closely as possible for the best cleaning
results. Should proble s occur, below are so e
possible causes and suggested solutions.
You ay need to add slightly ore detergent if clothes are heavily
soiled, have oily stains, or if your water is very hard.
Select a hotter te perature setting for each type of load.
Be sure to add a prewash and/or presoak for heavily soiled or oily
ite s.
Once wet, the clothes ust have roo to tu ble freely, especially
synthetics and per anent press.
Be sure you use a laundry detergent, not a soap. Soap reacts with
the inerals in hard water to for a soap curd, which can be
deposited on clothes.
Problem Possible Ca se S ggested Sol tion
Graying Not enough detergent
Water not hot enough
I properly prewashed or
presoaked
Washer overload
Soap used in hard water
areas
Separate clothes that shed lint (chenille and terrycloth) fro clothes
that attract lint (synthetics, corduroy, velveteen).
Non-phosphate detergents can co bine with inerals in hard water
and for a residue which can appear to be lint. Use a low phosphate
detergent. If possible, install a water softener.
Read labels. Most softeners should only be used in the final rinse.
Add softener to the softener co part ent. If added to the wash
cycle, softeners can have a reaction with detergents, producing a
white residue.
Pilling, which can look like lint, is produced by nor al wear on cotton/
polyester blend fabrics. To reduce pilling, wash these fabrics inside
out. For the best results, wash in the delicate cycle.
Lint or residue
left on clothes
I proper sorting of clothes
Non-phosphate detergent
Fabric softener used
i properly
Pilling
Add slightly ore detergent.
Use the hottest reco ended te perature for each type of load.
If possible, install a water filter. A s all a ount of Calgon or other
type of water conditioner added once a week is advisable in hard
water areas.
Yellowing Not enough detergent
Water not hot enough
Iron or anganese in
water
Follow gar ent care label instructions carefully. So e fabrics will
shrink no atter how they are washed. So e ay be achine
washed but not achine dried.
Shrinkage I proper washing or
drying
Knits tend to shrink ore than woven fabrics. If a knit has been heat-
shaped, wash in cool or war water. Dry with the low setting.
This can occur when special stabilizing finishes are reduced fro
wear or repeated washings. Gar ent ay so eti es be reshaped
by pressing after washing and drying.
Shrinkage can occur if the knit fabric was not stretched properly by
the anufacturer. Press back into shape each ti e gar ent is
washed and dried.
Knit shrinkage Overheating
Delayed or gradual
shrinkage
Poor construction
Dark clothes, especially cottons, can bleed excess dyes into wash
water. White or light-colored clothes can absorb the dye and discolor.
Separate light ite s fro dark ite s.
Always e pty all pockets before washing.
Cool or cold water is best for retaining dark or bright colors.
Fading and
discoloring
I proper sorting
Crayons or pens in pockets
Water too hot
Protein stains, such as ilk, egg, blood and soy for ula should be
re oved in cold water. Oily stains should be washed in the hottest
water reco ended for each fabric type.
The longer a stain re ains on a fabric, the harder it is to re ove.
Treat stains pro ptly. Do not set stains by achine drying or ironing
fabrics until stains are co pletely re oved.
Stains Incorrect water
te perature
Old stains
COMMON LAUNDRY PROBLEMS
NOTE: ASKO has no control over what is put in our
appliances once installed in a custo ers ho e. You
are solely responsible for what you wash in your
ASKO washing machine.

Page 9
ENGLISH
COMMON LAUNDRY PROBLEMS (CONTINUED)
Problem Possible Ca se S ggested Sol tion
E pty all pockets and turn inside out before laundering.
Fasten all hooks, snaps, and zippers before laundering to avoid snags.
Re ove sharp buckles. Turn knits inside out.
Before washing, rinse harsh che icals (such as battery acid, hair
care che icals, cleaning solutions, etc.) fro towels and other articles
to avoid holes in fabrics. Do not allow these unrinsed ite s to contact
other fabrics.
Mend all gar ents before laundering to prevent enlarging of rips.
These ite s ay fray at edges fro nor al wear, not the washer.
Wash only in half loads and dont wash in the sa e load with heavy
ite s, such as towels or jeans.
Rips, snags,
excess wear
Sharp objects in pockets
Hooks, snaps, zippers,
buckles
Harsh che icals
Existing rips and tears
Per anent press ite s
Per anent press ite s should be washed in half-loads to prevent
wrinkling. If possible, use a slower spin speed.
Use lower wash te perature settings.
Excessive
wrinkling
Machine too full
Water too hot
ERROR MESSAGES W640/W660
Error essages will display in the LED window if faults
occur while a progra is in progress. The table below
defines each possible error essage.
ERROR MESSAGE SOLUTION
When this sy bol flashes at the lower right corner of the display it erely eans
the glass door isnt closed securely. Close the door and try again.
0000 If this essage flashes at the top right of the LED window, the achine has failed
to spin. This could be because the load is out of balance. Turn the power off
then on again. Open the door and redistribute the washing. Run the Spin
progra again.
Door lock fault Call a service technician.
Foaming Run the Rinse progra again.
Try using less detergent and softener.
Use low-sudsing detergents. (See page 5.)
Overflo Call a service Technician
Pressure sensor Call a service technician.
Temperature stop Call a service technician.
Thermistor Call a service technician.
Wash motor Call a service technician.
Water inlet Make sure the water tap is open.
Water outlet Check the pin trap for possible blockage. Make sure the outlet hose isnt kinked.
To re ove the essage, turn the power off or change
the progra .
FAULT CODES W600/W620
The Progra Control knobs on the W600/W620 have
two fault codes: C and S. If the knob stops on one of
these, the achine detected a proble .
C Position
This indicates a proble that can probably be taken
care of without calling a service technician. Here are
so e possible proble s:
¨Power interruption.
¨Water not draining out.
¨Water not filling achine.
¨The achine didnt spin.
Refer to the Troubleshooting section on the next page
for possible causes and solutions. If none of these
work, call a service technician.
S Position
If the knob stops on S, this indicates a echanical
proble and you will probably need to call a service
technician.

Page 10
TROUBLESHOOTING
The door wont open.
¨Make sure the power to the unit is on. If the power
is on and the indicator la p is not lit, there is no
power supply. Check that the achine is properly
plugged into the electrical outlet. If it is, the fuses
ay be blown. Call a service technician.
¨Make sure all the water has drained out.
¨If there is no water in the achine and the door
wont open in the nor al anner, you should be
able to open it anually, as follows:
1. Make sure the tub is as e pty as possible and
the power is turned off.
2. Using the flat edge of the liquid detergent
partition piece, a flathead screw-driver or si ilar
ite , gently pry open the
drain pu p cover.
3. Using a T20 or flathead
screwdriver, unscrew
the red plastic looped
handle.
4. Pull the handle toward
you. The door should
open.
The machine doesnt fill.
¨Make sure the tap to the water supply line is open.
¨Turn off the water supply then disconnect the inlet
hose and check to see if the strainer in the inlet
connection is blocked.
The machine wont start.
¨Check that the glass door is closed securely.
¨Make sure the power switch is turned on.
¨If the power switch is on and the indicator la p is not
lit, there is no power supply. Make sure the achine
is properly plugged into the electrical outlet.
¨Check the house breaker switch/fuses.
The machine will not spin.
¨Make sure the pin trap or outlet hose isnt blocked.
Clean if necessary. (See page 7.)
¨Make sure the No Spin option is turned off.
¨If a load is out of balance, the washer will rotate a
few seconds to redistribute the load then atte pt to
spin again. It will do this up to ten ti es at a high
spin speed (1000 rp or higher). If it still isnt
balanced, it will advance the ti er with no spin.
Extreme vibration d ring spin
cycle.
¨Make sure the packaging and shipping supports
were re oved properly. (See page 14.)
¨Check that the achine is level.
¨Adjust achine feet and tighten locknuts. (See page 14.)
Overs dsing.
¨Too uch detergent could cause suds to backup
through the detergent co part ent and run down
the front of the washer onto the floor. The suds will
condensate into water and for a s all puddle on the
floor. (See page 5 for detergent reco endations.)
Washer stops d ring cycle.
¨It is nor al for the achine to pause occasionally
during operation, especially between cycles and
during the delicate wash progra .
¨Make sure the No Spin option isnt turned on.
¨If the power switch is on and the indicator la p is
not lit, there is no power supply. Make sure the
achine is properly plugged into the electrical outlet.
¨Check the house breaker switch/fuses.
Foam in the final rinse water.
¨Make sure nothing is blocking the outlet hose.
¨Check for kinks in the outlet hose.
¨Make sure the pin trap isnt blocked. (See page 7.)
¨Make sure that no part of the hose (including any
joints) is less than 3/4 (15 ) in dia eter.
Water left in the machine after
final spin.
¨Make sure the No Spin option isnt turned on.
¨Make sure the pin trap isnt clogged. (See page 7.)
¨Make sure the outlet hose isnt clogged.
¨Check for kinks in the outlet hose.
¨Make sure that no part of the outlet hose (including
any joints) is less than 3/4 (15 ) in dia eter.
Water leaks.
¨All hoses should be inspected at least once a year.
If they show signs of cracking, they should be
replaced.
¨Check to see if hose connections at faucets are
tight.
¨Make sure the end of the outlet hose is securely
inserted into the drain receptacle.
¨Make sure nothing is caught between the S art Seal
and the tank, such as apron strings, s all
handkerchiefs, socks, etc.
If you should experience a proble with your washer,
you should review the following list of frequently
encountered situations. It could save you the cost and
inconvenience of a service call.
Even though the product is under warranty, if the proble
is not caused by defective work anship or aterials,
you will be charged for a service call. Refer to page 17
to deter ine what is and is not covered under your
warranty. If youre still not sure, contact the ASKO
Advisory Center before you call a service technician.

Page 11
ENGLISH
W640/W660 CUSTOMIZING THE PRESET PROGRAMS
Before we tell you how to custo ize the preset progra s,
you need to review what these progra s are. The table
below lists the four preset progra s and the pre-
progra ed settings for each. To select a progra ,
si ply press one of the progra buttons then press Start.
THE PRESET PROGRAMS P1 P2 P3 P4
ASKOs EasyControl panel akes it si ple to
custo ize the preset progra s to perfectly fit your
laundry needs. You neednt worry about aking an error
because you can easily restore the original progra
settings.
Preset Wash Spin # of # Short Long
Program Wash Cycle Types of Laundry Temp(1) Speed (1) (2) Rinses Spins Spin
P1 (3) Nor al White cotton 140° F 1600 rp (4) 5 2 yes
P2 (3) Nor al Nor al/Per Press 105° F 1600 rp (4) 5 2 yes
P3 Super Quick Lightly soiled cotton/per press 105° F 1600 rp (4) 2 0 yes
P4 Wool/Hand Washable wool, silk, nylon 85° F 800 rp 3 1 no
NOTES: (1) You can te porarily adjust the te perature and spin speed settings. (See Te porary Progra
Changes below.)
(2) The spin speeds in the preset progra s are the axi u speed settings for these specific wash
progra s (except Super Quick).
(3) P1 and P2 are factory-progra ed with the Quick Main Wash option, which shortens the progra ti e
by about 27 inutes. (See page 14 for instructions on how to turn off this option.)
(4) Model W640 has a axi u spin speed of 1400 rp .
WARNING! Some fabrics may not be able to wit stand extremely ot temperatures.
Please refer to t e Recommended Was Temperatures section on page 6.
Re e ber, you can te porarily adjust the te perature
setting and spin speed for a preset progra . (See
Making Te porary Progra Changes on your Quick
Start Guide.)
In addition to the preset progra s listed above, you
can custo ize the preset buttons to use any of the
progra s listed in the table below.
This table also lists the pre-progra ed settings for
each progra . For exa ple, if you select Light wash on
18-min Temp Main
Cold Setting Wash Short # of Short # of Long
Program Prewash (° F) Action Spin Rinses Spin Rinses Spin Drain
Heavy wash yes 140° Nor al yes 3 yes 2 yes yes
Nor al wash no 140° Nor al yes 3 yes 2 yes yes
Light wash no 105° Nor al yes 3 yes 2 yes yes
Super Quick wash no 105° Nor al no 2 no no yes yes
Synthetic wash no 105° Nor al no 3 yes no no yes
Wool/Hand wash no 85° Gentle no 3 yes no no yes
Rinse no N/A N/A no 1 no no yes yes
Spin no N/A N/A N/A N/A N/A N/A yes yes
Drain no N/A N/A N/A N/A N/A N/A N/A yes
You can ake te porary changes to the wash
te perature and/or spin speed on the preset
progra s. Si ply press the button for the preset
progra you want to use then follow the instructions to
the right. The settings will revert to nor al at the end of
the progra .
Temperature Press until the desired te perature
displays in the LED window. If you also want to change
the spin speed, read the following paragraph,
otherwise, press START.
Spin Speed Press until the desired spin speed
displays in the LED window then press START.
TEMPORARY PROGRAM C ANGES
ALL PROGRAMS
the progra enu, it is auto atically progra ed to
wash at 105° F using a nor al wash action, rinse three
ti es then do a short spin, then rinse two ore ti es,
do a long spin and drain. You can odify so e of these
settings. See Progra Options on page 12.

Page 12
Option Set this option to On to:
Presoak Get a two-hour presoak before the wash progra starts. For heavily soiled ite s. Only available
with the wash progra s.
Quick Main Shorten the ain wash by 27 inutes. Only available with the Heavy and Nor al wash progra s.
Wash (Note: P1 and P2 are factory-progra ed with this option.)
Econo y Extend the ain wash ti e by 22 inutes. When used with low wash te peratures (85°100° F),
this progra conserves energy but gives the sa e high level of cleaning. Can also be used with
higher te perature settings to clean heavily soiled ite s. Only available with the Heavy, Nor al,
and Light wash progra s.
Super rinse Get two additional rinses. Reco ended for persons with sensitive skin or allergies. Only available
with the wash progra s.
Short spin O it the long spin.
Set this option to Off to:
Spin O it both the long and short spin cycles.
Drain O it the drain cycle. The washer stops with water in the achine. You can only select this option
if you have also set the Spin to Off. For use with progra s such as Wool/Hand wash. To drain the
washer, press the Door Open button.
Delayed Start Set a delay start for up to 12 hours. This feature is useful in areas where utility co panies offer
discount rates during certain hours. See page 13 for instructions on how to set a delayed start.
PROGRAM OPTIONS
The following table lists the options available with each wash progra . The progra s and options are described in
detail below. Its a good idea to scan through the enus a couple of ti es and fa iliarize yourself with the options
before you ake any changes. And re e ber, its easy to restore the preset progra s.
NOTES: (1) The axi u spin speed for the W640 is 1400 rp . The axi u spin speed for the W660 is 1600 rp .
(2) You can only turn Drain off if Spin is also turned off. To drain the achine, press the Door Open button.
OPTION DEFINITIONS
The table below explains the function of the options listed above.
NOTE: The ain wash cycle in a Nor al progra is 43 inutes.
OPTIONS (On/Off)
Temp Spin
WASH Setting Speed Pre- Quick Eco- Super Short Long Drain
PROGRAMS (° F) (rpm) (1) Soak Wash nomy Rinse Spin Spin (2)
Heavy Cold, 85°205° 600-1600 yes yes yes yes yes yes yes
Nor al Cold, 85°205° 600-1600 yes yes yes yes yes yes yes
Light Cold, 85°205° 600-1600 yes no yes yes yes yes yes
Super Quick Cold, 85°205° 600-1600 yes no no yes yes yes yes
Synthetic Cold, 85°205° 600-800 yes no no yes yes yes yes
Wool/Hand Cold, 85°104° 600-800 yes no no yes yes yes yes

Page 13
ENGLISH
The Temperat re Men
This enu lets you set the wash te perature. Only the
te peratures available for the wash progra you
selected will display.
Menu E nter
Select
temperature
< - + >
P1 140o
1. Use the Arrow buttons to raise or lower the
te perature setting.
2. When the te perature you prefer displays, press
ENTER. The LED will display the new te perature
setting.
Press MENU to advance to the next enu.
The Program Men
The Progra enu lets you set the wash progra you
prefer. You would also use this enu to set the achine
for a rinse, spin, or drain progra .
Menu E nter
Select
Program
Normal
< Next >
P1
1. Use the Arrow buttons to ove through the progra
choices (Heavy, Nor al, Light, etc.)
2. When your preference displays, press ENTER. The
LED will display the new progra setting.
Press MENU to advance to the next enu.
The Spin Speed Men
This enu lets you set the spin speed. Only the spin
speeds available for the wash progra you selected
will display.
Menu E nter
Select
spi n speed
< - + >
P1
rpm
1600
1. Use the Arrow buttons to raise or lower the spin
speed setting.
2. When the spin speed you prefer displays, press
ENTER. The LED will display the new spin speed.
Press MENU to advance to the next enu.
The following paragraphs explain how to navigate
through the enus and change the preset progra s.
If you dont want to ake changes in all of the enus,
continue to press MENU until the one you do want to
change displays.
To restore a preset progra to its original settings,
si ply press the button for the preset progra you want
to restore and hold it down while your press ENTER.
The progra will revert to its original settings.
We reco end that you ake two or three trial changes
to understand how easy it is to custo ize these
progra .
Remember, the first step to customizing a preset
program is to press the button for the program you
want to customize.
1. Press the button for the preset program
you want to change. The program you
select will display in the lower left corner
of the LED window.
2. Press MENU to display different
program and option settings.
3. Press the Arrows to move forward or
backward through the menu settings.
4. Press ENTER to choose your selection.
CUSTOMIZING THE PROGRAM BUTTONS (P1P4)
Below are the basic instructions for changing a preset wash progra . The following paragraphs explain the enus
and how to navigate the .
Start/Stop
Menu Enter
P1 P2 P3 P4
NAVIGATING THE MENUS

Page 14
The Delayed Start Men
This enu lets you set a delayed start fro 1 to 12
hours. This eans you can set the washer to start at
the ost convenient ti e for you, such as an hour before
you arrive ho e fro work. This feature is also useful
in areas where utility co panies offer discount rates
during certain hours.
Select time
f or del ayed st ar t
< - + >
P1
Menu E nter
0
1. Use the Arrow buttons to increase or decrease the
delay ti e. (The nu bers indicate hours.)
2. When the nu ber of hours you want to delay starting
the achine displays, press ENTER. The LED will
display the delay start ti e.
Press MENU to advance to the next enu.
The Options Men
This enu lets you set several options. Only the options
available with the wash progra you selected will display.
(See The Progra Menu table on page 11.)
rpm
1600
0
Menu E nter
Select
opt i ons
Pre-soak
< Off >
P1
1. On this enu, you press ENTER to advance through
the options, rather than pressing MENU.
2. Press an Arrow button to toggle between Off and On.
3. When your preference displays, press ENTER. The
LED will display the new options. Continue to press
ENTER until the LED displays your new progra .
RESTORING A PRESET
PROGRAM
To restore a preset progra to its original settings,
si ply press the button for the preset progra you want
to restore and hold it down while your press ENTER.
The progra will revert to its original settings.
To change the language, follow the steps below:
1. Turn the achine off then on again.
2. Press ENTER five ti es in succession then press
P1 five ti es. (This ust be done within 15 seconds.)
3. When the Language enu displays, press an Arrow
button to advance through the enu to the desired
language.
4. Once the correct language displays, press ENTER
to progra the LED window to display the language
you selected.
CHANGING THE TEMPERATURE
READOUT ON THE LED WINDOW
FROM CELSIUS TO FAHRENHEIT
You can change the te perature readout on the LED
window fro Celsius to Fahrenheit and vice versa. To
do this follow the steps below:
1. Turn the achine off then on again.
2. Press ENTER five ti es in succession then press
P2 five ti es. (This ust be done within 15 seconds.)
3. When the Te perature enu displays, press an
Arrow button to toggle between Fahrenheit and
Celsius.
4. When your preference displays, press ENTER to
progra the LED window to display the te perature
reading you selected.
CHILD-SAFE START (W640/W660)
As a safety easure, you can progra the W640 and
W660 not to start unless the START button is held down
for three seconds. To do this, follow the steps below:
1. Turn the achine off then on.
2. Press ENTER five ti es, then press P3 five ti es.
(This ust be done within 15 seconds.)
3. Delayed start displays with 0 flashing in the lower
right corner. Press the right Arrow button to toggle
the display to 3.
Child-Safe Men B tton
Please note that when you set the child-safe Start button,
the Menu button is automatically progra ed to delay
for three seconds before it beco es active. This prevents
a child fro accidentally changing the progra settings.
When you want to change a progra , press the Menu
button for three seconds to activate the enus. The
Menu button will work nor ally (without the 3-second
delay) until you have co pleted your changes. If it is not
pressed for two inutes, it will auto atically revert back
to the child-safe ode.
¨English
¨French
¨Spanish
¨Portuguese
¨Italian
¨Ger an
¨Swedish
¨Danish
¨Norwegian
¨Netherlands
¨Finnish
CHANGING THE LANGUAGE
ON THE LED WINDOW
There are eleven languages available for the LED
window:
NOTE: If you change the P3 progra then decide to
restore its original settings, after pressing P3
and ENTER, you ust go into the Options
enu (see page 14) and turn off Short Spin.

Page 15
ENGLISH
Height 33-1/234-1/2 (850876 )
Width 23-7/16 (595 )
Depth W640/W660: 23-7/16" (595 )
W600/W620: 24-7/16 (620 )
Weight 167 lbs. (73 kg)
Rated load See data plate
Supply voltage Single-phase 230 V, 60 Hz
Heating ele ent 2000 W
Fuse 15 A
ACCESSORIES
WATER SUPPLY CONNECTION
Because ASKO washers have their own heating
ele ent, you only need to have a cold water inlet. The
connection should be ade by so eone who is
sufficiently skilled. Use the hose supplied with the
washer.
Water pressure ust be in the range of 15146 PSI.
A tap should be fitted on the water supply pipe.
If a new supply pipe has been installed for the washer,
it should be flushed thoroughly to re ove any foreign
particles that ight clog the strainer in the water inlet.
INSTALLATION INSTRUCTIONS
Read these instructions carefully and co pletely before
you install the achine. The installation should be
carried out by a qualified person who is fa iliar with all
local codes and ordinances for electrical and plu bing
connections.
NOTE: Cos etic da age ust be reported to your
dealer within five days fro the date of
purchase. After unpacking the washer,
thoroughly check the unit for cos etic da age.
SPECIFICATIONS
Dru and Barrel Stainless steel
Outer casing Stove-ena elled hot-dipped
galvanized steel
Mounting Four adjustable rubber-covered
feet
Inlet supply hose 5 ft. (1.5 ) PEX tubing with
brass ferrules
Supply pressure 15142 PSI
Outlet hose 5.5 ft. (1.7 ) polypropylene hose,
3/4 ID
REMOVING THE SHIPPING
SUPPORTS
The achine is transported with three shipping
supports, as illustrated below. These supports hold
the tub in place during ship ent. When you unpack the
achine, you ust re ove these supports.
1. Unscrew the 5/8 (13
) bolts holding
the supports in place
and re ove the
bolts.
To re ove these supports, follow the instructions
below:
You must remove t e
s ipping supports
before you install t e
was er.
2. Push the rubber
spacer up then pull it
out of the slot.
ADJUSTING THE FEET
It is i portant that the achine is level so it wont vibrate
excessively during the spinning cycles. Each foot on
the washer is adjustable, so you can level the washer
on any surface. Once it is level, securely tighten the lock
nuts on the feet to prevent excessive vibration during
the spin cycles.
Be sure to tig ten t e
lock nuts securely
w en you level t e
mac ine.
Cold water
supply
Tap
2
1
4. Insert it into the slot
and push down to lock
it into position.
3. Rotate the spacer so that the extruded
end points toward the achine.

Page 16
ELECTRICAL CONNECTIONS
The achine is delivered ready-fitted with a plug and is
intended for connection to an ASKO Dryer, which is
equipped with a atching receptacle. The plug supplied
with the washer can only be used with an ASKO Dryer. If
the washer is used separately or with another dryer, it
ust be on a separate 220 V single-phase circuit.
If the achine is to be used in a wet area, the supply
ust be protected by a residual current device.
As supplied: 230 V, 60 Hz
2000 W heating ele ent
15 A fuse required
GROUNDING INSTRUCTIONS
This appliance ust be grounded. In the event of
alfunction or breakdown, grounding will reduce the
risk of electric shock by providing a path of least
resistance for electric current. This appliance is
equipped with a cord having an equip ent-grounding
conductor and a grounding plug. The plug ust be
plugged into an appropriate outlet that is properly
installed and grounded in accordance with all local
codes and ordinances.
WARNING! Improper connection of the
equipment-grounding conductor can result in a
risk of electric shock. Check with a qualified
electrician or serviceman if you are in doubt as to
whether the appliance is properly grounded.
Do not modify the plug provided with the appliance.
If it will not fit the outlet, have a proper outlet installed
by a qualified electrician.
DRAIN OUTLET CONNECTION
The achine is supplied with the outlet hose already
attached. The hose should be extended over a suitable
sink edge or drain pipe at a height of 24 to 36 (600
to 900 ) above the floor. (The lower height is
preferable.) Make sure that the hose is not kinked.
If the hose is extended, the internal dia eter of
the coupling ust not be less than 1/2.
NOTE:
WARNING! Do not extend t e drain ose ig er
t an 36 (900 mm).
WARNING! Connection to a permanently wired
supply point must be made only by a
qualified electrician.
FREESTANDING INSTALLATION
The washer can be placed next to the dryer.
It is essential that the achine is leveled and the
locknuts are tight to prevent excessive vibration during
the spin cycles. Also be sure to leave a ini u of
1/2 inch (12.5 ) of space between the washer and
the dryer.
ASKO washers can be installed beneath a cabinet or
worktop with a height of 34. There ust be a gap of
about 1/4 (.64 ) all around the achine, including
between the rear edge of the achine top panel and
the back wall. The opening width ust be at least 24
(600 ).
Space ust also be available for the inlet and drain
hoses. See the diagra below for easure ents and
positions.
BUILT-IN INSTALLATION
NOTE: The height adjust ent for the washer is
33-1/2 to 34-1/2 (850 to 876 ).
Do not raise it higher than 34-1/2.
STACKED INSTALLATION
ASKO washers should never be stacked on a counter
or a dryer. You can, however, stack an ASKO dryer on an
ASKO washer. Refer to your Dryer Use and Care Guide
for instructions on how to do this.
If t e drain outlet is ig er t an
24, you will need to recess t e
connections.

Page 17
ENGLISH
So e states will not allow the exclusion or li itation of incidental or consequential da ages, so this exclusion or
li itation ay not apply to you. This warranty gives you specific legal rights and you ay also have other rights which
vary fro state to state.
For warranty service, contact the dealer fro who you purchased the unit or an authorized ASKO service outlet.
Service will be provided during nor al business hours. Should you have a service proble that can not be resolved
locally write:
ASKO USA Inc.
P. O. Box 851805
Richardson, Texas 75085-1805
or call our
Custo er Service Center at
800-898-1879 or 972-238-0794
IN NO EVENT SHALL ASKO USA INC. BE RESPONSIBLE
FOR ANY INCIDENTAL OR CONSEQUENTIAL DAMAGES.
ASKO PRODUCT WARRANTY
MODELS W600, W620, W640, W660
Be sure to complete the Warranty Registration Card you received with your appliance and mail it to ASKO to
validate your appliance warranty.
ASKO WILL NOT PAY FOR:
A. Service calls to:
1. Correct the installation of the appliance.
2. Repair da age due to ship ent, delivery, installation, isuse or abuse.
3. Instruct how to use the appliance.
4. Replace house fuses or correct house wiring.
5. Correct house plu bing, including drain proble s related to i proper installation.
6. Clean or service air device in drain line.
B. Repair and/or replace ent parts for failure of product if appliance is used for other than ho e/residential use.
C. Da age resulting fro accident, fire, floods, acts of God, alteration, isuse, abuse, i proper installation, or
installation not in accordance with local electrical or plu bing codes.
D. Any shipping costs for parts during the li ited warranty period.
E. Replace ent parts or repair labor costs for units operated outside the Continental United States.
F. Pickup and delivery. ASKO washers are designed to be repaired in the ho e.
FOR RESIDENTIAL INSTALLATIONS ONLY
Three-Year Full Warranty
Fro date of purchase.
ASKO WILL PAY FOR:LENGTH OF WARRANTY
F urth & Fifth Year Limited Warranty
Three year full plus fourth and fifth year li ited
fro date of purchase.
Lifetime Warranty
ASKO replace ent parts for any defective solid-state
controls, ti ers, otors, or pu ps.
ASKO will replace the stainless steel inner or outer
dru if it rusts or fails to hold water.
ASKO replace ent parts and/or repair labor to correct
defect in aterials or work anship. Service ust be
provided by an authorized ASKO service agent.

Page 18
A
Advisory Center Number 17
Allergies 4
Automatic water level control 3
B
Bleach 5
Built-in installation 16
C
Care and cleaning 7
Care label instructions 4
Changing the ED readouts 14
Child Safety Features 2
Child-safe catch 5
Child-Safe Start (W640/W660) 2, 14
Child-Safe temperature knob 2
Control panel, cleaning 7
Cosmetic damage 15
Cottons 4, 6
Customizing the preset
programs (W640/W660) 11, 13
D
Delay start menu (W640/W660) 14
Delicate fabrics 4
Detergent 5, 6
Detergent drawer 5, 7
Discoloring 8
Door
cleaning 7
opening 3
Door lock fault error 9
Drain outlet connection 16
E
EasyControl Panel (W640/W660) 13
Economy (E2) option 3, 12
Electrical connections 16
Enzyme step 3
Error messages 9
F
Fabric softener 6
Fabrics, recommended
wash temperatures 6
Fading and discoloring 8
Fault codes 9
Feet, adjusting 15
Fluorescent colored fabrics 4
Foaming error 9
Freestanding installation 16
G
Glass door 3
Graying 8
Grounding instructions 16
H
Hard water 6, 7
Hazardous materials 2
HE detergents 5
I
Installation instructions 15, 16
Interrupting a program 3
K
Knit shrinkage 8
L
anguages, changing the ED 14
aundry detergents 5
aundry problems 8, 9
aundry tips 4
inens 4
int left on clothes 8
iquid detergent 5
oad sizes, recommended 4, 6
ow-sudsing detergents 5
M
Menus, programming (W640/W660)13
N
Nylon 6
O
Options
definitions 12
menu 14
Overflow error 9
P
Permanent press items 4
Pin trap, cleaning 7
Poison hotline 2
Polyester blends 6
Preset Programs (W640/W660) 11
restoring 14
Pressure sensor error 9
Prewash option 3
Problems (e.g., stains, etc.) 8, 9
Program (W640/W660)
menu 13
options 11, 12
Programming (W640/W660)
Celsius or Fahrenheit 14
child-safe start 14
language 14
menus 13
restoring preset programs 14
R
Rayon and acetate 6
Recommended detergents 5
Recommended wash temperatures 6
Removing object from behind drum 7
Restoring preset programs 14
Rinse cycles 3
Rips 9
S
Safety instructions 2
Sensitive skin, advice 4
Sensor evel Control 3
Service 17
Shipping supports 15
Shrinkage 8
Silk 6
Snags 9
Solutions to problems 10
Sorting the laundry 4
INDEX
Specifications 15
Spin options 4, 6
Spin speed
menu (W640/W660) 13
temporarily changing 11
Spray cleaner warning 7
Stacked installation 16
Stains 8
Stopping a program 3
Super Rinse option 3
T
Temperature
control 3
menu (W640/W660) 13
stop error 9
temporarily changing
(W640/W660) 11
Thermistor error 9
Troubleshooting 10
W
Warranty information 17
Wash motor error 9
Wash programs
recommended 6
W640/W660 11
Wash temperature control 3
Wash temperatures 6
Washer features 3
Washing special items 8, 9
Water hardness 6
Water inlet error 9
Water level control 3
Water outlet error 9
Water supply connection 15
Wear 9
Wool and wool blends 6
Wrinkling 9
Y
Yellowing 8

Page 1
FRANÇAIS
MANUEL DUTILISATION ET
DENTRETIEN DE LA LAVEUSE
ASKO
IMPORTANT!
Pour obtenir les meilleurs résultats de votre
laveuse, veuillez lire toutes les instructions de
fonctionnement avant de lutiliser pour la
première fois.
CONSERVEZ CES INSTRUCTIONS POUR RÉFÉRENCE FUTURE
TABLE DES MATIÈRES
Conseils de sécurité importants 2
Caractéristiques sécuritaires pour les enfants 2
Caractéristiques de la laveuse ASKO 3
Préparation de la lessive 4
Le tiroir à détergent
Les détergents
Les assouplissants de tissus 6
Températures de lavage recommandées 6
Instructions dentretien et nettoyage 7
Problèmes courants de lavage 8
Codes de défectuosités W600/W620 9
Messages derreur W640/W660 9
Dépistage des problèmes 10
Adaptation des programmes préétablis W640/W660 11
Instruction dinstallation 1
Garantie des produits ASKO 17
Index 18

Page 2
Pour réduire tout risque de feu, de choc électrique ou
de blessure lors de lutilisation de votre laveuse, suivez
les précautions de base, y compris les suivantes:
¨Lisez toutes les instructions avant dutiliser la
laveuse
¨Ne permettez pas aux enfants de jouer dans ou sur
lappareil Ne laissez jamais des enfants sans
surveillance près de la machine quand celle-ci est
en marche
¨Avant de vous débarrasser de la machine ou de la
mettre hors-service, enlevez les portes des
compartiments de lavage et de séchage
¨Ne mettez pas la main dans le tambour de la
machine si celui-ci est en mouvement
¨Ninstallez pas cet appareil dans un endroit où il
pourrait être exposé aux conditions climatiques
¨Ne modifiez pas les commandes de la machine
¨Ne réparez ni ne remplacez aucune pièce de
lappareil à moins que ce ne soit spécifiquement
mentionné dans les instructions destinées à
lutilisateur ou dans des instructions publiées que
vous comprenez ou que vous pouvez effectuer
¨Najoutez pas dessence, de produits de nettoyage
à sec ou dautres substances inflammables ou
explosives à leau de lavage, car celles-ci dégagent
des vapeurs qui pourraient prendre feu ou exploser
¨Dans certaines conditions, lorsque le système deau
chaude na pas été utilisé pendant plus de deux
TIROIR À DÉTERGENT AVEC
SYSTÈME DE SÉCURITÉ ENFANTS
Les laveuses ASKO sont munies dun verrou de sécurité
qui empêche un enfant douvrir le tiroir à détergent et
davoir accès au détergent ou à lassouplissant
Référez vous à la page 5 pour savoir comment
enclencher ce verrou de sécurité
BOUTON DE TEMPÉRATURE AVEC
SYSTÈME DE SÉCURITÉ ENFANTS
Les Modèles W600 et W620 sont munis dun verrou de
sécurité enfant quon peut enclencher pour éviter que
les enfants jouent avec le bouton des températures
Le verrou se trouve sous le bouton des températures,
derrière le rebord du panneau de commande Pour
lenclencher, insérez un tournevis à tête plate dans la
fente du verrou Appuyez vers le haut à mesure que
vous tournez le verrou dans le sens des aiguilles dune
montre Quand vous relâcherez le verrou, il devrait
légèrement dépasser sous le panneau de commande
Quand vous aurez enclenché le verrou de sécurité, vous
devrez le soulever pendant que vous placez le bouton à
la température désirée
MISE EN MARCHE DE LA
LAVEUSE AVEC SYSTÈME DE
SÉCURITÉ ENFANTS
Vous pouvez programmer les Modèles W640 et W660
afin quils ne se mettent pas en marche à moins que le
bouton Start ne soit maintenu pendant trois secondes
CONSEILS DE SÉCURITÉ IMPORTANTS
SYSTÈME DE PROTECTION POUR LES ENFANTS
NOTE: Ce manuel ne couvre pas tous les cas et
situations qui pourraient survenir Soyez
prudent et faites preuve de bon sens lors de
linstallation, la mise en marche et lentretien
de tout appareil ménager
Ne lavez ni ne séchez aucun article qui ait été
précédemment trempé, lavé ou nettoyé à laide
dessence, de produits de nettoyage à sec ou
dautres substances inflammables ou explosives,
car celles-ci dégagent des vapeurs qui pourraient
prendre feu ou exploser.
MISE EN GARDE!
CONSEILS DE SÉCURITÉ POUR
LES ENFANTS
¨Les détergents à lessive sont corrosifs, tenez-les
toujours à labri des enfants
¨Si un enfant avale du détergent, faites lui boire
immédiatement un ou deux verres deau ou de lait
Ne tentez pas de le faire vomir Appelez
immédiatement un médecin: 1-800-POISON1
¨Fermez toujours la porte de la laveuse et mettez-la
en marche dès que vous placez le détergent
¨Arrêtez toujours la machine si vous ne lutilisez pas
(placez-la sur Off)
¨Ne laissez jamais de petits enfants près de la
machine quand elle est ouverte Il pourrait y avoir
des résidus de détergent à lintérieur de la machine
¨Si quelquun reçoit du détergent dans les yeux, les
rincer immédiatement à leau pendant au moins
15 minutes
¨Ne laissez pas les enfants jouer avec la laveuse,
autour de la machine ou sur la machine
MISE EN GARDE!
ette laveuse doit être mise à la terre. Le branchement
incorrect de léquipement de mise à la terre peut résulter
en un choc électrique. Si vous avez le moindre doute,
faites vérifier par un électricien qualifié que lappareil est
bien mis à la terre.
La prise doit être branchée dans un réceptacle
correctement installé et mis à terre selon les
codes et règlements locaux en vigueur.
semaines, il peut y avoir production dhydrogène
LHYDROGÈNE EST UN GAZ EXPLOSIF Si le
système deau chaude na pas été utilisé pendant
une telle période, ouvrez tous les robinets deau
chaude et laissez leau couler pendant plusieurs
minutes Cela éliminera laccumulation
dhydrogène Prenez garde de ne pas fumer ou
dutiliser une flamme durant cette manoeuvre
Cela permet dempêcher que les enfants fassent partir
la machine par accident Référez-vous à la page 14
pour savoir comment programmer de dispositif de
sécurité
Other manuals for W600
6
This manual suits for next models
3
Table of contents
Languages:
Other Asko Washer manuals
Popular Washer manuals by other brands

Whirlpool
Whirlpool WhiteMagic LSE805 Service manual

Hoover
Hoover HAV-1 Use & care guide

Wascomat
Wascomat Giant W 185 operating & maintenance manual

Speed Queen
Speed Queen 18-30 lb Specifications

Stirling
Stirling XQB60-M933 instruction manual

Maytag Commercial
Maytag Commercial Neptune MAH14PD Service manual